Test and Performance Suite Enhancements - Lasernet FO Connector 7.2
- 20 Feb 2026
- 40 Minutes to read
- Contributors


- Print
- PDF
Test and Performance Suite Enhancements - Lasernet FO Connector 7.2
- Updated on 20 Feb 2026
- 40 Minutes to read
- Contributors
- Print
- PDF
Article summary
Did you find this summary helpful?
Thank you for your feedback
Introduction
The following are the main enhancements included in the Test and Performance Suite 7.2:
PDF Compare, a side-by-side comparison tool for PDF files.
Test plans for integrating elements, such as task recordings, comparisons of PDF and XML files, and existing Test plans.
Automation within batch tasks and when using Alerts in the event of a discrepancy or error.
Playback of Test plans and task recordings via a button on a form (context-based playback).
Easy re-recording of existing recordings.
Possibility to test across multiple legal entities.
Possibility to re-use Test plans, including the option to use placeholders, such as for a legal entity.
Data explorer, useful for examining tables and their relationships. It also includes the option to edit the data (even hidden data). This feature can, for instance, be useful for making flight adjustments within FinOps (Table: SysFlighting).
Assembly information, a feature to identify assembly (DLL file) versions. This helps track changes in Microsoft environments, such as ServiceFabric, and version updates in standard FinOps when redirection is missing.
The Test and Performance Suite (T&P) is an exceptionally robust tool for conducting tests within FinOps. While its primary purpose is to test output management, T&P is also capable of testing various other areas within standard FinOps, beyond Lasernet FO Connector, including business flows and processes.
It also offers the option to add a button to a form that plays back recordings, automating manual tasks.
T&P is also useful for pre-caching an environment.
It is straightforward to adopt and implement, requiring only the recording of necessary processes using the Task recorder in FinOps.
Playback of recordings ensures that all required processes are readily available and eliminates the need for caching.
Additionally, T&P offers the possibility of linking elements together by using Test plans.
Part I — Testing Reports and Their Distribution
This section describes the most efficient and quick method for verifying the accuracy of a document's content and confirming that the correct destination was identified and used.
This process creates Test flows to compare entries within the Lasernet Archive after an upgrade of FinOps, Lasernet FO Connector, or third-party solutions from ISV, or after implementing customizations.
The goal is to establish Test checkpoints that generate references to the entries within the Lasernet Archive. Subsequently, these references are used for comparison when processing identical documents.
XML and PDF files can be compared, as well as historical entries from the Lasernet Archive.
The checkpoints will be used to identify which reports need to be re-run and which XML and PDF files should be used for comparison after an upgrade.
The system will re-create a similar report using the checkpoints, resulting in additional XML and PDF files being created.
No reports will be delivered when additional reports are created within the Lasernet Archive.
Checkpoints and Test flows can automatically compare different versions of XML and PDF files (before and after an upgrade), and offer the option to add an Alert that will be triggered in the event of a failure.
Note
The term “failure” refers to differences found between the two XML and PDF files’ versions (before and after an upgrade).
The elements highlighted in the screenshot below are used within the Test and Performance Suite to prepare the checkpoints. While using Test flows may generally suffice, UX Tests and Test plans can be used when the whole business process should be included in the testing process.
The required checkpoints can be added from either the Lasernet Archive or by using Top Picking within the Test and Performance Suite. Top Picking provides the option to add multiple checkpoints within the same run and across different legal entities.
Note
In this section, checkpoints will be added via the Lasernet Archive.
1. Prepare the Checkpoints
Start by accessing the Lasernet Archive from the main menu or a specific Lasernet report. It is also possible to open the Lasernet Archive from one of the entries of standard FinOps journals.

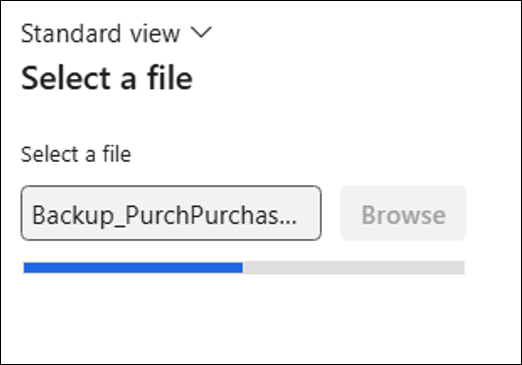
To prepare the necessary checkpoints from the Lasernet Archive, select the entries for which the checkpoints should be created.
You can select multiple entries and different reports within the same selection.
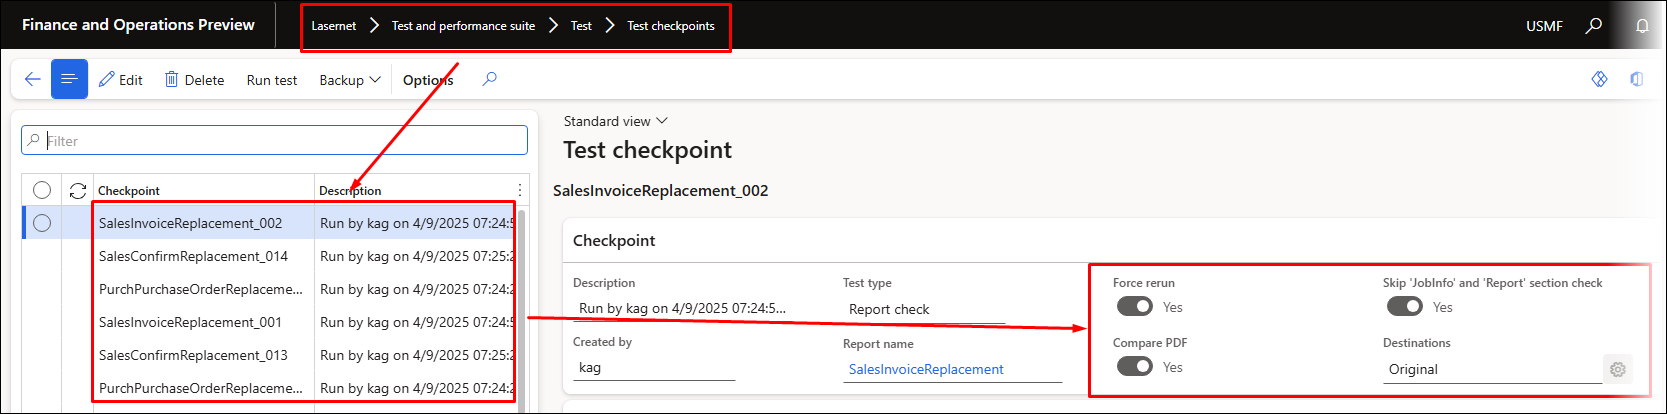
In the following example, the replacement reports for Sales Confirmation, Sales Invoice, and Purchase Confirmation are added by multi-selecting the required entries from the Lasernet Archive:
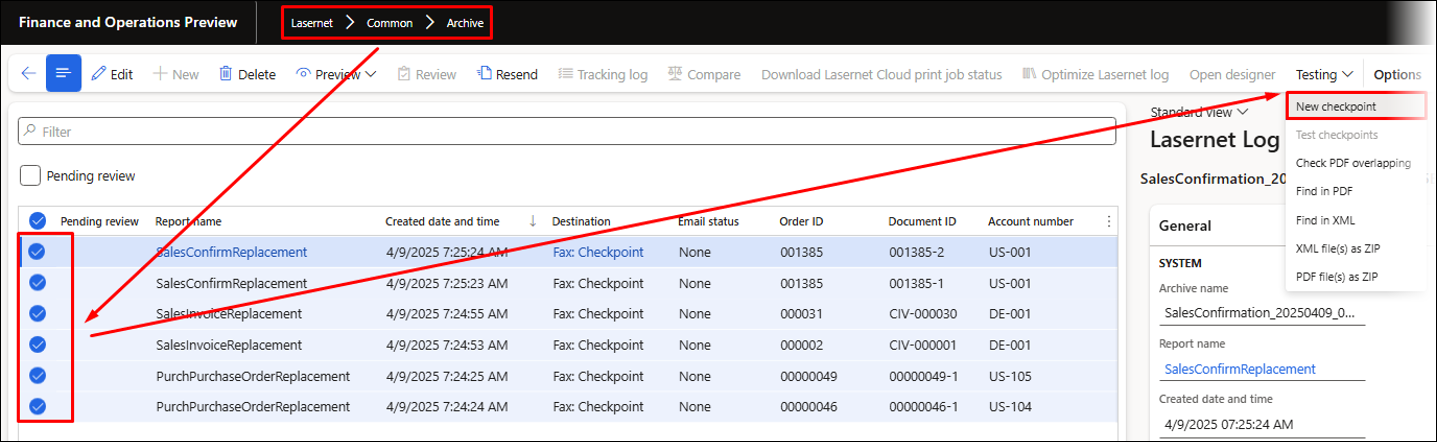
This will open a dialog where it is possible to choose from the following options:
Force rerun: We recommend enabling this option to ensure the report (and the entire process) is re-run from the start, such as after an upgrade. It is possible to run reports without using Force rerun, but this requires the report to be run during a task recording before it can be used as part of a checkpoint. Running a report and subsequently using a checkpoint is possible through a UX Test (task recording) and a checkpoint within the Test plan.
Compare PDF: Will use the PDF file from the checkpoint (the entry from the Archive) to compare the PDF file that will be created when running the checkpoint.
Skip ‘JobInfo’ and ‘Report’ section check: Will skip the comparison of some of the information in the JobInfo section within the XML file.
Destinations: Gives the option to select an alternative destination.
Add to flow: Enable this option if all the created checkpoints must be added to a flow.
Note
No documents will be delivered when the reports are run as part of the Test checkpoints or Test flows (Test flows contain multiple checkpoints).
You can leave the Add to flow field empty, which will prepare separate checkpoints for each of the selected entries from the Lasernet Archive.
However, adding a name to the Add to flow field will ensure all checkpoints are added to the same flow and can, therefore, be run within the same run and batch.
If different individuals or owners need to be informed of a discrepancy, multiple flows can be created. An Alert can also be used for each report within a flow or for the flow itself.
The flow will be created automatically if it does not already exist.
The following warning is displayed if no reference exists for the selected entry within the Lasernet Archive:
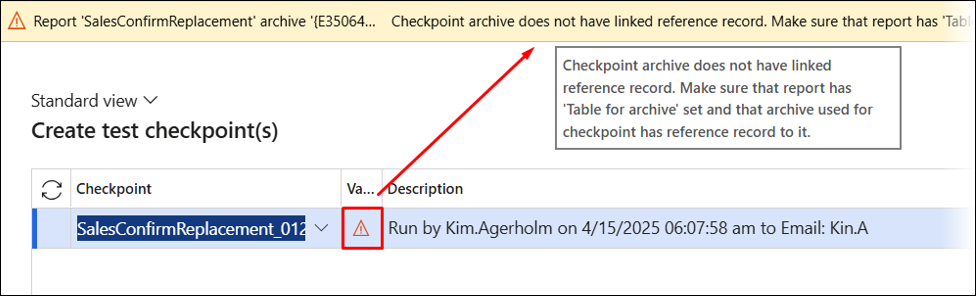
Warning
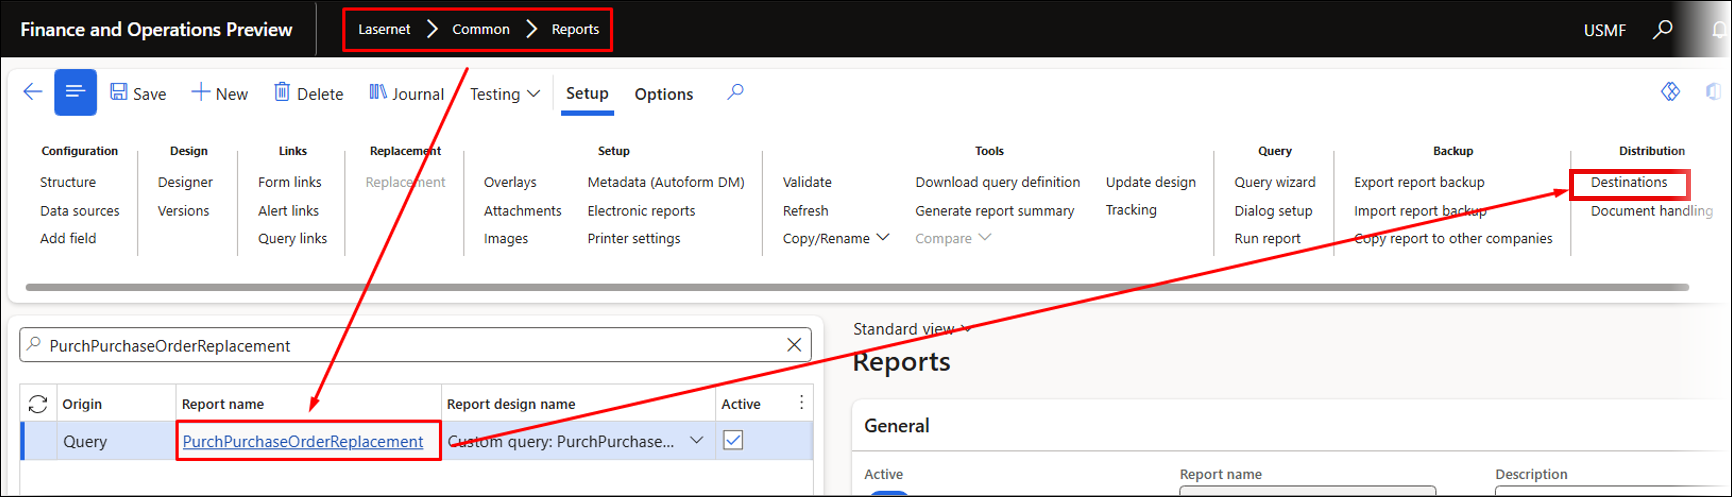
Report 'PurchPurchaseOrderReplacement' archive '{2B94FA8F-1962-4A98-B038-2CD6BFBE0CAA}'
Checkpoint archive does not have linked reference record. Make sure that report has 'Table for archive' set and that archive used for checkpoint has reference record to it.
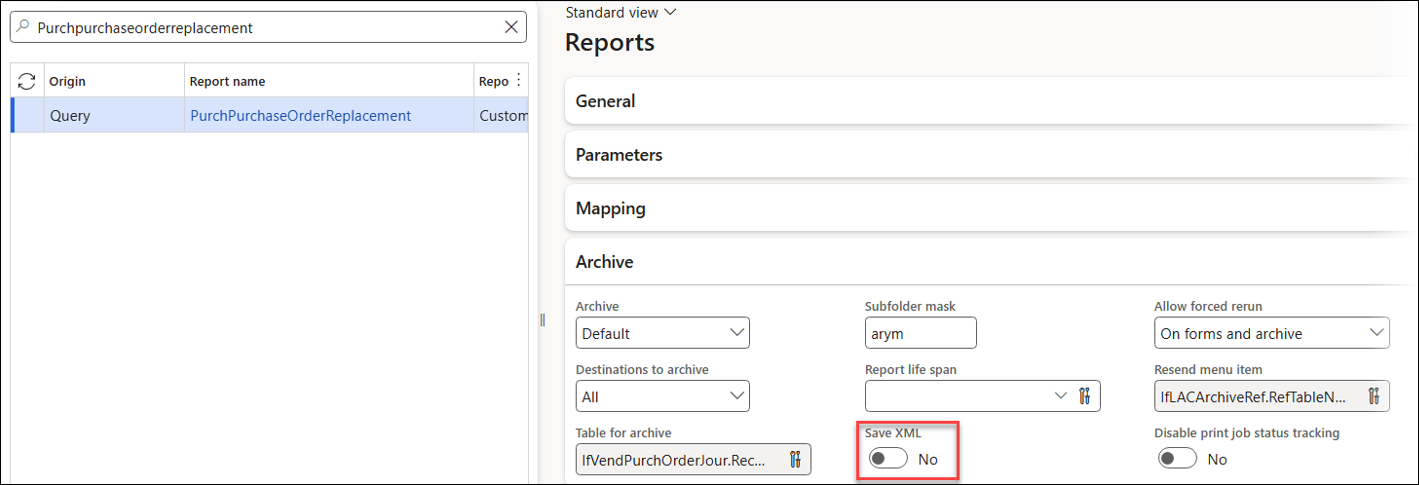
This warning occurs when no Table for archive is specified for the report.
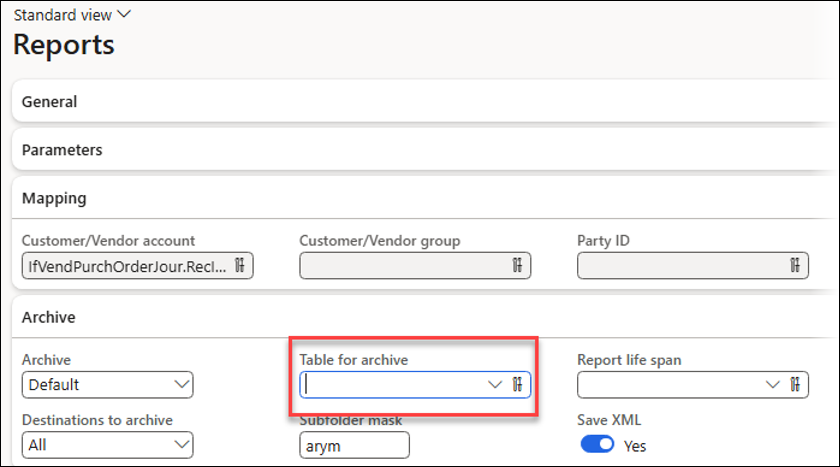
A similar warning appears if the XML file is not saved for the report.
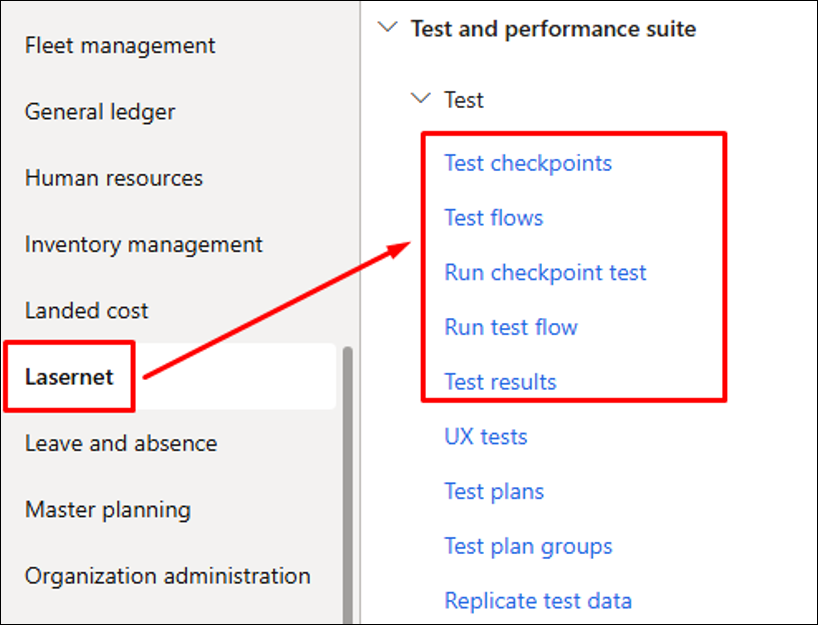
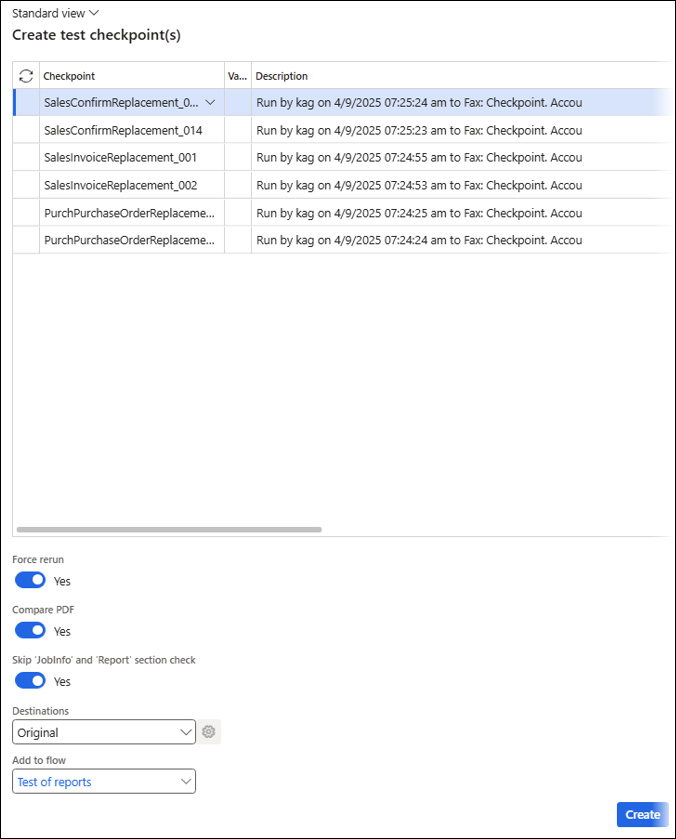
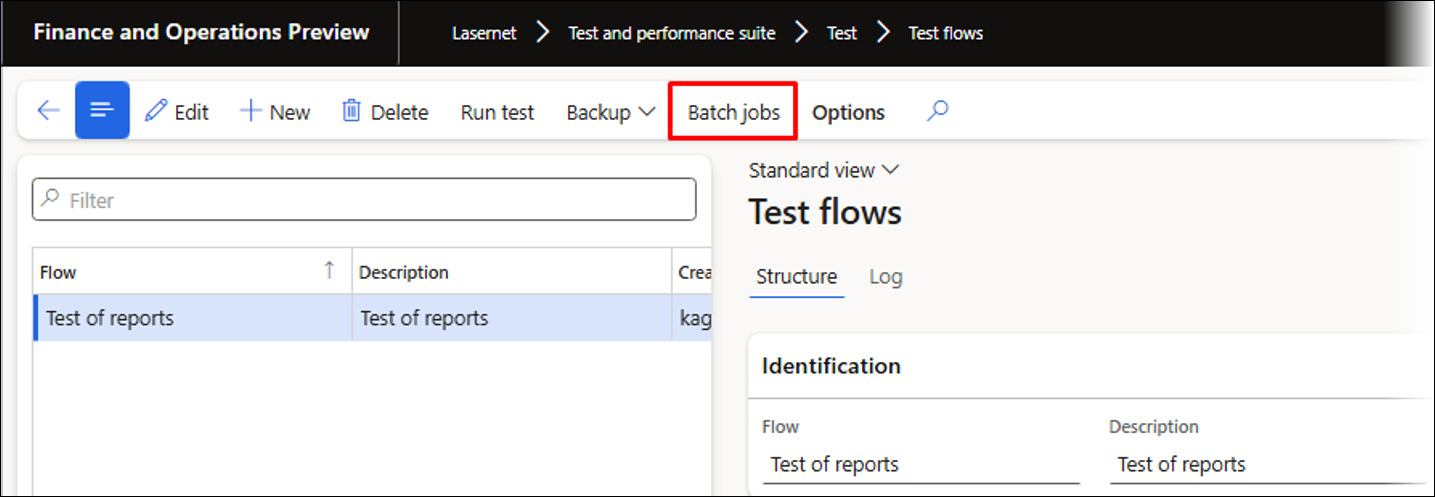
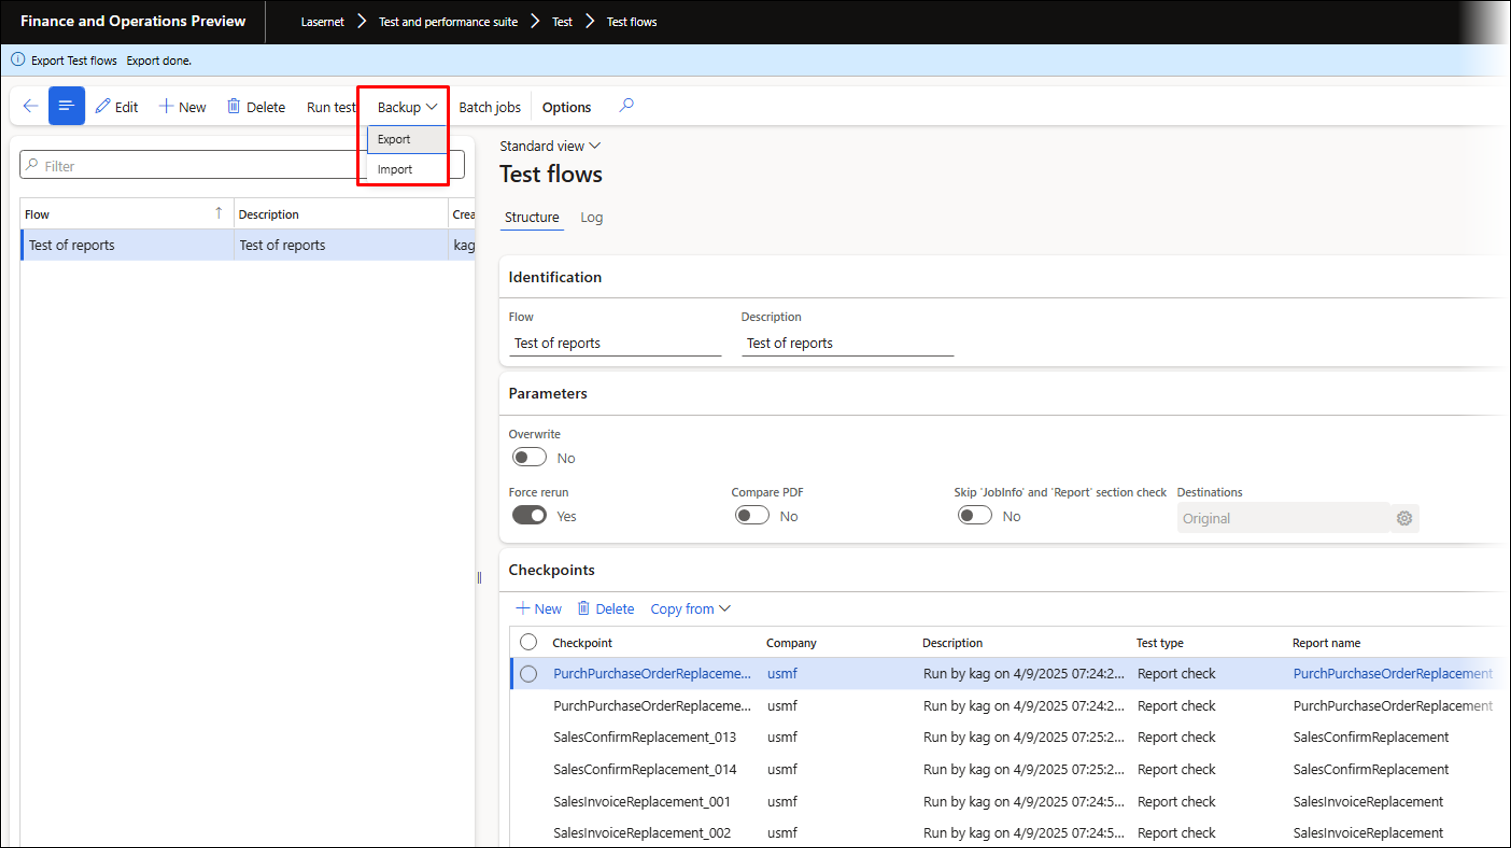
Clicking the Create button will open the following form, which is also accessible from Lasernet > Test and performance suite > Test > Test flows.

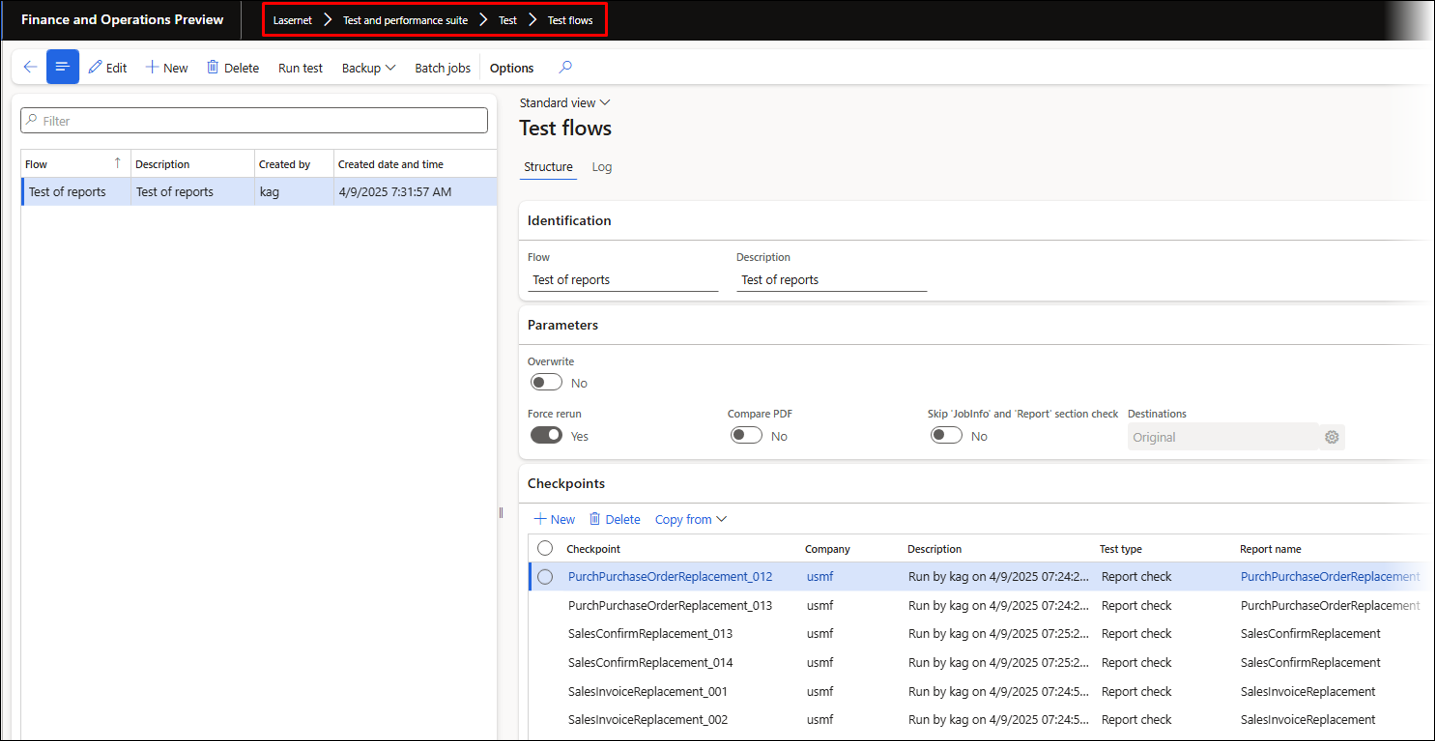
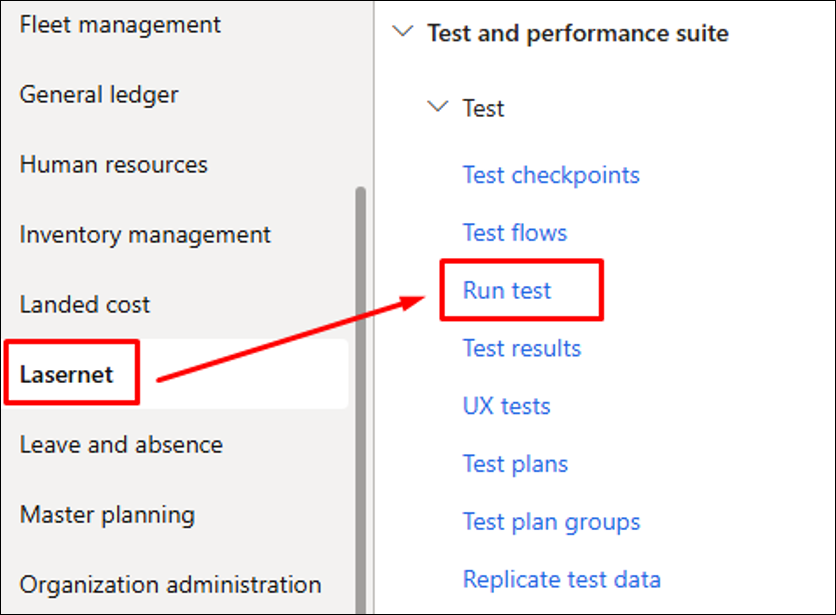
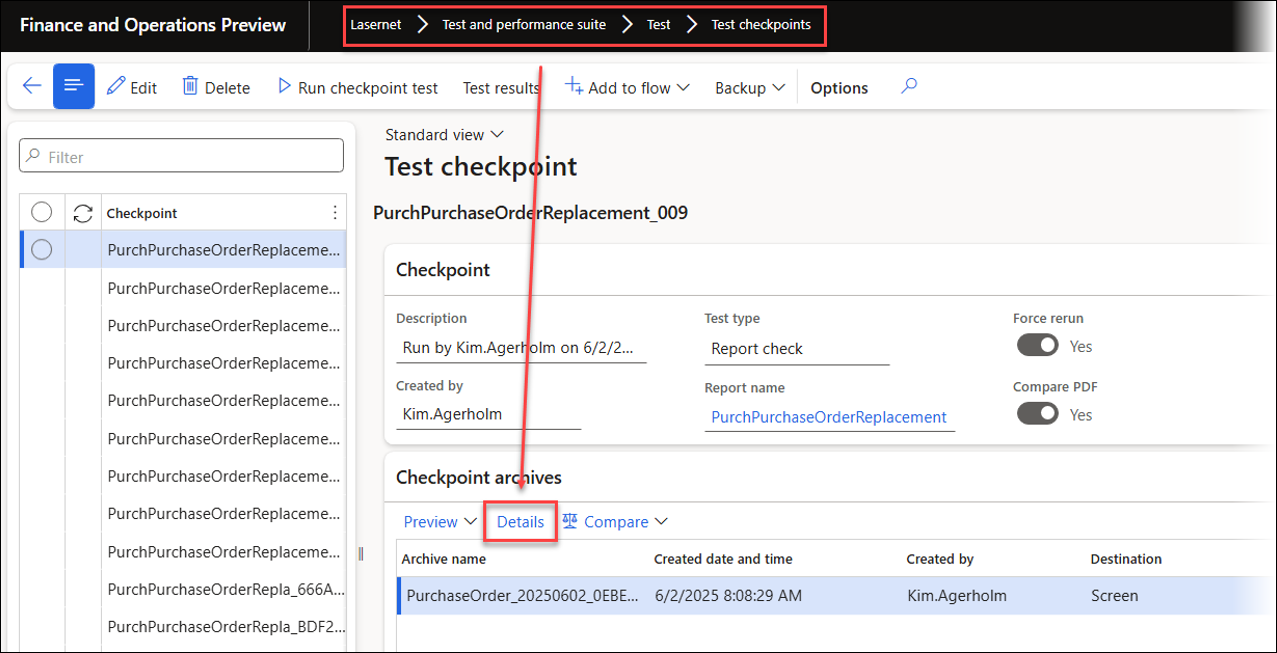
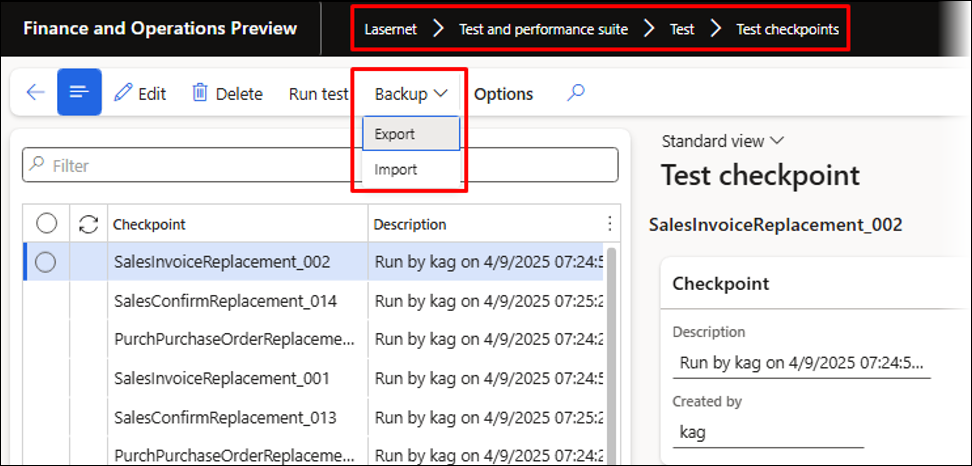
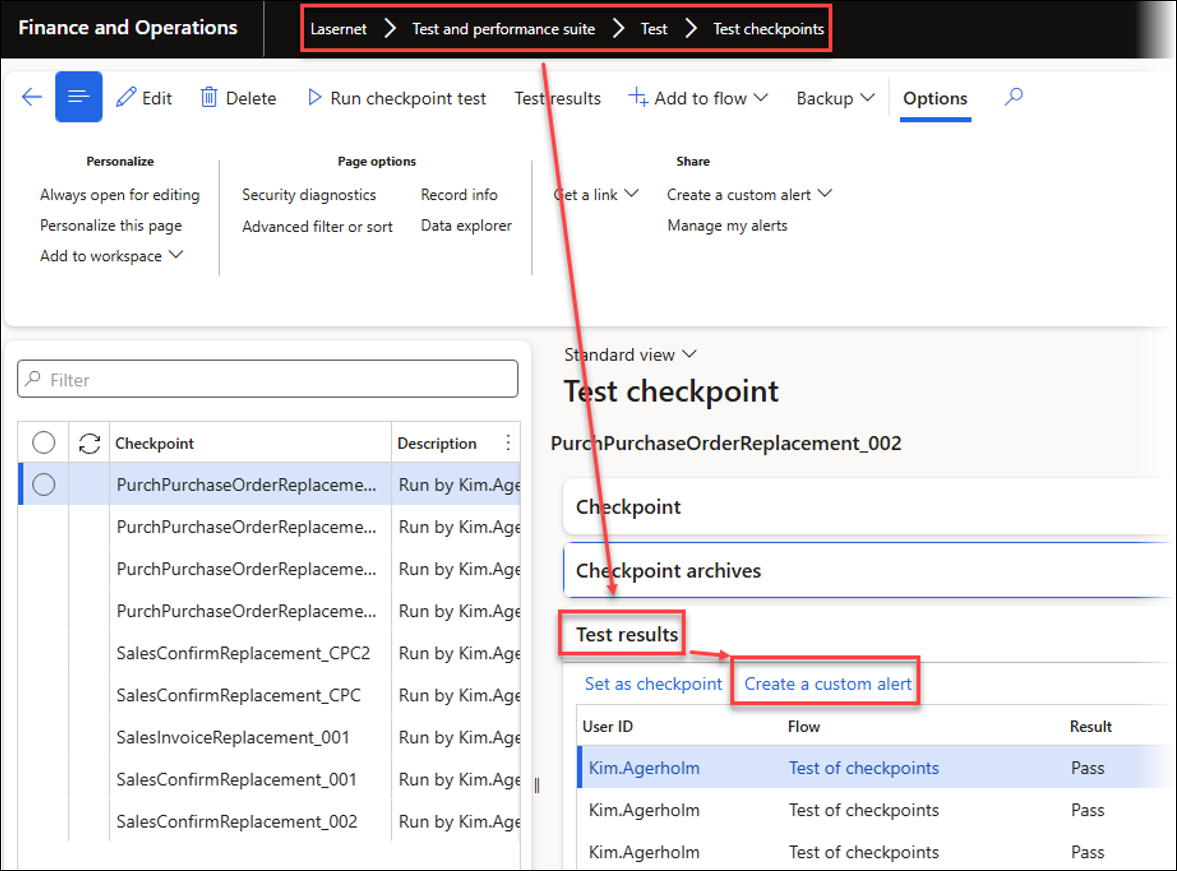
Each checkpoint can be accessed from Lasernet > Test and performance suite > Test > Test checkpoints.
Within this form, you can overwrite the previously chosen settings.
2. Run the Test Checkpoint and Test Flow
When running the created flows, the system will run the reports and compare the XML and PDF files.
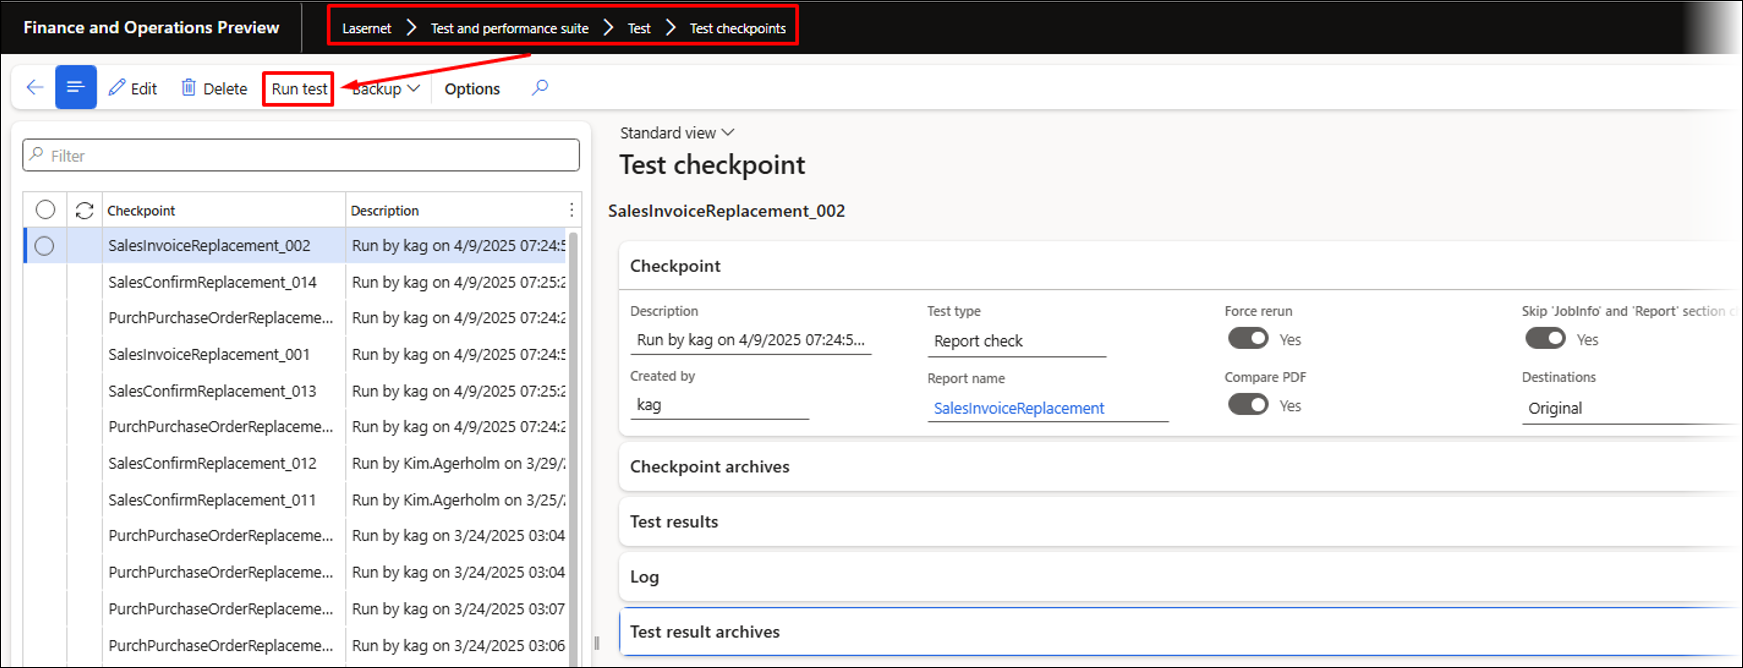
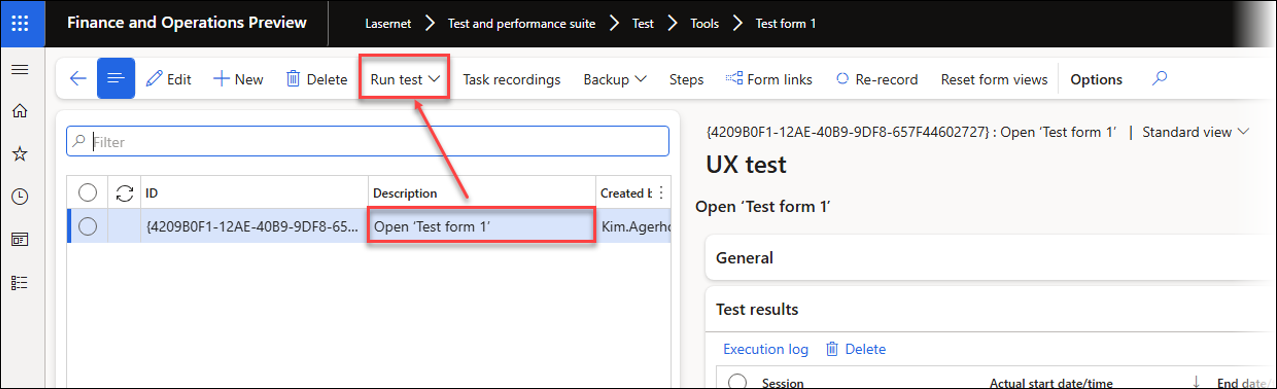
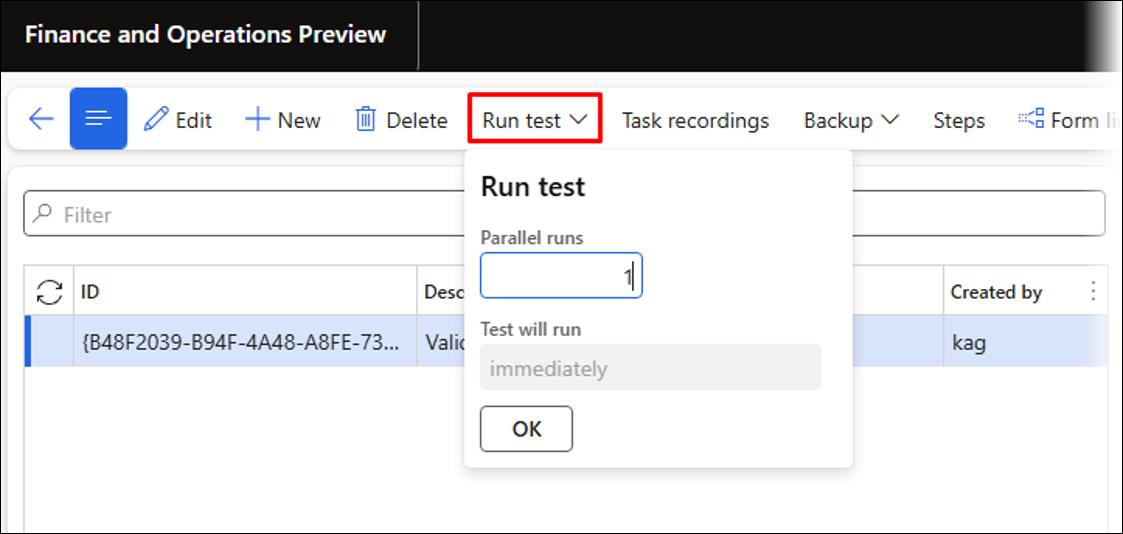
To do so, click the Run test button.
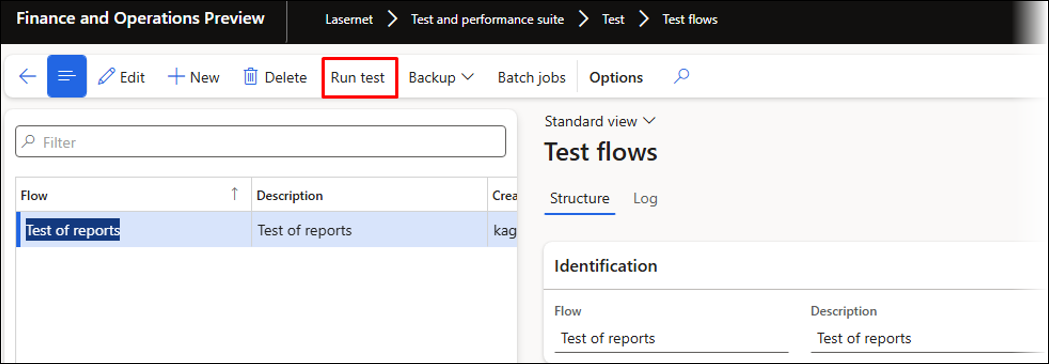
The Test checkpoints and Test flows can also be run from Lasernet > Test and performance suite > Test > Run test.
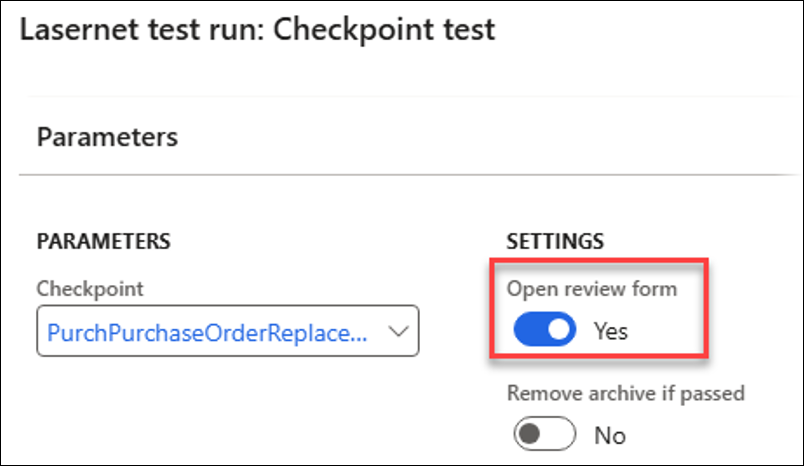
The following dialog is shown when clicking Run test:
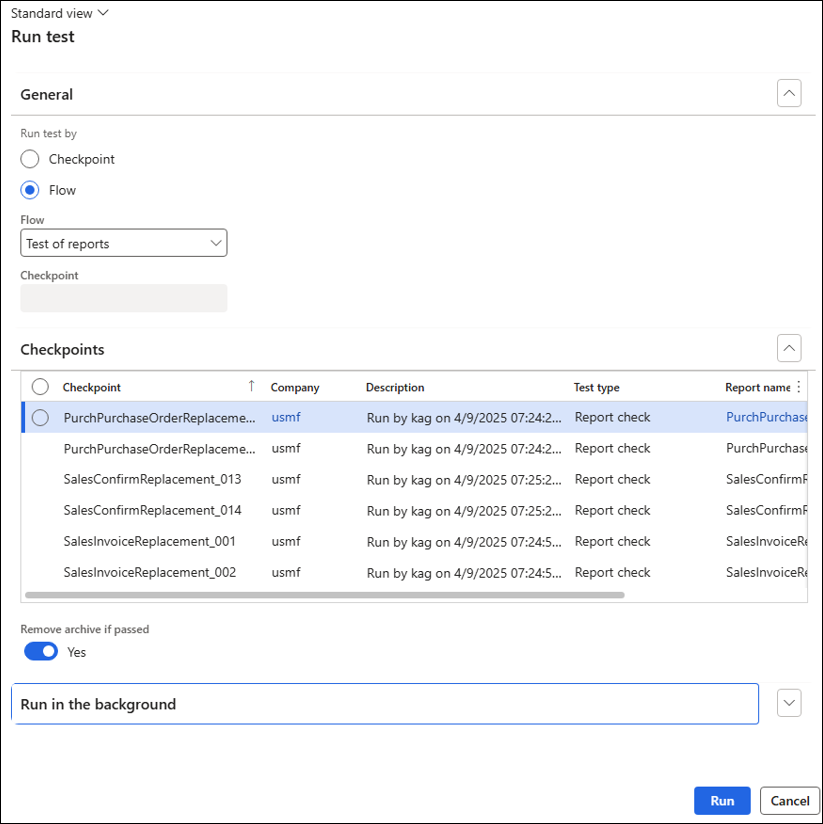
Run test will re-run the report entirely and save new entries for the newly created reports within Lasernet. Those entries are used to run the comparison with the prepared checkpoints (old entries).
In the dialog above, it is possible to choose from the following options:
Run test by:
Checkpoint: Runs a single checkpoint.
Flow: Runs a flow that can include multiple checkpoints.
Remove archive if passed: If enabled, no entry will be created within the Lasernet Archive, and if no discrepancies are found, no XML and PDF files will be saved.
This last option is useful when tests are run daily or weekly, as it saves space within the Archive.
The following log is shown after running the flow. It can also be accessed from Lasernet > Test and performance suite > Test > Test flows.

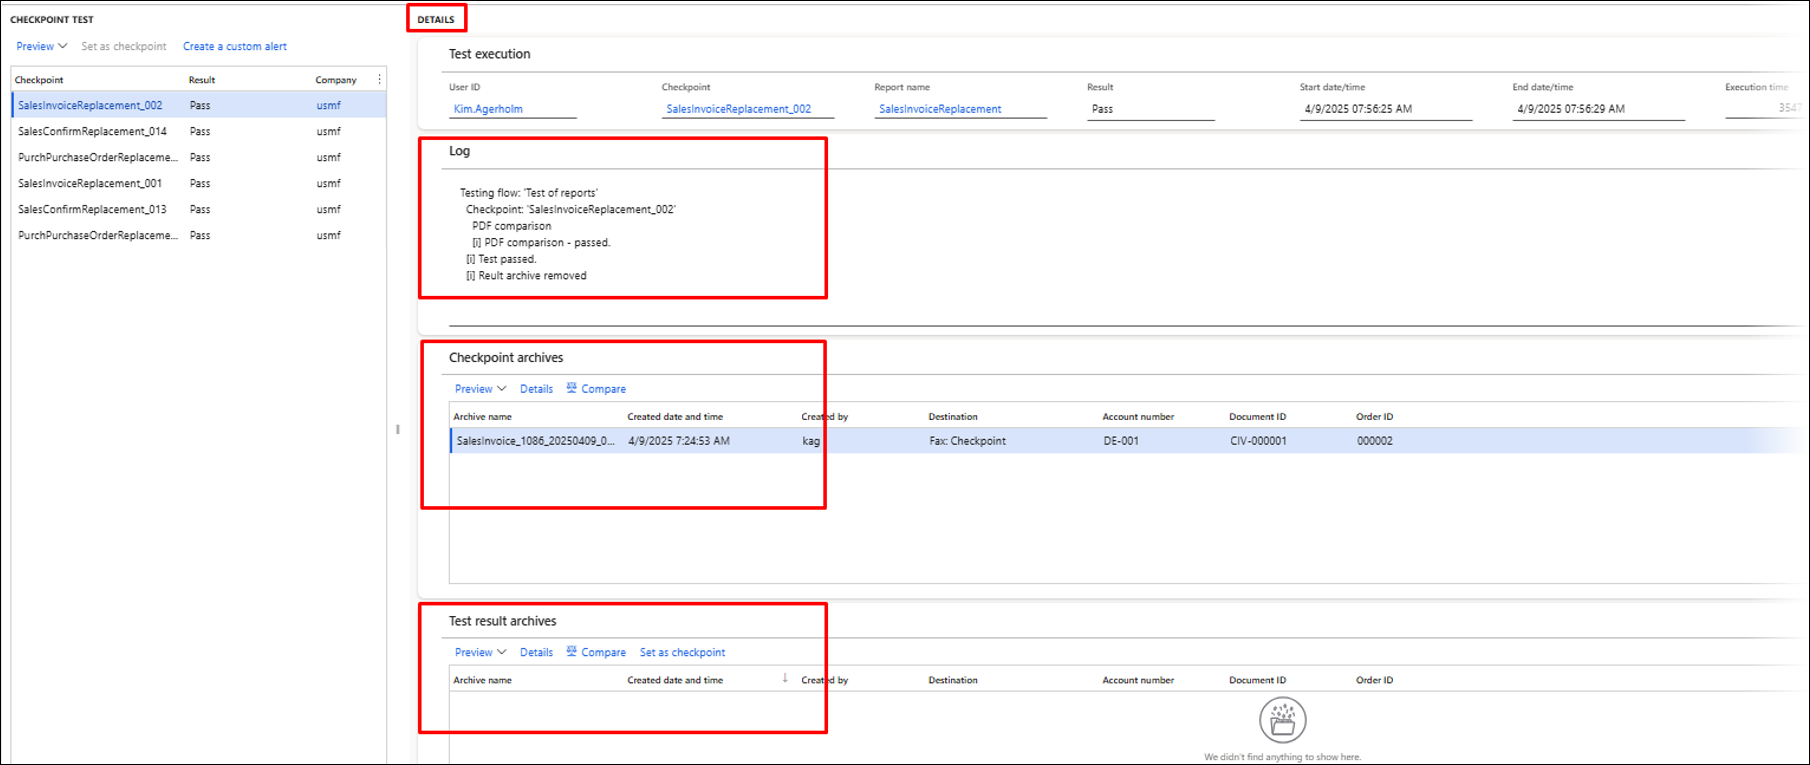
The Details section contains information about each checkpoint and who run it.
Note
You can also run a test for a single checkpoint.
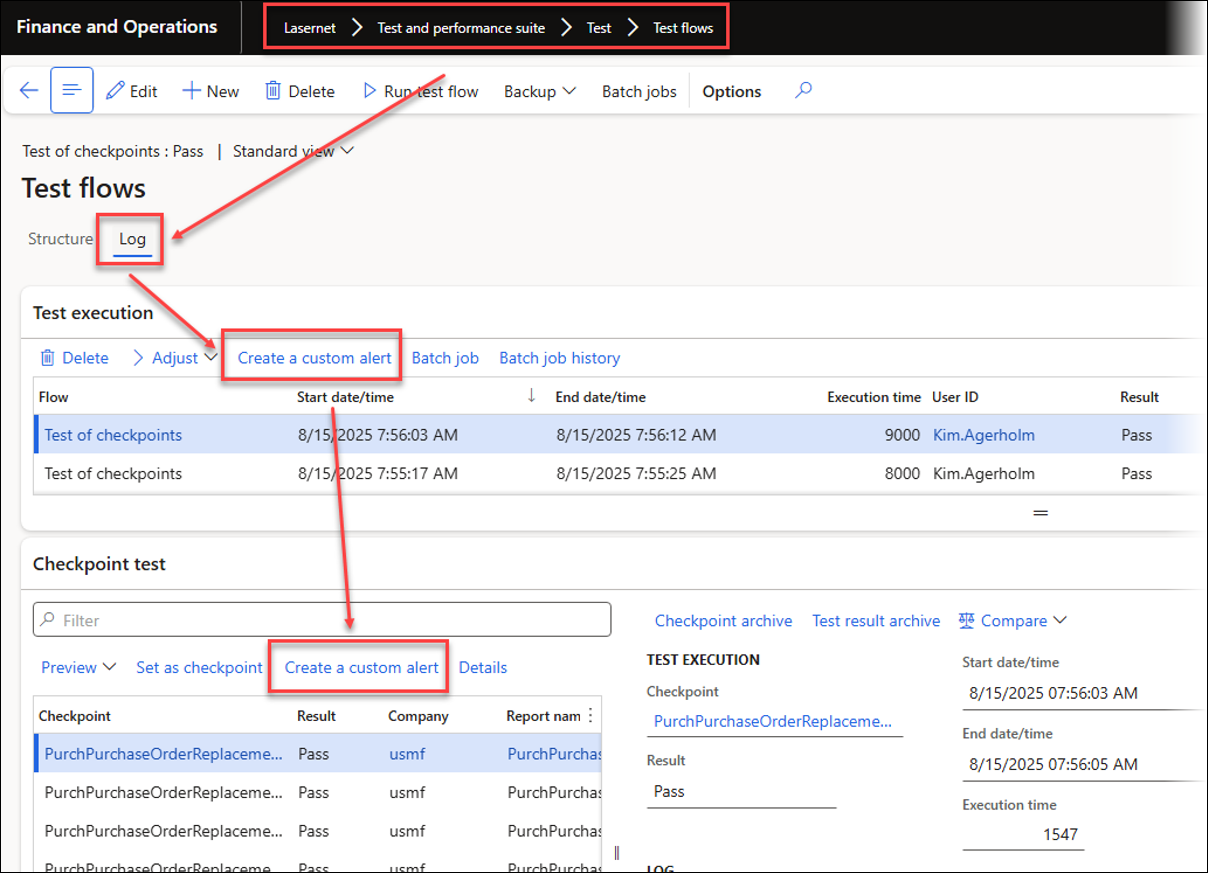
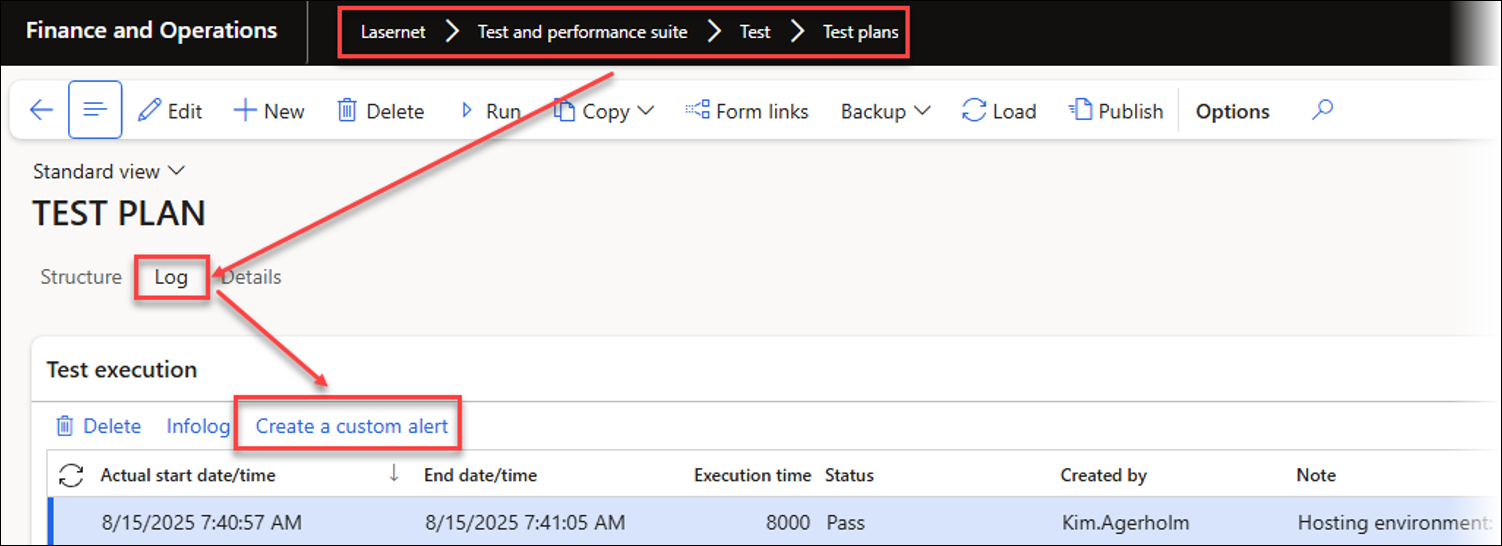
3. Log
Enabling the Open review form button will open a log, which is also accessible from the form above.
This Log displays any differences between the checkpoint created from the Archive (Checkpoint archives) and the Test result archives obtained after running the report.
From within the Log, you can skip the testing of some elements.
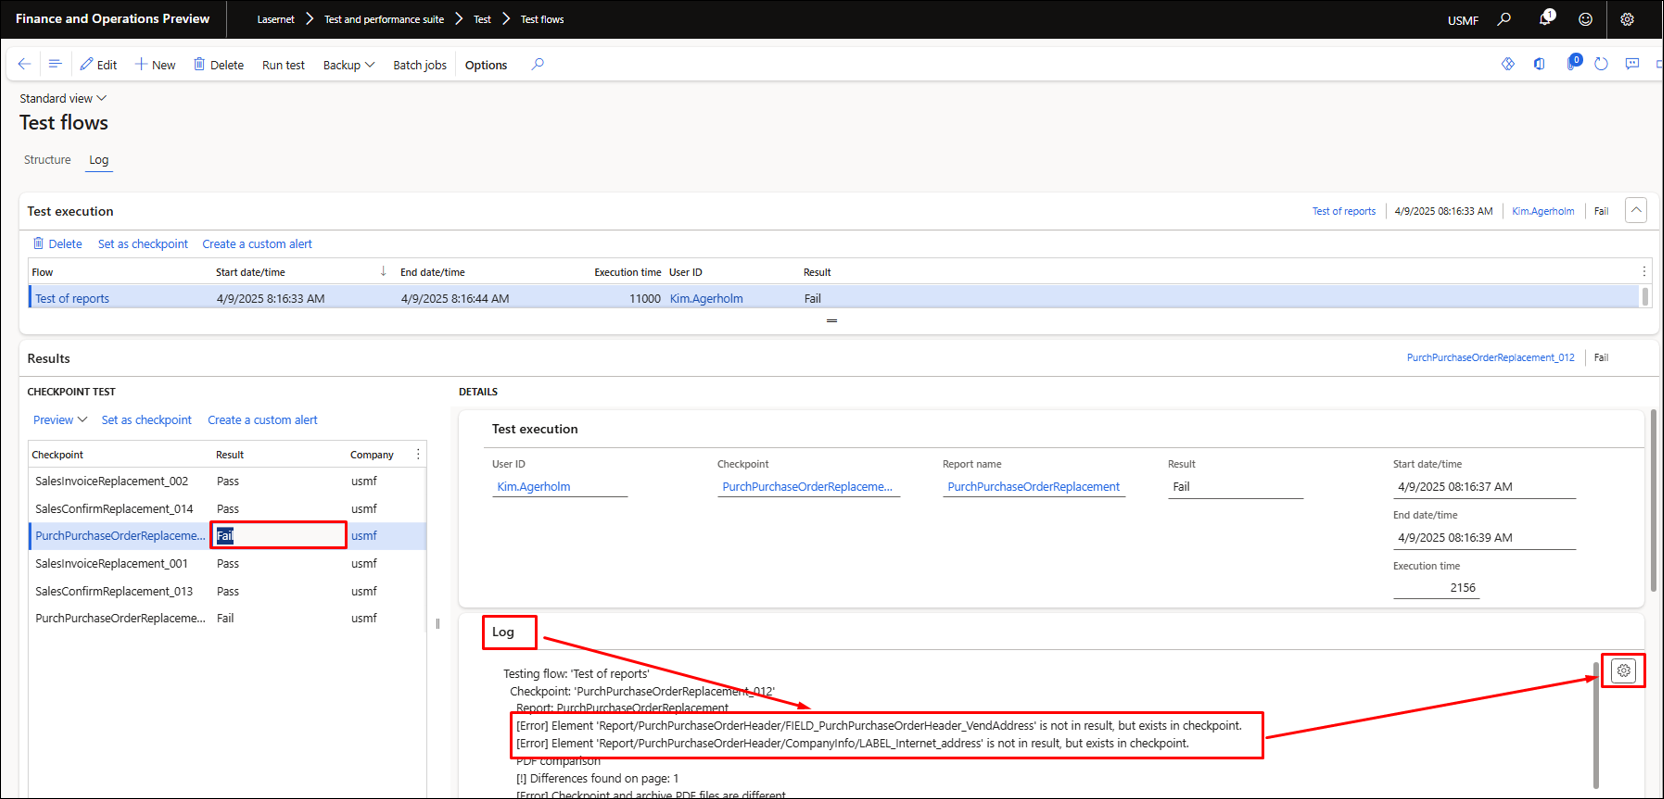
4. Exceptions
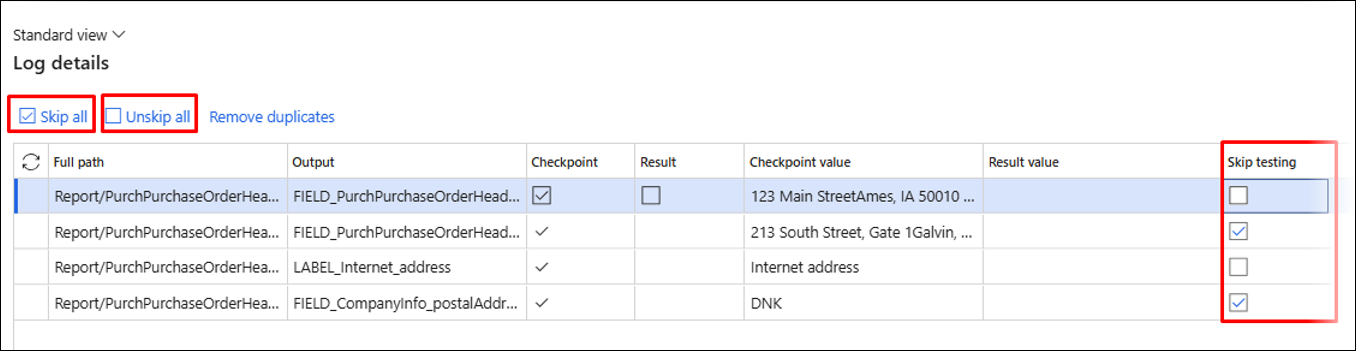
The following example illustrates the fields VendAddress and Label_Internet_address, which existed when preparing the checkpoints, but do not exist after re-running the reports.
You can choose which fields to compare by using Skip all, Unskip all, or Skip testing for each element:
You can also skip the testing of information within the report’s structure (Elements):
Any differences between the created checkpoint and the results obtained after re-running the reports are shown as follows:

5. Update Existing Checkpoints
You can also mark entries within the Test result archives as new checkpoints, which is particularly useful when the report has been intentionally modified.
Click Set as checkpoint in the Test execution section (top grid) to use all the results (newly run reports) as new checkpoints for the Test flows. Click Set as checkpoint in the CHECKPOINT TEST section (lower grid) to only replace the selected checkpoint from the result.

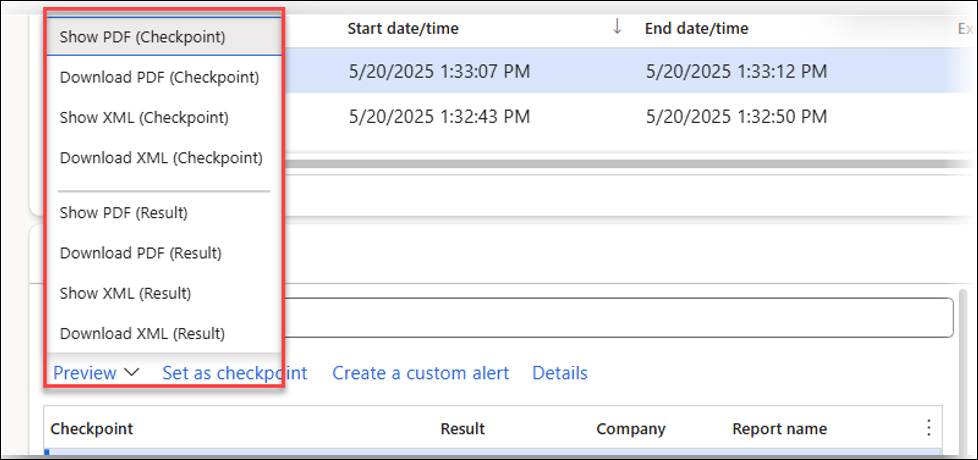
Both the Checkpoint archives and Test result archives enable users to view and download the PDF and XML files used for the comparison.
In the Checkpoint archives:

In the Log for the Test flow:
The test results for the checkpoint are also available by navigating to Lasernet > Test and performance suite > Test > Test results.

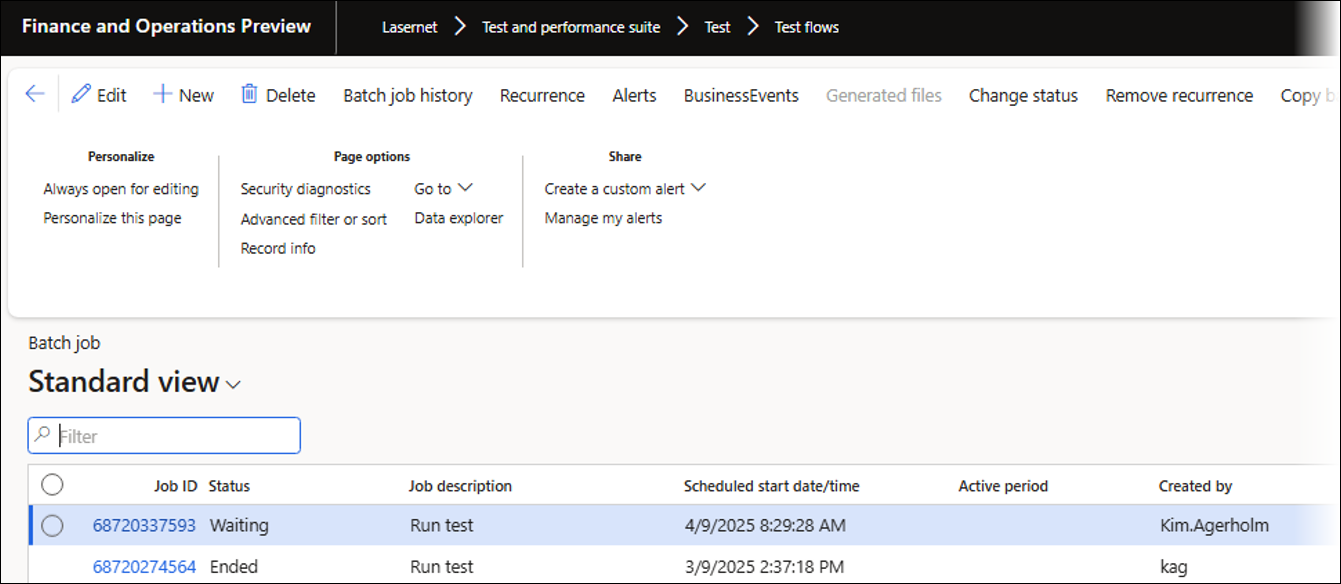
6. Batch
The Test flow can be run as a batch task. The recommended approach for frequent Test flow and checkpoints runs is to enable the Remove archive if passed option, which ensures identical records are not saved within the Lasernet Archive, and no XML and PDF files are saved.
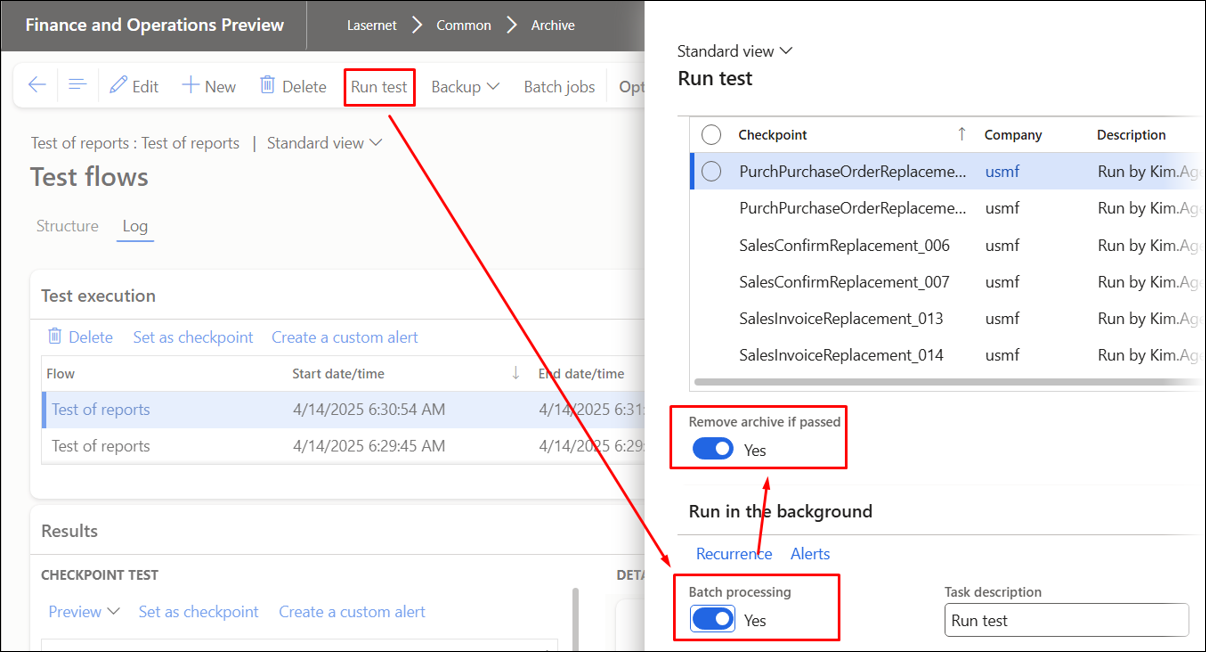
Enabling Batch processing will show the batch tasks already created for the selected Test flow:
The following image shows both a Waiting and an Ended batch job for the Test flow:
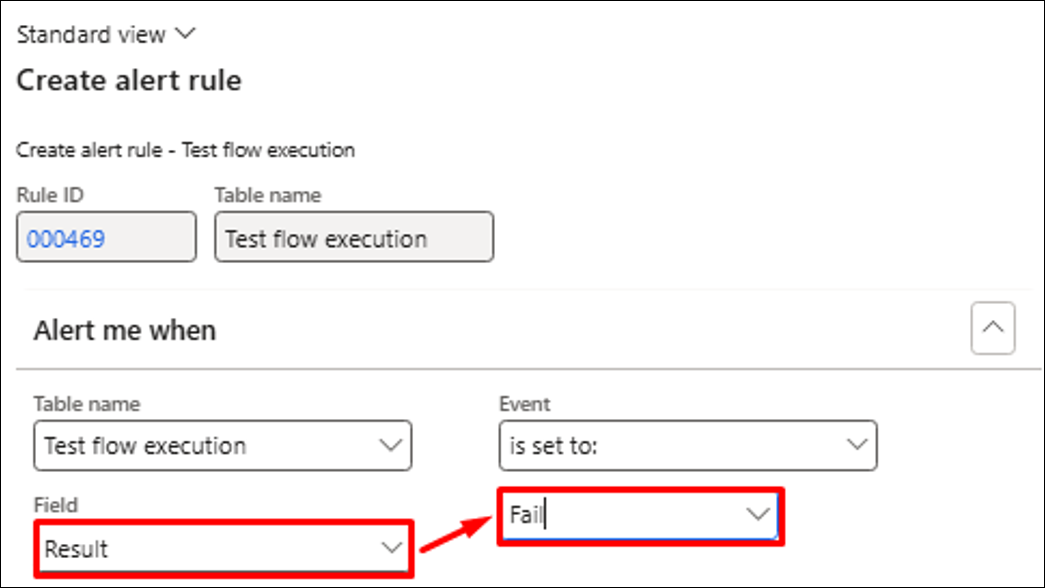
7. Alerts
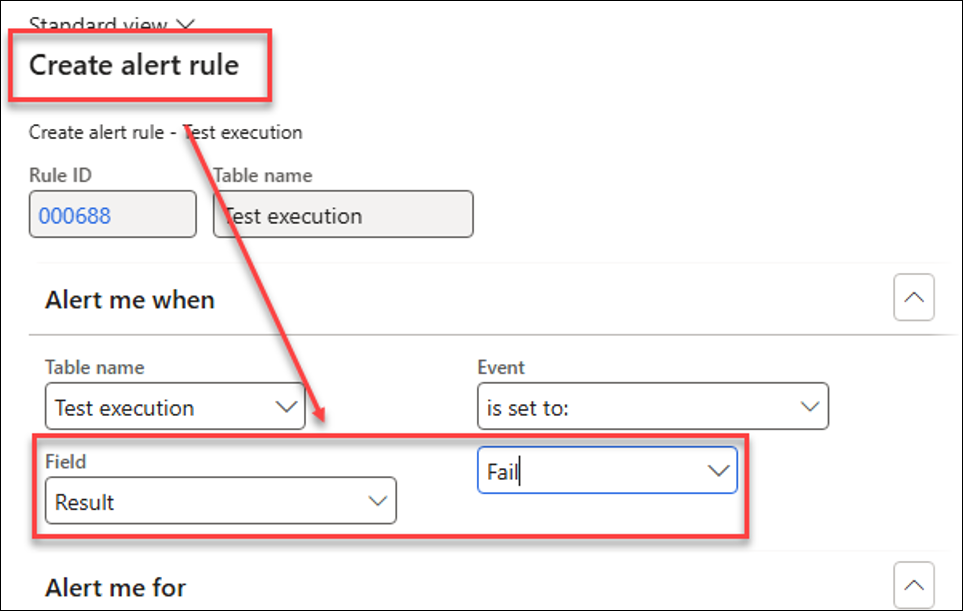
By using Create a custom alert, you can prepare a custom Alert for each checkpoint and Test flow. A general Alert can be created for all reports, or a specific Alert can be set up based on each report.
These options can be useful when each report has a different owner. In this case, it is possible to create different Test flows for each owner or use an Alert for each checkpoint.
A custom Alert can be created from either the Test execution (Test flow) or for the CHECKPOINT TEST sections:

After clicking Create a custom alert, the following dialog will appear, enabling you to create a standard Alert for the flow or the checkpoints.
In most scenarios, the Field “Result” set to Fail is used as a trigger. However, other information, such as Execution time, can also trigger the event.
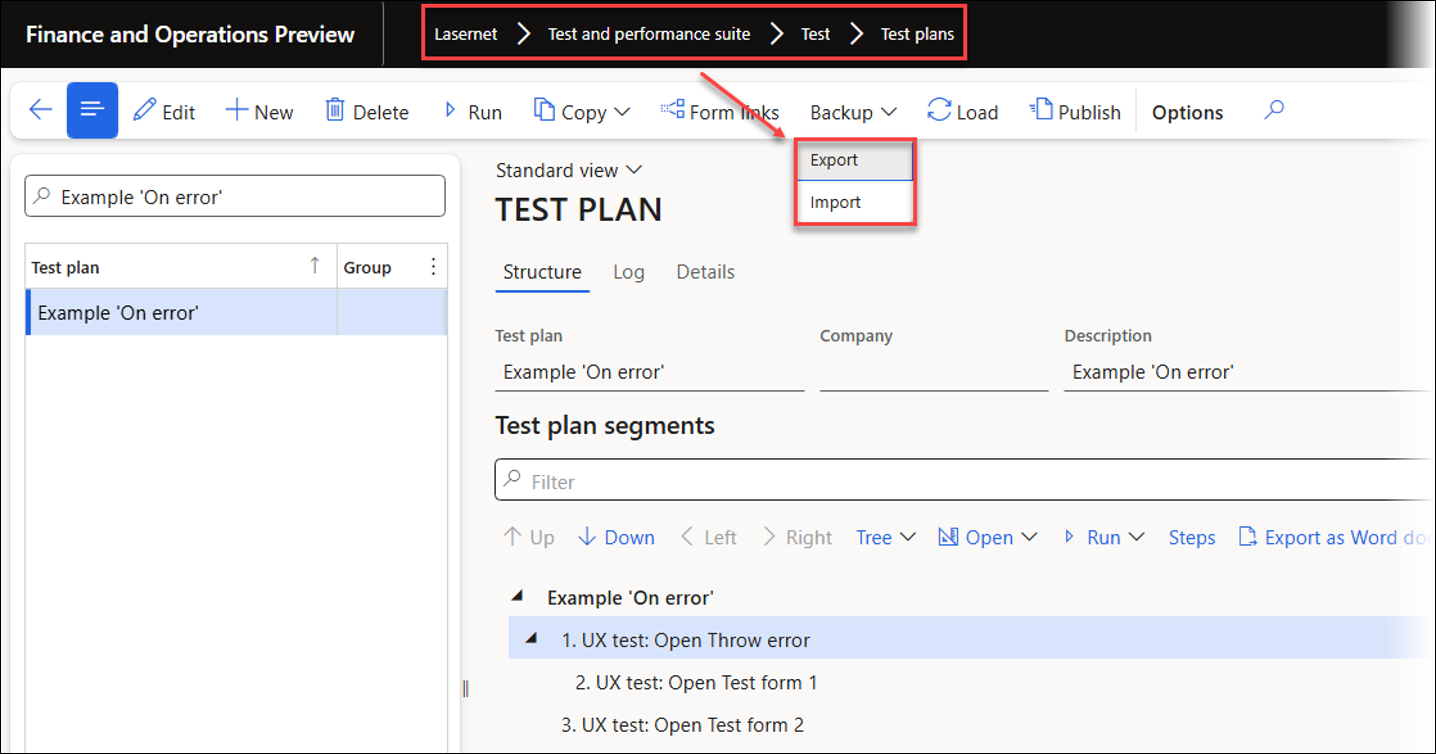
Backup (Export/Import)
Running backups of Test flows is essential for exporting and importing data between environments. Using a QA environment (TEST, UAT) is best for identifying issues early, ideally before reaching production. The backup will contain all necessary information for the Lasernet Archive and Azure storage.
Backup of a Test flow:
Backup of a single checkpoint:
PDF Compare — Side-by-Side PDF Comparison
PDF Compare is a powerful visual tool within the Test and Performance Suite designed to compare two PDF documents side-by-side and clearly highlight any differences between them.
The side-by-side PDF comparison tool can be accessed from the Lasernet Archive, Test checkpoints, and Test flows.
This tool is especially useful when testing reports, as it shows the differences between the original document (checkpoint) and the newly created document.
The system automatically analyses both files and visually marks all discrepancies, such as:
Moved text or objects
Added or removed content
Changes in text (font, size, content)
Styling alterations
Primary use case:
Essential for document testing and validation. It enables users to:
Quickly verify if a newly generated document matches the expected output (checkpoint).
Easily identify unintended changes introduced by system updates, design modifications, or data variations.
Efficiently review and approve intentional document alterations.
Benefits:
Clarity: Provides an immediate and clear visual representation of all changes.
Efficiency: Drastically reduces the time and effort required for manual document comparison.
Accuracy: Minimizes the risk of overlooking subtle but critical document errors.
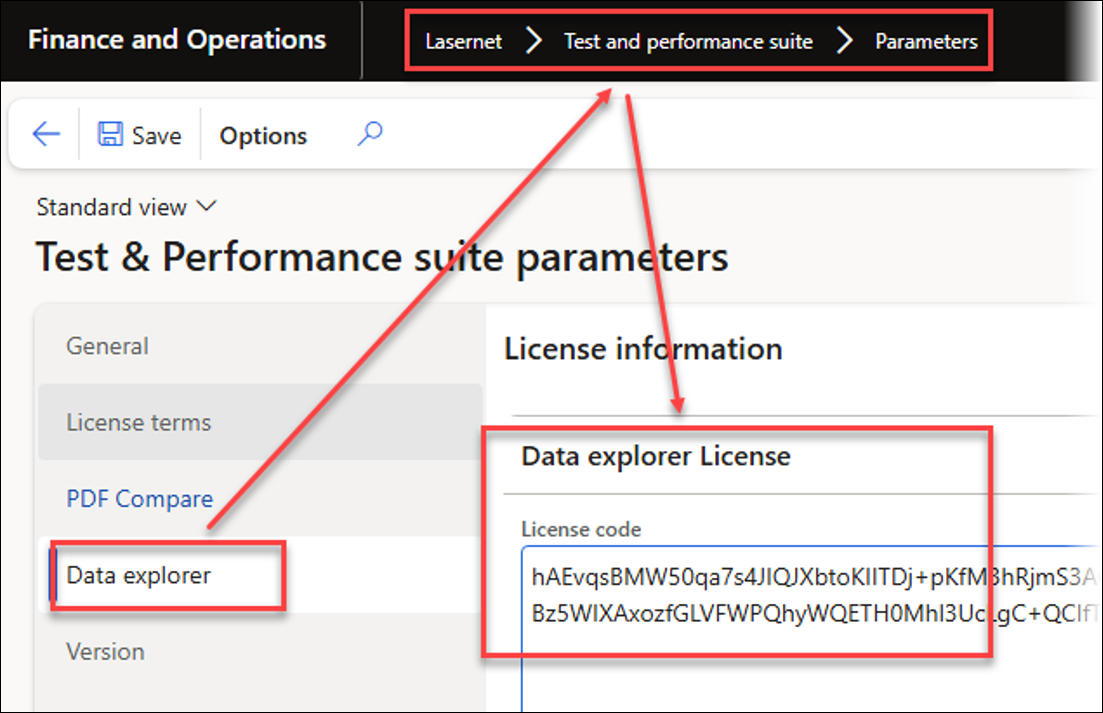
A License code is required for activation:

The following error occurs if no valid license is entered:
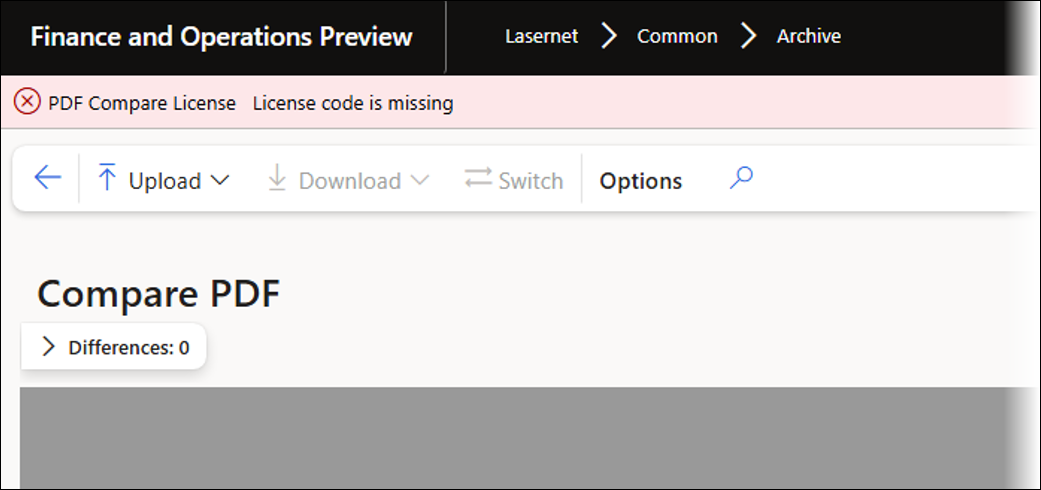
Error
PDF Compare License - License code is missing
PDF Compare displays two PDF files (typically an original, approved checkpoint document and a newly generated test document) directly next to each other on the screen.
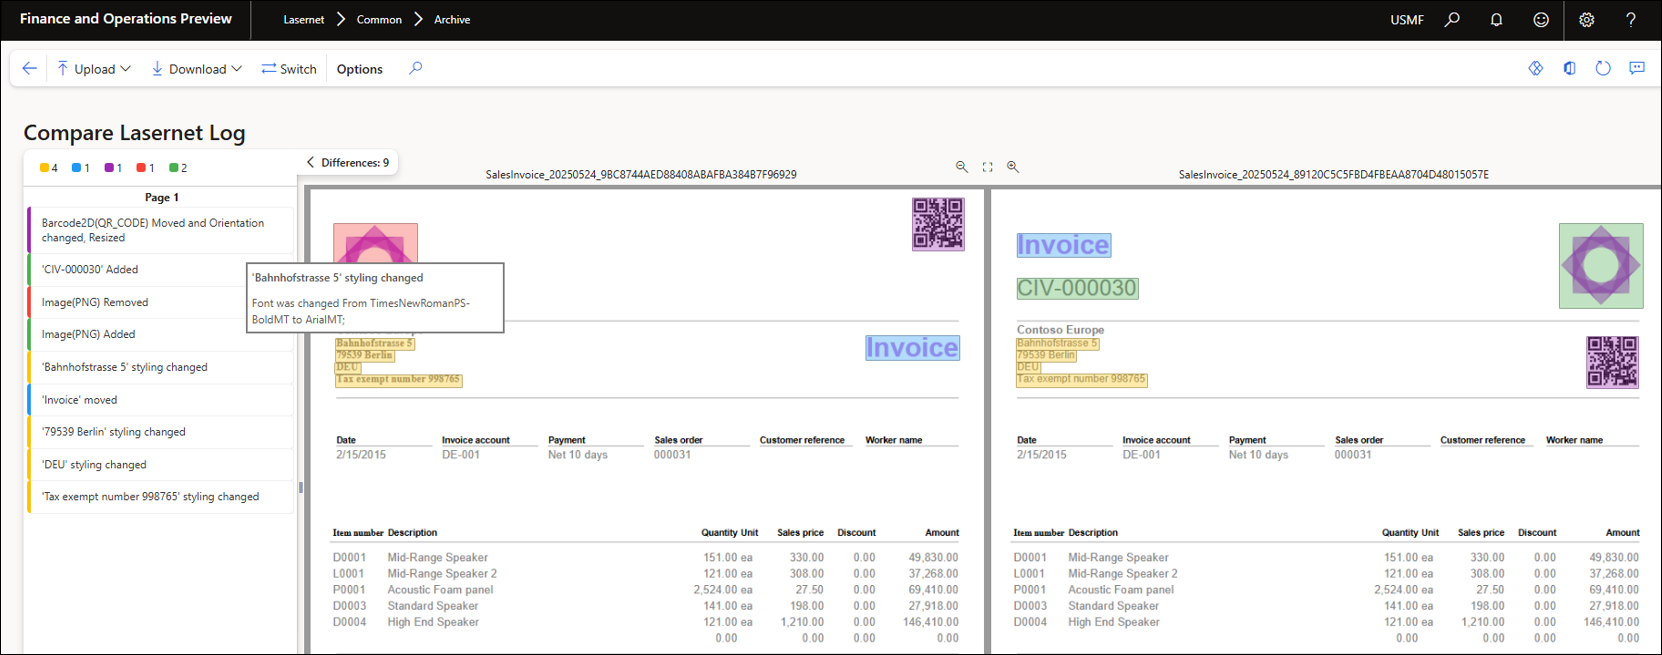
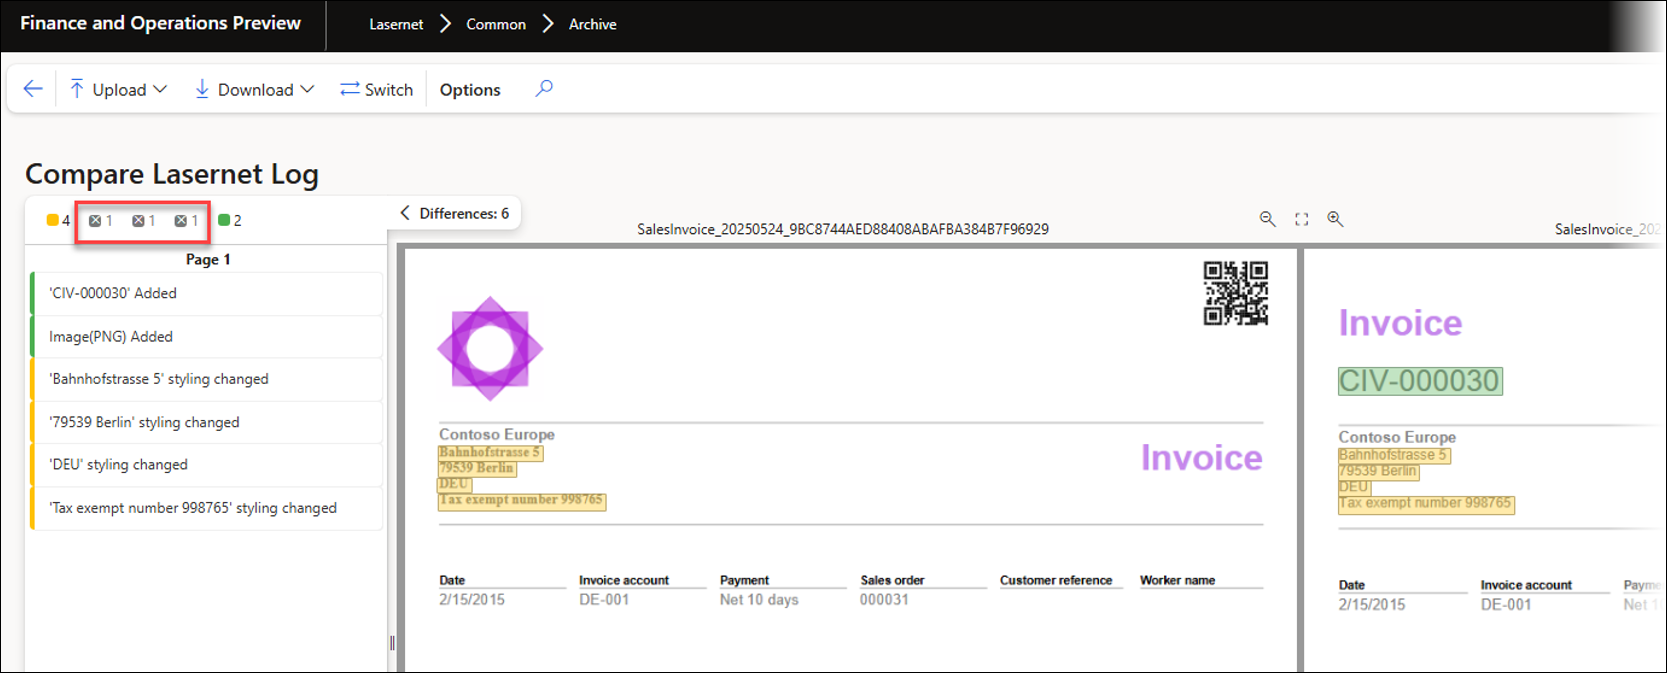
In the upper left corner, each color corresponds to a specific category of change. The number next to each color corresponds to the number of changes in that category. By clicking the corresponding color, unnecessary categories can be hidden.
Yellow: Changed
Blue: Moved
Purple: Changed and moved
Red: Removed
Green: Added
Once the category is hidden, it can be unhidden by clicking the color again. Hidden and unhidden categories and colors are saved within the usage data.
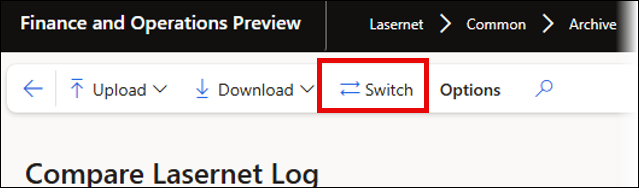
The Switch button moves the document on the right side over to the left, and moves the document on the left side over to the right. This may result in fields being added instead of removed, and removed instead of added.
The side-by-side PDF comparison tool is incredibly useful, not just when testing documents, as it facilitates signing off on and approving reports by saving checkpoints that can later be used for comparisons.
These checkpoints can be updated as documents are edited. Documents can also be saved in an external repository and uploaded for comparison.
This tool helps with document changes by comparing older designs with new ones. It can also ensure consistent header information, such as company details and bank information, across various reports.
Extract Images from PDF Files
PDF Compare also enables users to download both PDF files and any extracted images.
To do so, click Download and choose what to download.
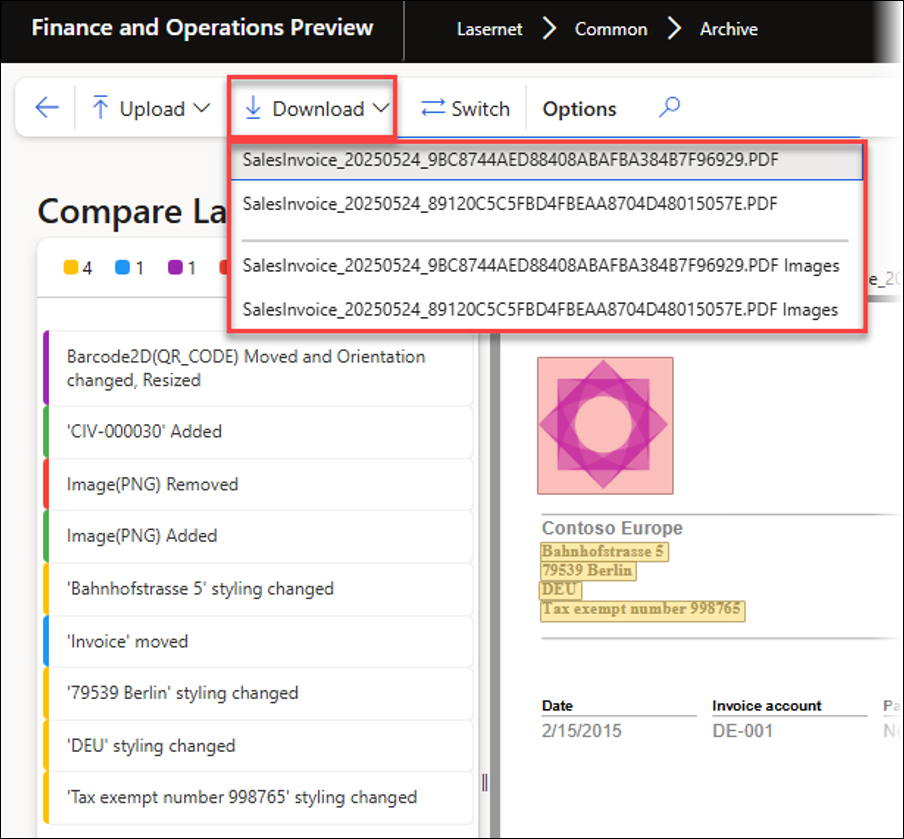
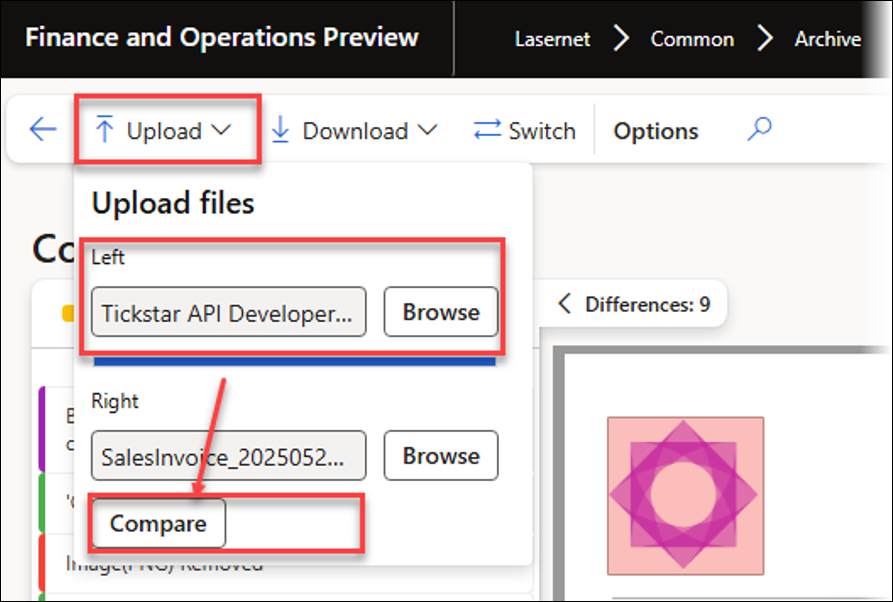
Using the Upload button, you can upload any PDF file, not just those generated by Lasernet FO Connector.
This is useful when external documents must be compared or images must be extracted. Upload the PDF file and download the images contained in it.

A ZIP folder containing all the vector graphics and images is downloaded to the user’s machine. Use the page number to find the required images.
Part II — Task recorder (UX Tests) and Test plans
This section explains how the Task recorder offers the option to save recordings for the UX Test or for the Test plan.
The Task recorder has been enhanced within the Test and Performance Suite by including the option to save personalizations and views, and supporting the recording and playback of the selection of a destination within the printer dialog.
All adjustments are implemented to ensure that the recording of any business processes can be used for reliable playback and validation of any information.
In standard FinOps, customizing a form during a recording by adding fields and expanding/collapsing groups could cause problems. Similar issues can occur when attempting to record and playback the selection of a destination within the printer dialog. The Lasernet FO Connector 7.2 enhancements circumvent these issues.
The use of attachments and files (such as configuration files for Lasernet FO Connector) has also been improved.
Locally uploaded files are automatically saved within Azure Storage, and, instead of loading the files locally, the playback of a recording automatically simulates loading from the Azure Storage as part of the playback.
Local configuration files used for Lasernet FO Connector are also saved within Azure Storage if they are part of a recording.
This approach guarantees that users can play back the recordings and ensures support for automation.
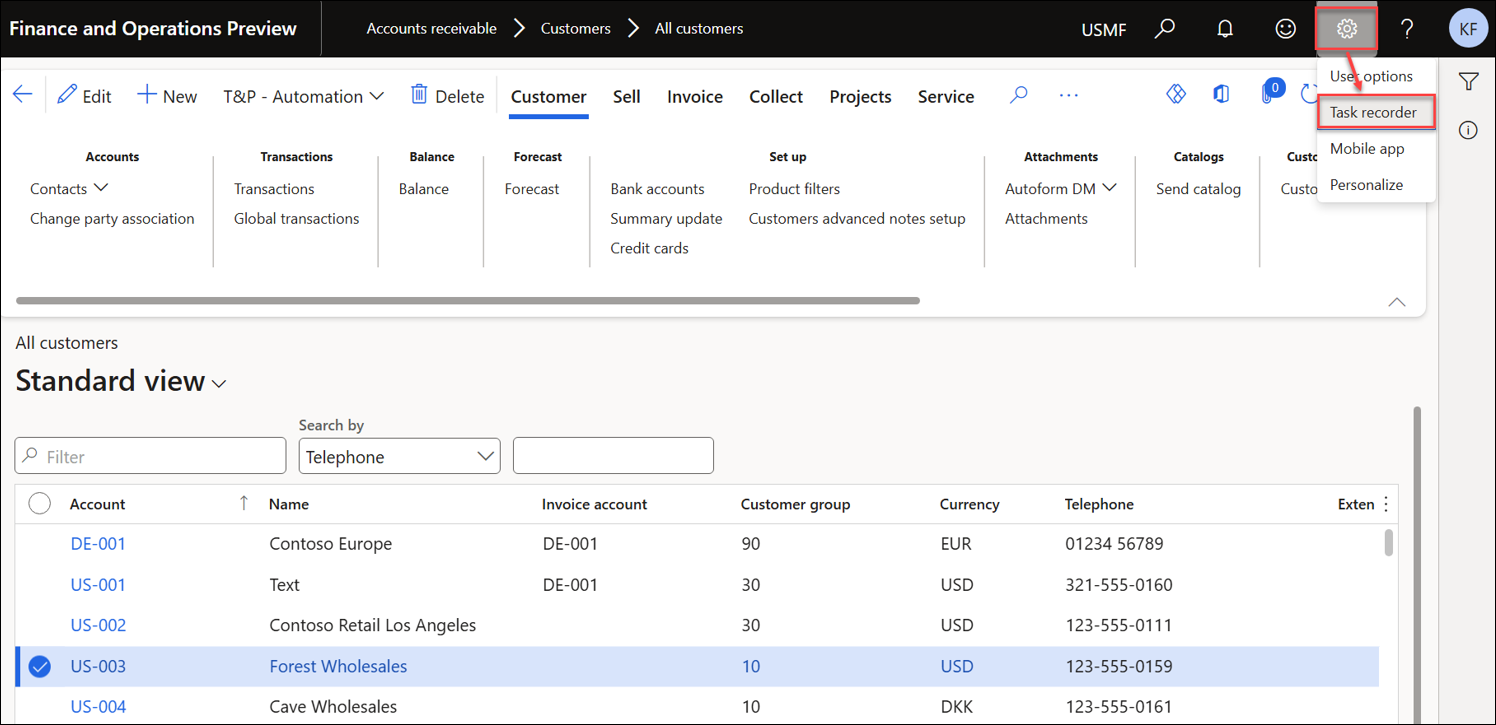
Task Recorder
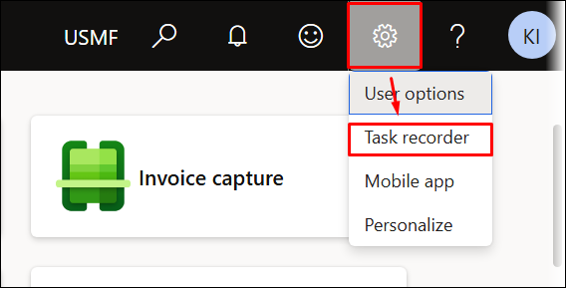
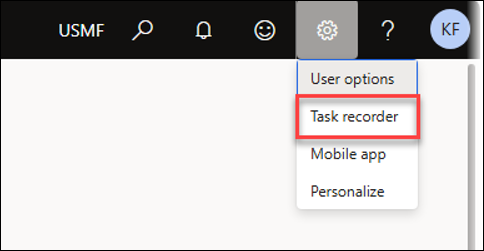
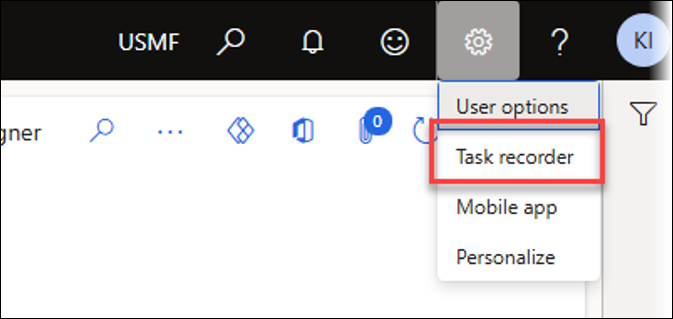
The Task recorder form is accessed via the Settings button located in the upper-right corner of the standard FinOps interface.
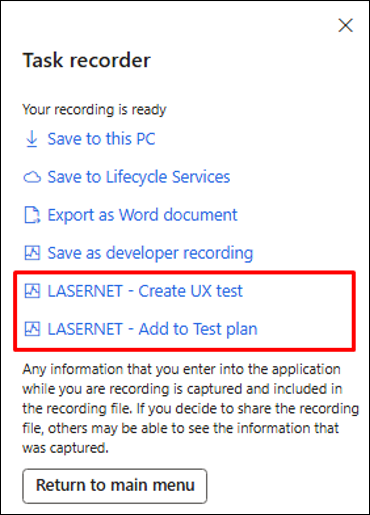
The following additional options are available within the Test and Performance Suite after completing a task recording:
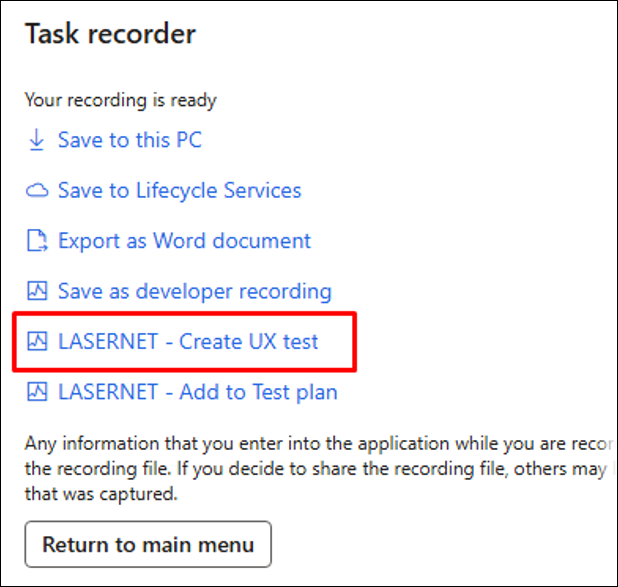
LASERNET - Create UX test: Single recording
LASERNET - Add to Test plan: Multiple and linked recordings (UX tests/task recordings)
The following example illustrates how to prepare the required recordings for the UX Test and how to link the recordings (UX Tests) using the Test plans.
UX Test (Single Recording)
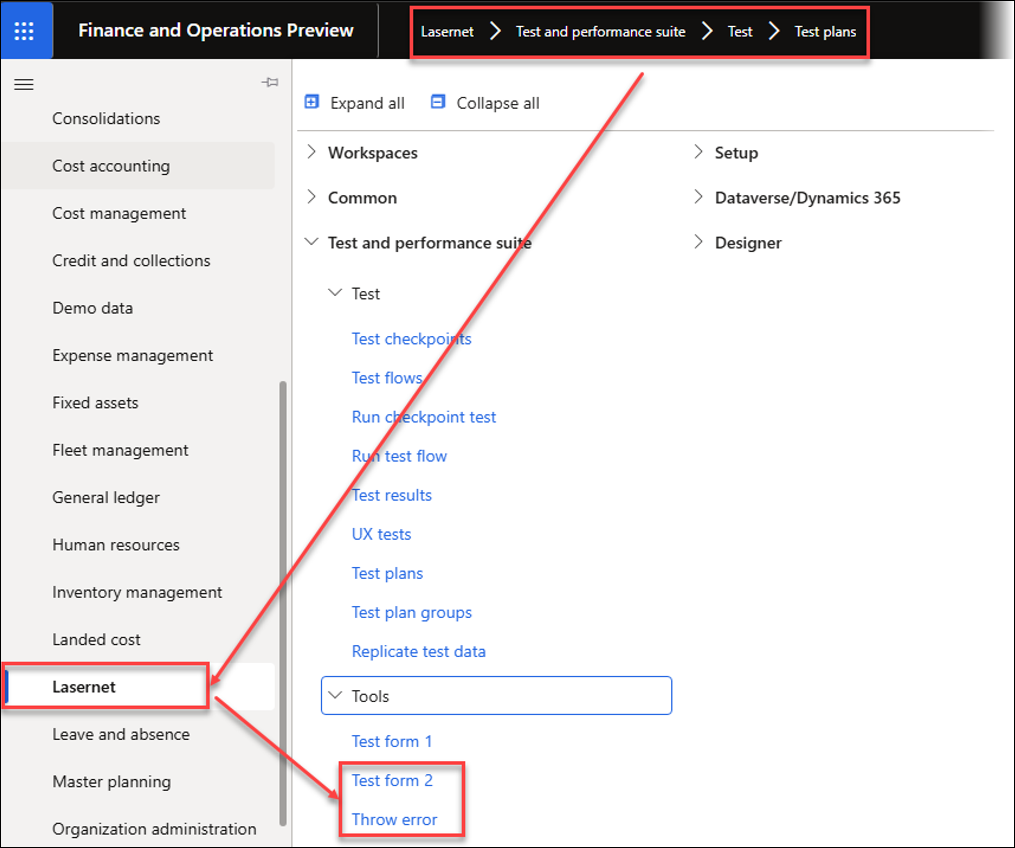
The menu items Test form 1, Test form 2, and Throw error are provided as part of the Test and Performance Suite 7.2.
Test form 1 and Test form 2 are dummy forms useful for showcasing the Test plans. They can also be used as placeholders for buttons created via the Form links within Lasernet FO Connector or for the recordings/Test plans in T&P.
They can be useful when adding buttons for reports and Queries, running Test plans or any other process via a button, and containing Test plans for pre-caching an environment.
The Throw error form demonstrates what should occur in the event of an error between two segments. This function is particularly useful for illustrating the expected behaviour during error conditions.
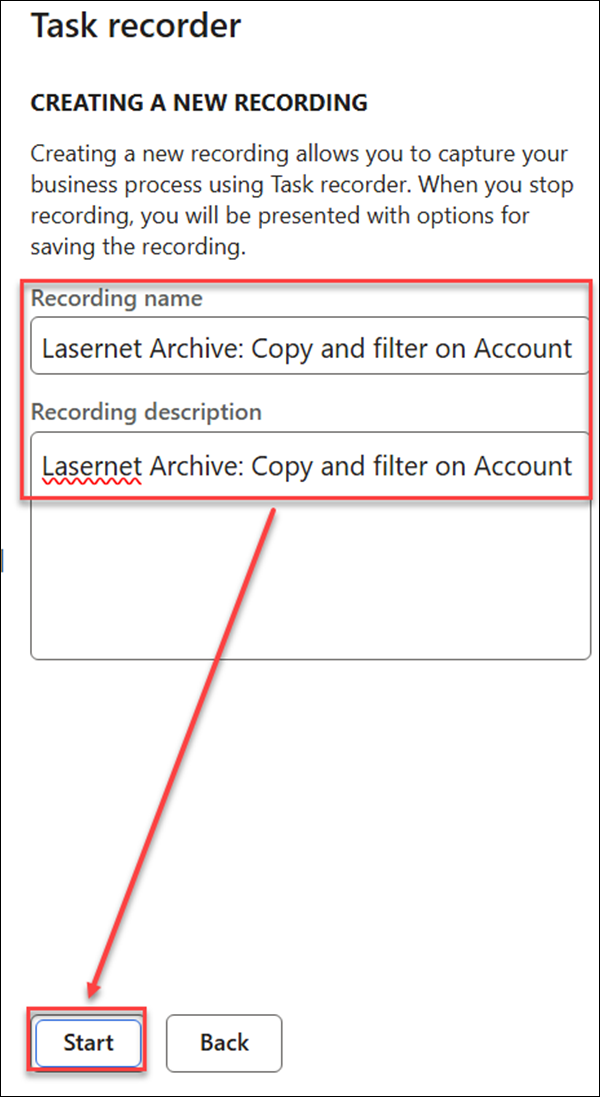
Create a Recording
To create a recording, follow these steps for Test form 1, Test form 2, and Throw error.
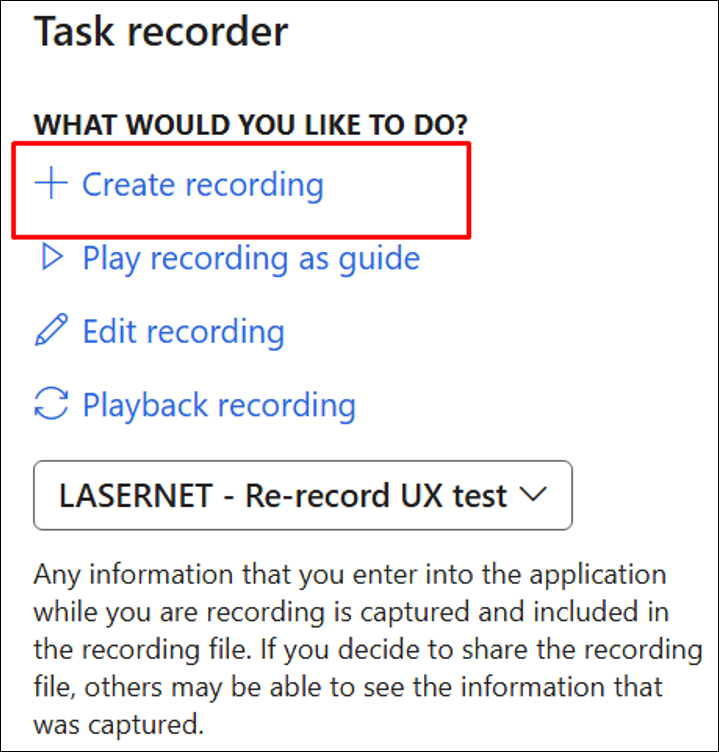
Open the Task recorder form.
Click Create recording.

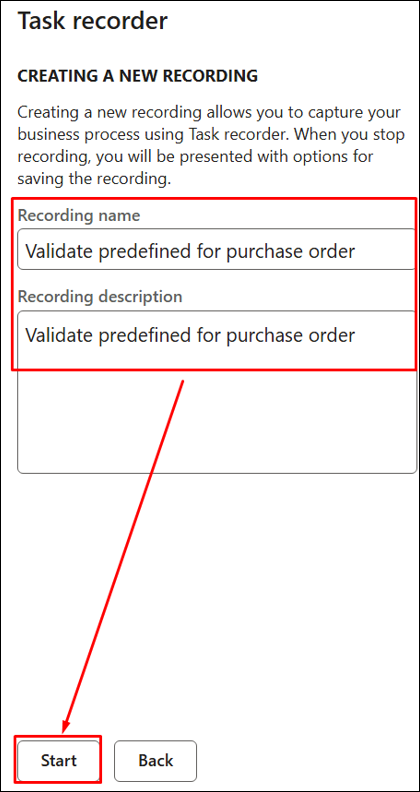
Enter suitable names in the Recording name and the Recording description fields, then click Start.
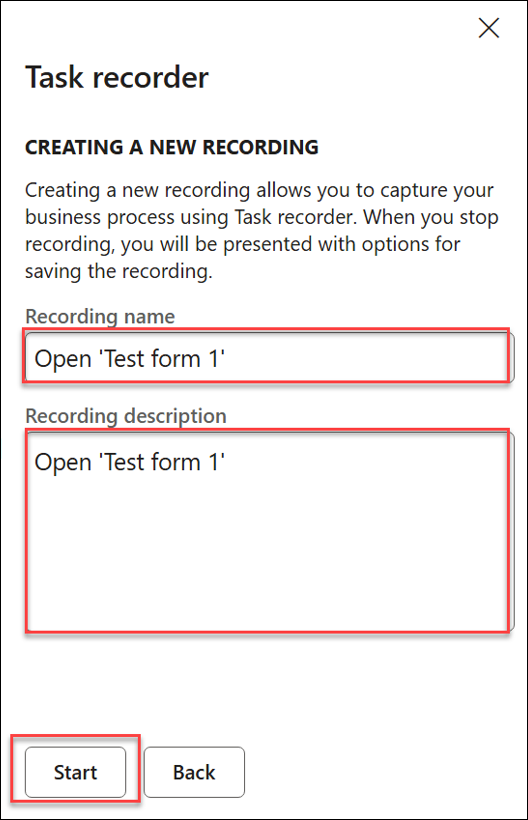
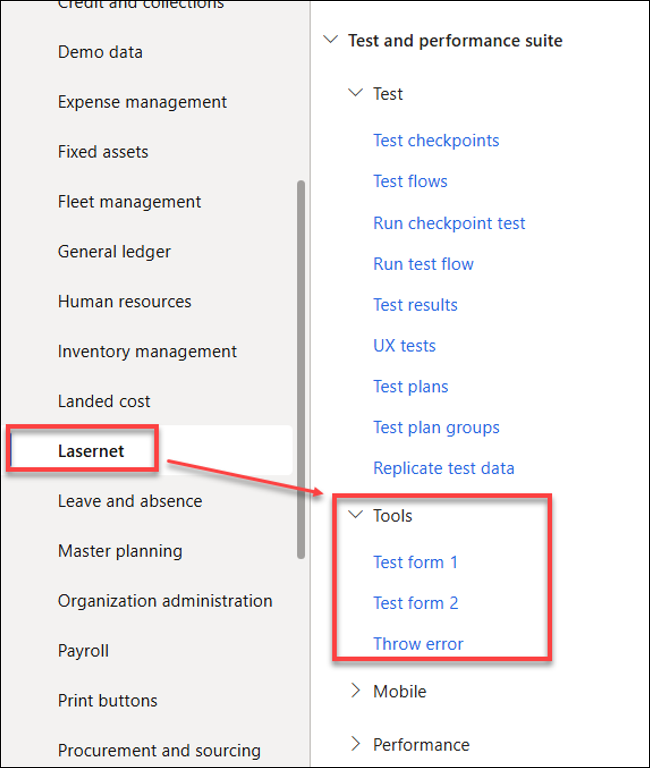
Open Test form 1 located in Lasernet > Test and performance suite > Tools.

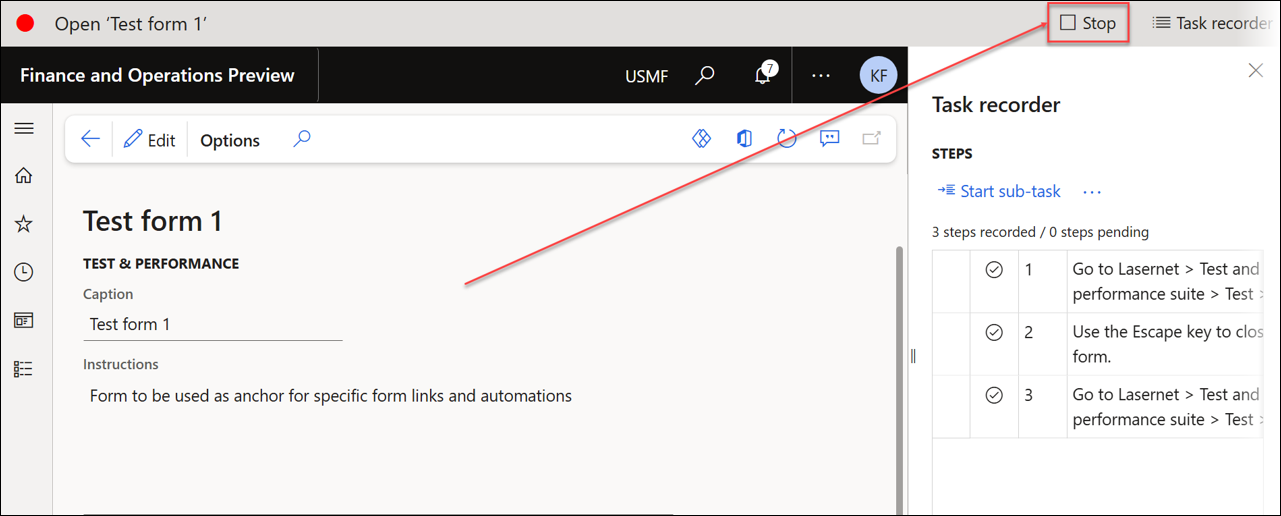
Stop the recording.
Save the recording using LASERNET – Create UX test option.
Ensure the recording is saved within the UX Test for this scenario, although it may also be added directly to a Test plan.
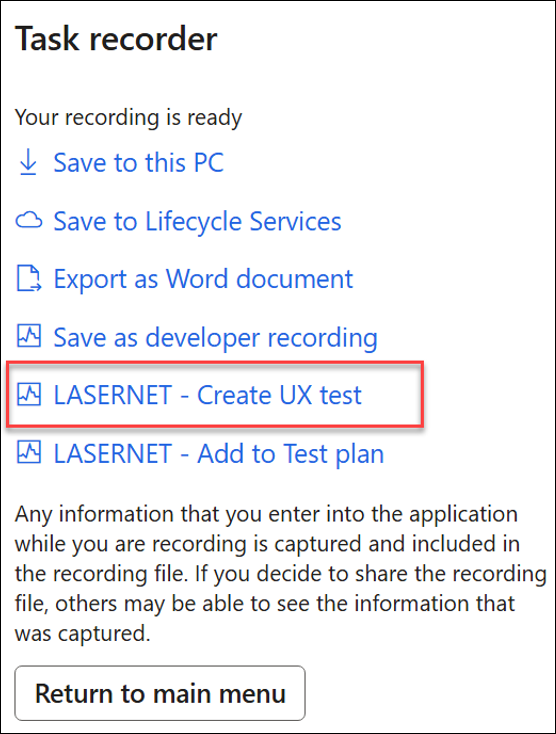
You can now run this recording, which will open Test form 1 from the UX Test.
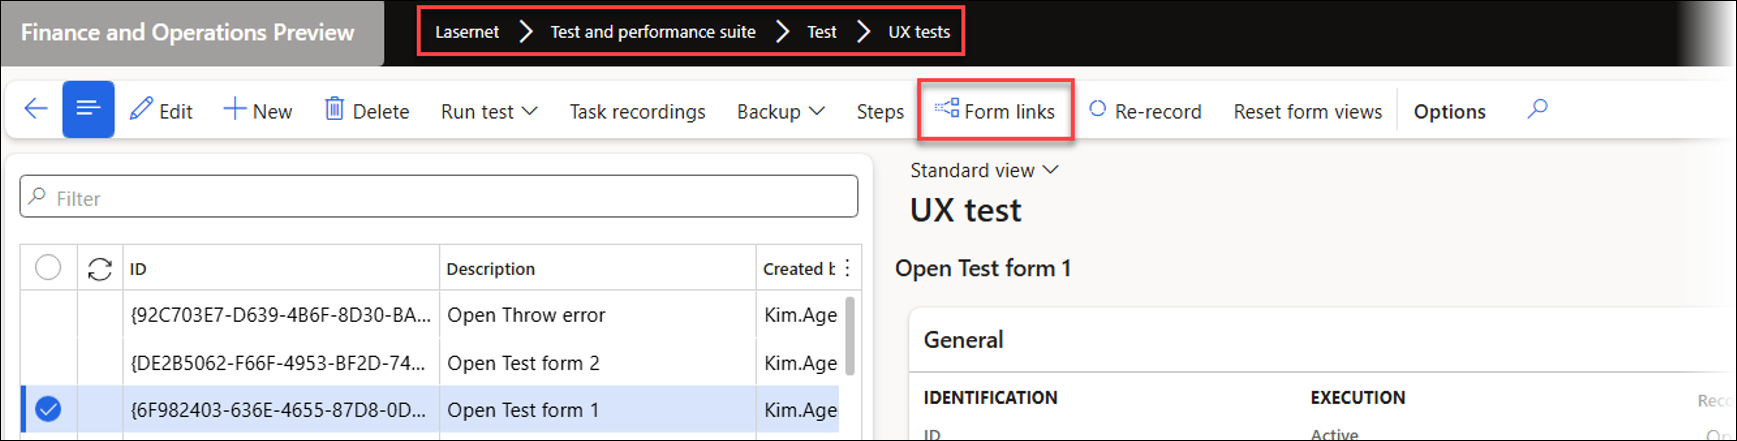
It is also possible to add this recording to any form by using the Form links, a powerful option for optimization and automation.
Repeat the same steps for Test form 2 and Throw error.
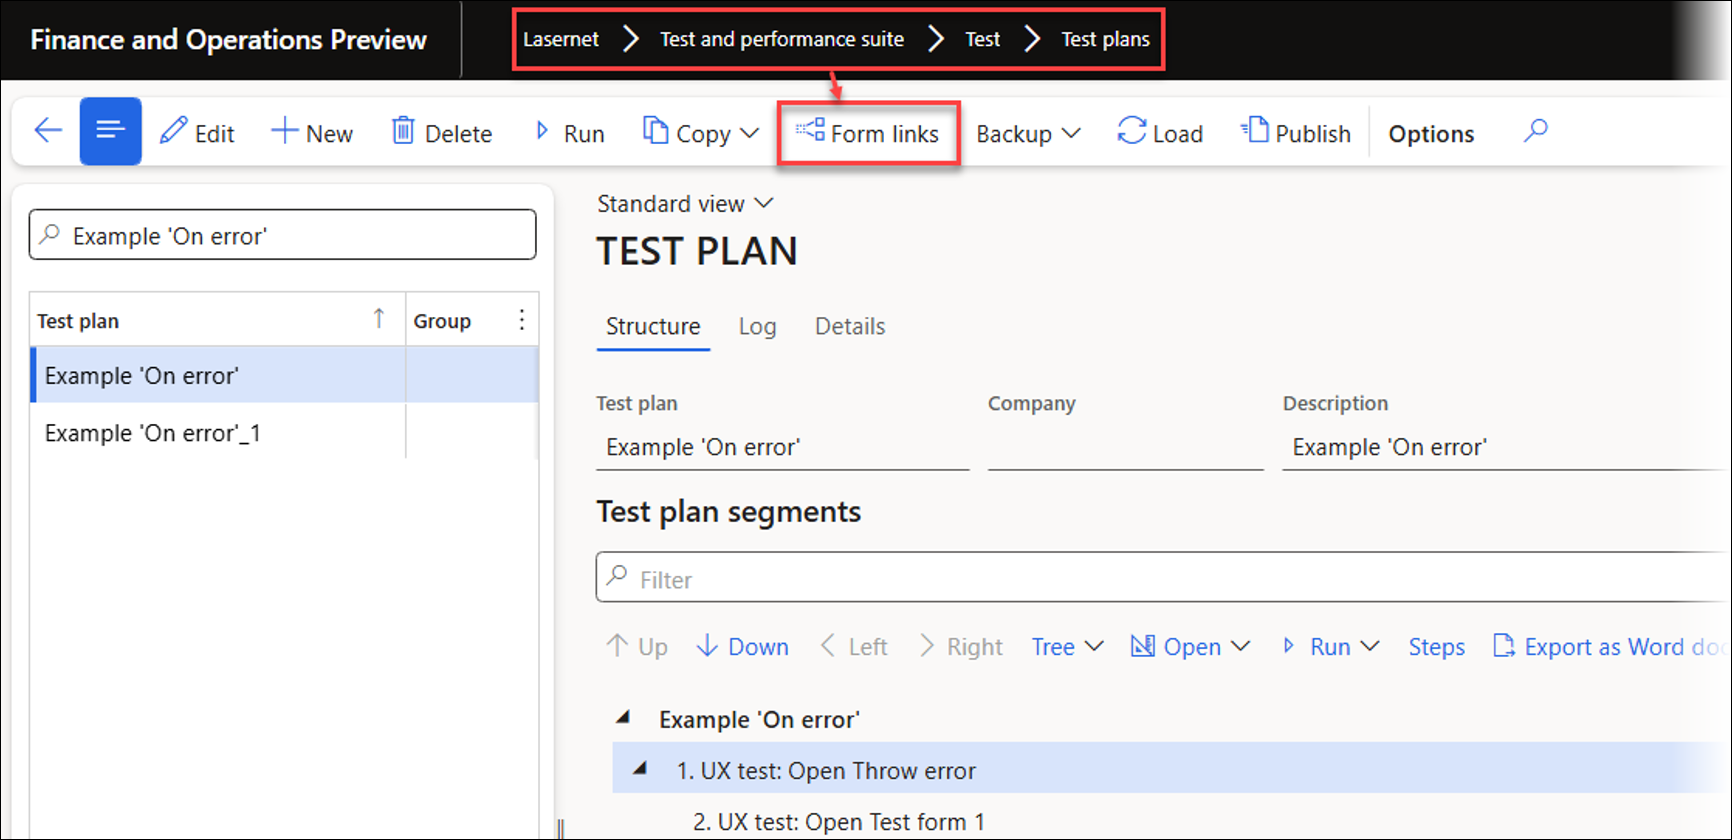
Test Plan (Link to Task Recording)
Create Test Plan
To create a Test plan, follow these steps:
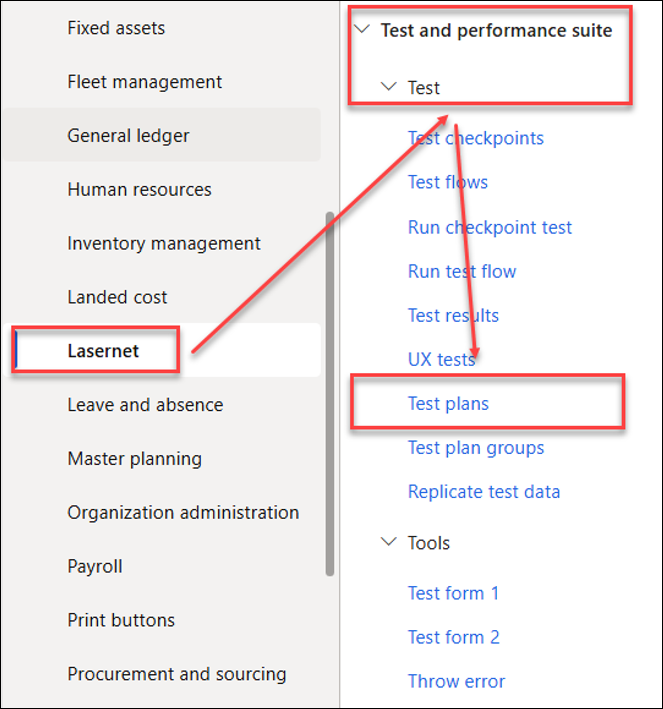
Open the Test plans form located in Lasernet > Test and performance suite > Test.
Create a new entry by entering a value in the Test plan and the Description fields.
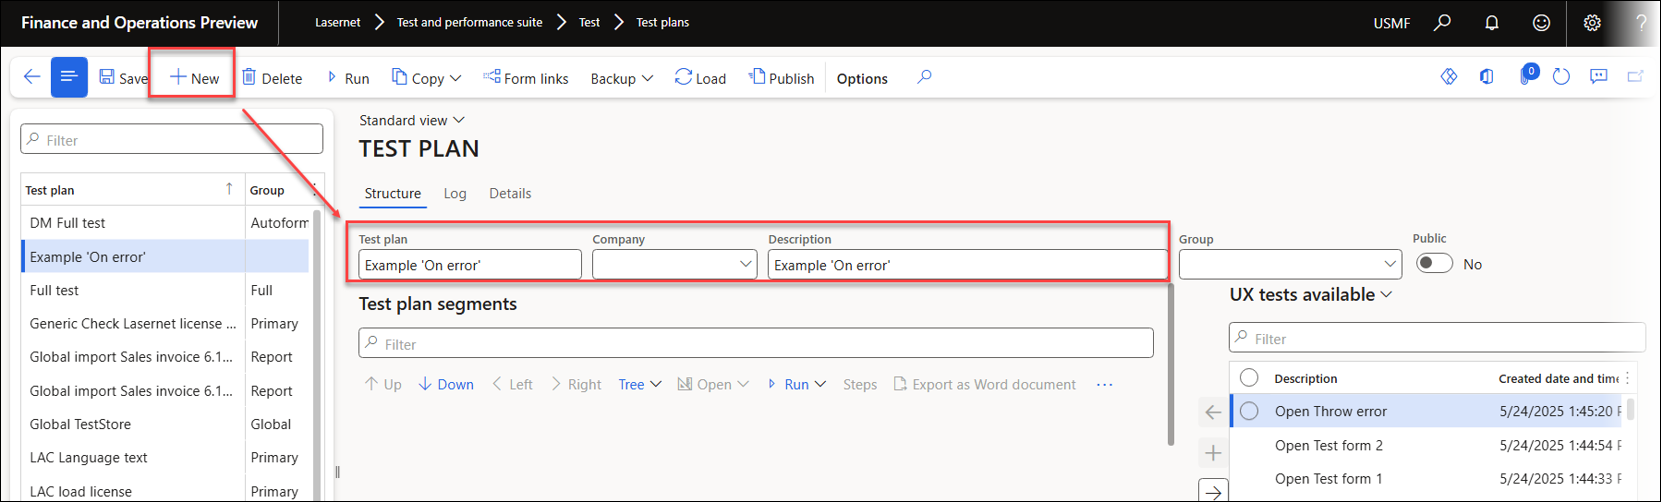
Click the Save button and add the task recording for Throw error as the first entry.
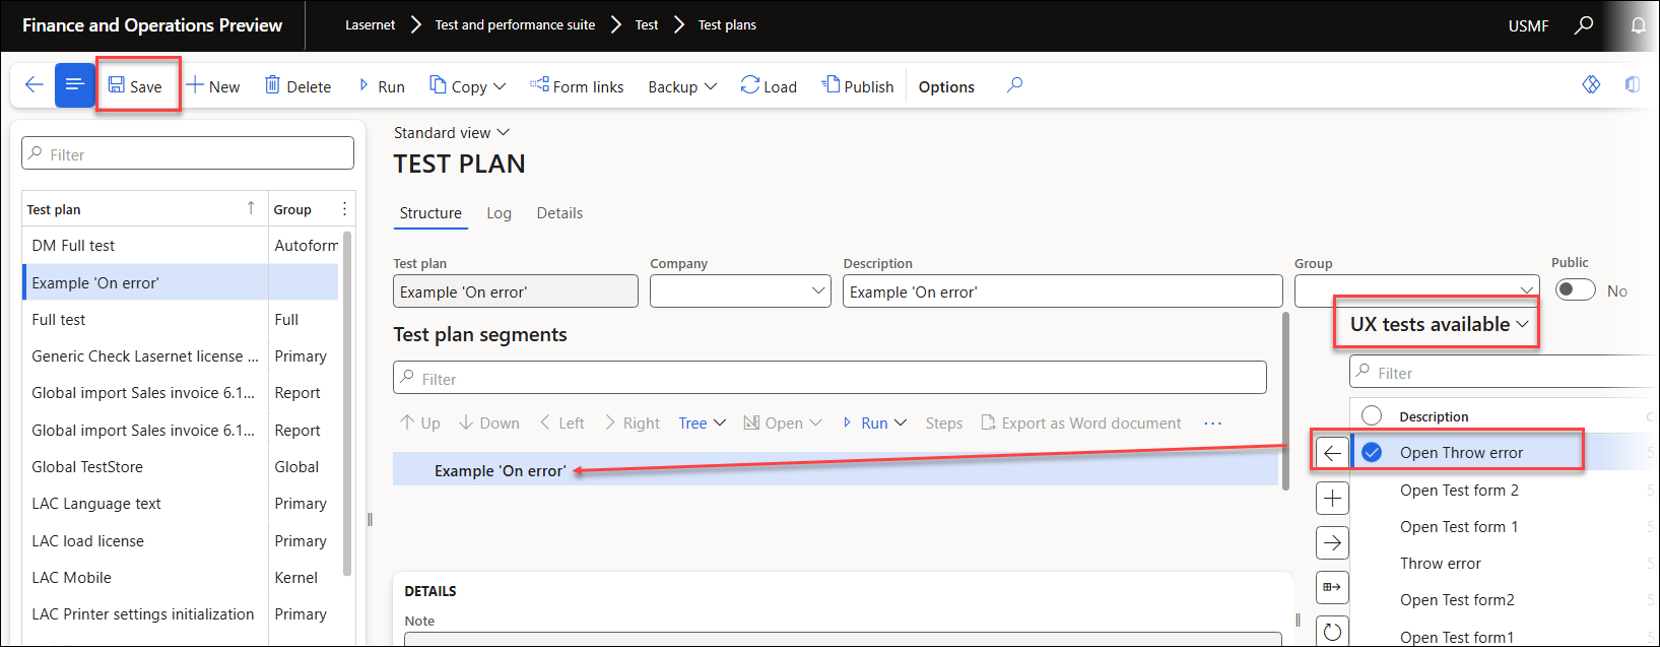
Select the recording for Throw error and add the recording that opens Test form 1.
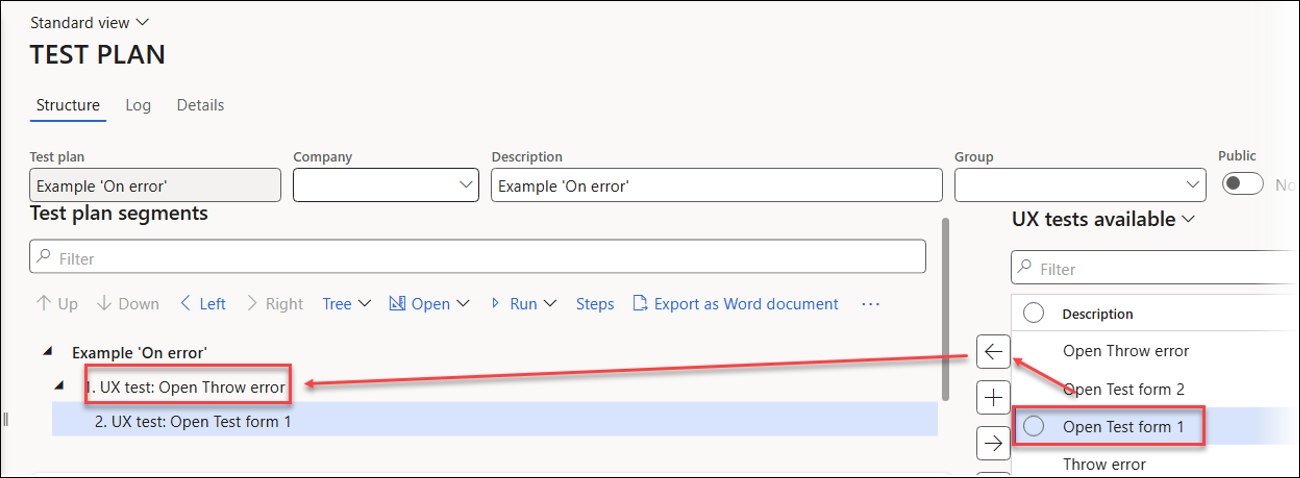
Include the task recording that opens Test form 2.
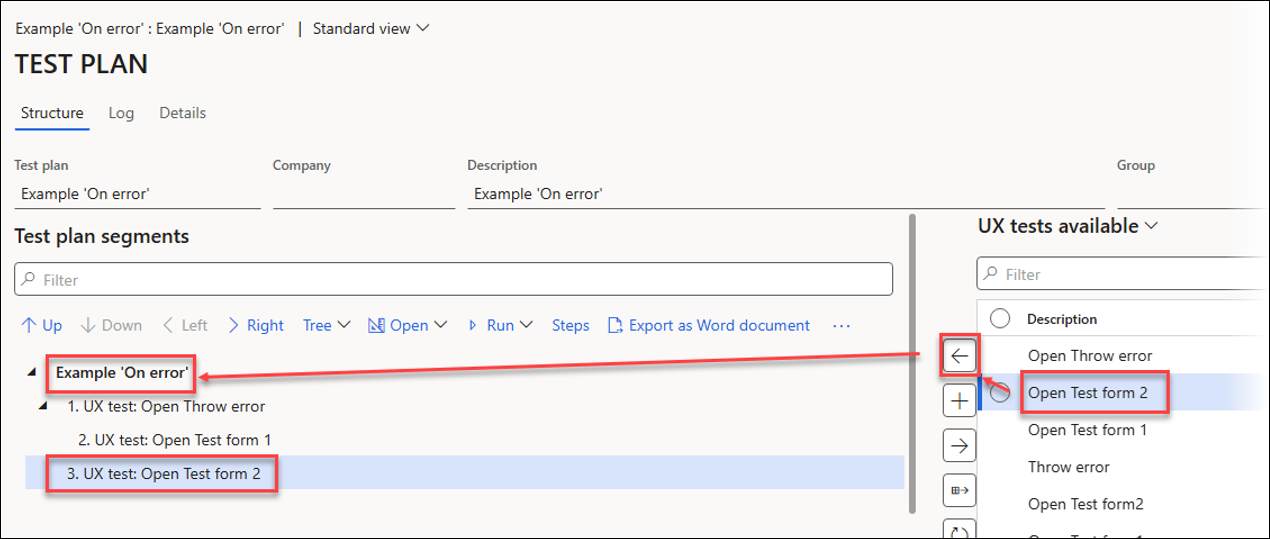
The Test plan should resemble the following screenshot:
Steps, Segments, and Branches
Steps, segments, and branches are key components of Test plans.
Steps recorded by the Task recorder are saved as a UX Test (task recording) in their original sequence.
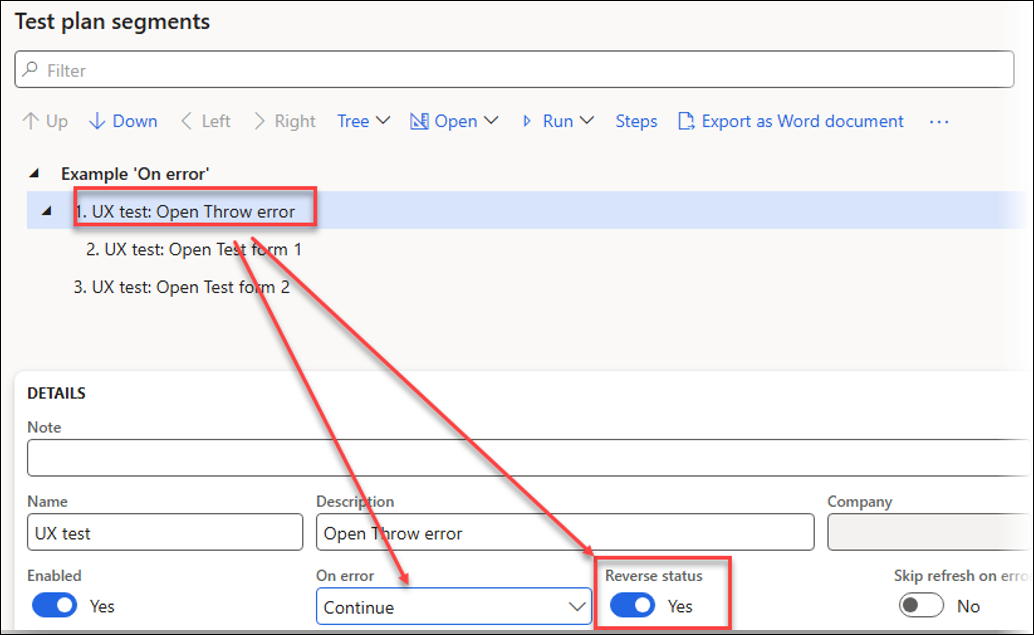
Each segment contains a UX Test with steps used for playback. Segments are numbered.
Branches consist of segments, as shown below: segments 1, 2, and 3 are part of one branch, while segments 3, 4, and 5 belong to a separate branch.
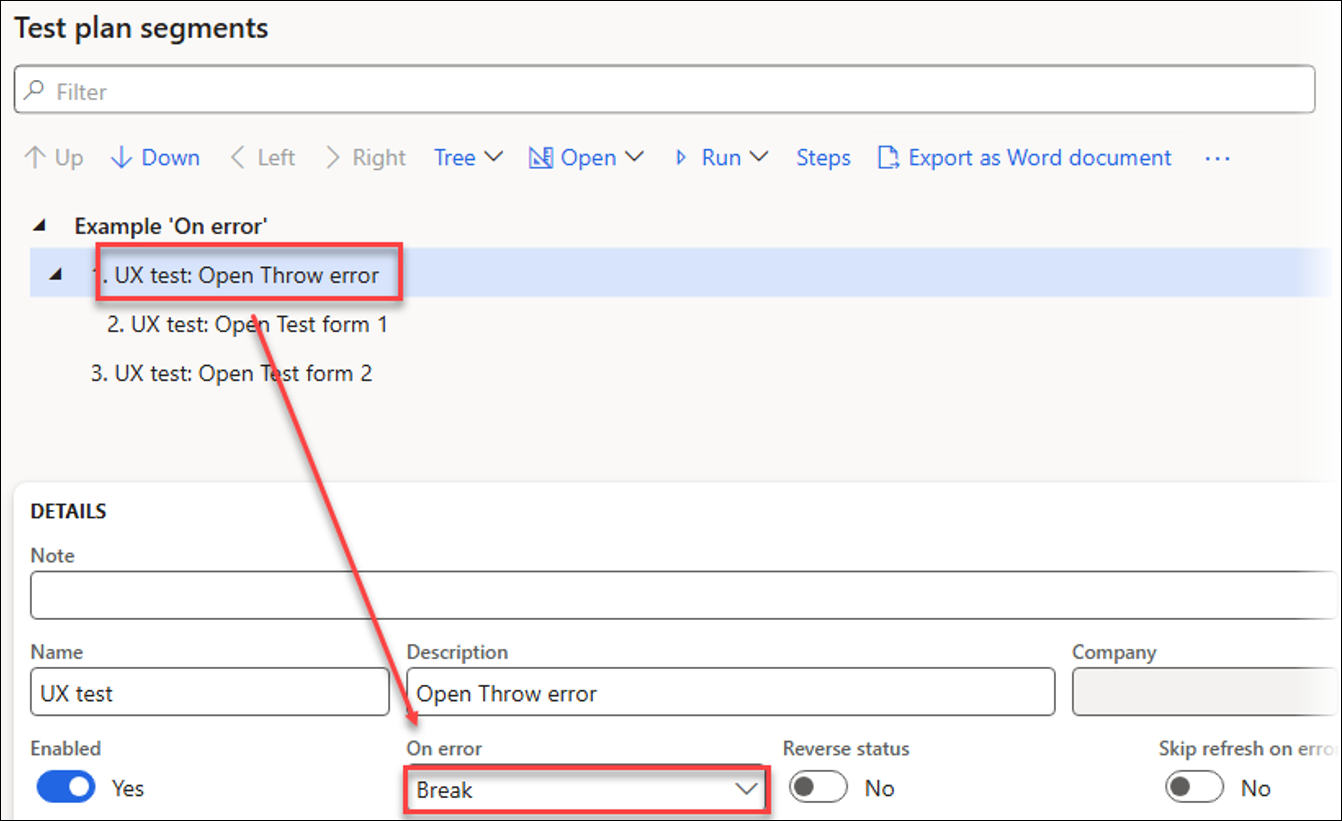
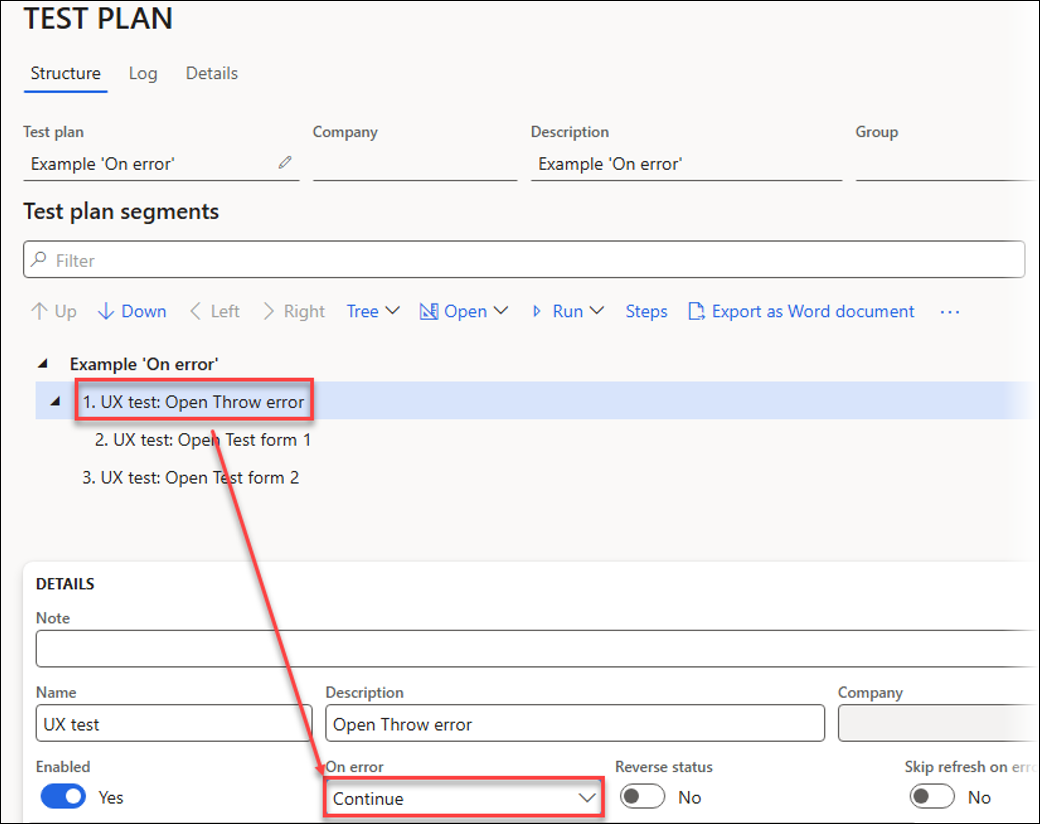
The On error option specifies how the system will proceed when a segment encounters an error.
Continue: This option runs the next steps within the same branch and then the steps in the following branches.
Break: This option stops the current branch and all subsequent branches from running.
Pass & proceed next: This option bypasses the subsequent steps within the current branch and continues running the following branches.
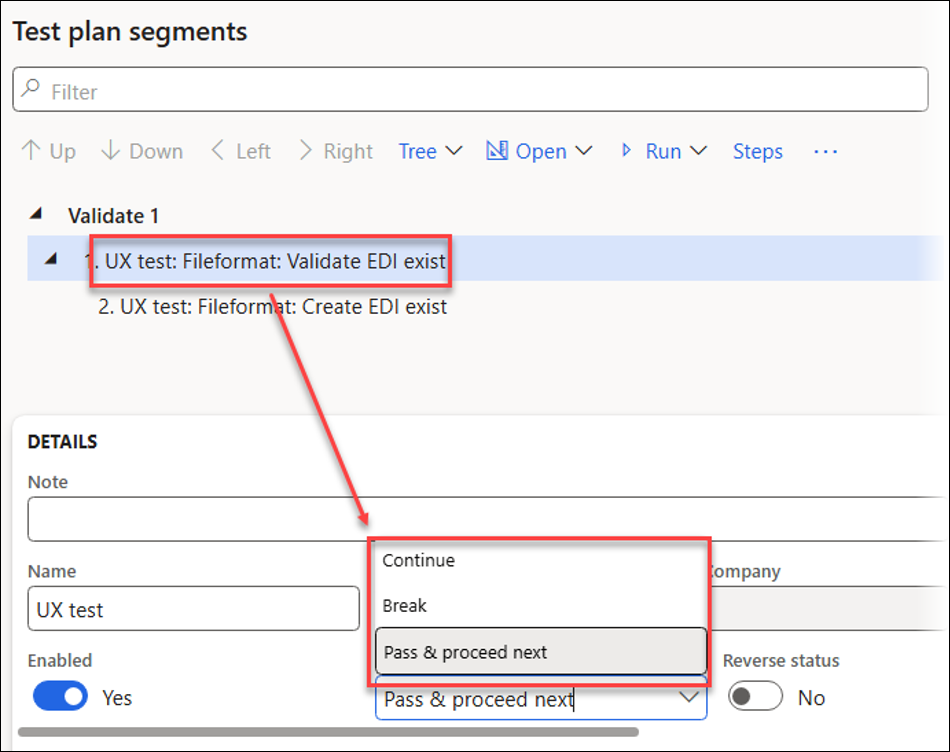
The Reverse status option is useful when failures are not regarded as errors, such as when verifying existing information and choosing intentionally to bypass subsequent steps if a failure occurs.

Open Throw error and Open Test form 1 belong to the same branch (formed by a segment and its sub-segment), whereas Open Test form 2 lies within a separate and distinct branch.
Branches are essential when using the On error option.
Structure
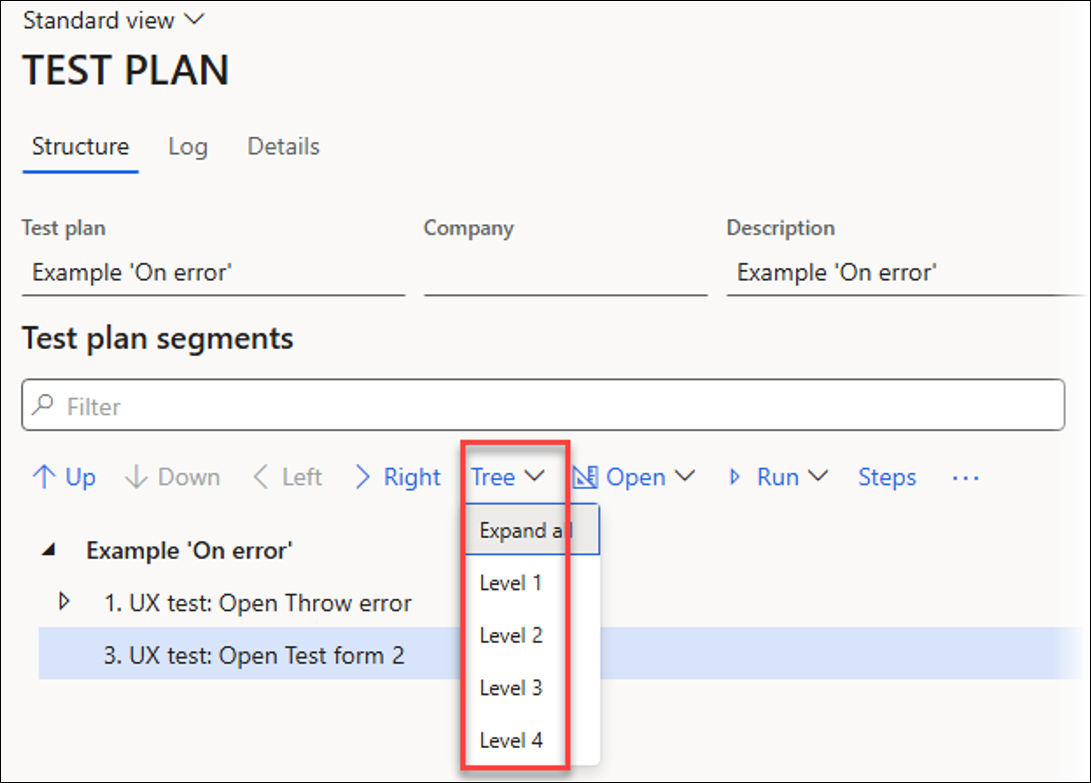
The Up and Down buttons change the order of the Test plan’s segments, while the < Left and > Right buttons move segments in or out of a branch.
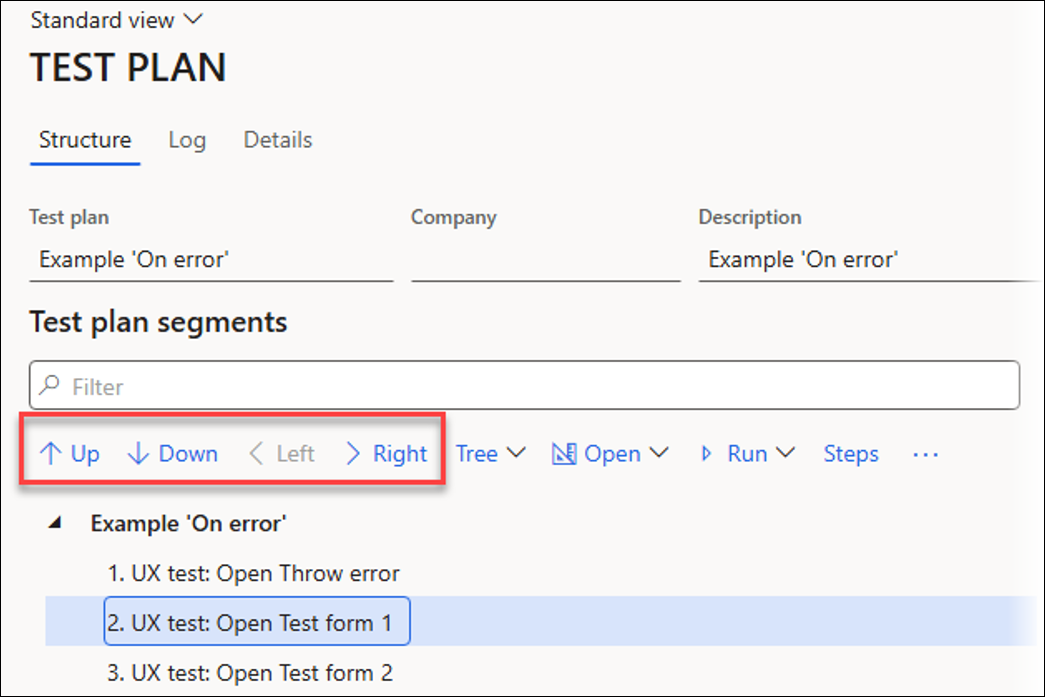
The Tree dropdown menu specifies how many segment levels should be expanded:
Run Test Plans
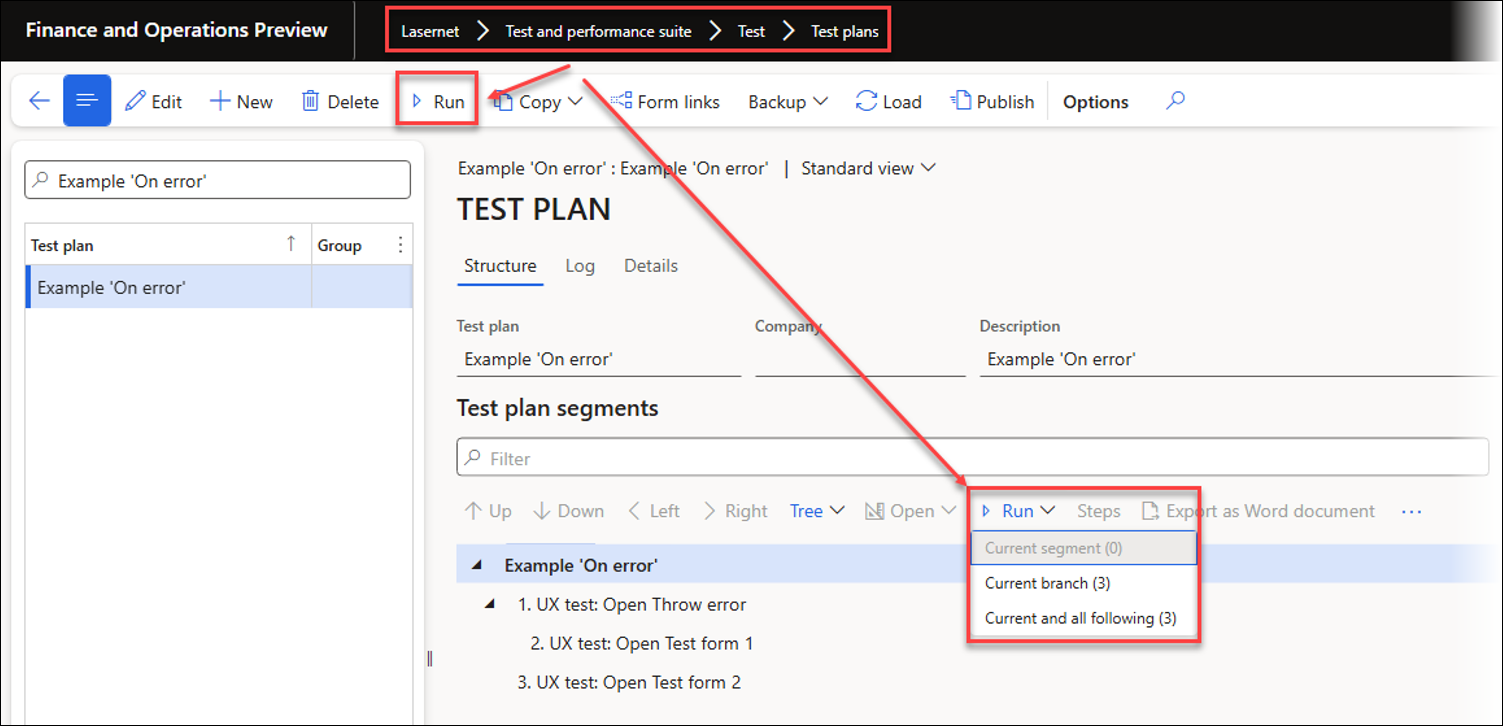
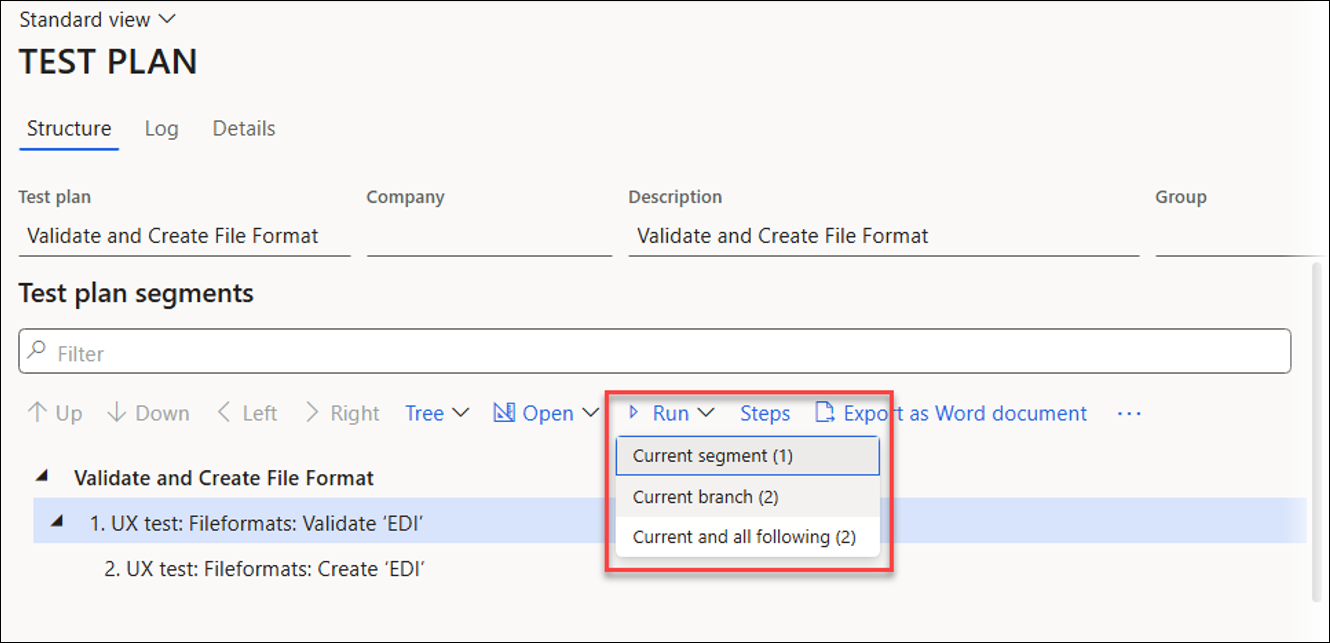
Several ways exist to run Test plans. Using the Run button located on the Action pane always runs the Test plan from the top segment, whereas using the Run button located within the Test plan segments section runs the current context. For instance, Current segment, Current branch, or Current and all following:
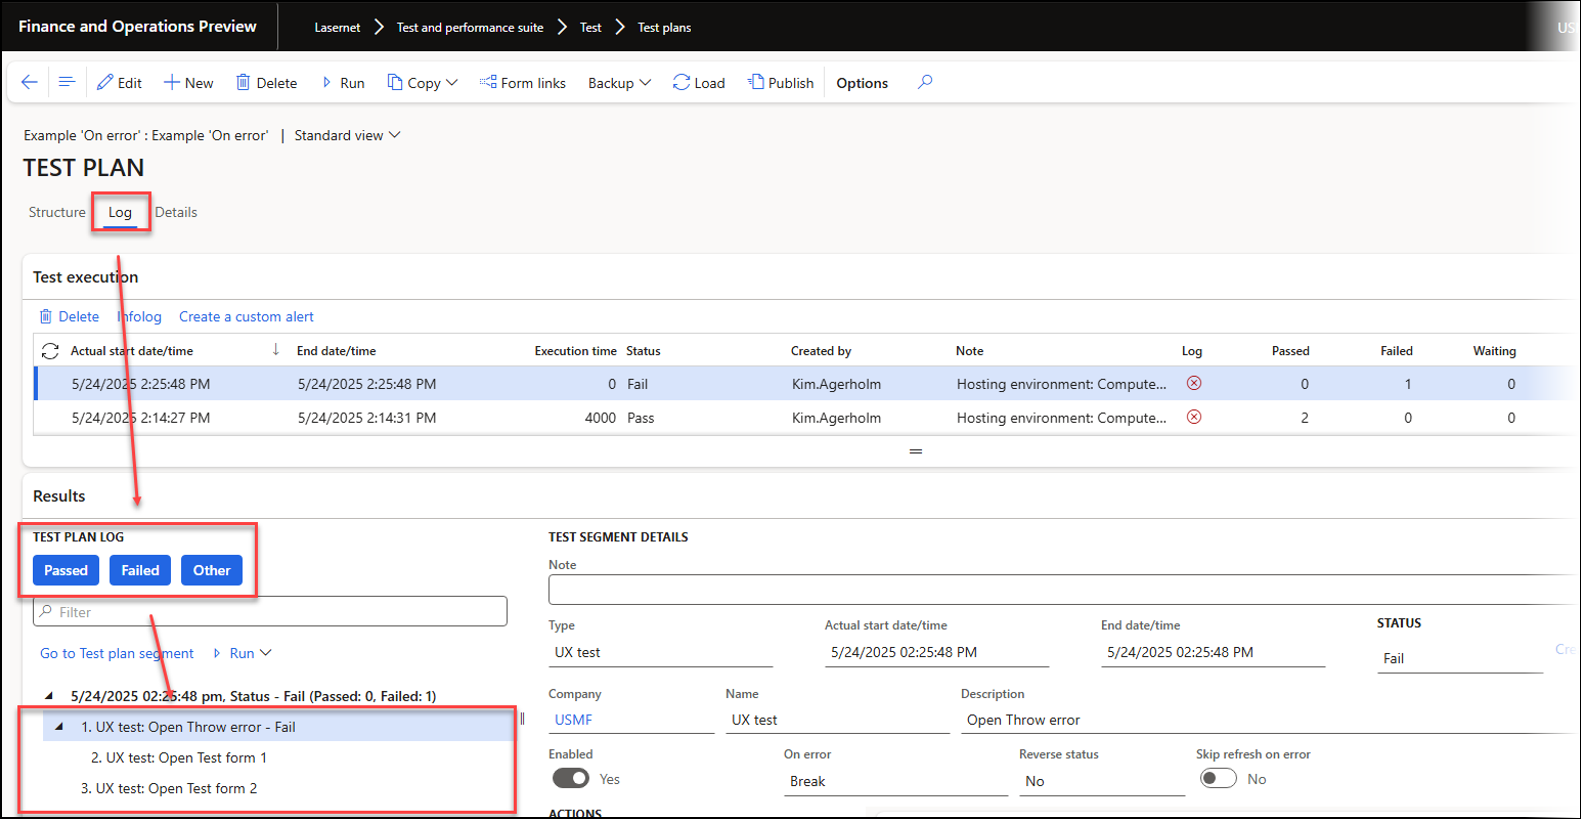
Execution Log
The Log button provides detailed information that describes whether each segment passed or failed.
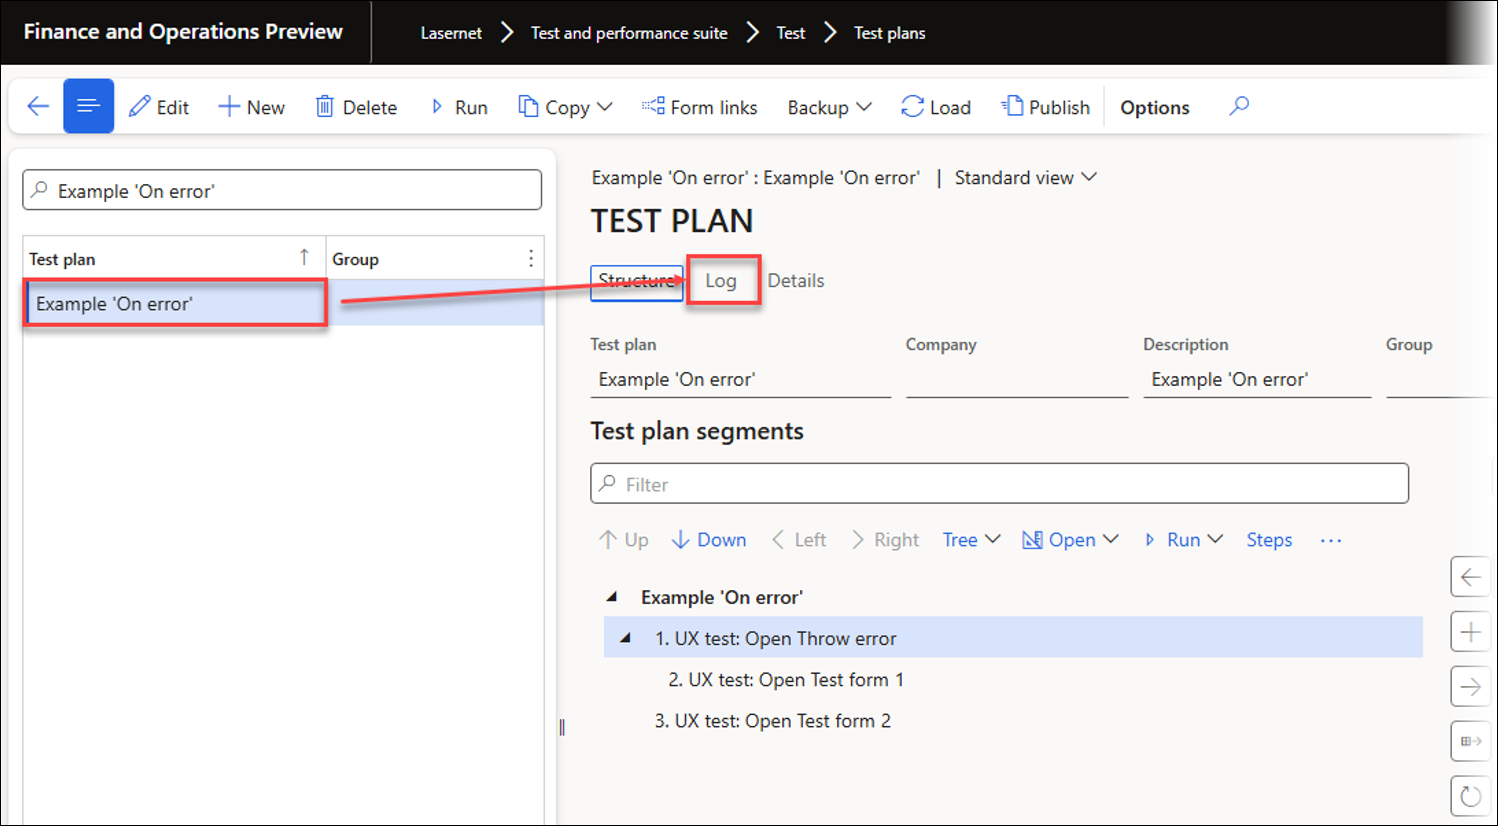
You can also open a log after running the Test plan.
This log includes the status for each step that was run and provides filtering options based on each step's status.
On Error (Test Plans)
This section explains the options available to the user if a segment fails while running the Test plan.
Break
Using Break stops the remaining steps in the current branch and any of the following branches from running.
When using Break, the log reports that the Test plan’s run has stopped after segment 1, which is causing an error. None of the additional segments has been run.
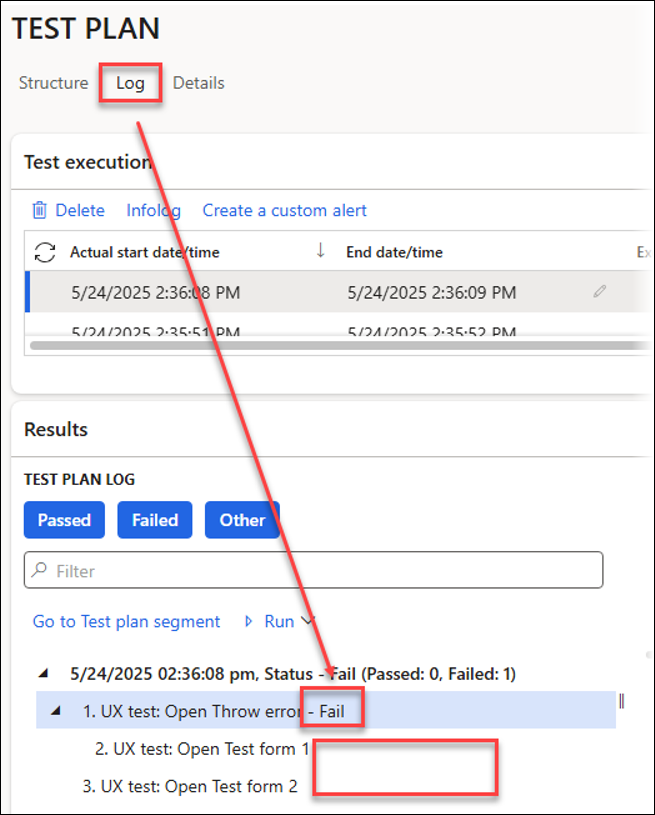
In this case, Open Throw error is marked with the status Fail, as an error has occurred while running this step.
Something similar will happen if any differences are spotted when using a Test checkpoint or Test flow for the XML and PDF comparison.
The second segment included in the same branch has a blank status, as it has not been run.
The third segment also has a blank status, as it has not been run.
Segments that have not been run are filtered by using the Other button.
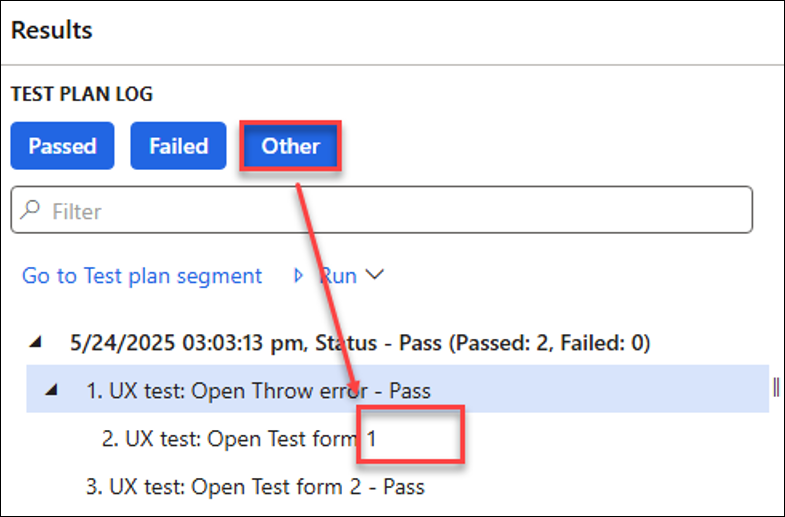
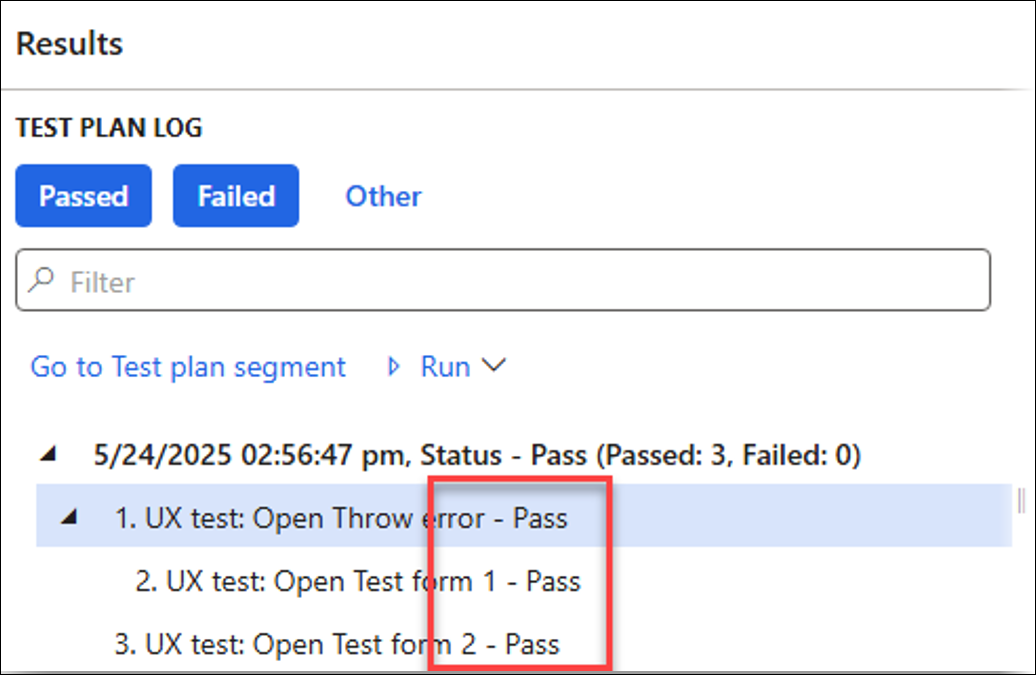
Continue
Using Continue runs the steps within the same branch as the failed segment, and then the following branches, including all their segments.
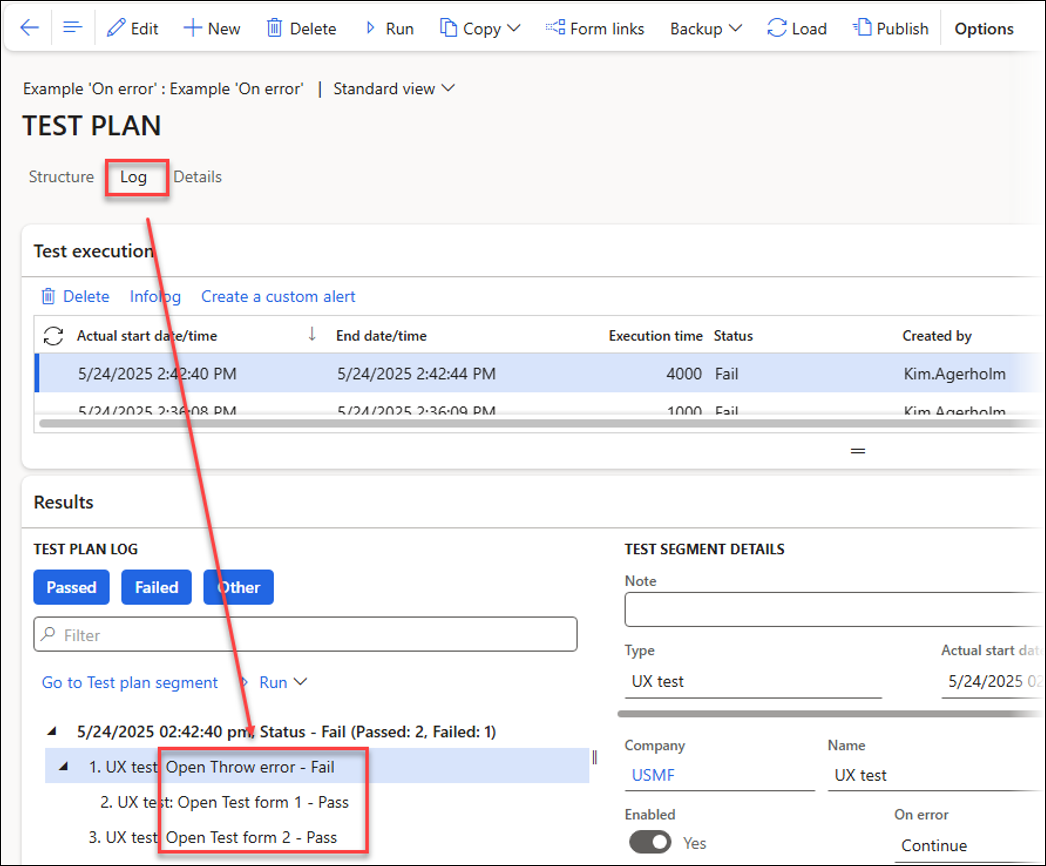
The first step fails due to an error.
The second step succeeds, as it can open Test form 1.
The third step succeeds, as it can open Test form 2.
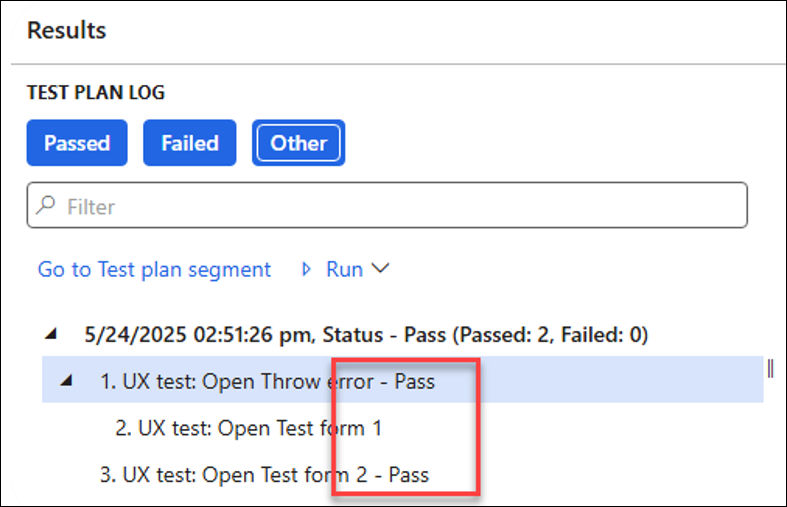
Pass & proceed next
Using Pass & proceed next bypasses the subsequent steps within the current branch as the failed segment, and continues running the following branches.
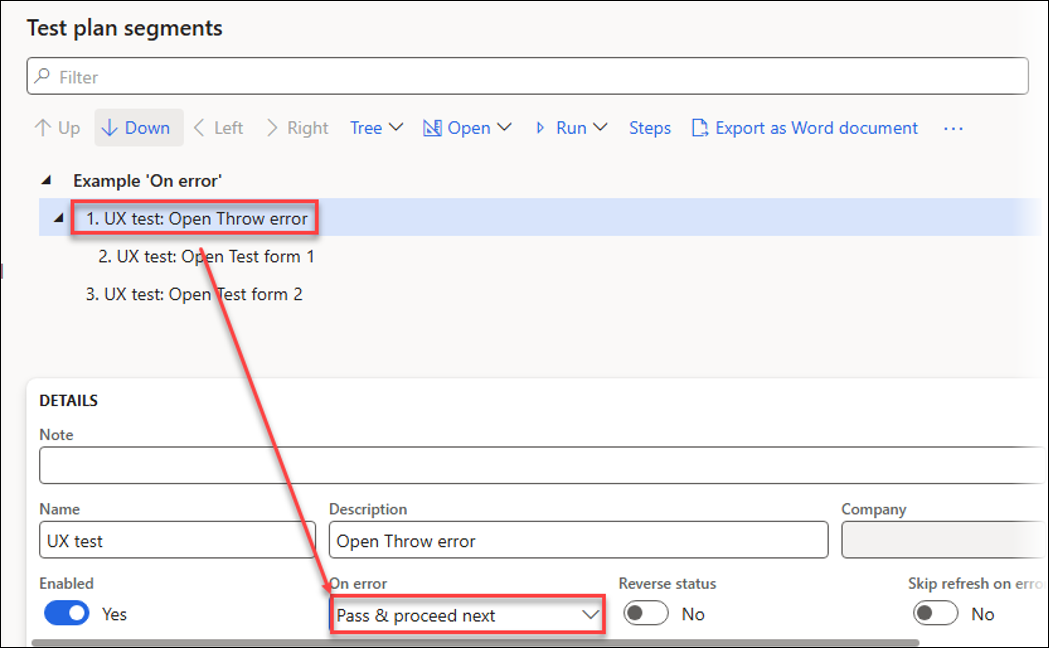
Step 1 passes, step 2 is skipped because Pass & proceed was used for segment 1, and step 3 passes.
You can use Reverse status from Fail to Pass or from Pass to Fail. For instance, in the example below, an error occurs, and the status is reversed from Fail to Pass.
This is a useful option when a negative result (Fail) is expected and when validating if an entry already exists before creating it. For instance, it is necessary to ensure its existence when creating a new connection entry for Lasernet.
When using Reverse status, the log reports that step 1 has passed even though an error occurred because Reverse status was used. Steps 2 and 3 pass as well because they can open their respective forms.
Backup (Export/Import)
You can export and import the UX Tests and Test plans between environments by using the Backup function.
The export contains everything required for running the UX Test (single task recording) or the Test plan within the environment into which it is imported.
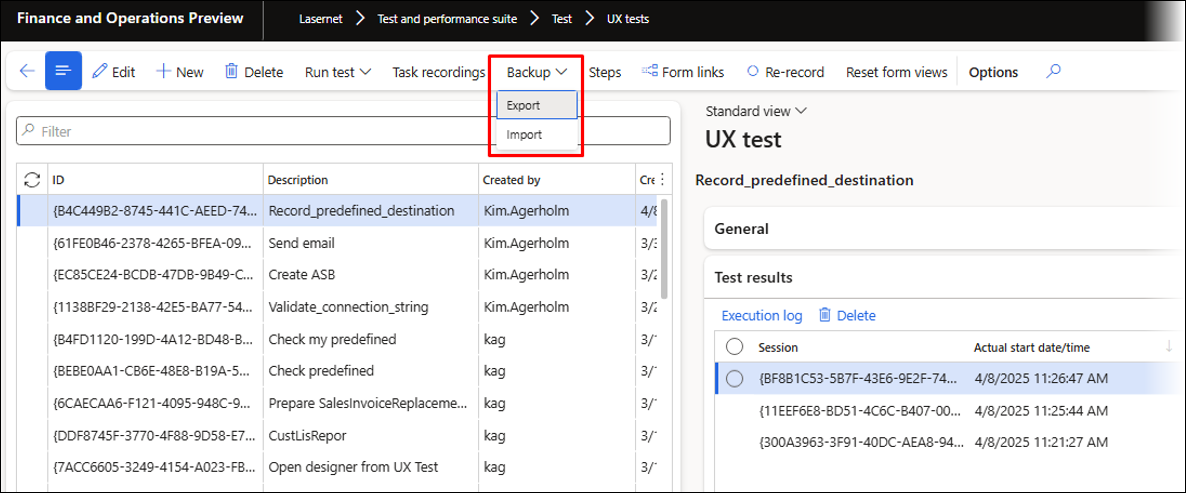
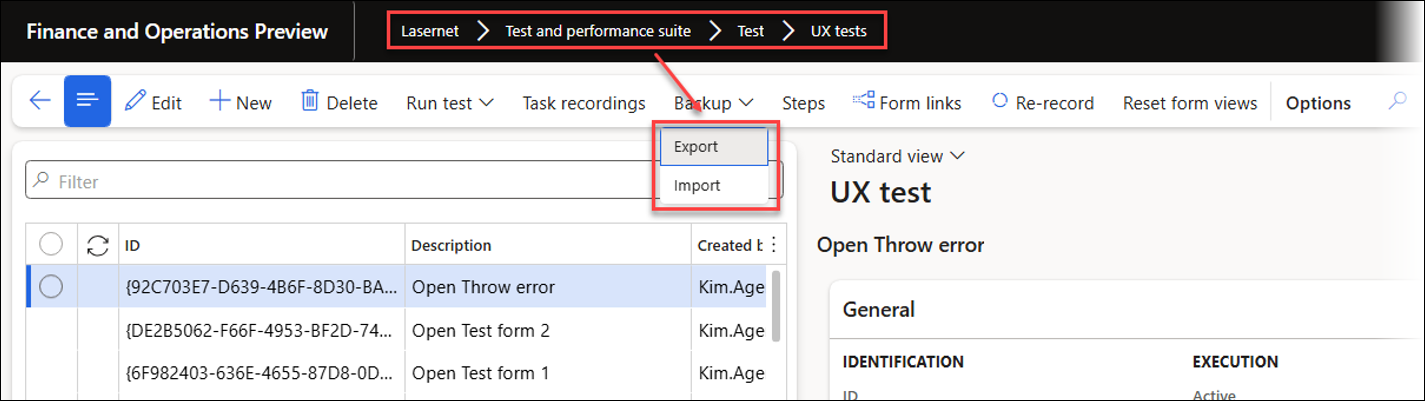
To export a UX Test, including multi-selection of single recordings, navigate to Lasernet > Test and performance suite > Test > UX tests.
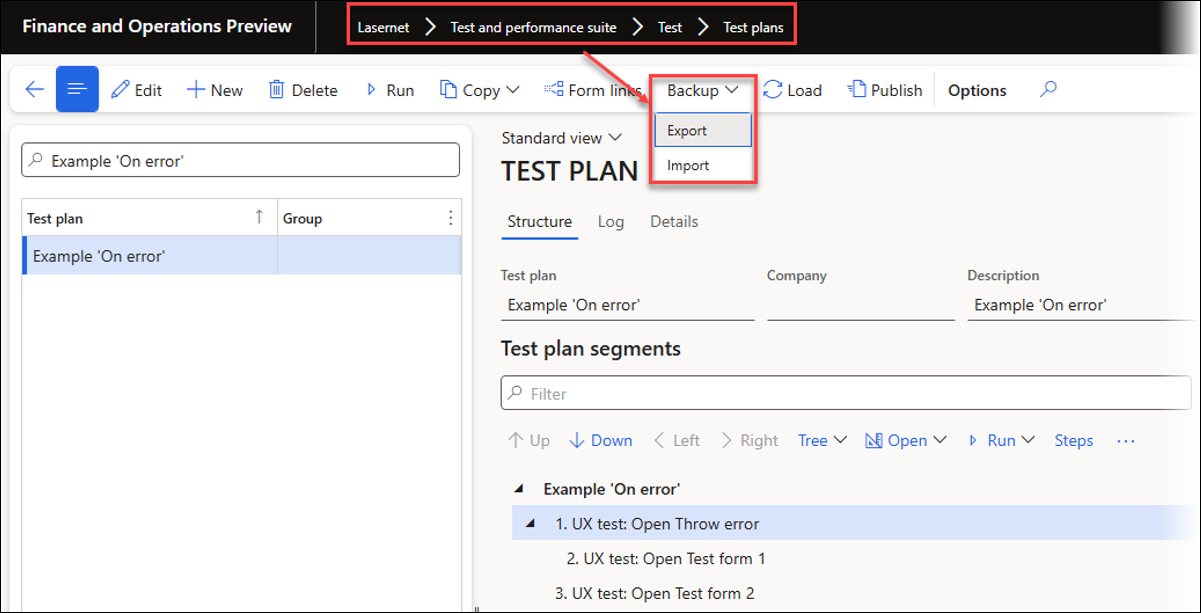
To export a Test plan, navigate to Lasernet > Test and performance suite > Test > Test plans and, on the Action pane, click Backup > Export.
The export is then saved to your machine.
Part III — Validating Information Within XML Files Using Task Recorder and UX Tests
This section describes how to use the Task recorder and UX Tests to validate information within XML files created using Lasernet FO Connector.
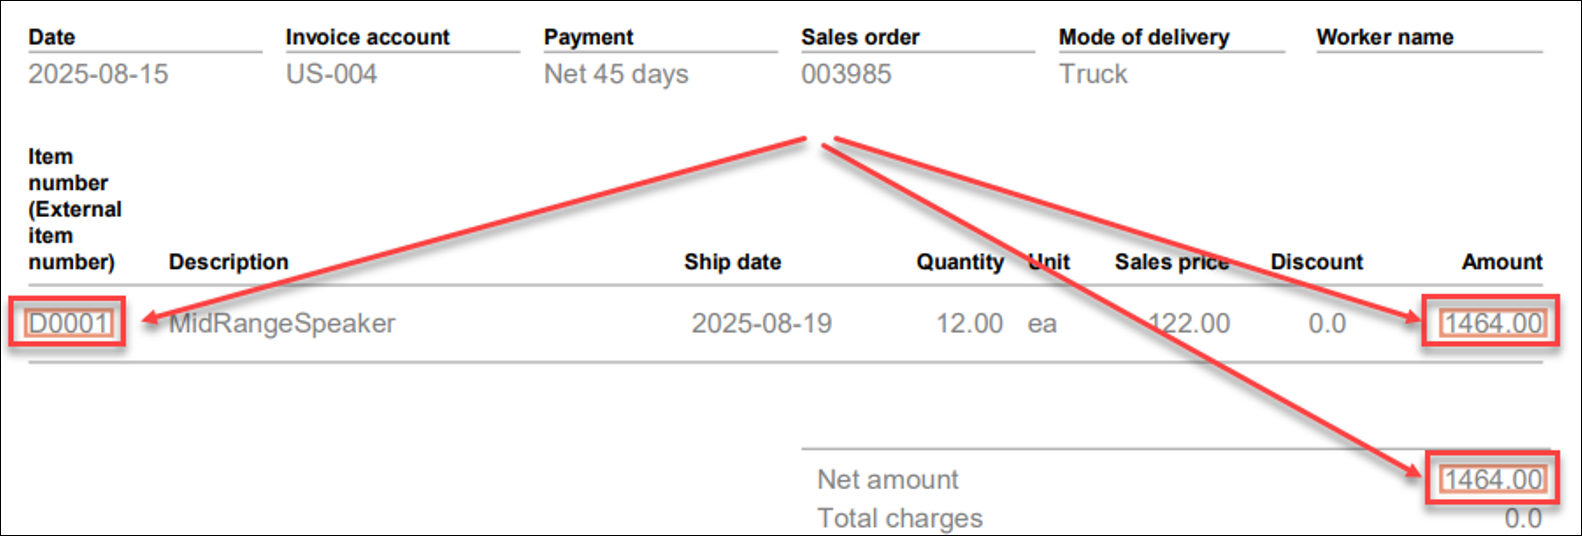
In the following example, we will validate whether the destination found via predefined destinations is correct by using the generated XML file.
This can be done using the Task recorder, UX Tests, and Test plans, as well as Test checkpoints and Test flows.
Test checkpoints and Test flows use the report as the starting point, whereas UX Tests and Test plans simulate the business process before and after running the report, which ensures the process is correct from start to end.
UX Tests provide the option to validate any value for an element within the XML file (such as the tag for the email address or printer name) and any destinations (such as printers or a manually entered email address). It is also possible to validate any of the other values provided within the XML file, which helps ensure consistency in all processes, including data creation.
In this example, we will use the replacement report PurchPurchaseOrderReplacement. The email address is found based on rules defined within the predefined destinations.
You can include within the recording the creation of the predefined destination and the email address located in the Contact information FastTab. However, this is usually created in advance and will not be part of this example. You can also create a task that will later remove the created email address.
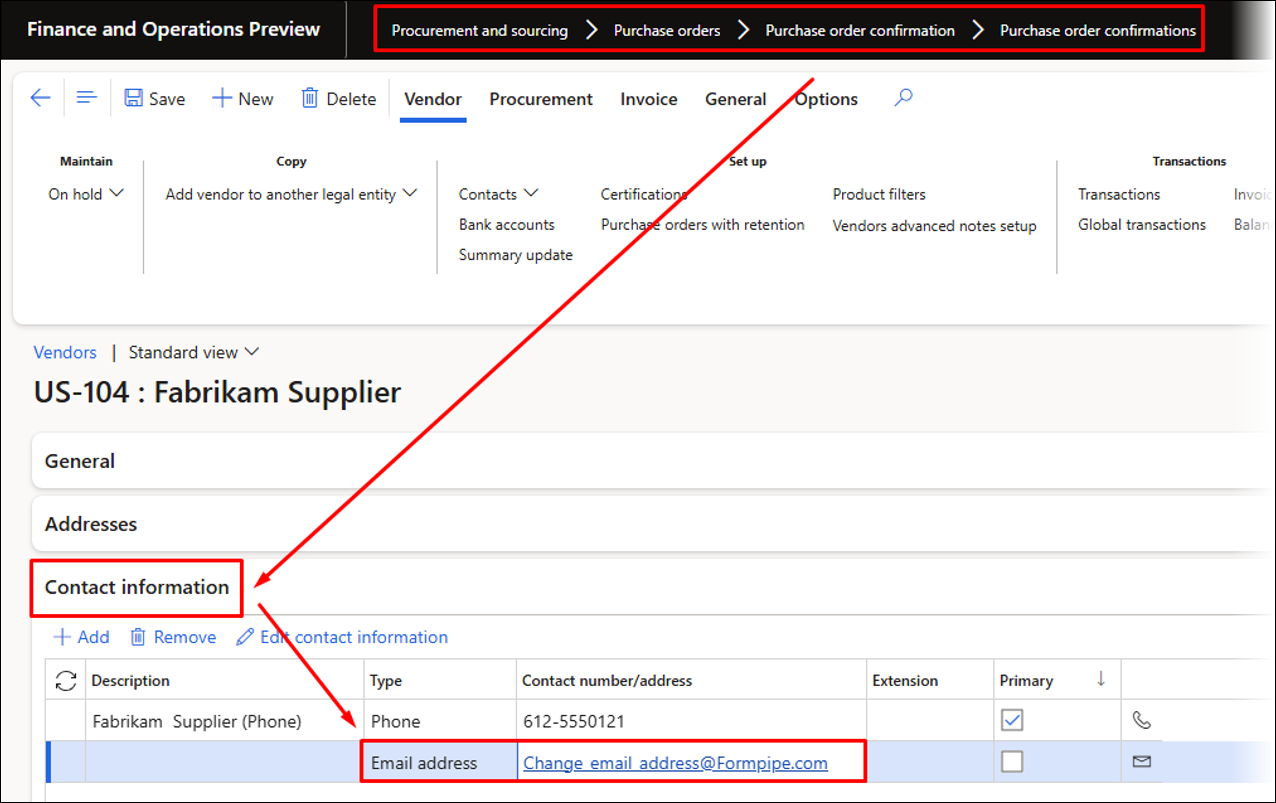
An Email address with the Purpose set to Business has been added to the Vendor account US-104.
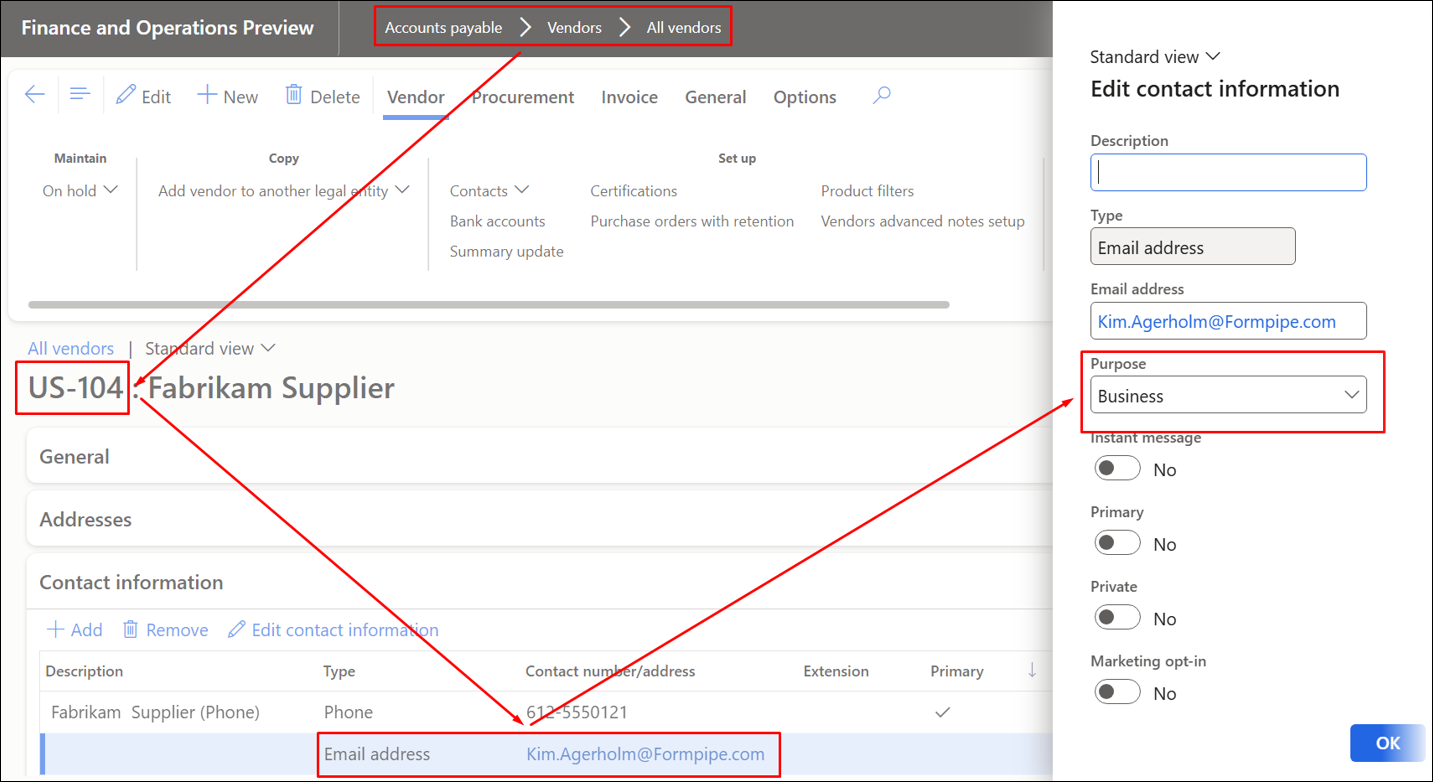
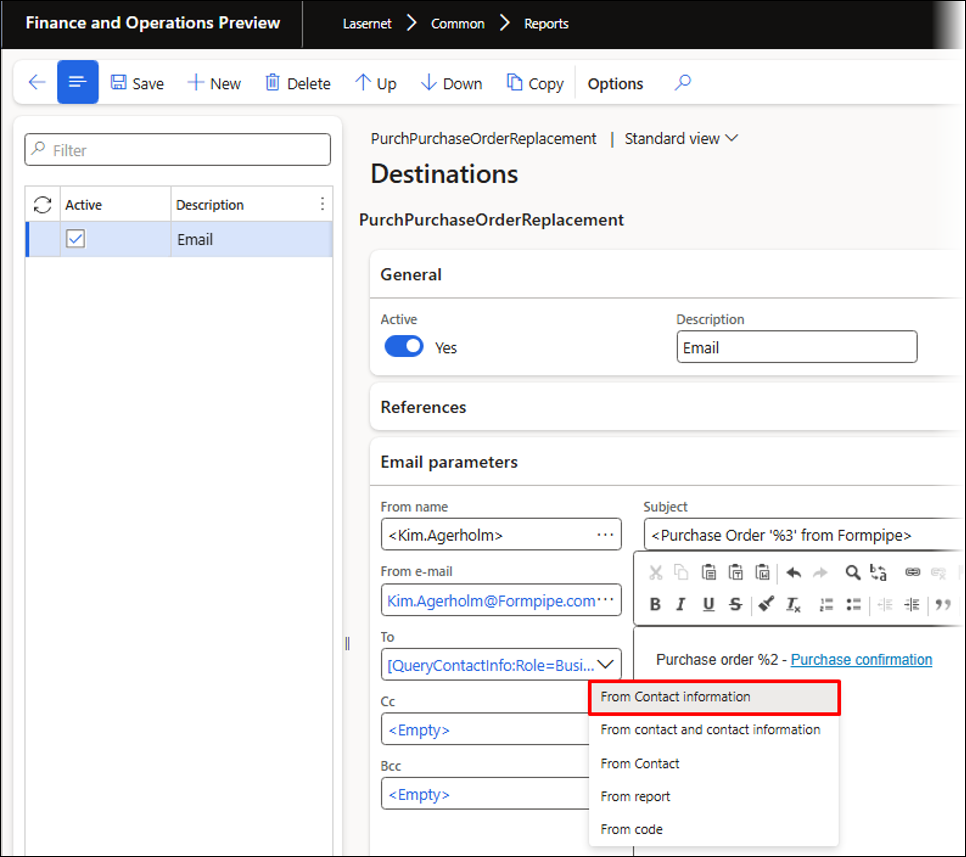
The rule for finding the correct email address is configured via the predefined destinations.
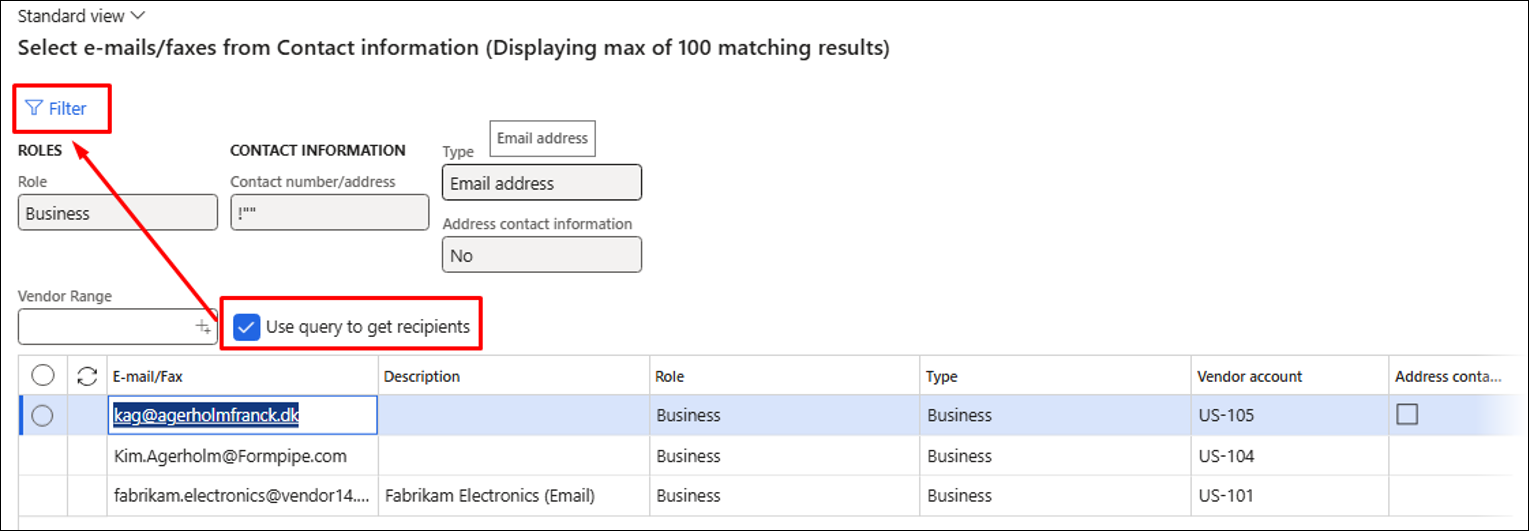
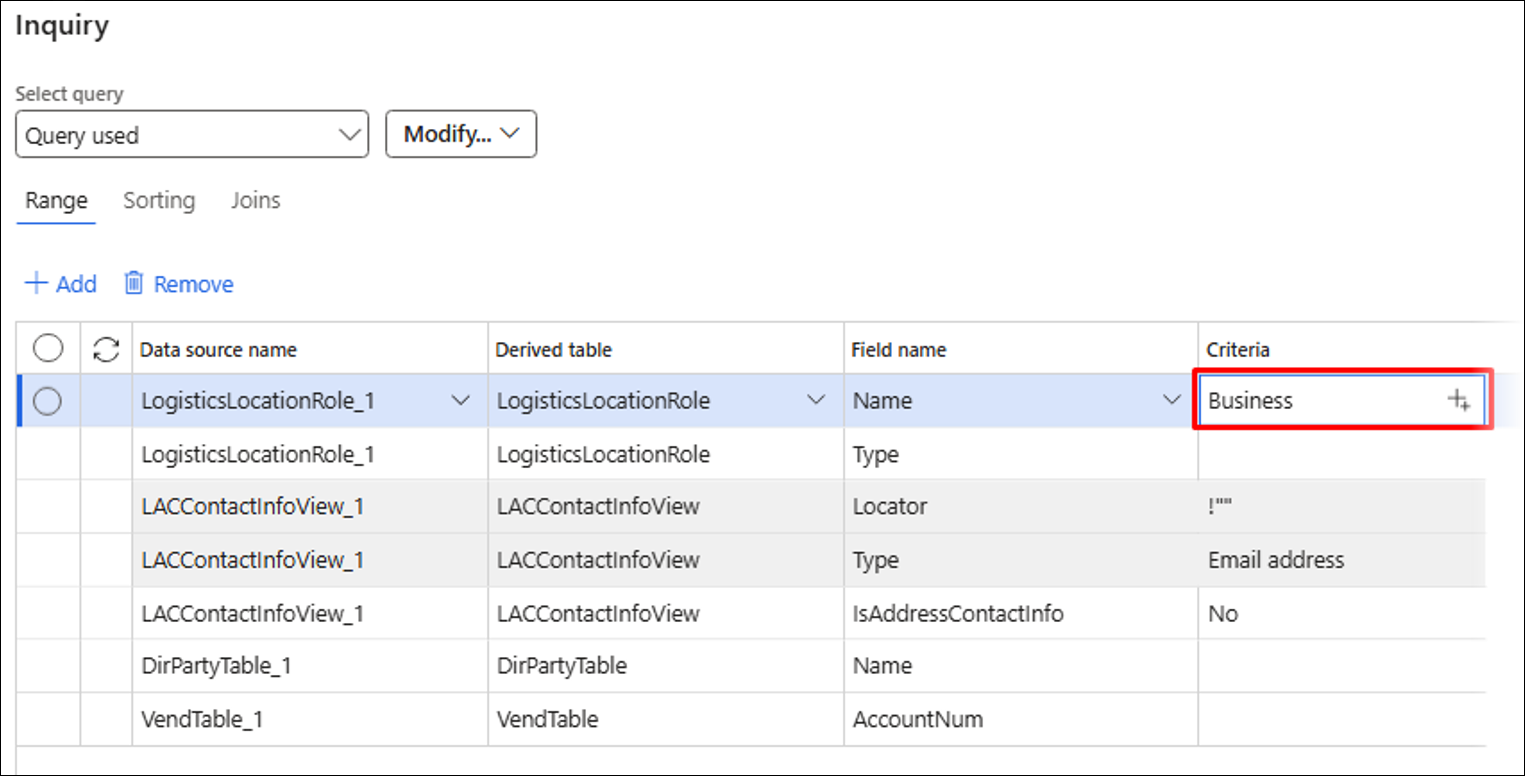
This rule will use the Purpose (which is Business) found in the Contact information FastTab to locate the email address used for the To email parameter: [QueryContactInfo:Role=Business, Address contact information=No, Contact number/address=!"", Type=Email address].
The value for the Purpose is defined by selecting the Use query to get recipients checkbox, and then using Filter.
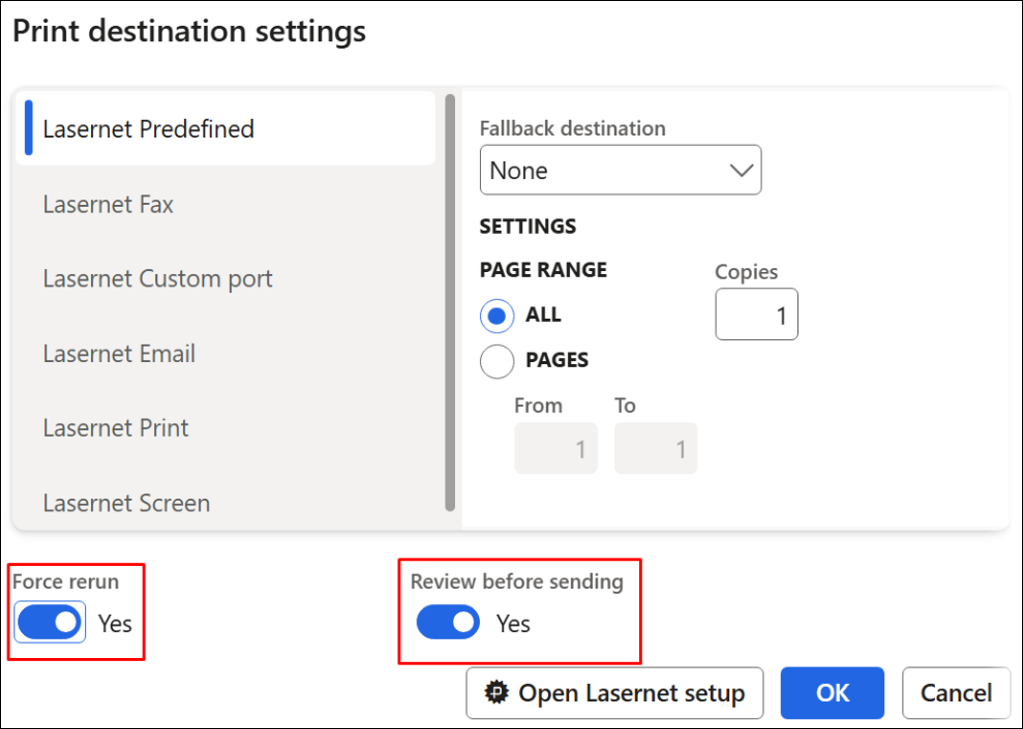
Ensure that either Review before sending or Allow choose review before sending are enabled, as the recording used to validate that the correct email address is used requires a review of the XML file. It is also possible to add the report settings to the recording and, therefore, to the playback.
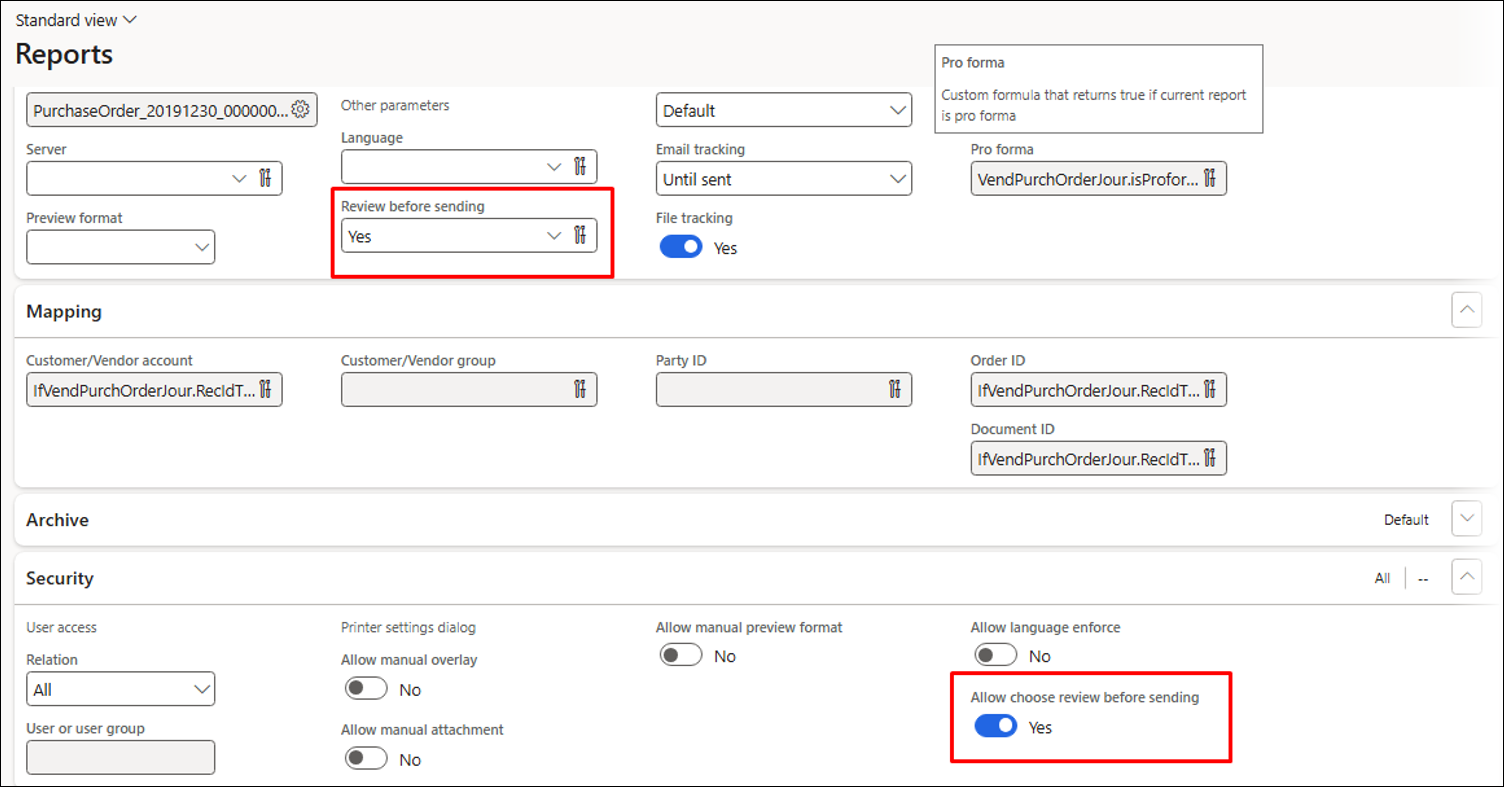
The following methods have been added to the report. They can be used if the report only needs to be reviewed before being sent, when running Test flows, and to provide instructions on what should happen if a report is run from a Test checkpoint.
Follow these steps to record your task:
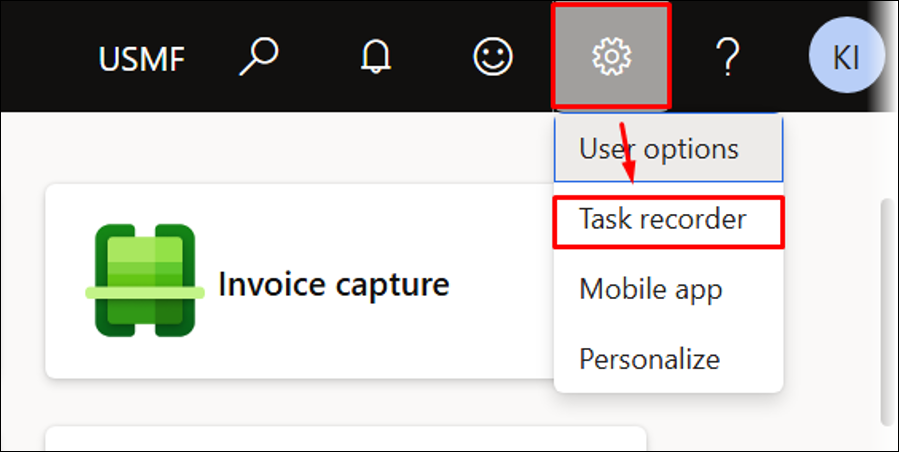
Open Task recorder from the Settings icon in the upper-right corner of your FinOps environment.
Click Create recording.
Fill in the Recording name and Recording description fields, then click Start.
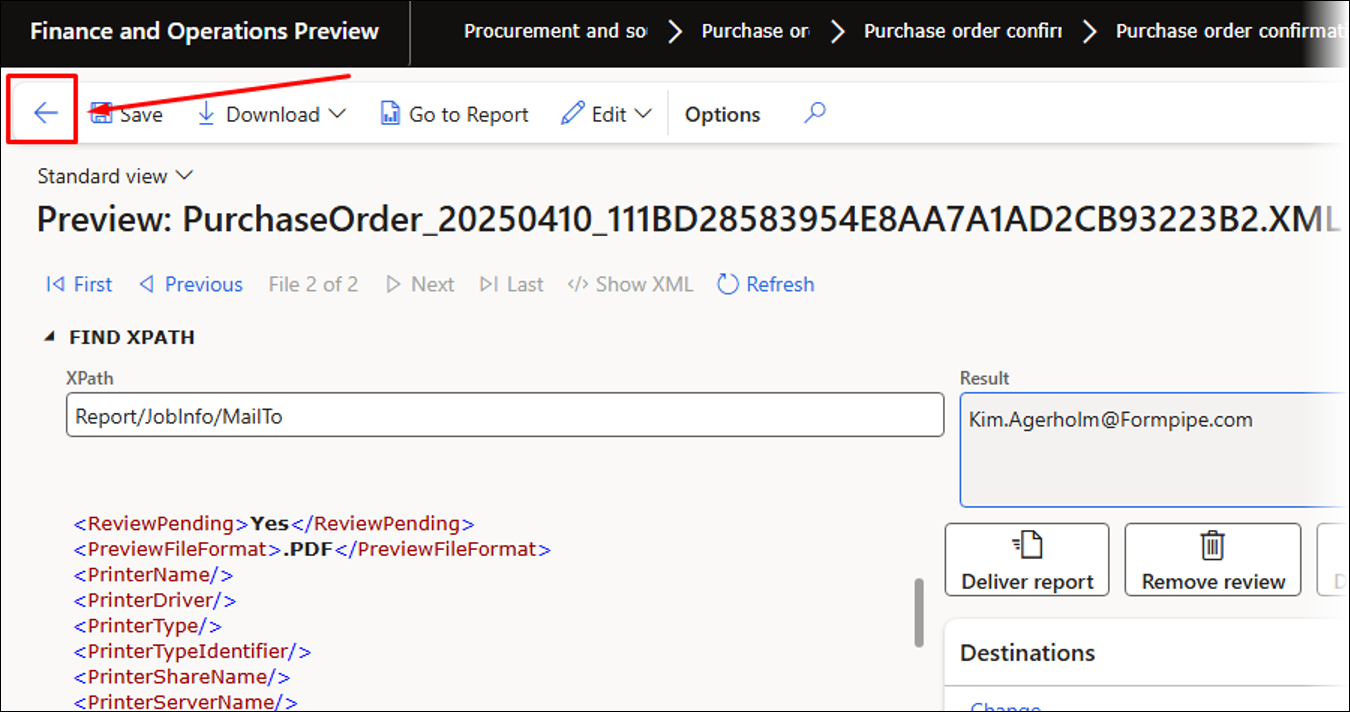
Find and resend an existing Purchase order confirmation for Vendor account US-104 that also includes an email address with the Purpose set to Business.
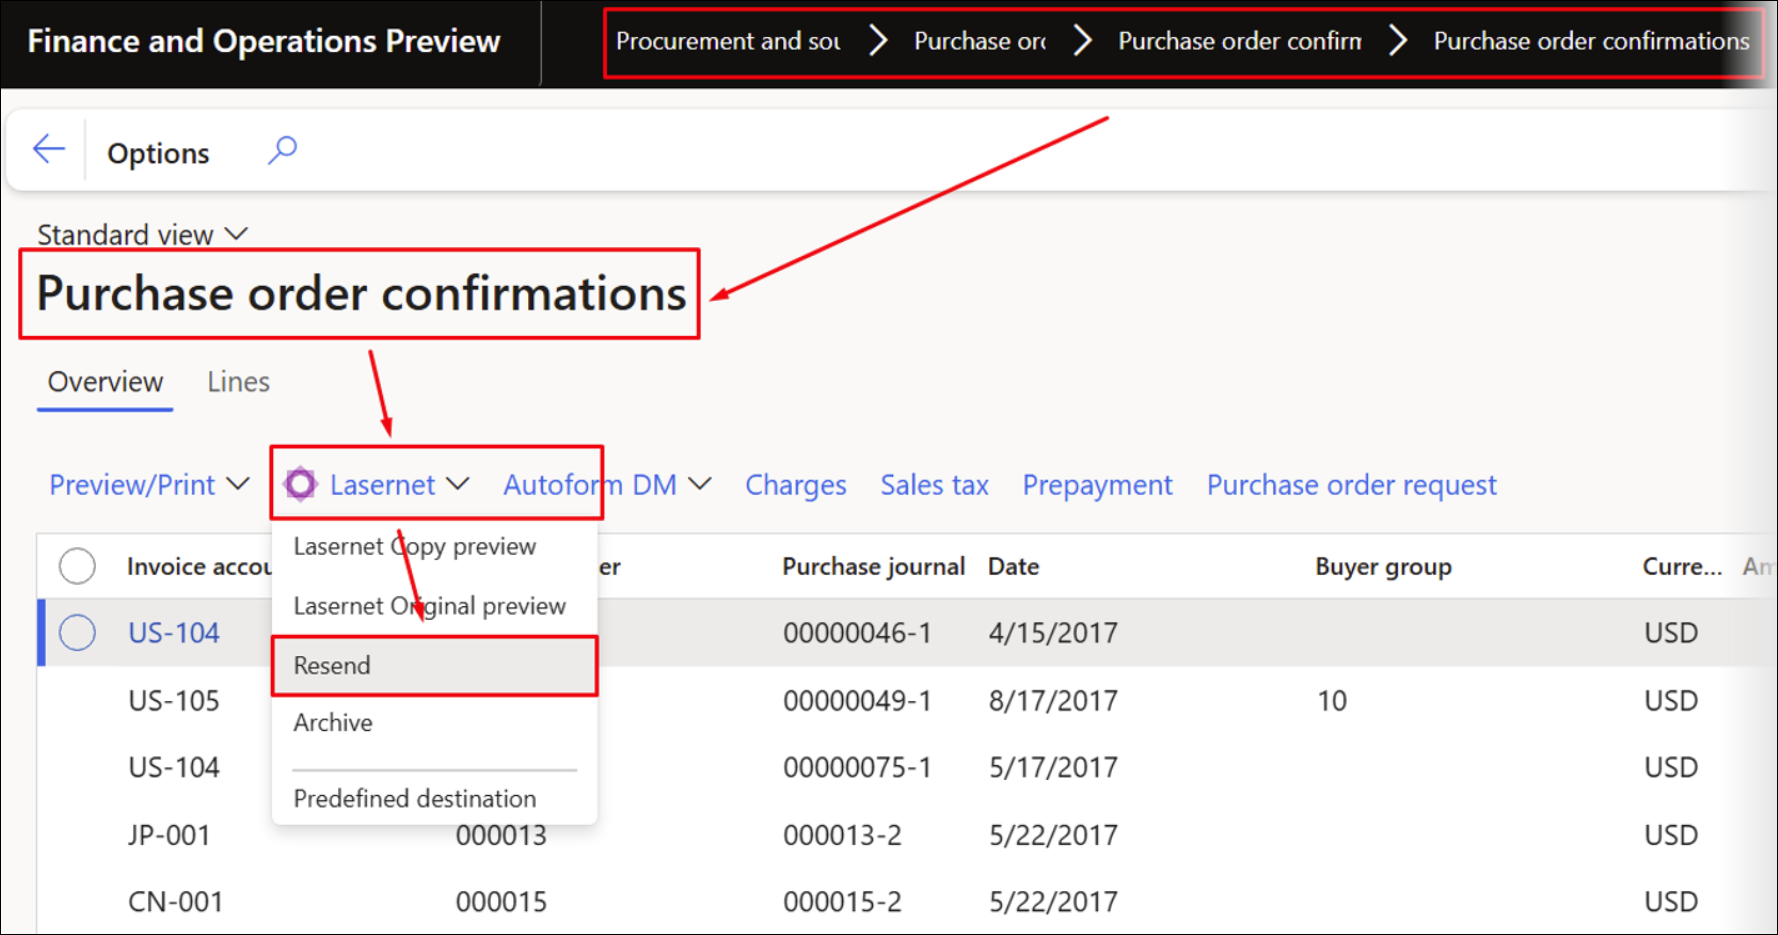
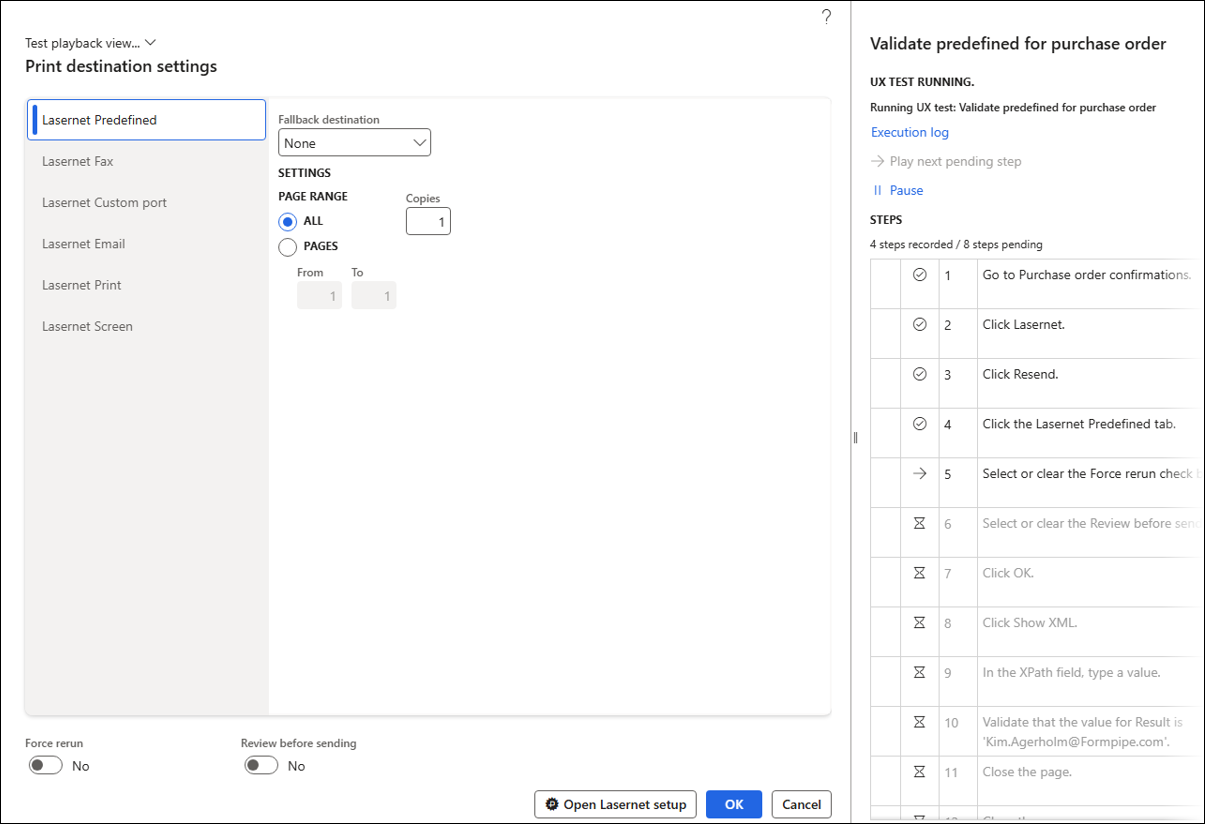
Resend the report with Force rerun and Review before sending enabled (these can be enabled at the report level or from the printer dialog).
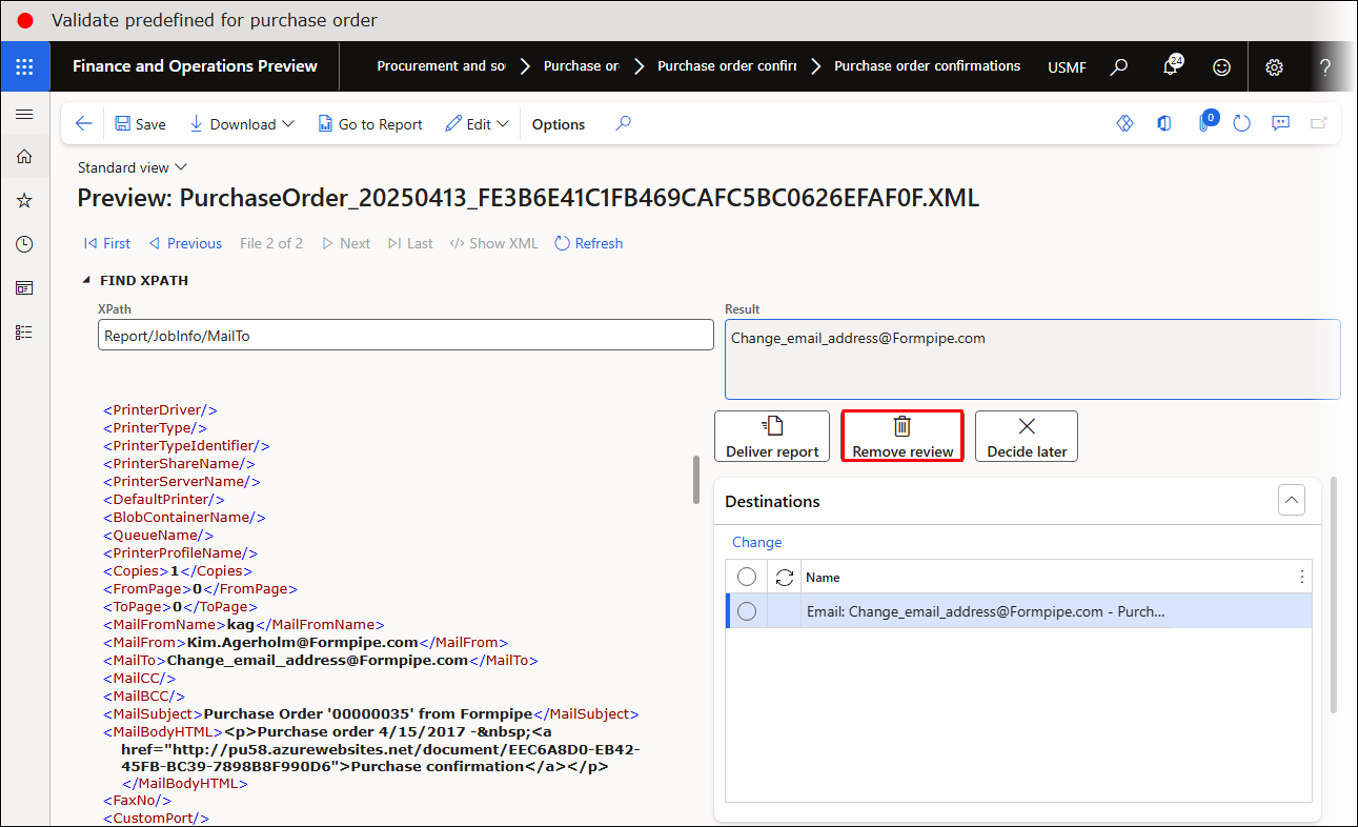
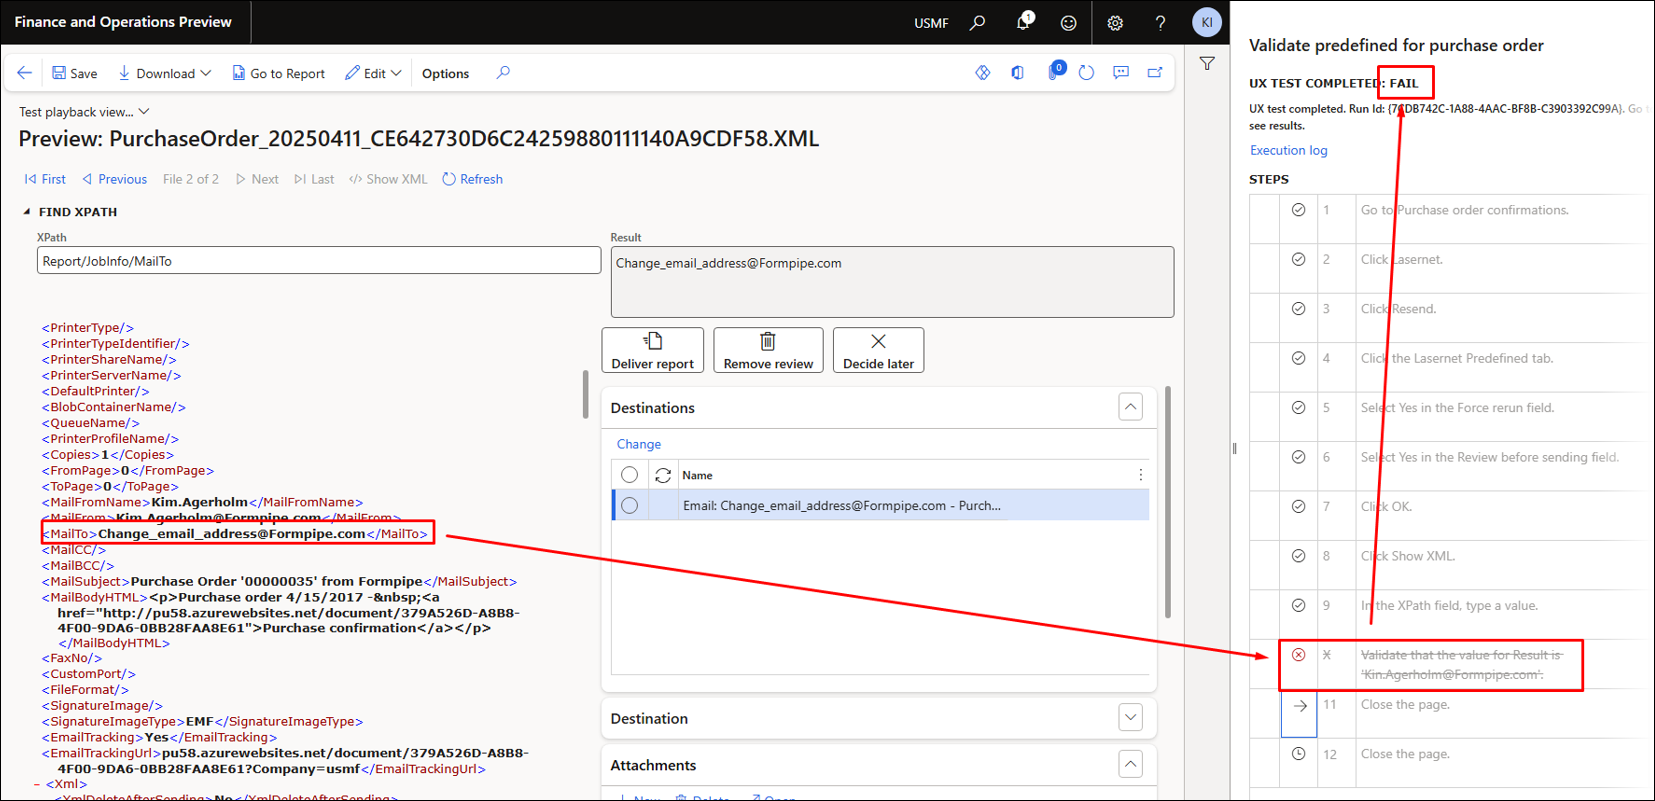
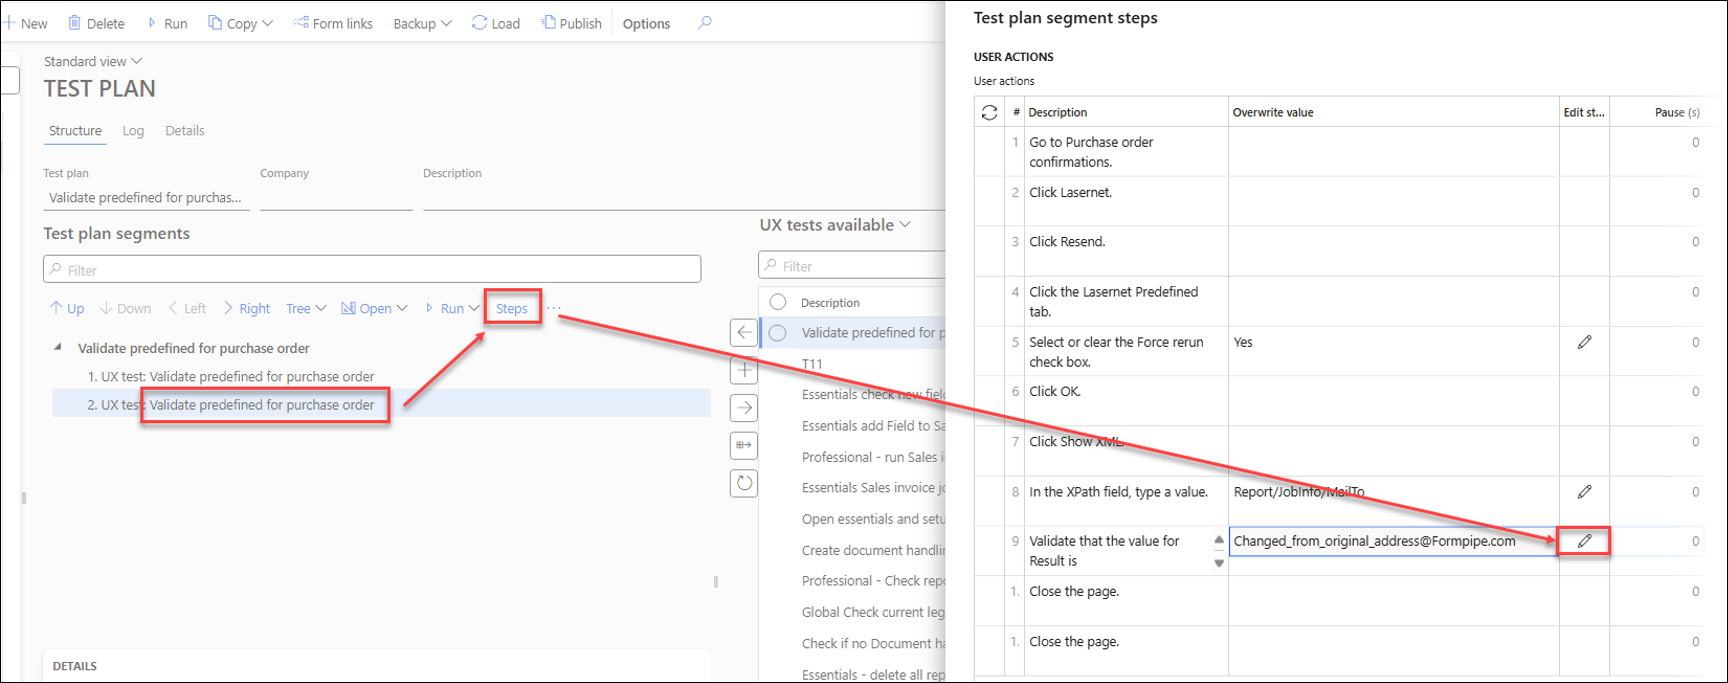
Click Show XML.
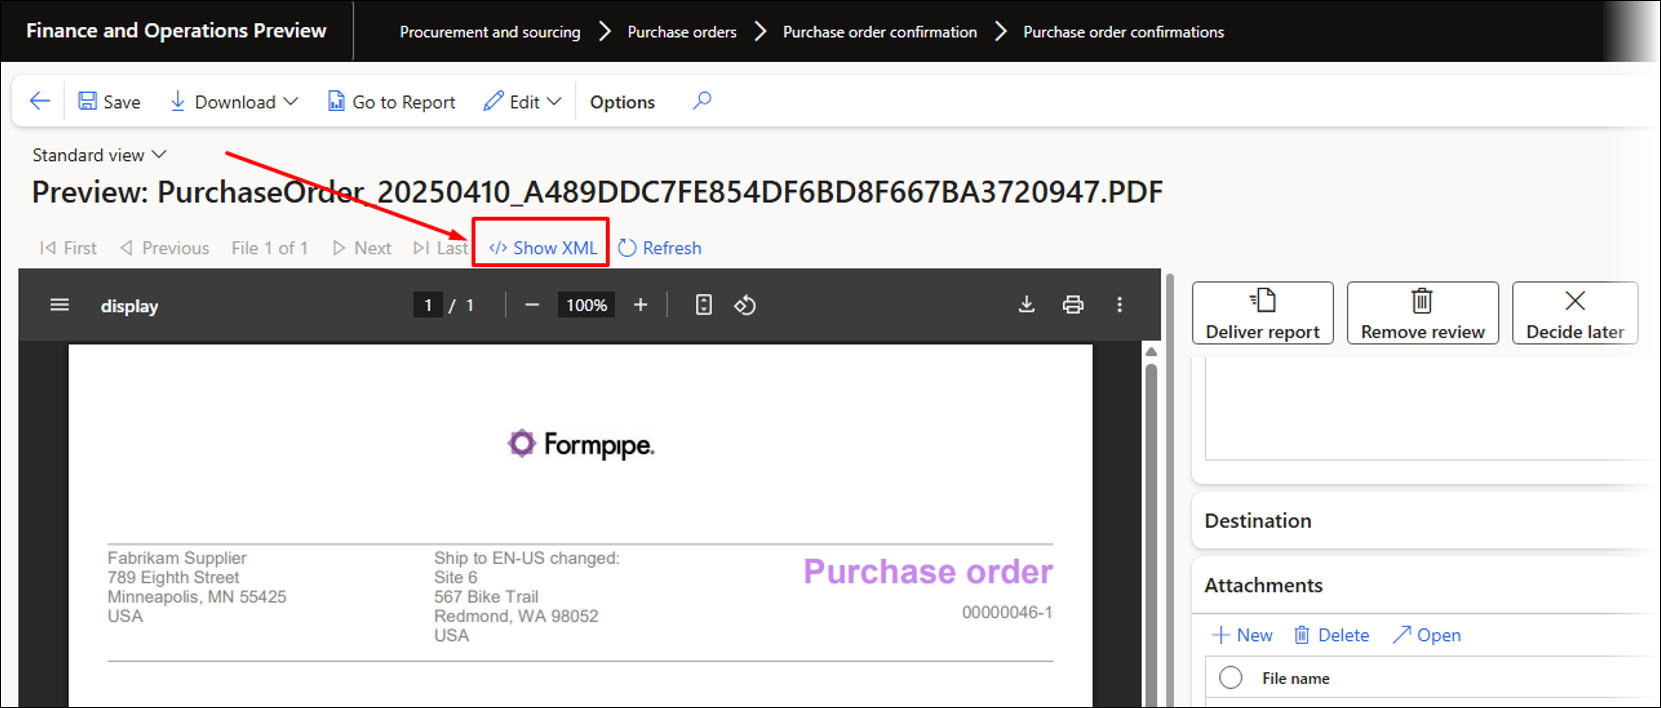
Find and right-click the MailTo tag. In this scenario, we are using the MailTo tag, but other fields and tags can be used.
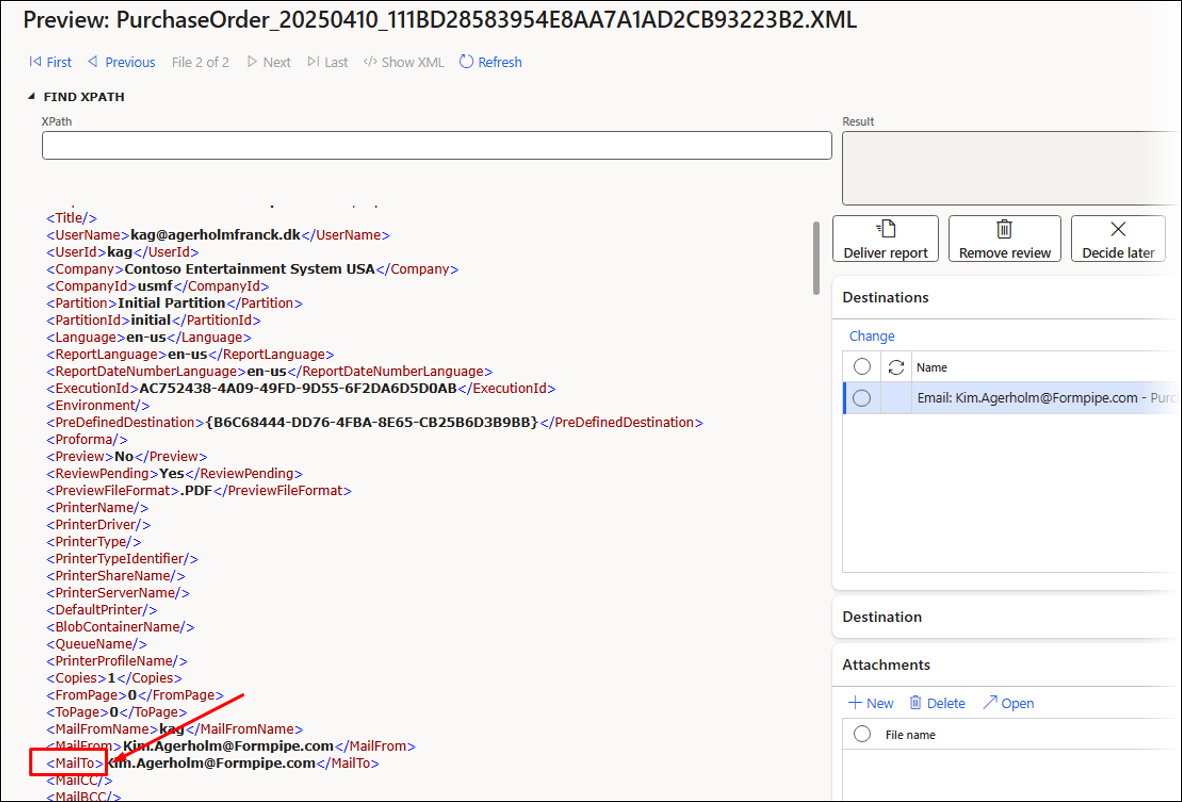
Select Find Current XPath. This inserts the selected XPath within the FIND XPATH field.
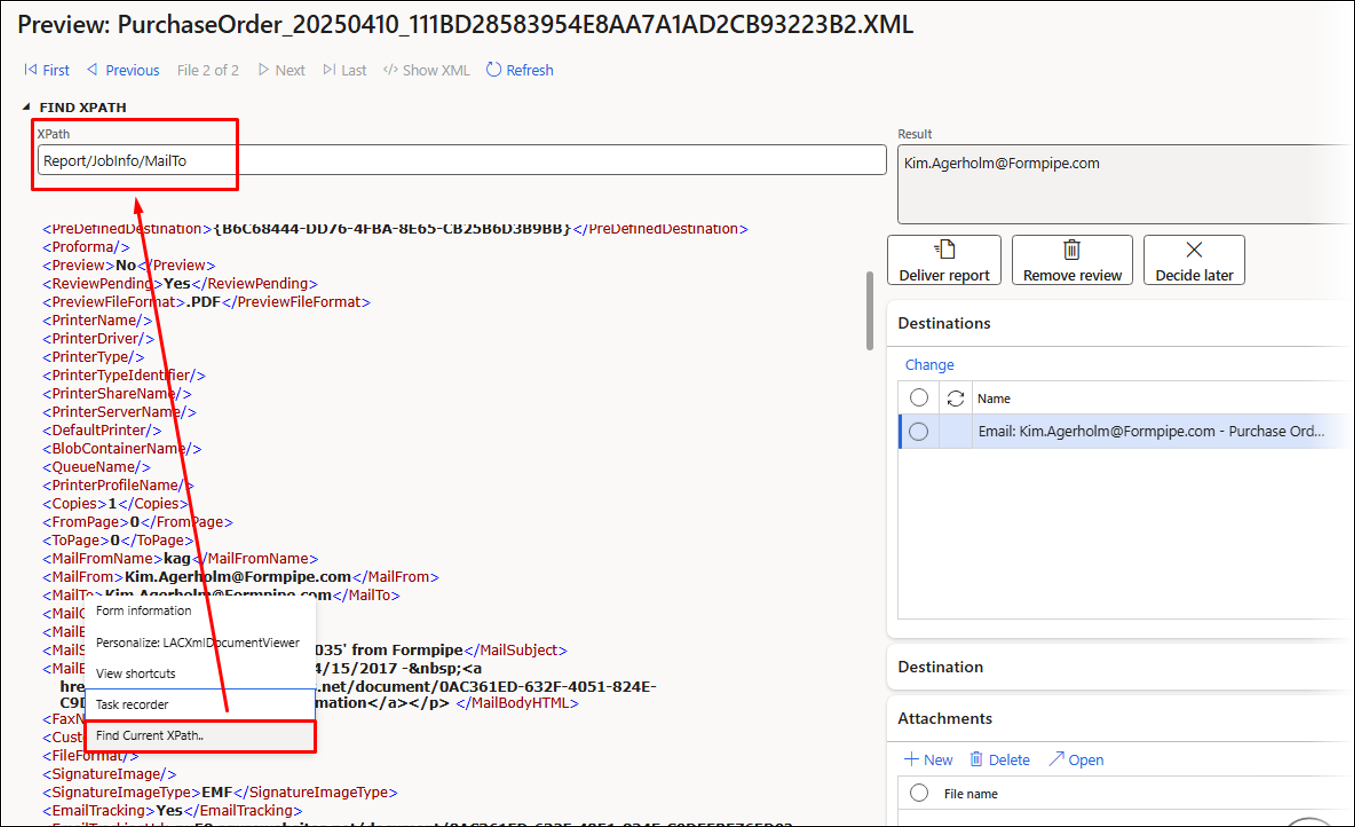
Right-click the value shown in the Result field and select Task recorder > Validate > Current value.
Click Remove review to ensure no entries are saved within the Lasernet Archive.
Using Review before sending is helpful for testing because this feature enables you to validate information within the XML file without having to save any entries in the Lasernet Archive.
Close all the forms by clicking the Back button until you reach the main menu.
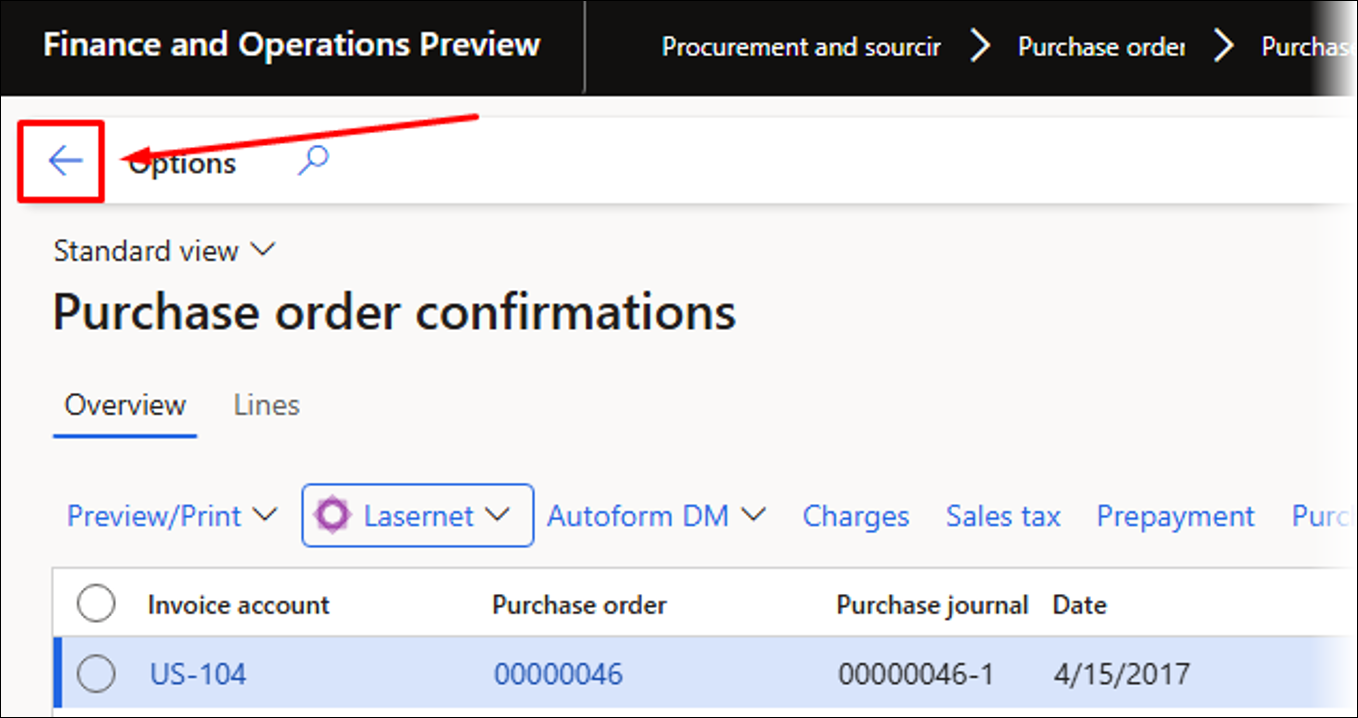
Close the Purchase order confirmations Journal by clicking the Back button.
The steps included within the recording are all shown in the dialog on the right-hand side of the screen.
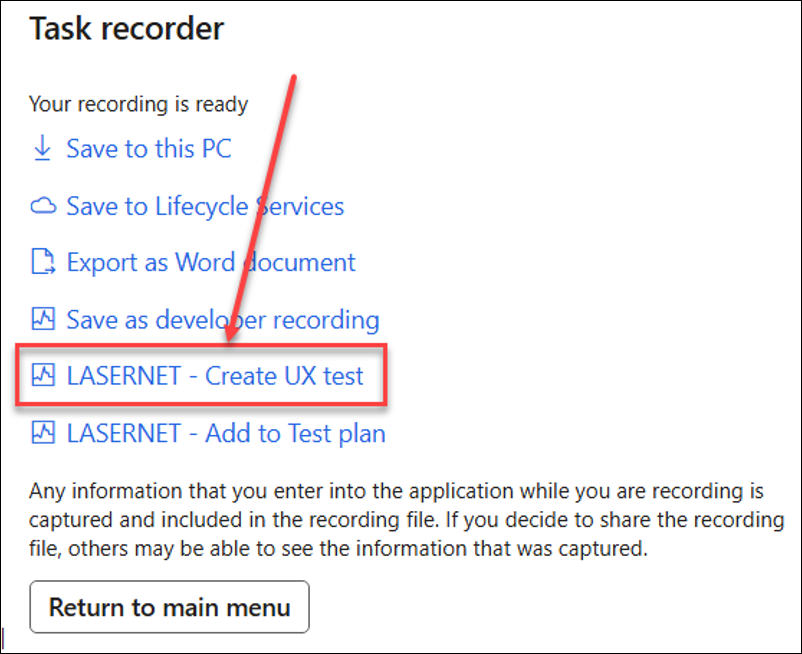
Click Stop to stop the recording.
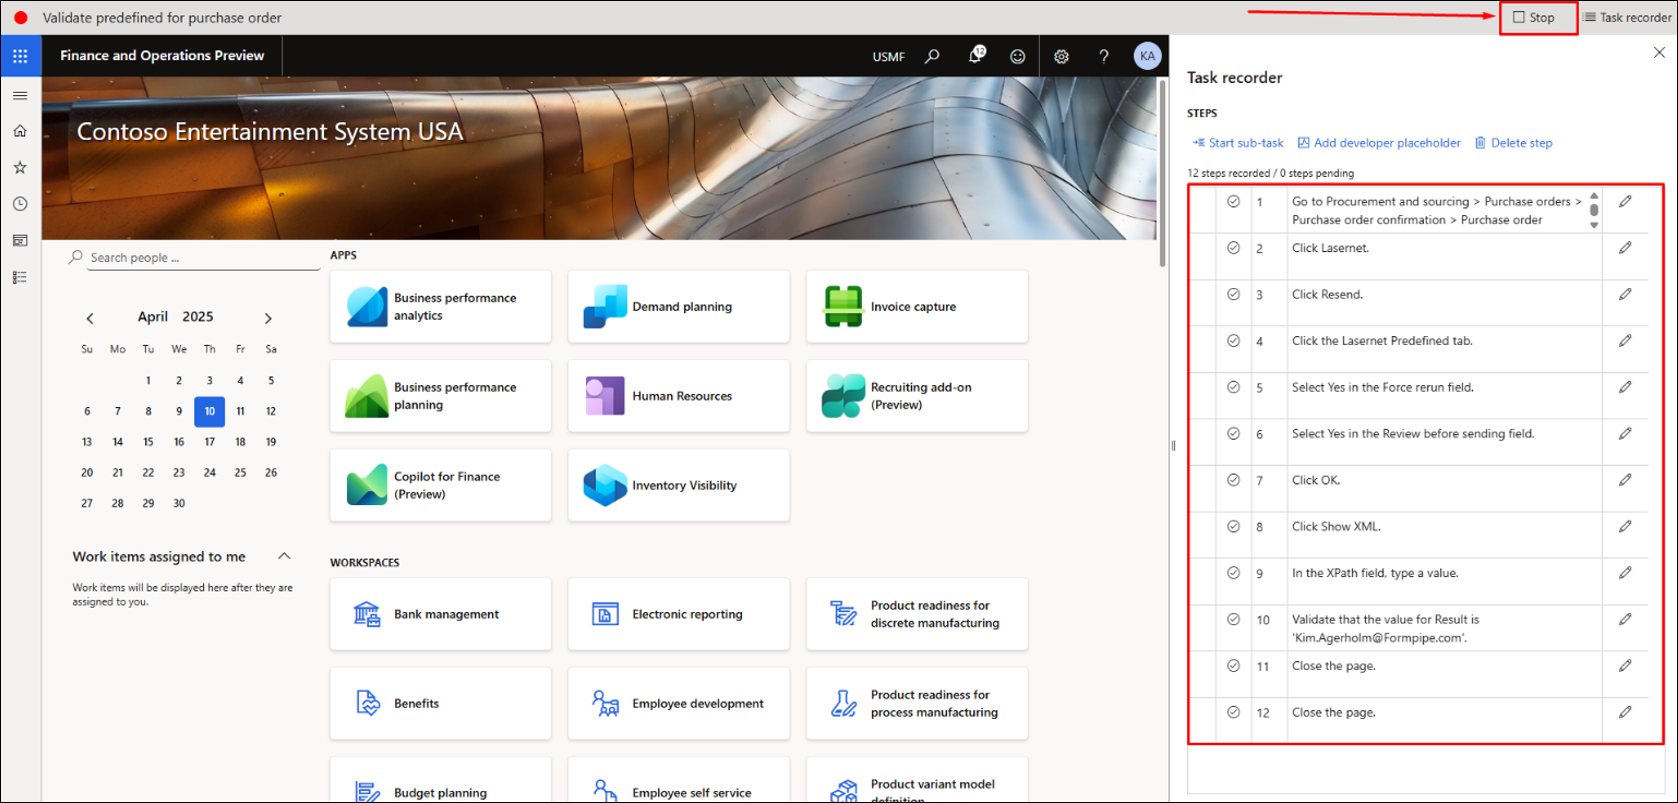
You can add the recording to either a Lasernet UX Test or Lasernet Test plan.
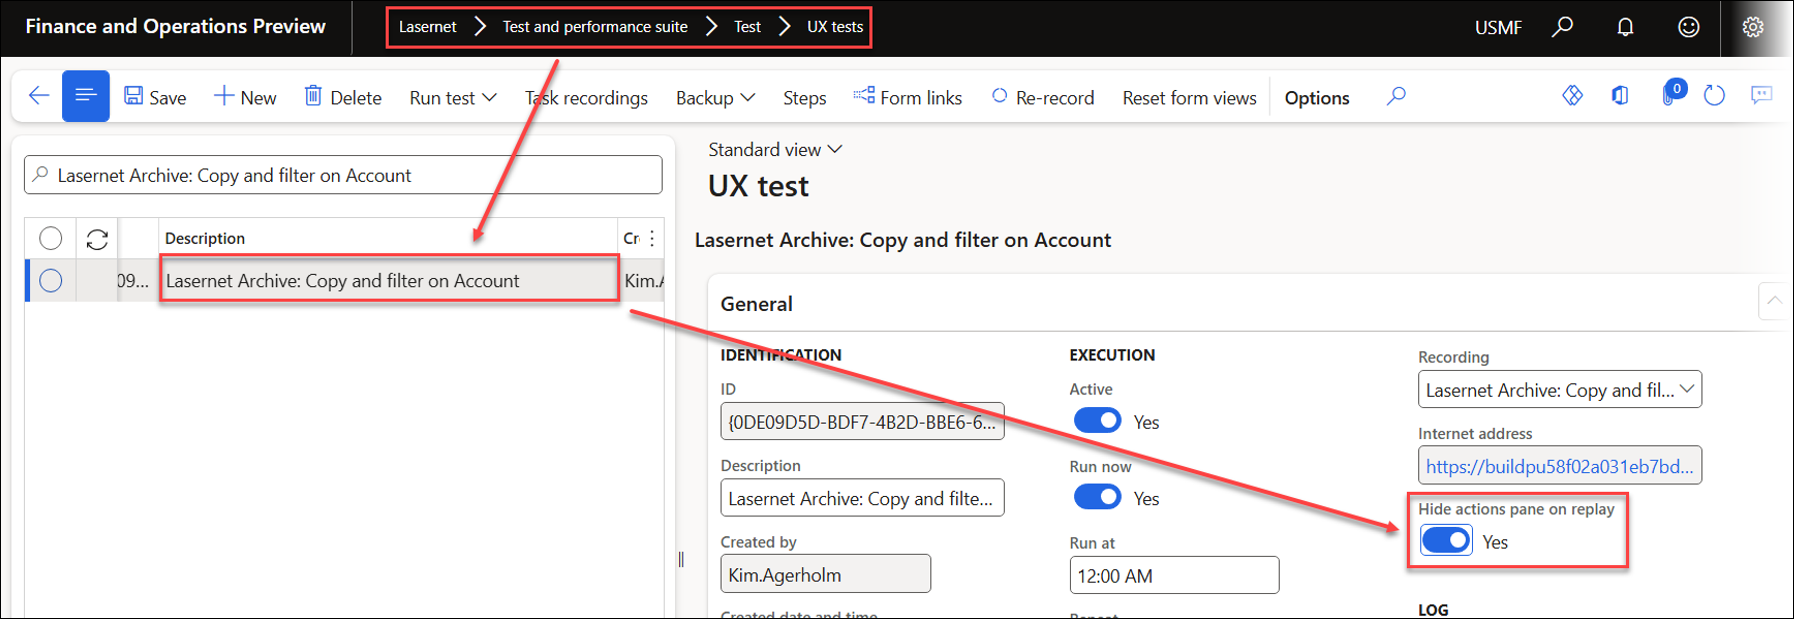
For the purposes of this example, click LASERNET – Create UX test, which will add the recording to a UX Test.
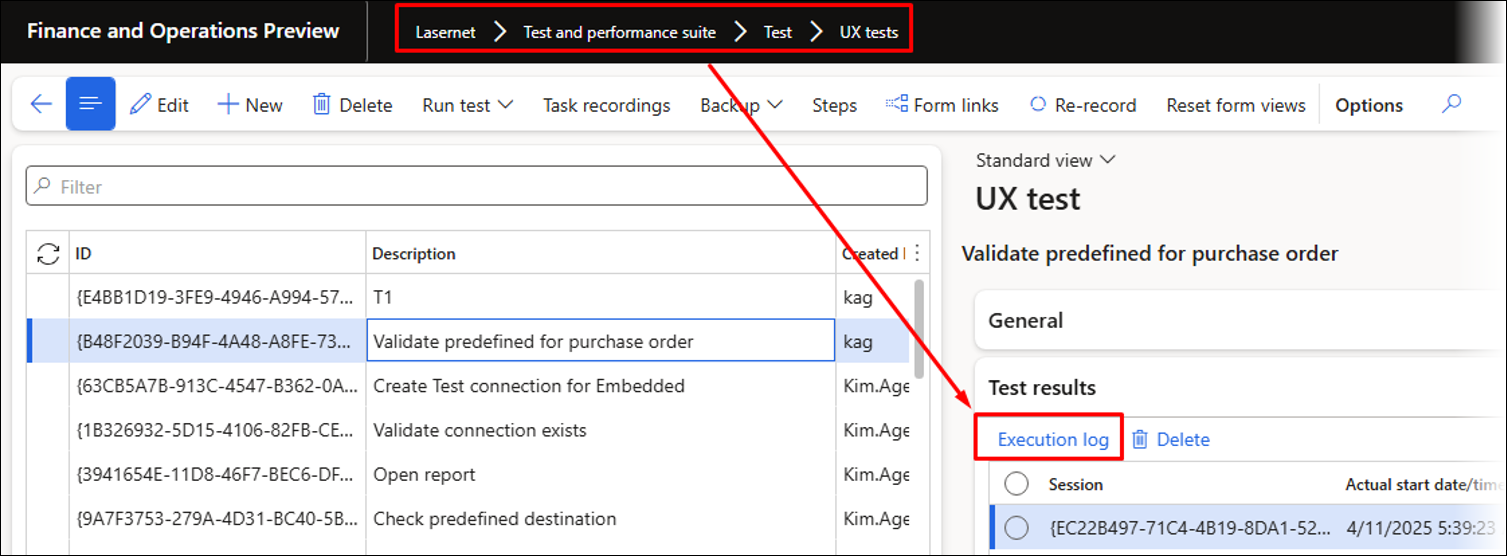
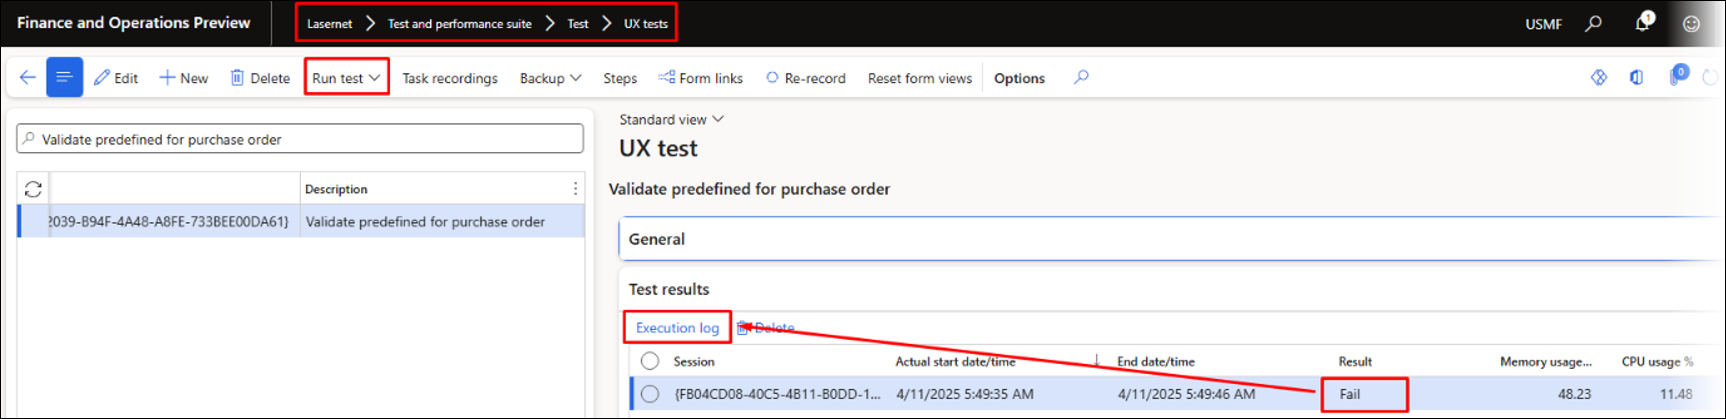
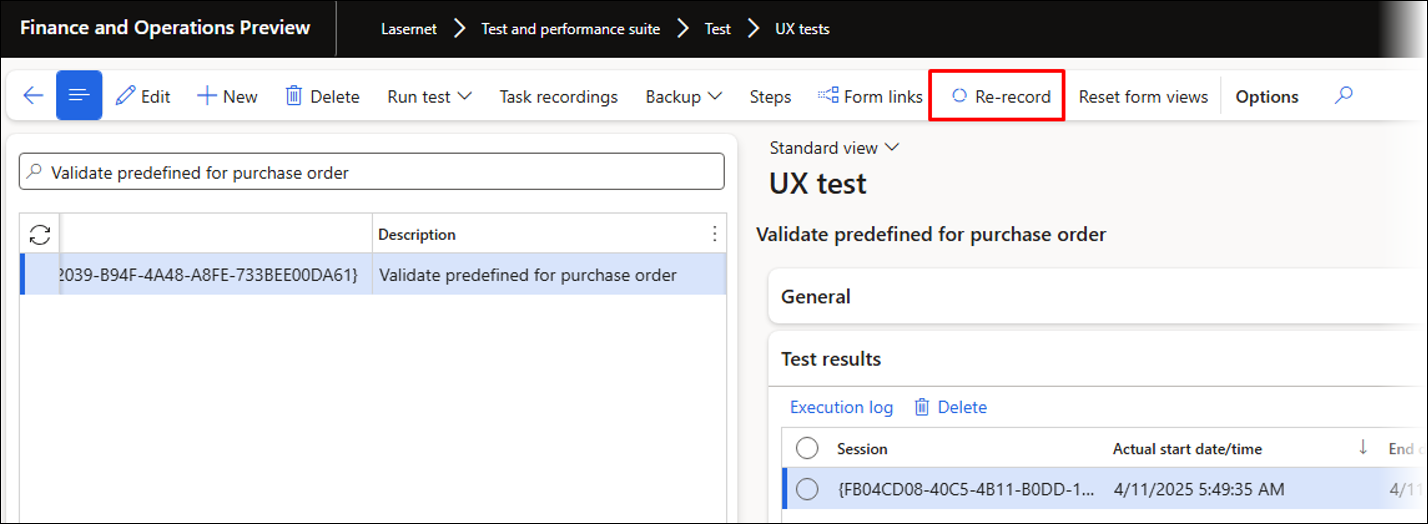
You can now use Run test to play back the recording or access the UX Test from Lasernet > Test and performance suite > Test > UX tests.
Playback of the recording:
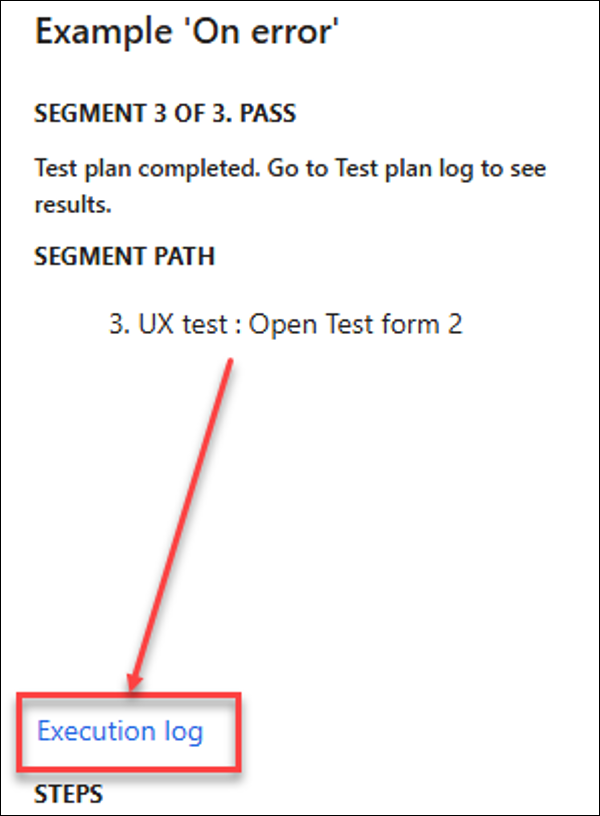
To open the log, click Execution log.
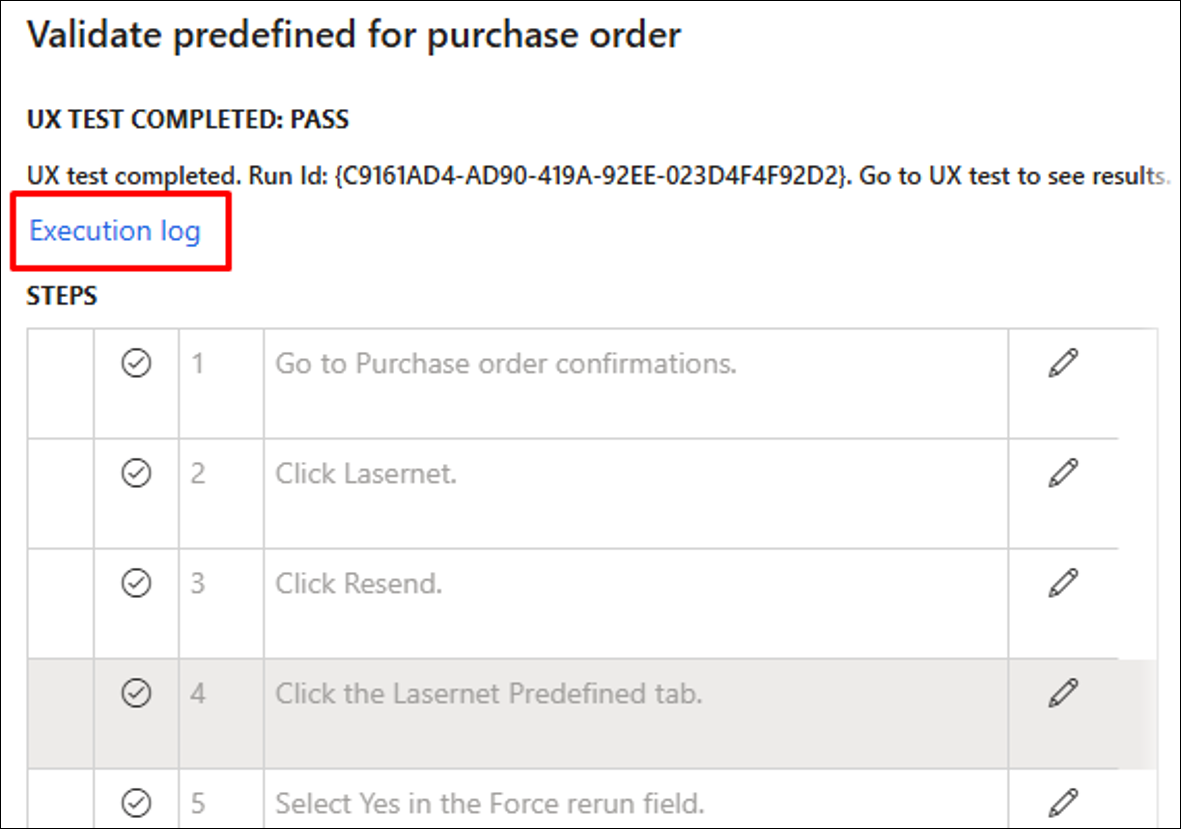
You can also open the log from Lasernet > Test and performance suite > Test > UX tests.
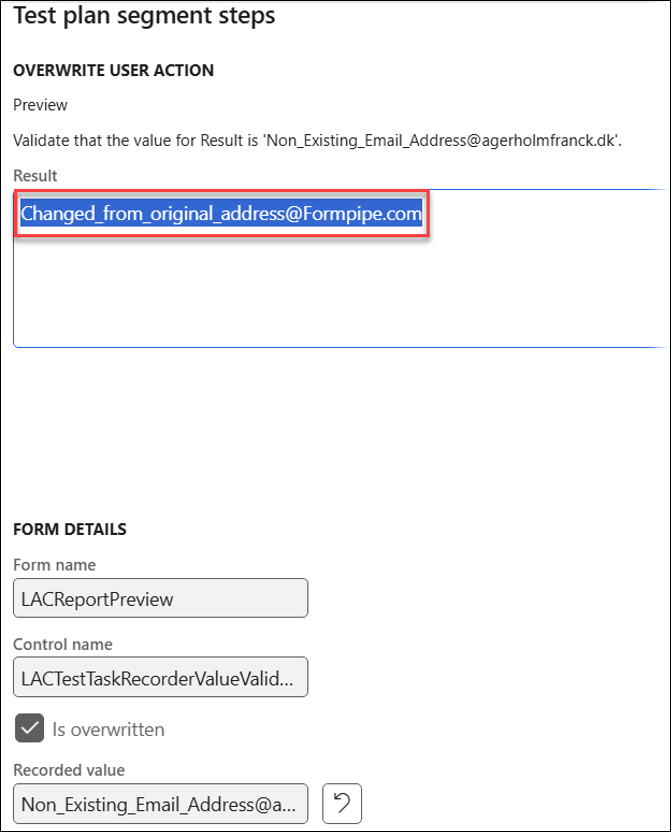
Changing the email address and rerunning the test will result in a failure. A similar outcome would occur if the logic for finding the email address or the predefined destination changed.
If the identified value is incorrect or intentionally altered, the test values within the Test plan segment steps can be modified.

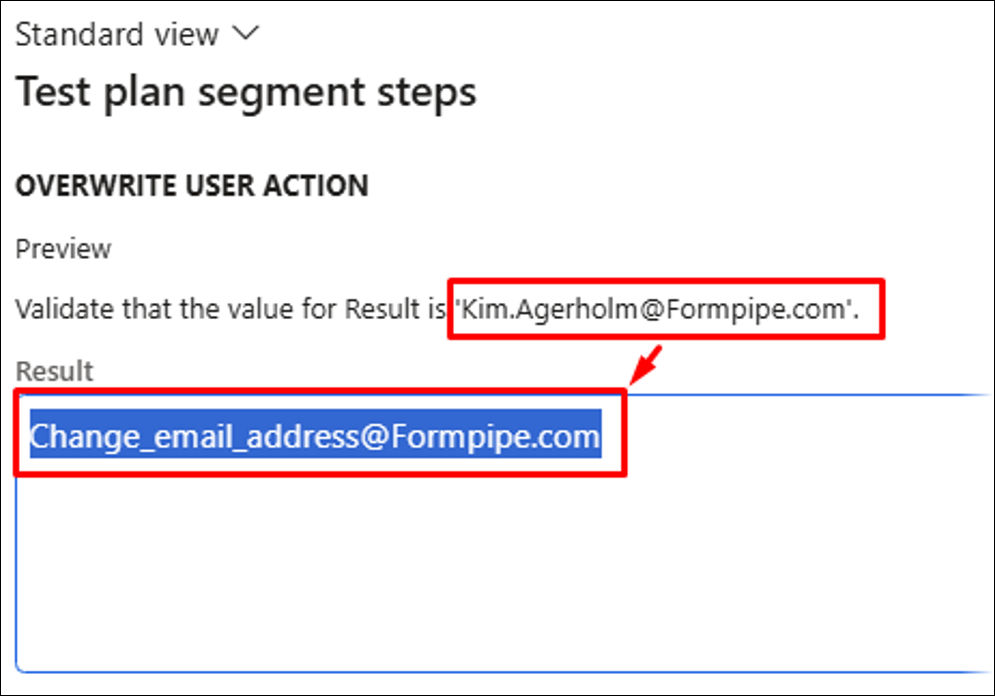
The test can be successfully run if the values are modified.
It is also possible to use the same recording with different values as placeholders.

Updating the placeholder applies the changes to the current segment and step.
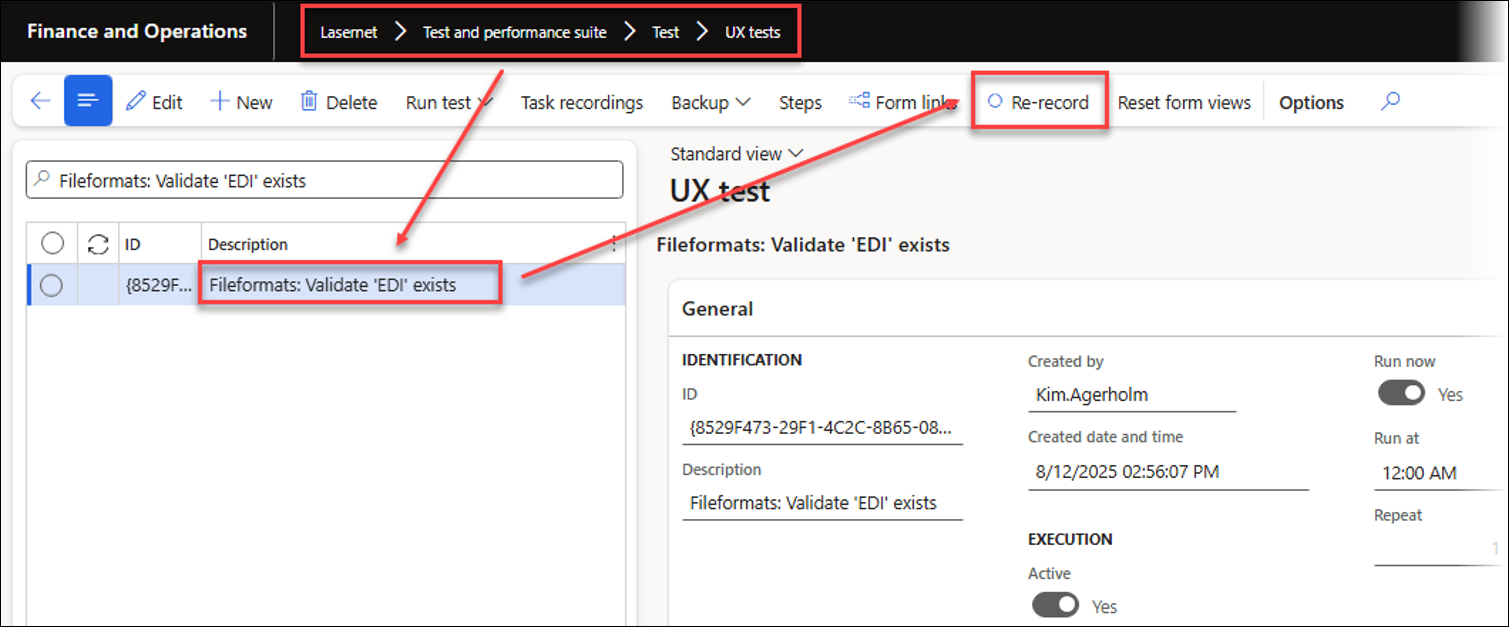
To update the values to other recently used values, modify the placeholders for the steps within a recording; alternatively, click Re-record to replace an existing recording.
Advanced Features
This section outlines some advanced features within the Test and Performance Suite 7.2. Beyond its extensive testing functionality, the suite provides strong support for automation, workflow management, e-learning, and automated playback. These features are:
The option to link a number of task recordings (UX Test) to a Test plan and create a procedure in the event of an error. Test plans are mainly used for testing, but can also be used for automating workflows by adding a button to a form from which the Test plan can be started in the current context.
Data explorer
Assembly information
A functionality to identify overlapping fields and search for multiple fields within XML or PDF documents.
Test Plans
Validate and Create a Record by Using a Test Plan
The following process describes a practical approach for validating and creating a record using a task recording during playback. This method uses a record only if it does not already exist and confirms that all processes complete successfully without failures.
This method is particularly useful when records must be generated within a table, such as those used for configuring connections, servers, reports, or accounts. It can also streamline the automatic establishment of connections between FinOps and Lasernet, for instance, during the setup of a new environment, by enabling sharing and distribution across environments and users.
You can also modify the placeholders to specify the values required for playback.
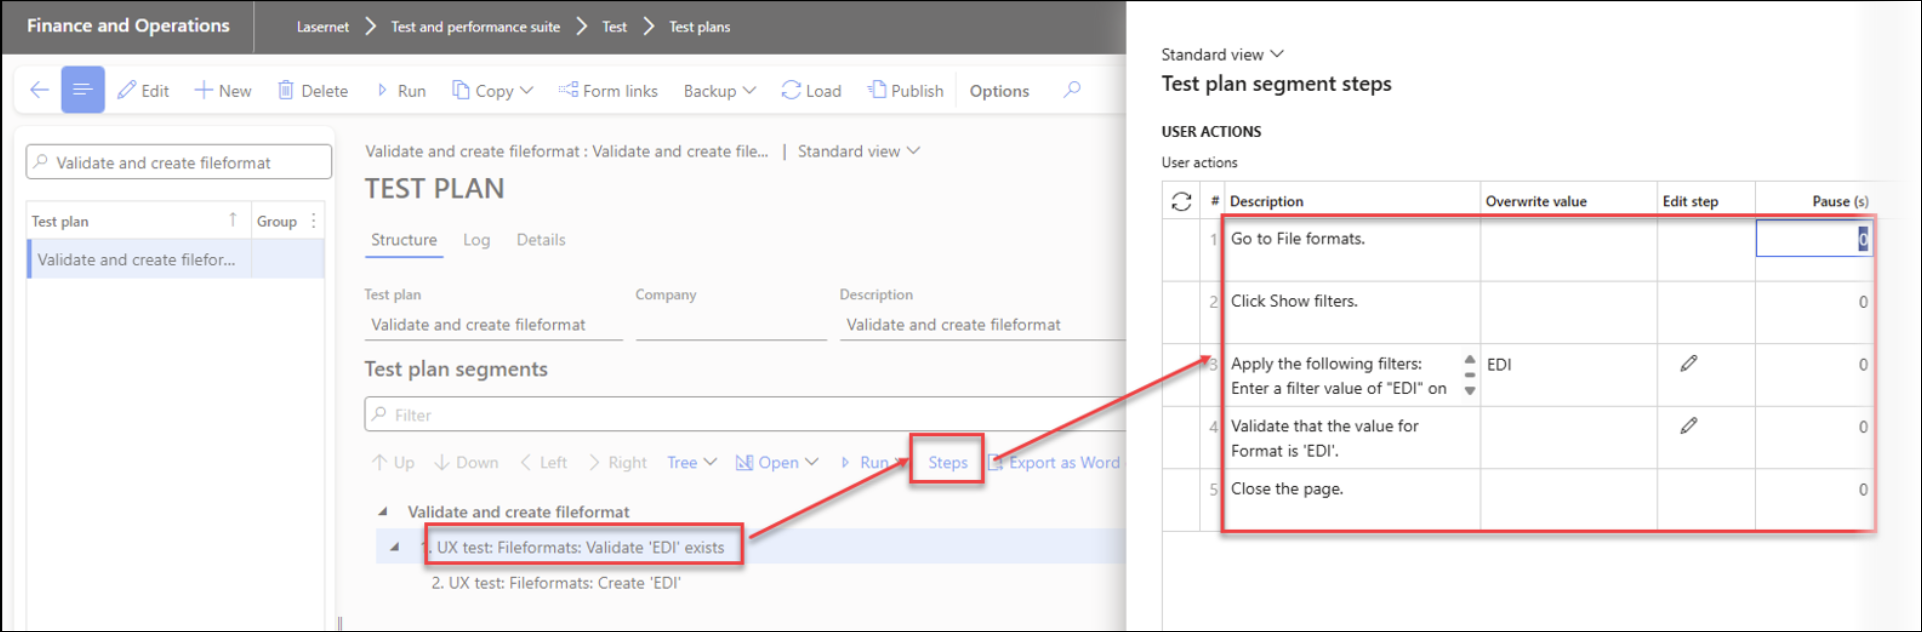
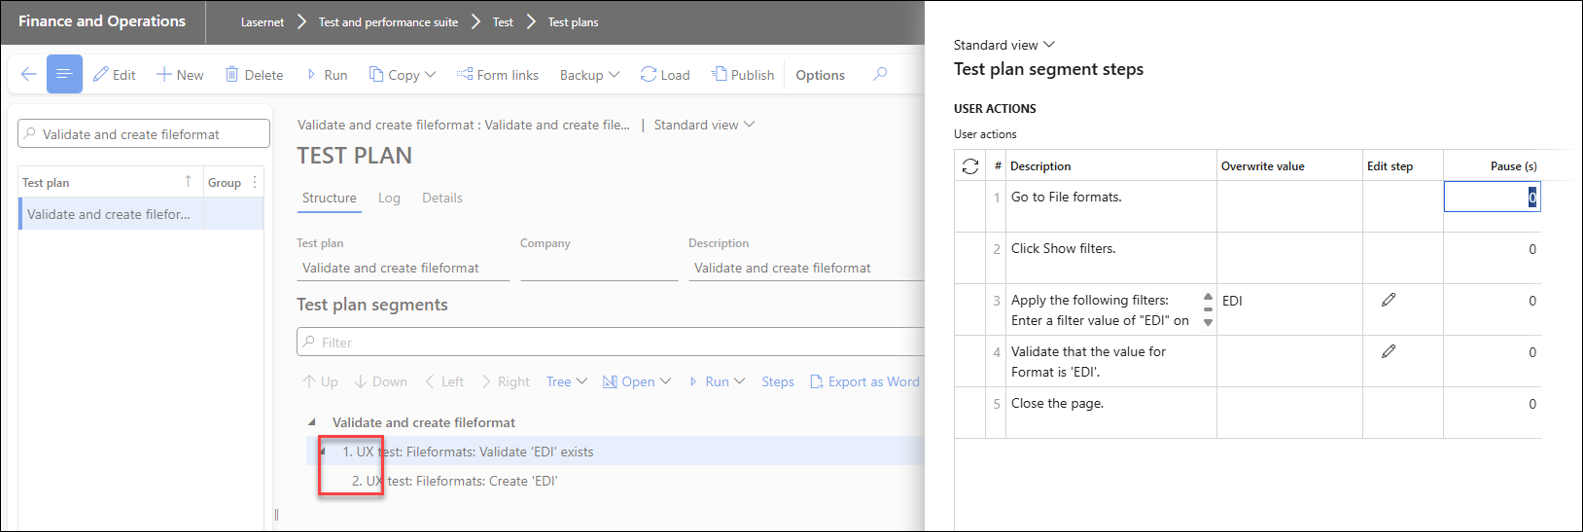
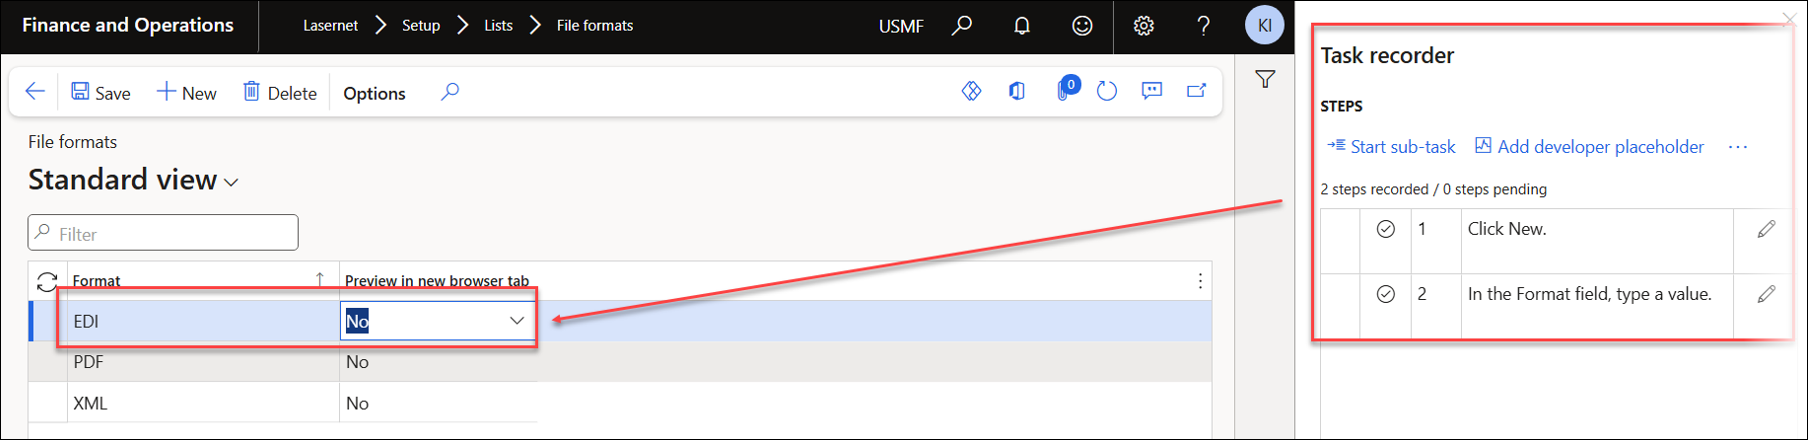
The example provided below illustrates the process for creating a record in File formats within Lasernet FO Connector, but the same approach can be applied to other types of records.
In this example, the recording is named Fileformats: Create ‘EDI’. This recording should include only the required record, and it is advisable to start without the record already present.
Start the Task recorder.
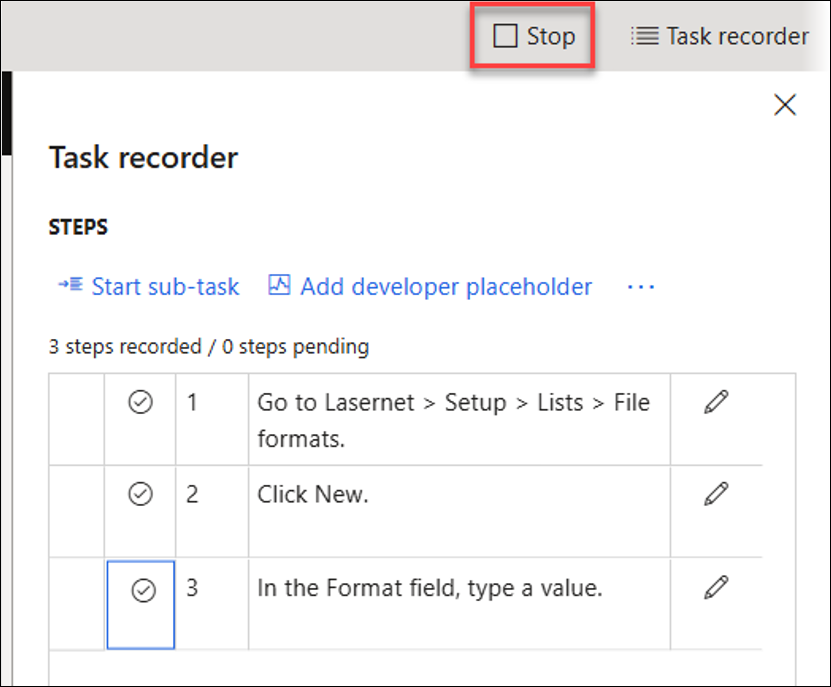
Navigate to Lasernet > Setup > Lists > File formats and create the record as part of the recording.
Stop the recording.
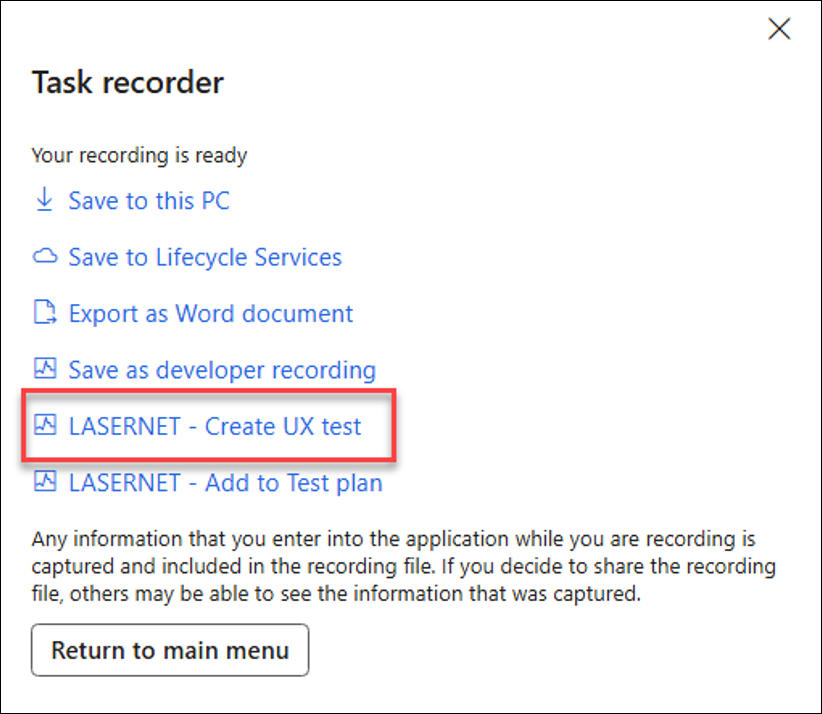
Use the LASERNET – Create UX test option to save it as a UX Test (single task recording).
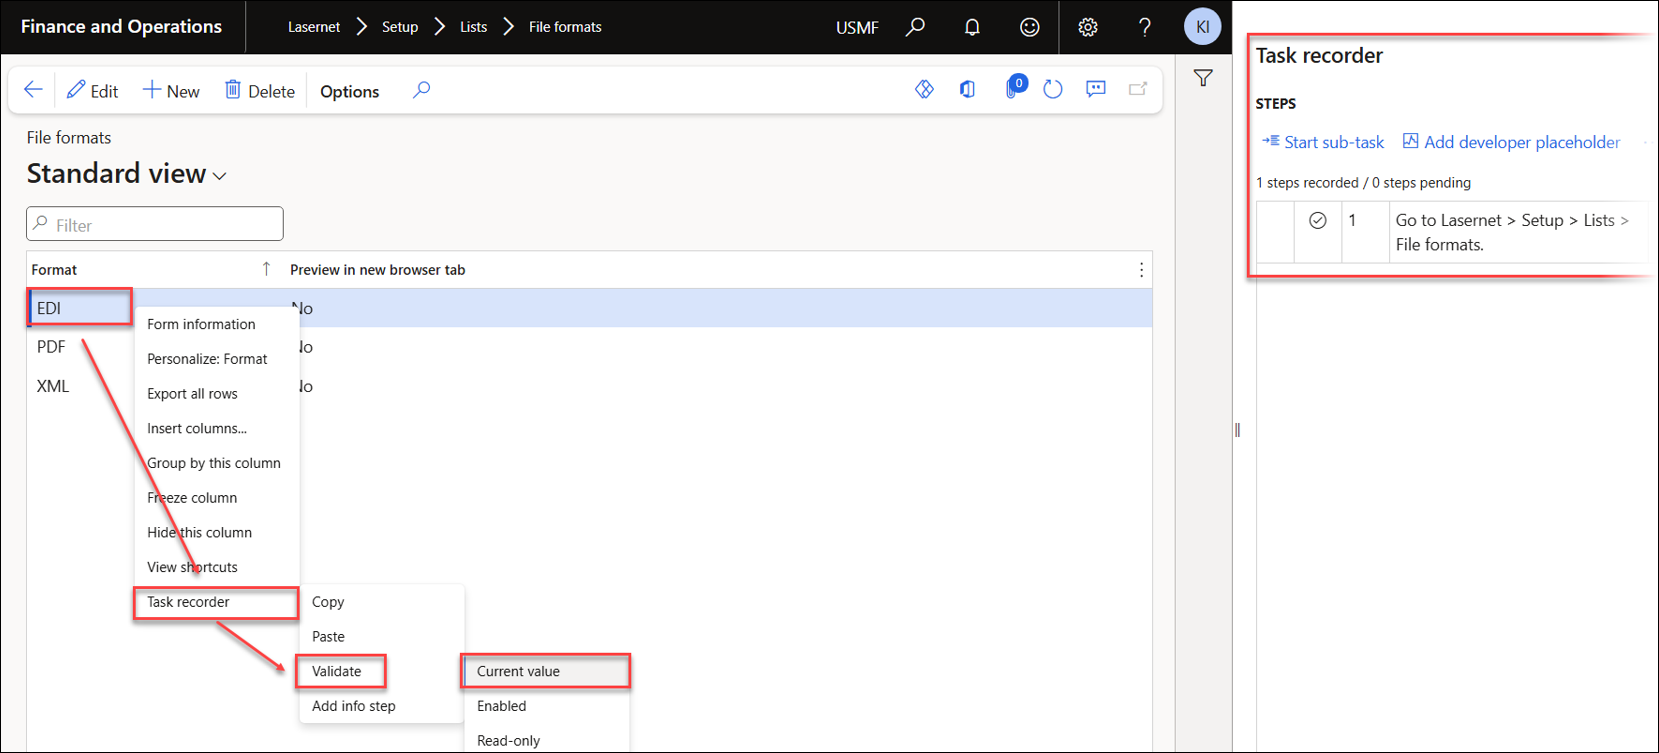
Create a recording called Fileformats: Validate ‘EDI’ to validate if the value exists. Use the Filter or Advanced filter to find the entry named EDI.
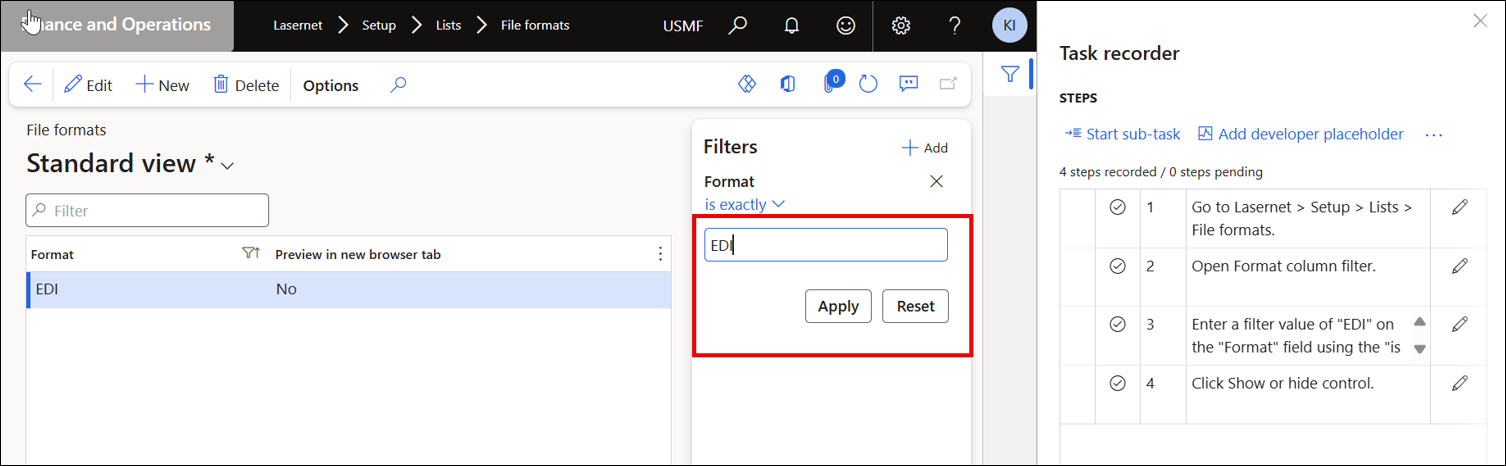
Select the EDI value, right-click the Format field, and select Task recorder > Validate > Current value. This adds a validation step to the task recording for playback.
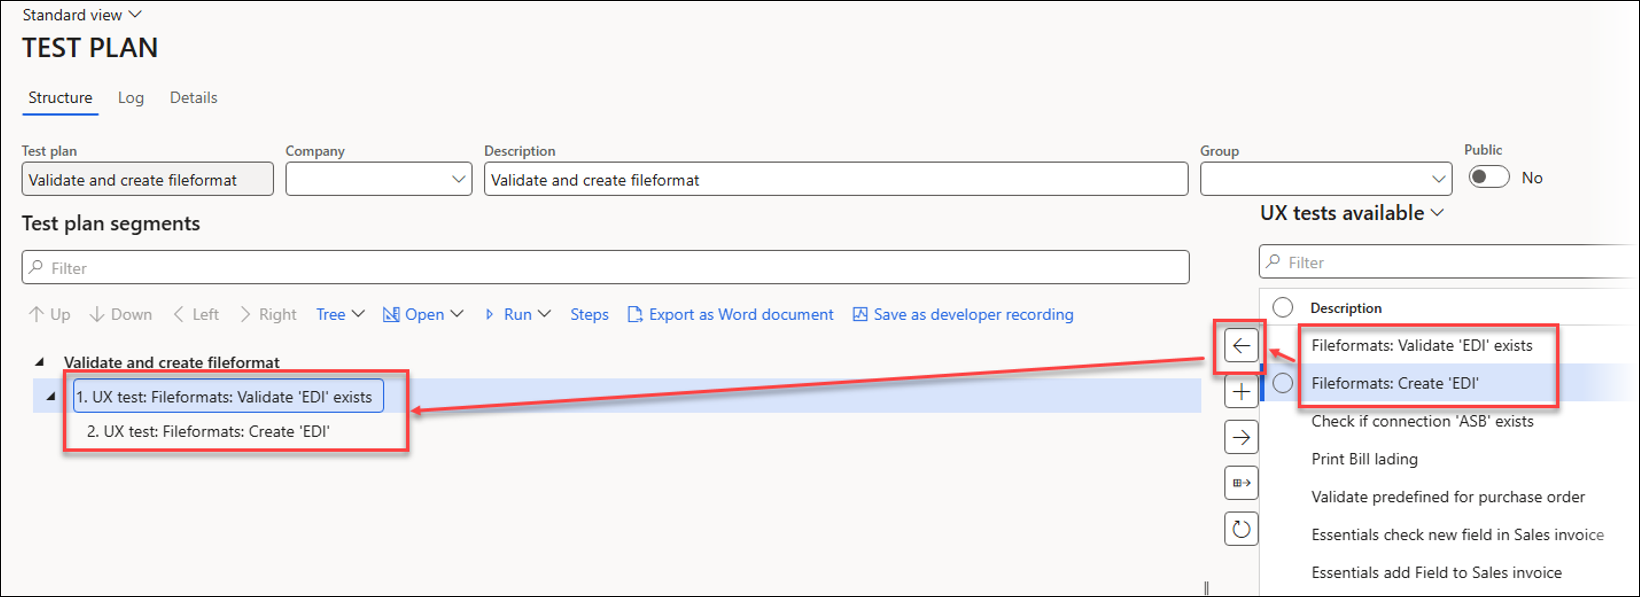
To add the two recordings to a Test plan, navigate to Lasernet > Test and performance suite > Test > Test plans.
The Test plan shown below is called Validate and Create File Format.
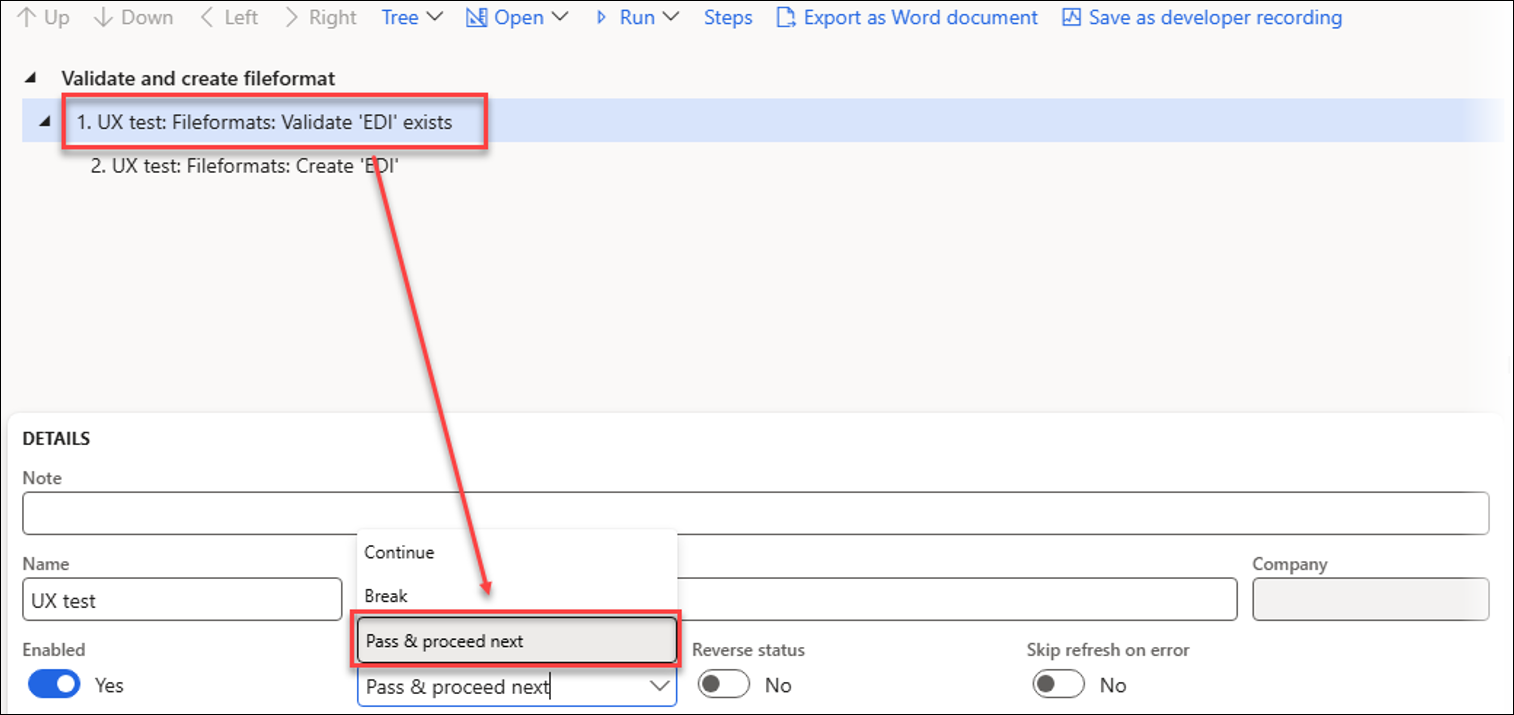
Validate 'EDI' exists will be segment 1, while Fileformats: Create 'EDI' needs to be inserted in the same branch by making it a child of the first segment.
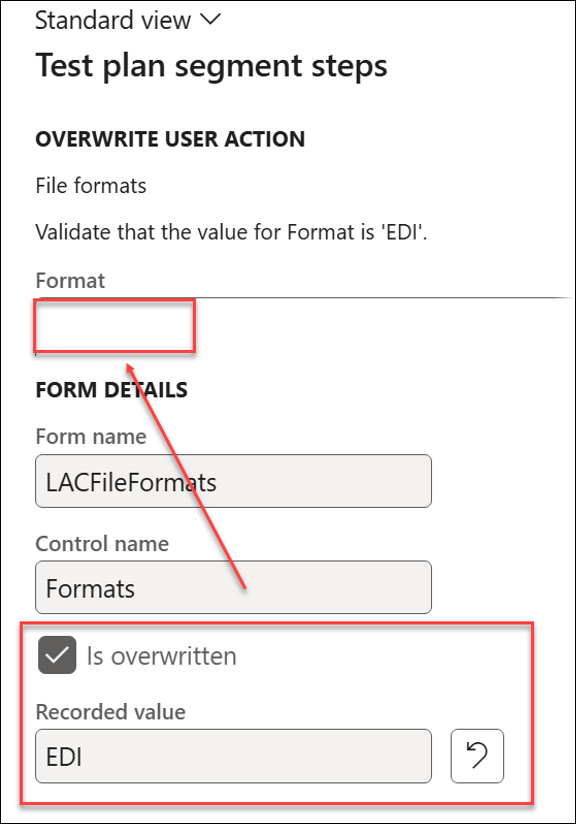
The first segment must be checked to ensure the Format field is empty, instead of EDI, which was used in the recording. Changes made to the task recording (UX Test) apply any time the recording is used; changes made in a Test plan affect only that specific plan.
Identify the validation step and click the Edit icon.
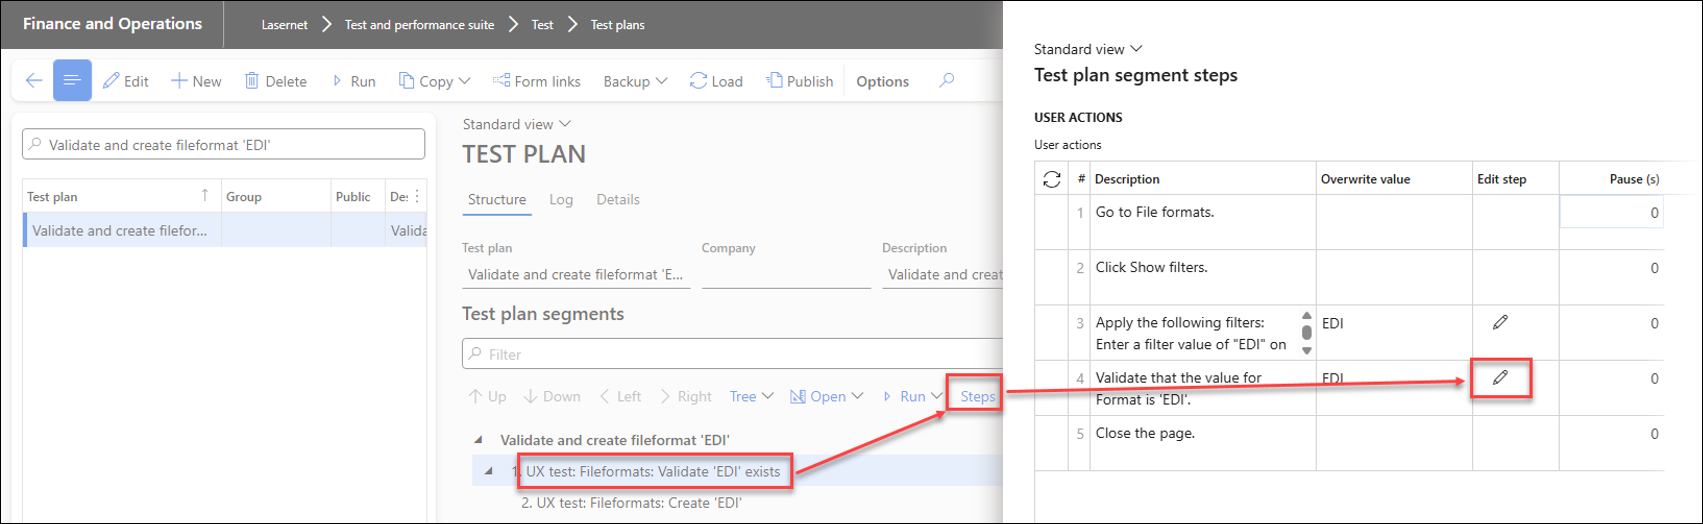
Remove the existing value EDI, leaving the Format field empty.

Click OK.
When revisiting this step, the Format field should be empty, and the Is overwritten checkbox field should be selected.
Set the On error field to Pass & proceed next instead of Break.
This approach prevents segment 2 from running if segment 1 fails and sets segment 1's status to Pass even when it fails. It also allows the system to continue running the subsequent branches. Segment 1 will fail if the record already exists, but Pass & proceed next ensures that its status is set to Pass.
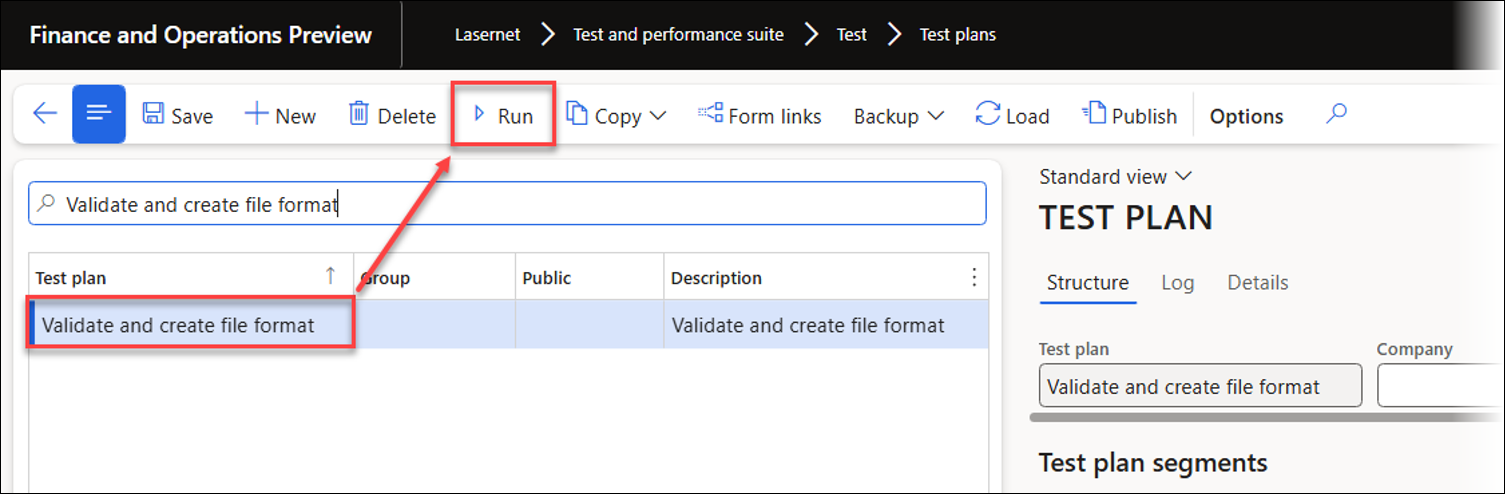
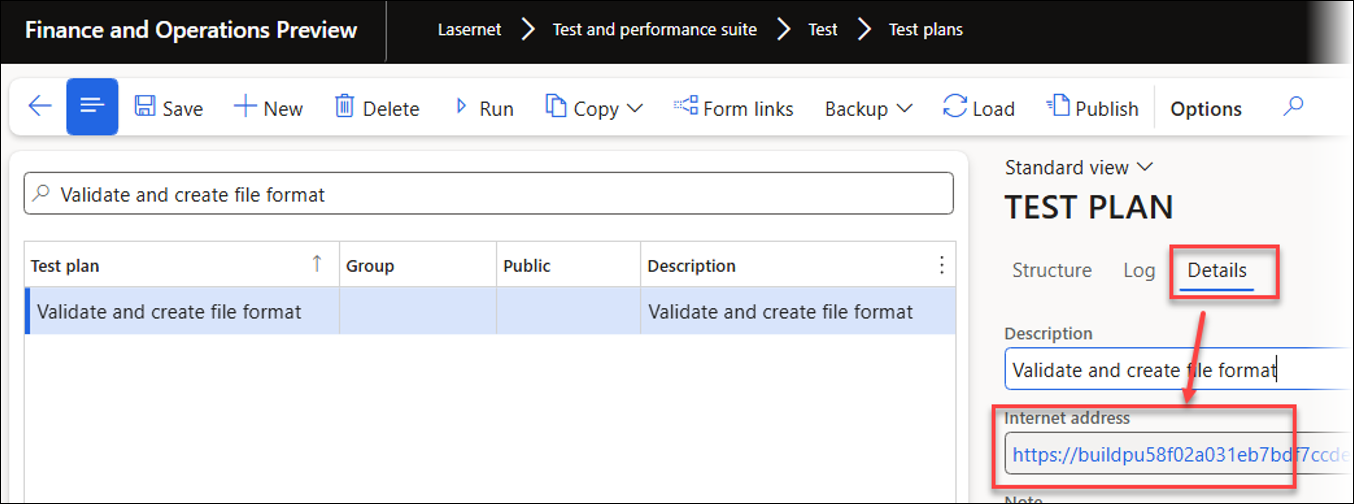
Running this Test plan will create the EDI record only if it does not already exist.
Run the Test plan by clicking the Run button on the Action pane, or use the URL found in the Details section to run it from a new session, such as with a Windows scheduler.
You can also run a single segment to verify if part of the Test plan works as intended.
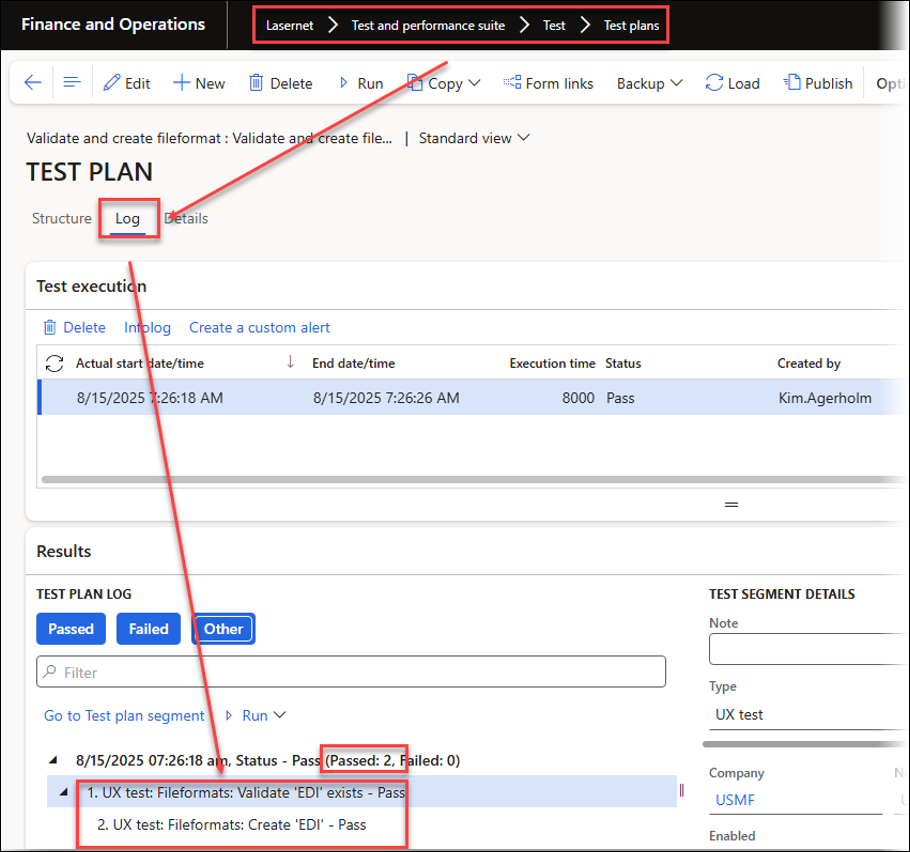
The following image shows the Log form when a record does not already exist: both segments are marked as Passed, and the overall status is set to Pass.
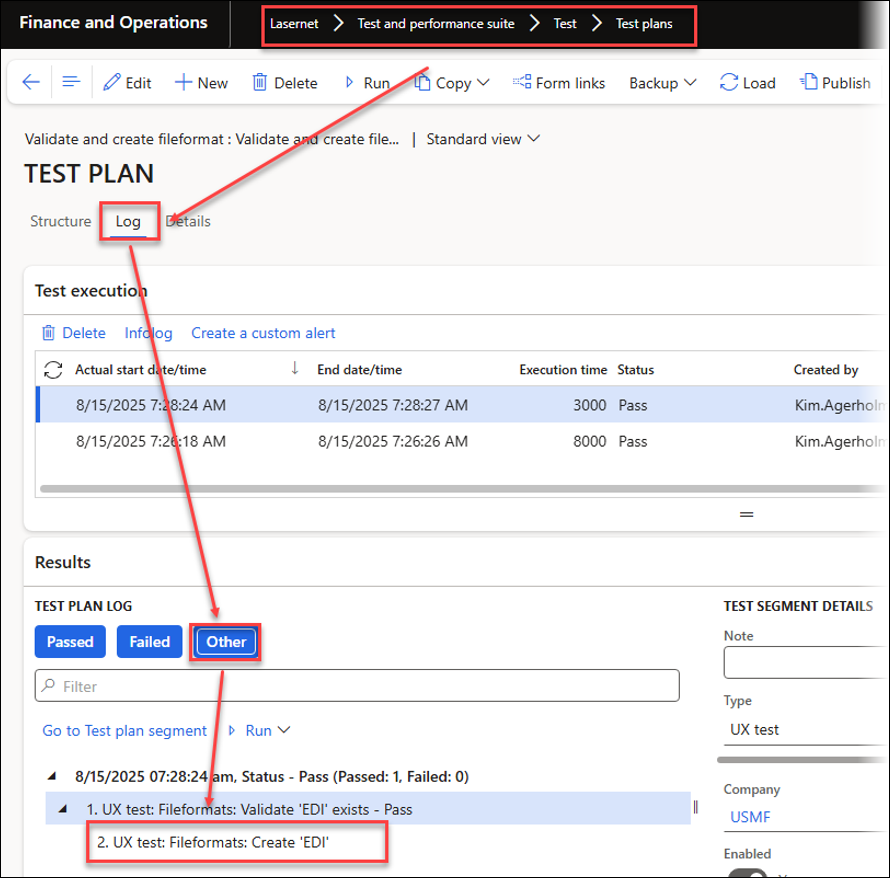
The following image, instead, shows the Log form if the record exists: only segment 1 will be assigned the status of Pass; however, the overall status will also be updated to Pass since the Pass & proceed next option was selected for segment 1.

Click Other to view the segments that were not run.
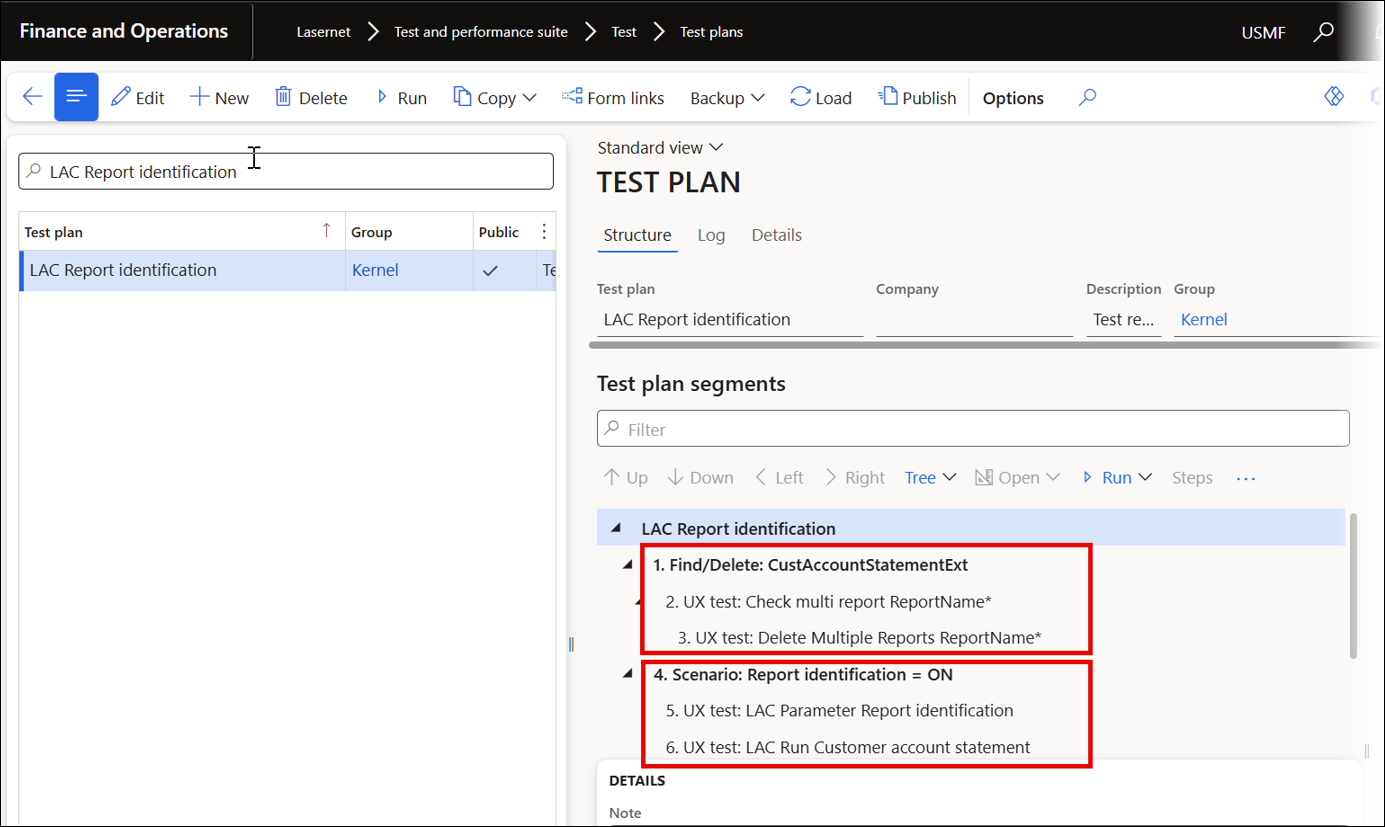
Execute Test Plans in Different Companies (Cross-Company)
A Test plan can be run in multiple companies regardless of which company is currently open in FinOps. This approach facilitates verification processes across various companies and allows for consistent record creation, such as automating the setup of Lasernet, in several legal entities.
Click Copy to generate a Test plan similar to the one used earlier for validating and creating records in File formats.
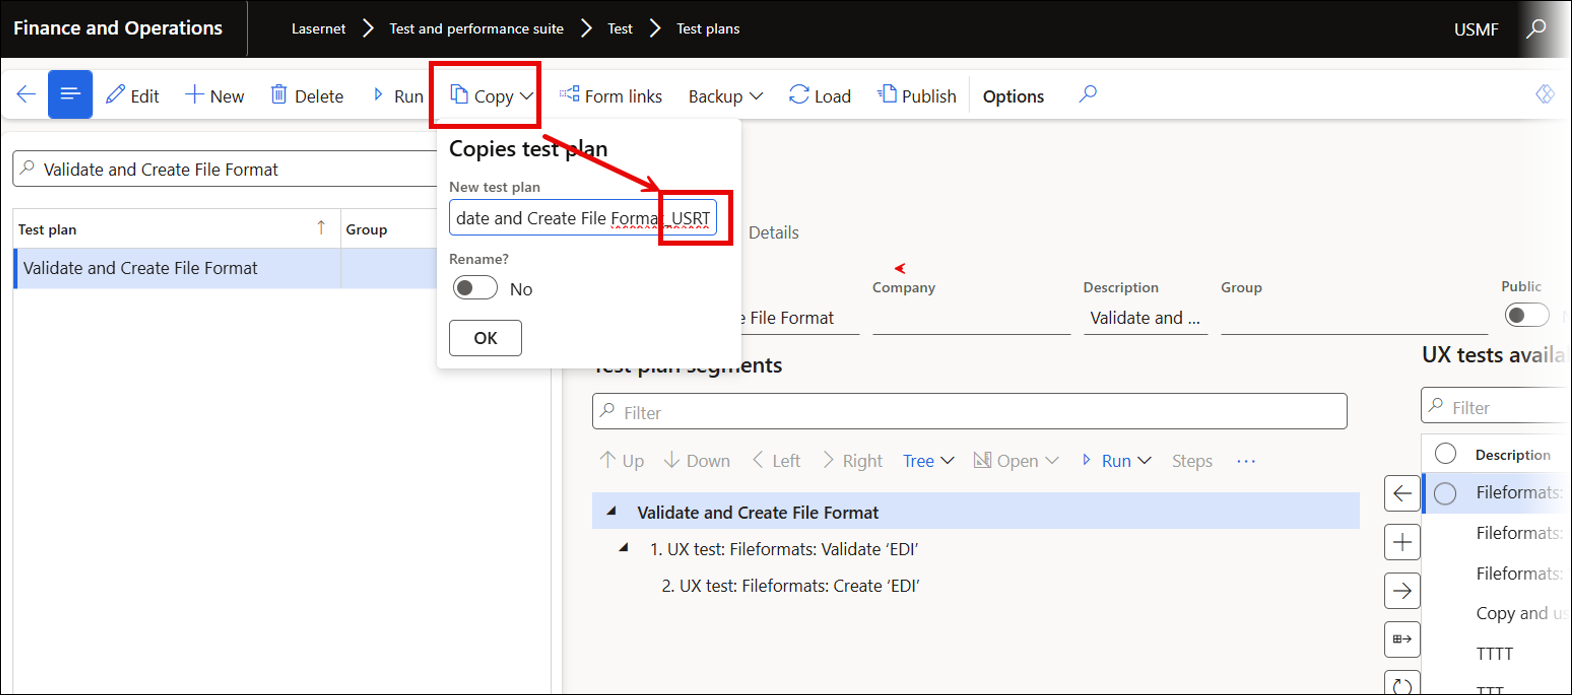
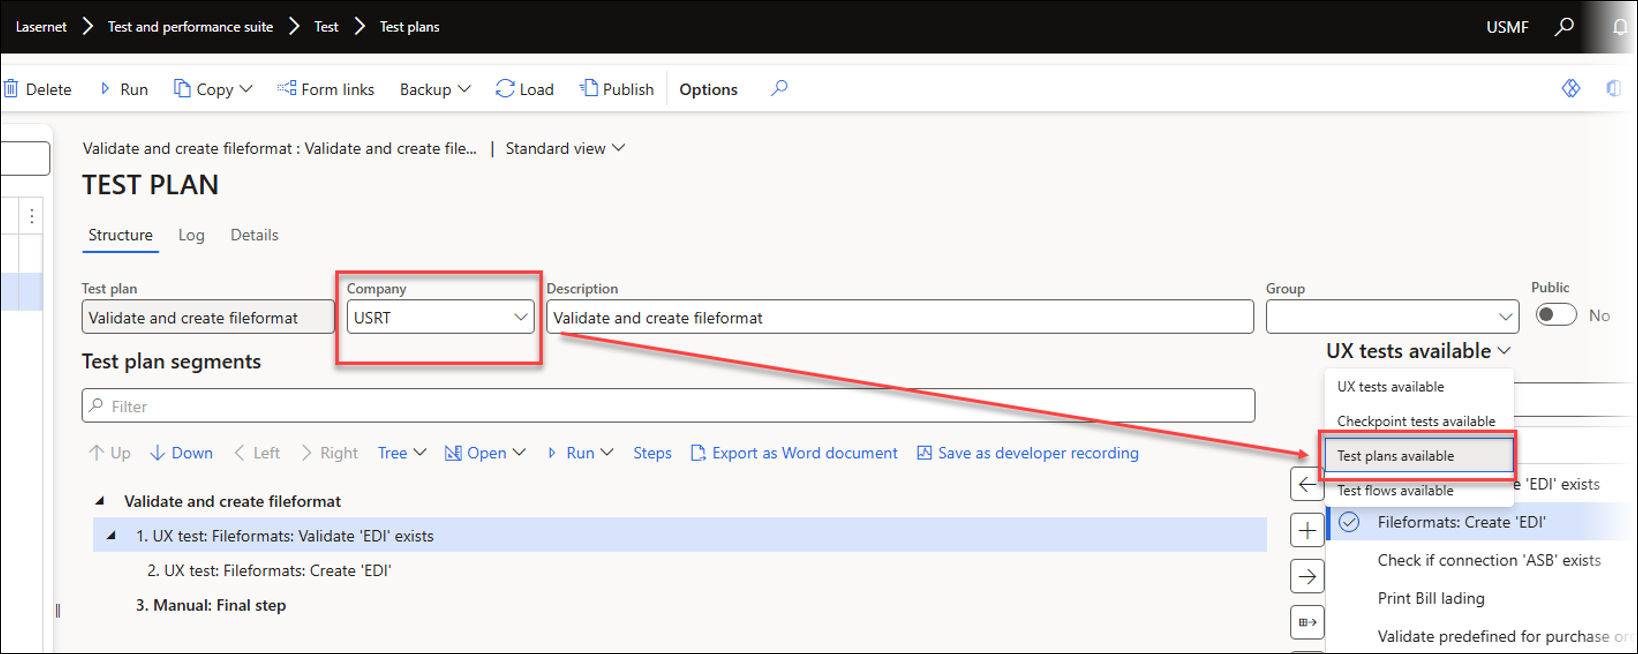
Enter the name of the company in which the Test plan should be run.
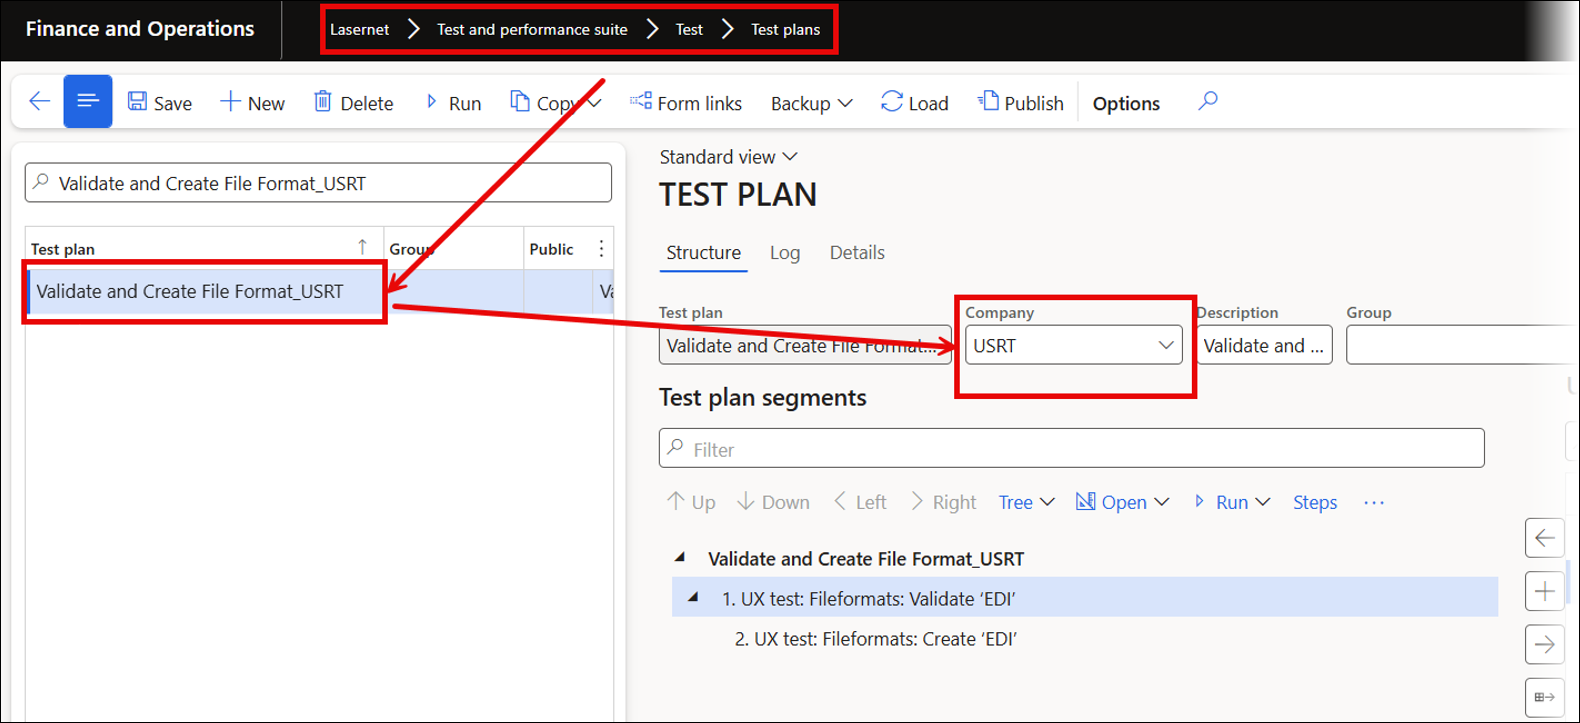
The Test plan will be run in the company USRT, regardless of working in the company USMF.
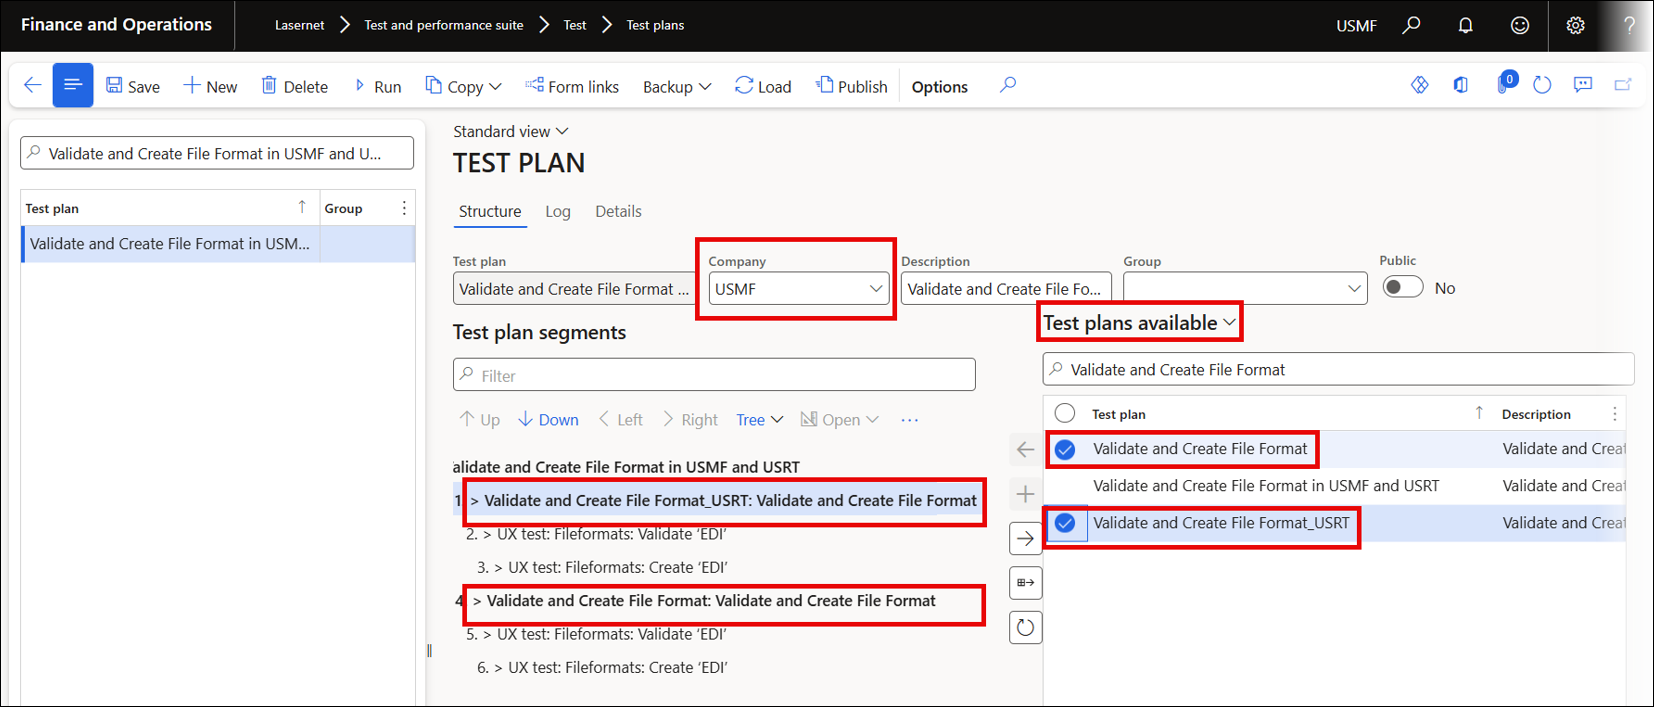
Now, it is necessary to integrate both recordings into a single Test plan. This will facilitate running the Test plans, resulting in the creation of the required file format in both companies. To do so, either prepare a Test plan for each of the companies using USMF and USRT or select both Test plans in the company that includes them both.
Select and add the Test plans from the Test plans available section.
A similar option for working across companies exists in Top Picking and Batch Bundling, from which it is possible to create a Test flow with Test checkpoints across multiple legal entities.

Working with Local Files in UX Tests and Test Plans
The Test and Performance Suite includes an option for working with attachments. In standard FinOps, playing back a recording that involves adding attachments to an entry (record) is not supported.
When preparing a task recording that involves uploading attachments, the Test and Performance Suite can simulate this upload by loading files from Azure instead of from local file folders.
The recording will save attachments in Azure storage and use the stored file instead of a local version.
A similar method is used for backups in Lasernet FO Connector, enabling users to upload local files as part of a recording. Playback retrieves the file from Azure rather than locally, so anyone can access the same recording even without the original file.
This method works well for setting up new environments or configuring third-party or ISV solutions.
The Test and Performance Suite is designed to automatically save documents, such as the example below, when these are included in a recording. This ensures dependable playback by facilitating the loading of documents directly from Azure storage rather than relying on local files.
A document upload will be stored in and retrieved from Azure storage when playback is initiated.

Similarly, a configuration file can be saved to Azure and loaded from there as needed during playback.
Azure storage is used for saving attachments and files. When a playback occurs, any local files saved as part of a recording are retrieved from this storage rather than being accessed directly. During playback, files are loaded through Azure storage, ensuring that the entire process is seamlessly simulated.

Form Links
Form links enable users to add a UX Test (single task recording) or a Test plan (multiple recordings or plans) to any form, enabling playback in the current context. You can reuse form details, such as a customer account, in later playbacks.
When a Form link is added to a UX Test without any existing task recordings, the recording will automatically begin the first time the Form links button is clicked. This approach ensures that the recording accurately starts from the intended point within the form.
UX Test Form links:
Test plans Form links:
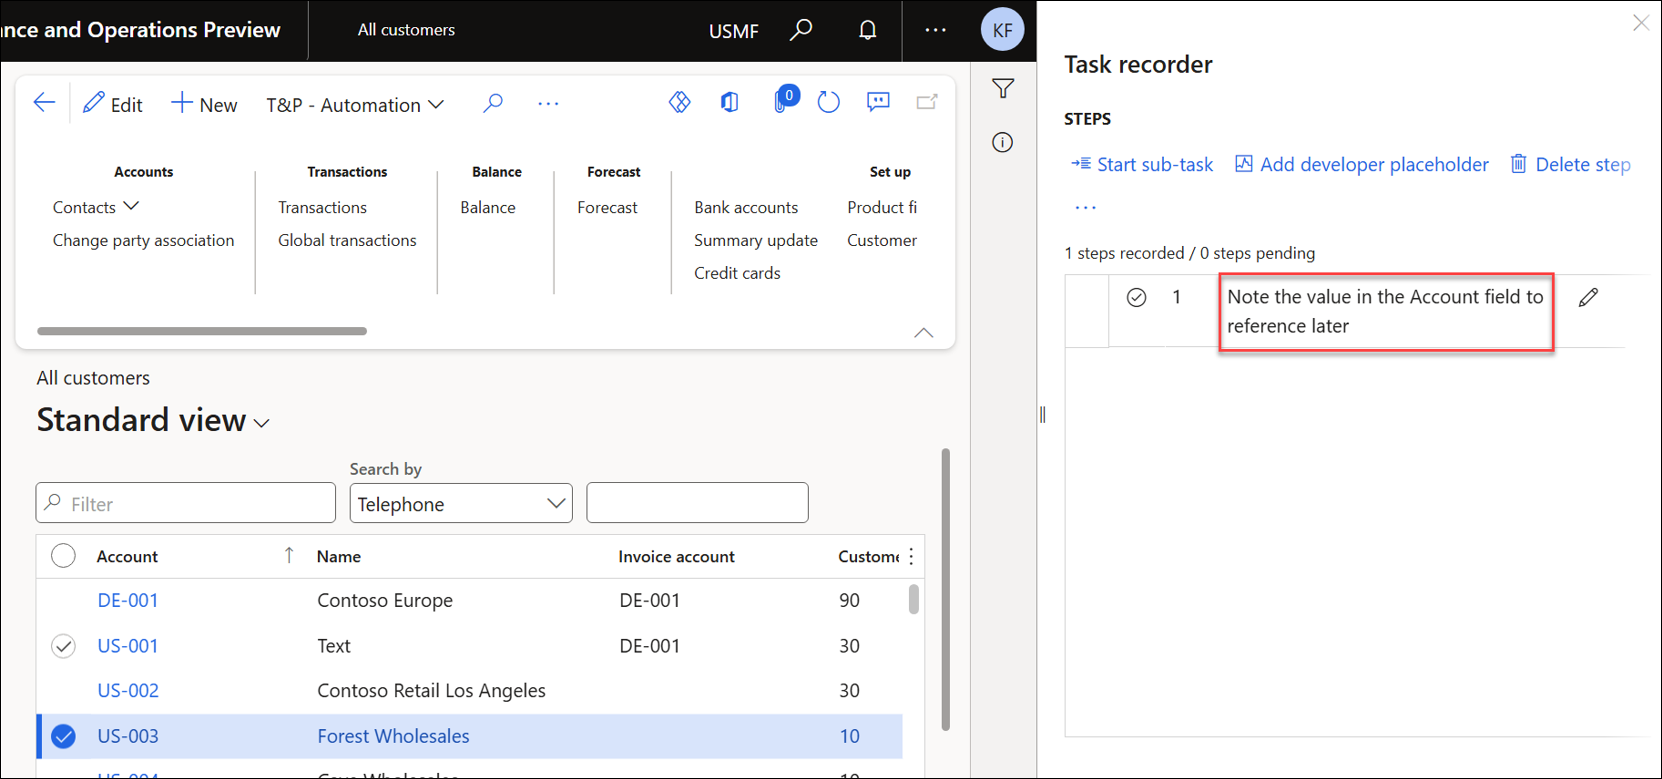
The steps below describe the process for incorporating a value into a recording. This example demonstrates how to copy and paste an account number and then use this value as a filter in the Lasernet Archive to display only entries associated with that specific account.
Open the customer form and start the Task recorder. Avoid any actions, as the current record will be used for playback.
Enter a Recording name and Recording description, then click Start.
Right-click the Account field and select Task recorder > Copy.
The value selected for Account can now be used during playback as part of the process.

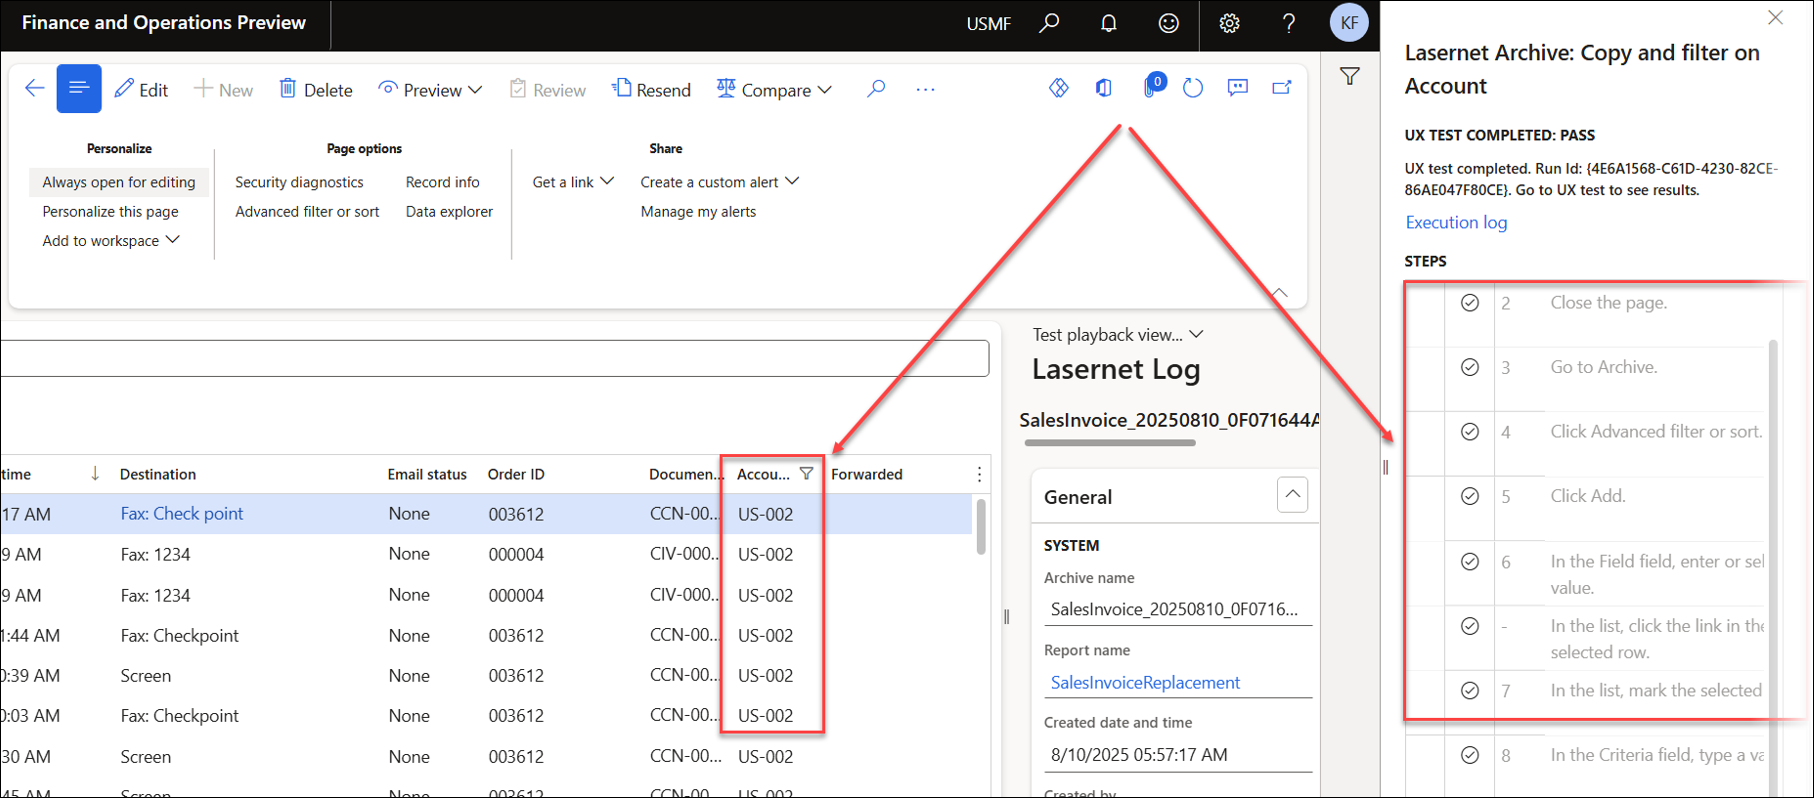
Open the Lasernet Archive and click Advanced filter or sort from the Action pane.
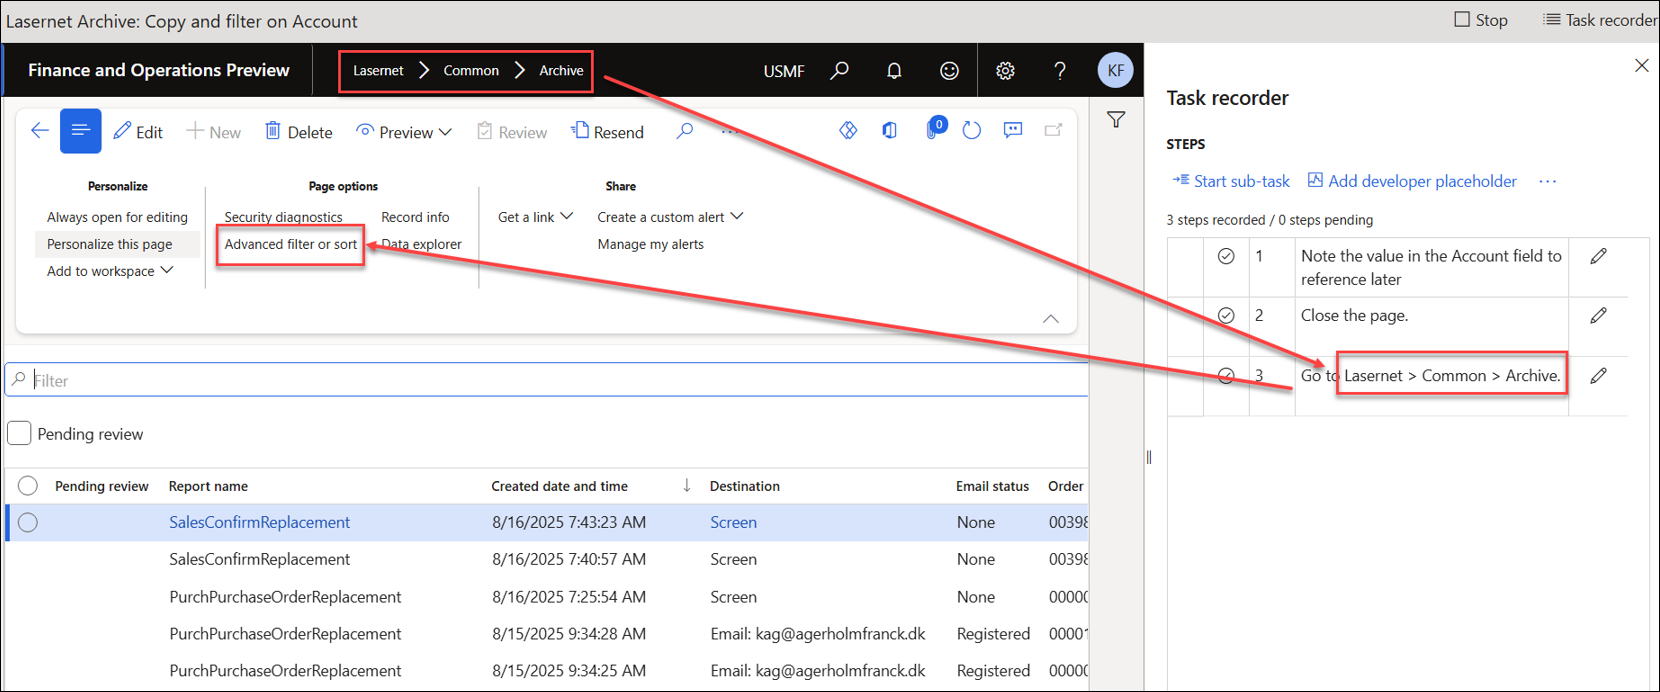
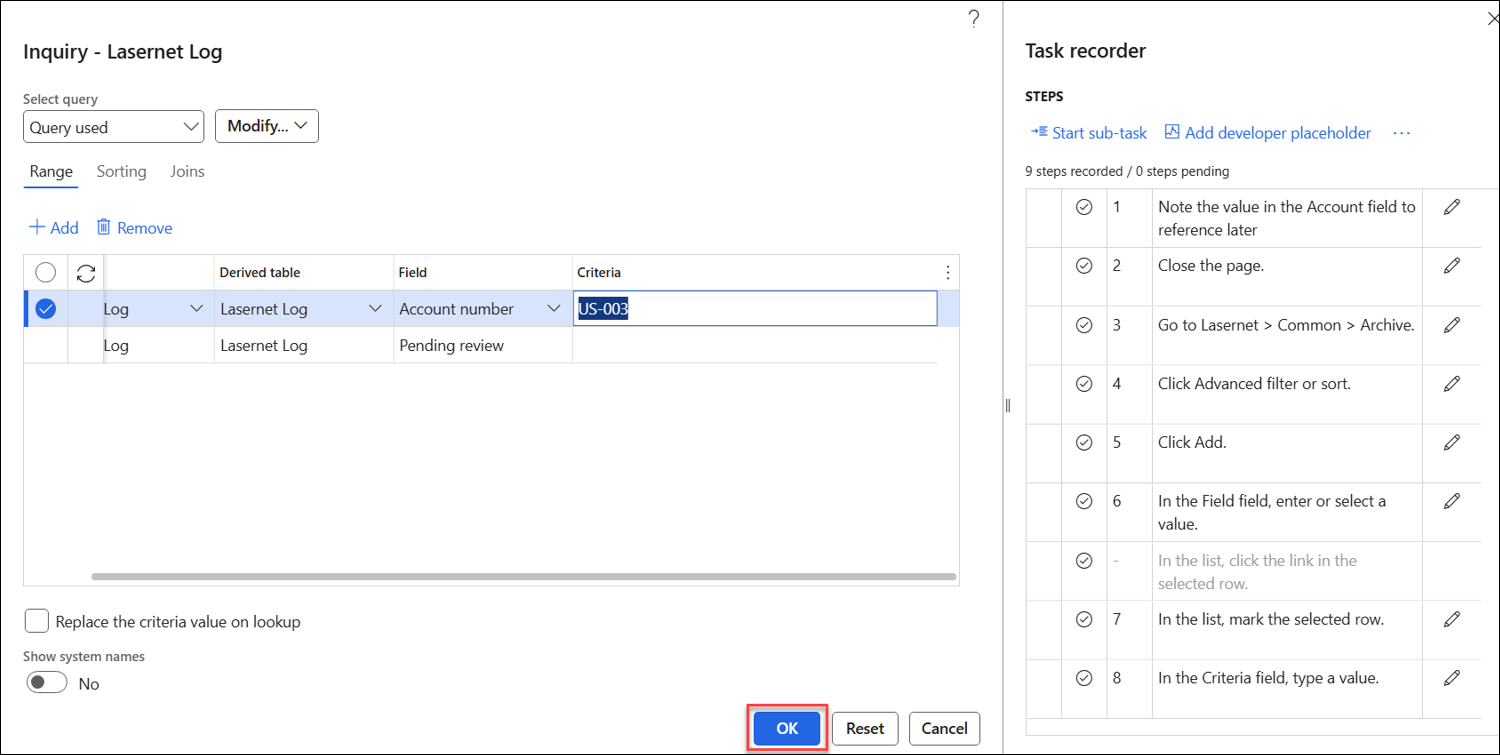
Add the Field “Account number”, then right-click it and select Task recorder > Paste > CustTable_AccountNum : US-003. During playback, the value US-003 will be replaced with the value selected on the Customer form.
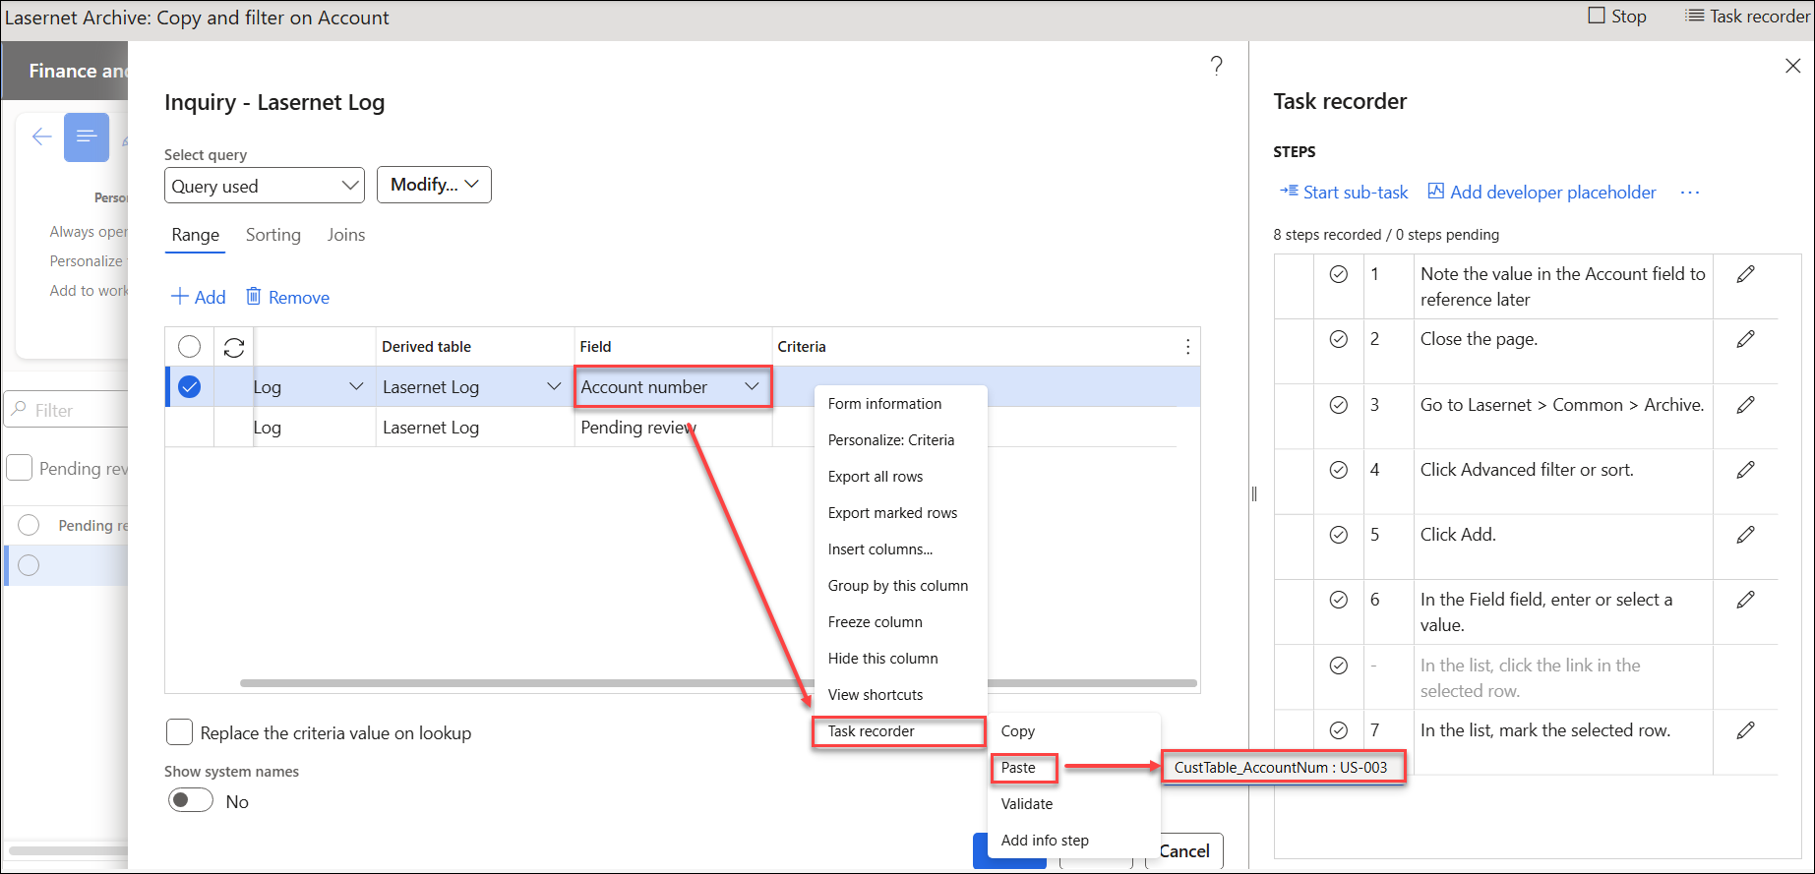
Click OK to add this step to the recording.
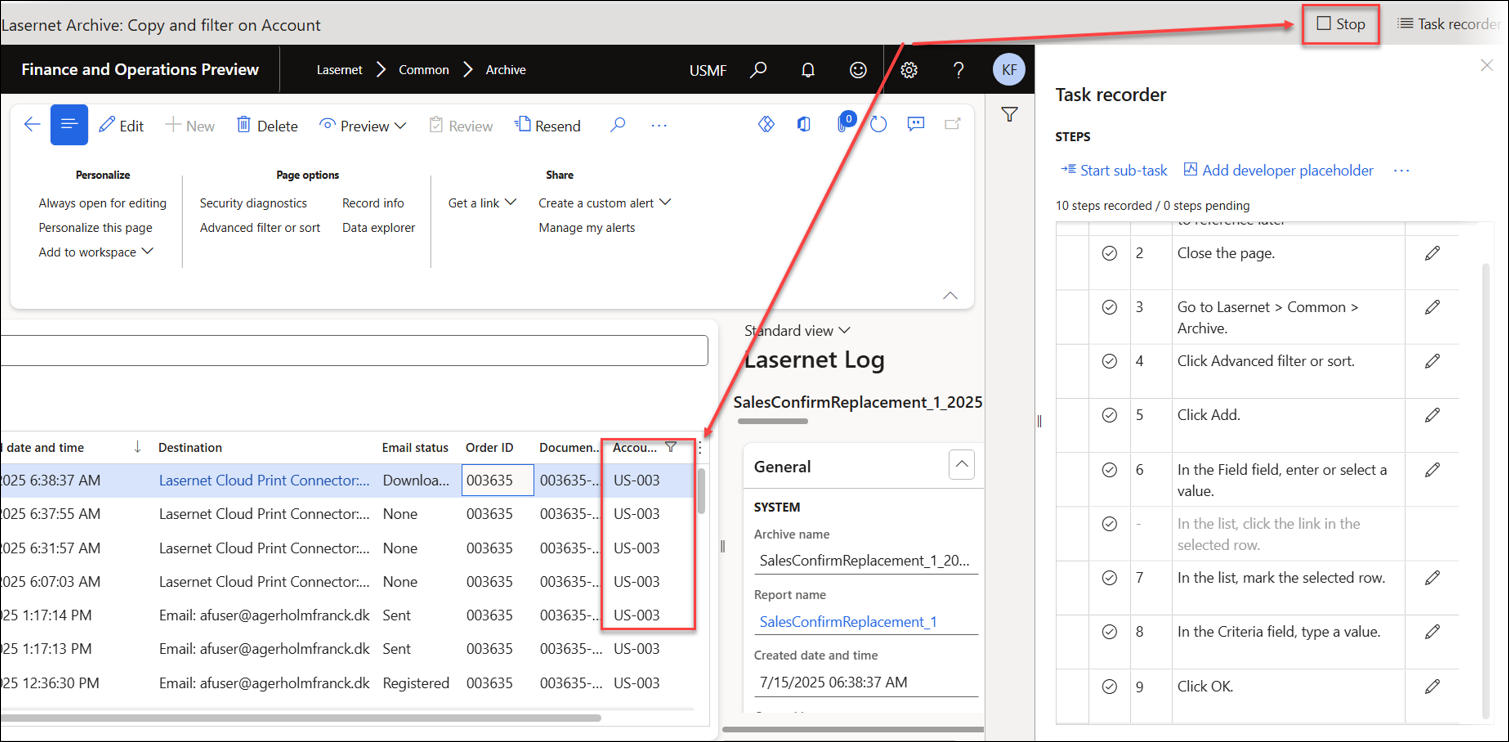
The entries in the Lasernet Archive are now filtered. Click Stop to end the recording.
Click LASERNET – Create UX test to save the recording as a UX Test.
Use the Form links button to add the recording to the form.
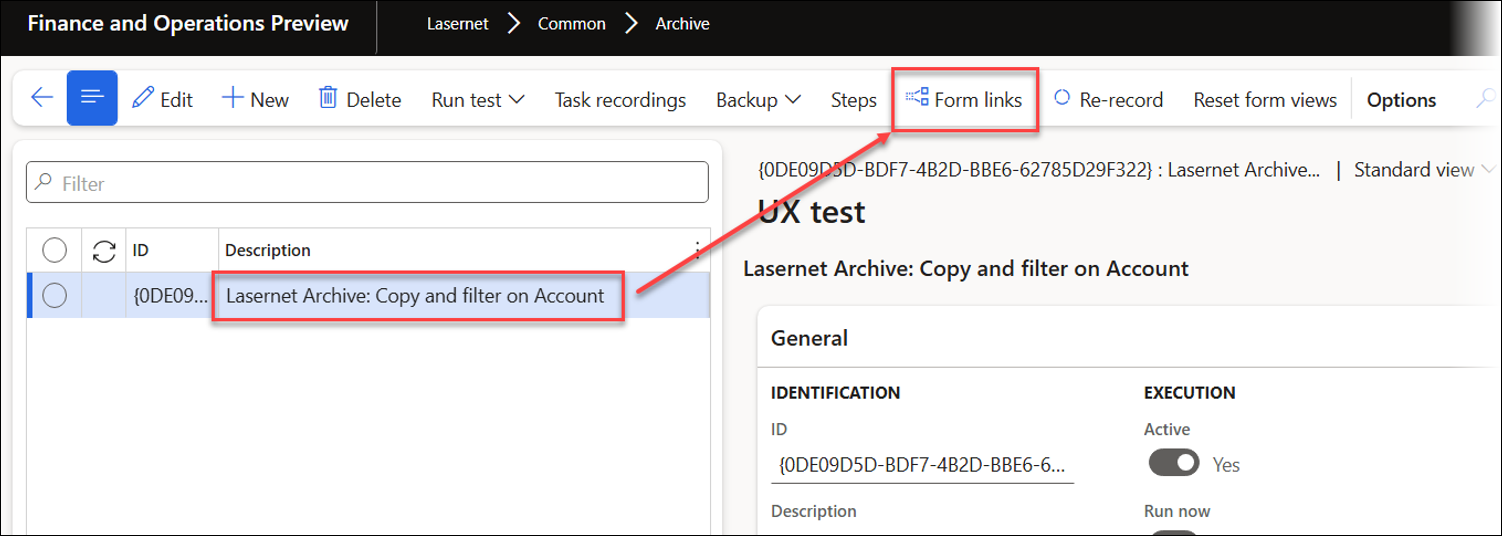
This example uses the CustTable form.
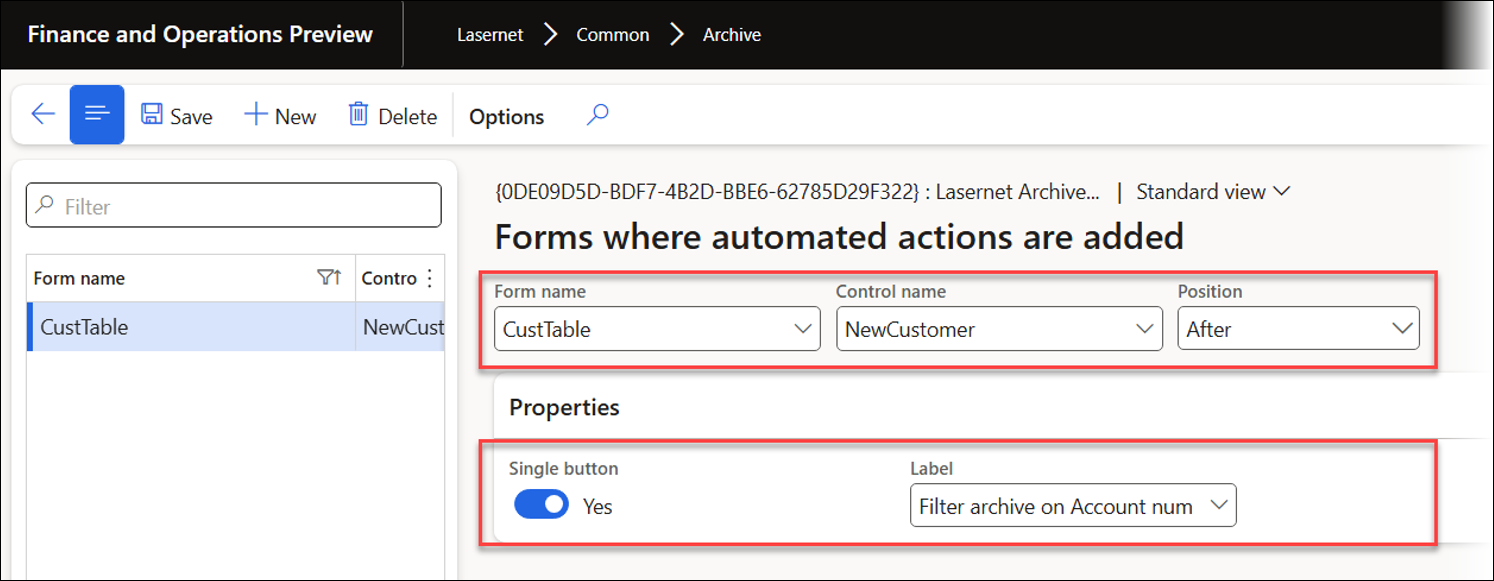
When reopening the customer form, a Filter archive on Account num button appears. Clicking it filters Lasernet Archive entries to find the selected customer account.

Only records pertaining to the selected account (US-002) are displayed.
The pane displayed on the right-hand side of the page can be hidden by toggling the appropriate button (Hide actions pane on replay).
Re-Record a Task Recording (UX Test)
An existing recording can be replaced within a UX Test using the Re-record option.
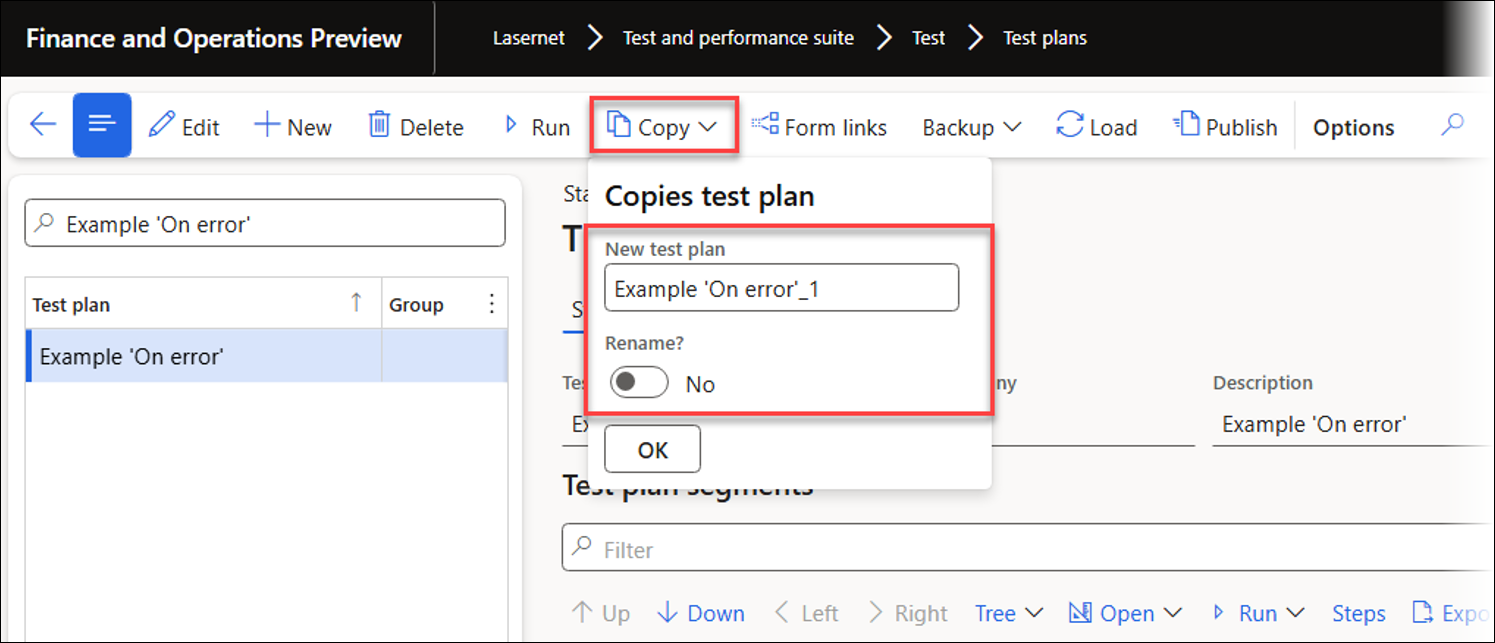
Copy and Rename
A Test plan can be duplicated by using the Copy feature and renamed by using the Rename option within the Copy menu.
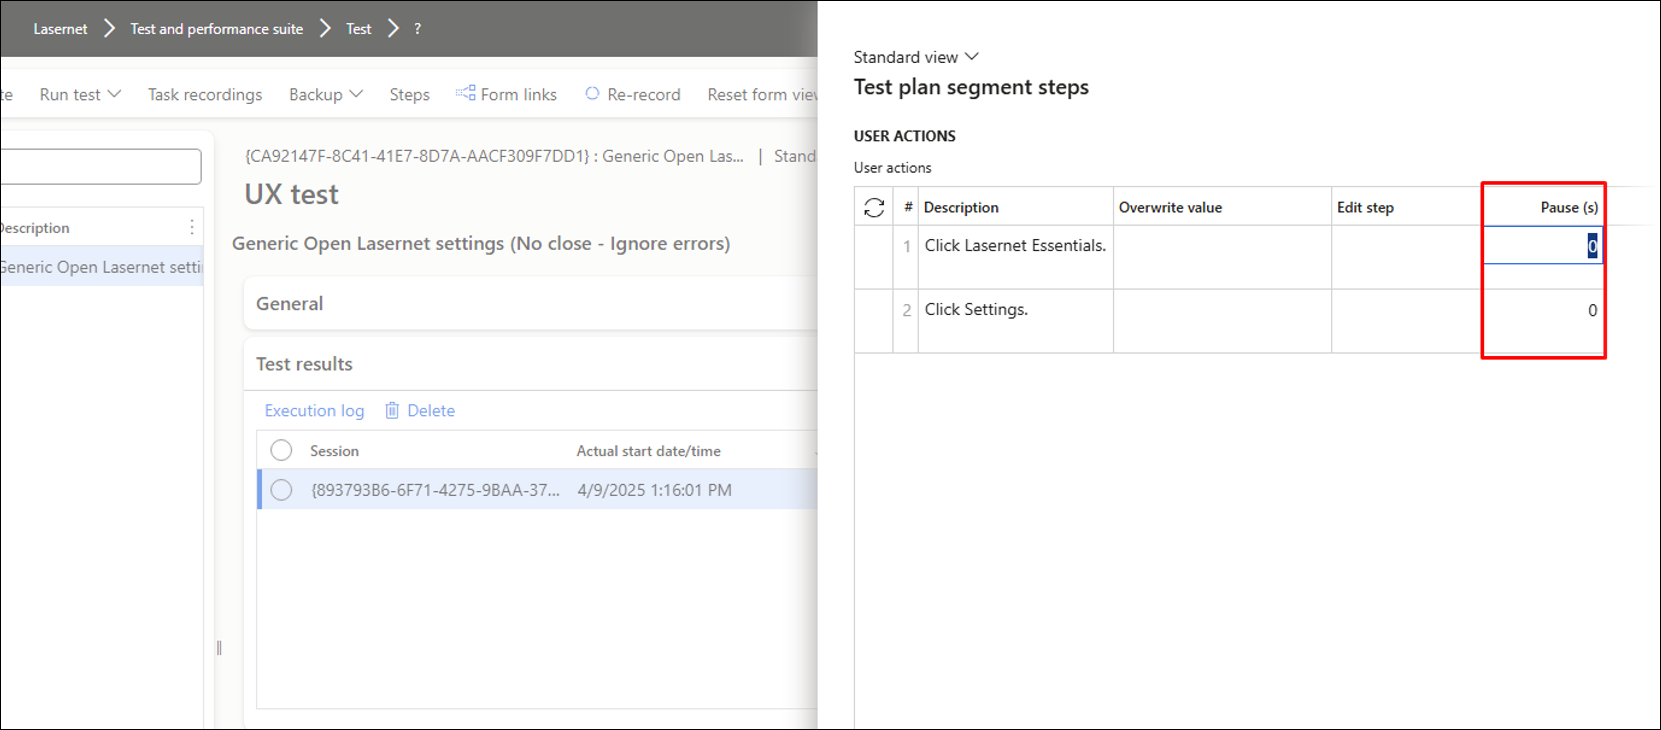
Pause
It is also possible to add a pause after any step within a task recording (UX Test), which is helpful for automatic playback during presentations.
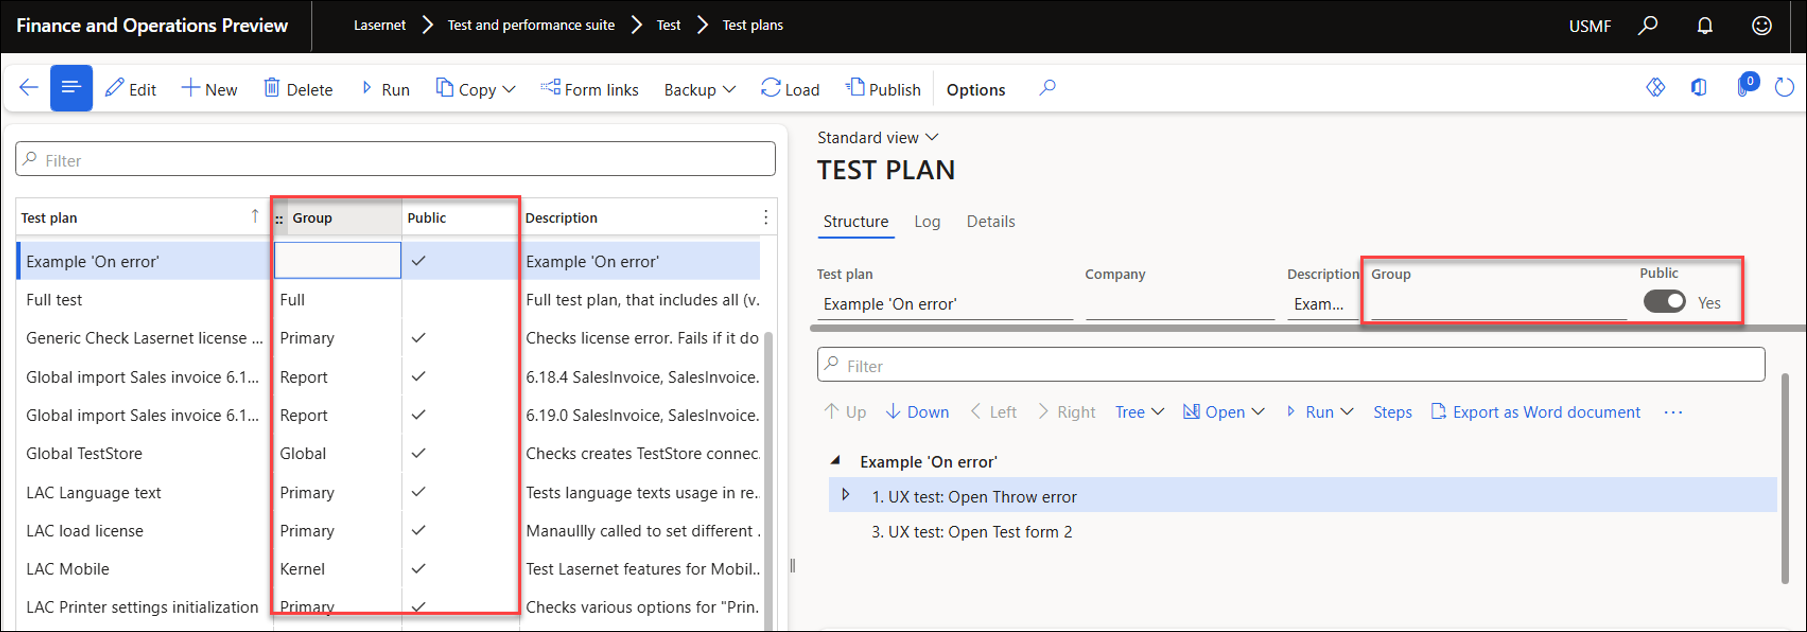
Test Plans: Group and Public
It is possible to assign a Group to a Test plan, dividing your Test plans into specific categories. Additionally, you can specify whether a Test plan is Public, indicating whether it is intended to be shared or accessible by others.
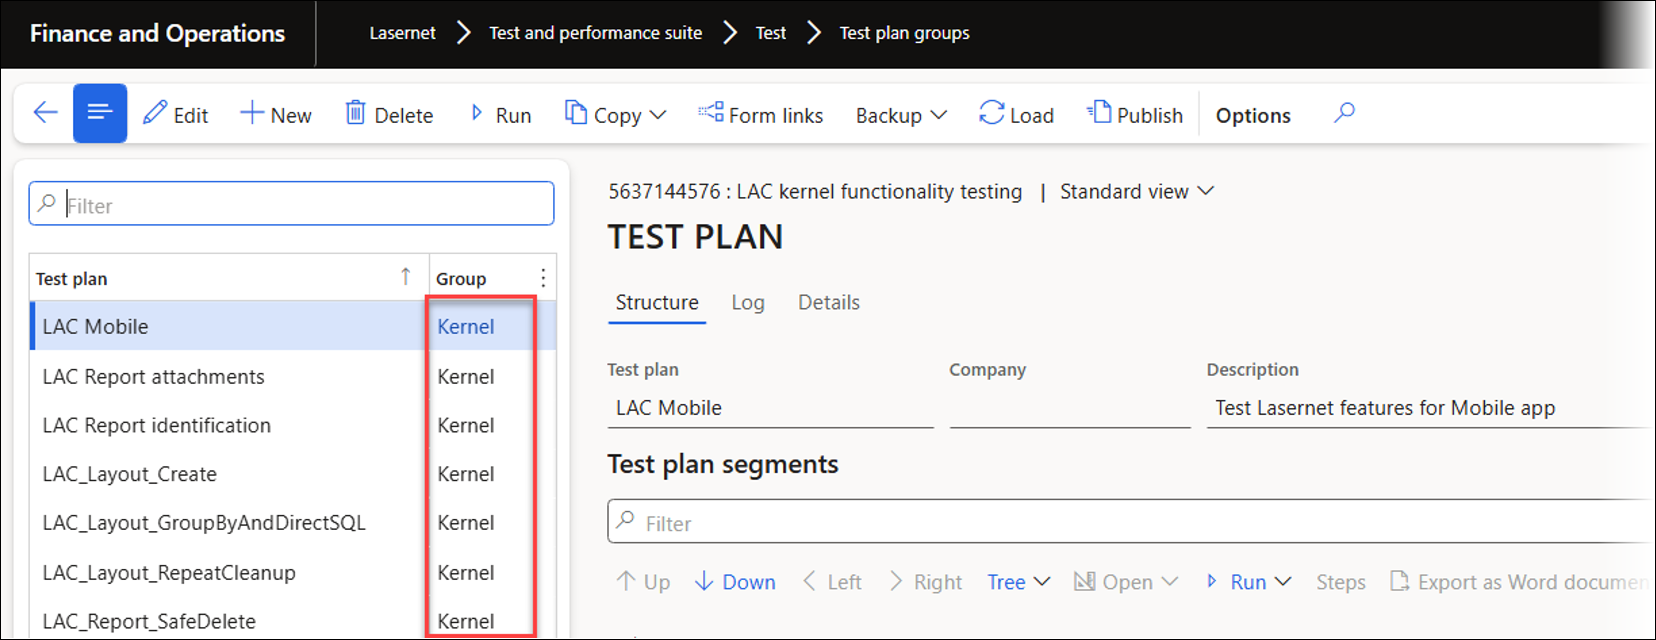
To view which Test plans are linked to each group, navigate to Lasernet > Test and performance suite > Test > Test plan groups.
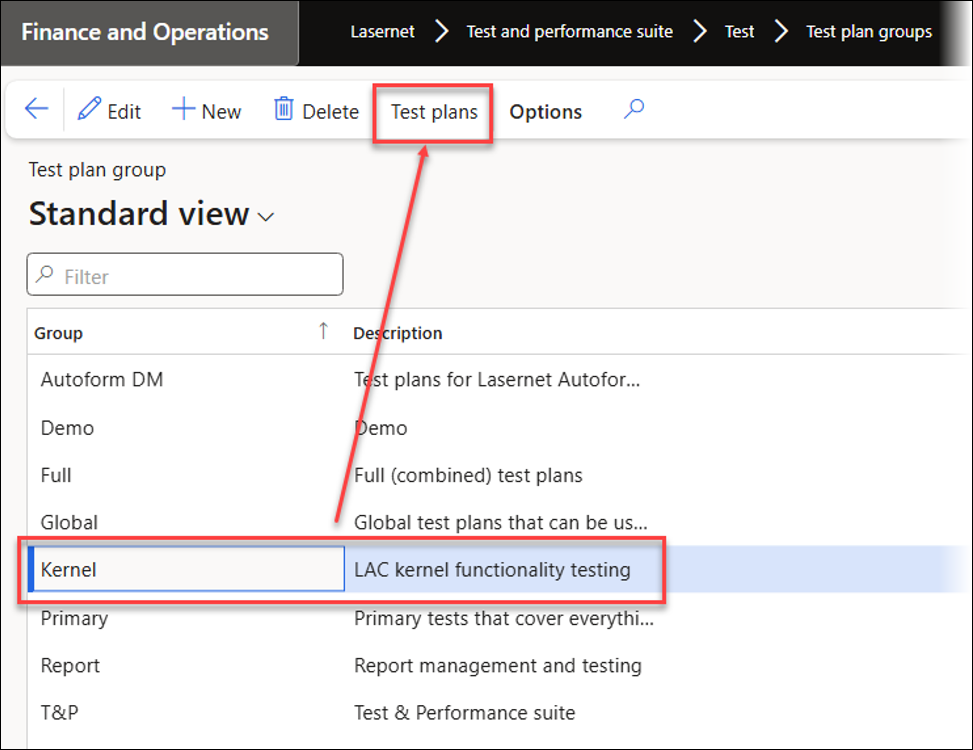
Clicking the Test plans button will show all the Test plans for that group.
Backup
It is possible to back up (export and import) single UX Test recordings as well as Test plans.
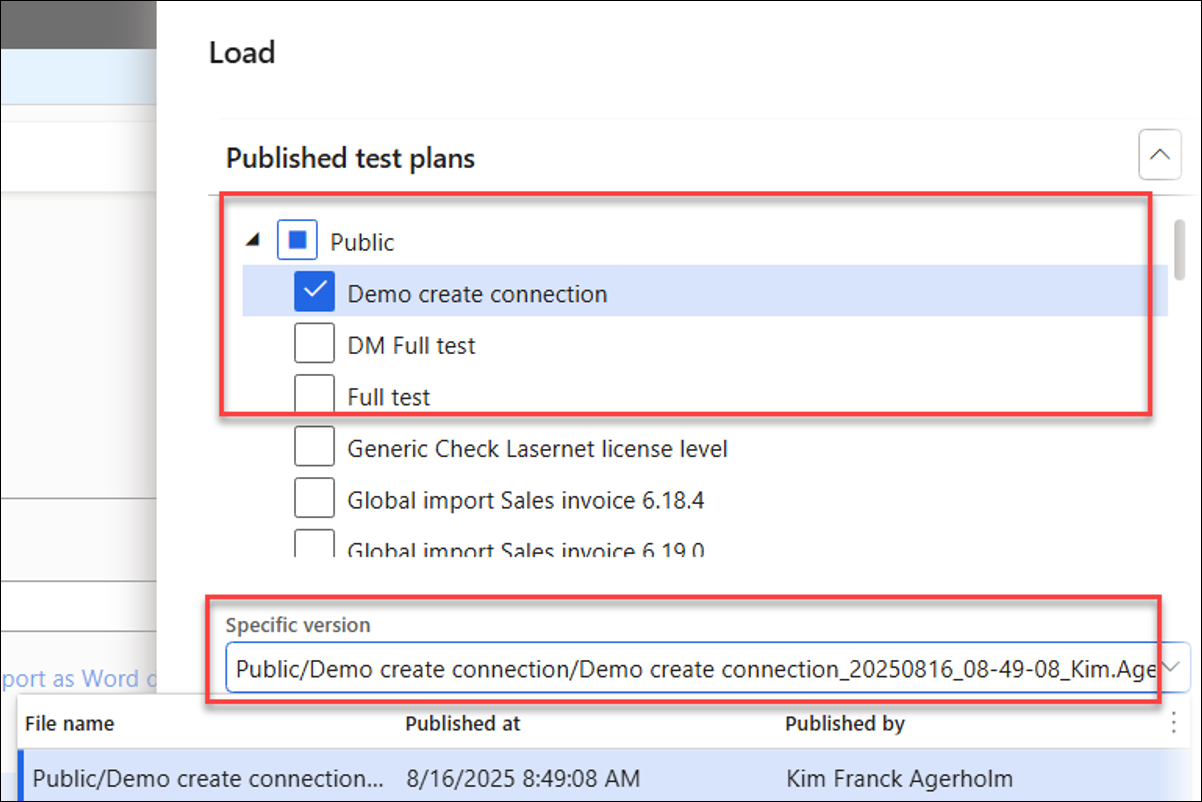
Load and Publish
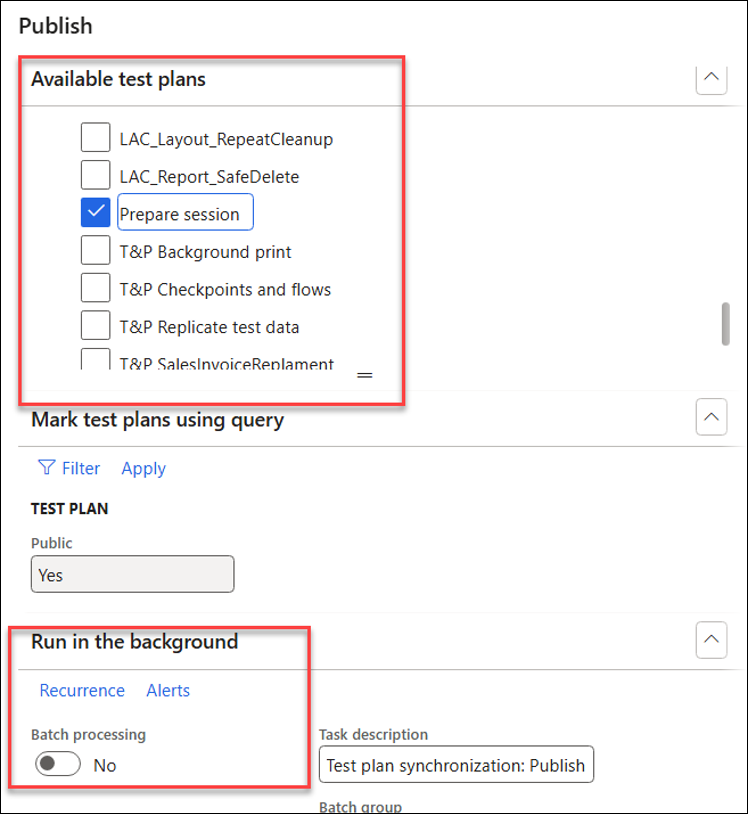
The Load and Publish features enable users to publish and download Test plans to and from Azure storage, making it easy and fast to share test plans among different users and environments.
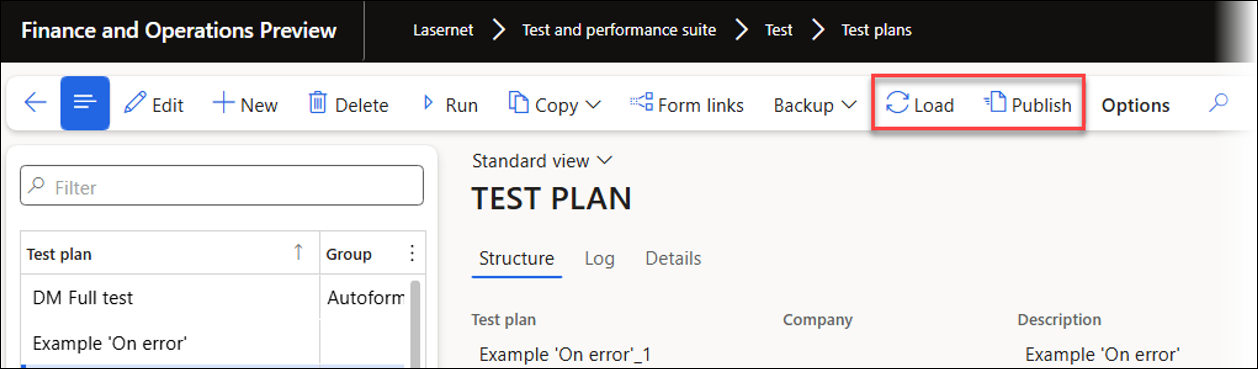
When clicking Load, a form is displayed that enables users to select which Test plans to download (import from Azure storage). Users can choose the Test plans to import and specify a particular version for each Test plan; if the Specific version field is left blank, the system will load the latest available version of the selected Test plan(s). Additionally, Load can be run via a batch task to ensure that the most recent Test plans are always loaded.
Publish enables users to choose which Test plans to upload to Azure storage.
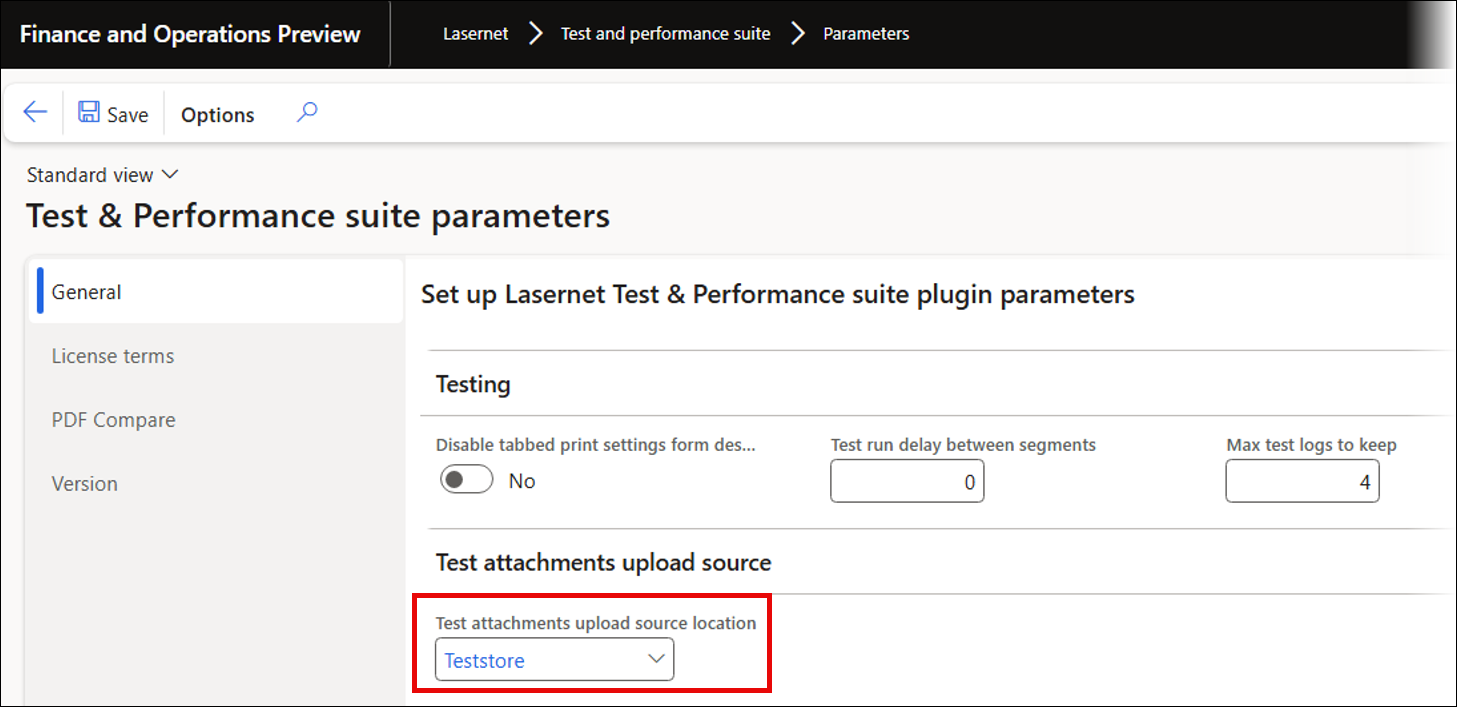
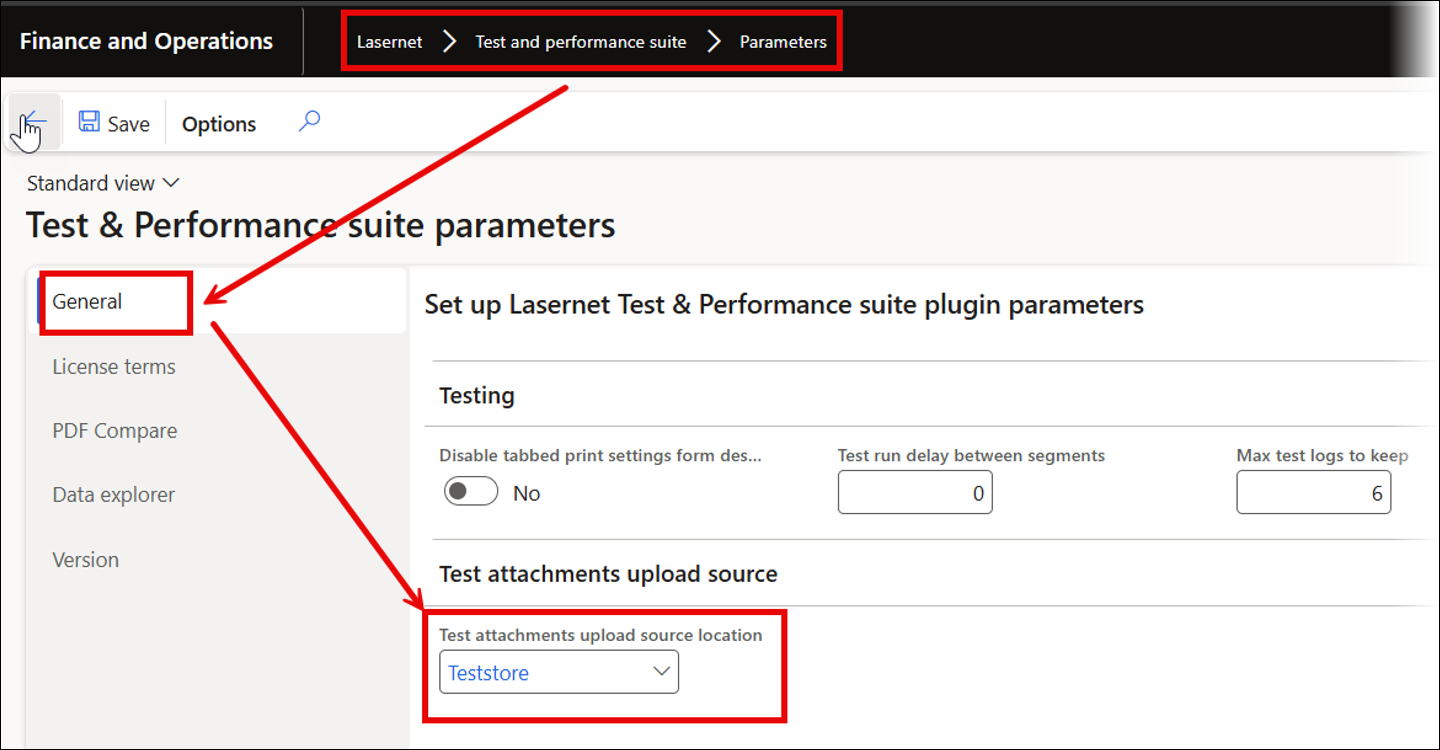
For both Load and Publish, the connection defined in Test attachments upload source location will be used. This can be found by navigating to Lasernet > Test and performance suite > Parameters. This Azure storage connection is also used to simulate local file uploads.
Parameters for Test Plans
Test Logs to Keep
The Max test logs to keep setting determines the number of test logs retained during a Test plan’s run.
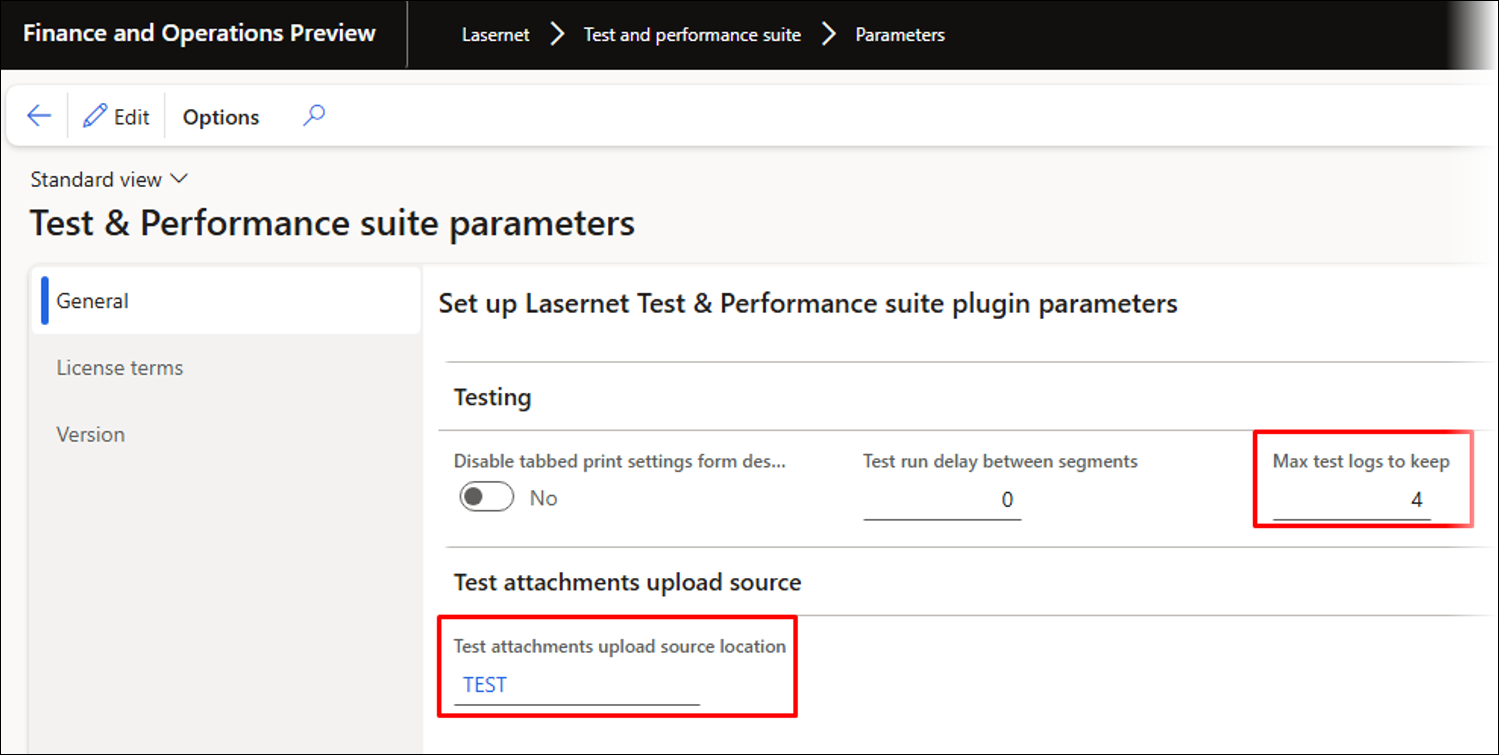
Tabbed printer settings have been introduced to enable playback of recordings that include printer dialogs or settings, which standard FinOps does not support. Tabbed printer settings are enabled by default, but can be switched off by toggling the Disable tabbed print settings from destination button.
The Test run delay between segments option enables users to set a pause between each segment.
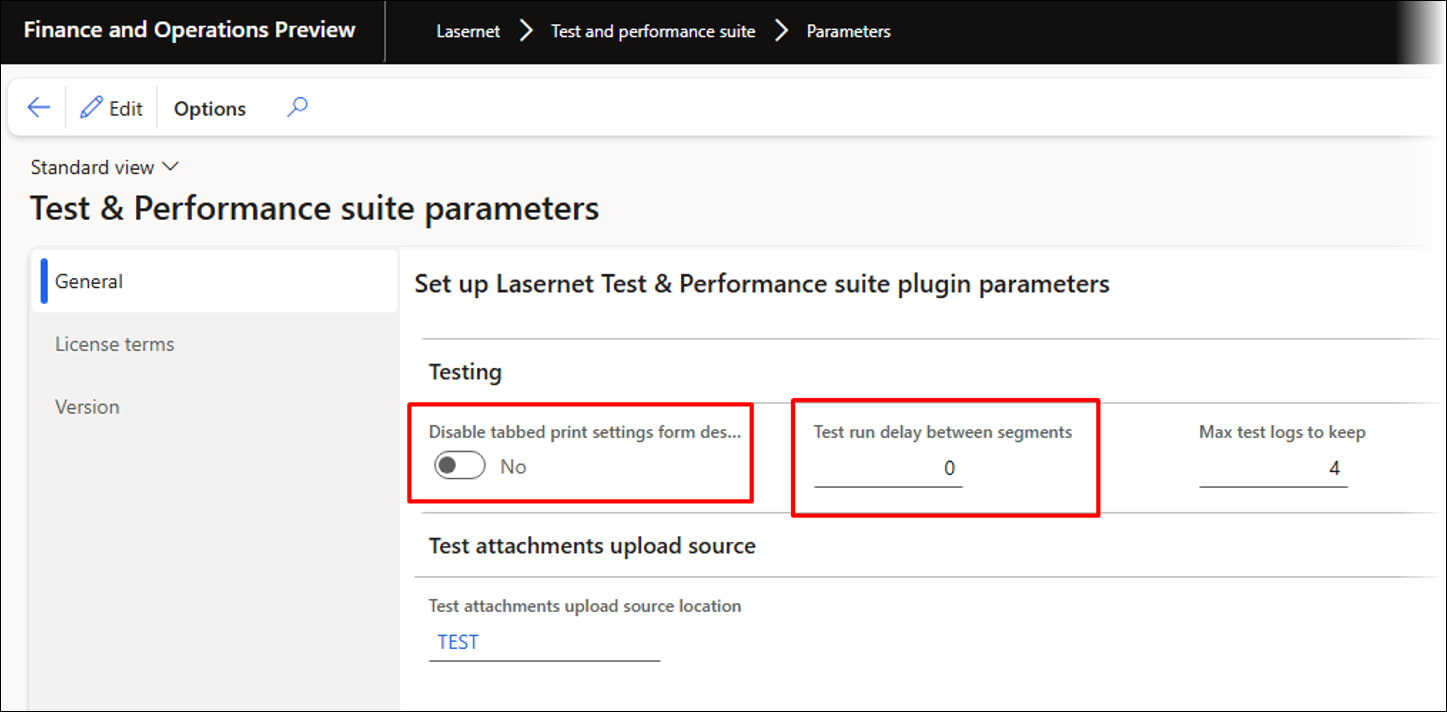
The Test attachment upload source location specifies the connection to Azure storage. It handles files or attachments during recording and playback and is used for the Load and Publish features in UX Tests and Test Plans.
Best Practices for Recordings and Test Plans
Start and end recordings from the main menu unless you are recording the use of a button that requires form context.
Use the Advanced filter when searching for or filtering records, as this ensures accurate retrieval of the appropriate record.
Create short recordings, as they are more manageable and easier to edit than longer sessions.
Use Re-record on the UX Test form to make any changes.
Include a validation step when inserting records to verify that no errors occur and processing continues as expected. This ensures every segment gets a Pass status, which is crucial when using alerts in the event of failures.
Personalization:
If a form does not work during playback but works for other users, try deleting personalization.
Interact with the user interface instead of using the keyboard to ensure that preferred views and customizations are properly saved and applied.
Alerts
Alert rules can be set up for Test checkpoints, Test flows, and Test plans to trigger alerts on failures, such as file differences, playback errors, or incorrect values during playback. Alerts involve notifications about issues. An alert rule can be linked to a report or Query in Lasernet FO Connector, enabling nearly unlimited workflow automation options with Lasernet.
Alert rule:
Test checkpoints:
Test flows:
Test plans:
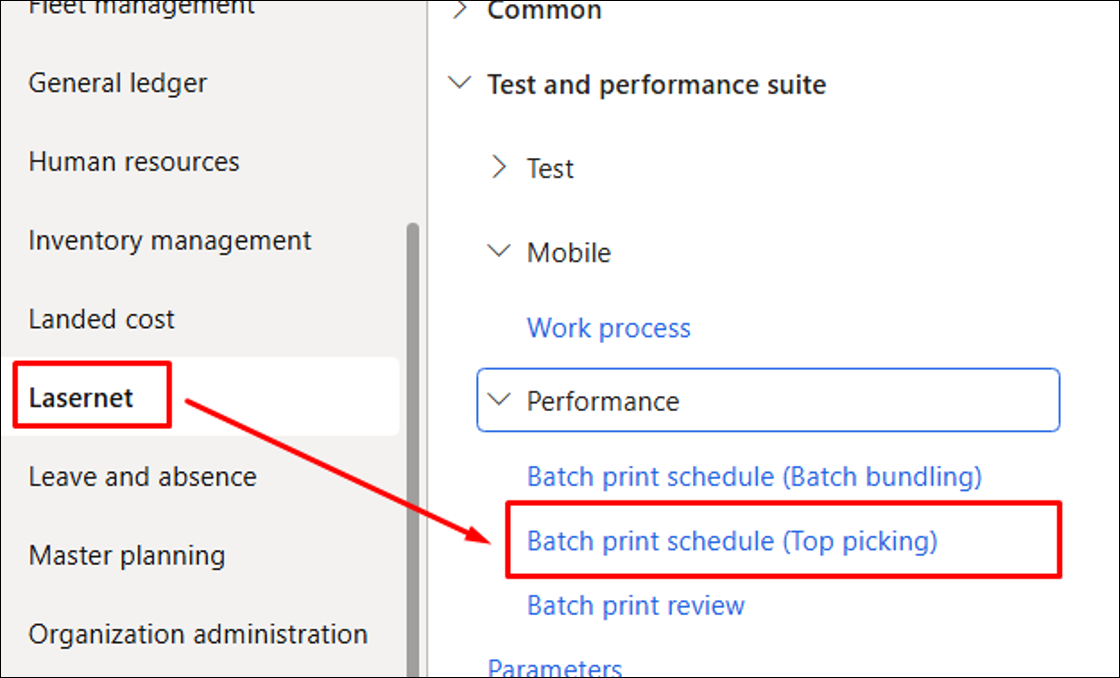
Top Picking for Creating Test Checkpoints
Adding a Test flow via Top Picking
By using Top Picking, you can bulk-insert Test checkpoints into a Test flow and create Test checkpoints across multiple legal entities within the Test and Performance Suite.
This is especially useful when needing to bulk-test across multiple legal entities.
Navigate to Lasernet > Test and performance suite > Performance > Batch print schedule (Top Picking).
Select the desired report.
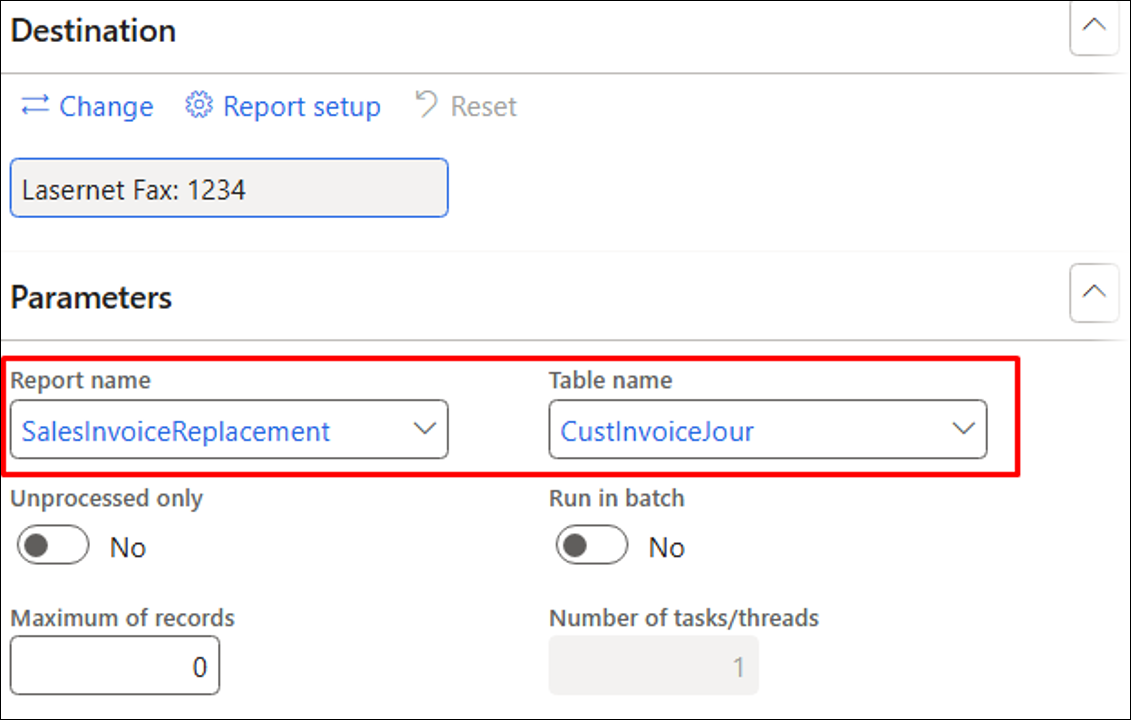
The Maximum number of records (reports) indicates how many will be generated per selected company.
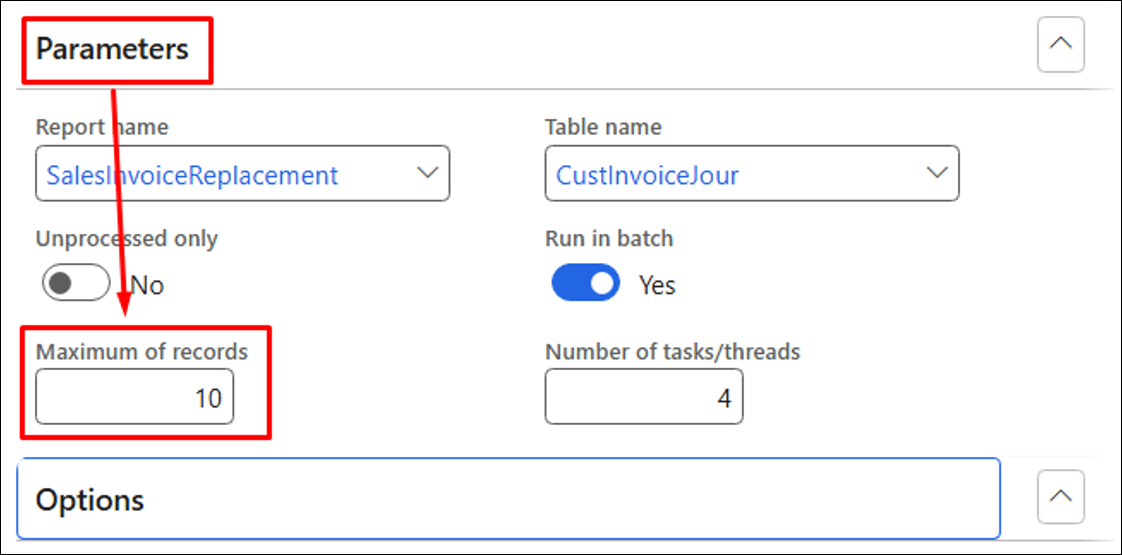
Enable the Create checkpoints option and specify a name for the Test flow within the Advanced settings. You may also enable the Multicompany functionality.
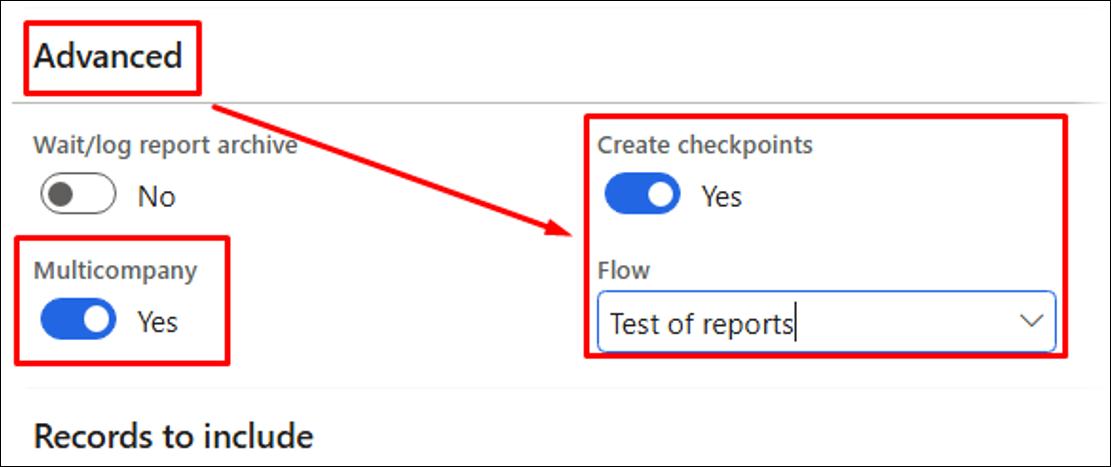
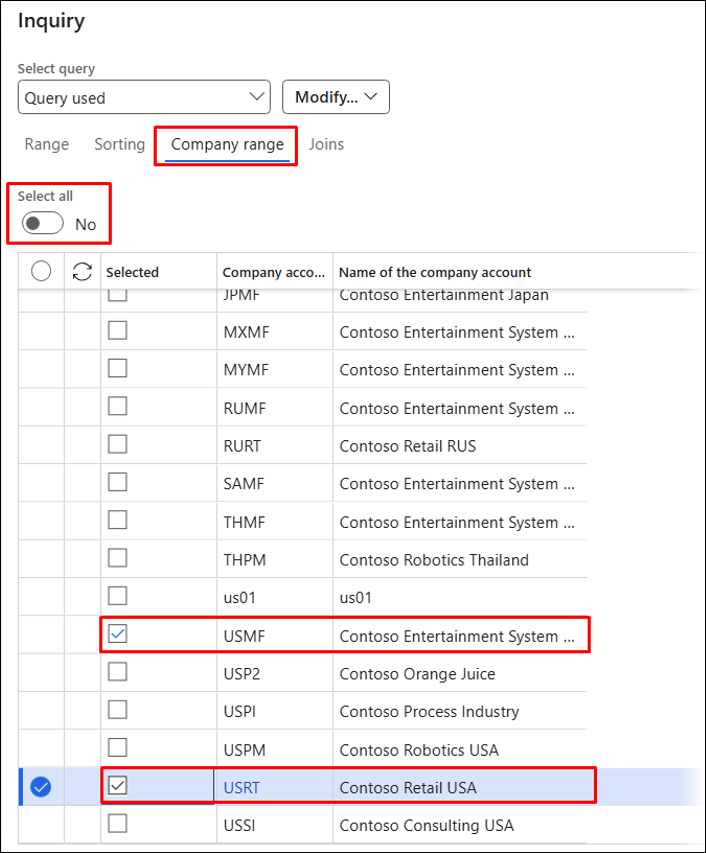
Use the Filter to select legal entities when creating Test flow checkpoints across multiple companies.
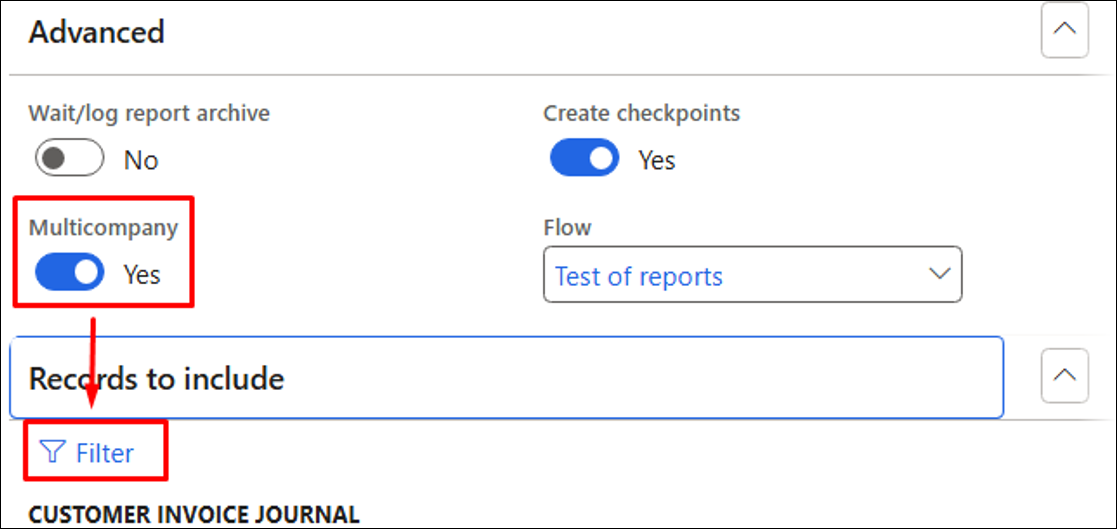
Enable Select all or choose specific companies.
Additional Options for Batch Bundling and Top Picking
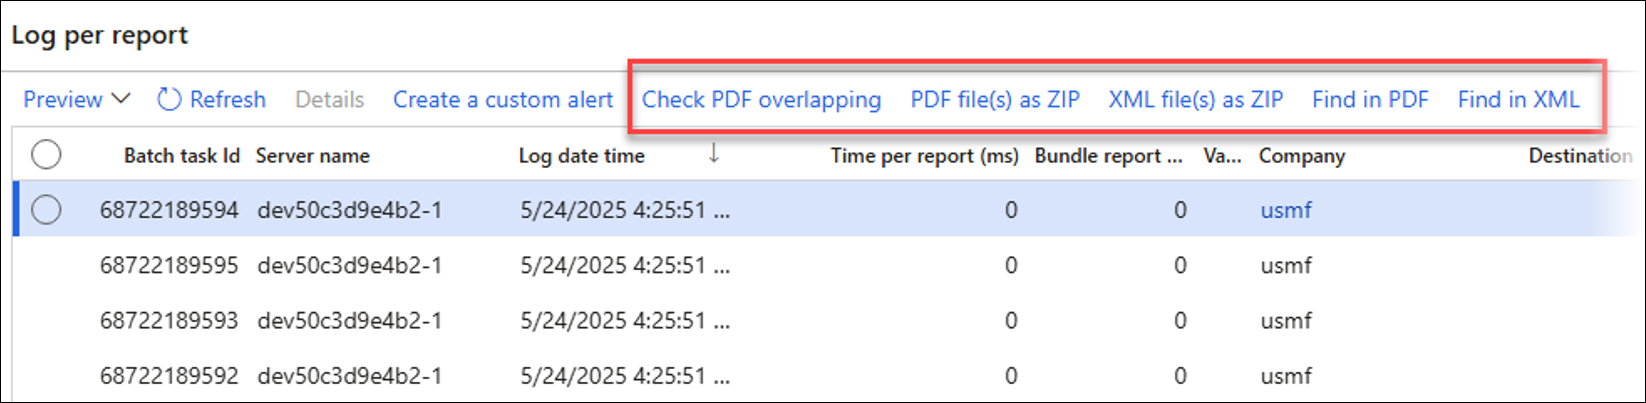
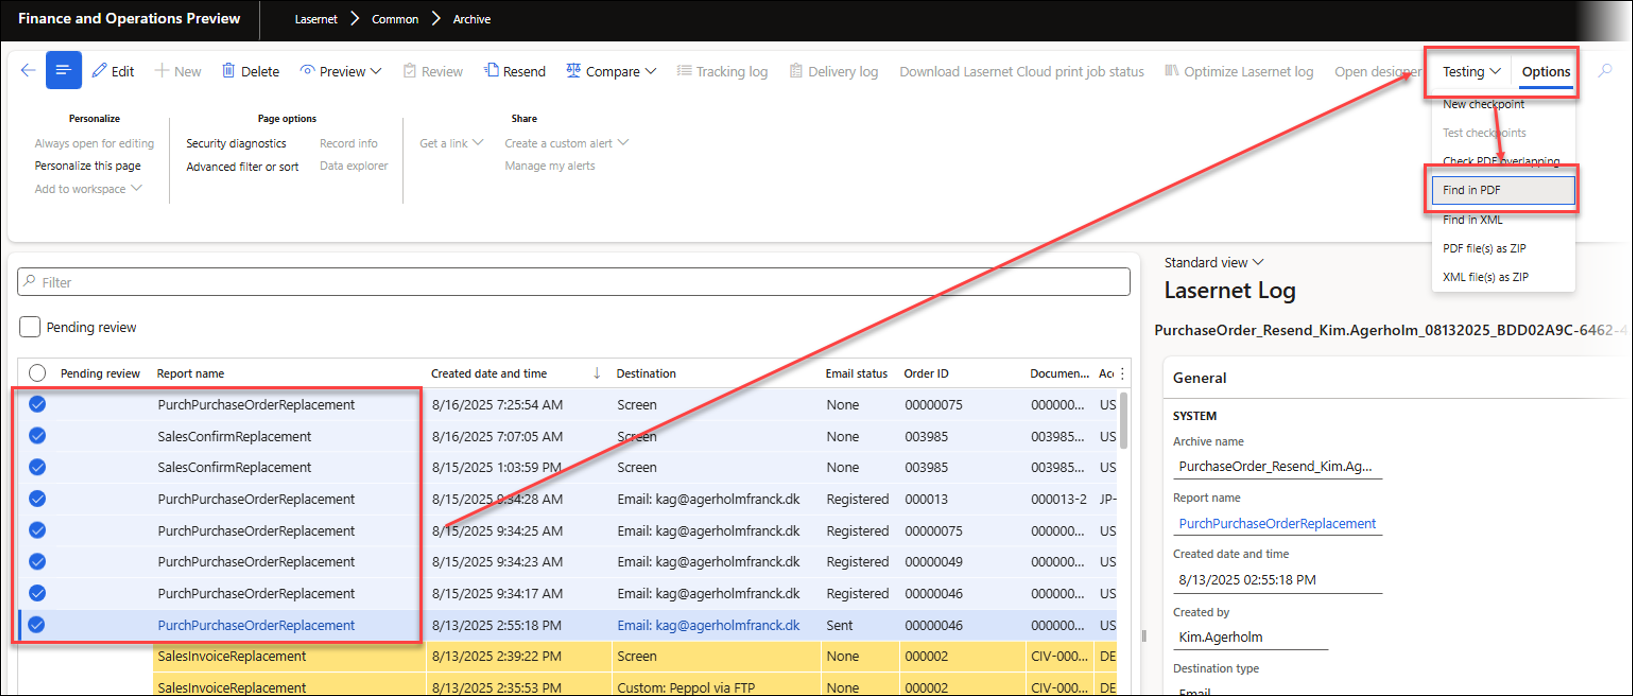
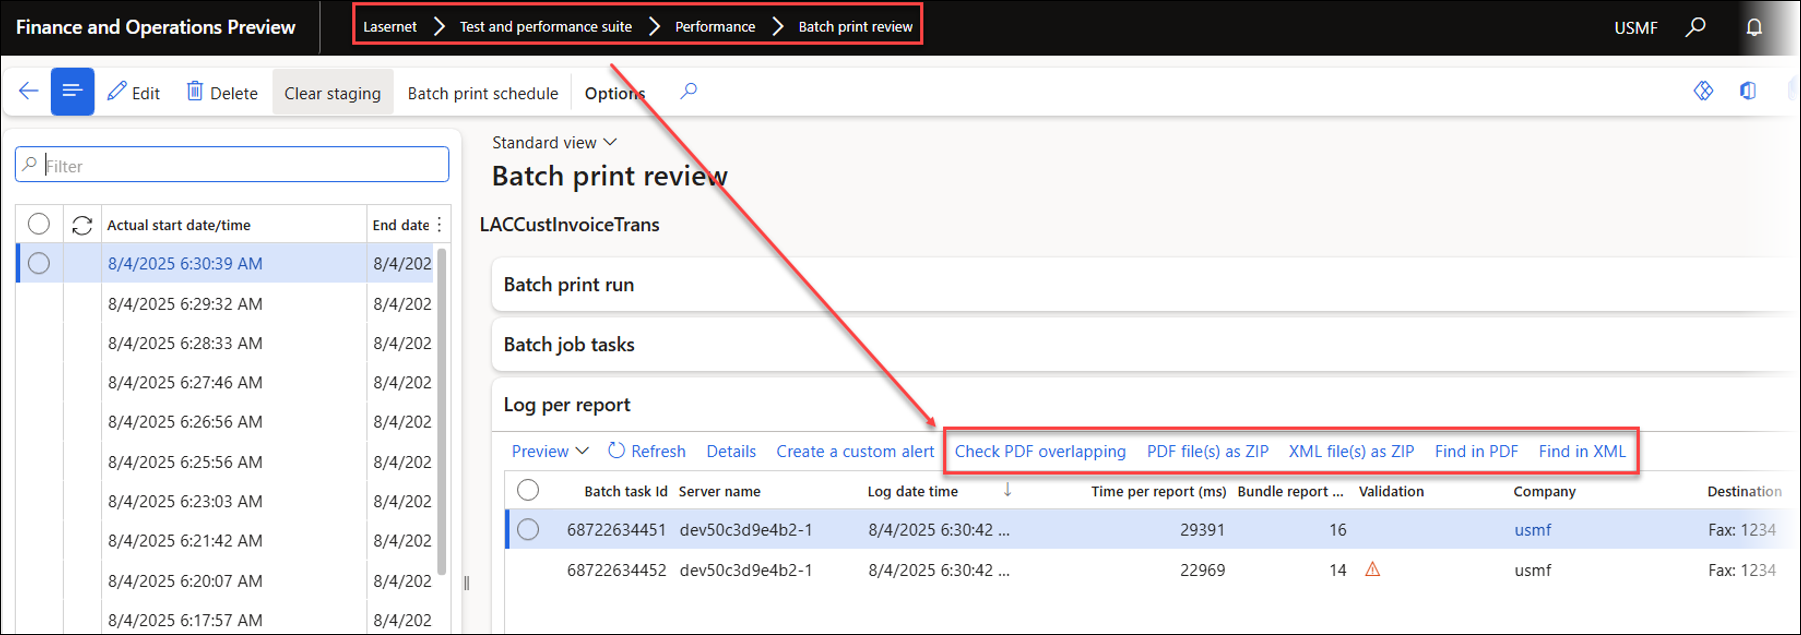
The Test and Performance Suite now offers new options available through both the Lasernet Archive and the Review form for Batch Bundling and Top Picking.
A T&P license is needed to use these features, but a demo license is available for testing.
Check PDF overlapping: Used to identify overlapping fields across multiple PDF documents.
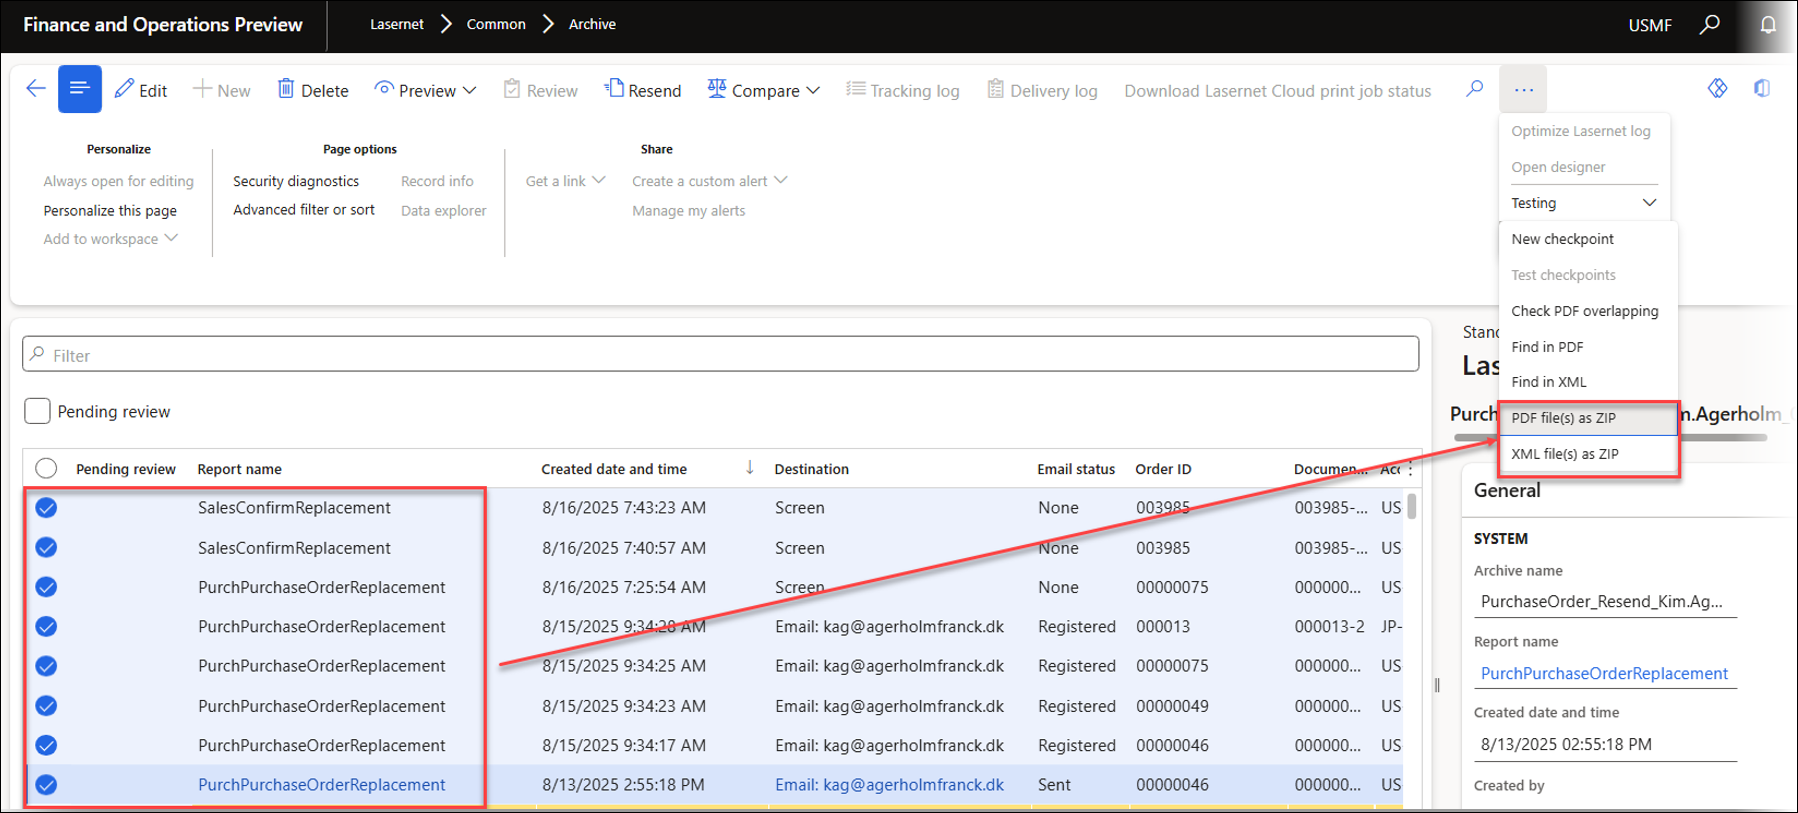
Find in PDF: Used to search for particular values across multiple PDF files (entries from the Archive)
Find in XML: Used to search for specific values across multiple XML files containing entries from the Archive.
XML file(s) as ZIP: Used for zipping XML files into a ZIP file/archive.
PDF file(s) as ZIP: Used to compress PDF files into a ZIP file/archive.
These functions are available directly within the Lasernet Archive.
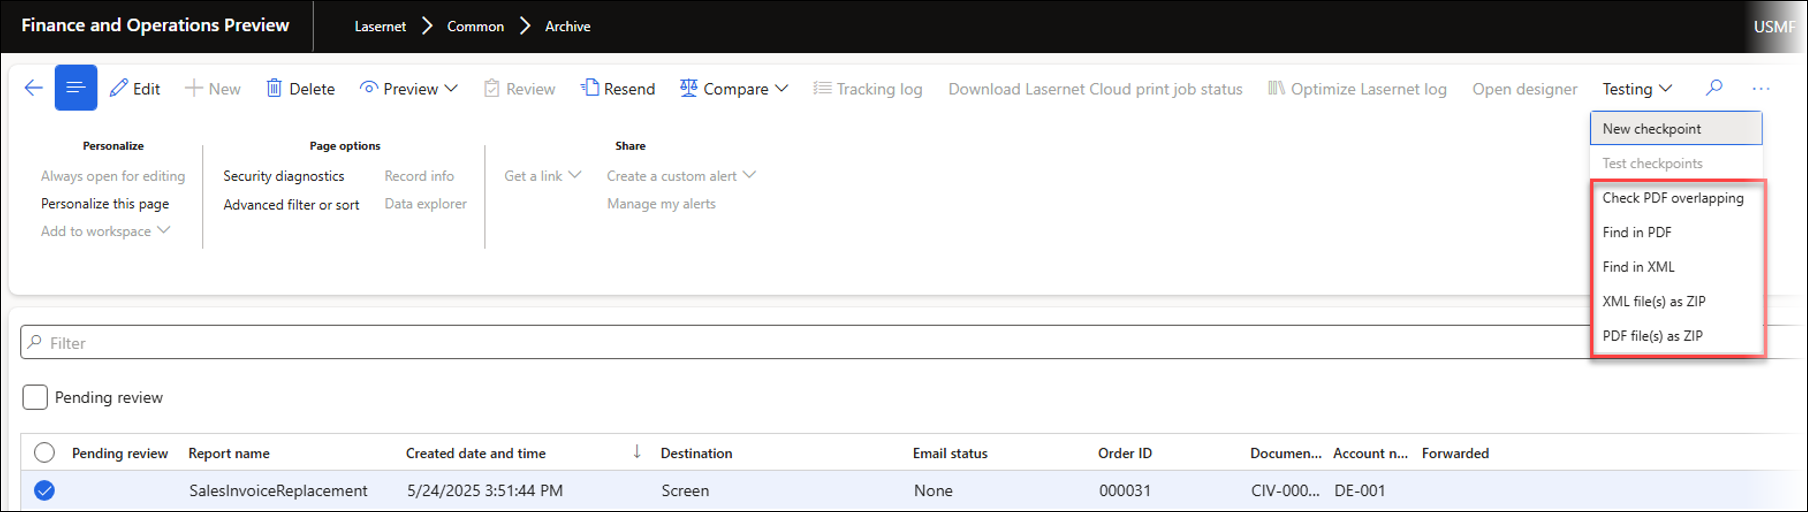
They can also be accessed from the Review form under Batch Bundling and Top Picking, found in the Test and Performance Suite.
Check PDF Overlapping
Check PDF overlapping is useful for confirming whether a report contains overlapping fields, particularly in cases where the maximum length of a field is uncertain.
Select the required entries from the Lasernet Archive.
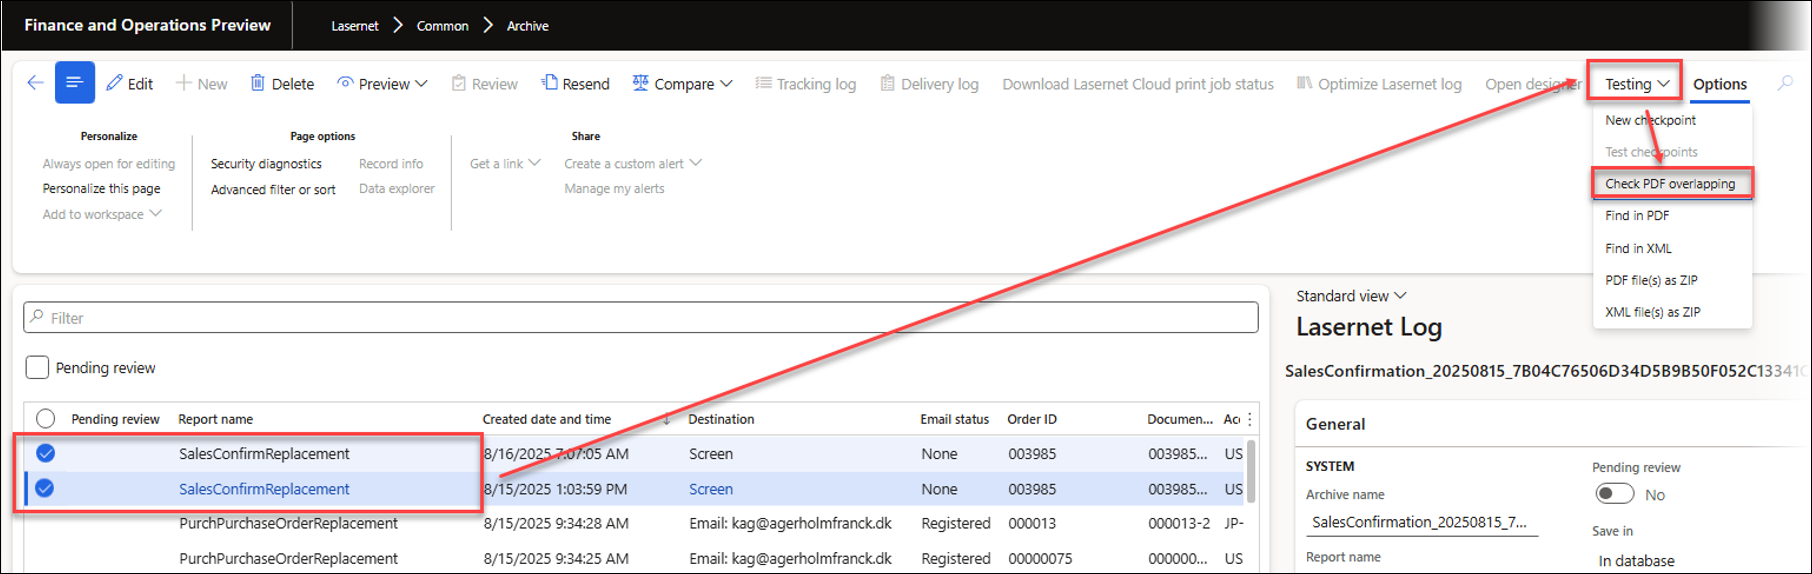
Alternatively, after selecting Check PDF overlapping, use the Filter to specify the desired range.
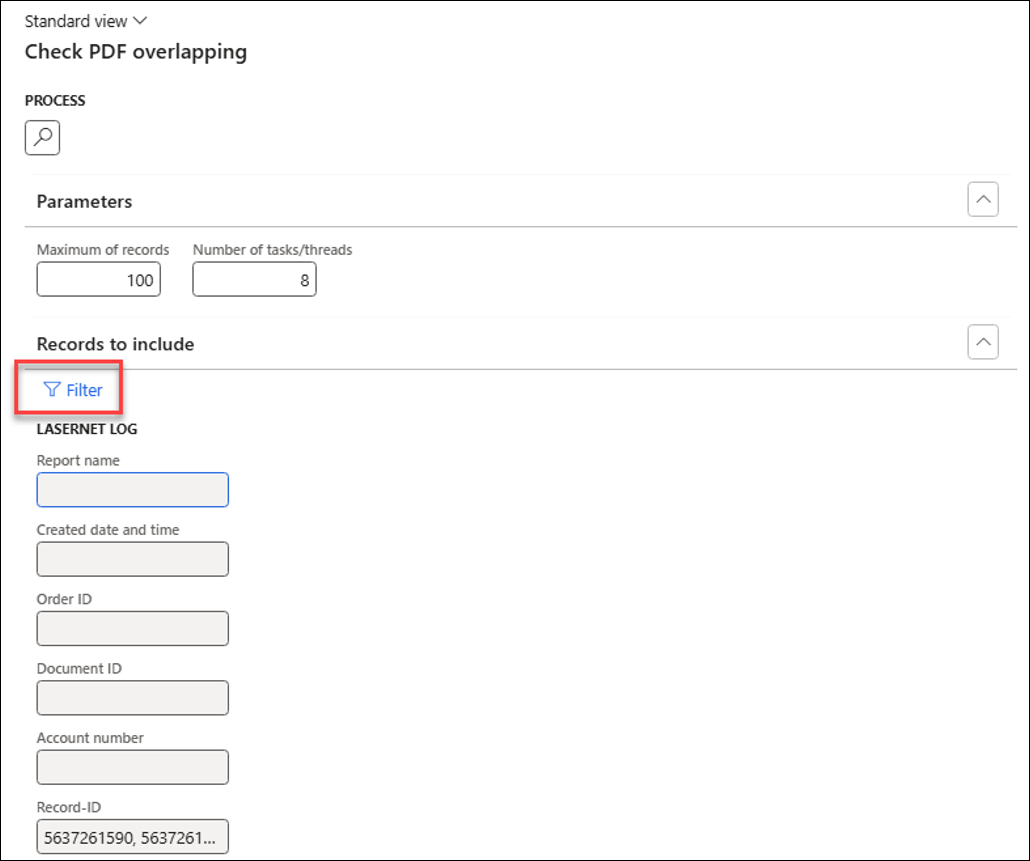
Indicate the maximum number of records and the batch/thread count to use. The thread limit is 12.
Click PROCESS to identify PDFs with overlapping fields.
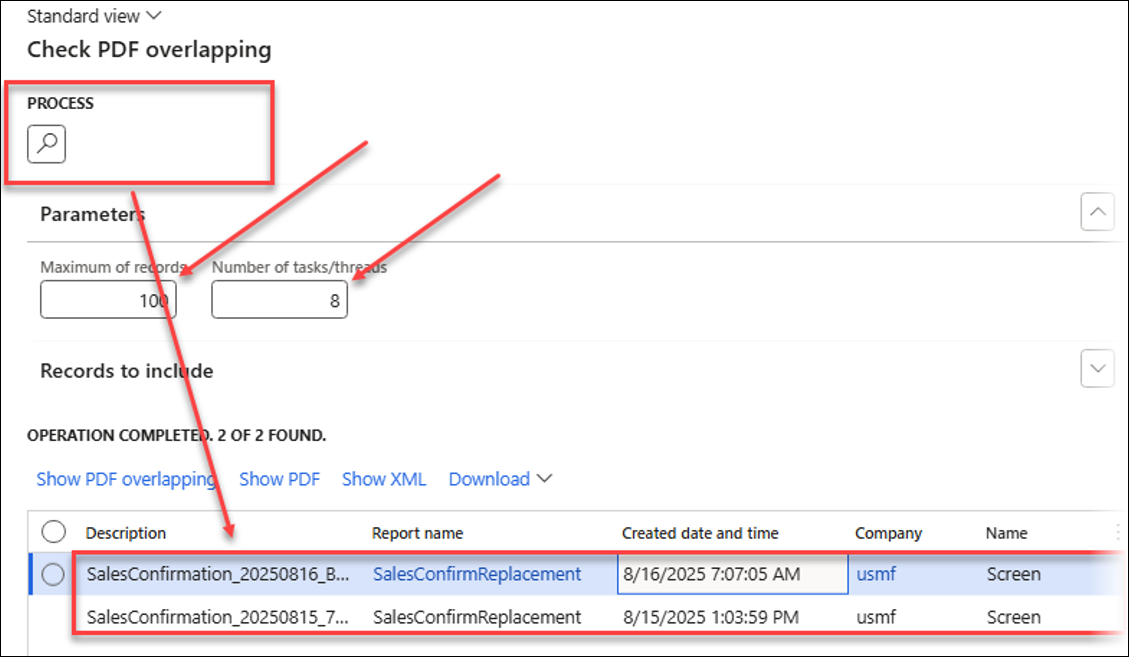
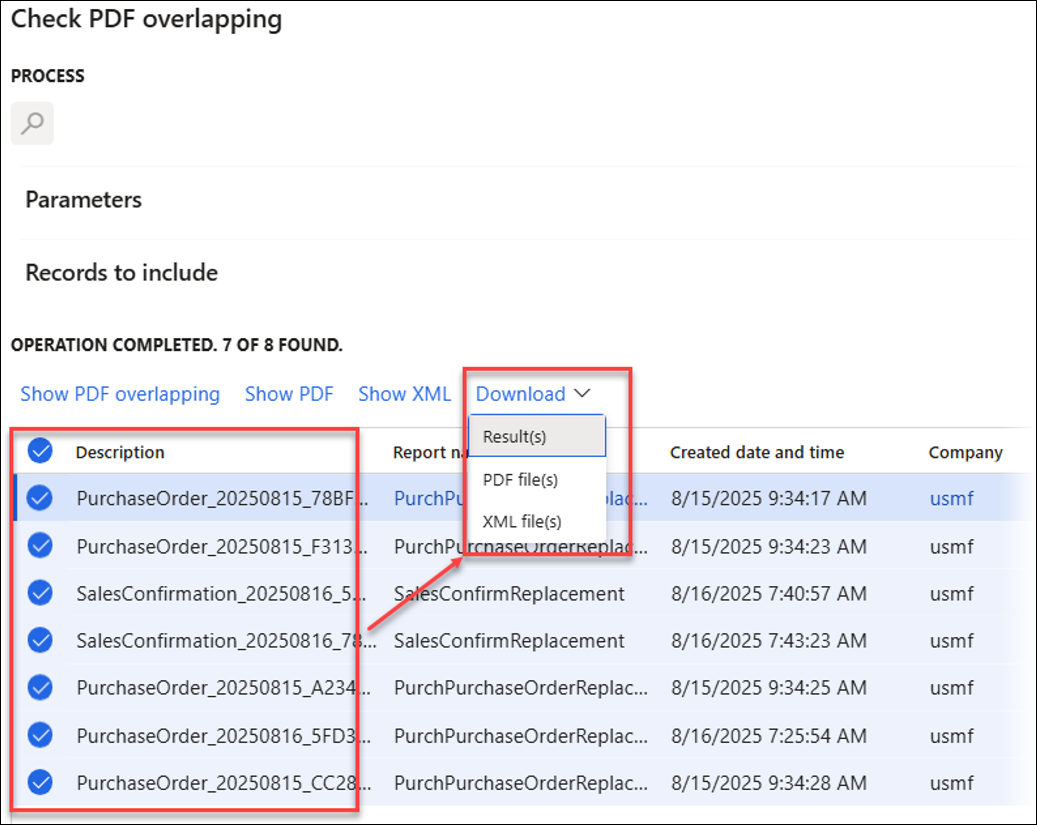
From here, you can also choose among Show PDF, Show XML, or Download the PDF and XML files.
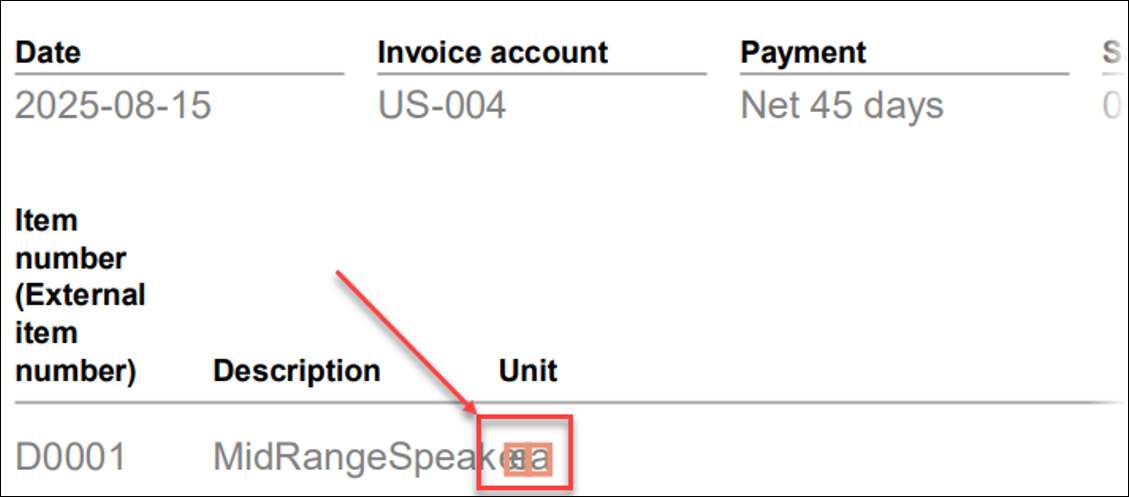
Click Show PDF overlapping to display fields that overlap in the PDF.
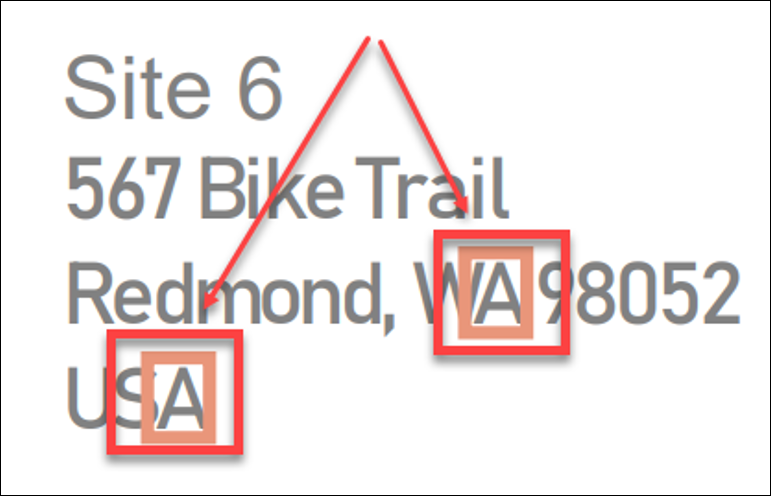
Overlapping fields are highlighted as shown below: the value for Description overlaps with Unit.
The appearance of overlapping letter pairs such as "WA" and "SA" may vary depending on the specific font employed.
The following download options are available:
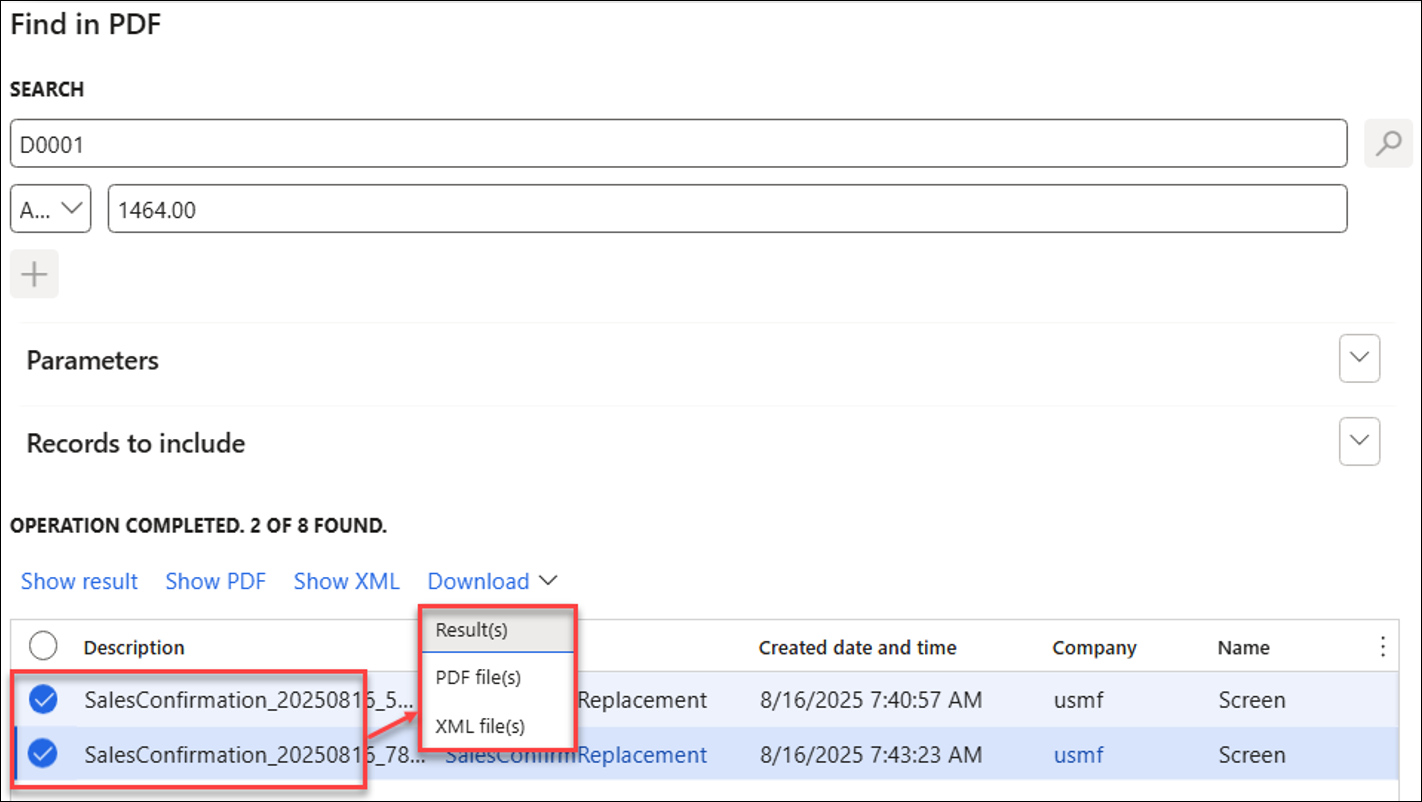
Find in PDF and Find in XML
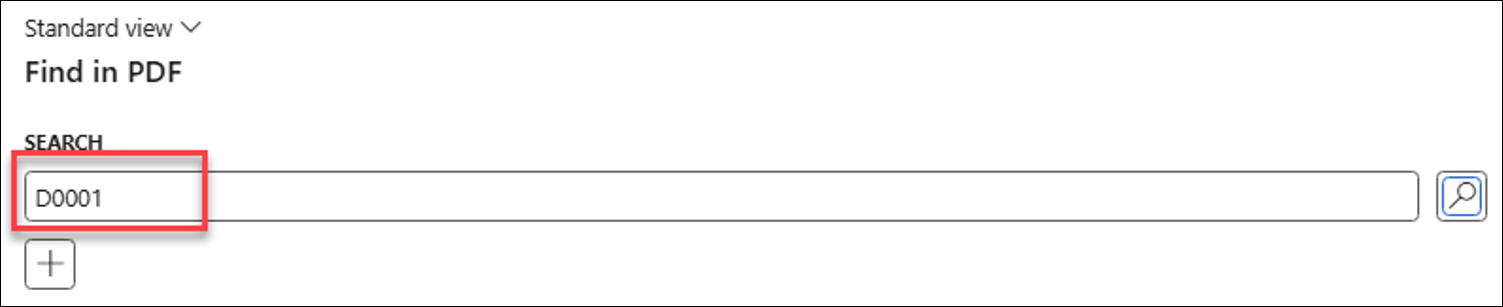
Find in PDF and Find in XML enable users to search through multiple PDF files, making it easy to find information in final reports or across different documents. You can also combine several values for more targeted searches.
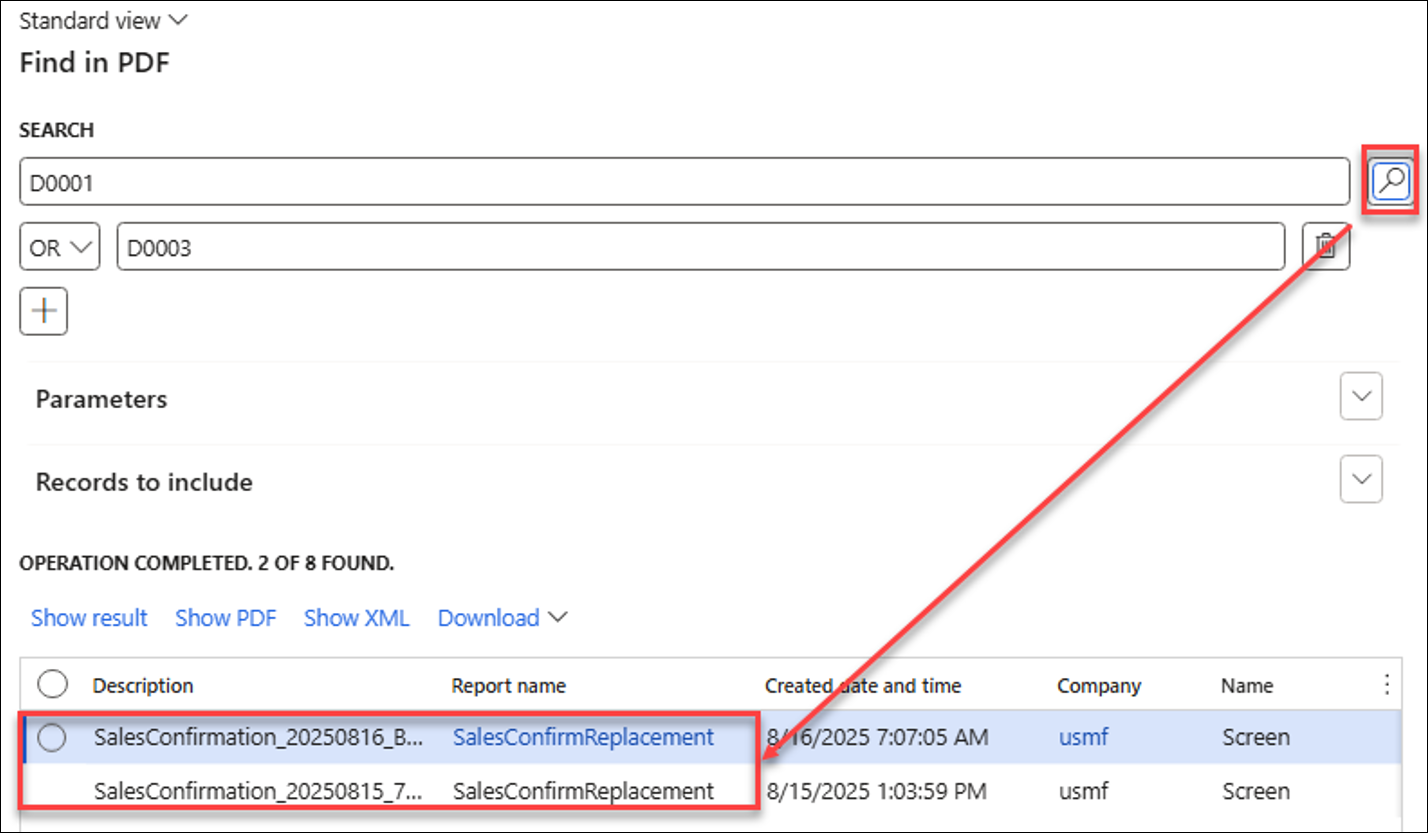
Follow these steps to use Find in PDF:
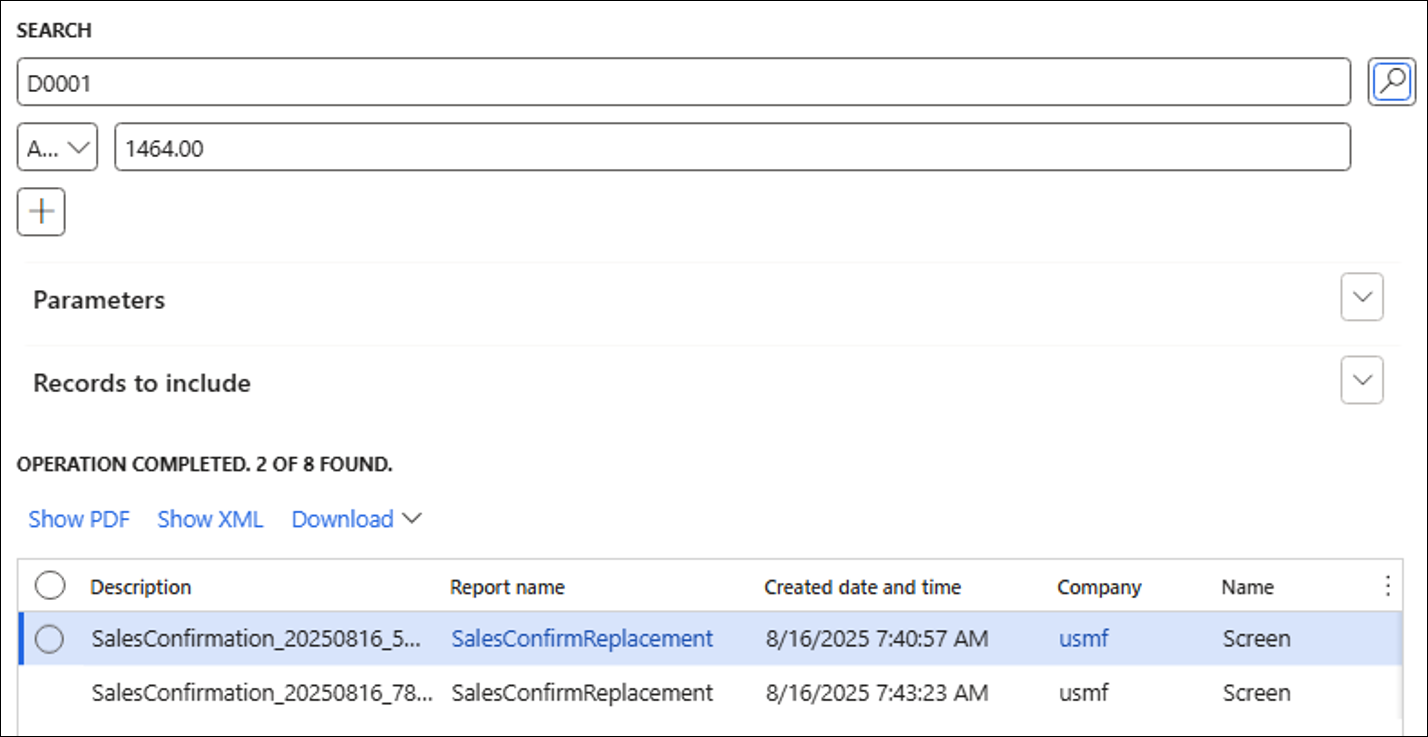
Input search value(s).
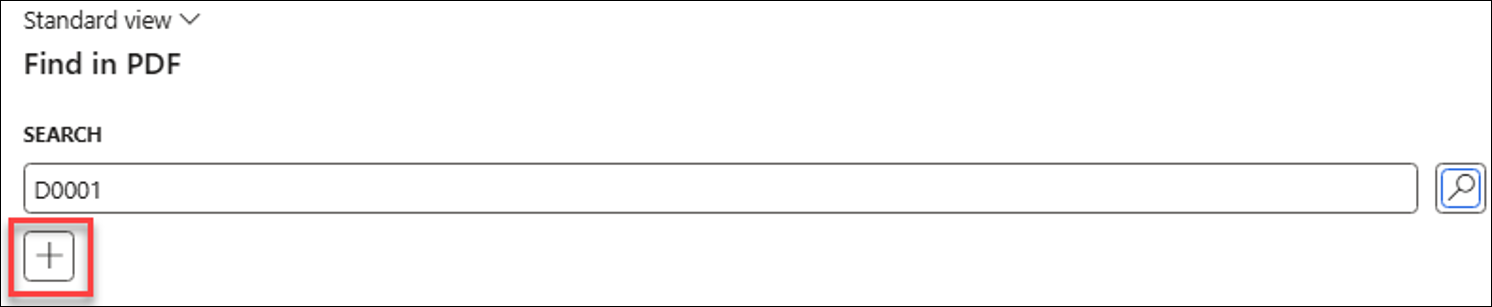
Use the + button to combine multiple values.
Indicate whether all the values being searched for must be present by applying the AND operator, or if any single value is sufficient by using the OR operator.
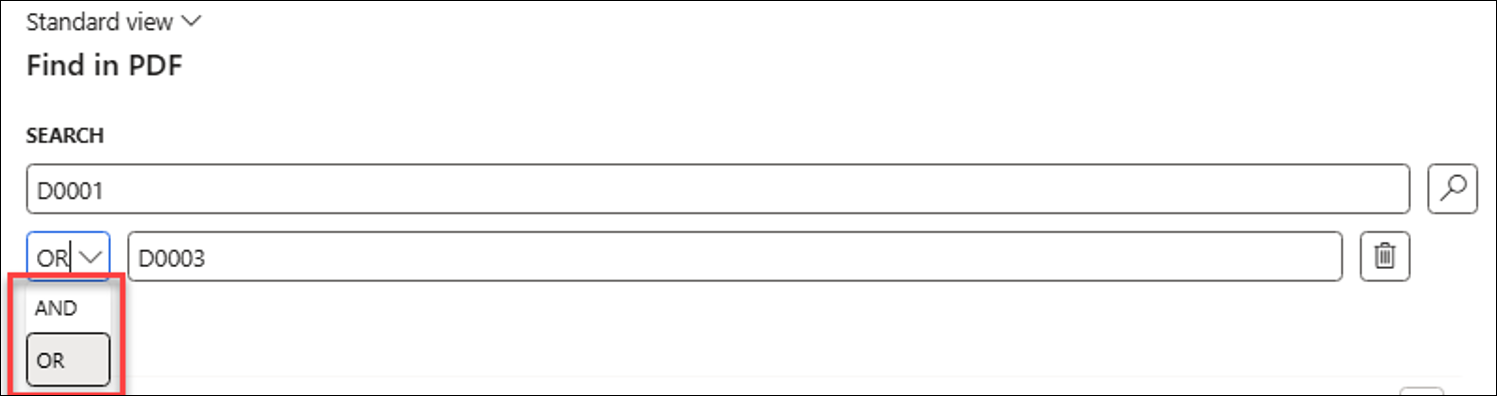
To initiate a search, click the search icon. A list of files containing the specified value(s) will be displayed.
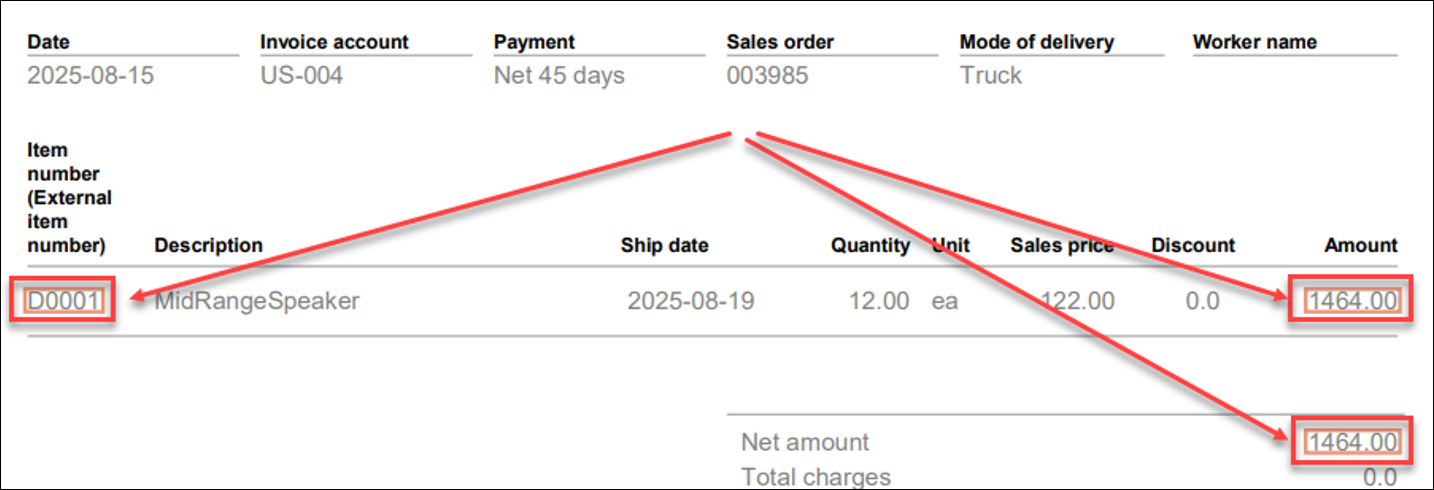
Click Show result to display the results from a file.
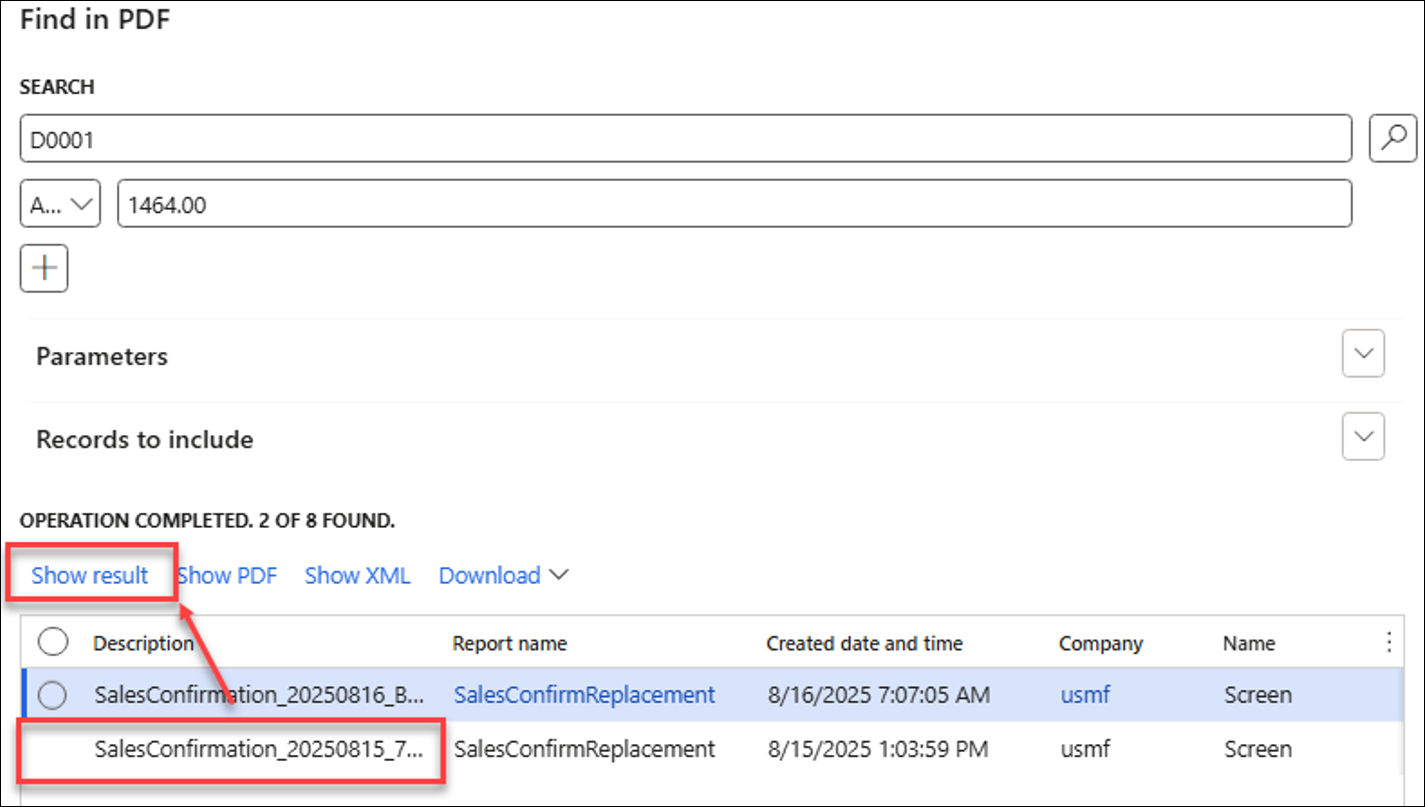
The Find in XML feature works similarly, but it does not include the Show result option.
Find in PDF enables users to download a single PDF by selecting one entry, or a ZIP file with multiple PDFs by selecting several entries.
Find in XML offers the option to download files. Selecting one entry downloads a single XML file, while selecting multiple entries generates a ZIP archive containing the chosen XML files.
Download Result(s) creates PDF files in a format similar to the Show result option.
PDF File(s) as ZIP and XML File(s) as ZIP
PDF file(s) as ZIP and XML file(s) as ZIP are used to download selected entries as ZIP files.
Similar options are available for the Batch print review feature, which is used for both Batch Bundling and Top Picking components of the Test and Performance Suite.
Top Picking and Batch Bundling efficiently enable bulk operations through FinOps' batch framework.
Assembly Information
Assembly information is a new feature introduced in the Test and Performance Suite 7.2 that provides detailed information about assemblies and DLL files without requiring a license key for T&P.
This feature is useful to identify which assembly (DLL) files are being used, particularly if Microsoft updates assemblies and omits necessary redirections, potentially resulting in system failures. Additionally, it is possible to download the relevant DLL files to replicate similar behaviours within a local environment when needed.
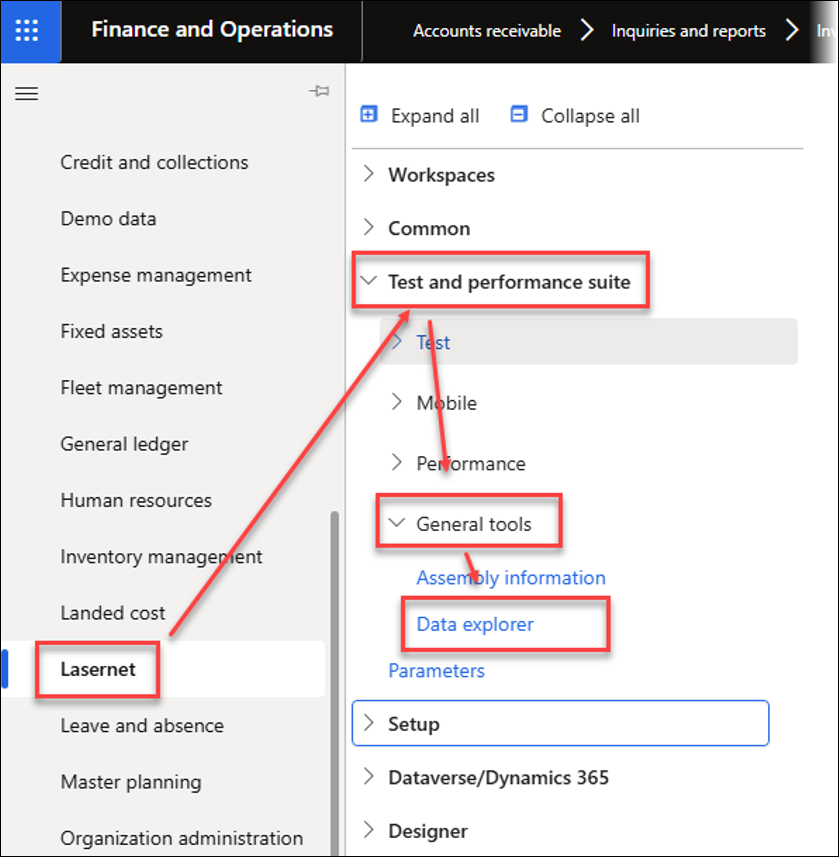
Assembly information is located in Lasernet > Test and performance suite > General tools.
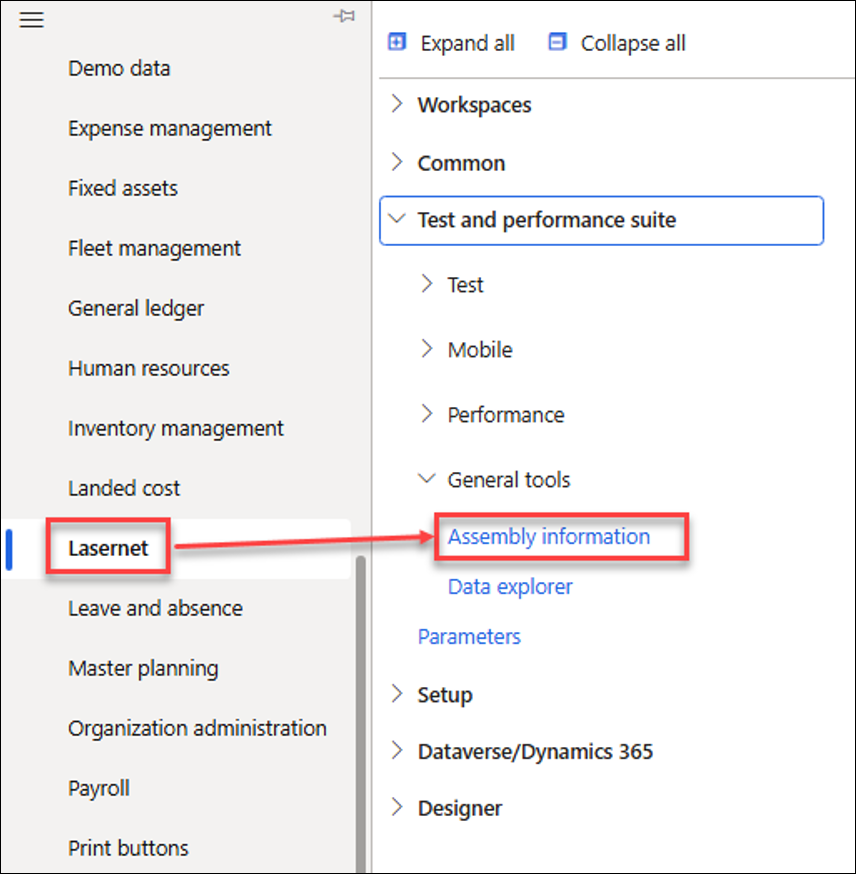
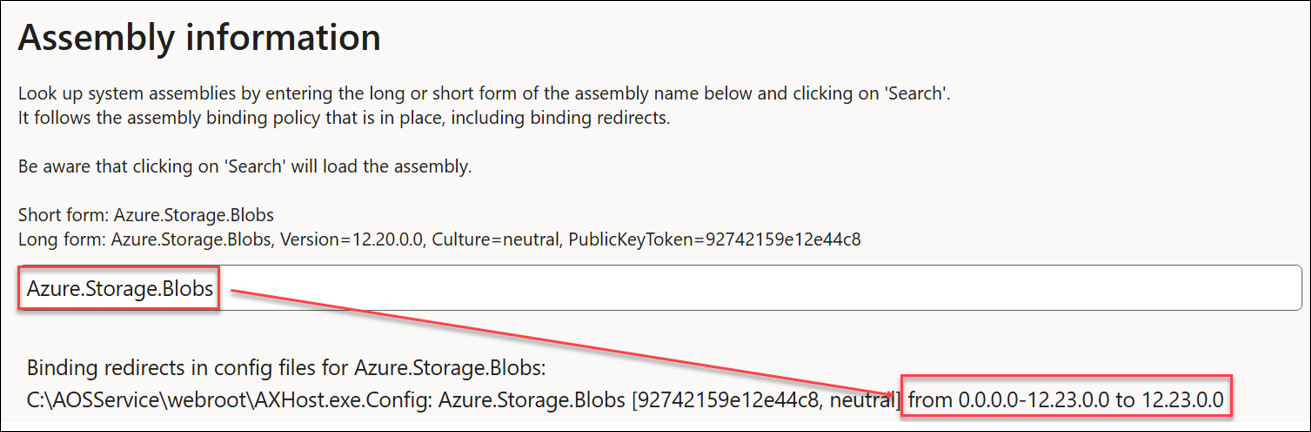
The following image provides an example in which the Azure.Storage.Blobs assembly (DLL) has been updated to version 12.23 in 10.0.44 (PU68), but no redirect has been configured. As a result, errors may occur when using Lasernet FO Connector if Lasernet attempts to load the required assembly/DLL files.
Redirects have been included by Microsoft in later releases of 10.0.44 (PU68) and 10.0.45 (PU69).
Enter the DLL file name and click Search.
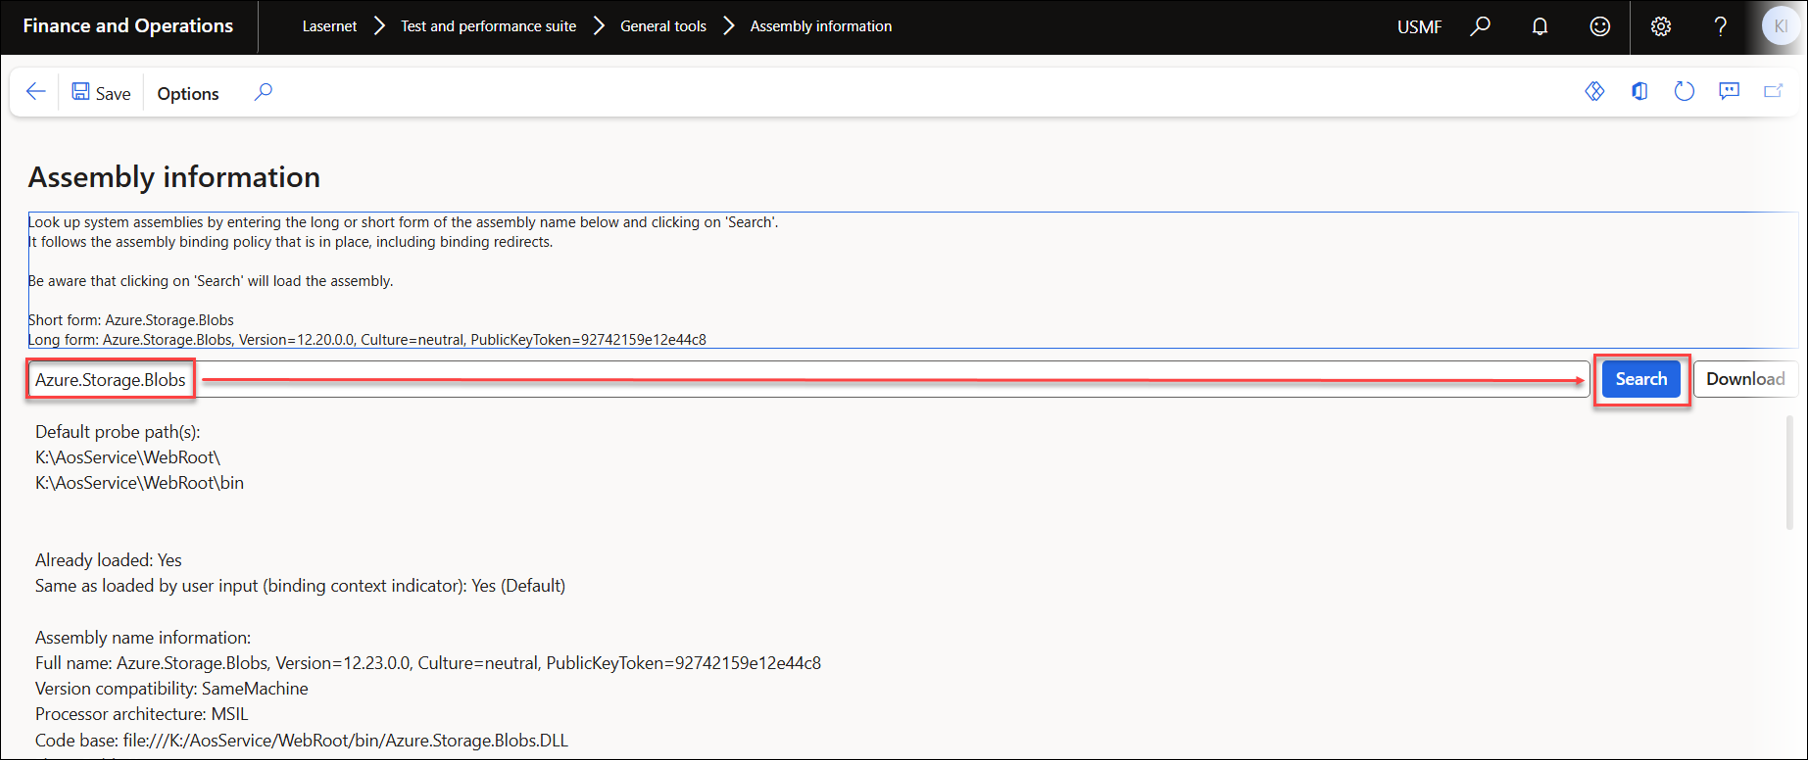
Early versions of 10.0.44 (PU68) had an assembly (DLL) issue because Microsoft did not add a redirect when updating Azure.Storage.Blobs from version 12.20 to 12.23.
Missing redirects in 10.0.44 | Correct redirects in 10.0.44 and 10.0.45 |
|---|---|
|
|

Data Explorer
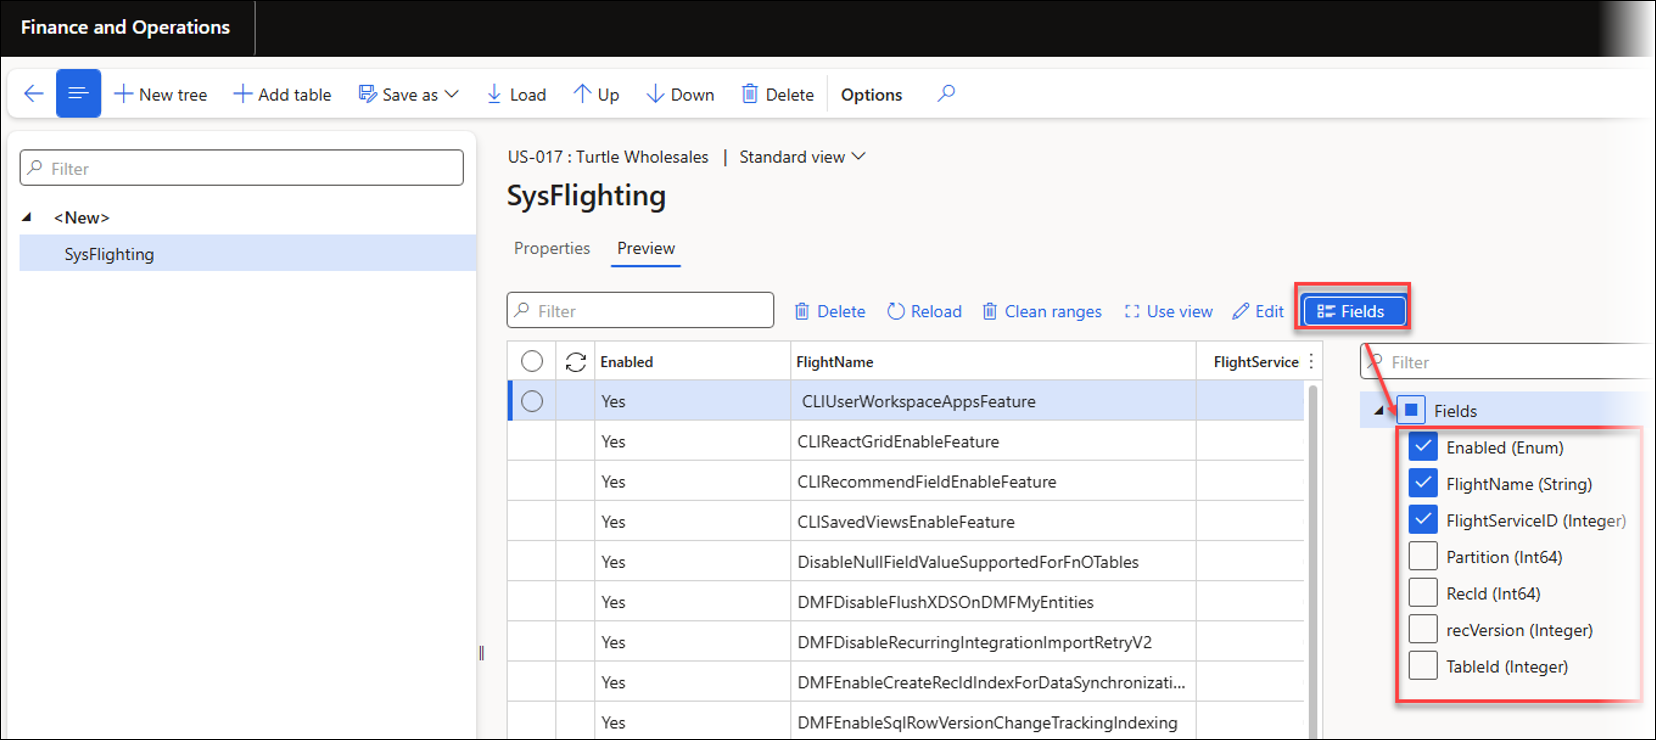
The Test and Performance Suite 7.2 introduces a Data explorer tool for Dynamics 365 for Finance and Operations. This feature enables users to explore and edit any table, including system tables such as SysFlighting, with appropriate permissions. It also supports creating views for related tables.
Editing has been closed for Microsoft Hosted environments.
The Data explorer is accessible from the Options menu on any form in FinOps.
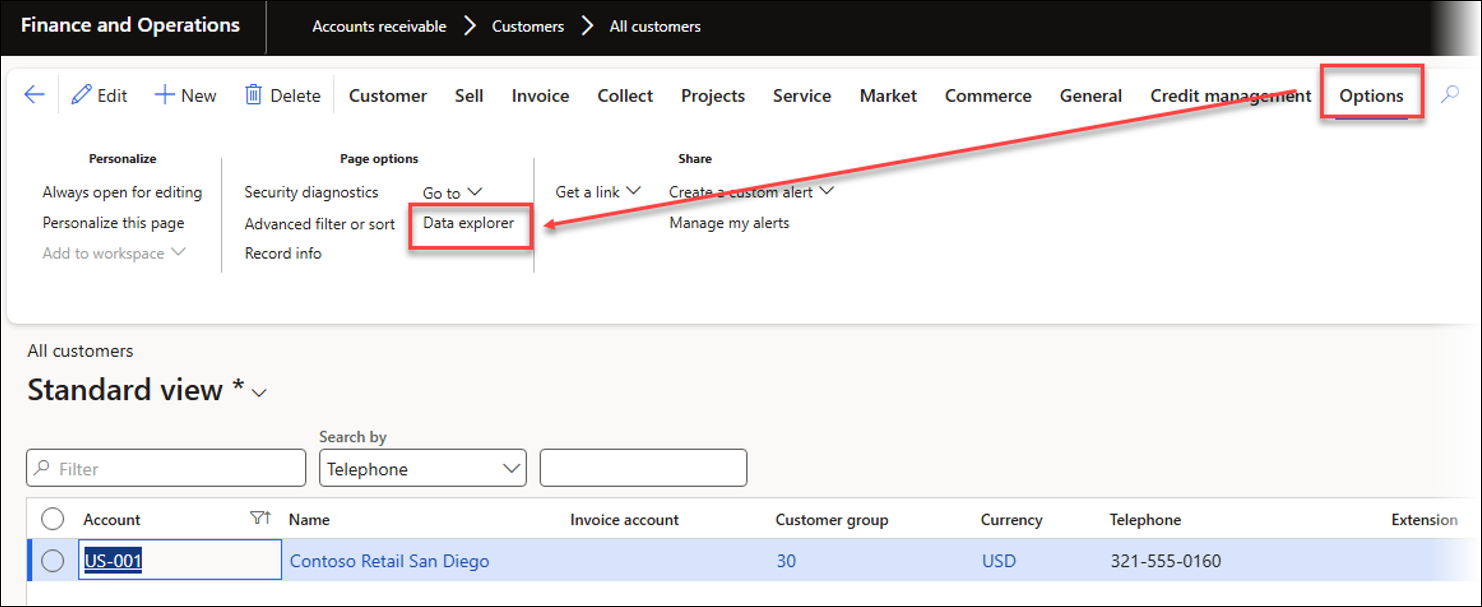
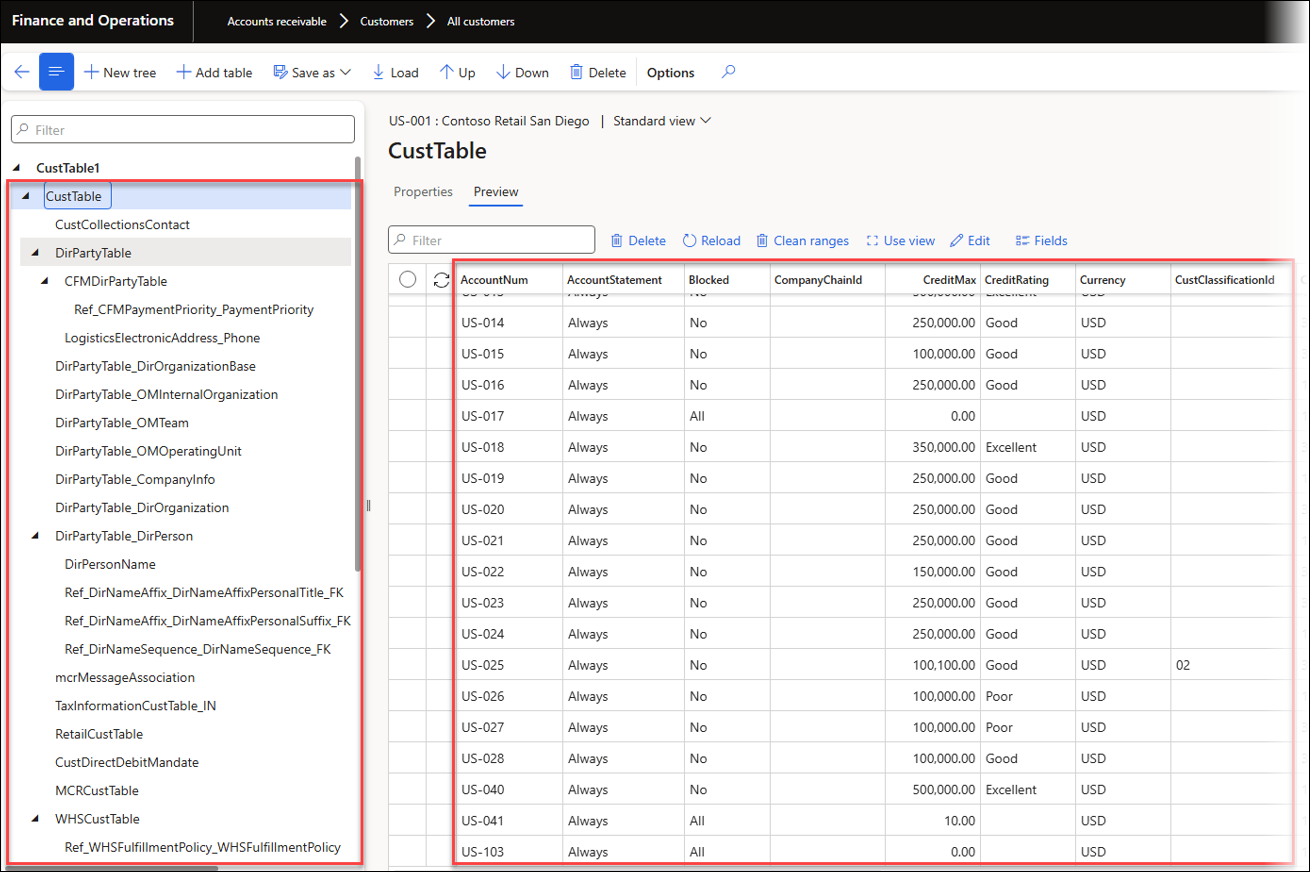
Example of Data explorer launched from the CustTable form:
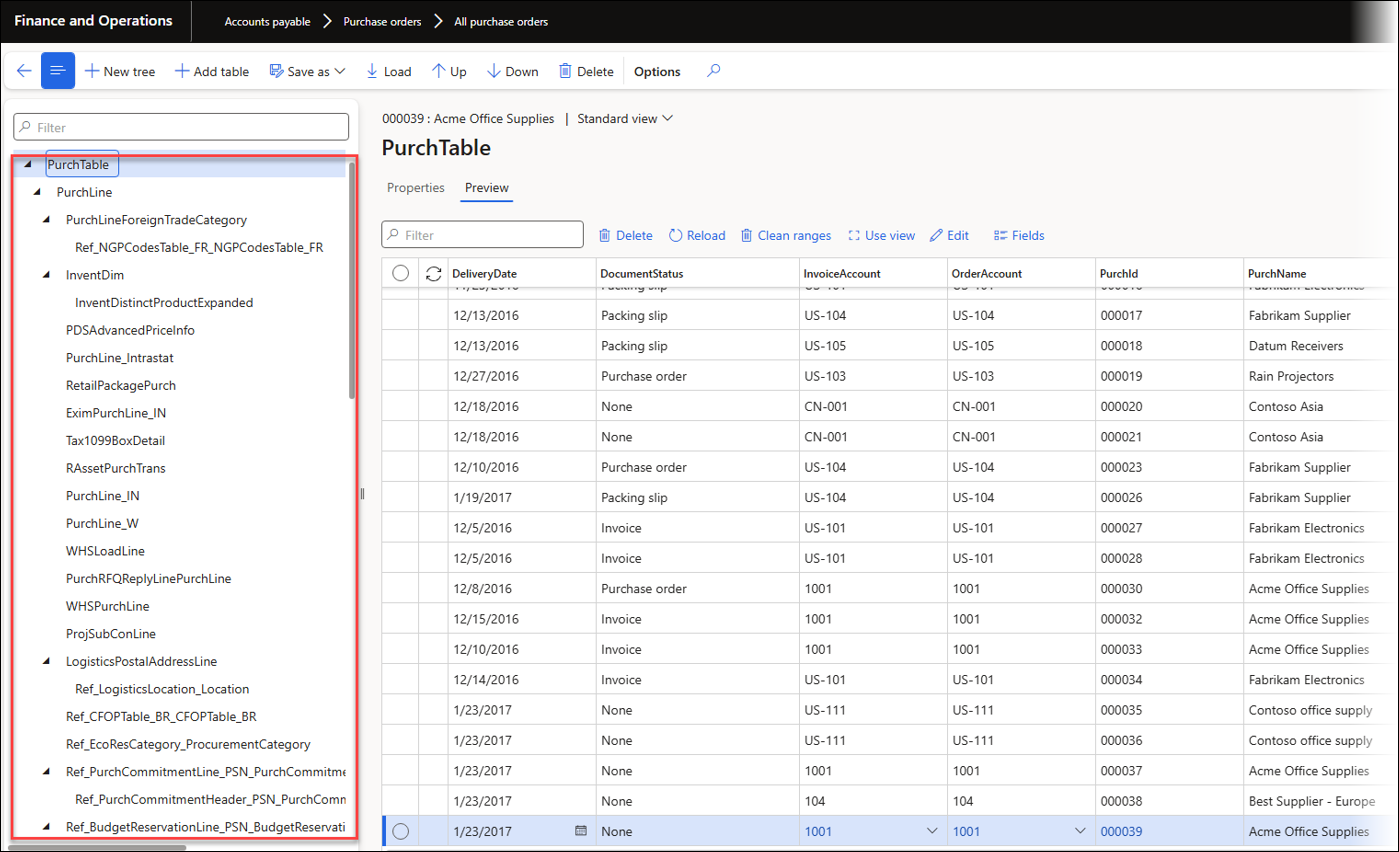
Example of Data explorer launched from the PurchTable form:
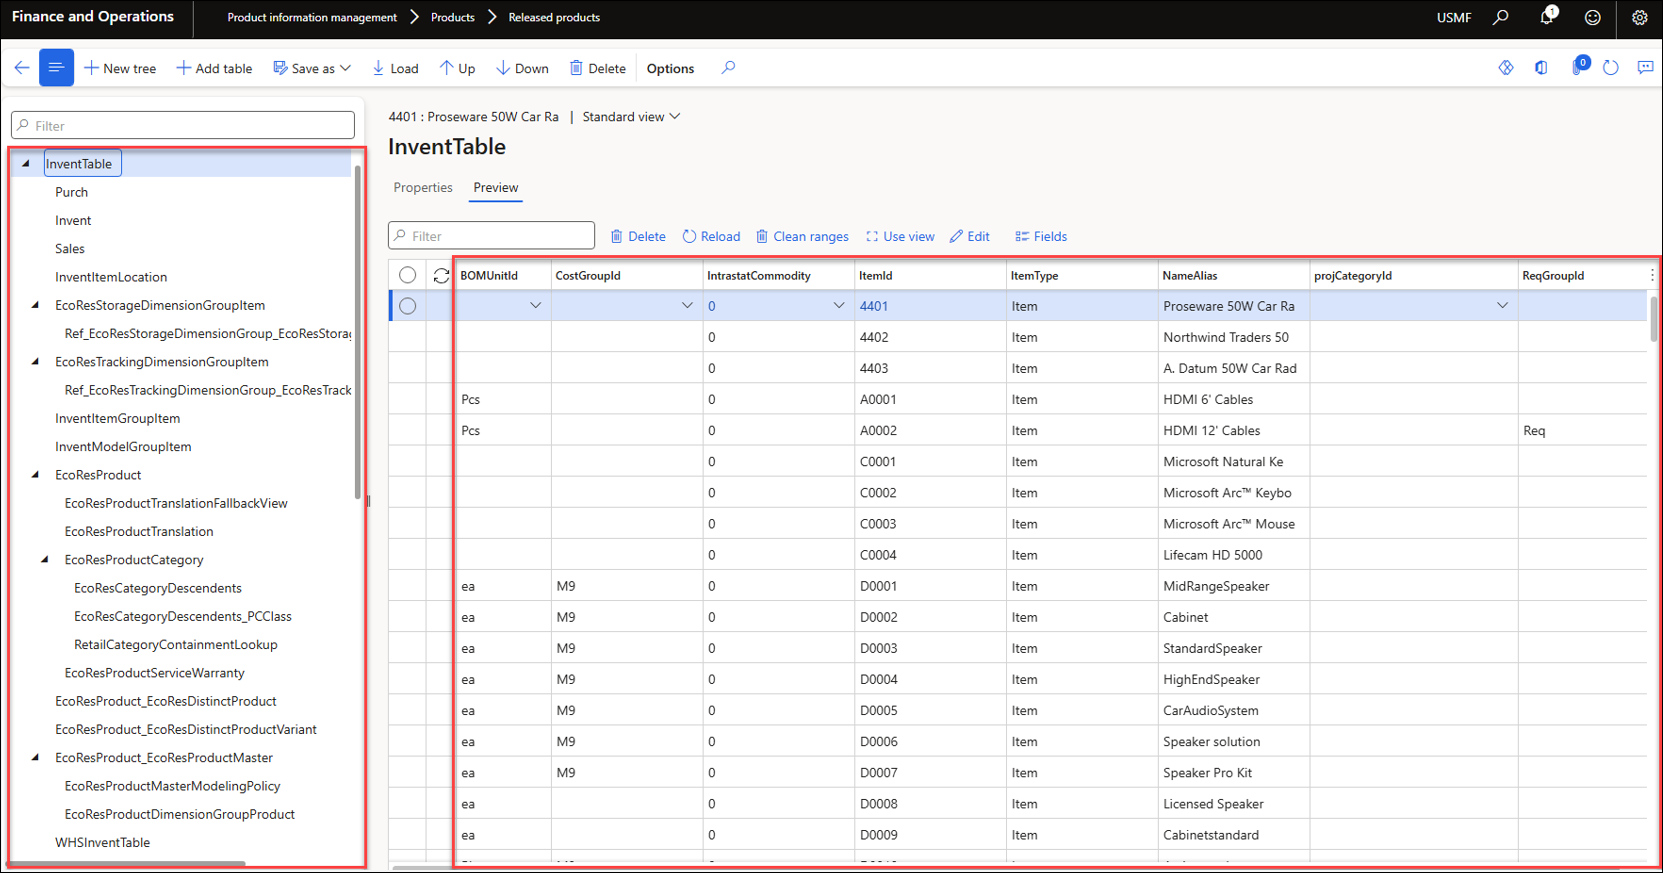
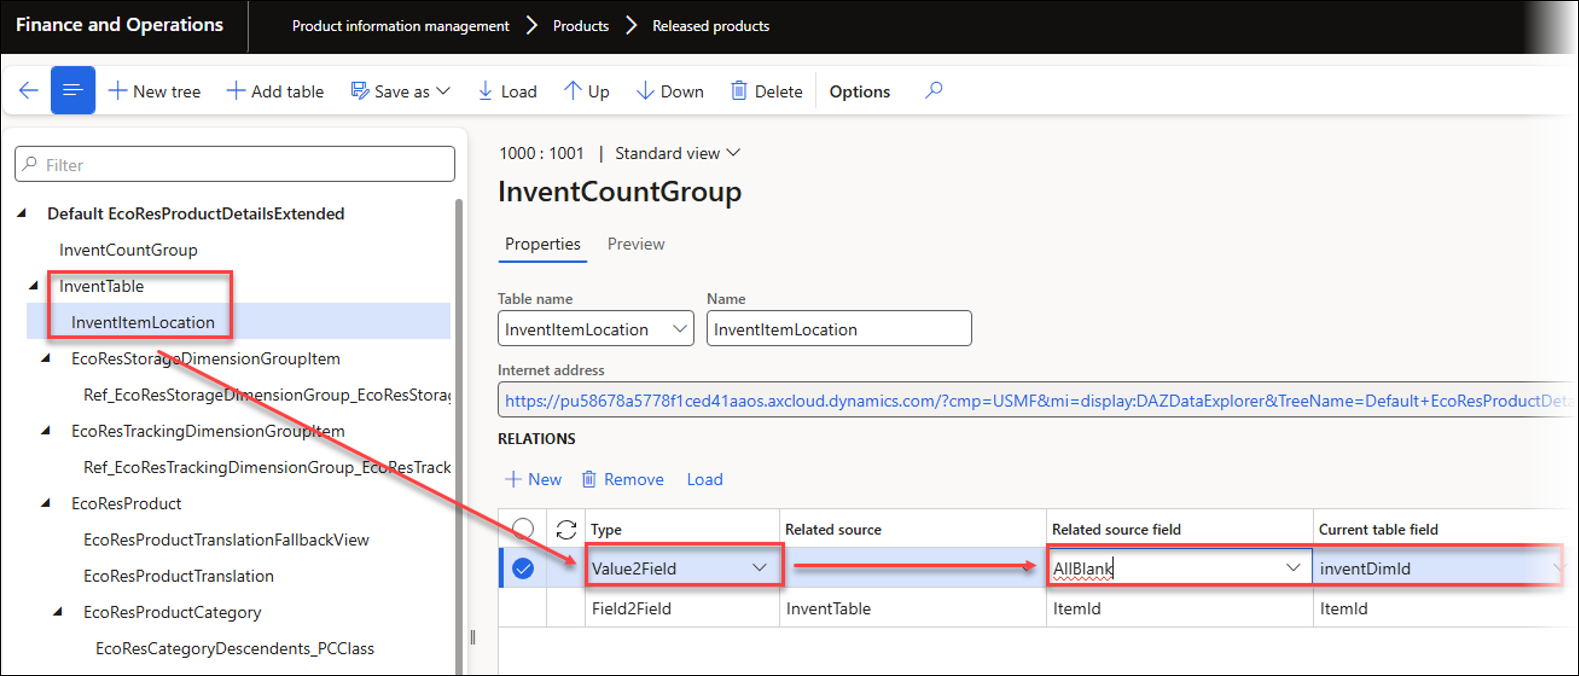
Example of Data explorer launched from the EcoResProductDetailsExtended form:
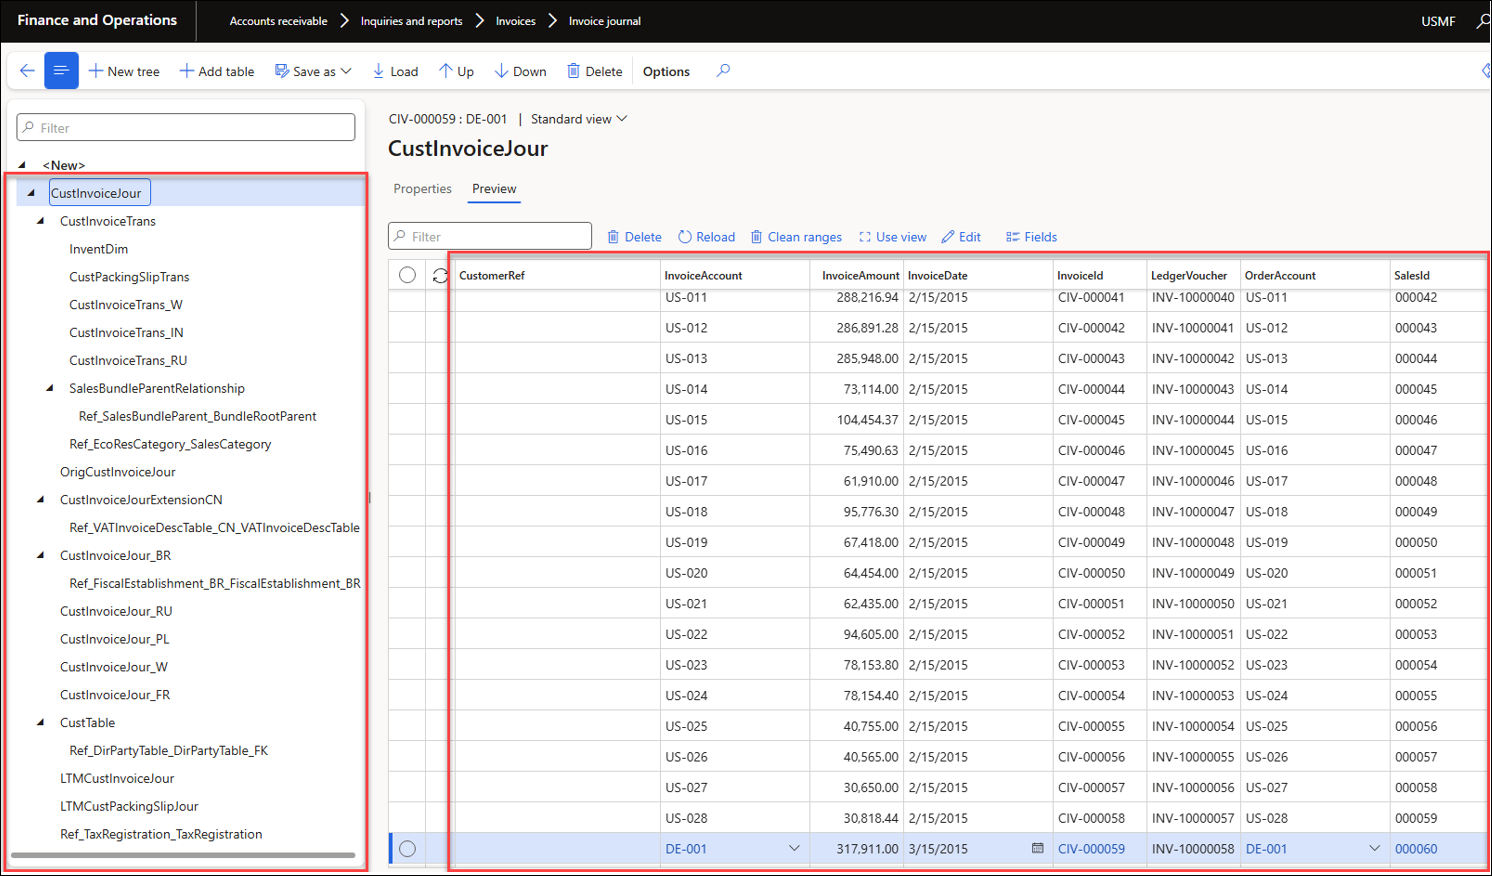
Example of Data explorer launched from the CustInvoiceJournal form:
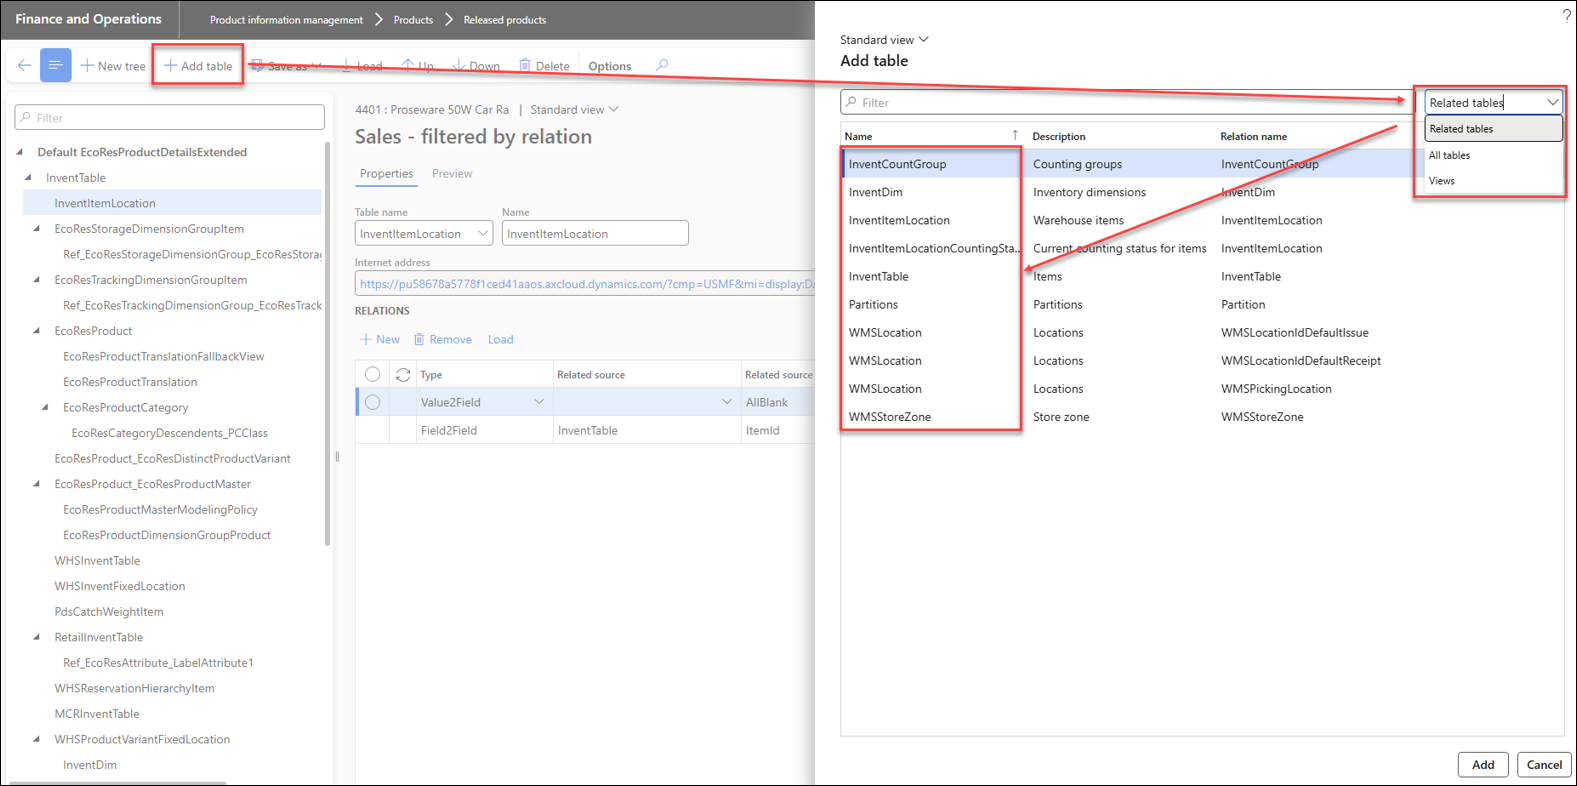
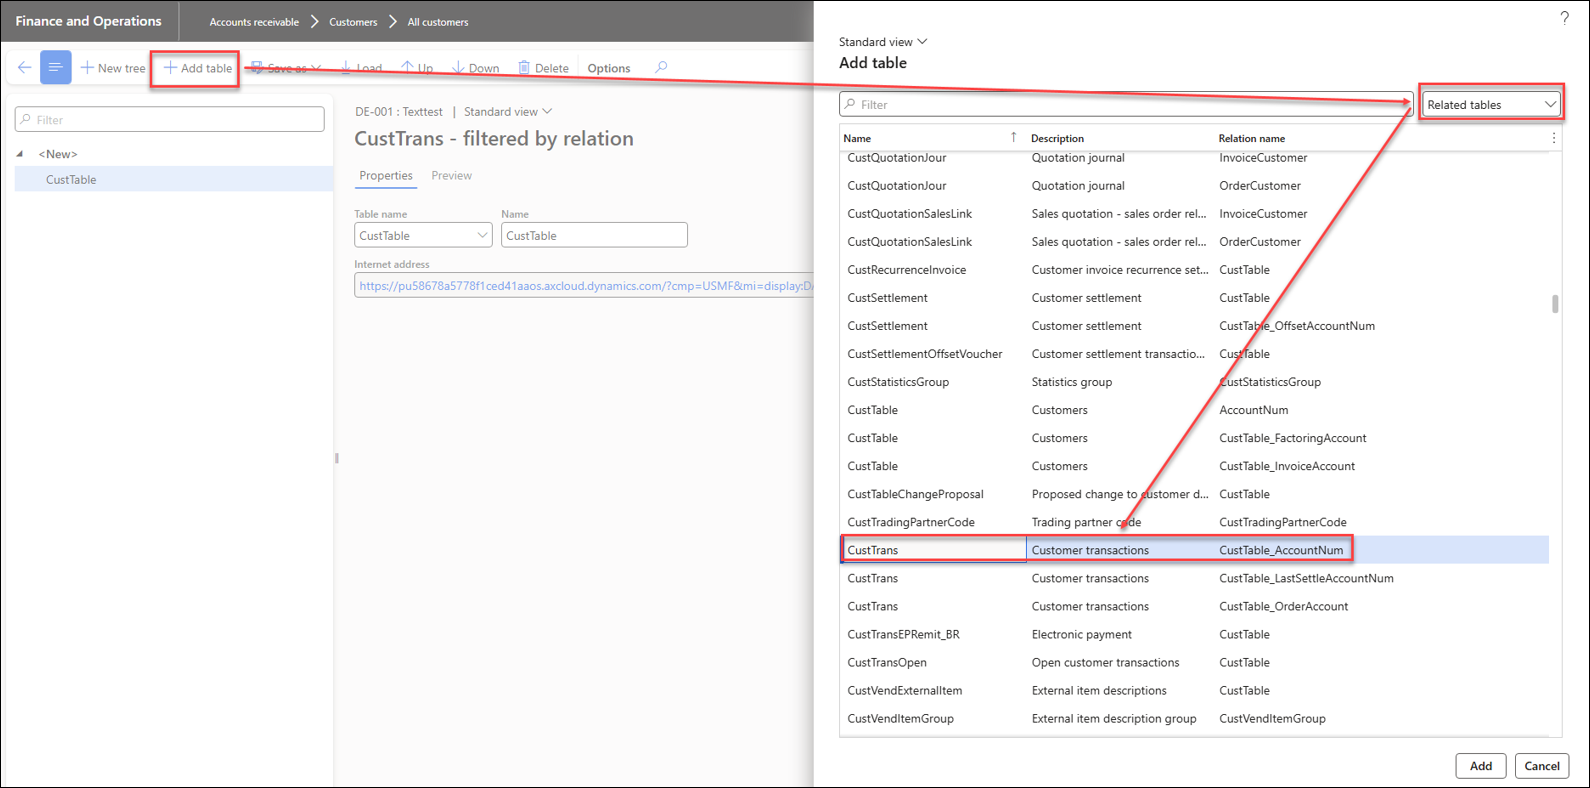
Tables can be removed using Delete, and additional tables may be added by clicking Add table.
Related tables displays all tables associated with the selected table and establishes the appropriate relationships automatically.
When adding a new table through All tables or Views, it is necessary to specify the relationships manually.
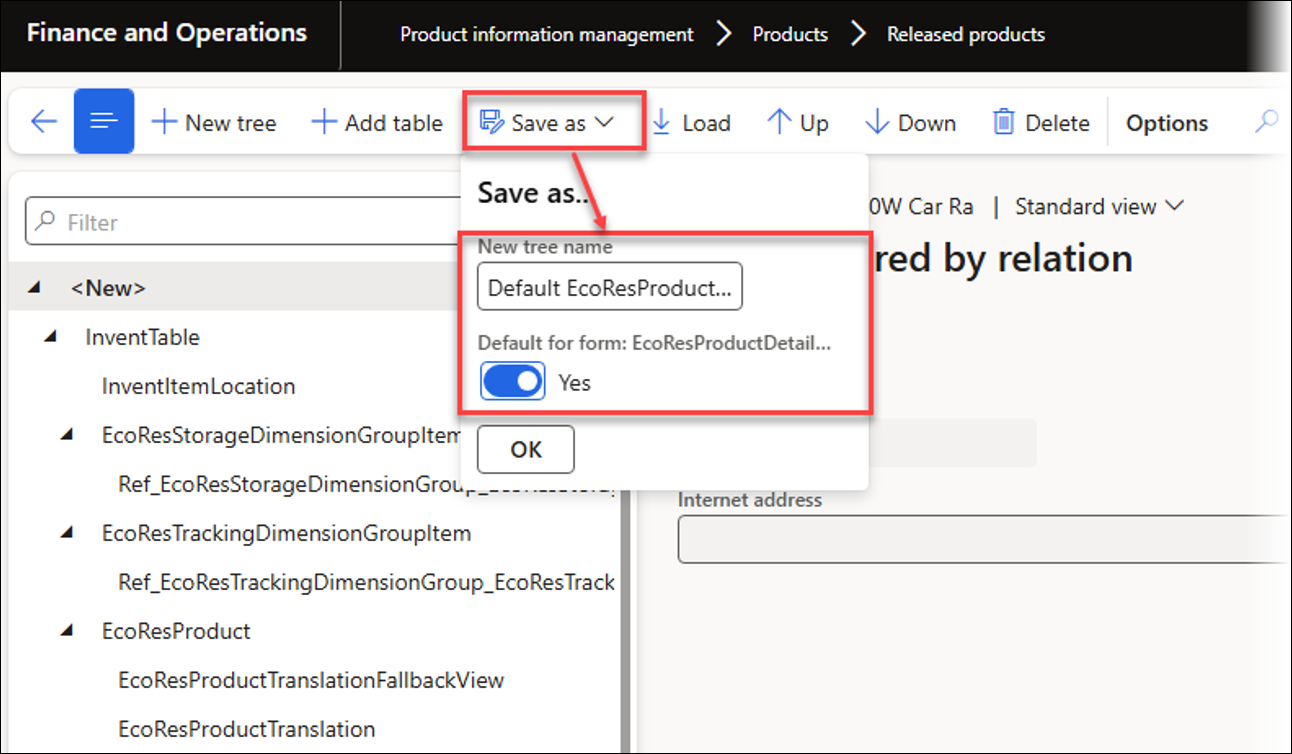
The Save as feature enables users to change or specify the tree's name and provides the option to set the tree as the default when opening it from the form.
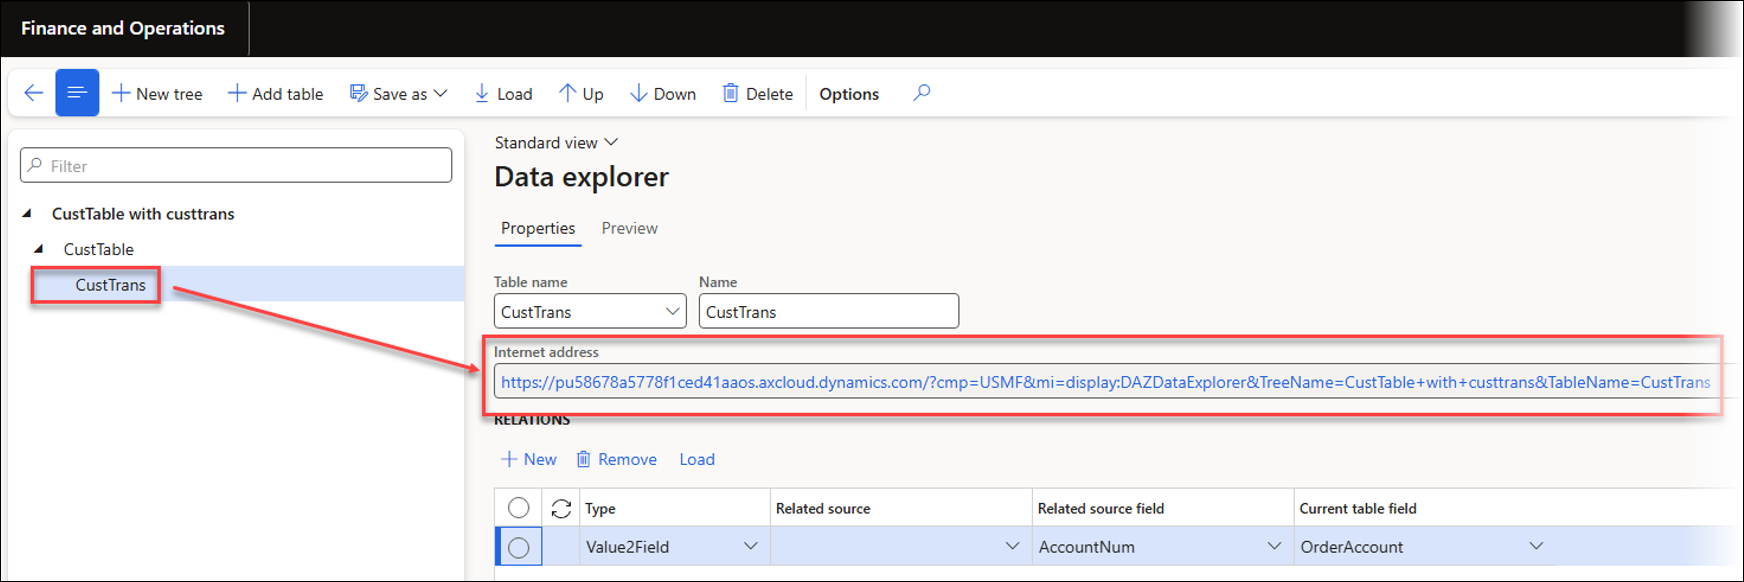
It is possible to paste the URL to access the table tree. This approach makes it easy to provide direct access to the required trees through favourites.
In the following example, the view CustTable with CustTrans is used. CustTrans is accessed because its URL was obtained from this location.
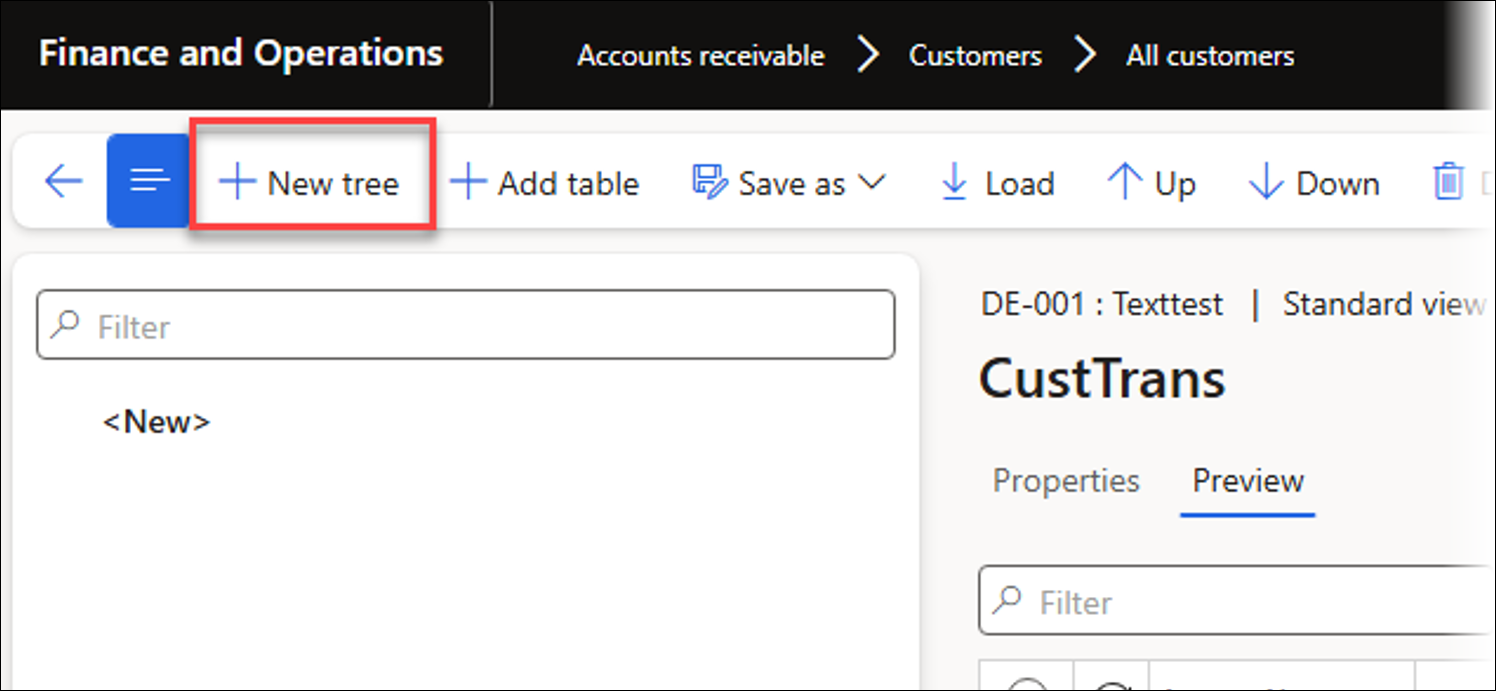
Click New tree to create a new tree using either a table or related tables.
Use Add table to add tables to the tree.
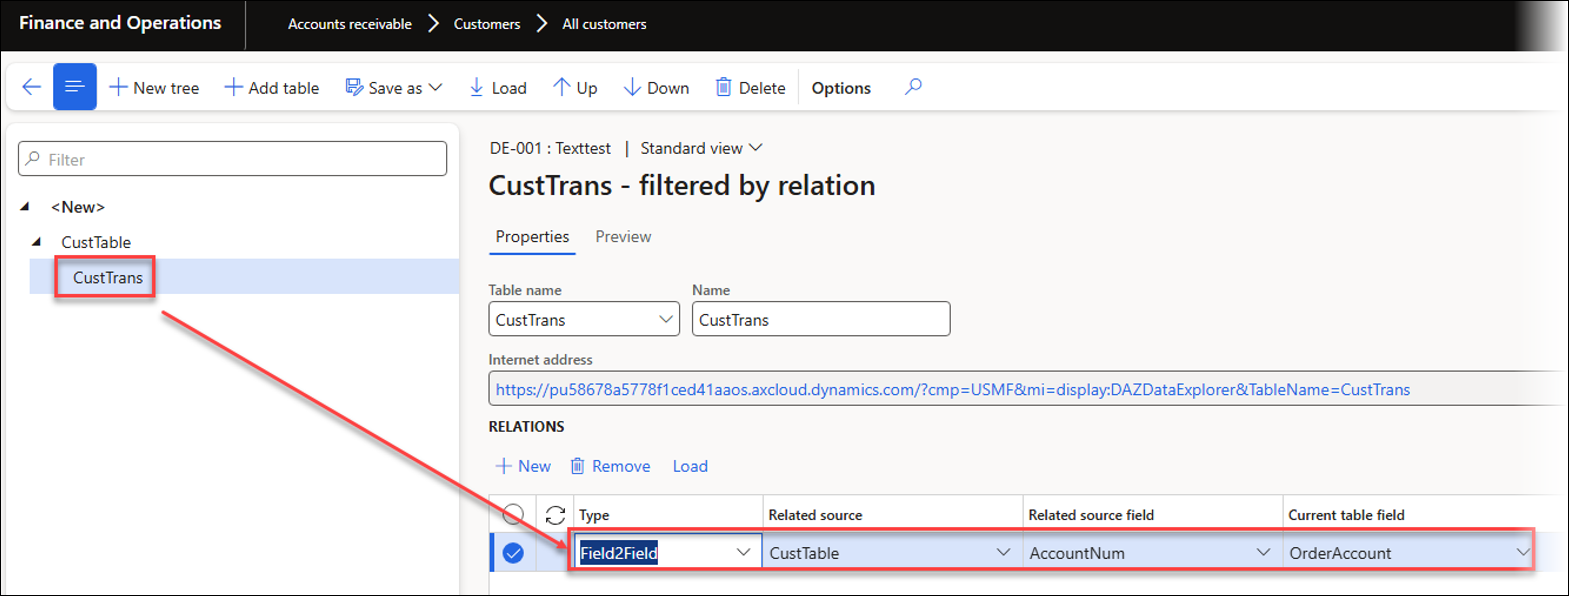
Available value Types for relations:
Field2Field: Field to field relation
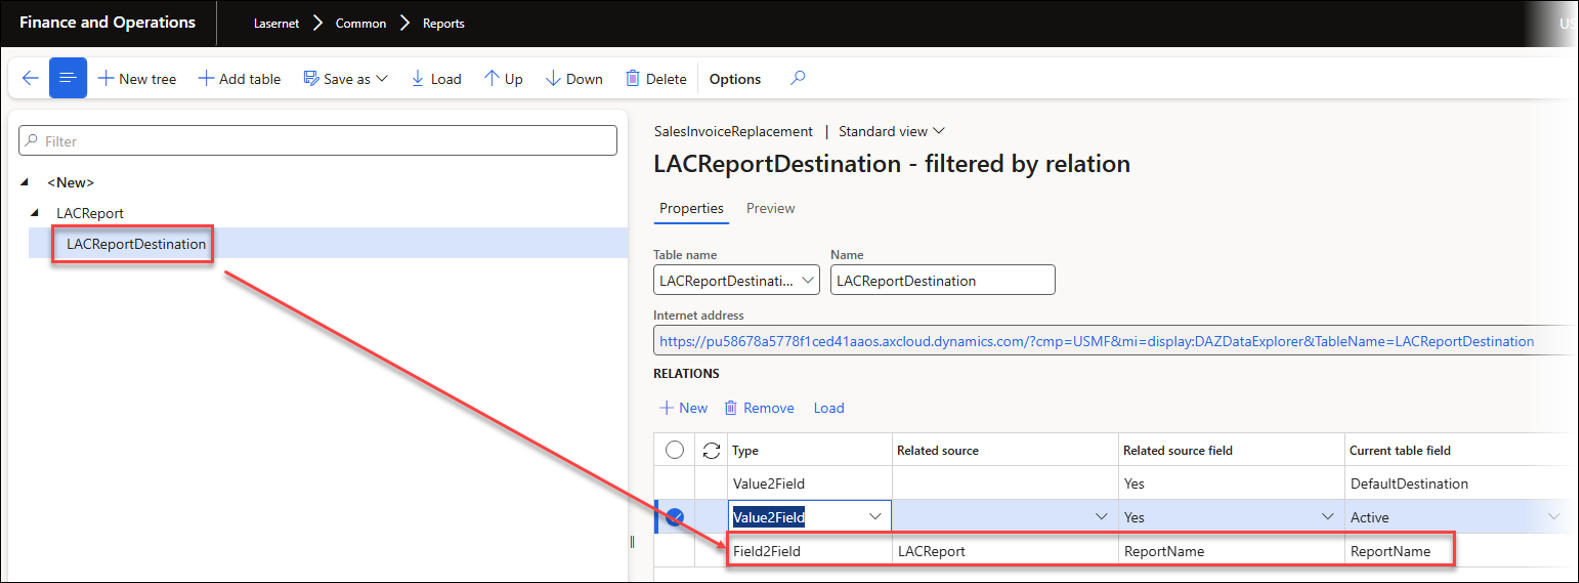
Field2Value: Field to value relation
Value2Field: Value to field relation
Use the Fields button to select which fields should be shown.
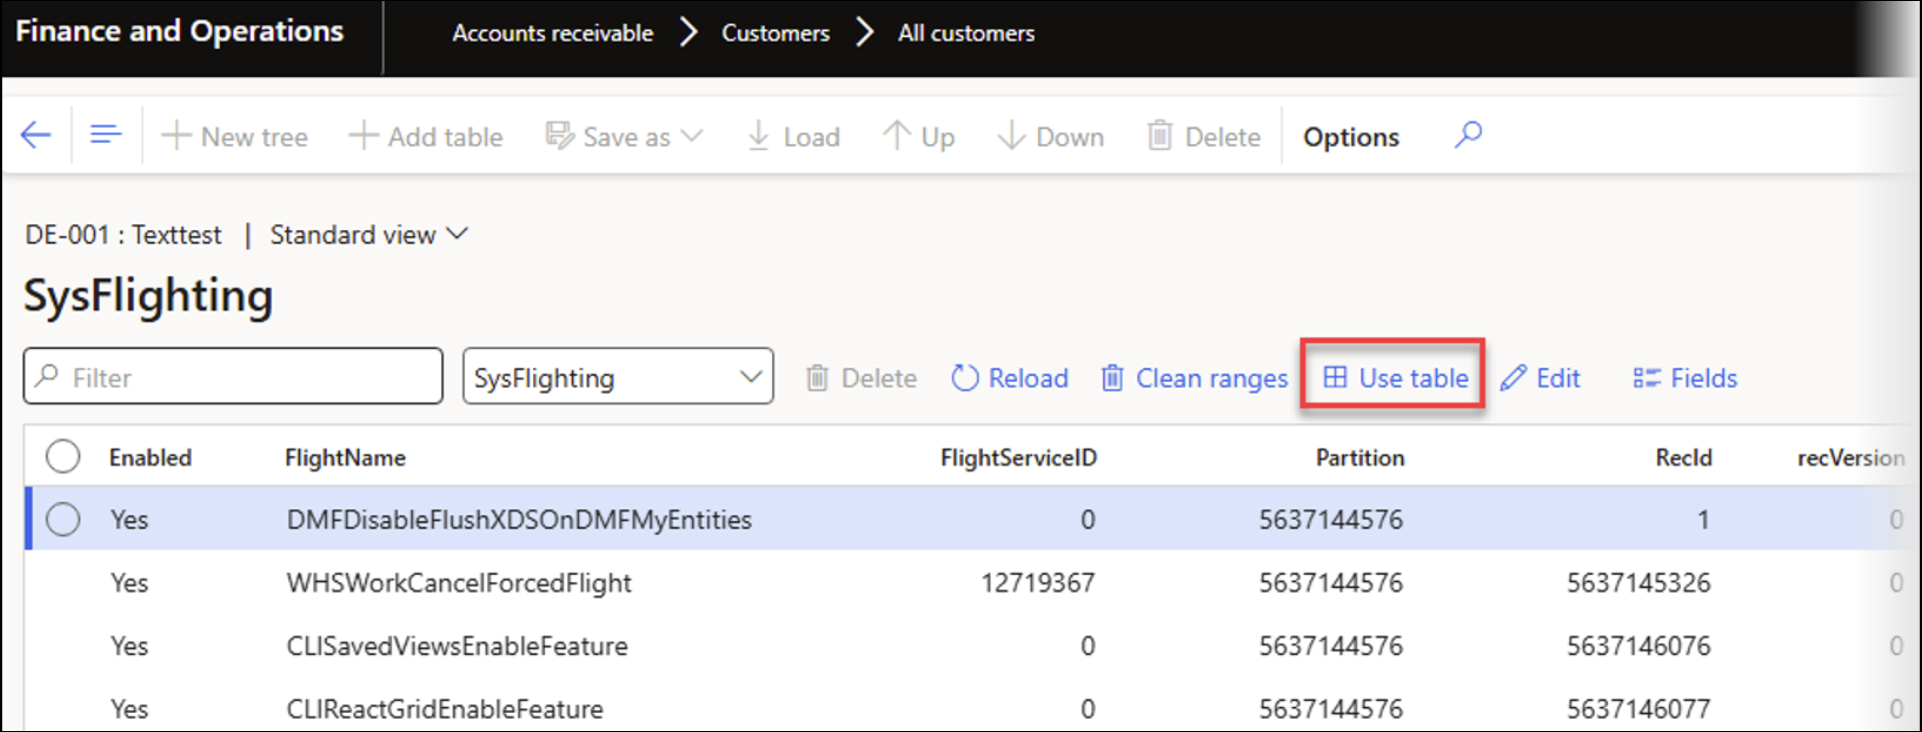
It is possible to switch between View and Table modes by clicking Use view.
Table mode enables direct editing of data fields.
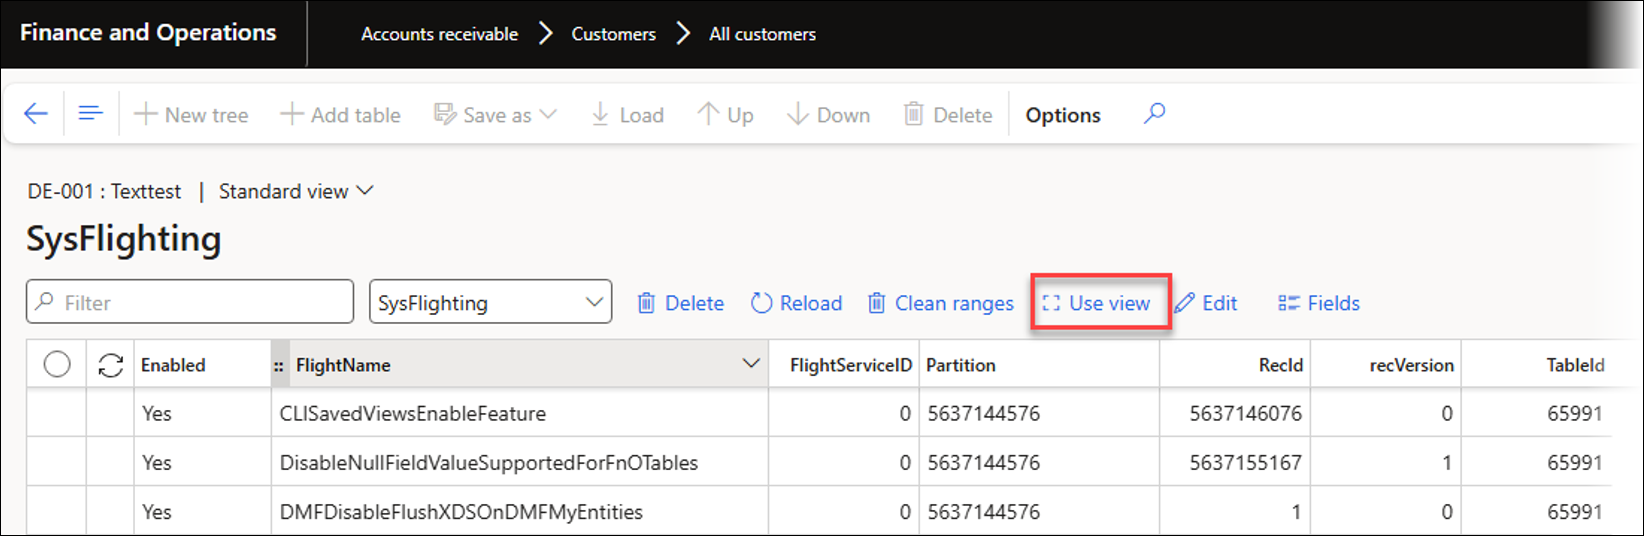
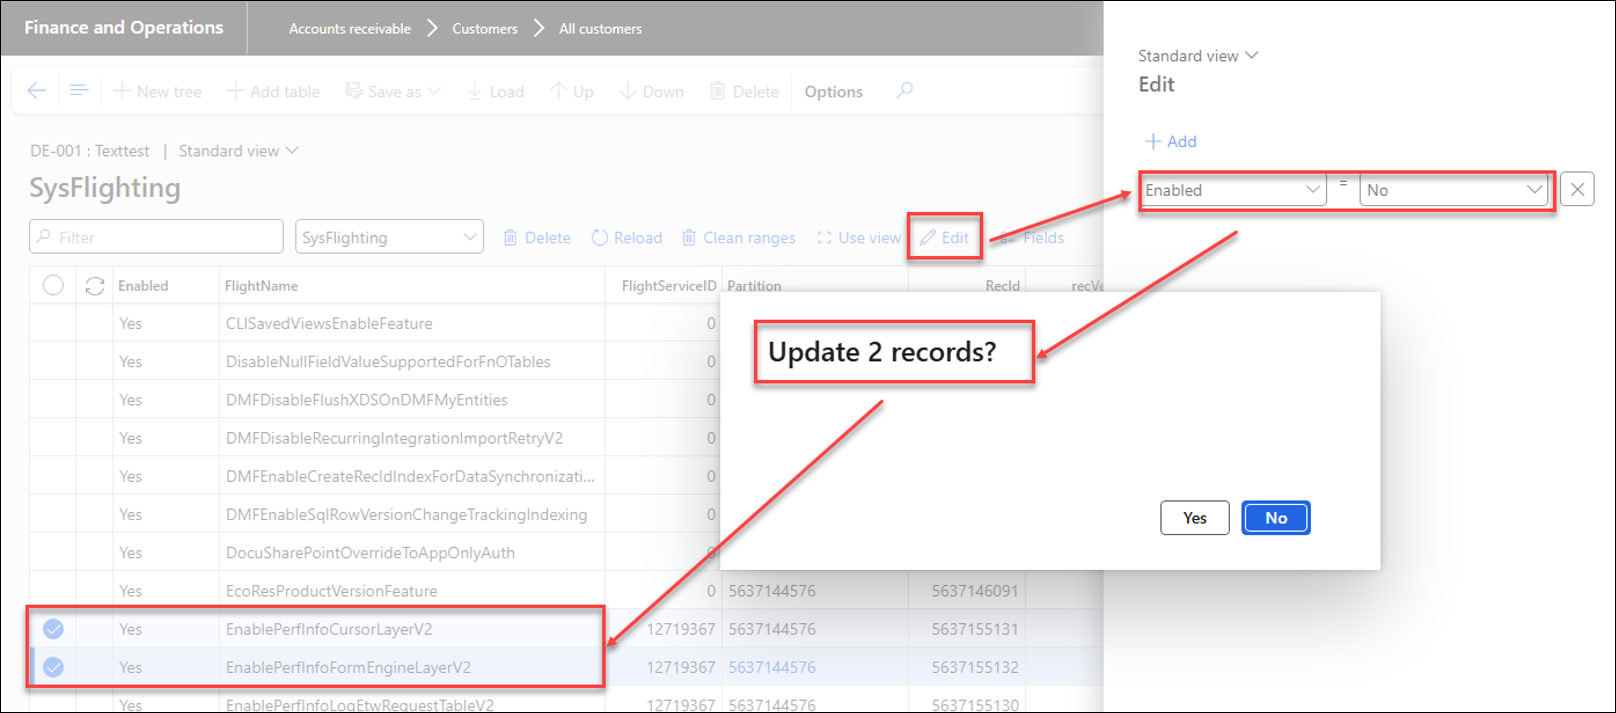
In View mode, data fields cannot be edited directly, but can be modified using the Edit button.
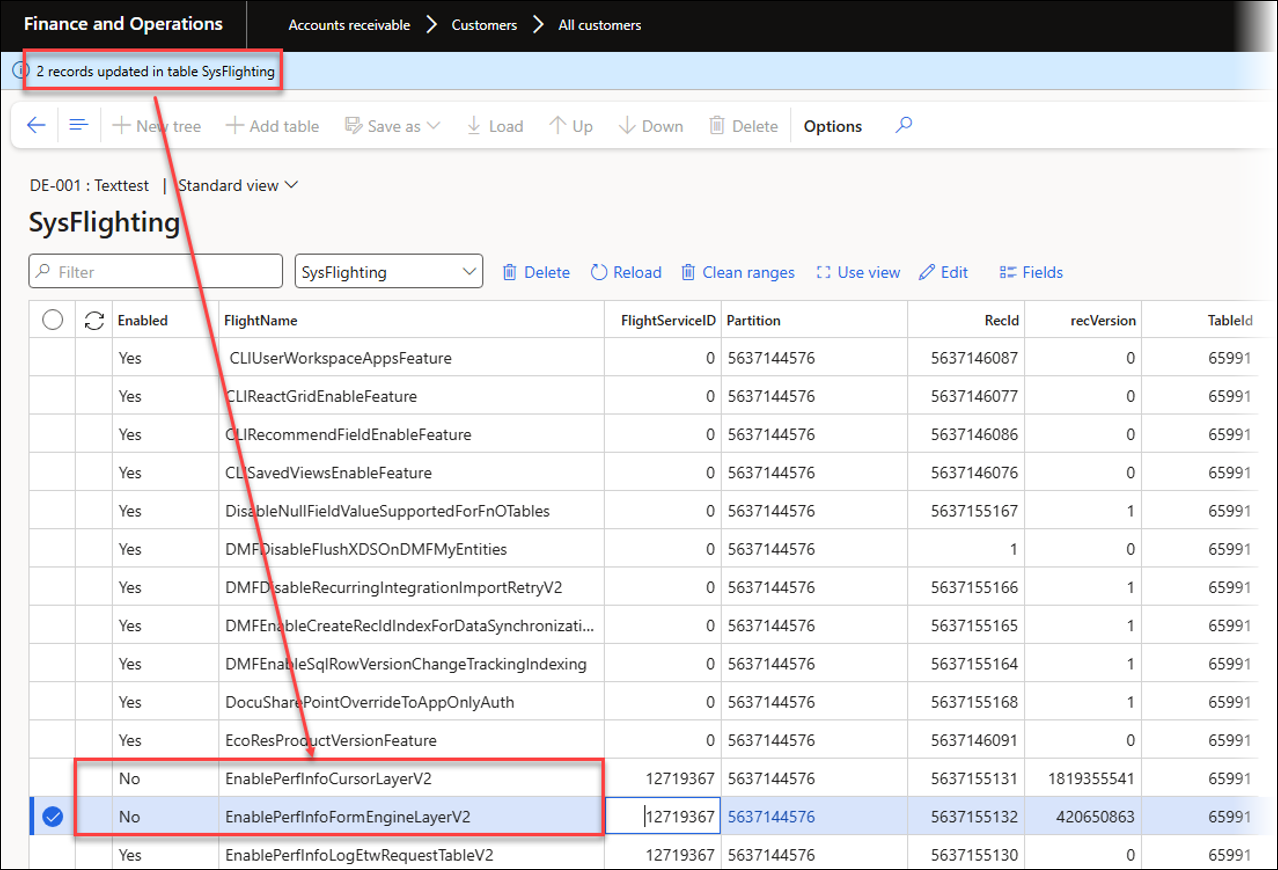
For example, in the SysFlighting table, the Enabled field for two selected records can be changed from Yes to No.
After updating the two records:
Data explorer can also be accessed by navigating to Lasernet > Test and performance suite > General tools.
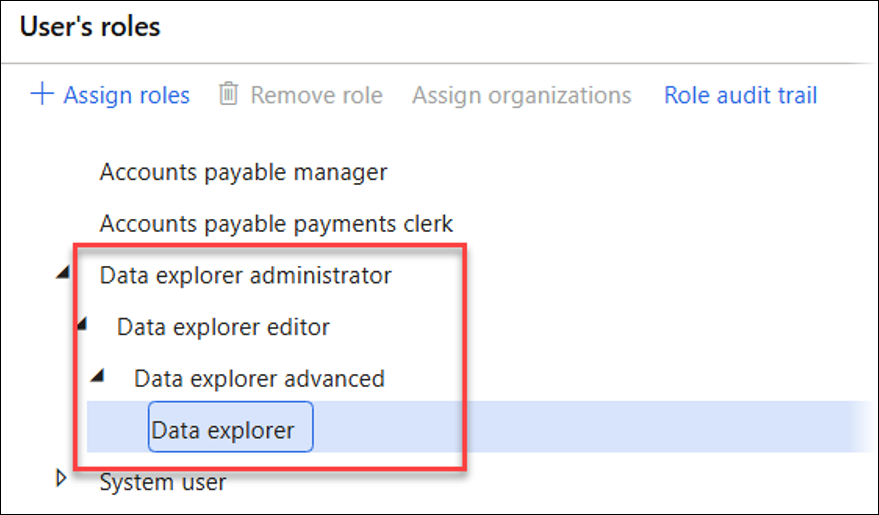
Data explorer includes the following roles:
Data explorer: Has access to basic Data explorer functionality. Cannot edit data fields nor access hidden data fields by using View mode.
Data explorer advanced: Has access to hidden data via View mode. Cannot edit data fields, but can access hidden data fields via View mode.
Data explorer editor: Has access to data editing.
Data explorer administrator: Has access to all functions in Data explorer.
A valid license is needed for Data explorer and can be entered in Lasernet > Test and performance suite > Parameters.