Share Content Between Forms (Subforms and Phrases)
- 15 Apr 2026
- 10 Minutes to read
- Contributors


- Print
- PDF
Share Content Between Forms (Subforms and Phrases)
- Updated on 15 Apr 2026
- 10 Minutes to read
- Contributors
- Print
- PDF
Article summary
Did you find this summary helpful?
Thank you for your feedback
Subforms enable you to create content once and reuse it in multiple places. Subforms are relevant to EMF-based, XML, EDI, and JSON output. The scope of the subform feature depends on the Lasernet that you are using:
Lasernet Core 11 and 10: You can create a subform and then use it in:
Different sheets of the same form.
Different forms.
Lasernet Essentials / Professional / Advanced: You can create a subform and then use it in different sheets of the same form.
Phrases have the same purpose as subforms. Phrases are relevant to rich-text-based DOCX, PDF, and HTML/XHTML output.
Subforms
The subform tool is designed to add fixed content as a stand-alone entity to a document or a report. For example, you might need to create several reports for different departments, where all the reports are to contain the same text fragment. Rather than adding the fragment to each report individually, the easiest method is to create a subform and add the fragment to that instead. The subform can then be easily included in each report.
Alternatively, if the fragment should only appear on some reports and not others, you can achieve this by using criteria to select or deselect reports for treatment. To do this, we recommend that you create the required number of subforms and specify criteria for each of them based on the input or JobInfos.
Subforms can be added to the form design of EMF-based forms (including forms that output PDF or PDF/UA documents), as well as to outputs in XML, EDI, or JSON format. Subforms are often used as an alternative to overlays (used in previous versions of Lasernet) to maintain company branding elements, like company logos, addresses, or graphical elements.
Note
Only subforms whose Output Format is PDF/UA are compatible with PDF/UA forms. This is because only the form items in PDF/UA subforms have the necessary Reading order properties. For more information about Lasernet Core’s PDF/UA capability, see Configure PDF/UA Output.
Refer to the information that corresponds to the form’s output data format:
EMF-based output
Note
The following information is relevant only to PDF, TIFF, and EMF sheets whose underlying format is EMF.
Add a Subform
You can create a subform from existing form design items, or you can create a blank subform and add items to it.
Create a Subform from Existing Form Design Items
To add a subform, follow the steps below:
In the output, select the objects you want to add to the subform. Right-click the selected objects, and then select New Subform on the context menu.
Note: Only absolute (not conditional) objects can be added to a subform. Additionally, make sure that those objects have the same values for their Absolute and Relative to position settings.

With the Subform dialog displayed, specify a subform type (Global or Local) and a subform name.

Click the OK button to confirm, and then a subform is added and shown in the output.

You can add existing global or local subforms to your output. To do this, follow the steps listed below:
Click the down-pointed arrow next to Subform.
Select Insert Global Subform or Insert Local Subform.

After you have chosen a subform type, the mouse cursor changes its view. Click anywhere in the output to insert the subform.
Afterwards, use the Subform dialog that appears to add a subform.
Create a Blank Subform and Add Items to It
It is also possible to add subforms through the Subforms tool of Lasernet Developer.
Click Subforms in the Lasernet Developer Tools pane.
In the toolbar, click Add.
Enter properties for the subform (including an appropriate Input Format and Output Format) and then click Ok.
If you are creating PDF/UA forms, select PDF/UA from the Output Format list.
Lasernet Developer adds the new subform. Double-click it in the main area of the Subforms tool to design it.
Edit a Subform in the Form Design
To edit a subform that is used in a form design, follow these steps:
Do one of the following:
Double-click the subform tab.

Right-click the form, and then click Edit.

As a result, the subform editor opens.

Note
The subform editor only features tools designed for creating and manipulating absolute objects and not patterns with conditional rearranges.
To locate a subform in the same position as the objects added to the subform, select the Static subform check box on the toolbar of the subform editor. The position of the static subform is then locked in the output. Subforms marked as not static do not take the paper format into account.

The rearrange in the upper left corner is calculated internally with an off-set set to X= 0 and Y = 0, and other objects on the page are relative to that rearrange.
Subform Instance Properties
Subform instances have specific properties, which are similar to those of rearranges. For more details about the rearrange properties, see Edit Rearrange Properties.
To open a dialog showing a list of subform instance properties, double-click a subform or right-click it, and then select the required command on the context menu.

Change the Output Format of an Existing Subform
If you are creating PDF/UA forms, you must use subforms whose Output Format is PDF/UA. This is because only the form items in PDF/UA subforms have the necessary Reading order properties.
Note
For more information about Lasernet Core’s PDF/UA capability, see Configure PDF/UA Output.
To create a PDF/UA subform, follow the Create a Blank Subform and Add Items to It instructions above. When you create the subform, select PDF/UA from the Output Format list.
To convert an existing EMF subform to a PDF/UA subform, follow these steps:
Click Subforms in the Lasernet Developer Tools pane (see 1 in the image below).
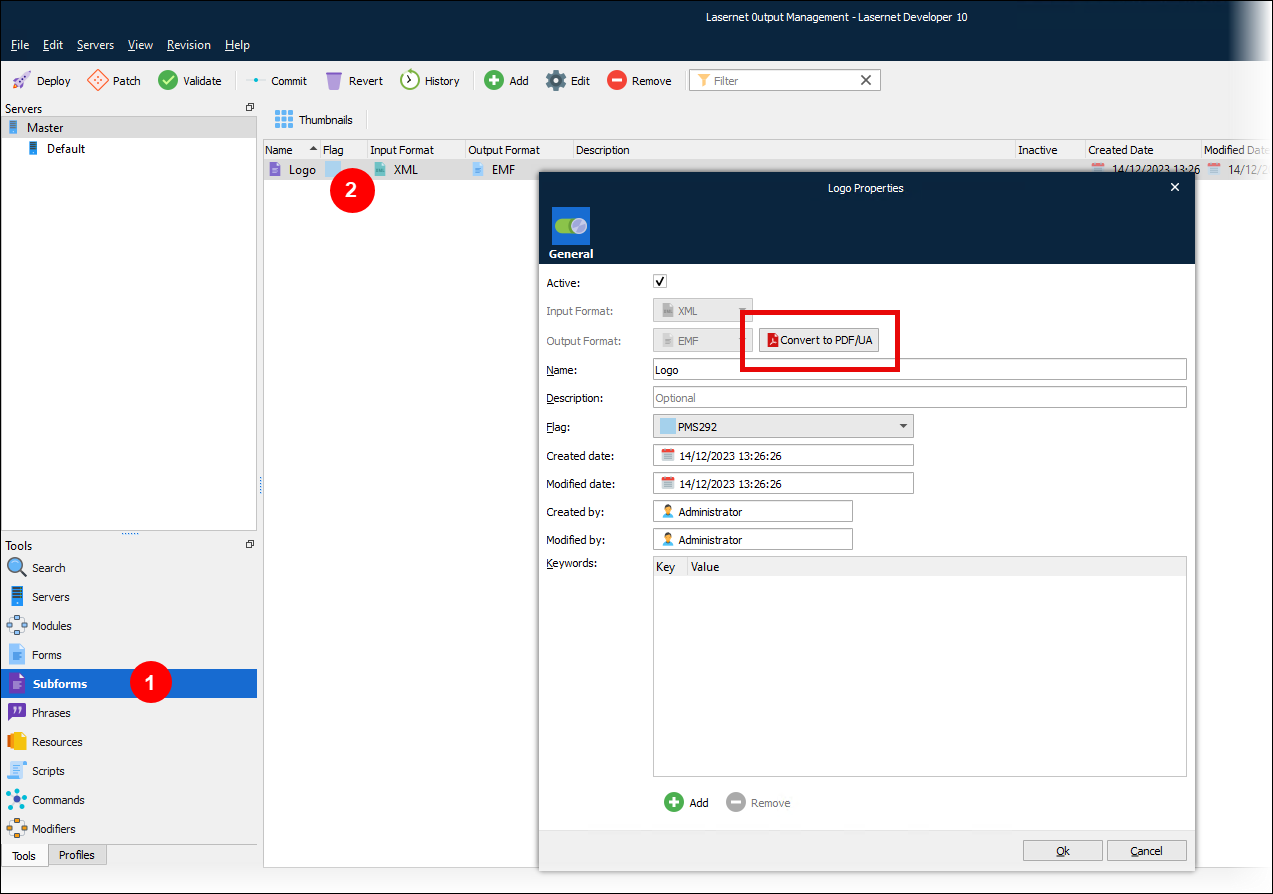
Right-click the subform that you want to convert (2), and then select Properties.
In the subform Properties window, click Convert to PDF/UA beside the Output Format list. The Output Format of the subform changes.
Click Ok to save your changes to the subform.
You can now use the subform in a PDF/UA form.
XML, EDI, and JSON output
Adding a Subform
To add a subform to XML, EDI or JSON format output, follow the steps listed below:
In the output, right-click a top node of the structure you want to add to the subform. On the context menu that appears, select New Subform. As a result, this node, as well as all its child node(s), rearranges, and patterns added to them, are copied/moved to this subform.

With the Subform dialog displayed, specify a subform type (Global or Local) and a subform name.

Click the OK button to confirm. As a result, the subform is added and shown in the output.

Note
A local subform is added within the current form. It becomes available for each sheet of the form possessing the same output type.
Note
A global subform which is added becomes available of all the forms of the same input/output formats within the current configuration.
If you want to create a new subform from scratch, or select an already created one, use the Subform tool on the Developer toolbar.
You can add the following subform types to your output: global or local. To do this, follow the steps listed below:
Click the down-pointed arrow next to the Subform tool.
On the menu that appears, click a command of your choice: Insert Global Subform or Insert Local Subform.

After you have chosen a subform type, the mouse cursor changes its view. Click anywhere in the output to insert the subform.
Afterwards, use the Subform dialog that appears to add a subform.
It is also possible to add and manage subforms via the Subforms tab of Lasernet Developer.

Editing a Subform
To edit a subform, do one of the following actions:
Double-click the subform tab.

Right-click the form, and then click Edit Subform.

As a result, the subform editor opens.

Add Rearranges and Patterns to Subform Structure
Working with subforms, you have the following ways of adding rearranges and patterns:
By editing the subform itself using the subform editor (for more information, see Editing a Subform).
By adding rearranges and patterns directly to a subform in the output.
It depends on the purpose of using the subform functionality.
In the former case, you are supposed to create several different output files based on one input file which contains the same fragment(s). Patterns and rearranges are then added to the subform itself using the subform editor. Afterwards, you add the edited subform to those documents.
In the latter case, you are supposed to have different input files with different structures, and as a result, get different output files possessing the same fragment(s). To this end, you can create a subform in an output document and add patterns and rearranges directly to this subform structure by moving them from the input.
You can use both cases described above at the same time.

Subform Instance Properties
Subform instances have specific properties, which are similar to those of rearranges of the XML file.
To open a dialog showing a list of subform instance properties, double-click a subform or right-click it, and then select the required command on the context menu.

There is a property that is specific for a subform created for XML, EDI, or JSON output formats. It is the Behaviour property. This property is available on the XML tab of the Edit XML Subform dialog. You can use the property to define a behavior for a subform being edited, and then apply that subform to a definite node, which you can select from the list on the XML tab.

Move a Subform
You can change the order of a subform relative to another subform. The subforms for which you want to change the order, must possess the same Behaviour and Insert location values. Otherwise, the functionality is disabled.
To change the order of a subform, right-click or double-click it and then select Move Before or Move After, depending on your need.

Phrases
The phrase tool is designed to add specific content as a stand-alone entity to a document or a report, for example, when creating several reports for different departments, which all need to include the same piece of content. Rather than adding the piece to each report separately, you can create a global phrase instead, add the content to the phrase and then insert the phrase into each report. An example of the type of content used with phrases is a company’s legal information, Term & Conditions, and other similar content.
You can also use criteria to show one piece of content whilst hiding another. Simply create the required number of inline phrases and specify the criteria for displaying/hiding each of them based on the DataSet input or JobInfos.
Refer to the information that corresponds to the form’s output data format:
Rich-text-based DOCX, PDF, and HTML/XHTML output
Add a Phrase
You can add the following phrase types to your output: global or inline. To do this, click the down arrow next to the Phrase tool. On the menu, select either Insert Global Phrase or Insert Inline Phrase.

Afterward, use the Phrase dialog that appears to add a phrase. By default, the dialog opens with the General tab.

You can select a phrase from the list or add a new phrase.
To add a phrase from the list to the output, select it and then click the OK button.
To add a new phrase, follow the steps listed below:
On the General tab of the Phrase dialog, click Add.
With the Phrase Properties dialog displayed, specify the phrase name and description and then click OK.

Add the phrase content in the phrase editor window.

From here you can add required fields (see the "Add required fields to the output" step in the Add Fields to Rich-Text-Based DOCX, PDF, and HTML/XHTML Output section of Add Input Data to a Sheet) by dragging them from the input or adding a static text, table or the other elements using the available tools.
Once you are done, click the Save button on the toolbar and then close the phrase editor.
The phrase is then available (and automatically selected) from the list on the Phrase dialog. To add it to the output, just click the OK button.
In addition, you can use the following controls available from the Phrase window.
Controls on the General Tab (Phrase window)
Control | Description |
|---|---|
Active | Select the check box to make the phrase active and show it in the output; clear the check box to make the phrase inactive and hide it in the output. |
Type | Select the Global radio button to create a global phrase; select the Inline radio button to create an inline phrase.
|
Search | Use controls for the Search group to find a phrase. |
Preview | Use the preview panel to view the phrase content. |
Edit | Click to edit the selected phrase. |
Controls on the Criteria Tab (Phrase window)
Control | Description |
|---|---|
Add DataSet | Add a criterion based on the DataSet input. |
Add JobInfo | Add a criterion based on JobInfo. |
Manage Phrases
After a phrase has been added to the output, it can be managed by right-clicking on it and using the available commands from the context menu:
Edit: Opens the phrase in the editor so you can make adjustments as required. You can also double-click the phrase to edit it.
Properties: The Phrase dialog opens on the General tab, where you can edit properties of the phrase “instance” in the current document. Any changes on the General tab are not applied to the phrase itself (which might appear in several documents).
Duplicate: The phrase instance is duplicated for the current output.
Add DataSet Criterion: Use the command to add DataSet criteria to a phrase.
To access a list of all phrases added to the output, click Sheet > Phrases.

Global phrases can be managed via the Phrase tab of Lasernet Developer.
