Scenarios
- 03 Mar 2026
- 3 Minutes to read
- Contributors


- Print
- PDF
Scenarios
- Updated on 03 Mar 2026
- 3 Minutes to read
- Contributors
- Print
- PDF
Article summary
Did you find this summary helpful?
Thank you for your feedback
This page describes two scenarios, each using either option of the Email tracking setting of the Parameters FastTab in the Reports list page.
Scenario 1 – Until Sent
This scenario will use the Lasernet Embedded solution, so a Tracking ID will not be visible in the email subject.
Lasernet Report Configuration
Navigate to Lasernet > Common > Reports.
Select the SalesInvoiceReplacement report, open the Parameters FastTab, and set Email tracking to Until sent.
Lasernet Predefined Destination Configuration
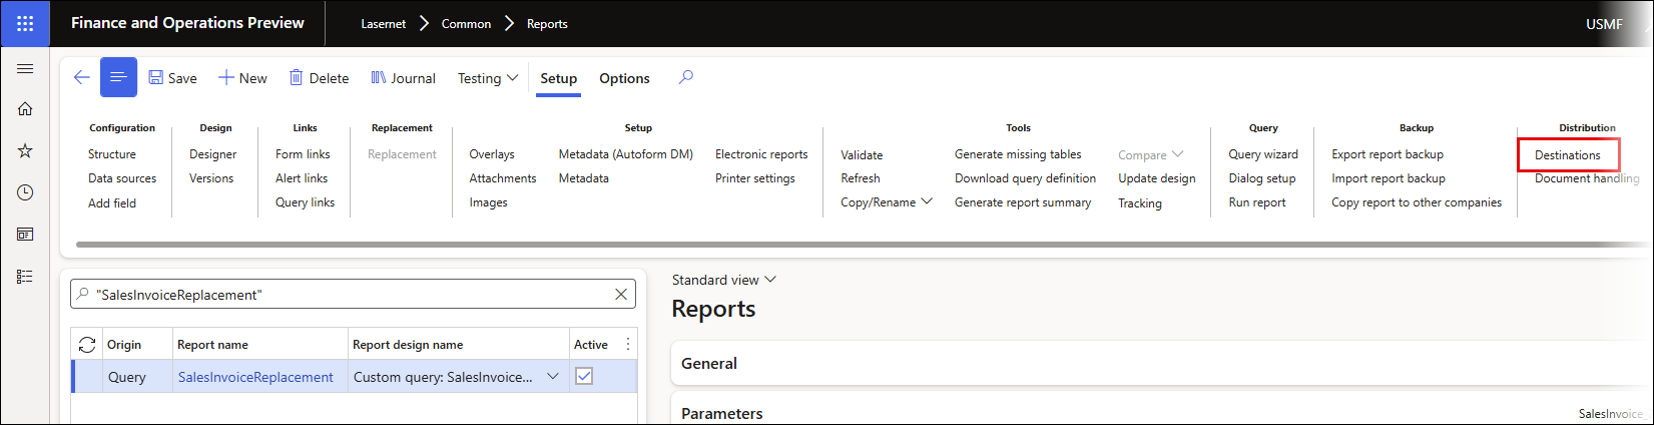
Navigate to Lasernet > Common > Reports.
Select the SalesInvoiceReplacement and then click the Destinations button on the Action pane.
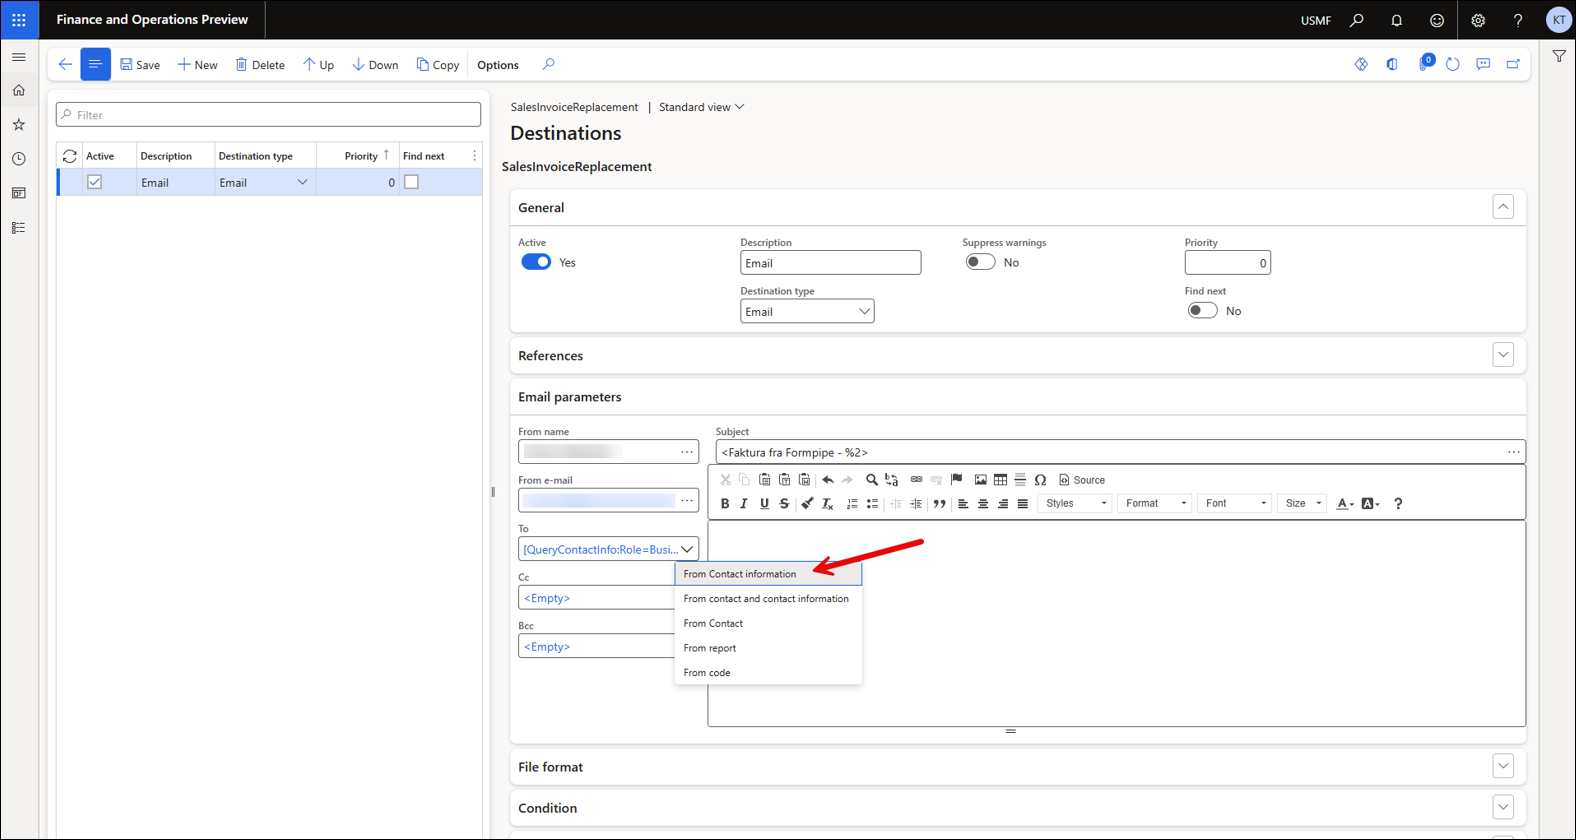
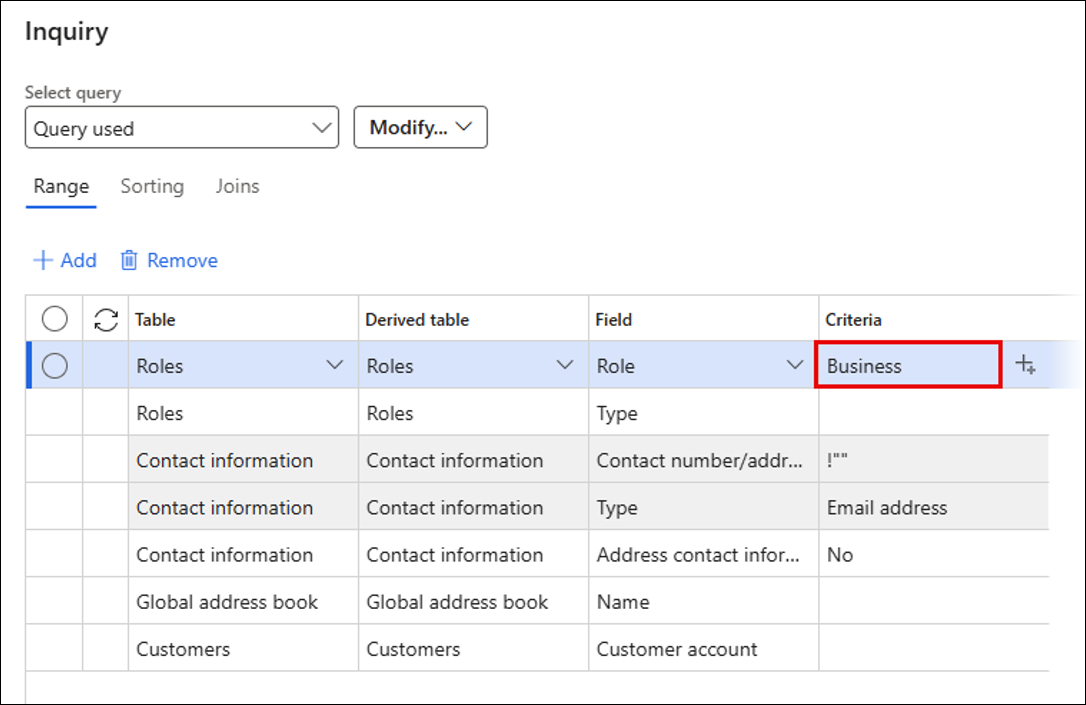
Select From Contact information from the dropdown menu in the To field.
Click Filter.

The predefined destination has been set up to take the email address from the customer record’s Contact information FastTab with the purpose of “Business”.
Send the Sales Invoice Sent to an Email Address Using the Lasernet Predefined Destination
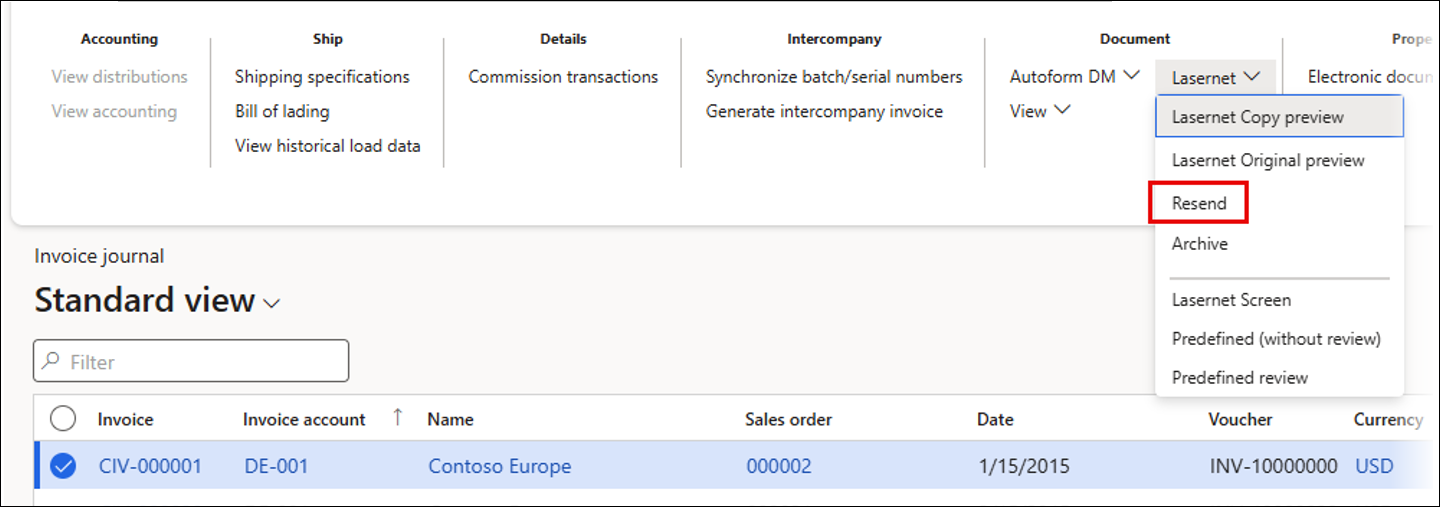
Navigate to Accounts receivable > Inquiries and reports > Invoices > Invoice journal.
Select an invoice journal, click Lasernet, and then Resend.
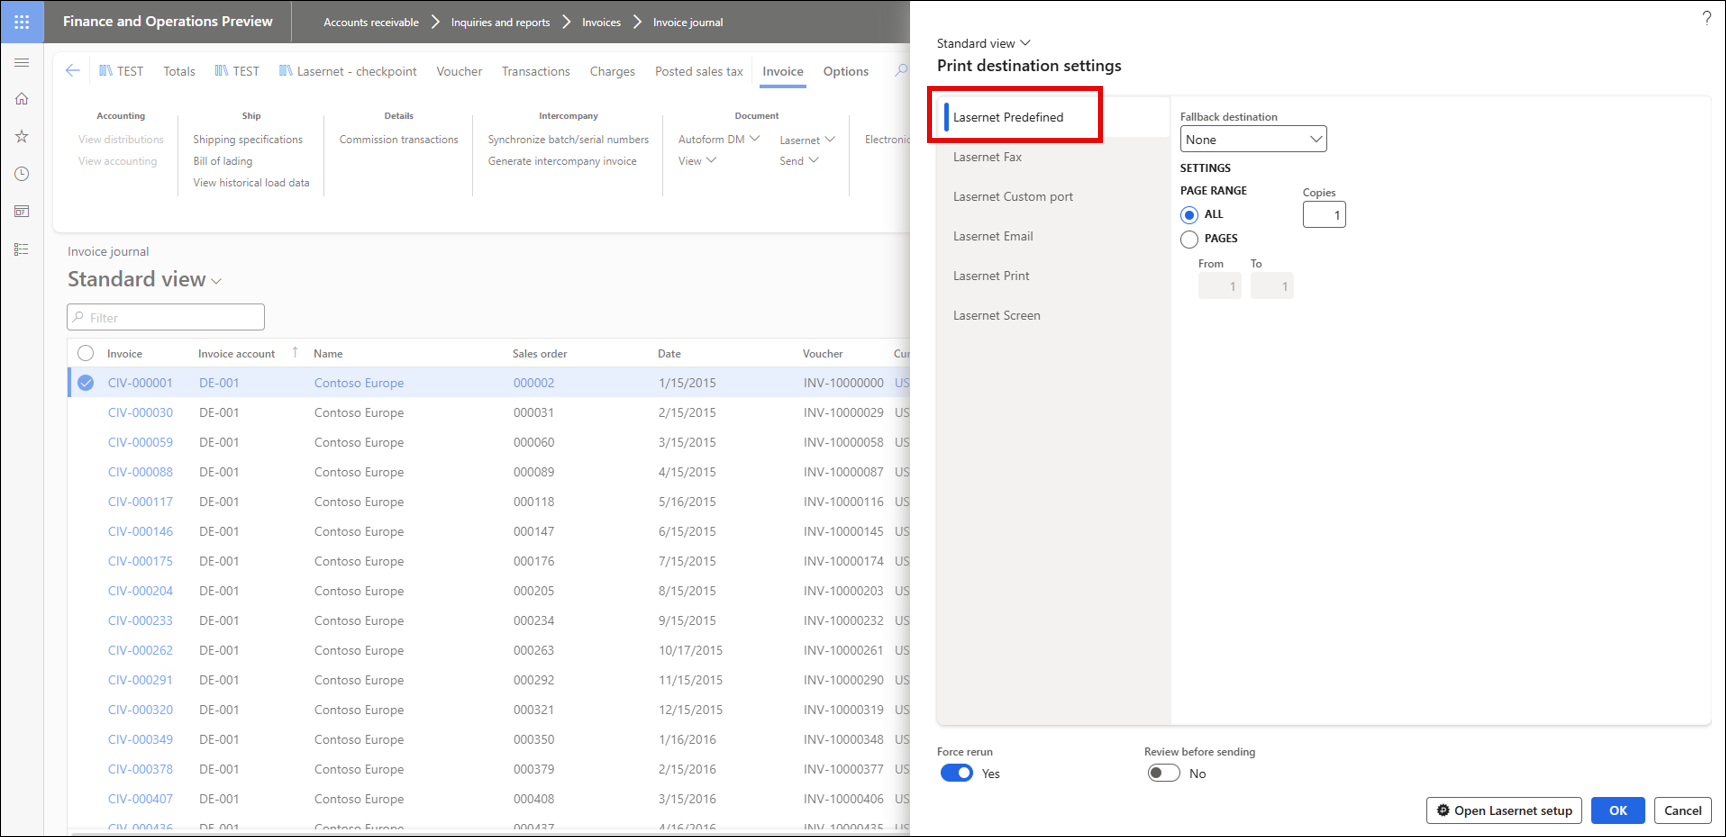
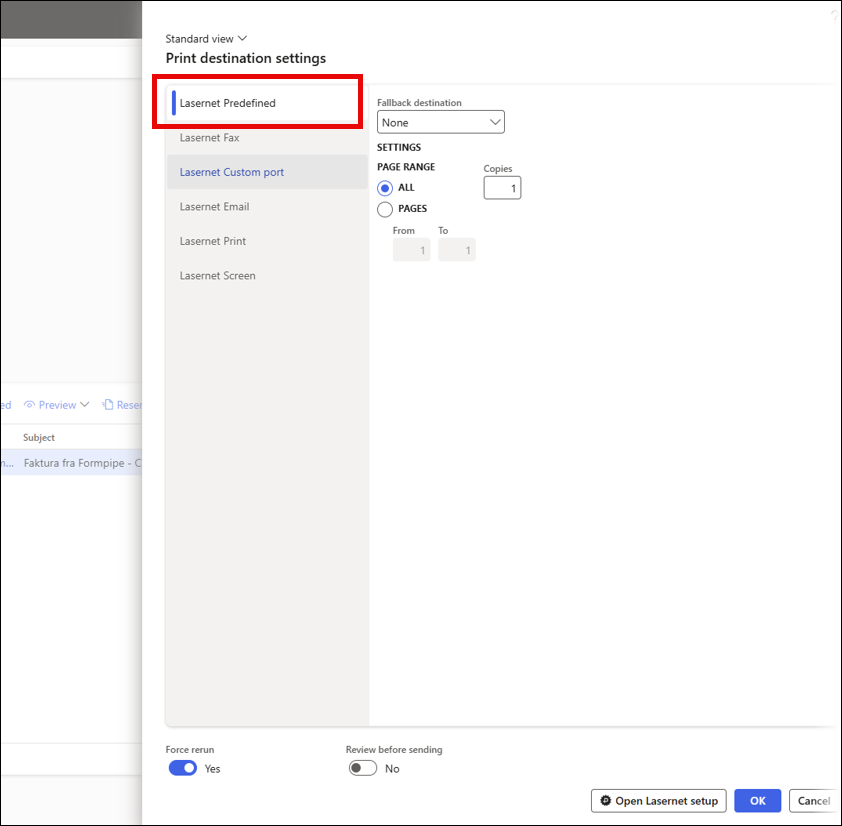
Ensure Lasernet Predefined is selected, then click OK.
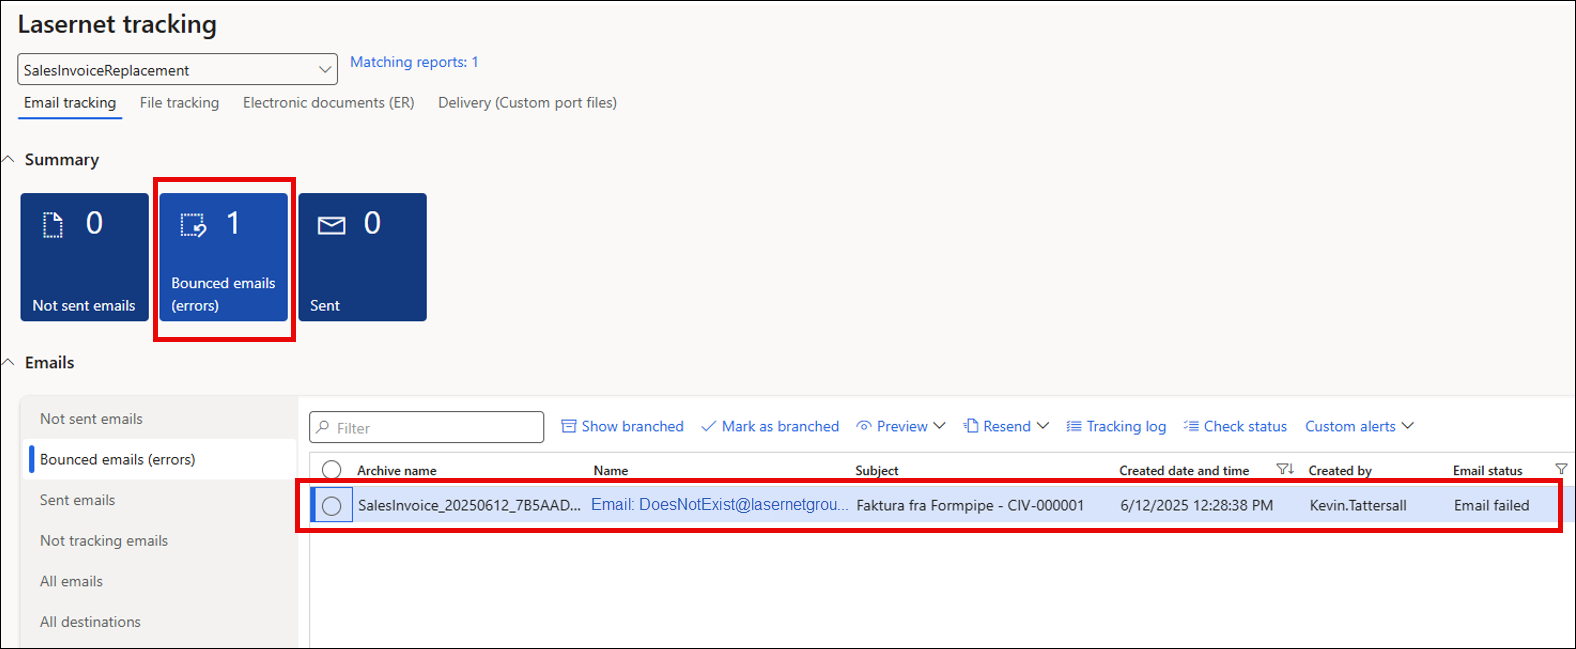
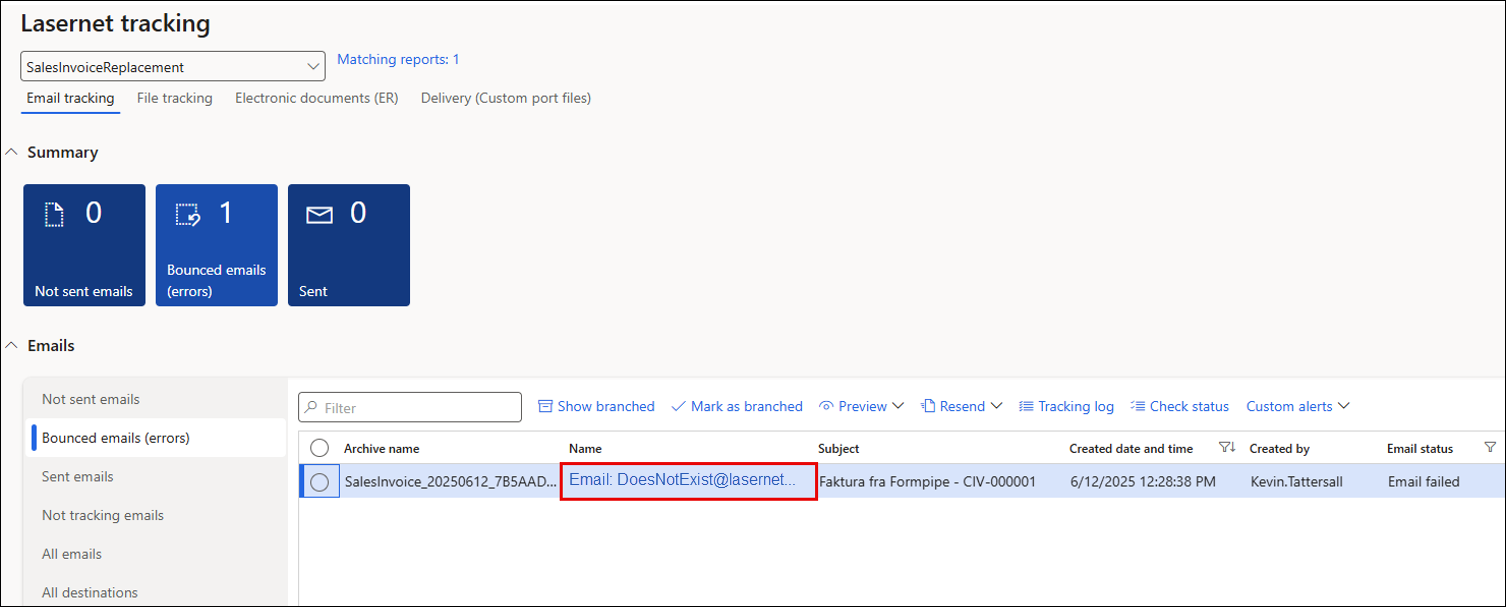
Check the Email Tracking Status of the Sales Invoice
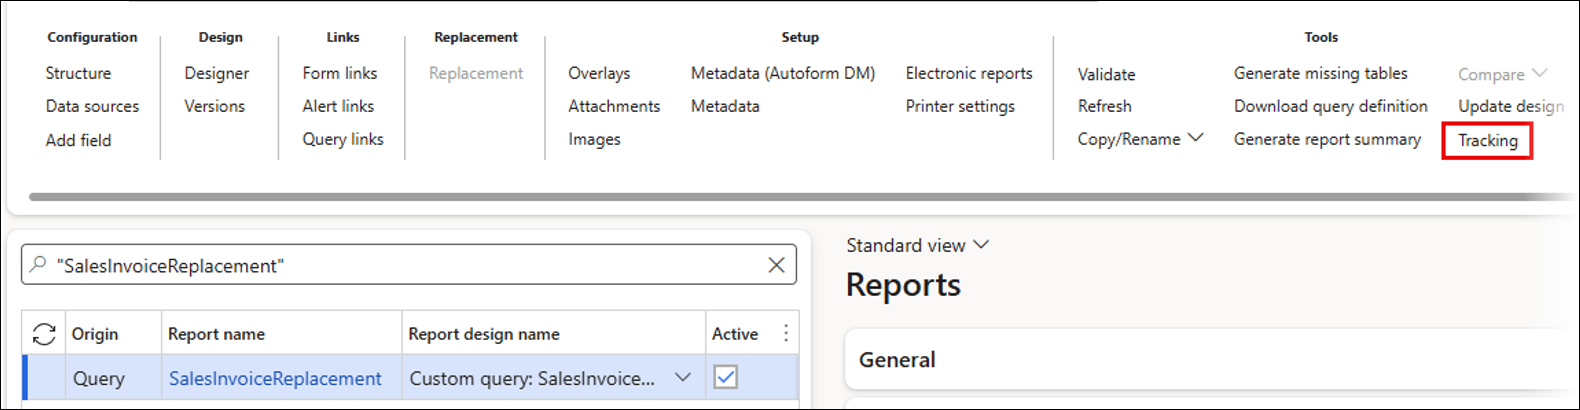
Navigate to Lasernet > Common > Reports.
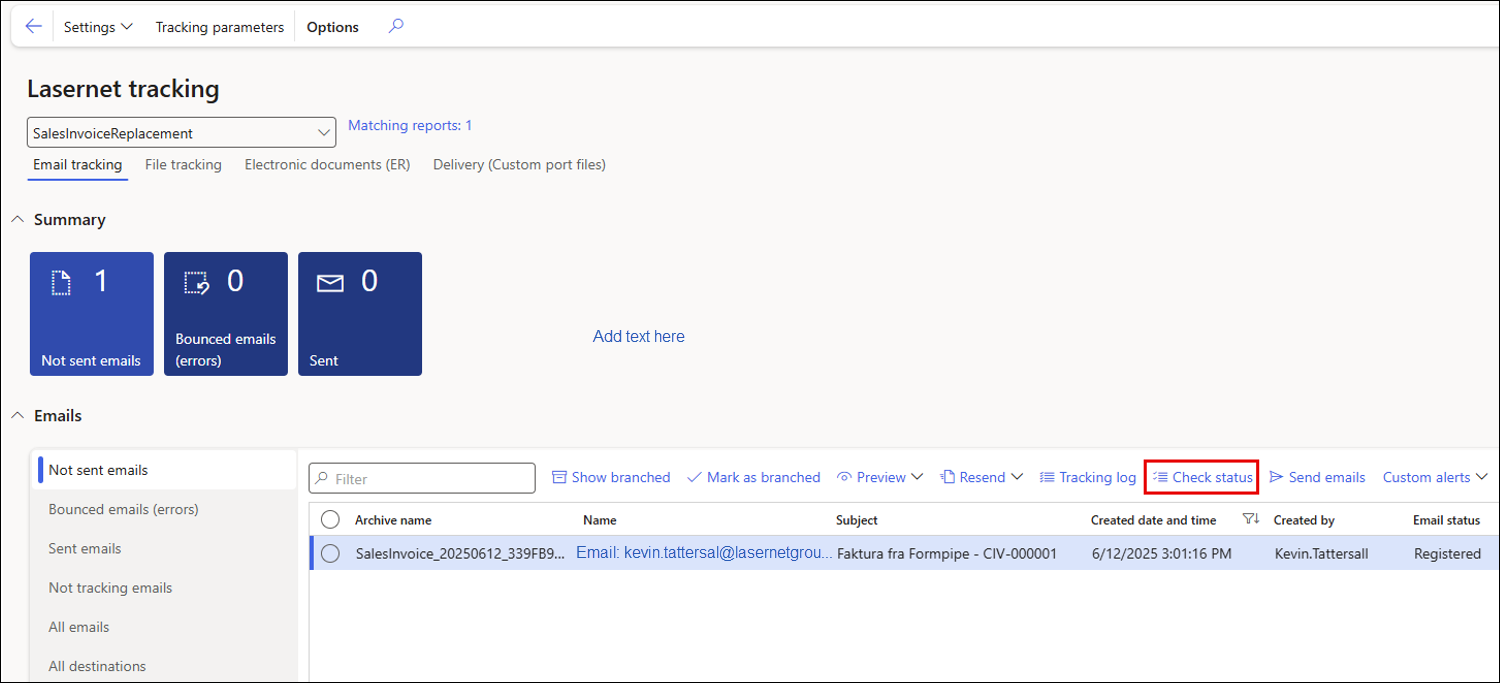
Select the SalesInvoiceReplacement report and click Tracking on the Action pane.
Here, we can see that the email has bounced:
Note
If the batch job has not been set up to check the email status, you can do this manually by clicking Check status.
If a message appears saying "0 emails have been analysed", click Settings and set Show data for last number of days to a number greater than 0.
Click Tracking log.
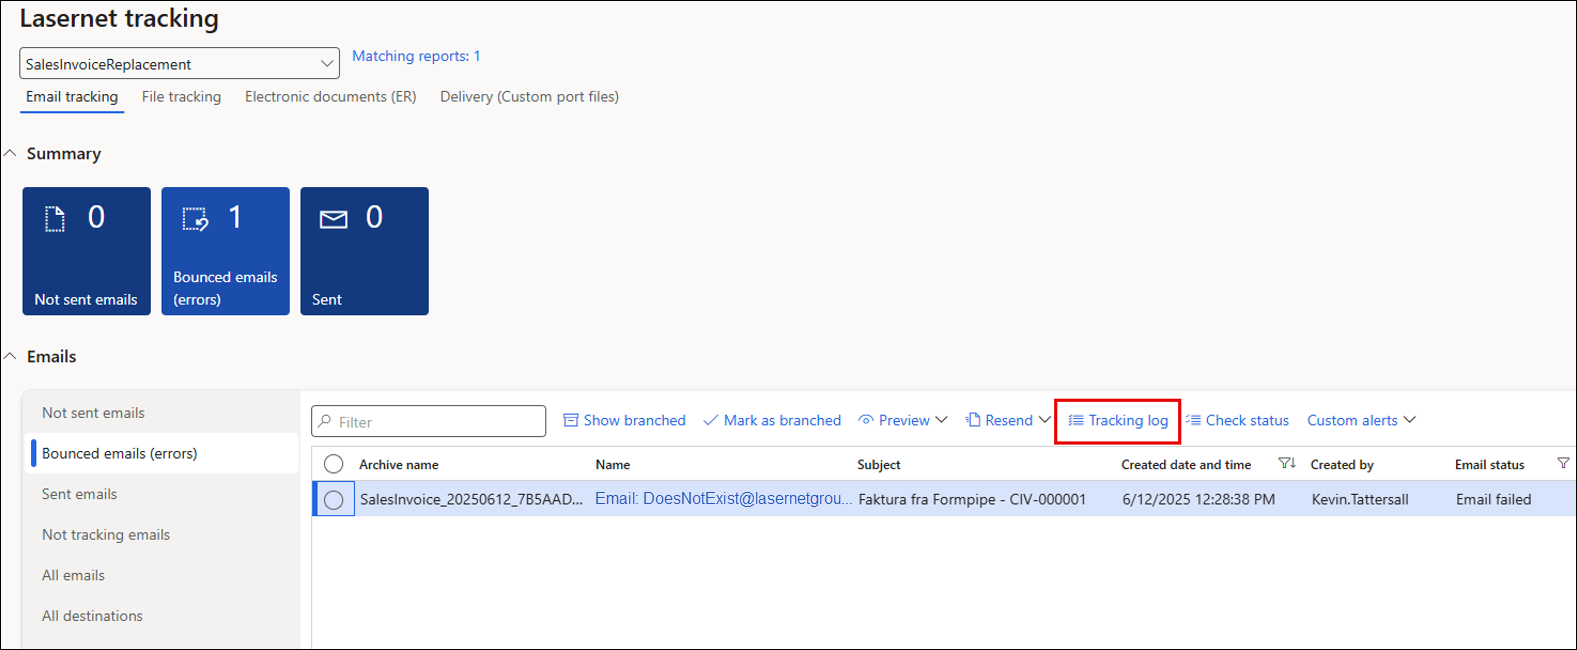
Hover the mouse pointer over the Text field on the Email failed line (you do not need to click). A pop-up will appear.
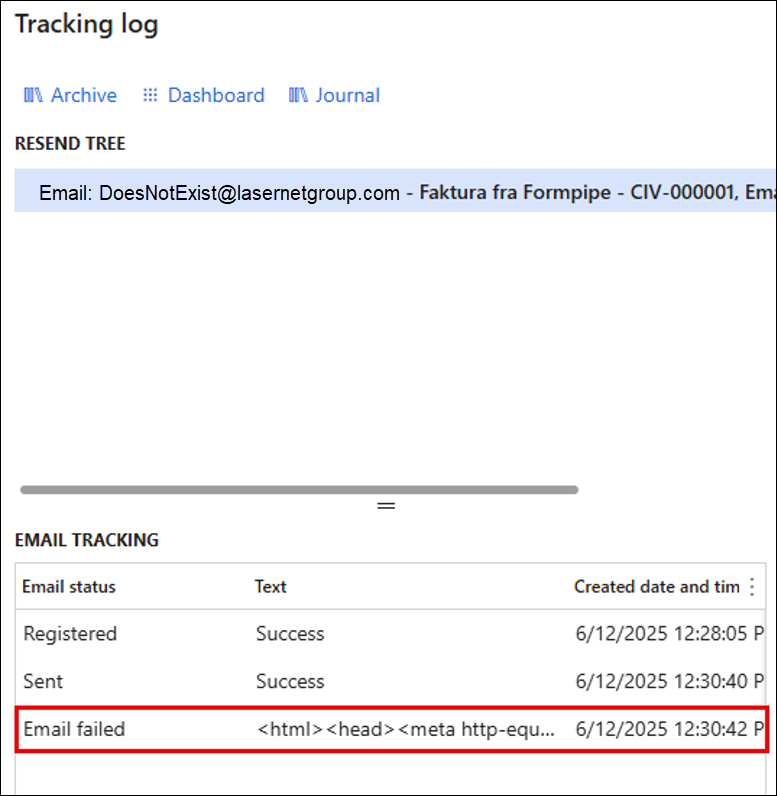
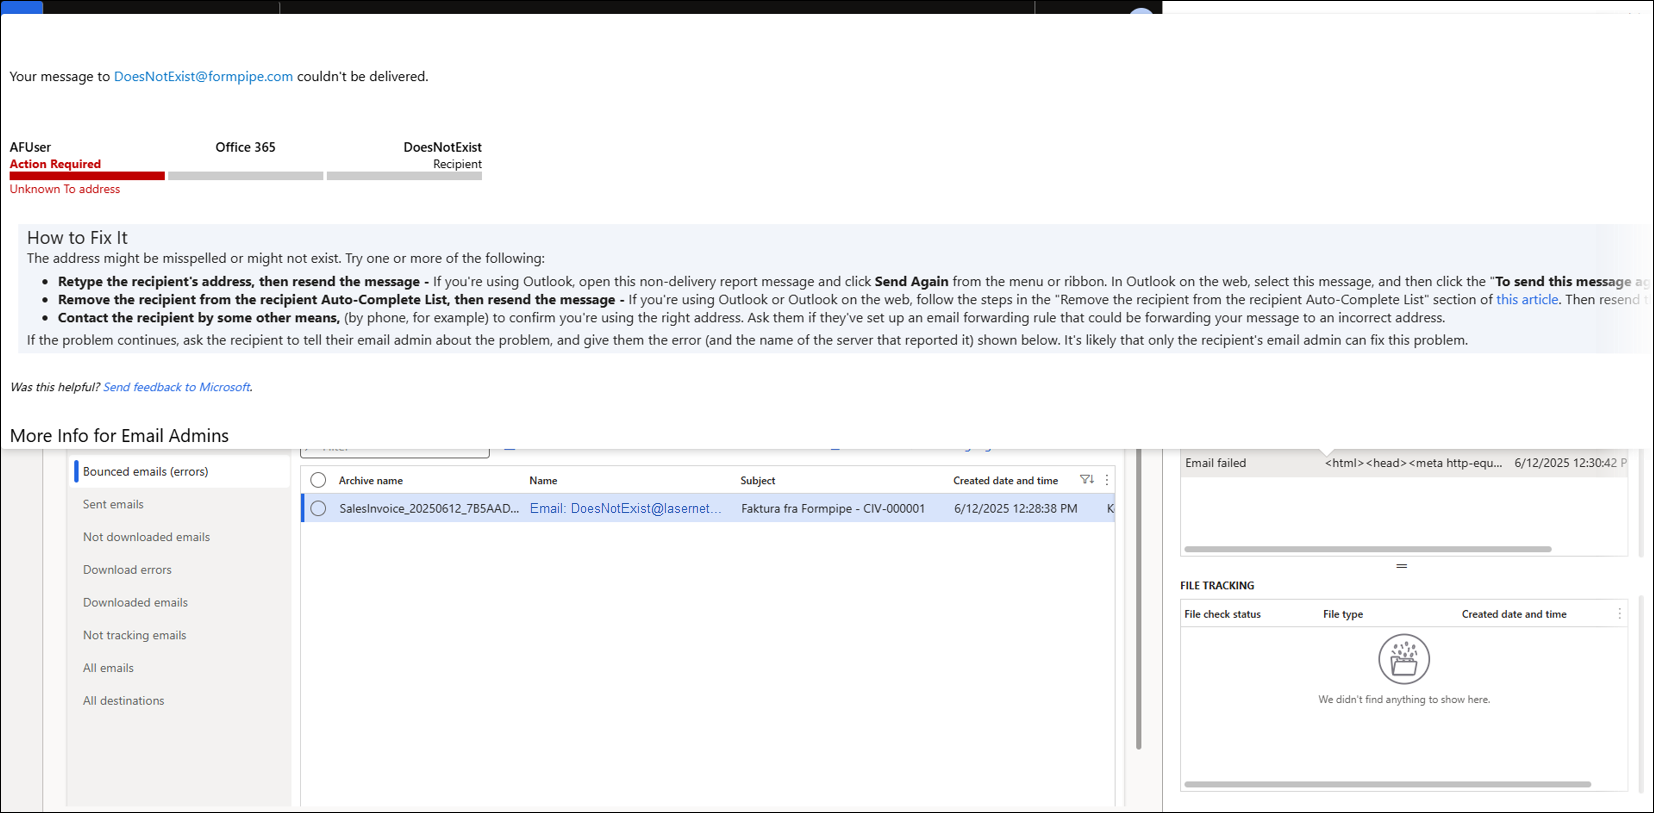
Here, we can see the error in the pop-up:
Change the Email Address to the Correct Email Address
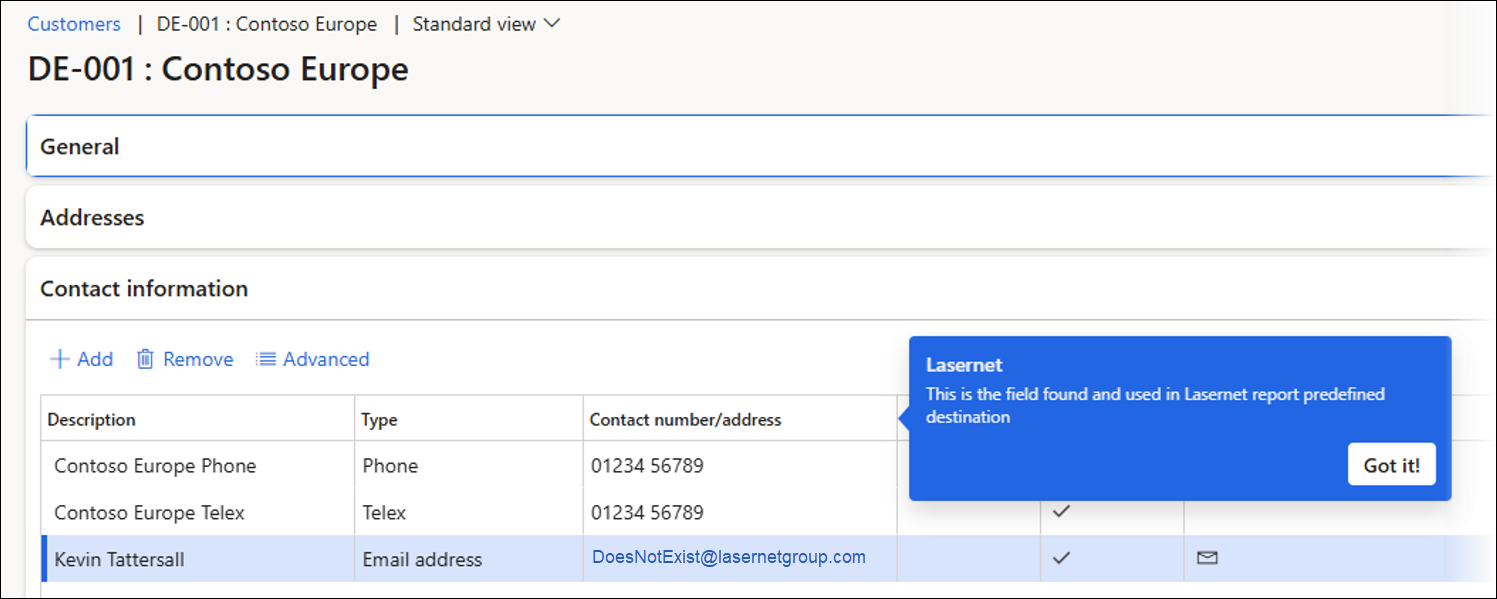
Click the hyperlink on the Name field.
This link takes you to the email address that was used in the first place. In this case, the business email address for the DE-001 customer account was used: DoesNotExist@lasernetgroup.com.
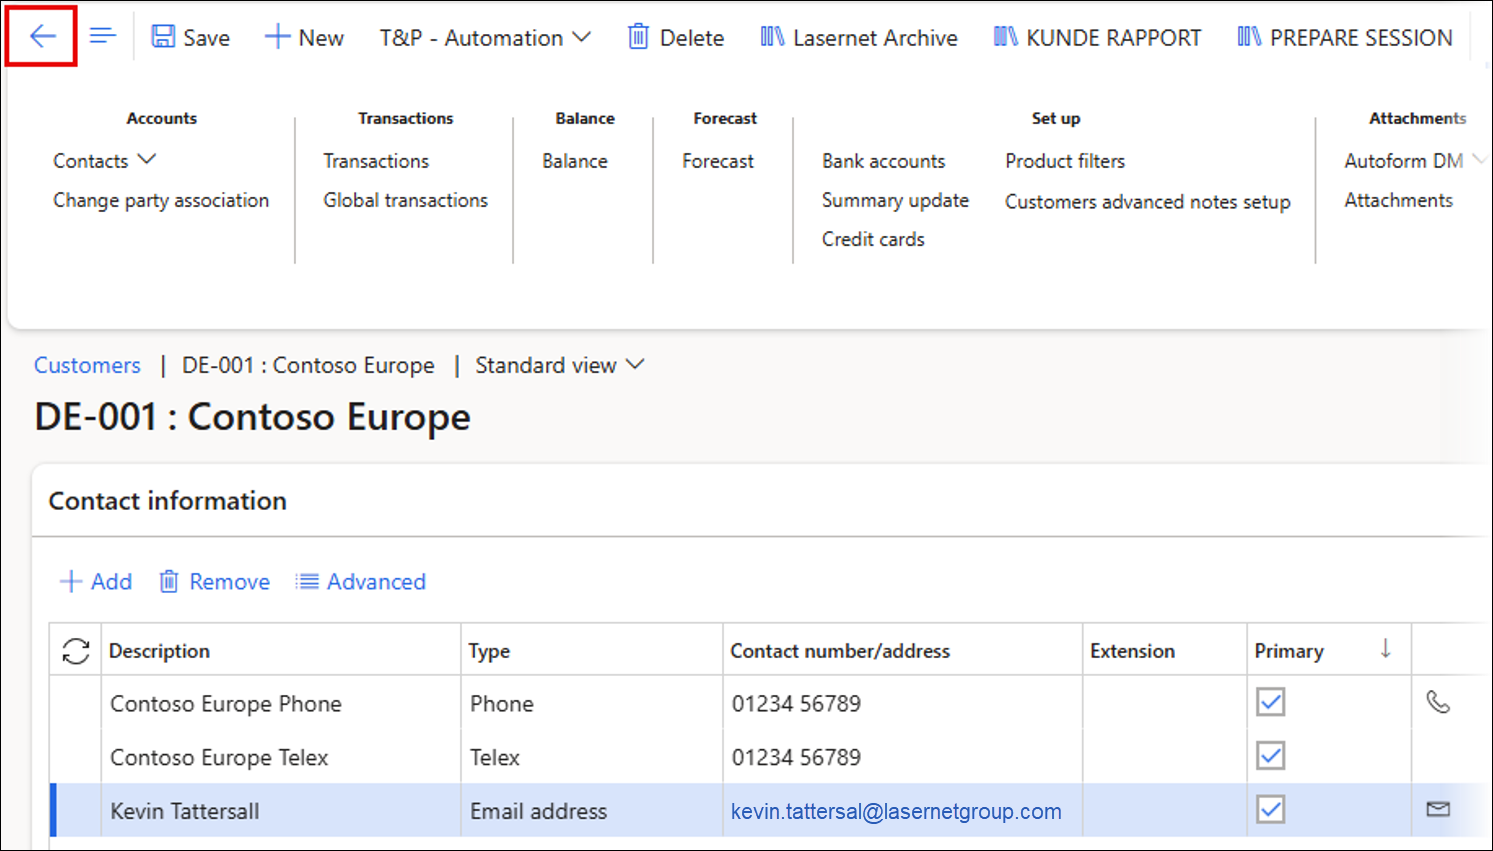
Change the email address to the correct one, in this case, kevin.tattersall@lasernetgroup.com.
Note
The master data has been changed so all invoices for this customer will be sent to the correct email address in the future.
Click the backward-facing arrow to navigate back to the Lasernet tracking workspace.
Resend the Email
Resend the email with the updated email address by selecting the bounced email and clicking Resend > Resend.
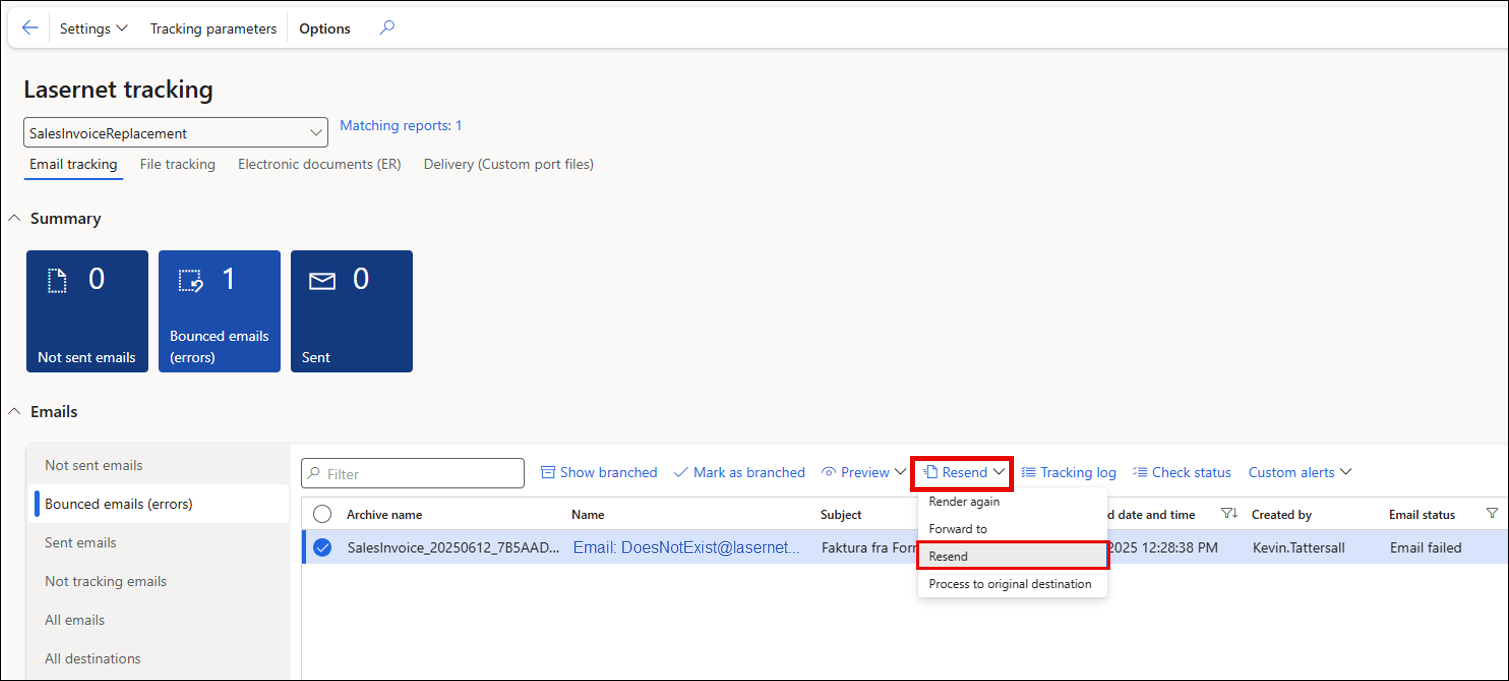
Send to Lasernet Predefined.
Check the Email Tracking - The Email Has Been Successfully Sent
Click Check status to manually check the status of the emails (a batch job can also be used to automate the status check).
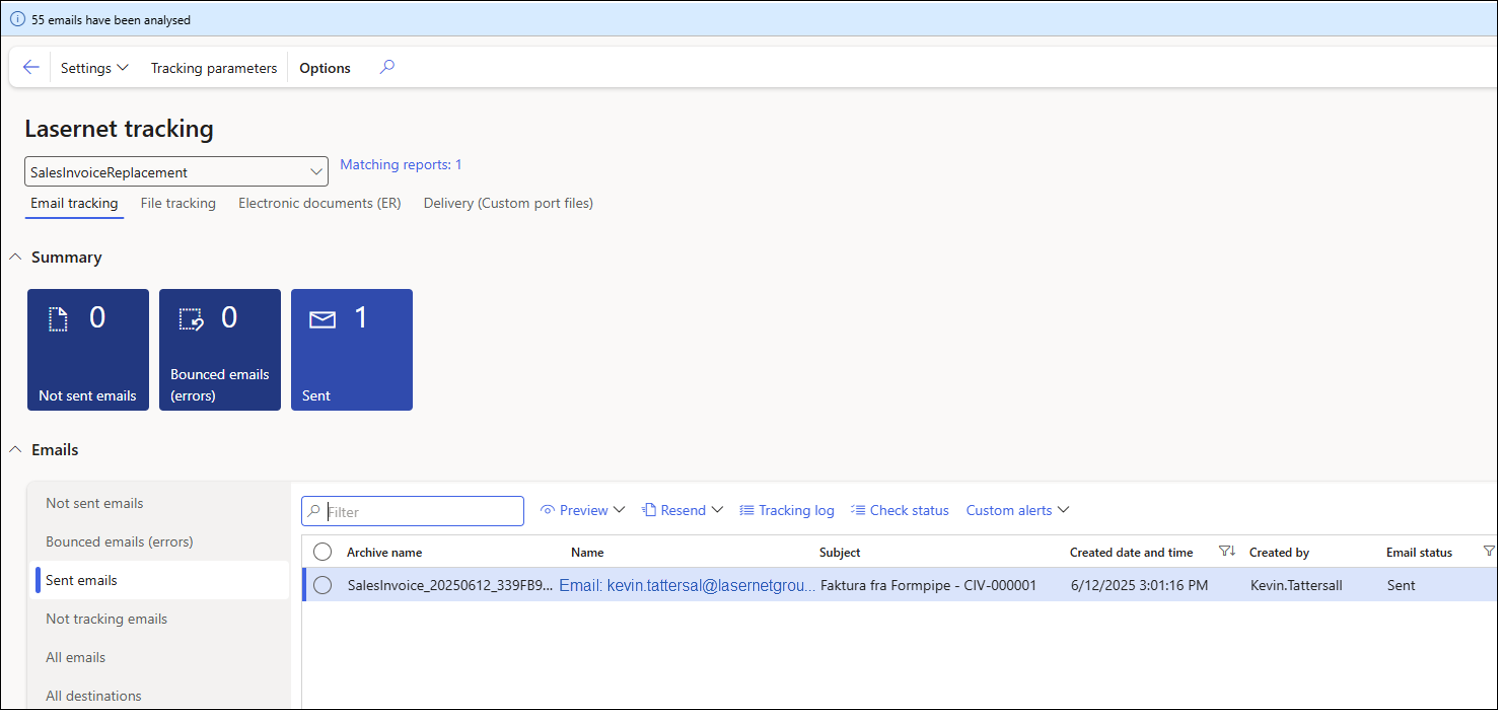
An infolog confirms that the emails have been analysed.
The Sent emails tab confirms that the email has been sent.
Scenario 2 – Until Downloaded
This scenario will use the Lasernet Embedded solution, so a Tracking ID will not be visible in the email subject.
Lasernet Report Configuration
Navigate to Lasernet > Common > Reports.
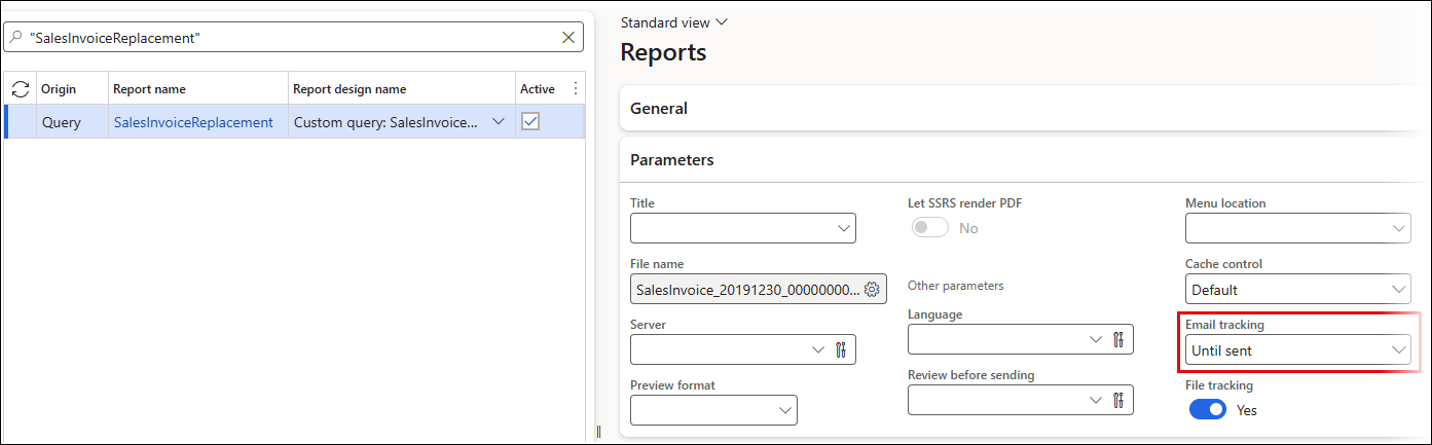
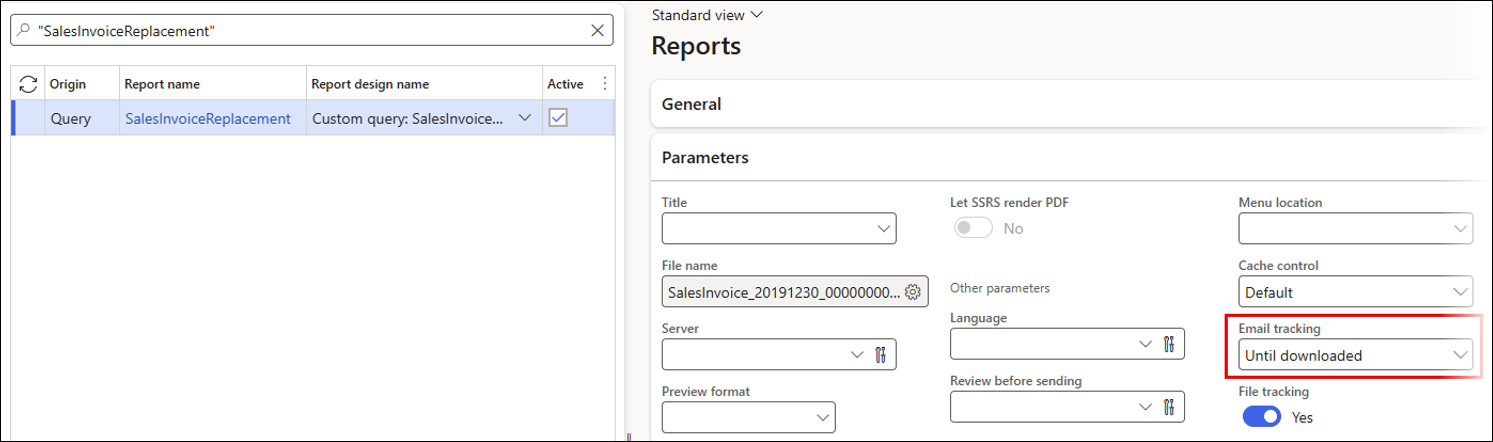
Select the SalesInvoiceReplacement, open the Parameters FastTab, and set Email tracking to Until downloaded.
Create Email Subject and Body
Lasernet Predefined can be used for an Until downloaded scenario. However, to demonstrate another print destination, we will configure the Lasernet Email option instead. Follow these steps:
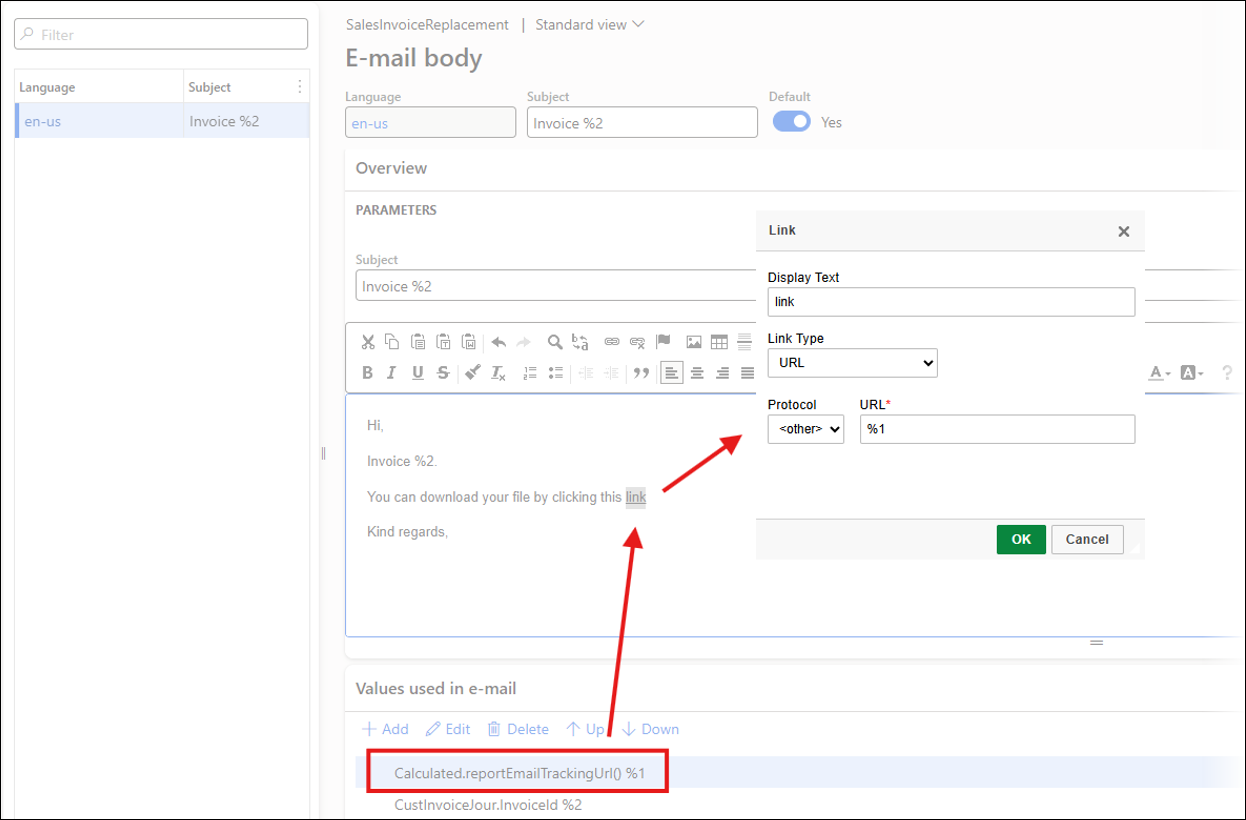
Expand the Destination defaults FastTab and click the ellipses button (…) on the Subject field.
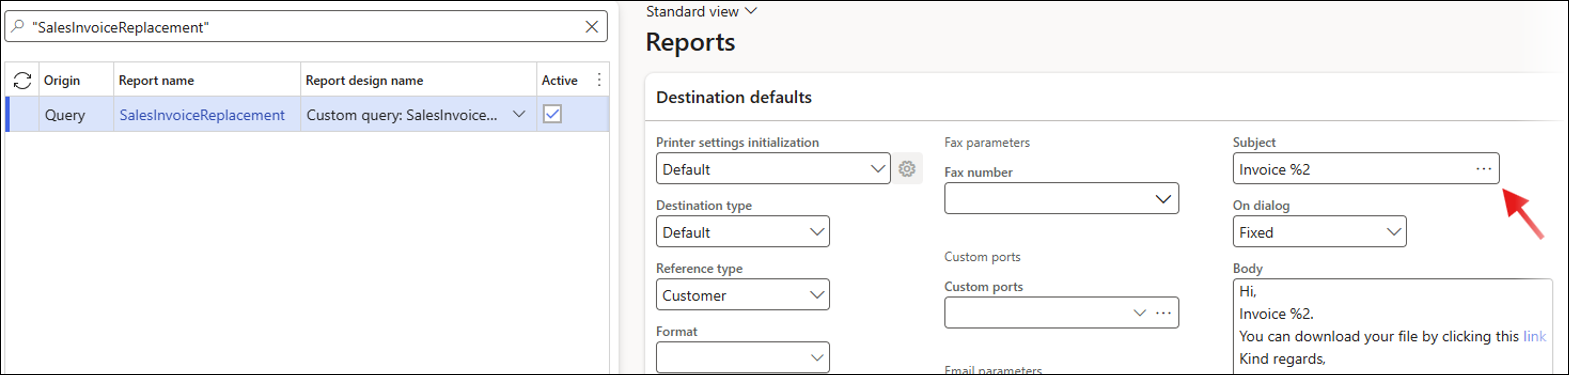
A Calculated.reportEmailTrackingURL placeholder has been added to the email body, as well as a link, so that a long URL is not visible.
Send the Sales Invoice Using Lasernet Email
Navigate to Accounts receivable > Inquiries and reports > Invoices > Invoice journal.
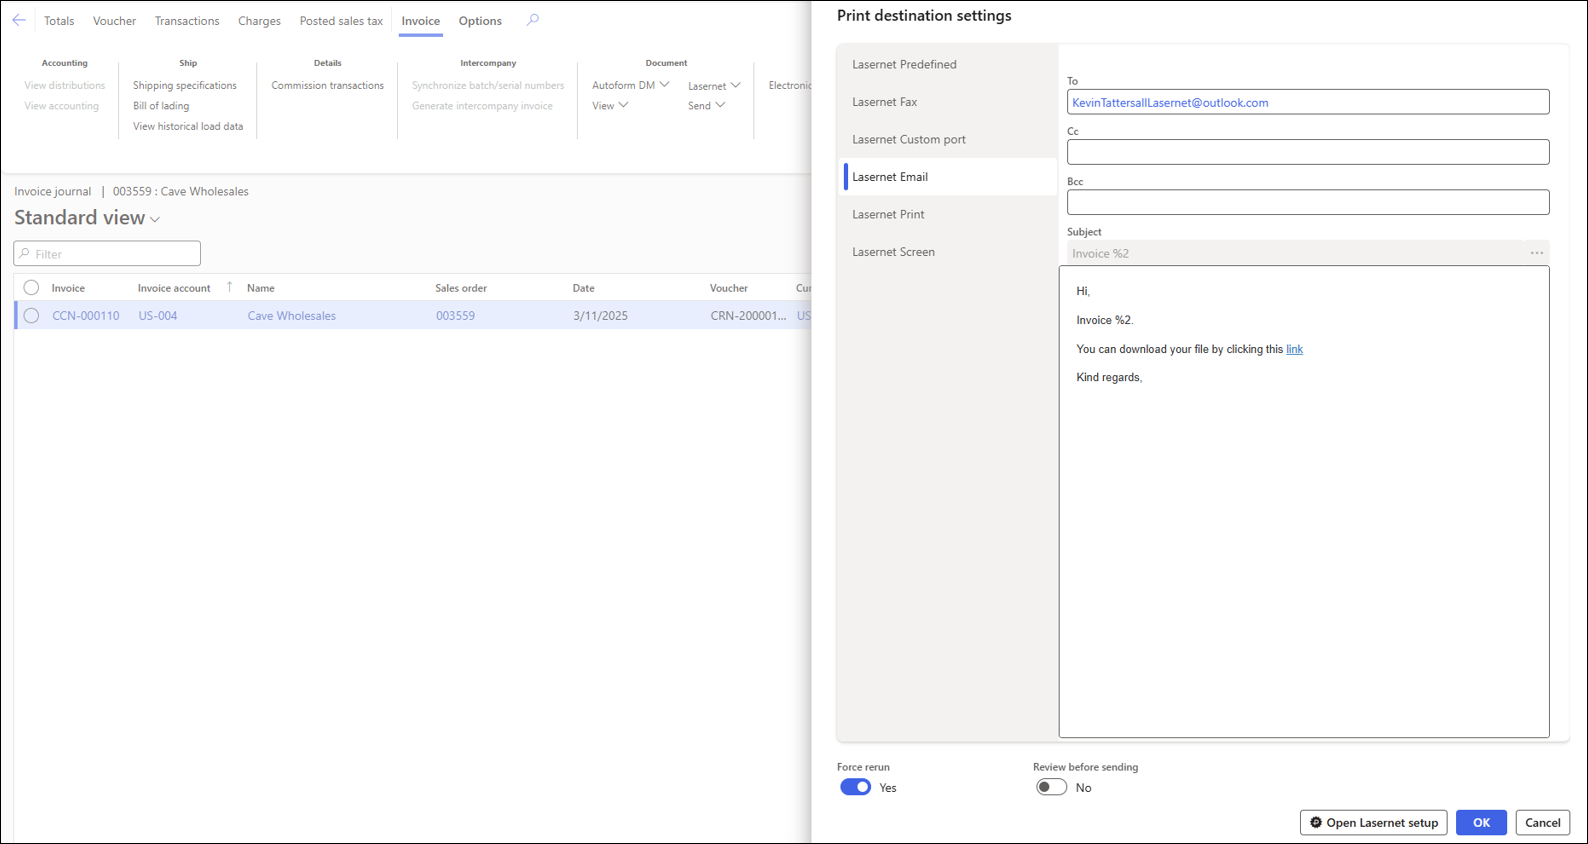
Select a sales invoice, and then click Lasernet > Resend.
Send the sales invoice using Lasernet Email.
The subject and body of the email are automatically populated with the data entered earlier in the Destination defaults for the report.
Click OK.
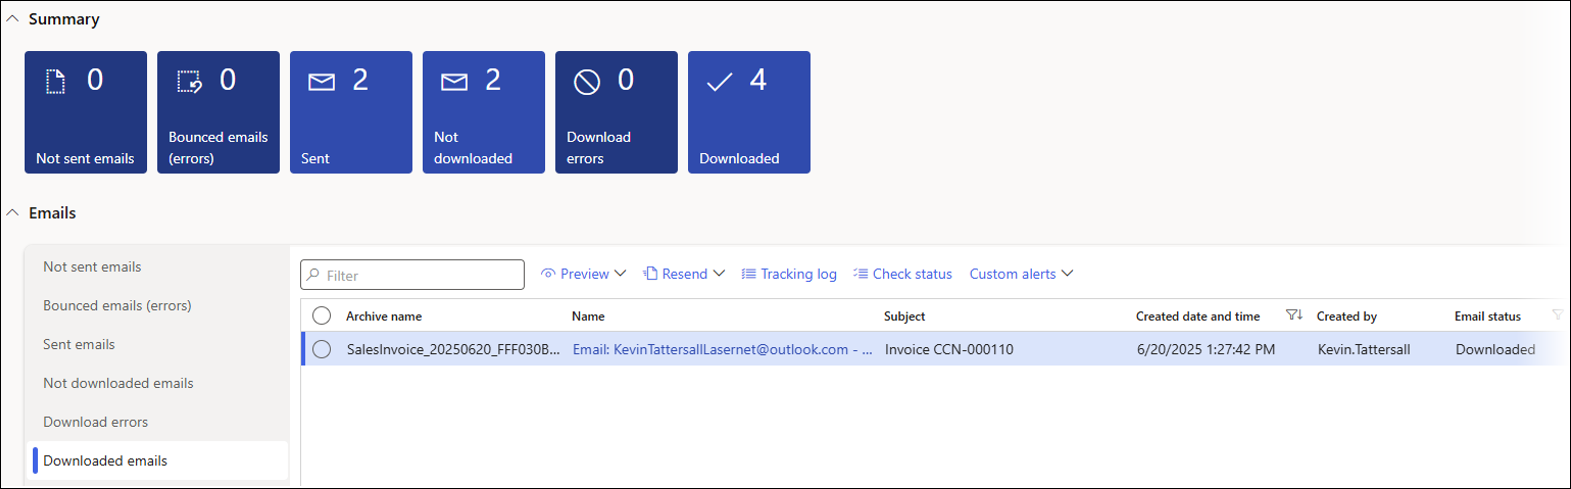
Check the Tracking Workspace to See if the Email Is in the Not Downloaded Section
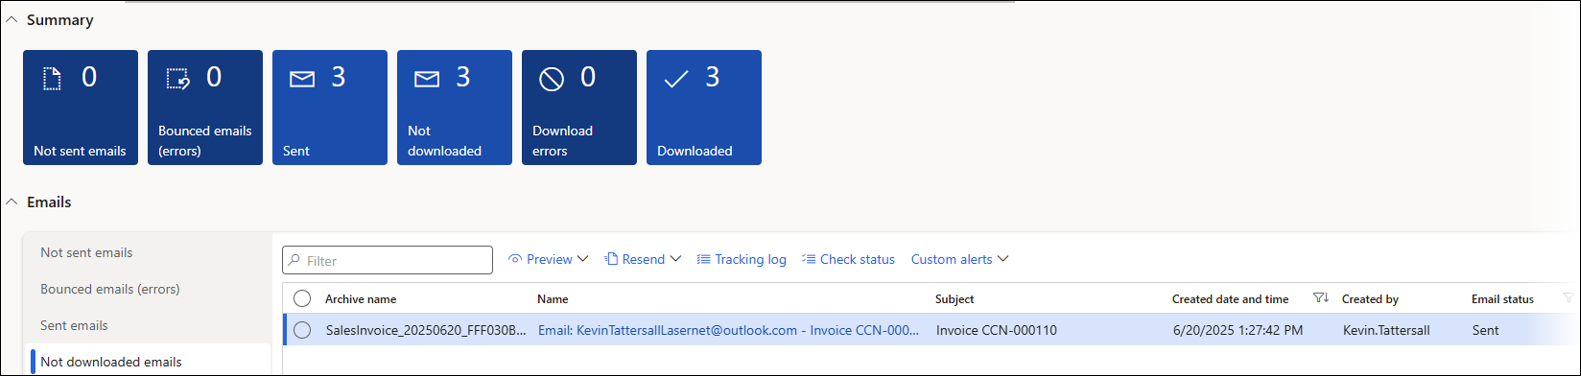
The Email distributor batch job has run, which processes emails for the Lasernet Embedded solution. This moves the email from Not sent emails to Not downloaded.
The record can be seen in the following screenshot:
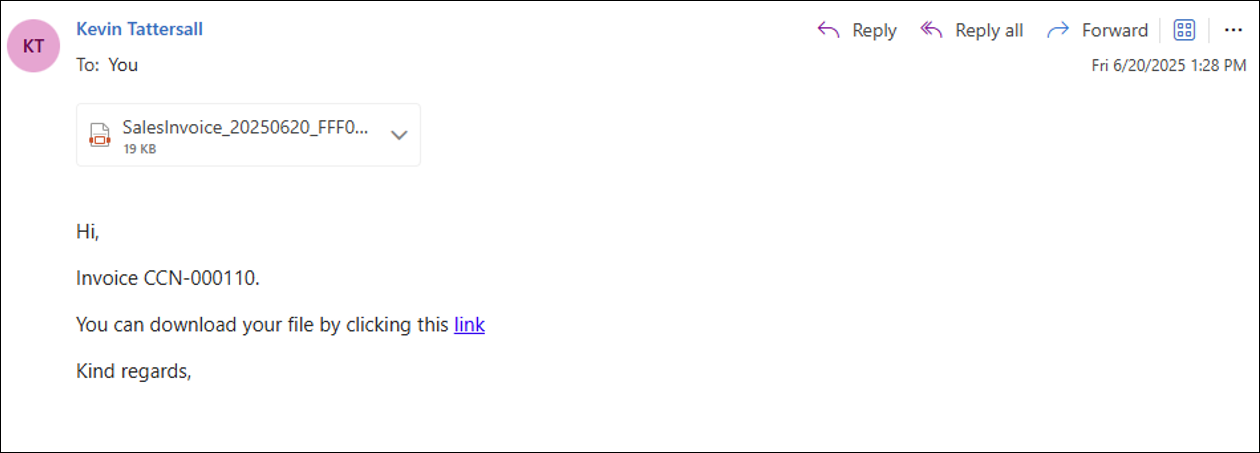
The Recipient Downloads the File Using the Link in the Email Body
The email can be seen in the recipient's inbox. Click the link to initiate the file download.
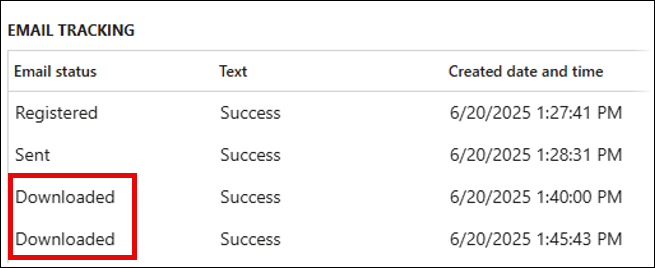
Once the link has been clicked, the record will move from Not downloaded to Downloaded.
Click the Tracking log button to view when the link was clicked.
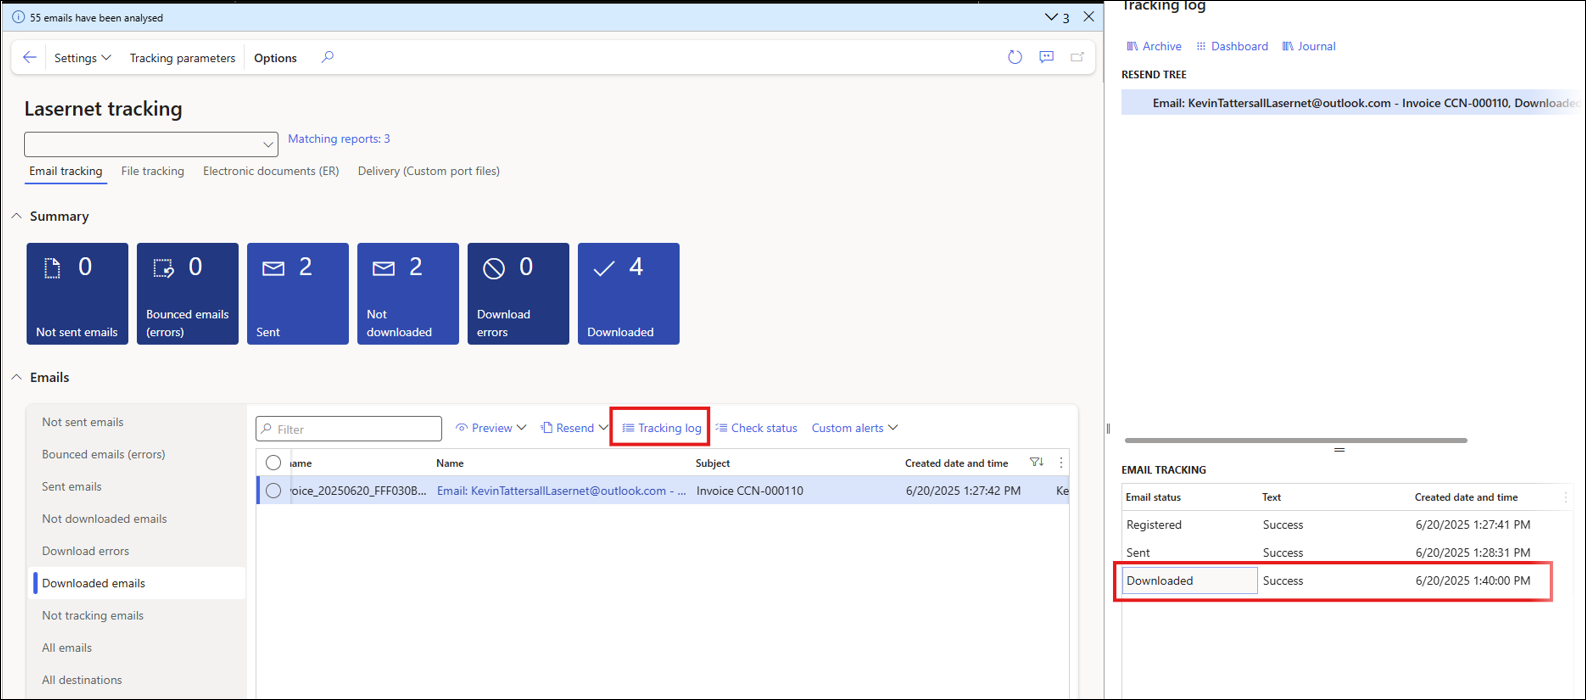
If the link is clicked multiple times, you will see multiple Downloaded records in the list: