Revert Configuration Changes or Restore Objects from Past Revisions
- 16 Apr 2026
- 3 Minutes to read
- Contributors

")
- Print
- PDF
Revert Configuration Changes or Restore Objects from Past Revisions
- Updated on 16 Apr 2026
- 3 Minutes to read
- Contributors
- Print
- PDF
Article summary
Did you find this summary helpful?
Thank you for your feedback
Applies to: Lasernet Core 11
If necessary, you can:
Discard all the changes made to one or more objects since the configuration was last committed.
Restore an object to the state that it had in an earlier revision of the configuration.
Note
For Lasernet Core 10 documentation on this subject, see the Lasernet Config Server and Deployment Guide.
Revert Configuration Changes
You can revert selected objects in the workspace to their state in the latest revision. This discards the in-progress, uncommitted changes made to the selected objects.
To revert changes, follow these steps:
In the Lasernet Developer toolbar, click Revert (see 1 in the image below).
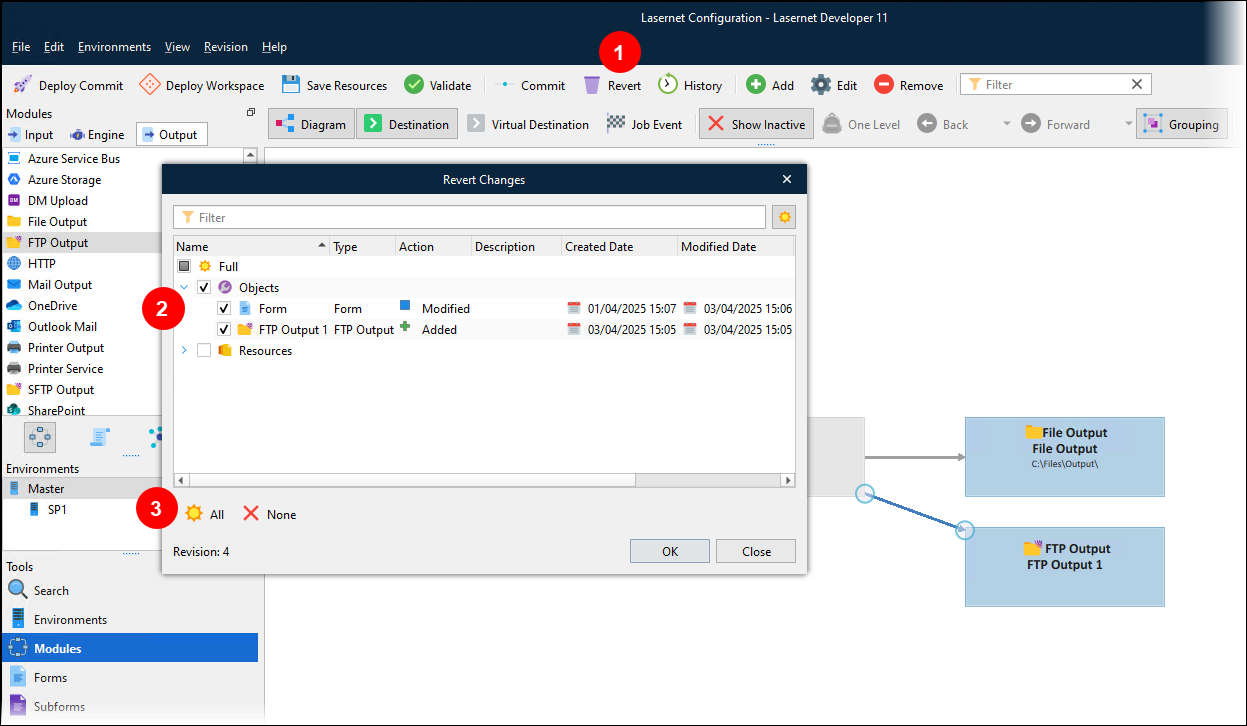
In the Revert Changes window, select the objects (2) that you want to revert. The Revision indicator at the bottom-left of the window confirms the revision number of the latest revision.
To select an individual object, select its checkbox.
To select all objects, select the checkbox beside Full (at the top of the object list) or click All (3).
To deselect all objects, click None (below the list).
You can click the arrow beside a collapsed part of the list to display the objects within it.
Click OK.
In the confirmation window, click Yes.
Lasernet Developer reverts the selected objects:
Objects that were marked as Removed are restored.
Objects that were marked as Modified have their changes discarded.
Objects that were marked as Added are discarded.
Restore Objects from a Past Revision
You can select objects present in any past revision of the configuration and “restore” them to the workspace. This feature copies the selected objects (in the state they were in when the selected revision was created) and adds them to the workspace as new, uncommitted changes.
If relevant, Lasernet Developer will provide options that enable you to specify how to handle conflict scenarios. For example, if the object you select already exists in the workspace, your options include replacing the object currently in the workspace, or skipping the import of the selected object.
To restore objects from a past revision, follow these steps:
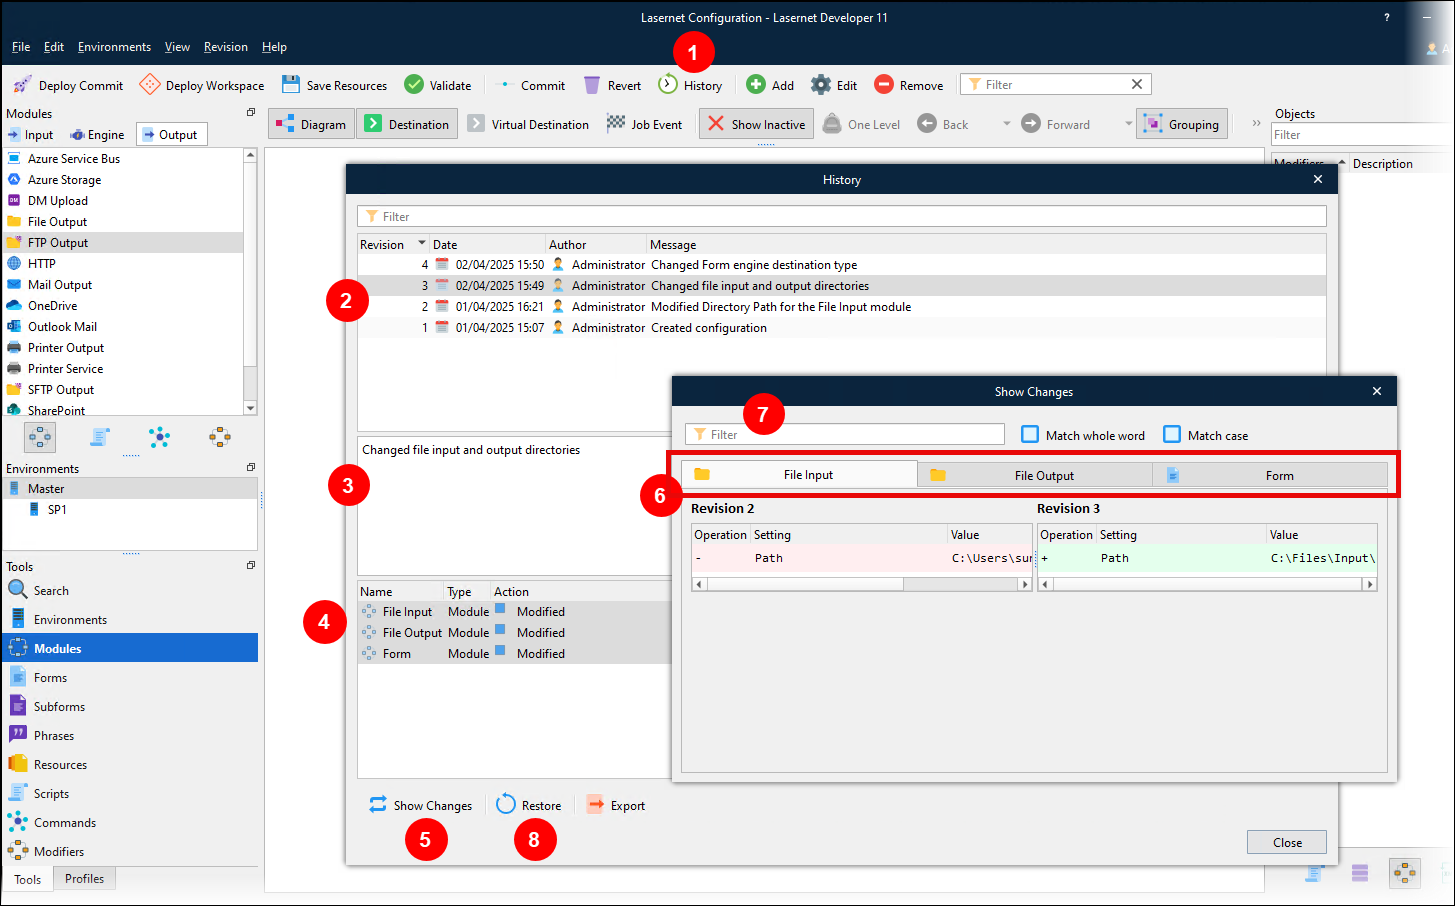
In the Lasernet Developer toolbar, click History (see 1 in the image below). The History window:
Contains the configuration’s revision list (2).
Displays the description of the selected revision (3).
Displays a list of the object changes that were committed to create the selected revision (4).
Click a revision to select it. The object changes that formed that revision are displayed, and the first 10 changes are automatically selected.
To see how the selected objects changed (between the selected revision and its preceding revision), click Show Changes (5).
The Show Changes window contains a tab for each of the selected objects (6). Click an object’s tab to see what changed in that object.
The tables on each tab display how the object changed (between the revisions specified above the tables).
A - (minus) in the Operation column indicates a removed setting.
A + (plus) in the Operation column indicates an added setting.
The Value column displays the value of each affected setting.
To filter the list of affected settings, use the Filter box (7).
Click the x in the upper-right corner to close the Show Changes window.
In the object list (4), select the objects that you want to restore, then click Restore (8).
If an object that has the same name or ID (as an object you selected for import) already exists in the workspace, Lasernet Developer will provide conflict resolution options for you to choose from. Click the most appropriate option for this object. After you do this, Lasernet Developer will provide options for the next object.
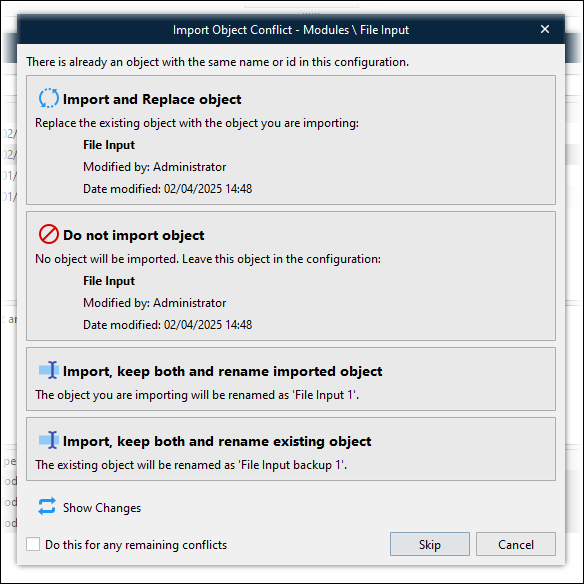
Import and Replace Object: Replace the existing object in the workspace with the one that is being imported.
Do not import object: No object is imported. The existing object is unchanged.
Import, keep both and rename imported object: Keep the existing object and do not rename it. Import the incoming object and rename it (as specified).
Import, keep both and rename existing object: Keep the existing object and rename it (as specified). Import the incoming object without renaming it.
Click Show Changes to see how the incoming object (from the selected revision) differs from the existing object (in the workspace).
To apply the option that you select to all other conflicts in this import, select Do this for any remaining conflicts.
To skip importing this object, click Skip.
To cancel the entire import, click Cancel.
After you complete this process, the selected objects are imported into the workspace from the selected past revision.
Note
Imported objects that differ from objects already in the workspace (before your actions) create new uncommitted changes in the workspace.
Imported objects that do not differ from their corresponding existing object are not registered as modified.