Manage Extended Properties
- 29 May 2026
- 2 Minutes to read
- Contributors


- Print
- PDF
Manage Extended Properties
- Updated on 29 May 2026
- 2 Minutes to read
- Contributors
- Print
- PDF
Article summary
Did you find this summary helpful?
Thank you for your feedback
Users, groups, and document definitions have a set of standard properties. However, your organization’s workflow might require them to have additional properties that are unique to your organization. Extended properties are essentially custom fields that enable you to achieve this.
For example, all users (in every Keep system) have Username, Full name, Email, and Account expiry date properties. However, you might want to add an Employee ID property to the users in your Keep system. To achieve this, you can add Employee ID as an extended property for users.
You can add extended properties in the All Users, All Groups, and Document Definitions areas of Keep. Extended properties are object-type-specific. As a result, when you add an extended property in the All Users area, it is available only when you create or edit users. Keep administrators can provide and edit values for extended properties when they create and edit users, groups, and document definitions in Keep.
Extended properties can also be used to support third-party application integrations with Keep, because extended properties are included in the relevant Keep REST API responses.
Add an Extended Property
To add an extended property to Keep, follow these steps:
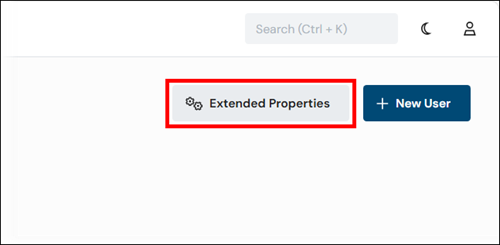
Navigate to the All Users, All Groups, or Document Definitions administration page.
Click Extended Properties in the upper-right corner.
Click New Property.
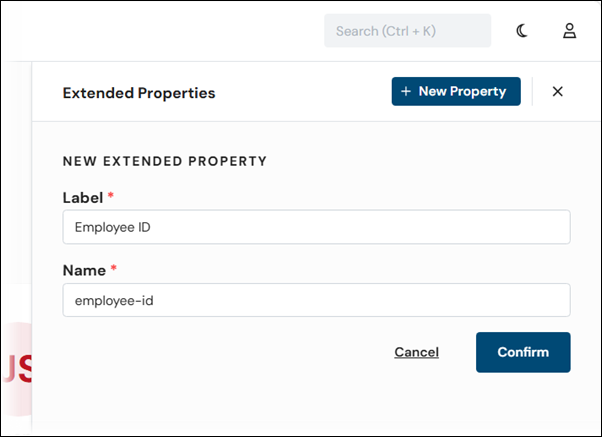
Enter a Label for the property. Label is the extended property’s “display name”. Keep uses this label to identify the property in various parts of the application, such as the editing page for the user, group, or document definition.
Enter a Name for the property. Keep autogenerates a name, which you can modify. Primarily, Keep uses Name internally when processing actions. It is displayed in only some areas in the Keep user interface (such as in the audit log). Name must be unique.
Click Confirm. Keep adds the property to the extended properties list.
After you create the extended property, you can use it to store data when you create or edit a user, group, or document definition.
Edit an Extended Property
To edit an extended property, follow these steps:
Go to the All Users, All Groups, or Document Definitions administration page.
Click Extended Properties in the upper-right corner.
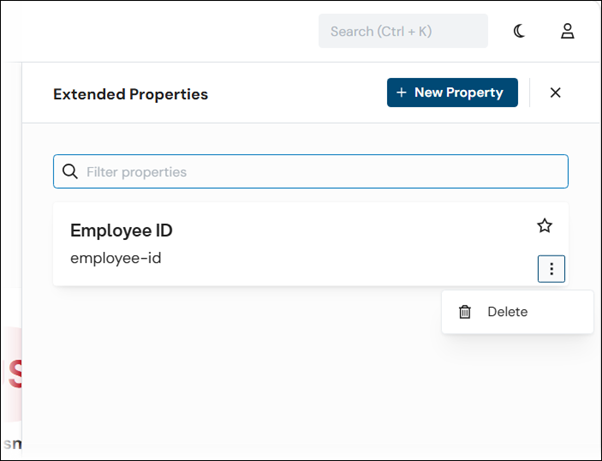
To find a particular extended property in the list, enter its name or label into the Filter properties list.
Click the extended property that you want to modify.
Update its Label, Name, or both.
Click Confirm.
Delete an Extended Property
To delete an extended property, follow these steps:
Navigate to the All Users, All Groups, or Document Definitions administration page.
Click Extended Properties in the upper-right corner.
To find a particular extended property in the list, enter its name or label into the Filter properties list.
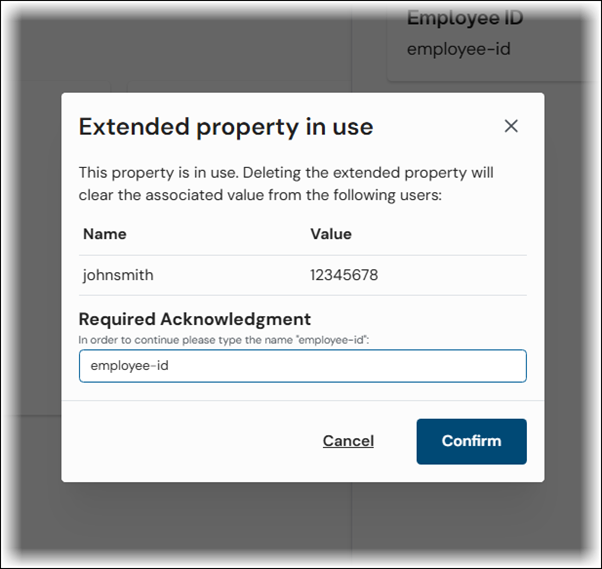
Click the menu button (three vertical dots) on the extended property that you want to delete, then select Delete.
The next step depends on whether Keep is currently storing data in that extended property.
If Keep is not storing any data in that property: In the Delete Extended Property window, click Confirm.
If Keep is storing data in that property: In the Delete Extended Property window, click Confirm. Next, the Extended property in use window lists the users, groups, or document definitions that currently store data in that property (and provides the data stored). If you proceed, that data will be removed from those users, groups, or document definitions. To proceed, enter the confirmation text provided, then click Confirm.