Lasernet FO Connector 7.1 New Features and Fixes
- 02 Mar 2026
- 25 Minutes to read
- Contributors

- Print
- PDF
Lasernet FO Connector 7.1 New Features and Fixes
- Updated on 02 Mar 2026
- 25 Minutes to read
- Contributors
- Print
- PDF
Article summary
Did you find this summary helpful?
Thank you for your feedback
Lasernet for Dynamics 365 Finance and Operations
Release version: 7.1
Release date: 17th February 2025
Introduction
This page describes the new features, fixes, and enhancements in Lasernet FO Connector 7.1.
The following documentation is available:
New Features – Lasernet FO Connector 7.1
Lasernet FO Connector 7.1 is released for Dynamics 365 for Finance and Operations versions 10.0.41 (PU65), 10.0.42 (PU66), and 10.0.43 (PU67).
The same source code is used across all versions.
This is aimed to be a quality update, provided through the following new features, fixes, and enhancements in Lasernet FO Connector 7.1.
Lasernet FO Connector 7.1 introduces new licensing, improvement options for working with the Internal Azure Storage managed by FinOps, and optimized operations for various storage options.
Azure Storage
Lasernet FO Connector supports both the Internal Azure Storage managed by FinOps and External Azure Storage options managed by partners or customers.
Internal Azure Storage (FinOps)
Lasernet uses a connection string to access Azure Storage. Microsoft plans to deprecate the use of this connection string when using the Internal Azure Storage managed by FinOps.
Only the use of this connection string for the Internal Azure Storage managed by FinOps will be deprecated. Therefore, it will still be possible to use a connection string for an External Azure Storage option.
The following are the options provided by Lasernet FO Connector 7.1 for supporting Azure Storage:
Use of Temporary Azure Storage both for communication between Lasernet FO Connector (FinOps) and Lasernet, and for archiving purposes.
Use of Temporary Azure Storage for communication between Lasernet FO Connector (FinOps) and Lasernet, and an External Azure Storage option for archiving (attachments for Document Handling are still saved within the Internal Azure Storage managed by FinOps).
Use of an External Azure Storage option, where all documents are migrated.
Use of a user-delegated SAS for the connection between Lasernet FO Connector (FinOps) and Lasernet. This SAS will be used for communication and/or archiving purposes. For more details, consult this article and this article.
Temporary Azure Storage
A new option called Temporary External Storage has been introduced with Lasernet FO Connector 7.1.
This new Temporary Azure Storage can be used to communicate between Lasernet FO Connector (FinOps) and Lasernet. It also ensures that documents can be saved as attachments (Document Handling within Lasernet FO Connector).
Afterward, a batch job will migrate documents from the Temporary Azure Storage into the Internal Azure Storage, which is managed by FinOps.
The advantage of using this approach is that documents used for Document Handling as attachments, which always use the Internal Azure Storage, can still be saved back into FinOps.
All Review functionalities are supported by the temporary storage.
The option to specify Temporary External Storage is located in Lasernet > Setup > Administration > Lasernet servers.
(34).png)
The temporary connection is created in Lasernet > Setup > Administration > Connection.
(26).png)
Azure storage is the default setting within the Lasernet configuration. It is, therefore, required to use the Azure Storage Connection string if the default configuration is used for Lasernet.
(30).png)
(23).png)
It is possible to override the connection name in Lasernet by specifying the required connection name within the Lasernet Azure command name to reports storage and then creating a connection with the same name in Lasernet.
(25).png)
Use the same Connection string in Lasernet as the one used within Lasernet FO Connector (either the one used for the Temporary Storage or the one used for D365FO connection to reports storage).
(24).png)
No additional adjustments are required in Lasernet when using the default/demo configuration provided by the Lasernet Group.
If you do not receive a response from Lasernet when creating a preview or validating the connection from Lasernet FO Connector to the Lasernet server, use the Lasernet Monitor.
If an error message such as the following appears within the Lasernet Monitor, use the Find all option:
(26).png)
Search “connection”:
(24).png)
Ensure the DatabaseConnection shown actually exists and has the same connection string as the one used within Lasernet FO Connector.
(24).png)
Batch Job for Synchronization of the Azure Storage
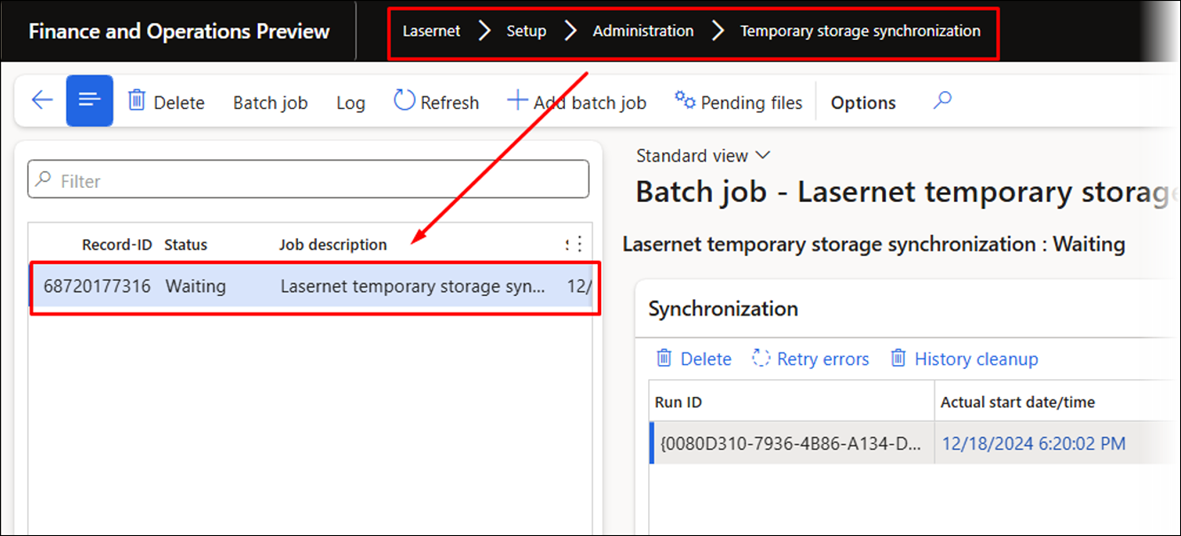
The batch jobs used to migrate documents from the External Azure Storage to the Internal Azure Storage managed by FinOps are located in Lasernet > Setup > Administration > Temporary storage synchronization.
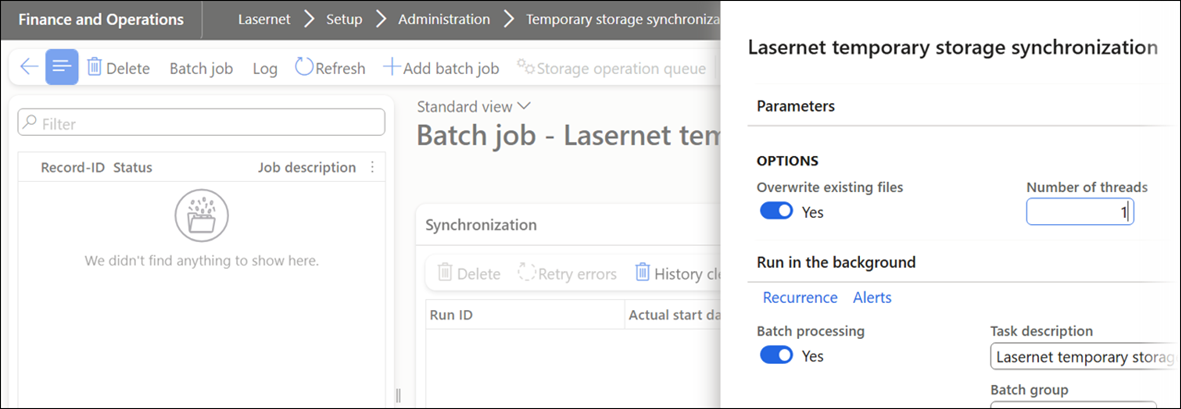
A prompt such as the following appears if a batch job has not already started, and it is possible to specify whether files should be overwritten, the number of threads, and the recurrence.
The default recurrence is every minute, but it is possible to adjust this within the Batch job.
In the Pending files section, it is possible to see what has been queued within the Temporary Azure Storage and, therefore, is ready to be processed:
(5).png)
The prefix “document” indicates the file is a document that should be used for Document handling as an attachment and, therefore, should be saved within the Internal Azure Storage managed by FinOps.
(5).png)
Document Handling - Saving Documents from Lasernet back into FinOps
(5).png)
It is possible to select attachments From archive instead of From attachments. For example, invoices can be added as attachments when sending customer account statements.
(5).png)
One reason for using the Azure Storage managed by FinOps is to ensure attachments can be picked up from Document Handling in FinOps.
However, this can often be replaced by selecting From archive.
Examples:
Temporary Azure Storage and Internal Azure storage managed by FinOps
This approach uses the Temporary Azure Storage to communicate between Lasernet FO Connector and Lasernet, as well as for archiving purposes.
Create a Connection string and select TempStorage.
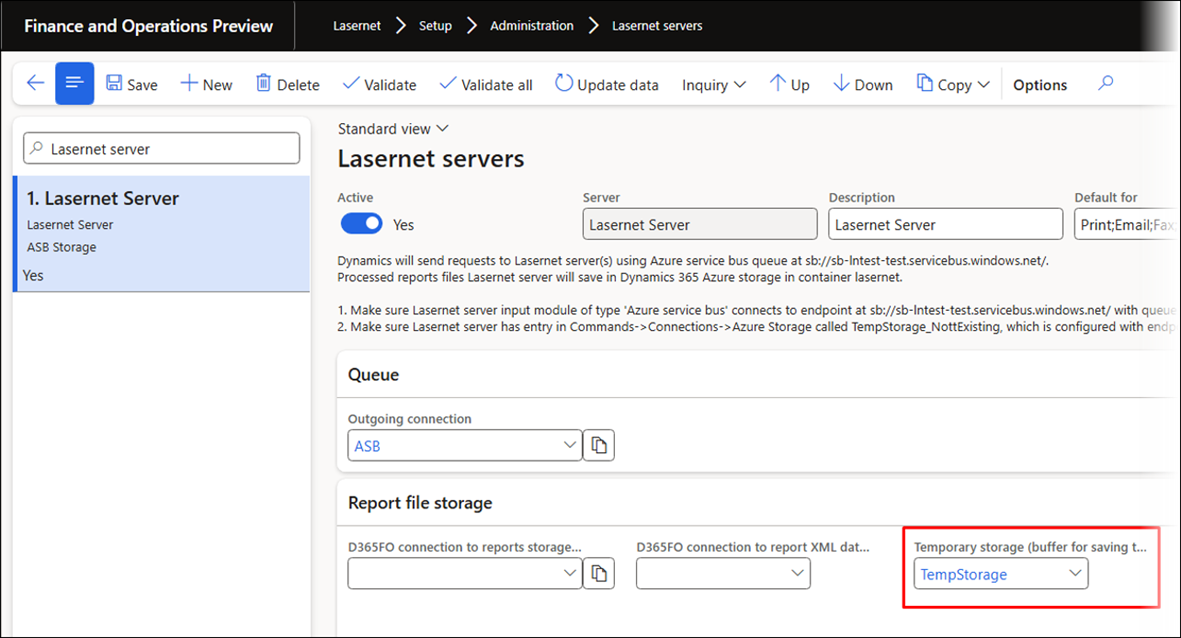
Ensure the connection Azure Storage in Lasernet uses the same Connection string as the one specified within the TempStorage.
(4).png)
This process also requires the batch job located in Lasernet > Setup > Administration > Temporary storage synchronization to be scheduled.
This batch job ensures reports are migrated from the External Azure Storage to the Internal Azure Storage managed by FinOps. It also ensures reports are used as attachments if Document Handling is used within Lasernet FO Connector.
Create a new batch job in case no batch tasks are shown in the grid/list:
Temporary Azure Storage for communication, External Azure Storage for archiving, and Internal Azure Storage managed by FinOps for Document Handling
(4).png)
Ensure Azure Storage in Lasernet uses the same Connection string as the one specified in D365FO connection to reports storage when the Lasernet Azure command name to reports field is empty.
(3).png)
Ensure a connection Name with the same Connection string as the one specified in Lasernet Azure command name to reports storage exists in Lasernet, if the field Lasernet Azure command name to reports storage contains a value.
(3).png)
(4).png)
The final destination is shown for the entries within the Lasernet Archive, while the Preview and Download options for the XML/PDF files will work both before and after the batch job for the synchronization has been executed.
(3).png)
External Azure Storage
All storage operations for Azure are redesigned (optimized) in Lasernet FO Connector 7.1.
This is to improve functionality, readability, and performance. Storage operations maintain Lasernet archives and files stored in the storage controlled by Lasernet Connector.
Storage operations are executed in parallel threads in batch mode. The Review form enables users to see the progress of the storage operations, with an Auto-refresh option available and a log per file/record.
Process archive lifespan – Cleans up Lasernet archived data by Lifespan setup.
Copy archives - Run for Lasernet log (Archive) query data. Allows copying archived files to another storage and updating archive records.
Copy files - Run only for files in storage. Allows copying files by name/date criteria to the storage, but does not update the Lasernet Archive records.
Move archives - Run for Lasernet log (Archive) query data. Allows moving specific archives to another storage option.
Move files - Run only for files in storage. Allows moving files by name/date criteria to the storage, but does not update the Lasernet Archive records.
Cleanup archives - Run for Lasernet log (Archive) query data. Allows deleting specific archives that contain files or archives that do not contain files.
Cleanup files - Run only for files in storage. Allows cleaning up files by name/date criteria in the storage or only files that do not have an Archive record (checking cross-company).
Storage operations can be started in “Pre-calculation” mode via the option Scan only, which allows users to see what files or records will be updated by the operation without any updates actually taking place.
Within the completed operation, users can select specific items from an already selected list and use Execute list to quickly process them, as the list is already initialized.
(14).png)
Failed storage operations can be rerun on the files or records that failed.
A file-based operation can use a Regular expression File name filter as a parameter.
For PDF files, use: /\.pdf$/
For XML files, use: n/\.xml$/
For PDF or XML files, use: /\.(pdf|jpg)$/
For more complex regular expressions, consult the following:
A storage operation can be marked to create a text file log in the storage.
The provided history cleanup job deletes unneeded historical data.
Storage operations can be executed and maintained from the Lasernet connection or the Lasernet storage browser.
(14).png)
(12).png)
Performance Using Storage Operations
Performance across all storage operations for the Azure Storage has been optimized to facilitate the transition of customers who wish to migrate documents from the Internal Azure Storage managed by FinOps to an External Azure Storage managed by the customers themselves.
(13).png)
Performance is optimized by introducing the same Top Picking framework and “Overview” as within the Test and Performance Suite, including a staging table. Introducing a staging table also ensures stability when processing large numbers of records.
The whole operation is carried out in three stages :
Initialize: This can take up to a few hours, as all file metadata (file names, dates, and extensions) must be read. During this stage, the system also applies the criteria and creates a record in the queue that is ready for processing. This stage is the most time-consuming of the whole process.
Parallel processing: Depending on the number of threads selected, multiple parallel processing jobs are run when records ready for processing are found in the queue.
Summarise: This last stage starts when the processing is finished.
Lasernet Professional
Lasernet Essentials aims to offer a user experience that is largely keyboard-free, with most functions accessible through mouse navigation alone.
This benefits the end-user and enhances software demonstrations.
Lasernet Essentials also adopts a streamlined approach, promoting adherence to best practices by offering fewer options while also ensuring that the available choices are well-considered and effective.
The Lasernet Professional edition of Lasernet FO Connector offers similar benefits concerning simplifications and enhancements. Users have the option to transition from Lasernet Essentials to Lasernet Professional and continue using the same methods/features they are accustomed to.
You have the option to transition from Lasernet Professional to Lasernet Enterprise in relation to the Form designs.
To learn more about Lasernet Professional, consult the dedicated User guide.
Bug Fixes and Enhancements - Lasernet FO Connector 7.1
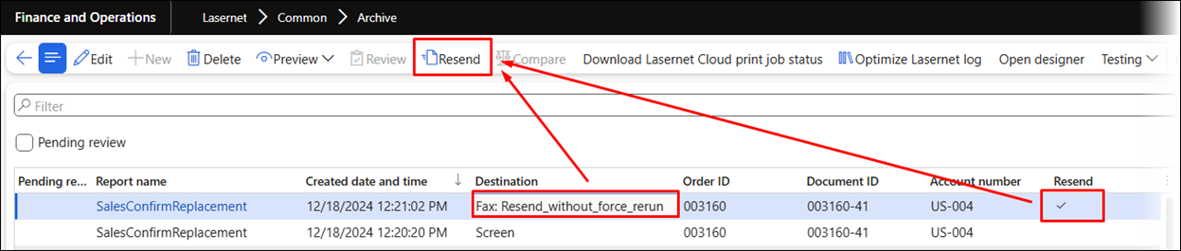
444806@LAC365FO – Resend without Force resend should not bundle different archives into one
Lasernet FO Connector 7.1 supports the option to resend a report that was originally sent without Force rerun, which was not previously possible.
Storage operations have been redesigned to improve functionality, readability, and performance.
Read more about this here in the External Azure Storage section.
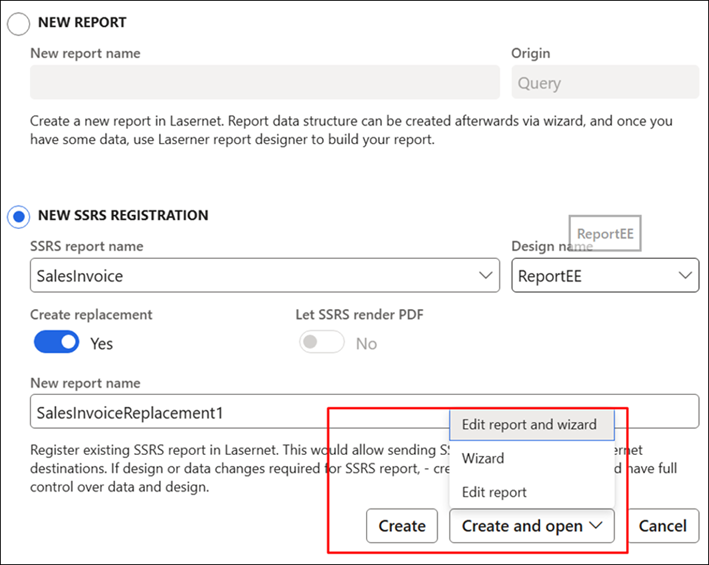
446386@LAC365FO – If a license code for Advanced/Enterprise is provided, a brand new report can be created in the workspace
The report creation process (SSRS, query, replacement, and class/CE reports) has been enhanced with a new dialog.
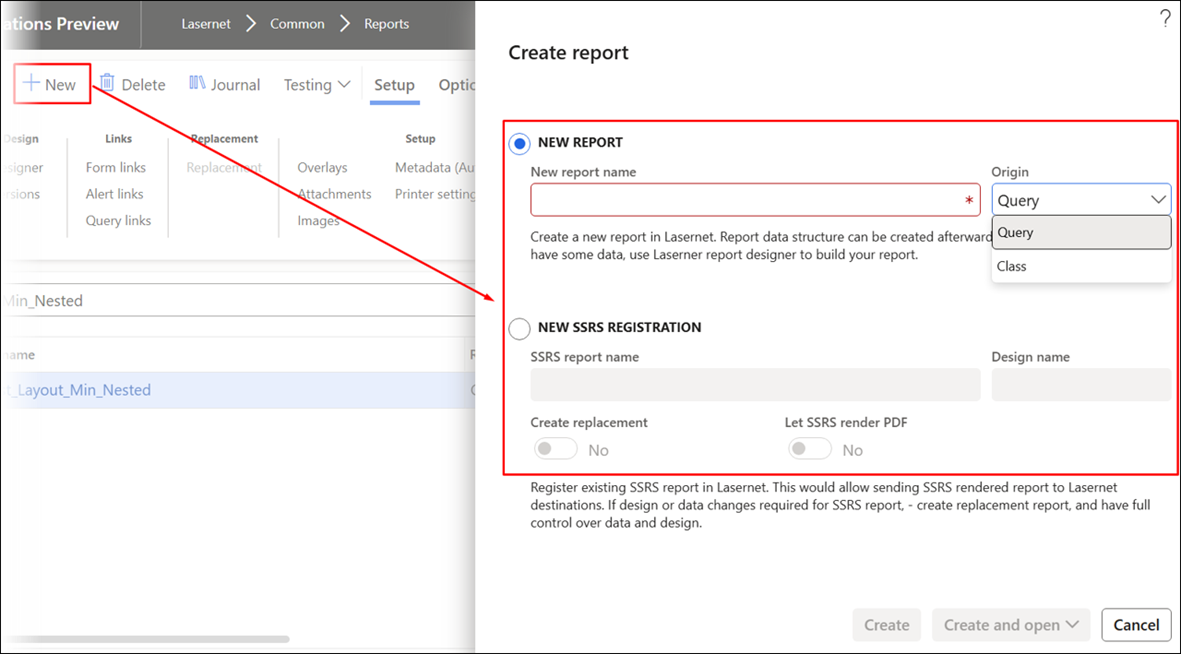
The Create and Create and open buttons will become available once either the New report name or SSRS report name fields have been filled.
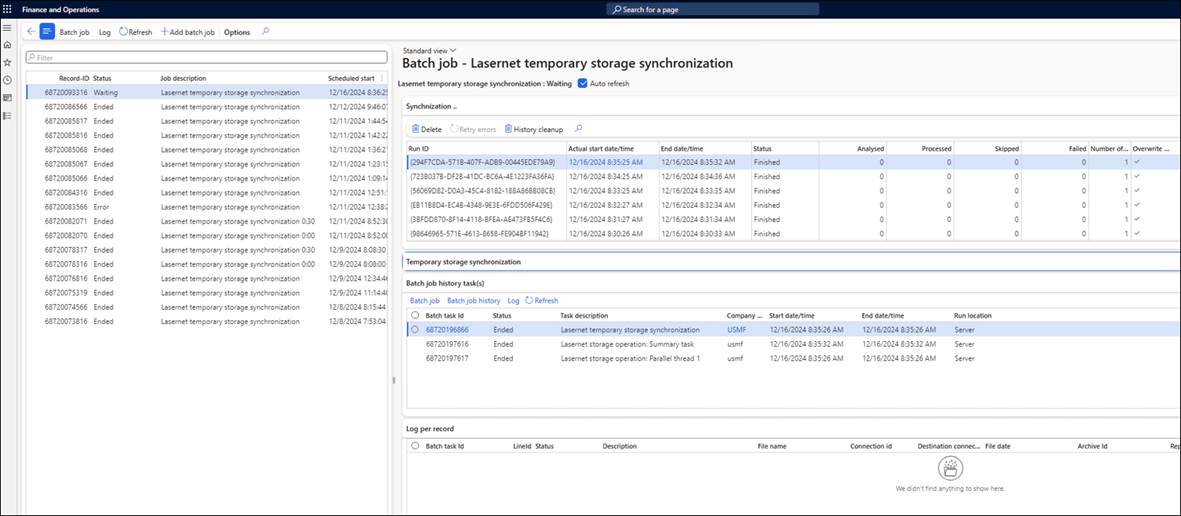
446336@LAC365FO – Temporary Storage Synchronization
The Temporary Storage parameter has been introduced for the Lasernet server. This is used by the Lasernet server to place files that are required to be the internal Dynamics 365 FO storage. The Temporary storage synchronization job was introduced to set up and maintain a periodic batch job that migrates files from Temporary Storage to Dynamics 365 FO.
The review form allows users to track the progress of the storage operations, with an Auto refresh option available and a log per file/record.
Temporary storage synchronization is executed in parallel threads, in batch mode, using the same approach as other Lasernet storage operations.
The synchronization can be maintained from Lasernet > Setup > Administration > Temporary storage synchronization.
In previous versions, it was possible to add tables within the form ranges by using tables that had not even been selected.
Lasernet FO Connector 7.1 does not allow this approach. A table added as part of the range should be replaced by a relation and a range/filter for the table/data source.
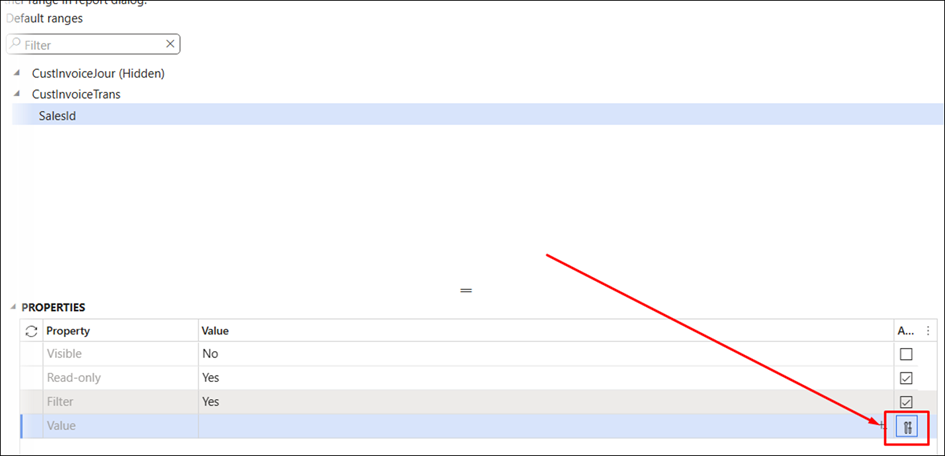
Similarly, within Form links and when adding a range.
446176@LAC365FO – The report’s latest state is not reflected in Print in batch
In previous versions, a query’s changed property or added table was not always reflected in the report batch run.
This issue was caused by the caching of the table and the batch storing this cache across all processes. When the report was updated, the new version was not loaded in batch, which caused the differences.
Lasernet FO Connector 7.1 selects the report directly instead of loading via the cached instance.
440045@LAC365FO – The Associated payment attachment does not work after upgrading to version 6.21 or when using a solution from another ISV
In previous versions, using the Associated payment caused an error when used in combination with another ISV.
A workaround has been introduced in Lasernet FO Connector 7.1.
Email Support
Lasernet Advanced supports various senders’ email addresses as long as a single domain is used. For example, one sender's email address is in company A (From: companyA@lasernetgroup.com), and another is in company B (From: companyB@lasernetgroup.com).
A Lasernet server can be added, and Lasernet Enterprise can be utilized in scenarios that require multiple domains. Such as company A (From: companyA@firstDomain) and company B (From: companyB@secondDomain)
The domain part of the email address is the portion that appears after the "@" symbol.
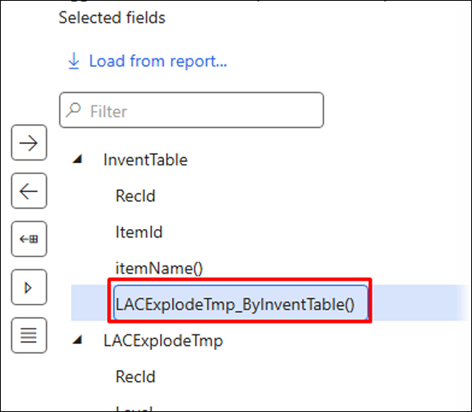
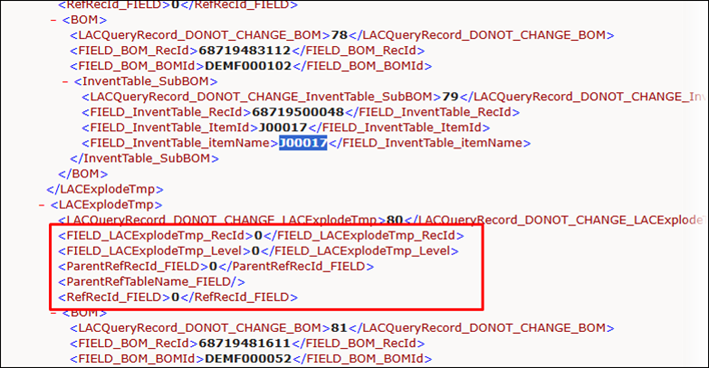
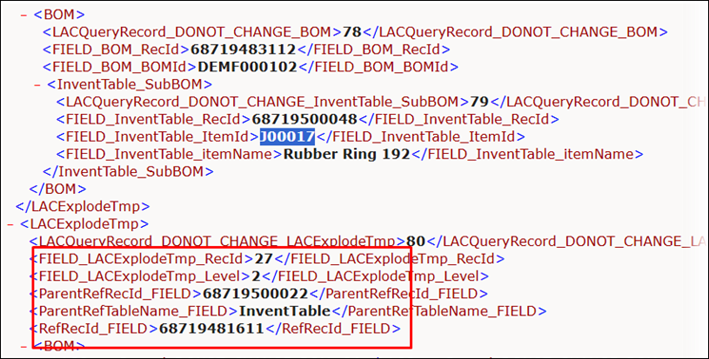
437278@LAC365FO – An issue with empty records was identified when using the context method LACExplodeTmp_ByInventTable() to explode a BOM
In previous versions, using the context method LACExplodeTmp_ByInventTable() provided out of the box with Lasernet FO Connector could, in some cases, produce an empty output.
This context method provides the option to explode a BOM (Bill Of Materials).
Using the context method LACExplodeTmp_ByInventTable():
Previous versions | Lasernet FO Connector 7.1 |
|---|---|
Empty output:
| Correct output:
|
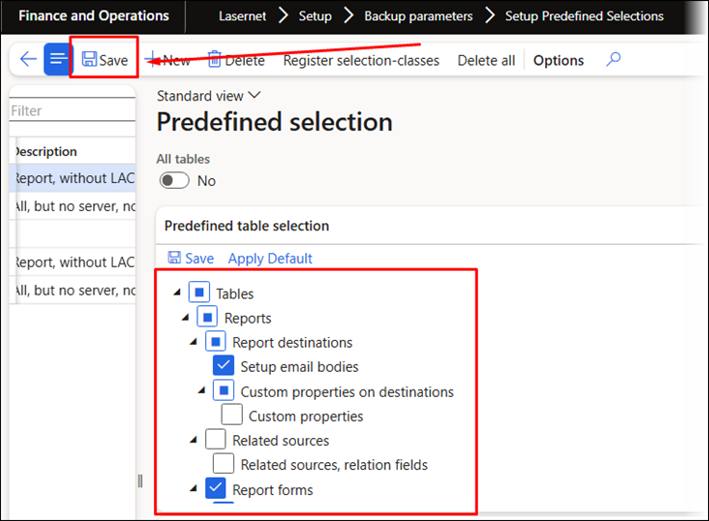
436151@LAC365FO – Issues with creating Predefined selections
In previous versions, when changing data sources/tables within the Predefined table selection, changes were not saved when using the Save button located in the Action pane.
The workaround was using Save within the Predefined table selection (lower grid).
Lasernet FO Connector 7.1 solves this issue.
Predefined selection for the backup is located in Lasernet > Setup > Backup parameters > Setup Predefined Selections.
452698@LAC365FO – Demo mode has been removed from the Lasernet parameters page
Demo mode has been removed from Lasernet FO Connector 7.1.
(18).png)
(17).png)
This is to ensure better security and lower the number of configurations and potential issues.
Lasernet FO Connector 7.1 supports a similar option by enabling the parsing of a Shared Access Signature (SAS/ SAS Token) via the Azure Service Bus Queue when Microsoft-managed environments (Service Fabric) are used.
Security is maintained at an exceptionally high level when using the option to pass a SAS/SAS Token.
452433@LAC365FO – An issue was identified regarding the inability to import Lasernet Form Objects from Lasernet Developer with a Keywords set
In previous versions, importing a Lasernet form was not possible if a Keywords set had been defined in the form:
(16).png)
Importing the form resulted in the inability to map the form design within Lasernet FO Connector.
(17).png)
The following warning appeared:
(17).png)
Warning
No Form designs in file are mapped with local report names and selected for import
This has now been fixed.
451082@LAC365FO – The auto-complete feature in the Expression editor is not working correctly for Alert Links
In previous versions, the ranges’ auto-complete feature did not function as intended when used within Alert links.
In Lasernet FO Connector, it is possible to trigger a report from an Alert via the Alert links.
Alerts are useful for tracking events during the workday and for informing parties both inside and outside the organization.
(18).png)
It is possible to specify ranges for Alerts.
(16).png)
The auto-completion feature used to block lookups:
(17).png)
Lasernet FO Connector 7.1 supports the auto-completion feature when Context is used as part of the Expression:
(17).png)
450638@LAC365FO – An error occurs when illegal characters are used within a field
Lasernet FO Connector 7.1 will produce an error message if any illegal characters are used.
Illegal characters are often added from external systems, such as MS Teams, when copying information into FinOps.
Identifying those characters can often be a time-consuming task. This enhancement to detect illegal characters will help determine which fields contain them more quickly.
An error message will be displayed, indicating both the field containing the invalid character and the illegal character, such as the following, where the field is IdentificationNumber and the invalid character hexadecimal 0x003:
(15).png)
Error
Lasernet report LACCustTable Invalid symbol ‘…’ hexidecimal 0×03 in field: IdentificationNumber
If this happens, locate and check the field.
(15).png)
Then, remove any illegal characters.
(13).png)
450315@LAC365FO – Licenses that fail due to user count limitations should not result in a downgraded level
In previous versions, using a license for too few users in Lasernet Enterprise used to launch Lasernet Essentials instead of enabling the Enterprise version and adding a 10-second pause.
In the following example, the license code was given to 60 Enterprise users, but 70 users were required:
(14).png)
Lasernet FO Connector 7.1 maintains the Enterprise level active, even with insufficient users in the license code.
(12).png)
450221@LAC365FO – deliveryAddress() fields for WHSShipmentTable are removed from the table when Reset modification is set to Yes
In previous versions, methods added from a class method, such as deliveryAddress() in WHSShipmentTable, were removed when Reset modifications was enabled in the final step of the Query Wizard:
(13).png)
Before finishing the Query Wizard:
(11).png)
Upon completing the Query Wizard and subsequently reopening it:
(11).png)
This issue has been fixed.
445001@LAC365FO – An option has been added to include/exclude Predefined destinations as part of Export/Import
The export of Predefined destinations is now included in Lasernet Essentials and is available when using Backup from the workspace in Lasernet Professional and Lasernet Advanced/Enterprise:
(12).png)
449655@LAC365FO – Imported Lasernet server (Active/Inactive) with connections pointing to other environments causes an error
In previous versions, importing a server setup into an environment with connections pointing to other environments that were not defined for the imported connections did not enable adjustments for the imported server setup.
A similar issue could arise when adding a new environment without adding connections using this Environment id.
(12).png)
(10).png)
Lasernet FO Connector will keep generating warnings and errors, but it enables editing and saving the record.
(11).png)
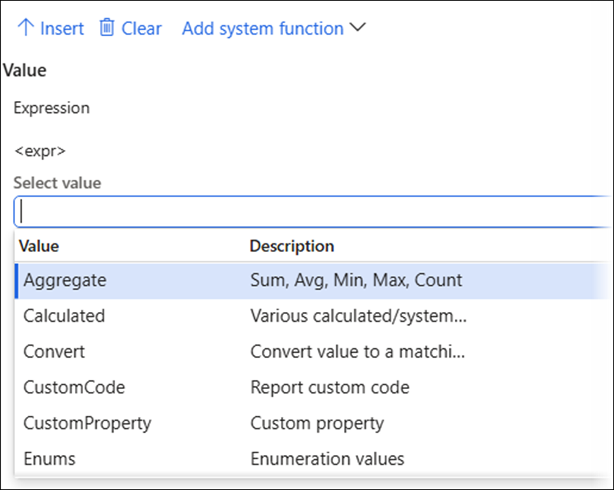
448468@LAC365FO – Using the Sum Aggregate function in conjunction with an Expression that uses a custom field results in NaN output
In certain situations, using a Sum Aggregate function resulted in a NaN output. This issue occurred when the Type of the used field was changed from String to Real.
Lasernet FO Connector 7.1 ensures that fields designated as numbers are correctly treated as numbers within the aggregation process.
(10).png)
445574@LAC365FO – Mobile device - The value selected in the Print to field is not saved
In previous versions, when a report was not configured for Lasernet, it was not possible to specify the number of copies for a standard destination, resulting in an error.
(10).png)
Error
Object reference not set to an instance of an object.
This has now been fixed.
443619@LAC365FO – Warehouse Management app - The value selected in the Print to field is not saved
In previous versions, selecting a printer for a warehouse label specified for a worker would change the printer back to Default printer once work was completed within the warehouse app.
Lasernet FO Connector 7.1 ensures the selected printer is maintained even when the work is completed.
The Lasernet printer Local Zebra is selected as the default:
(10).png)
(8).png)
However, selecting another printer within the Warehousing app would revert to the Default printer ZEBRA once the work was completed.
(7).png)
Lasernet FO Connector 7.1 ensures that any changes made to the Default printer are maintained once the work is completed.
The Default printer is specified either for the worker in FinOps or within the Warehousing app.
Warehouse management > Setup > Worker:
(7).png)
Warehousing app:
(7).png)
(7).png)
412331@LAC365FO – Standardization of the CompanyId
Dynamics 365 Finance and Operations uses a mix of upper and lower case for the CompanyId (dataAreaId).
Lasernet FO Connector 7.1 ensures that the output for the CompanyId (dataAreaId) is kept in lowercase for any newly created reports (XML).
This applies to the following situations:
When using Calculated.CompanyId() within the Structure/Elements:
(7).png)
When using CompanyId within the JobInfo section:
(6).png)
When using the Filemask (filepath) within Lasernet FO Connector:
(7).png)
(7).png)
453855@LAC365FO – An issue arises with the Email editor in 10.0.43
In previous versions, the following error occurred when using Finance and Operations 10.0.43 (Update 67) and any earlier versions of Lasernet FO Connector:
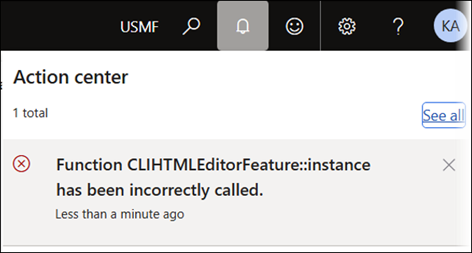
Error
Function CLIHTMLEditorFeature::instance has been incorrectly called.
The error occurred:
When opening a printer dialog for a report that was configured for Lasernet. No errors were detected when trying to open the printer dialog until the previous dialog was closed.
(44).png)
When accessing the Lasernet parameters page.
(37).png)
This issue has been fixed.
453803@LAC365FO – An error occurs when importing a report: "Could not load parameters from the compressed archive"
(28).png)
This issue has been resolved by using the Maximum setting for the quotas.
453650@LAC365FO – It is now possible to use range Expressions with the same query data sources in the Query Wizard
In Lasernet FO Connector 7.0, the use of tables for ranges in a query through an Expression was restricted.
Optimal practice and best performance are achieved by using relations between tables, which reduces the number of queries and, therefore, decreases the load on the SQL server.
Lasernet FO Connector 7.1 enables the use of tables for a range through an Expression in the following circumstances:
The table used in the Expression is not part of the same query branch.
When using a table from another query branch, only the first record is used for the range.
It is possible to utilize any tables within an Expression for a range when employing a subquery.
Examples
Permitted use of tables within an Expression for a specified range:
The data source CustInvoiceJour is part of the query branch that has SalesInvoiceHeaderFooterTmp as its data source.
The data source TaxTrans is added at the root level and within its own query branch:
(32).png)
Lasernet FO Connector 7.1 enables the use of SalesInvoiceHeaderFooterTmp and CustInvoiceJour for the range specified in the Expression for TaxTrans.
The first record from CustInvoiceJour sets the ranges for TaxTrans.
(25).png)
Non-permitted use of tables within an Expression for a specified range:
It is not possible to use any table for the ranges if, for instance, the data source TaxTrans is part of the same query branch as SalesInvoiceHeaderFooterTmp > CustInvoiceJour.
(27).png)
It is not possible to select the data sources SalesInvoiceHeaderFooterTmp and CustInvoiceJour as they are within the same query branch (related tables).
(26).png)
Validation indicates whether a data source or table has been moved into the same query branch. For instance, the data source TaxTrans has been moved into the same query branch as the tables that were previously used within the Expression for the range.
A validation warning will be shown:
(28).png)
(26).png)
453119@LAC365FO – Access to Cloud Print Connector (CPC) Setup is enabled, which may be needed as a workaround for the Azure deprecation
Lasernet FO Connector 7.1 enables access to Connections and Cloud Print Connector Setup from the Finance and Operations workspace.
This will be useful when Microsoft restricts access to Internal Azure storage, which is managed by FinOps/Microsoft, through a connection string.
Ensure Cloud Print Connector can be used with an External Azure storage.
Lasernet Essentials:
(26).png)
Lasernet Professional:
(22).png)
Lasernet Enterprise:
(21).png)
452678@LAC365FO – The warning issued when using AOT query LACWHSPrintLabels for Warehouse labels has been removed
In previous versions, the AOT query LACWHSPrintLabels (used when printing labels from the Warehousing app) issued a warning within the Query Wizard, although everything functioned correctly.
(19).png)
(19).png)
Warning
Duplicate table WHSDocumentRoutingLine_1 removed from report. Finish wizard to save changes
This warning has been removed in Lasernet FO Connector 7.1.
448889@LAC365FO – An issue arises when trying to add Print buttons to certain forms, such as CustCollectionLetterJournal and CustCollectionLetterNote
In previous versions, it was not possible to dynamically add additional Print buttons to certain forms if their structure and design did not align with those used in journals, such as CustInvoice and Packing slip.
Lasernet FO Connector 7.1 enables adding Print buttons if the report is configured for Lasernet and it uses Lasernet as the anchor for the button(s). This ensures the correct destination is used, and it optimizes the printing process by eliminating the need to adjust printer settings.
To add a Print button, navigate to Print buttons > Direct printout destinations.
(18).png)
In previous versions, Print buttons could not be added through Form adjustment unless the form's structure matched the standard structure used for journal forms.
Lasernet FO Connector 7.1 includes the option to adjust and add Print buttons to forms that do not have the same structure as the standard FinOps journal forms.
To do so, navigate to Print buttons > Common > Form adjustment.
(17).png)
Note
This requires the report to be configured for Lasernet.
Navigate to Print buttons > Common > Direct printout destinations and choose either Journal or Both in the Show button dropdown:
(18).png)
The form now shows the desired Print buttons:
(18).png)
You can also add Print buttons in the following configuration:
(19).png)
To do so, specify a Control name for the location where the Print buttons should be positioned:
(18).png)
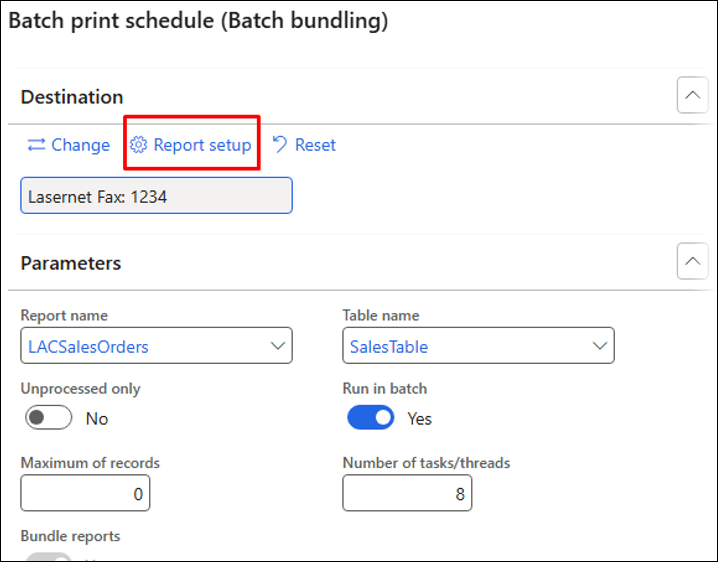
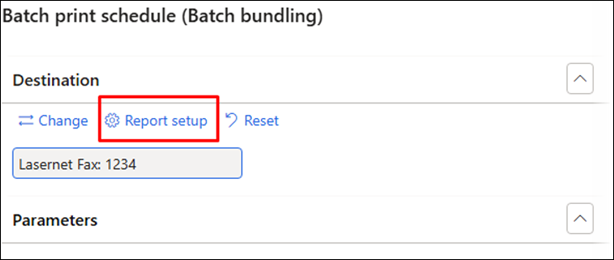
452358@LAC365FO – An issue arises when trying to control the Review before sending function from code
In previous versions, controlling the Review before sending function using code was only possible if the feature was enabled for the report:
(18).png)
Code:
(18).png)
Following this approach, the Review before sending option appeared within the printer dialog for the report.
In Lasernet FO Connector 7.1, a class called LACDestinationSettingsManager_DispContext has been included to help preserve values throughout the printing process. This class enables users to specify which values should be "read-only" during the process and not re-initialized from the report.
(14).png)
449256@LAC365FO – A correlation has been established between the SELECTED REPORTS and SELECTED TABLES sections
In Lasernet FO Connector 7.1, clearing the Reports selection in the SELECTED TABLES of the Export Lasernet backup dialog removes any selected reports.
Selecting Reports selects all reports.
In previous versions, no established correlation existed between SELECTED REPORTS and SELECTED TABLES.
(16).png)
A similar approach is used with Predefined selection.
453802@LAC365FO – Images cannot be retrieved from CE
Previous versions of Lasernet FO Connector did not support the retrieval of images from CE.
Version 7.1 supports the retrieval of thumbnails for the images.
452816@LAC365FO – The Lasernet parameters page now includes the Environment Id
The LCS Environment Id parameter is now included in the Lasernet parameters page (Lasernet > Setup > Parameters).
Provide Microsoft with the Environment ID if adjustments to Flight modes are needed for an environment.
(11).png)
ESC Flight Mode activates or deactivates features in FinOps, which are managed exclusively by Microsoft within their hosted environment. Lasernet FO Connector shows configuration values for the environment, not just the fields from the database.
For example, Microsoft can enable or disable the following ESC Flight modes and provide access through a connection string and/or Shared Access Signature (SAS):
EnableSharingOfValidStorageConnectionString
EnableRegisterOfAzureStorageInterceptors
Test and Performance Suite
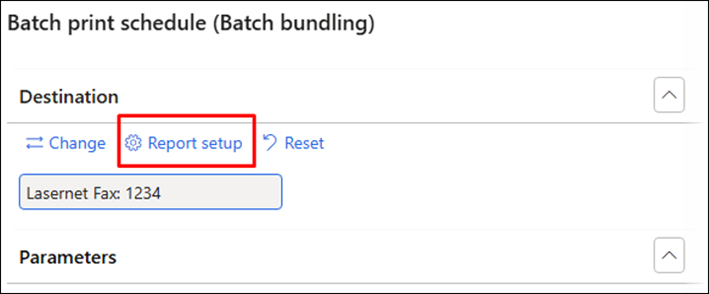
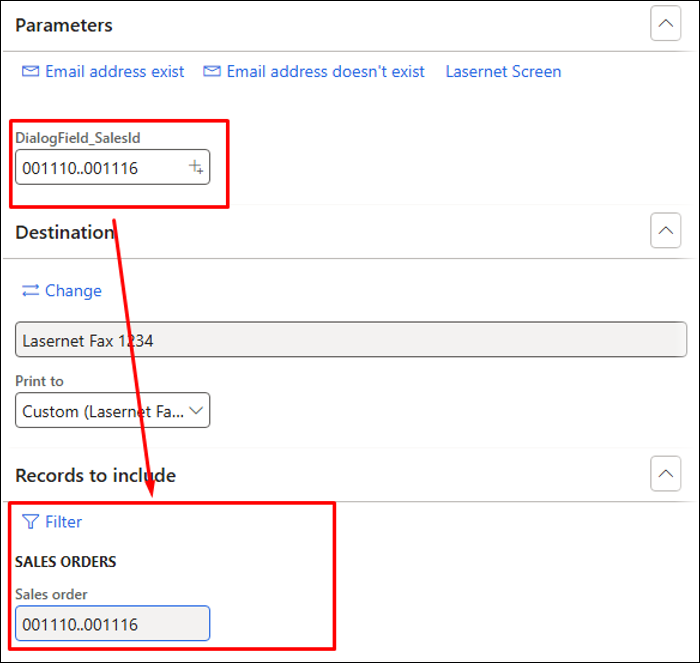
441081@LAC365FO – The Background print Bundling requires redesigning
In previous versions, it was not possible to specify ranges for child-data sources when using Top Picking or Batch Bundling.
The Test and Performance Suite 7.1 supports this and the use of dialog fields created for the report.
Using dialog fields and specifying ranges for the child data sources is useful for optimizing performance when executing large numbers of records.
In the following example, a report is created with a dialog field where a range can be specified for the sales orders and is added for the records that should be included:
Dialog fields are only used to execute the report and cannot be used to select the scope of records because there is no correlation between the report and the filter used.
The scope of the records is the records for which the report will be executed.
The following defines the scope:
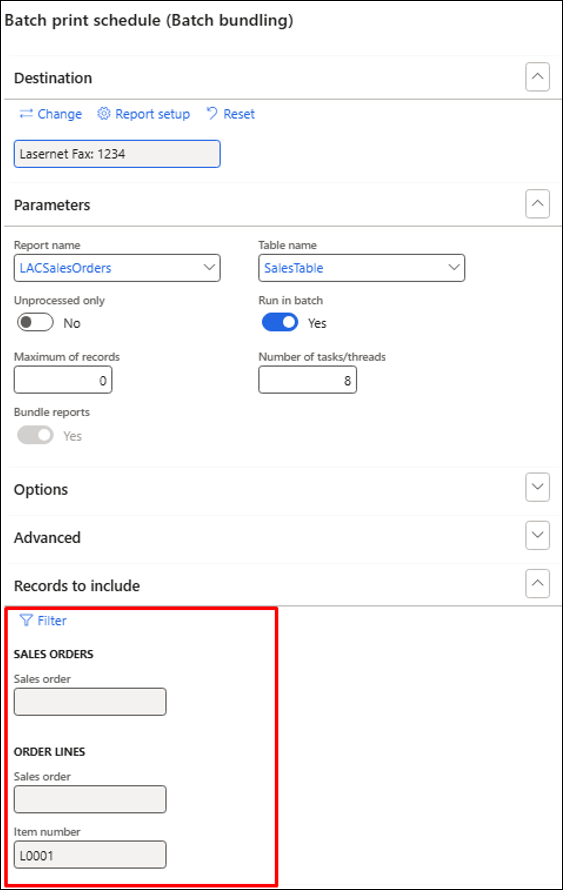
Whereas the following defines the range(s) for the report(s):
451685@LAC365FO – An option has been added to add multiple documents to a Test checkpoint/flow
The Test and Performance Suite 7.1, included in Lasernet FO Connector 7.1, supports adding multiple entries from the Archive into a Test checkpoint.
This offers a quicker and easier way to incorporate Archive entries into Test checkpoints.
Test checkpoints enable comparisons of XML/PDF files before and after Dynamics upgrades, Lasenret FO Connector updates, customizations, and other ISV solutions.
A new dialog enables users to toggle options when adding entries from the Lasernet Archive into Checkpoints.
Id and Description
(43).png)
Compare PDF, Force rerun, Skip JobInfo, Destinations, and Add to flow (the latter enables users to add into existing or new flow-created Checkpoints)
(35).png)
The following icon has been added to indicate whether the Checkpoint archive was a valid reference record for Force rerun (Reference record, Resend menu, and others):
(27).png)
450524@LAC365FO – Always skip Record Ids (RecIds) when using Checkpoints
Record Id (RecId) comparisons are always omitted in Checkpoints within Test and Performance Suite 7.1.
RecIds are typically not beneficial for comparisons as they tend to be dynamic and frequently change.
In previous versions, they were included in the comparison of XML files:
(31).png)
And often would cause issues when comparing two files:
(24).png)
RecIds are always omitted in T&P 7.1, and no differences in relation to RecIds will, therefore, be shown:
(26).png)
(25).png)
450521@LAC365FO – An option has been added to add an attribute/property in the XML to identify whether Checkpoints are being used
The JobInfo section now includes details on whether the report was prepared via Test checkpoints, Test flows, or executed via the Run Test.
This can be useful to prevent the distribution of documents used for testing purposes.
This information can later serve as a condition or criterion in Lasernet to avoid the distribution of the report(s).
(27).png)
The LACTestCheckpointRun is added when running a Test checkpoint for a single report:
(25).png)
The information is incorporated when generating reports from Test checkpoints, Test flows, or through the Run Test feature.
Additionally, if executed via Test flow, the report will include details about the flow used in LACTestFlowRun.
(25).png)
451004@LAC365FO – The option to filter on skip testing has been introduced
In previous versions of the Test and Performance Suite, the Skip testing field could not be filtered. Version 7.1 now supports this function.
This enhancement ensures a better user experience and that nothing is overlooked, especially when dealing with numerous fields, some of which may be designated to be skipped during testing.
(21).png)
449545@LAC365FO – Test and Performance Suite 7.1 requires a new license code created specifically for 7.1
The Test and Performance Suite 7.1 requires a new license code.
(20).png)
An error message such as the following will appear if an older license code is used:
(18).png)
Licenses for T&P are located in Lasernet > Test and performance suite > Parameters > License terms.
453099@LAC365FO – The following error occurred during PDF comparison: “[Error] @LACTest:CheckpointPDFCompareNoResult”
In previous versions, when Compare PDF was disabled at the Checkpoint level but enabled at the Test flow level, the test result failed and provided an incorrect label ID:
(16).png)
The Compare PDF function was toggled to No at the Checkpoint level:
(14).png)
Compare PDF was toggled to Yes at the Test flow level:
(15).png)
451685@LAC365FO – An option has been introduced to add multiple reports to the Checkpoints/Test flows
The Test and Performance Suite 7.1 supports adding multiple entries from the Lasernet Archive to Checkpoints and Test flows.
Checkpoints and Test flows are useful for automating testing reports after upgrading FinOps, Lasernet FO Connector, ISV solutions, or other customizations.
The ability to add multiple reports from the Archive simplifies and streamlines the process of adding to various reports.