Install and Configure the Autoform DM Iframe Integration
- 12 Feb 2026
- 3 Minutes to read
- Contributors


- Print
- PDF
Install and Configure the Autoform DM Iframe Integration
- Updated on 12 Feb 2026
- 3 Minutes to read
- Contributors
- Print
- PDF
Article summary
Did you find this summary helpful?
Thank you for your feedback
This page provides all the installation steps that you must follow to implement the Autoform DM integration.
The installation process has the following stages:
Before you begin: Ensure that you have read the prerequisites and solution summary for this integration.
Navigate to the Customization Page
Within your Dynamics 365 Customer Engagement system, click the Settings icon in the top right corner, and then select Advanced Settings.
.png "DM iframe 1 edit(1).png")
In the Settings form, select the Customizations option in the Customization column.
.png "DM iframe 2 edit(1).png")
Click Customize the System.
.jpg "DM iframe 3 edit(1).jpg")
Navigate to the target entity, and then navigate to the form in which the integration is to be done.
Add the Integration Script to a Form
To run the integration functions, the integration script must first be added as a library to the target form.
Note
The upload step only needs to be performed once. If the integration is to be performed on other forms, the global script library can be reused.
Click Form Properties.
In the Form Properties window, under Form Libraries, add a library.
If the integration script has not yet been uploaded, click New, then follow these steps:
In the form that is shown, set the Name to formpipe-dmintegration (or another descriptive name as required).
Set the Display Name and Description as required.
Set the Type to Script (JScript).
Upload the provided integration script.
Click Save to save the library.
Ensure the integration script library is selected, and then click Add to add it to the form.
Add an Event Handler to Initialize the Script
To initialize the integration script, an event handler must be added. This task:
Must be done once per form.
Must run before any iframe initialization calls.
Click Form Properties.
Under Event Handlers, set the Control to Form and set Event to OnLoad.
Choose to add a new event hander.
Select the integration script library that you added (when you followed the steps in Add the Integration Script to a Form).
Set the Function to FpApp.Embed.initEmbed
Set the parameter to a quoted string (single quotes) containing the full URL to Autoform DM. For example, 'https://my.dmappdomain.com'

Add a Tab with an Iframe Component
To embed a DM application within a form, an iframe component must be used. This can be done in whatever manner best fits the integration requirements and usage. However, we recommend using a single-column tab to host the iframe to provide the best end-user experience.
Insert a new single-column tab into the form.
Within the new tab, ensure that a section exists. If one does not, add a section.
Within the section, insert an iframe component.
.png "DM iframe 5 edit(1).png")
In the iframe configuration window, set the Name to a value that represents the application to be embedded. For example, dm-statements-search
Set the URL to the canonical dummy URL: https://www.example.com
Note
This URL will not be used.
Enter an appropriate Label.
Ensure that the Restrict cross-frame scripting option is not selected. If this option is enabled, the application will not work.
.png "DM iframe 6 edit(2).png")
The iframe will act as a container for the DM application, loaded via the initialization functions described in the next set of steps.
Add an Application Initialization Event Handler
For each iframe component that will host a DM application, an event handler must be added to initialise and load it.
Click Form Properties.
Under Event Handlers, set the Control to Form and set Event to OnLoad.
Choose to add an event handler.
Select the integration script library that you added (when you followed the steps in Add the Integration Script to a Form).
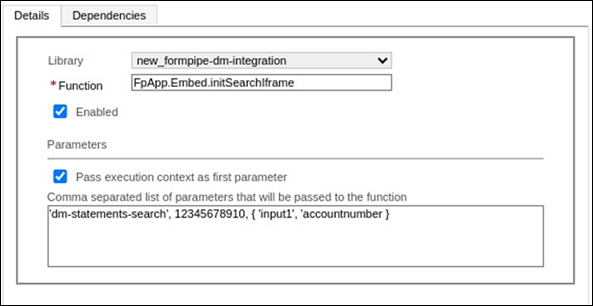
Ensure that the Pass the execution context as first parameter option is selected.
Set the function call and parameters based on the type of application that is to be embedded:
Search Application Parameters
Function: FpApp.Embed.initSearchIframe
Parameters:
<IFrame name> (without IFRAME_ prefix)
<DM application ID>
<Field mapping> — An object map where each key-value pair is an application search input name and a Dynamics form field name
Import Application Parameters
Function: FpApp.Embed.initImportIframe
Parameters:
<IFrame name> (without IFRAME_ prefix)
<DM application ID>
<Field mapping> — An object map where each key-value pair is an import input field name and a Dynamics form field name
.png "DM iframe 8 edit(1).png")
Next Steps
To avoid creating a Dynamics configuration that prevents the integration from working correctly, read Dynamics Security Controls.
To learn about the various attack vectors present and (for each) to learn about the risk and whether there are safeguards in place to prevent it, see Iframe Attacks and Preventions.