Install Lasernet Keep (Interactive Installation)
- 16 Mar 2026
- 14 Minutes to read
- Contributors


- Print
- PDF
Install Lasernet Keep (Interactive Installation)
- Updated on 16 Mar 2026
- 14 Minutes to read
- Contributors
- Print
- PDF
Article summary
Did you find this summary helpful?
Thank you for your feedback
This guide describes how to use the interactive installation wizard to install Lasernet Keep (in standalone mode) on a supported Windows operating system.
Important
The instructions on this page describe installing Lasernet Keep in standalone mode only.
Note
For information about how to upgrade an existing Keep system, see the Lasernet Keep Upgrade Guide.
How to Follow This Installation Guide
Follow the subsequent sections of this guide in sequence. In summary, the process is:
Complete the prerequisite and preparatory steps. This includes making decisions (for example, which network port numbers Keep will use), acquiring and installing prerequisite software (such as the Java runtime environment (JRE) that the installer will use), and preparing a database for Keep to use.
Install Keep. This involves making selections and entering values at each stage of the installation wizard, so that it can install Keep according to your requirements and appropriately configure the application server (Wildfly) that Keep runs on.
Complete post-installation tasks. This includes ensuring that relevant network ports are open and running basic Keep functionality tests.
This guide also contains an Elements of a Keep Installation section. Understanding what elements comprise a basic Keep installation can help you understand why the prerequisite steps of the installation process are needed and what the Keep installer does. This understanding can also help you administer your Keep system after you have successfully installed and started it.
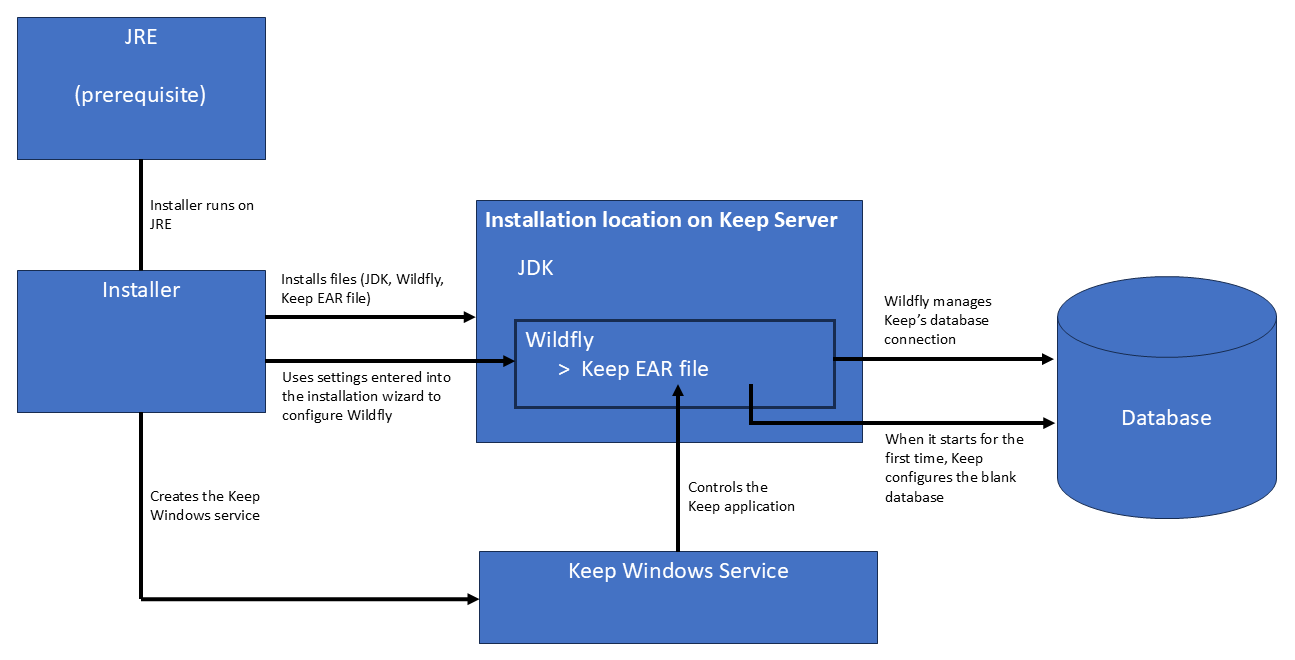
Elements of a Keep Installation
The Keep installer installs the following basic elements of a Keep system:
A JDK
Wildfly (application server)
Keep software and files (as an EAR file installed in Wildfly's
\standalone\deployment\directory)A Windows service to provide easy start/stop/restart control over Keep
The following elements must be present before you run the Keep installer:
A database for Keep to use.
Note
The installer does not create this database. Instead, you must create it as a prerequisite task of the installation process.
A JRE for the installer to use.
Note
The installer is a Java application, so you must install a JRE for the installer to run on. Installing this JRE is a prerequisite task of the installation process. However, the installed JRE can be removed after Keep has been successfully installed, because the installer installs a JDK for Wildfly (and consequently Keep) to run on.
The following diagram illustrates how these elements interact.
Prerequisite and Preparatory Tasks
Decide Whether Keep Will Use HTTP or HTTPS
By default, the installer configures Keep to use HTTPS.
If Keep will use HTTPS, you must obtain a keystore that contains relevant certificates. If these are not available during installation, the installer can create a temporary self-signed certificate, which you can replace later.
Decide Which Network Ports Keep Will Use
To avoid conflicts with other applications, consider what port Keep will use for HTTPS connections and (if relevant) HTTP connections.
Tip
If multiple instances of Keep will run on the same server, use the port offset feature to ensure that they do not use the same ports. In the Keep installer, you can specify the same port numbers when you install each Keep instance (for example, port 443 for HTTPS), but you can specify a different port offset for each Keep instance.
For example, if two instances of Keep are installed and both instances' HTTPS Port is set to 443, and you set Port offset to 0 for the first instance and to 1 for the second instance, the first server's HTTPS port will be 443, and the second server's HTTPS port will be 444.
This configuration occurs at the Configure Wildfly (Application Server) stage of the installation process.
Create and Configure a Database
Before you install Keep, you must create a database for it to use. When Keep starts for the first time, it will configure the database.
Microsoft SQL Server
If necessary, install Microsoft SQL Server. For information about compatible Microsoft SQL Server versions, see the Lasernet Keep Compatibility Matrices.
Then, to create a suitable database, follow the instructions on the Create a Microsoft SQL Server Database for Keep page.
Oracle
If necessary, install an Oracle database management system. For information about compatible Oracle versions, see the Lasernet Keep Compatibility Matrices.
For information about creating a suitable Oracle database, Lasernet Support.
Install a Java Runtime Environment (JRE)
The Keep installer runs on Java. For this reason, you must install a JRE or JDK on the Keep server before you run the Keep installer.
For more information about this install-time Java requirement (and about the associated Java licensing implications), see Lasernet Keep and Java Licensing.
For information about compatible JREs, see the Lasernet Keep Compatibility Matrices.
Check that the Keep Server is Running a Supported Operating System
For information about compatible Microsoft Windows operating systems, see the Lasernet Keep Compatibility Matrices.
Install Keep
The Keep installation wizard has several pages. Together, these pages collect information that enables the installer to:
Install Keep application files
Install Wildfly
Install a JDK
Configure Wildfly
After collecting this information, it installs this software and configures Wildfly.
1. Run the Keep Installer
Note
The screenshots on this page show installer screens available in Lasernet Keep 11.1 and later.
To run the interactive installer, double-click the installer EXE file (for example: Lasernet-Keep_Installer-v11.1.0.exe). The installer will display its Welcome page.
Click Next.
Note
The installer is also available as a JAR file. Use the JAR file instead of the EXE installer if you have advanced installation requirements that necessitate the use of a JAR file.
2. Accept the End User Software Licence Agreement
Review the license terms and conditions at https://www.lasernetgroup.com/legal/.
If you accept the terms of the agreement, click I accept the terms of this license agreement, then click Next.
3. Select "New" Installation Type
Because this is a new installation (rather than an upgrade), click New. Then, click Next.
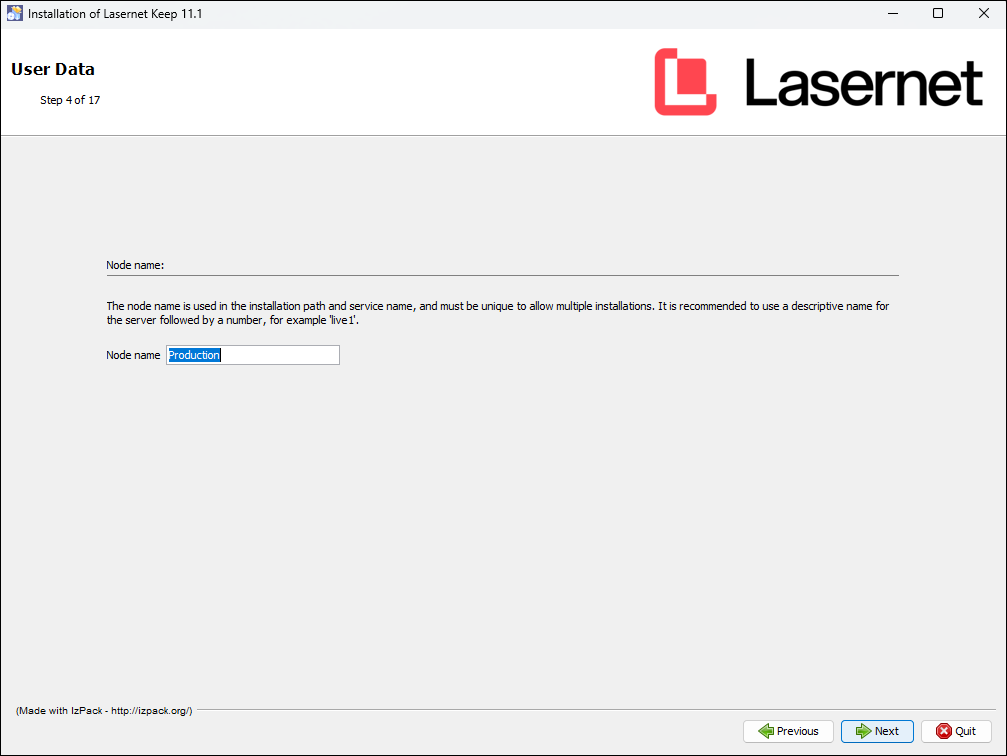
4. Enter a Node Name
Each distinct installation of Keep on a particular server (and so, each running instance of Keep on that server) is referred to as a node. Each of these instances is differentiated by its node name, which the installer automatically includes in that Keep installation's Windows service name and installation file path.
You can use the node name to identify the instance. For example, the node's name could indicate that Keep instance's role (such as Test or Production).
Enter an appropriate Node name, then click Next.
5. Choose an Installation Location
Check whether the default installation path (which includes the node name) is appropriate. If necessary, enter a different location (or click Browse to select a location).
Then, click Next.
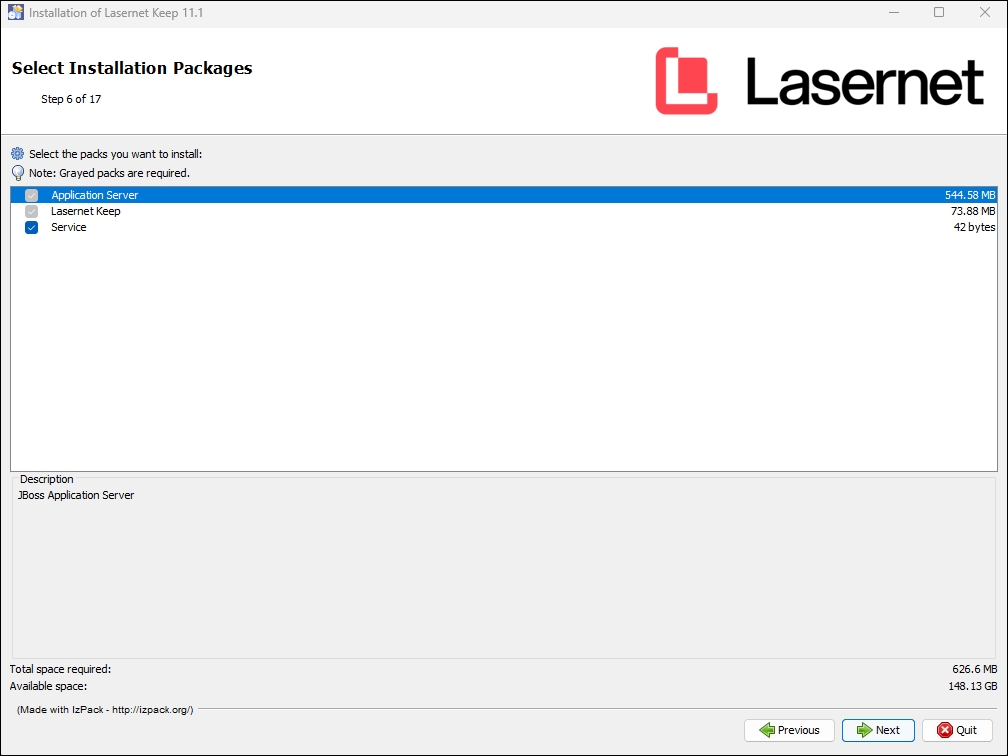
6. Choose Which Components to Install
Select the checkboxes beside the Keep components that you want to install, then click Next.
Note
Application Server and Lasernet Keep are mandatory components. As a result, they are automatically selected and are grayed (so that their checkboxes cannot be cleared).
Service: This component is a Windows service that represents this installation of Keep.
7. Configure Wildfly (Application Server)
The next few pages of the installation wizard collect configuration settings for the application server (Wildfly).
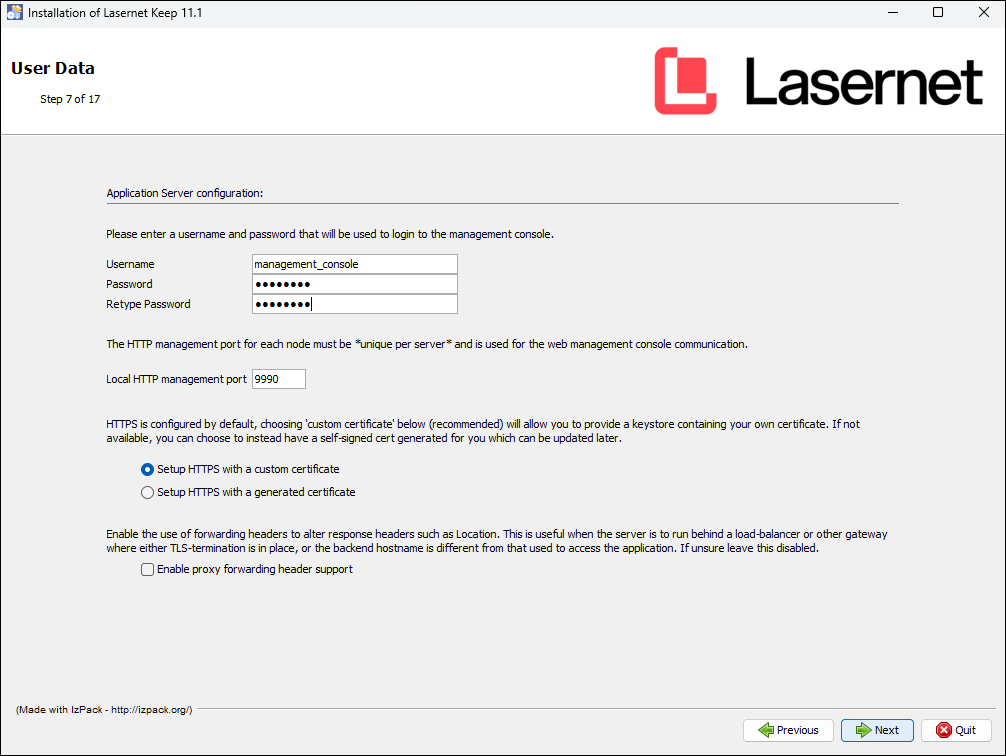
Application Server Configuration Page
Username, Password, and Retype Password: Set the access credentials for the application server management console.
Note
These credentials are used to access the Wildfly management console, not the Keep application.
Local HTTP management port: If necessary to avoid a port conflict, change the default value. If multiple installations of Keep will run simultaneously on the server, each installation must have a unique Local HTTP management port value.
HTTPS is configured by default. Click Setup HTTPS with a custom certificate (recommended) if you are able to provide a keystore containing the certificate that you want to use. Else, if you click Setup HTTPS with a generated certificate, the installer will generate a self-signed certificate, which you can change for a custom certificate at a later date.
Enable proxy forwarding header support: By default, this checkbox is cleared. If appropriate, select this option; the information above the checkbox describes when this option is relevant.
Complete this page, then click Next.
Application Port Configuration Page
HTTP Port and HTTPS Port: The default HTTP Port is 80 (standard HTTP port), and the default HTTPS Port is 443 (standard HTTPS port). Change these port numbers if there is risk of a port number conflict with other services or web servers that are installed on the same server.
Port offset and Custom offset: The ports that a Keep instance uses must be for the sole use of that Keep instance. If multiple Keep instances are installed and running on a server, and those instances all have the same HTTP Port and HTTPS Port numbers, a port conflict will occur unless each instance has a different Port offset.
The Port offset resolves this problem by adding the specified number to the port numbers that are used by the Keep instance that you are installing. For example, if HTTPS Port is set to 443 and you select 50 from the Port offset list, the instance will use port 493 for HTTPS communication. You can select a value from the Port offset list, or select Custom from the list and enter a number into the Custom offset box.
Note
Port offset does not affect Local http management port.
Complete this page, then click Next.

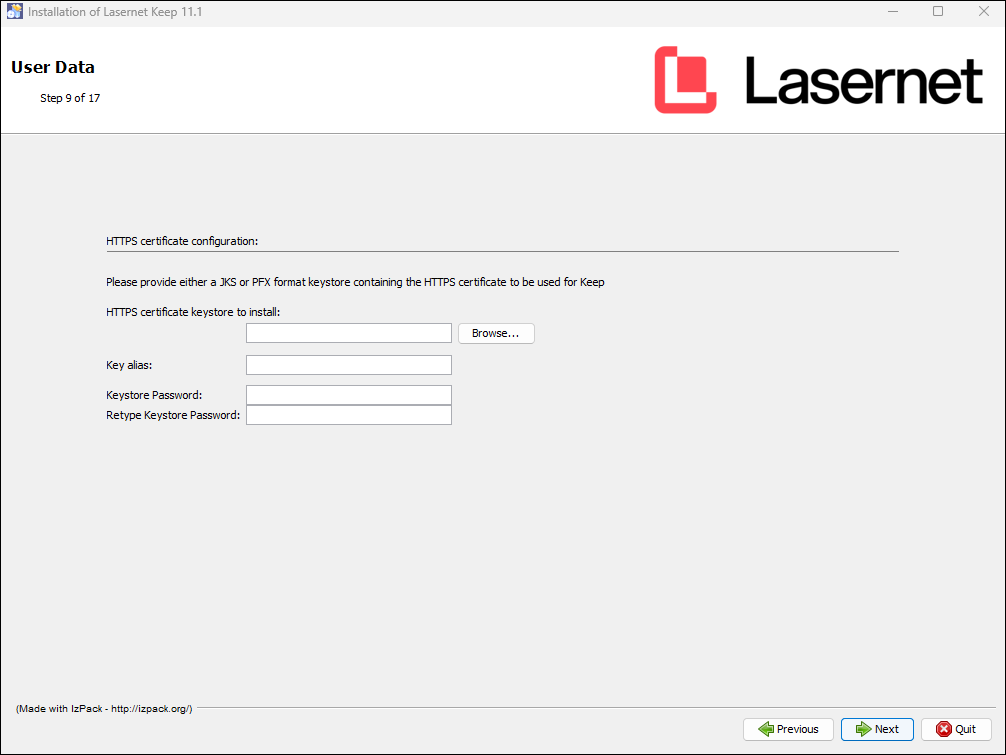
HTTPS Certificate Configuration Page
If you selected Setup HTTPS with a custom certificate (on the Application Server configuration page), you must provide a keystore that contains the HTTPS certificate that you want Keep to use. You must also provide the accompanying credentials.
HTTPS certificate keystore to install: Select the Java KeyStore (JKS) or Personal Information Exchange (PFX) file that contains the SSL certificate that you want to install. The installer will copy this keystore to a location within the Keep installation directory.
Use Key alias, Keystore Password, and Retype Keystore Password to provide the access credentials for that keystore.
To continue, click Next.
Warning
After you click Next, the installer will validate the supplied access credentials against the selected keystore. If the credentials are not valid, you will be unable to proceed with this installation.
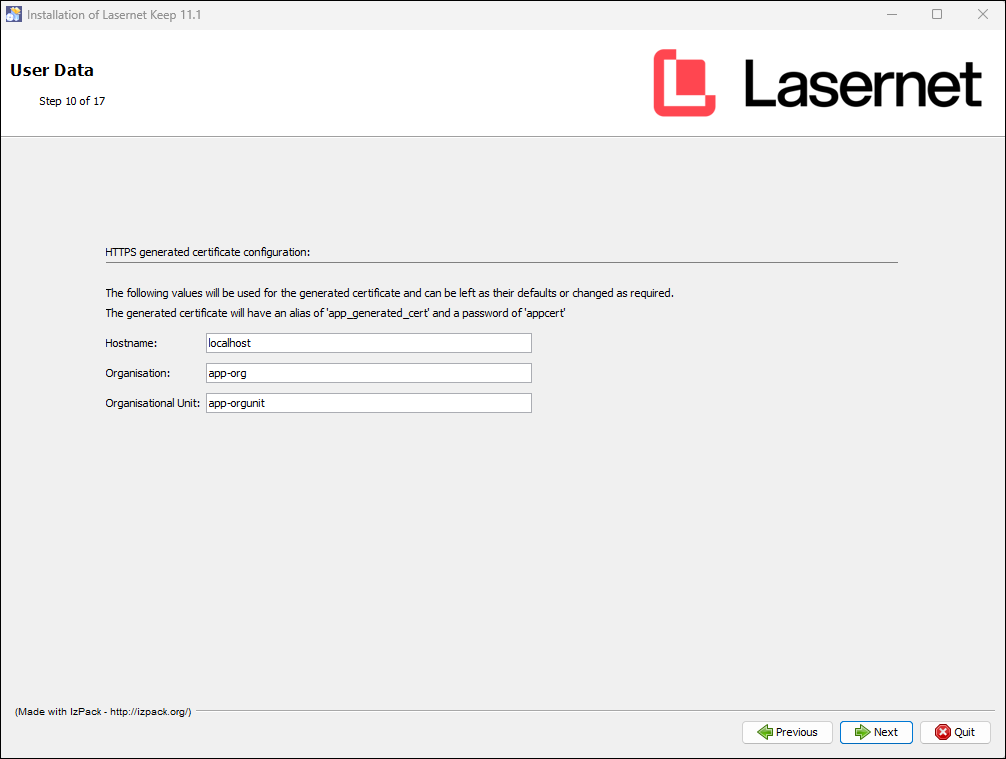
HTTPS Generated Certificate Configuration Page
If you selected Setup HTTPS with a generated certificate (on the Application Server configuration page), you must enter Hostname, Organisation, and Organisational Unit values that enable the installer to generate a self-signed certificate. You can use the default values or change them.
The alias and password for the generated certificate depends on the Keep version.
Lasernet Keep 11.1 and Later
alias:
app_generated_certpassword:
appcert
Lasernet Keep 11.0
alias:
dm_certpassword:
dmcert
To continue, click Next.
Note
The automatically generated certificate is intended to speed up the installation and deployment process, while establishing a base level of security. To provide a more secure environment, Lasernet Group recommends that you replace the generated (temporary) certificate with a custom certificate as soon as possible.
8. Configure Keep
In Archive path (on the Lasernet Keep configuration page), enter an existing location for Keep to use as the document archive location, or click Browse to select a location. Then, click Next.
Warning
Ensure that Keep has read and write permissions to this location.
Note
For standalone Keep systems, you can specify a local path, such as the default
c:\archiveTo specify a remote location, you can use one of the following types of path:
UNC path: Enter a reference to a network share. For example,
\\nas\share\ARCHIVEiSCSI target: This type of path is robust and appears as a local path to the application.
If you want to use an advanced type of path (such as an Azure path), you must do this as a separate configuration task after you have successfully installed Keep.
It is not recommended to use other remote path options such as symlinked paths and mapped drives.
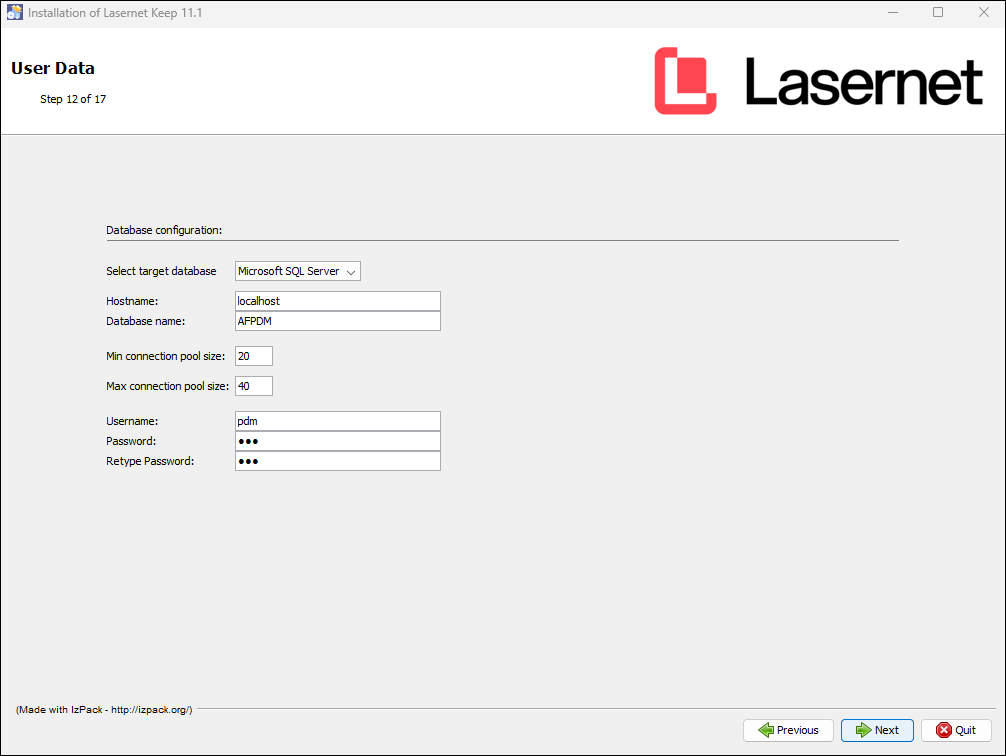
9. Configure the Database Connection
The information that you enter on this page enables Keep to connect to the database that you created during the earlier Create and Configure a Database part of the installation process.
Select target database: Select the type of database that Keep will be using.
Warning
Do not use the H2 database type for production systems. It is intended only for temporary test installations.
Hostname: Enter the host name of the computer that is hosting the database.
Database name, Username, Password, and Retype Password: Enter values that match those used when you created the database.
Unless directed otherwise, use the default Min connection pool size and Max connection pool size.
To continue, click Next.
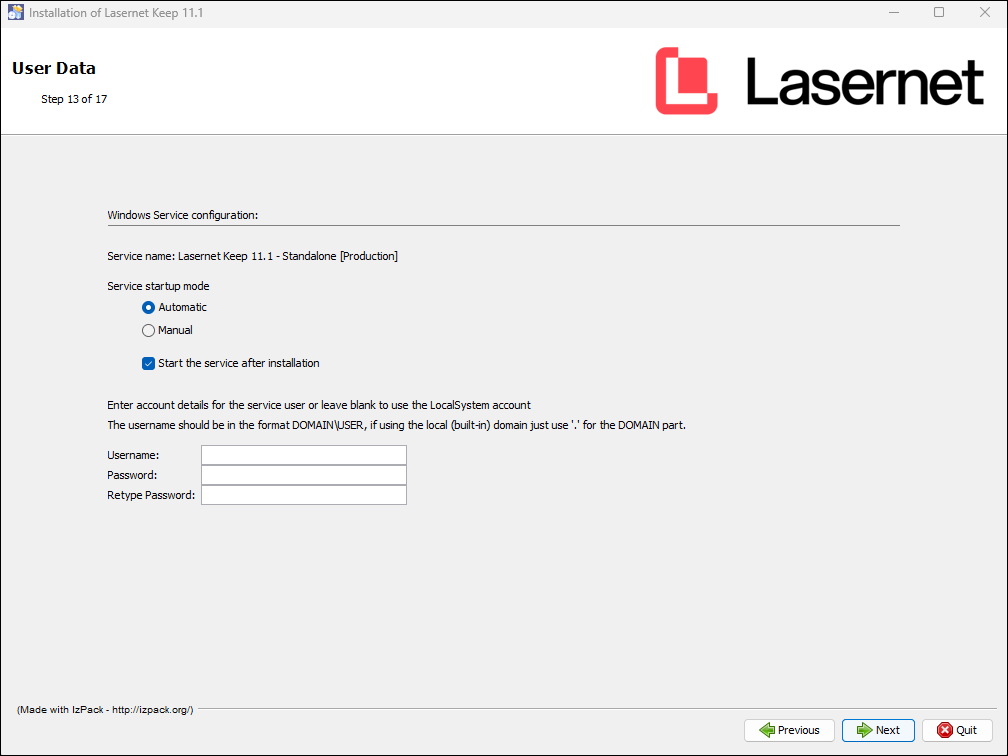
10. Configure the Windows Service
If you selected Service (on the Select Installation Packages page), you must configure the Windows service that the installer will create. This service represents the new Keep installation.
Service Startup Mode: If you click Automatic, the Keep service starts automatically when the server starts. If you click Manual, a user of that server must manually start the Windows service.
Start the service after installation: By default, this option is selected.
Next, specify the identity that the service will run under:
To use the Windows LocalSystem account: Leave Username, Password, and Retype Password blank.
Note
The LocalSystem account cannot access archive file locations on other computers.
To use an existing user account: Enter that user account's username and password. Enter the username in
<domain>\<user>format; appropriately substitute<domain>and<user>. If the user is on the local domain, substitute<domain>for.(period). Ensure that the specified account has Log on as a service privileges and will be able to access the archive file location.
To continue, click Next.
11. Review the Pre-Installation Summary
The Summary Configuration Data page summarizes the settings and configuration values that the installer will use to install and configure Keep and the application server (Wildfly).
The HTTP Port and HTTPS Port that the new installation will use are calculated from the port number and offset entered earlier and are displayed here. If they differ from the default values, make a note of them.
To start installing the software, click Next.
12. Install the Software and Monitor Installation Progress
The Keep installer will install and configure the software. Progress bars on the Installation page indicate how much of the process remains to complete.
After the installer successfully installs the software, it will display an Installation Finished page.
Click Done to close the installation wizard.
Apply a License to Keep
To use the new Keep instance, you must apply a valid license to it.
To do this, follow these steps:
In a web browser, go to
<base-URL>:<port>/keep(substitute<base-URL>for the base URL of the Keep installation or forhttps://localhostif appropriate), and substitute<port>for the Keep HTTPS port). If Keep is using its default port numbers with no offset applied, you can omit:<port>. For example,https://KeepServer/keep.On the Welcome to Keep page, enter the following credentials, then click Log in:
Username:
adminPassword:
ChangeMe
On the Password Expired page, enter a new password for the admin user, then click Change Password.
On the Welcome to Keep page, use the new password to log in as the admin user.
On the Licence Required page, click Browse (see a in the image below), select your Keep license file, then click Activate (b). Alternatively, paste the license key text (from that file) into the box (c), then click Activate.
Note
If a license file is not available to you at this time, you can temporarily activate Keep for 30 days. To do this, click Evaluate (see d below) in the Evaluation Mode area.
.png)
After the license successfully activates (or Keep enters evaluation mode), the Keep home page opens.
Complete any Necessary Post-Installation Tasks
After completing the steps above, you might need to complete some of the following tasks.
Make Post-Installation Configuration Changes (in the node.properties File)
If you need to change or update some of the configuration values that were used during installation, you can edit them in the node.properties file, which is in the \standalone\configuration\ area of the Keep installation's directory.
Example File Paths
Lasernet Keep 11.1 and Later
Default path to the node.properties file: C:\Program Files\Lasernet\Lasernet Keep\Server_11.<minor version number> - <node name>\wildfly-<version number>.Final\standalone\configuration\.
Appropriately substitute <minor version number>, <node name> and <version number>.
Lasernet Keep 11.0
Default path to the node.properties file: C:\Program Files\Formpipe Software\Lasernet Keep\Server_11.0 - <node name>\wildfly-<version number>.Final\standalone\configuration\.
Appropriately substitute <node name> and <version number>.
The node.properties file is the default location for changing installation values. Do not make changes in other XML configuration files (to change configuration values) because those files do not have primacy over node.properties.
Example of Adjustable Values
# The bind address for the management interface
jboss.bind.address.management=127.0.0.1

# The port for the web management console and jboss cli, also used by the windows service.
# Note that this is fixed and not affected by the port offset if set
jboss.management.http.port=9990
jboss.management.https.port=9993
Refer to the information in the node.properties file itself for full details and explanations of the various properties that can be set. These properties include the Keep logging level.
Other Post-Installation Tasks
Open Ports
Ensure that the HTTP and HTTPS ports chosen during installation are accessible through any firewalls between the target machine and clients.
Remove the 'Data Definition Language' Role
Once the installation is complete, the database account can (and should ideally) have its permissions tightened to remove the ability to DROP, UPDATE, and ALTER tables. For example, remove the db_ddladmin role so the user only has the db_datareader and db_datawriter roles for SQL Server.
Perform a System Test
Once Keep has started and has been activated, perform a series of actions that will enable you to confirm that the installation is working as expected. For example, you could:
Test logging in to Keep.
Run a search, or upload, or both.
Note
A new Keep system does not provide any searches or uploads, and its archive is empty. To enable you to run this part of the system test, you must add an upload configuration to Keep and add a search too. After you do that, you can upload documents to the archive and run searches for them.
View a document image from a search.
Azure Storage Paths
If you wish to use Azure for one or more storage paths, you must set these up after Keep is installed and running. Log in to Keep and configure the paths on the Server Settings page.
Collation Setup
If Keep runs without errors, leave the collation settings as their default values. On SQL Server and Oracle, the default collation is based on the locale setting of the server that the database system is installed on.
How to change collation on Oracle (See NLS_SORT)
How to change the collation on MS SQL Server
Warning
The collation that is used must be case-insensitive, so that it is compatible with the Keep server.
Known Issues
Installing with Oracle Database – Extra Permission Needed
Note
Keep installations that use an Oracle database require you to follow extra configuration steps.
Keep cannot select dba_ind_columns. For example:
Sql = SELECT index_name FROM dba_ind_columns WHERE UPPER(table_name) = 'TBLDOCUMENTS' AND UPPER(column_name) = 'SKEY1'

Error Msg = ORA-00942: table or view does not exist
The solution is to grant the pdm user the SELECT ANY DICTIONARY permission:
GRANT SELECT ANY DICTIONARY to pdm;