Install and Configure Keycloak
- 23 Mar 2026
- 10 Minutes to read
- Contributors


- Print
- PDF
Install and Configure Keycloak
- Updated on 23 Mar 2026
- 10 Minutes to read
- Contributors
- Print
- PDF
Article summary
Did you find this summary helpful?
Thank you for your feedback
A Keycloak instance must be installed, available, and correctly configured.
The steps that you follow depend on whether you will create and configure a new Keycloak instance for Autoform DM to use, or whether a Keycloak instance is already available and Autoform DM will join an existing realm.
Note
The information on this page applies only to self-hosted Cloud and on-premises Autoform DM systems.
Use an Existing Instance
If a Keycloak instance is already installed and configured, your only configuration task is to add a Keycloak client configuration for Autoform DM.
Create and Configure a New Instance
To install and configure a new instance of Keycloak, follow this process:
If necessary: Configure access to Keycloak via proxy.
Add Keycloak clients for Autoform DM and for applications that will interact with Autoform DM.
If necessary: Configure the tenant whitelist.
This page provides instructions for each of these tasks.
Install and Configure Keycloak
Complete the following tasks to install Keycloak, configure the Keycloak server, and set up an admin user.
1. Install Keycloak
Before you begin: Review the Keycloak installation prerequisites.
To install Keycloak, follow these steps:
Download the following Keycloak software and adapter packages from GitHub.
Note
Keycloak 17.0.1 should be used because it has undergone full compatibility testing with Autoform DM.
If you need to use a newer release of Keycloak, contact the Lasernet Group.
keycloak-oidc-wildfly-adapter-17.0.1.zip
Note
This adapter package is used later in the configuration process (on the Configure Autoform DM SSO page of this guide).
Unpack
keycloak-17.0.1.zipto the location where the Keycloak service will run from.Install a JDK that is compatible with KeyCloak and configure it so that Keycloak can use it.
2. Configure the Keycloak Server
You must configure Keycloak by editing its conf/keycloak.conf file and then apply the configuration to Keycloak.
For detailed information about the content of this file, see Keycloak documentation.
As a minimum, you must complete the following configuration tasks in that file and then run a command to apply your configuration changes.
Configure the Database Connection
The following configuration options control the connection to the database that stores realm configuration. A database and a database user must be available for Keycloak to use.
dbDatabase type. For example,
mssql
db-url-hostDatabase host. For example,
localhost
db-schemaDatabase schema. Typically
dbo
db-url-databaseDatabase name
db-usernamedb-passwordtransaction-xa-enabledShould be
false
Configure the Keycloak Host Name
hostnameThe URL used to access KeyCloak.
Configure HTTPS
For production use, KeyCloak must be configured to use HTTPS. Before you do so, generate a TLS certificate and then place a keystore that contains the certificate in the KeyCloak directory (as https.keystore). Then, use the following configuration properties to set the HTTPS port, path to the keystore, and the keystore password.
https-porthttps-key-store-filehttps-key-store-password
Configure Proxy Mode
proxyProxy configuration mode
Apply the Configuration to Keycloak
Run this command:
Windows:
bin/kc.bat buildLinux:
bin/kc.sh build
Example Configuration File
In the following example, Keycloak is configured to use:
An MSSQL DB on
db.my-db-host.comnamed KeyCloak.The hostname
kc-sso.somedomain.comto access KeyCloak.A generated certificate pair in a PKCS12 file named
https.keystore.A gateway/load-balancer to route requests.
HTTPS to access KeyCloak both externally via the gateway/loadbalancer and internally.
db=mssql
db-url-host=db.my-db-host.com
db-schema=dbo
db-url-database=KeyCloak
transaction-xa-enabled=false
db-username=keycloak
db-password=keycloakpass
hostname=kc-sso.somedomain.com
https-port=9443
https-key-store-file=https.keystore
https-key-store-password=password
proxy=reencrypt
3. Start the Keycloak Service
To start the Keycloak service, run this command:
Windows:
bin/kc.bat startLinux:
bin/kc.sh start
Note
To run the server as a service on Windows, a “service wrapper” is required. Several options (paid for and free) are available. The Lasernet Group has tested NSSM and recommend its use (unless you want to use an alternative).
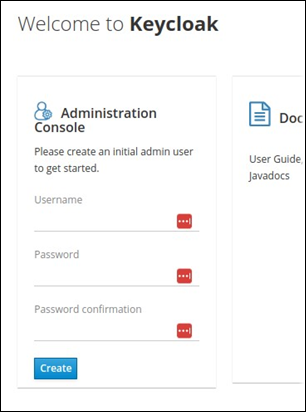
4. Create the Keycloak Admin User
After Keycloak starts, navigate to it in a web browser. On the Welcome to Keycloak page, complete the form that enables you to create an initial admin user.
5. Configure Access to Keycloak via Proxy
If the KeyCloak service will run behind a reverse proxy or gateway, create rules that ensure that the /admin path (admin portal) is not accessible externally.
The /realms/<realm name>/broker/<idp name>/endpoint path must be accessible to Autoform DM and any other services that need to authenticate requests against it. Appropriately substitute <realm name> and <idp name>.
Depending on whether end-to-end SSL is used or SSL termination is used, the proxy configuration option should be set to reencrypt or passthrough.
Note
For more detail and guidance, see the KeyCloak documentation on usage behind a reverse proxy.
Create and Configure a Realm
The security configuration and boundaries for an SSO domain are defined within a named “realm”.
After KeyCloak has been configured and started, an initial default realm named master is available, but this realm should not be used for SSO purposes and a new realm should be created. By convention, an Autoform DM SSO realm is named formpipe-dm-realm.
The following sections describe Keycloak realm creation and configuration, which is done in the Keycloak application.
6. Create the Autoform DM SSO Realm
To create formpipe-dm-realm, follow these steps. You will need the template realm creation script (formpipedm-realm_realm-template_<version>.json), which is supplied by the Lasernet Group.
Open
formpipedm-realm_realm-template_<version>.jsonin a text editor and replace{tenant_id}with the following text:Multi-tenancy scenarios:
commonSingle-tenancy: The Azure Tenant ID for the tenant.
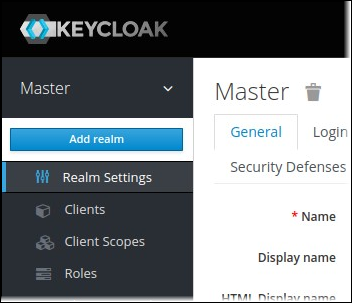
Log in to the Keycloak administration console.
Use the menu in the top-left corner to add a realm.
Select the template realm creation script that you edited.
Check that Name is set to formpipe-dm-realm.
Click Create.
The new realm will include:
Example groups
A template Microsoft Entra ID identity provider
An example client
A custom authentication flow for whitelisting tenants
7. Add the IdP to the Keycloak Configuration
The template realm creation script adds a template Microsoft Entra ID identity provider to formpipe-dm-realm. To configure Keycloak to use your IdP, modify this template Identity Provider item in Keycloak:
In Keycloak, navigate to the template Identity Provider item.
Adjust the Display Name (appropriately for your Microsoft Azure domain).
In the Client ID field, replace
{azure-client-id}with the application ID that was generated when you configured the app registration in the IdP.In the Client Secret field, enter the client secret that was generated when you configured the app registration in the IdP.
Check that the URLs in the Identity Provider configuration in Keycloak do not contain
{tenant_id}. The modifications that you made to the template realm creation script should have swapped all instances of{tenant_id}for appropriate values.If using Azure multi-tenancy: Delete the URL in the Issuer field.
Save the Identity Provider configuration in Keycloak.
8. Configure IdP Claims Mappers
Mappers translate the claims in IdP-generated identity tokens into meaningful relations within the KeyCloak realm. In Keycloak, mappers are present on the Mappers tab of the Identity Provider item.
The most common usage of a mapper is to translate an OID for an Azure group into a security group for the KeyCloak realm. To help you do this, the template realm includes several example mappers.
To add your own group mapper, copy the configuration for any of the example groups (for example, Group – Dev Users), replace {group_id} with the OID of the Azure group, and appropriately change the KeyCloak group.
Examples are also provided for mapping Azure app roles if using role-mapped security rather than group-mapped security.
9. Add Keycloak Clients for Autoform DM and for Applications that Will Interact with Autoform DM
To enable Autoform DM to connect to Keycloak, you must create a “client” in Keycloak. This client represents Autoform DM.
You will also need to create clients for the external applications and services (such as Lasernet, other Lasernet Group applications, and third-party applications) that will integrate with Autoform DM through the “client credentials” flow described in Summary of the SSO Flow.
A Keycloak client specifies the configuration for the application or service, including the application URL, security protocol, and roles. It also provides the client ID and client secret that the application or service uses to authenticate with Keycloak.
How Many Keycloak Clients Do I Need to Create?
For Autoform DM, create a client for each Autoform DM instance that will connect to Keycloak. For example, if there are two Autoform DM environments (Test and Production) and both will share the same Keycloak instance, create two separate Keycloak clients for Autoform DM.
For each external application and service that will integrate with Autoform DM, create Keycloak clients on a "per Autoform DM environment" basis. This means that you create a client for each combination of application/service and environment. For example, if there are two Autoform DM environments (Test and Production) and a requirement for Lasernet to interact with Autoform DM, you would need to create two separate Keycloak clients for Lasernet.
Create a Keycloak Client for Autoform DM
The formpipe-dm-realm created by the template realm creation script includes an example client for a Dev (Development) Autoform DM environment. To set up a new client, either edit this example client, or create a new client by importing the client-template configuration provided by the Lasernet Group (see the JSON script referred to below).
This example client includes the pdm and pdmAdmin roles that are used to access Autoform DM. These roles will be assigned to users and groups to allow them to access and use the Autoform DM environment.
As a minimum, to create a client for Autoform DM, change the following elements of the client’s configuration:
Client ID: Change to match the intended usage.
Name: Change to match the intended usage.
Root URL: Change to the Autoform DM environment’s URL.
On the Credentials tab, create a new Secret. Make of note of this secret, because you will use it when you configure Autoform DM.
The Lasernet Group can supply a template client creation script (formpipe-dm-realm_client-template_<version>.json), which you can use when you create a new client. When you use this script, make the changes described above.
Create a Keycloak Client for an External Application or Service
The formpipe-dm-realm created by the template realm creation script includes an example client (external-integration-client-example) for an external application or service. To set up a new client, either edit this example client, or create a new client by importing the integration-client-template configuration provided by the Lasernet Group (see the JSON script referred to below).
This example client does not include any roles. Assign the pdm and pdmAdmin roles that were created by the Keycloak client for Autoform DM (described above) to this new client to allow the external application or service to access and use the Autoform DM environment.
As a minimum, to create a client, change the following elements of the example client’s configuration:
Client ID: Change to match the intended usage.
Name: Change to match the intended usage.
Root URL: Leave this blank.
On the Credentials tab, generate a new Secret. Make of note of this secret, because you will use it when you configure the external application or service’s integration with Autoform DM.
On the Service Account Roles tab, assign only the Autoform DM roles that are absolutely needed by the Autoform DM environment that this client will enable the external application to access. The Lasernet Group recommends that (if possible) only the
pdmrole is assigned. AssignpdmAdminonly if it is absolutely needed in order to ensure that a principle of least privilege is maintained.
The Lasernet Group can supply a template client creation script (formpipe-dm-realm_integration-client-template.<version>.json), which you can use when you create a new client. When you use this script, make the changes described above.
Also, when importing from the template script, ensure that you add an attribute named account-type with the value service to the service account, and ensure that a suitable email address is set, because these are not included.
10. Configure the Tenant Whitelist
Note
Tenant whitelists apply only to multi-tenancy scenarios.
If you are connecting KeyCloak to Microsoft Azure in multi-tenancy mode, then it is recommended that you use a tenant whitelist to restrict which tenants are allowed to interact with the KeyCloak realm.
To do this, you must install and configure the tenant whitelist provider:
Acquire the provider JAR (
keycloak-azure-auth-provider-<version>.jar). This is provided as part of the supporting materials package, which you can request from your Lasernet Group consultant.Stop the Keycloak service.
Place the JAR file in the
providerssubfolder of the Keycloak deployment.Start the Keycloak service.
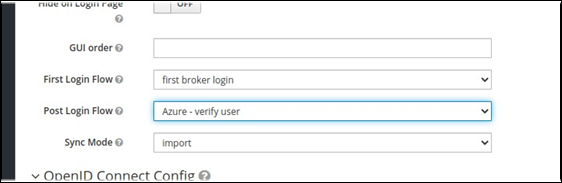
Configure the relevant Identity Provider item (in Keycloak) to use the whitelist flow:
Navigate to the Identity Provider item that represents the Microsoft IdP.
Set Post Login Flow to Azure - verify user.
Click the Authentication menu item, then select the Azure - Verify User flow.
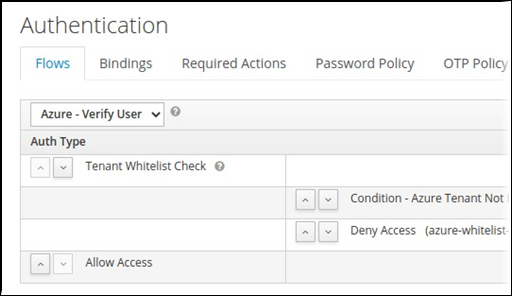
To the right of Condition - Azure Tenant Not In Whitelist, click Actions, then click Config.
Use the plus icon to add the ID for each tenant.
Next Steps
The next stage of the process is to configure the Autoform DM SSO capability.