Edit Rearrange Properties
- 04 Apr 2025
- 19 Minutes to read
- Contributors


- Print
- PDF
Edit Rearrange Properties
- Updated on 04 Apr 2025
- 19 Minutes to read
- Contributors
- Print
- PDF
Article summary
Did you find this summary helpful?
Thank you for your feedback
You can edit the properties of any rearrange by double-clicking it either in the input pane or output pane of Lasernet Form Editor. Alternatively, right-click it and choose the property you want to edit from the context menu.
The following image shows you the Edit Rearrange dialog.
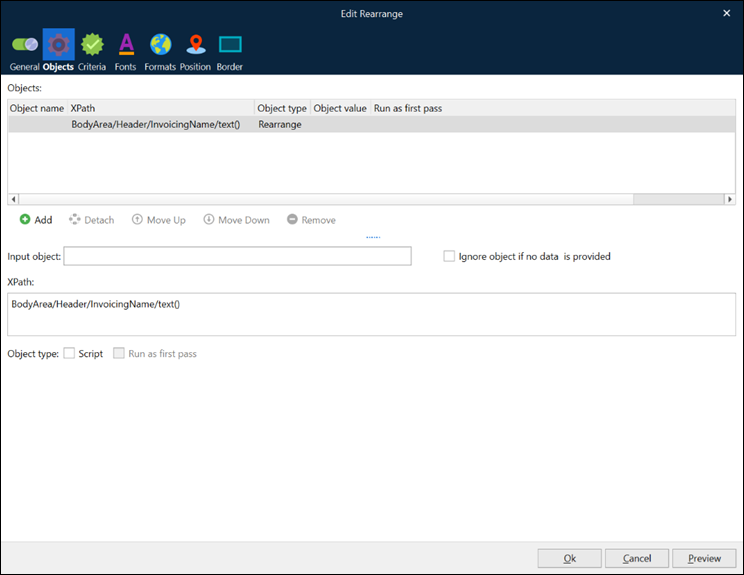
The dialog is presented with several tabs. When opening a dialog by double-clicking the object, the Objects tab is displayed by default. Otherwise, it opens on the tab corresponding to the property you select in the context menu:

Properties
Note
Some properties are relevant to only some input types and output types.
General Properties
Property | Description |
|---|---|
Active | Toggles rearranges between active and inactive state. If a checkbox is selected, the rearrange is active and processed. If the checkbox is cleared, the rearrange becomes inactive and, as a result, it is not processed or shown in the input or output.
|
Output object | The logical name of the rearrange on the output page and the combined contents for all values of the input objects assigned to the same output rearrange. This name can be used to reference the rearrange in a criterion assigned to the other absolute rearranges or to conditional rearranges belonging to the same pattern or for JavaScripts. |
Description | A descriptive representation of an object. |
Master only | If selected, the rearrange is only applied to the Master sheet and not the child sheets (sheets inherit data from a Master sheet). |
Locked | Select the checkbox to prevent moving and resizing a rearrange. |
XHTML | When selected, Lasernet assumes input as XHTML code and uses it to interpret the content of the document to display it in output. As a result, the Style Sheet tab becomes available in the Edit Rearrange dialog. |
Object Properties
Property | Description | ||||||||||
|---|---|---|---|---|---|---|---|---|---|---|---|
Objects | Several input rearranges can be combined into one single object on the output page.
| ||||||||||
Input object | A logical name can be assigned to a rearrange. This name can be used to reference the rearrange in a criterion assigned to the same or other absolute rearranges, conditional rearranges belonging to the same pattern, or in JavaScript. | ||||||||||
Position | Exact position of a rearrange on the input page is defined by left/right columns and top/bottom rows (note: positioning can be carried out much faster by dragging-and-dropping). Selecting the Footer checkbox provides the possibility to position a rearrange in the footer of the input page; i.e. positioned relative to the end of the input conditional area. This is enabled by default when rearranges are created below a defined input conditional area and is only available for forms with text as input format.
| ||||||||||
Script | JavaScript to be executed within the rearrange. For example, for data conversion, text trimming or more advanced functions. Once the checkbox is selected, more Script controls become available. | ||||||||||
Ignore object if no data is provided | If the checkbox is active and there is no data (defined XPath is not present in the input data or value is empty), the rearrange is not processed. It is not shown in the output or the input. If the checkbox is not selected (default value), the rearrange is processed with an empty value.
| ||||||||||
Run as first pass | Affects the event point execution time. By default the setting is turned off, which is the recommended setting in most scenarios. By turning the setting on, you can accelerate execution time to run as the first pass in the processing of a form. The output result of the script will then be used when analyzing the number of pages and calculating text positioning on pages in the final form. |
Criteria Properties
Property | Description |
|---|---|
Criteria | Includes Objects, Schedule, and JobInfos. For details, see Add Criteria to Form Objects. |
Instance Qualifiers | You can use the Instance(s) qualifiers option when you work with conditional rearranges. For details, see Instance Qualifiers. |
Fonts Properties
Property | Description |
|---|---|
Style name | Select to apply one of the predefined styles. |
Formatting | Define font type, font size, color, and formatting of the field on the output form. |
Formatting Substitution | Shows a list of formatting substitution elements you can include using the Add button. The rest of the command buttons allow you to manipulate the elements in the list: Edit, Move up, Move down, and Remove. For more details about formatting substitution elements, see Criteria-based Text Formatting. |
Formats Properties
You can specify bespoke formatting for each of the items in the Objects list. To format an object or rearrange, select it in the Objects list and then use the controls and properties on the Formats tab.
Property | Description |
|---|---|
Format category Input format Output format | Format category enables you to specify the type of data this rearrange handles (so that Lasernet can appropriately format the data). Because regional profiles specify number, currency, date, and time formats, the Input format and Output format tabs are enabled only when Number, Currency, Time, or Date is selected from the Format category list. The Input Format and Output Format Tabs The Input format tab enables you to specify which regional profile to apply to the data value that this rearrange reads from the input data. The regional profile enables Lasernet to correctly interpret a numerical, currency, time, or date value in the input data. The Output format tab enables you to specify which regional profile to apply to the value that this rearrange adds to the output document. On the Input format tab and Output format tab, you can select one or more regional profiles. When several regional profiles are added at a time, you can define which regional profile is applied to the rearrange by setting criteria that are based on the JobInfo, input data values, or both. If the criteria are true for several regional profiles in the list, the first of the regional profiles in the list whose criteria are true is used. The settings on the Input format tab are applied to the rearrange only if the Override form input format checkbox on that tab is selected. Similarly, the settings on the Output format tab are applied only if the Override sheet profile checkbox on that tab is selected. Override Form Input Format If the Override form input format checkbox on the Input format tab is selected, the regional profile listed on the Input format tab is applied to the rearrange. If the Override form input format checkbox on the Input format tab is not selected, the content of the Input format tab is disregarded, and the regional profile specified in the Form Options window is used to interpret input data. If Override form input format is selected but no regional profile on the Input format tab is applied, the regional profile specified in the Form Options window is used. Override Sheet Profile If the Override sheet profile checkbox on the Output format tab is selected, the regional profile listed on the Output format tab is applied to the rearrange. If Override sheet profile is not selected, the content of the Output format tab is disregarded, and the regional profile specified in the Sheet Options window (and, in Lasernet 11 and 10, JavaScript class If Override sheet profile is selected but no regional profile on the Output format tab is applied, the regional profile that is set in the Sheet Options window is used to format the data that this rearrange adds to the output document. Override Sheet Output Format On the Output format tab, you can specify other format parameters (such as how numerical and currency values are rounded). If you select Override sheet output format, the formatting settings specified on the Output format tab are applied to the output. If you do not select Override sheet output format, the formatting settings on the Output format tab are disregarded, and the formatting settings specified on the Format tab of the Sheet Options window are used. UTC Date and Time If Time or Date is selected in the Format category list, and the Override form input format checkbox is selected, the UTC Date and Time checkbox is available. Select UTC Date and Time to define the format of input data as UTC date and time. |
Newline | Choose to insert a new line before or after the rearrange text on the output form. You can also substitute line breaks for spaces. |
Trim spaces | Trim spaces either before or after the rearrange text. In contrast to this, “Whitespace on edges” trims the output (see below). |
Maximum value length | If Format category is String, you can specify a maximum number of characters to be included in the output. Linefeeds are counted as characters for strings that contain multiple lines. |
Hyperlink | Allows you to create a hyperlink. For details, see Turn Form Objects into Hyperlinks. |
Position Properties
Property | Description |
|---|---|
Absolute | Defines on what page(s) the rearrange appears.
|
Position size type | This property supports the following settings: Auto XY, Auto X, Auto Y and Manual. If you choose Auto XY, the text box on the output page will be generated automatically depending on the font type and font size and Lasernet will not insert any line breaks. In Auto X mode, it is possible to define a maximum height. If the input contains more lines than will fit, Lasernet will hide any lines that would overflow the height. Auto Y enables you to specify a width. Lasernet will add line breaks automatically to create as many rows as needed. The Manual setting provides the ability to create a custom-sized text box on the output page by defining a maximum height and width. |
Position X/Y | The exact position of the rearrange text field on the output page. You can manually adjust the position by entering values in the fields. |
Position Width / Height | The width and height of the text box on the output page. These values cannot be changed when Lasernet is set to automatically calculate them i.e. Auto X/Y/XY. |
Rotation (degrees) | The rotation angle of the text box on the output page. You can set the value in degrees. |
Rounding properties |
Lasernet 10: Use Width ellipse and Height ellipse to specify the shape of the corner rounding. Lasernet 11 and Lasernet Essentials / Professional / Advanced: Use Width and Height to specify the shape of the corner rounding. Lasernet 11 and Lasernet Essentials / Professional / Advanced: Use the Left / top, Left / bottom, Right / top, and Right / bottom checkboxes to choose which corners the rounding is applied to. Unselected corners become 90-degree angles. |
Relative to | This property allows you to set the position of a rearrange (both absolute and conditional) relative to other entities such as a conditional area or a region or a group. The following options are available in the drop-down list: Current conditional area progress (for conditional rearranges only) – locates the selected rearrange depending on the settings of the conditional area and the pattern to which it belongs. Checkboxes of the Absolute group box are disabled. It is the default option for conditional rearranges.
If all checkboxes in the Absolute group box are cleared for an absolute rearrange, the Relative to setting is changed to HIDDEN. If you unhide it by selecting absolute, it is disabled. To enable the Relative to setting, select at least one checkbox in the Absolute group box. If you locate conditional rearranges relative to a conditional area or a region, you do not have the option to specify these entities as these rearranges already belong to them. Otherwise, you are allowed to specify these entities for absolute rearranges. The group entity can be selected for both absolute and conditional rearranges as an entity relative to which you are going to locate rearranges.
The checkbox becomes available only if one of the following values are chosen from the Relative to drop-down list:
|
Box vertical alignment | The vertical alignment of the text box on the output page relative to the X/Y position. You can choose between Top, Middle, and Bottom. |
Box horizontal alignment | The horizontal alignment of the text box on the output page relative to the X/Y position. You can choose between Left, Center, and Right. |
Text horizontal alignment | The horizontal alignment of the text within the text box. The text can be aligned as Left, Center, Right or Justified. |
Text vertical alignment | The vertical alignment of the text within the text box. The text can be aligned as Top, Middle, or Bottom. |
Font Point Size | If Font Point Size is selected, the largest possible text size between the minimum and maximum size will be applied to the text.
|
Font Width Scale | If Font Width Scale is selected, the optimal scale to fit the most text, between the minimum and maximum percentage values, will be applied to the text.
|
Line height | The line height can either be set as Absolute or Relative. In Absolute mode, it is possible to define a specific line height in millimetres. In Relative mode, the line height will be defined automatically based on the chosen font type and size. |
Absolute empty line height | Enables you to define a specific line height in millimetres for empty lines. Select the checkbox and type in the height.
|
Overflow | Specifies how instances are handled when letters do not fit within the rearrange box in the horizontal direction. This happens in Auto Y and Manual mode when a word is so long that it cannot fit alone on a line. Force Line Break cuts the word as late as possible and then inserts a new line with the rest of the word. Truncate cuts the word as late as possible and hides the rest of the word. Overflow (default) allows the word to continue outside of the box. In all cases outside overflow handling, the word is placed on a new line first to give it as much space as possible.
|
Keep rows together | When the checkbox is selected, Lasernet keeps all the lines of the selected column of rearranges for a pattern together on the same page.
|
No word wrapping | When the checkbox is selected, Lasernet does not add line breaks at spaces, hyphens, or other similar characters when formatting the text. This setting has no impact on Auto X and Auto XY modes since these do not add implicit line breaks. The actual appearance of the text in the rearrange, if Prevent implicit line breaks is checked, depends on what is selected in the Overflow control:
|
Widow/orphan control | When the checkbox is selected, Lasernet avoids putting one or more paragraph-ending lines at the top of a page (widows) and leaving one or more paragraph-starting lines at the bottom of a page (orphans). You can set the number of lines to be considered widow/orphan.
|
Whitespace on edges | How whitespace is handled on the left and right edges of the output rearrange. The Before and After columns refer to the left and right rearrange edge respectively. Trim (default) removes all edge whitespace, shrinking the output rearrange box as much as possible. Pad inserts one or more characters, usually periods or hyphens from the rearrange contents to the edge. Keep makes sure that no whitespace is removed, making the output more accurately reflect the input.
|
Border Properties
Background and border | These options make it possible to add an optional background color or surrounding rectangle to the text. A margin can be specified (in millimeters) from the text to the edge of the rectangle.
In addition, it is possible to add a border to the selected rearrange. To do this, select the Border checkbox to activate the other controls. You can set border thickness, color, as well as show borders (Left, Top, Right, Bottom) by selecting the required checkboxes. |
Border area | You can add a border to the rearrange. To do this, in one or more of the Left, Top, Bottom, and Right areas (as required), select a Color and border line Width. These settings can differ for each edge of the rearrange. |
Fill area | You can add an optional background Color to the rearrange. Also, you can specify (in millimeters) the Margin between the rearrange’s text and the edge of the rectangle.
|
Style Sheet Properties
Use the Style Sheet tab to add CSS (Cascading Style Sheets) for the current XHTML rearrange using the internal way, which stands for a <style> element.
The style added here for the current XHTML rearrange overwrites the one defined for all XHTML rearranges on the Style Sheet tab of the Sheet Options dialog (for more information, see Sheet Options).
The style defined on this tab is overwritten by CSS added to HTML elements inline, if any.