Configure Users, Groups, and Security Roles
- 17 Apr 2026
- 29 Minutes to read
- Contributors


- Print
- PDF
Configure Users, Groups, and Security Roles
- Updated on 17 Apr 2026
- 29 Minutes to read
- Contributors
- Print
- PDF
Article summary
Did you find this summary helpful?
Thank you for your feedback
To enable users to access the features of a Lasernet Core system, you must appropriately create and configure users, groups, and roles in Lasernet Config Server.
By default, Lasernet Config Server has an admin user that is granted all possible permissions. However, you might want to create additional Lasernet Core users and grant them fewer permissions, to limit their range of Lasernet Core actions.
Quick Start
The Lasernet Core system created by the quick start installation and setup process uses only the admin user. If you are following the quick start process, you do not require the information on this page. The next step of the quick start installation process is to deploy a Lasernet Core configuration to the Lasernet Core environment.
The information on this page is intended for those following the full installation and setup process, who need to learn more about Lasernet Core authentication and access control and need to create non-administrative users (who have limited access rights) and additional groups and security roles.
For example, you might want a particular set of users to be able to deploy Lasernet Core configurations to environments through Manage (or the Lasernet Config web app) and create configurations in Lasernet Developer, but be unable to modify the Lasernet Config Server’s licensing and security role configuration through Manage (or the Lasernet Config web app).
You can achieve these restrictions for these users by creating an appropriate role, creating a group and assigning it that role, and adding those users to that group.
In general, follow the access control configuration process described on this page to achieve this. Depending on your goal, you might need to follow parts of this process, rather than all of it.
Authentication for External Applications
External applications that connect to web services (created by Web Server input modules in Lasernet Core workflows) are authenticated via an app-registration-based “client credentials” authentication flow that is managed by Lasernet Config Server.
Like the user authentication and access control described above, configuring this access for external applications involves groups and security roles. For more information, see Set Up App-Registration-Based Access for External Applications.
Introduction to Lasernet Core Authentication and Access Control
In a basic Lasernet Core system, user authentication and access control is based on the following principles:
To use Lasernet Core and its associated applications, a user must select a Lasernet Config Server and then log in to it. For example, when they start Lasernet Developer, they must select a Lasernet Config Server and then enter a username and password to log in.
That person must log in as a “user” that is defined in the Config Server’s Users list.
That “user” must be a “member” of a “group” that is defined in the Config Server’s Groups list.
Each group is assigned one or more “security roles”. A security role specifies which Lasernet Core capabilities are given to the groups that are assigned that role.
So, in summary, when a user logs in to a Lasernet Config Server (for example, to access Manage or Lasernet Developer), they are granted access to the applications, capabilities, and features permitted by the security roles that their groups are assigned to.
Note
Instead of definining “local” users and groups in Lasernet Config Server (as described above), access can be controlled by the user identities and app roles externally defined in a supported identity provider (IdP) such as Microsoft Entra ID. In Lasernet Core systems that use this capability, users log in to Lasernet Config Server using the credentials that they use to authenticate with that IdP. For more information, see Guide to Configuring Microsoft Entra ID Authentication for Lasernet Core.
The admin User
Lasernet Config Server has a built-in admin user, Administrators group, and multiple All rights security roles (in categories such as Config & Developer and Logs). The admin user has full permission to use all Lasernet Core features and applications because it is a member of the Administrators group, which is a member of every All rights security role.
However, you might want to grant some Lasernet Core users fewer permissions. Or, you might want users of Lasernet Core to log in through user-specific accounts that identify them (for traceability of their actions). If so, create new users, groups, and security roles (if necessary), rather than use the admin user.
The Access Control Configuration Process
To enable users to access and use the Lasernet Core system with appropriate capabilities and restrictions, follow this process:
As well as providing steps for these tasks, this page describes concepts such as security roles. It also describes how to complete other user, group, and security configuration tasks (such as resetting a user’s password and deleting a group).
Note
Other security administration tasks (such as blocking a user from accessing Lasernet Core) are described in the Lasernet Core 11 Administration Guide.
Users
The following sections describe how to add a user, subsequently modify its configuration, and remove a user.
Add a User
To add a user, follow these steps.
Manage
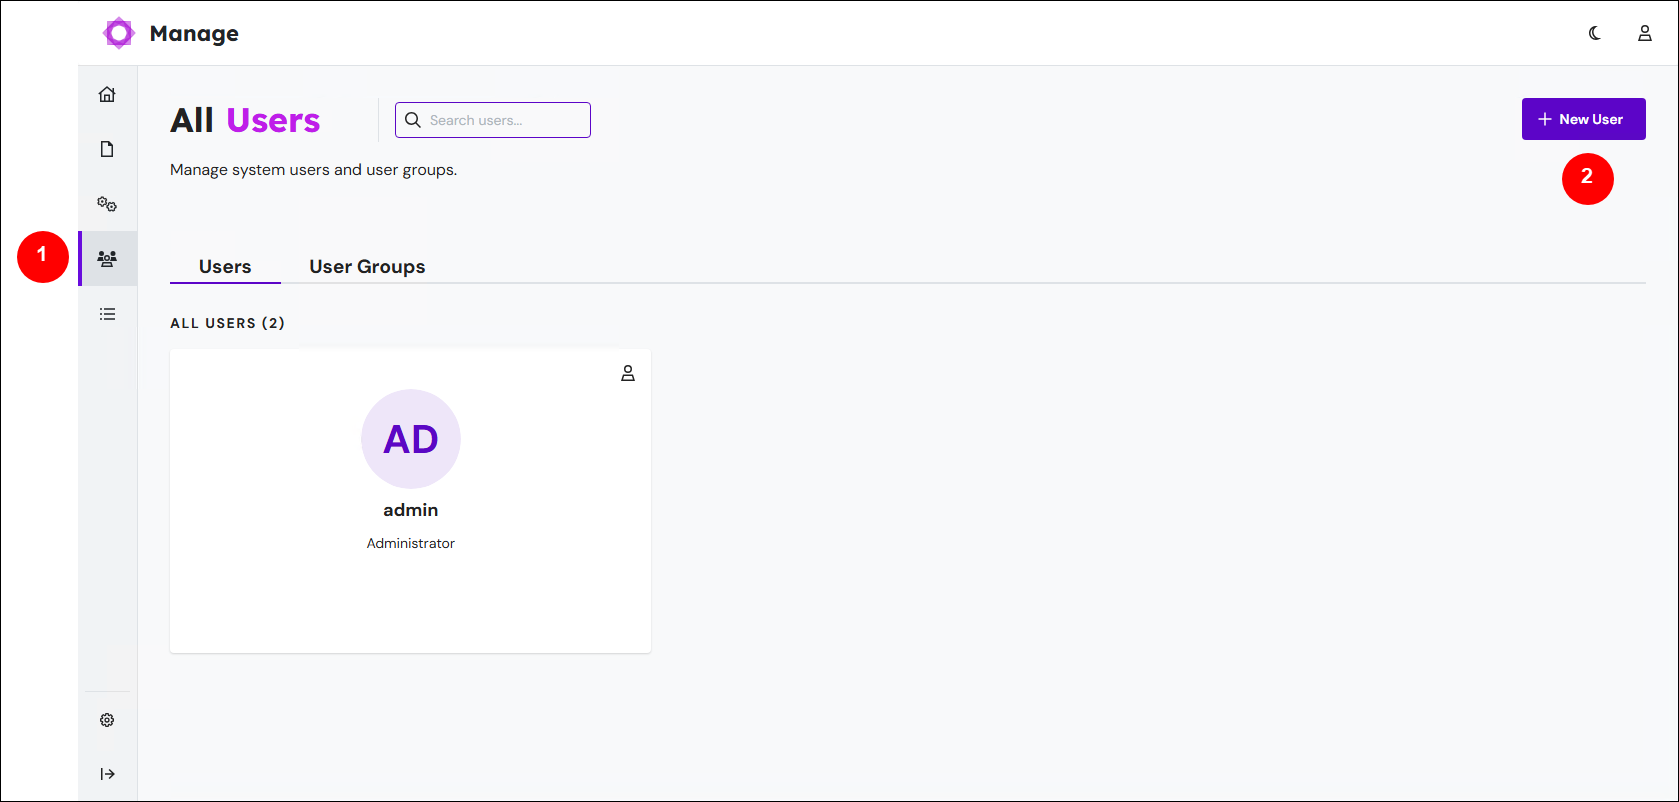
In the side menu, click User Management (see 1 in the image below).
Click New User (2).
In the Add User window, configure the new user:
Name: The name of the user.
Display Name: Lasernet Core displays this name in various user interface areas instead of Name.
Description: A description of the user. This property is optional.
Password: Enter a password for the user.
Change Password: To require the user to change their password when they next log in to Manage or a Lasernet Core application (such as Lasernet Developer), select this checkbox.
Active: To enable the new user to log in, select this checkbox.
Click Confirm.
Lasernet Config Web App
Note
The Lasernet Config web app was provided with earlier versions of Lasernet Core. It is a legacy web app and will be deprecated in a future version of Lasernet Core.
Expand for information
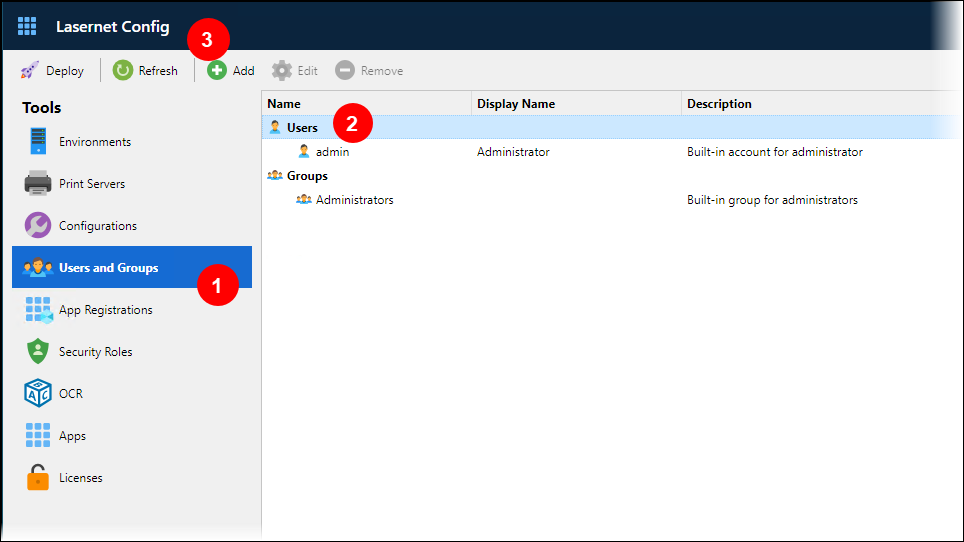
In the Tools menu, click Users and Groups (see 1, in the image below).
In the main area of the window, click Users (2).
In the toolbar, click Add (3).
In the Add User window, configure the new user:
Name: The name of the user.
Display Name: If supplied, Lasernet Core displays this name in various user interface areas instead of Name. If Display Name is blank, Lasernet Core displays the user’s Name.
Description: A description of the user. This property is optional.
Password: Enter a password for the user. If you leave Password blank, the user will have no password.
Disabled: To enable the new user to log in, clear this checkbox.
Change Password: When you create a new user, this checkbox is selected and cannot be cleared. As a result, the user must change their password when they next log in (to the Lasernet Config web app or Lasernet Developer).
Click OK.
Edit a User
To edit the properties of an existing user, follow these steps. This section also describes how to reset a user’s password.
Manage
In the side menu, click User Management.
On the All Users page, click the user that you want to edit.
.png)
In the user properties pane, change the user’s properties. The properties are described in Add a User.
Note
If you select Change Password, the user must change their password when they next log in (to the Lasernet Config web app or Lasernet Developer).
Note
Unlike the Add User window, there is no Password property. So, you cannot manually change the user’s password. However, you can reset their password (see instructions below).
Click Confirm to save your changes to the user’s properties.
Note
To protect the admin user, some user modifications are blocked. You cannot:
Change their Name.
Change their Description.
Clear the Active checkbox to prevent them logging in to Lasernet Core.
However, you can:
Change their Display Name.
Select Change Password (to force them to change their password when they next log in).
To reset a user’s password, follow these steps:
Click the menu button (three vertical dots) on their tile on the All Users page.
Click Reset password.

In the Are you sure? window, click Confirm.
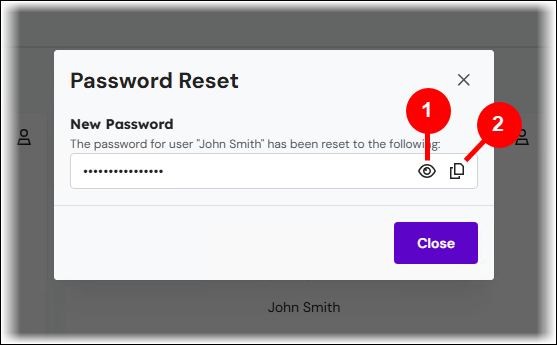
Lasernet Config Server changes the user’s current password to a random combination of letters and numbers. Manage displays the user’s new password (obscured for security) in a Password Reset window. To reveal the password, click the eye icon (1). To copy the new password to the clipboard, click the copy icon (2).
Note
The user will be asked to change their password when they next log in.
Click Close.
Lasernet Config Web App
Note
The Lasernet Config web app was provided with earlier versions of Lasernet Core. It is a legacy web app and will be deprecated in a future version of Lasernet Core.
Expand for information
On the Users and Groups page of the Lasernet Config web app, click the user.
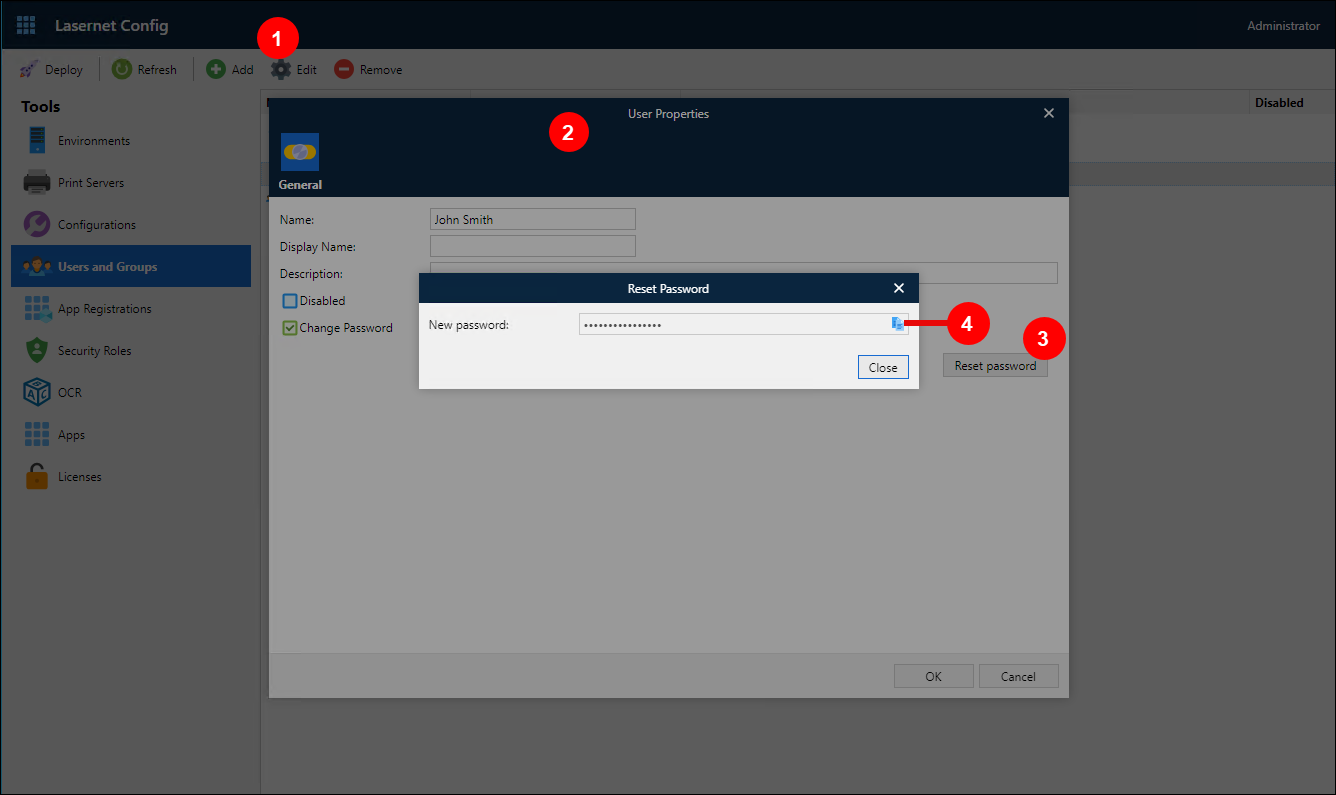
In the toolbar, click Edit (see 1, in the image below). Alternatively, double-click the user.
In the User Properties window (2), change the user’s properties. The properties are described above.
Note
Unlike the Add User window, Change Password can be selected and cleared. If you select Change Password, the user must change their password when they next log in (to the Lasernet Config web app or Lasernet Developer).
Note
Unlike the Add User window, there is no Password property. So, you cannot manually change the user’s password. However, you can reset their password (see following step).
To reset the user’s password:
Click Reset Password (3). Lasernet Config Server will change the user’s current password to a random combination of letters and numbers.
The Lasernet Config web app will display the user’s new password (obscured for security) in a Reset Password window. To copy the new password to the clipboard, click the copy icon (4).
Note
The user will be asked to change their password when they next log in.
Click Close.
Click OK to save your changes to the user’s properties.
Note
To protect the admin user, some user modifications are blocked. You cannot:
Change their Name.
Change their Description.
Select the Disabled checkbox to prevent them logging in to Lasernet Core.
However, you can:
Change their Display Name.
Select Change Password (to force them to change their password when they next log in).
Click Reset password.
Delete a User
To delete a user, follow these steps.
Manage
Click the menu button (three vertical dots) on their tile on the All Users page.
Click Delete.
In the Delete User? window, click Confirm.
Note
You cannot delete the admin user.
Lasernet Config Web App
Note
The Lasernet Config web app was provided with earlier versions of Lasernet Core. It is a legacy web app and will be deprecated in a future version of Lasernet Core.
Expand for information
On the Users and Groups page of the Lasernet Config web app, click the user.
In the toolbar, click Remove.
In the confirmation window, click OK.
Note
You cannot delete the admin user.
Groups
The following sections describe how to add a group, subsequently modify its name and description, manage its user membership, and remove a group.
Add a Group
To add a group, follow these steps.
Manage
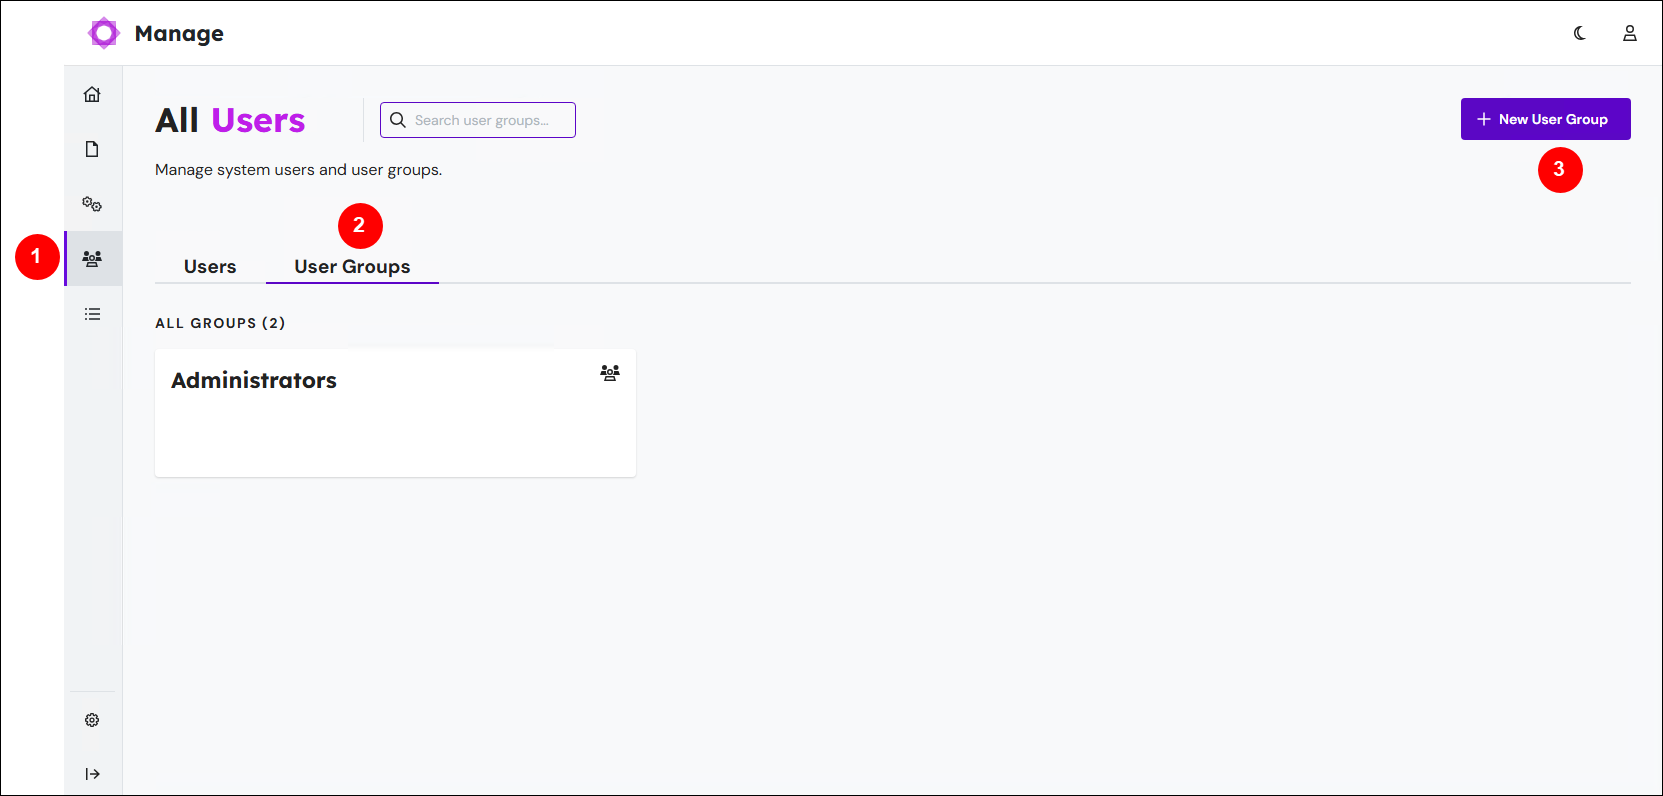
In the side menu, click User Management (see 1 in the image below).
Click the User Groups tab (2).
Click New User Group (3).
In the Add User Group window, configure the new group:
Name: The name of the group.
Description: A description of the group. This property is optional.
Click Confirm.
To add users to the group, see Edit a Group and Manage Its Membership.
Lasernet Config Web App
Note
The Lasernet Config web app was provided with earlier versions of Lasernet Core. It is a legacy web app and will be deprecated in a future version of Lasernet Core.
Expand for information
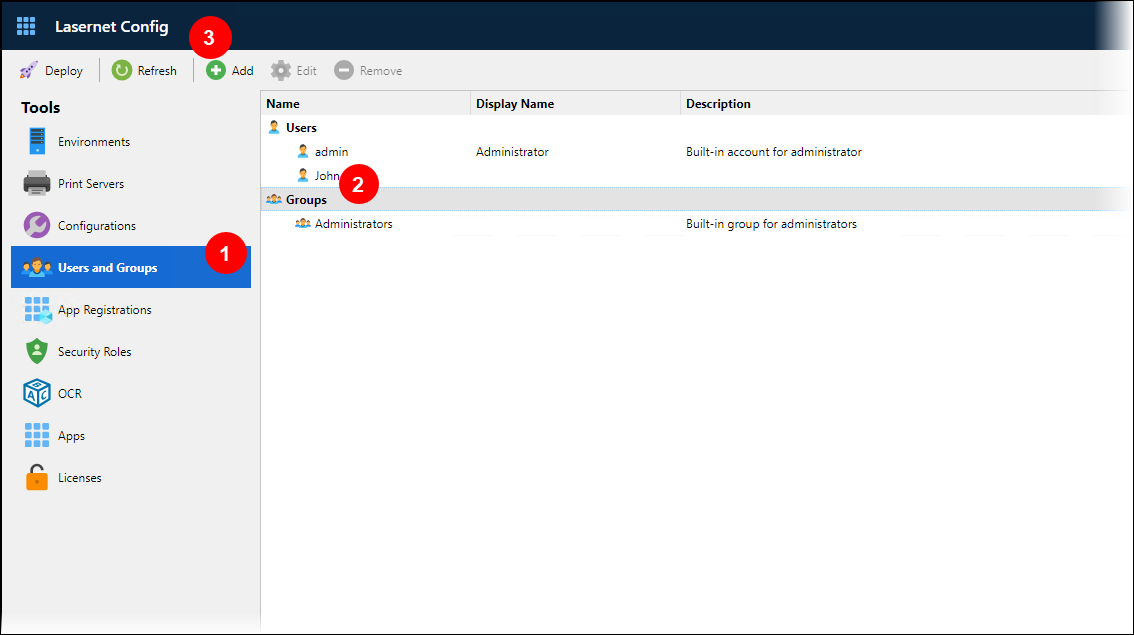
In the Tools menu, click Users and Groups (see 1, in the image below).
In the main area of the window, click Groups (2).
In the toolbar, click Add (3).
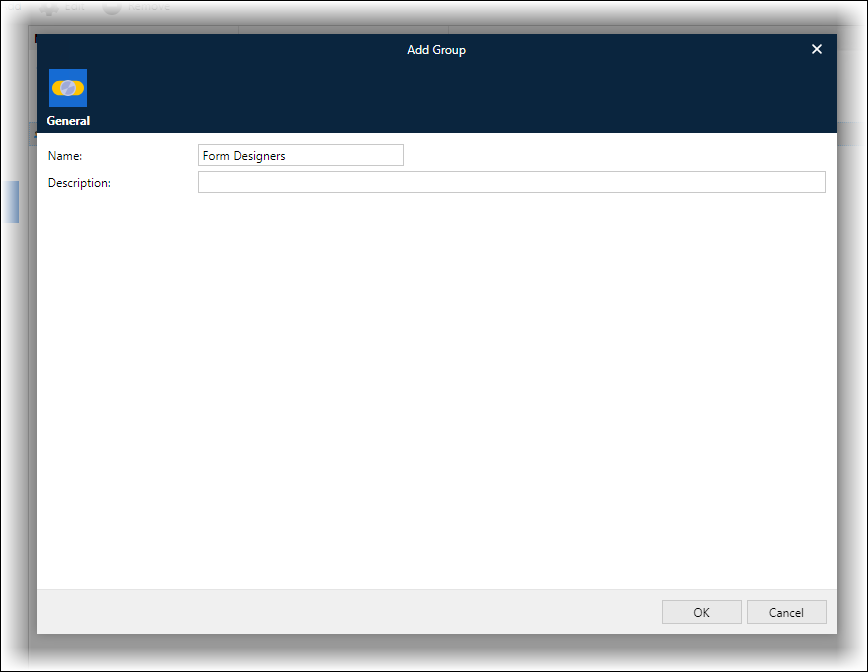
In the Add Group window, configure the new group:
Name: The name of the group.
Description: A description of the group. This property is optional.
Click OK to create the group.
To add users to the group, see Edit a Group and Manage Its Membership.
Edit a Group and Manage Its Membership
To change a group’s name or description, or modify its membership, edit the group.
Manage
In the side menu, click User Management (see 1 in the image below).
Click the User Groups tab (2).
Click the group that you want to edit. The group properties pane opens.
.png)
In the General area of the pane (3), change the group’s Name and Description.
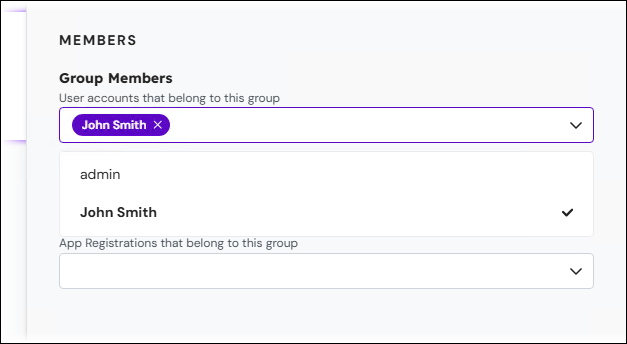
In the Members area of the pane (4), you can add and remove users from the group:
Add a user to the group: Click a blank part of the Group Members list and select users from the list. Manage adds them to the member list.
Remove a user from the group: Click the x beside the group member’s name.
Click Confirm.
Lasernet Config Web App
Note
The Lasernet Config web app was provided with earlier versions of Lasernet Core. It is a legacy web app and will be deprecated in a future version of Lasernet Core.
Expand for information
In the Tools menu, click Users and Groups.
Click the group that you want to work with, then in the toolbar, click Edit (see 1, in the image below). The Group Properties window opens.
On the General tab (2) of the Group Properties window, you can change the group’s Name and Description.
On the Members tab (3), you can add and remove users from the group:
Add a user to the group:
On the Members tab, click Add (4).
In the Add Group Member window, use the list to select the user that you want to add to the group (5).
Click OK. The user is added to the user list on the Members tab.
.png)
Remove a user from the group: Click the user on the Members tab, then click Remove.
Warning
Do not remove the admin user from the Administrators group.
Click OK to close the Group Properties window and save your group changes.
Note
The App Registration tab in the Group Properties window relates to app-registration-based authentication and access control for external applications. This capability is described in Set Up App Registration Based Access for External Applications.
Delete a Group
To delete a group, follow these steps.
Manage
Click the menu button (three vertical dots) on the group’s tile on the Users Groups tab.
Click Delete.
In the Delete User Group? window, click Confirm.
Note
You cannot delete the Administrators group.
Lasernet Config Web App
Note
The Lasernet Config web app was provided with earlier versions of Lasernet Core. It is a legacy web app and will be deprecated in a future version of Lasernet Core.
Expand for information
On the Users and Groups page of the Lasernet Config web app, click the group.
In the toolbar, click Remove.
In the confirmation window, click OK.
Note
You cannot delete the Administrators group.
Security Roles
A security role defines the Lasernet Core capabilities that are available to the members of the groups that are assigned that role.
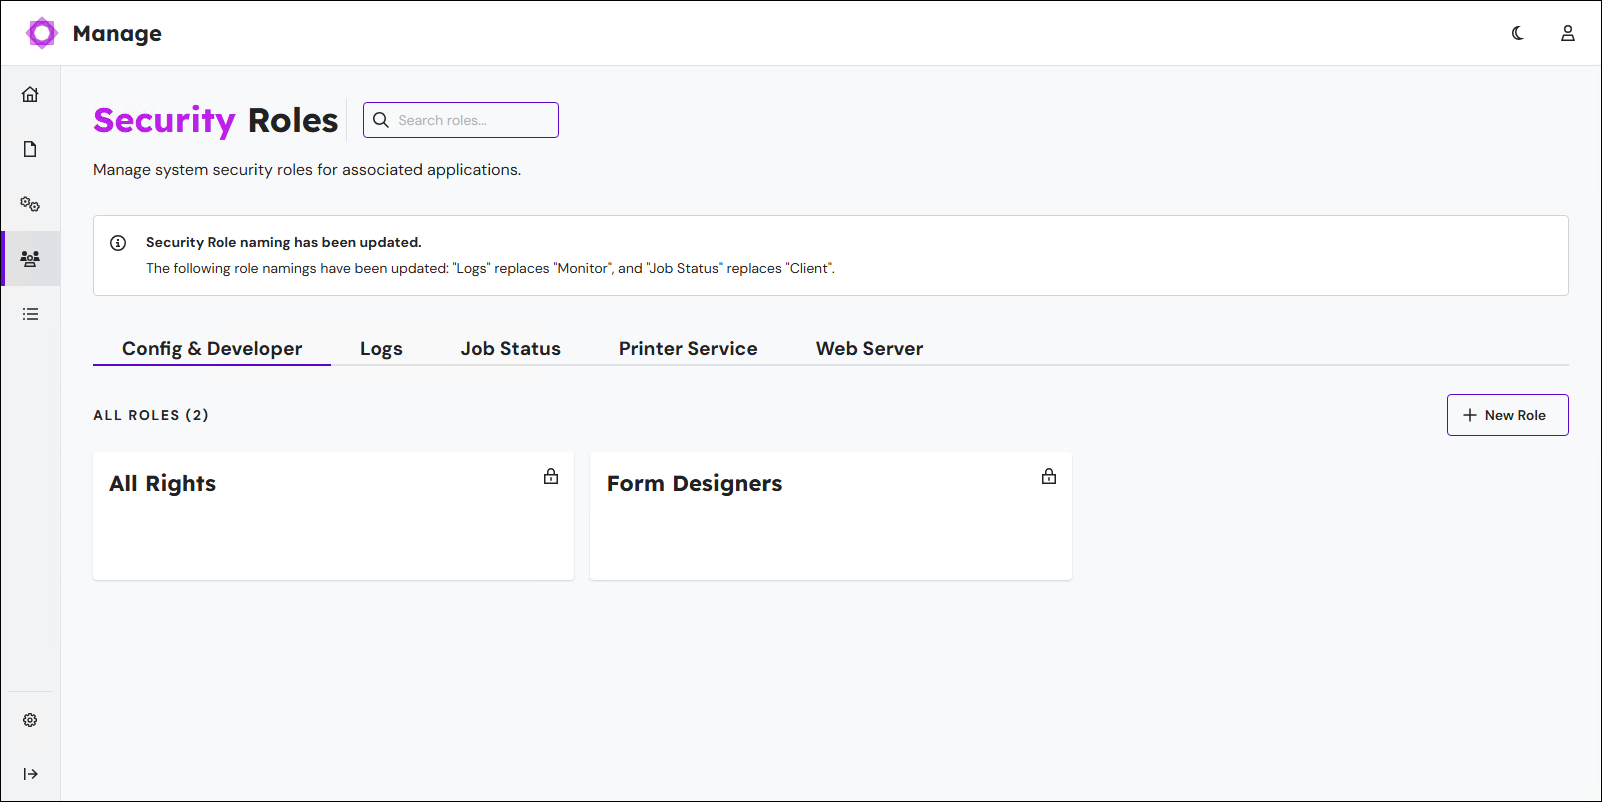
You manage security roles on the Security Roles page of the Lasernet Core administration tool.
Manage
Lasernet Config Web App
Note
The Lasernet Config web app was provided with earlier versions of Lasernet Core. It is a legacy web app and will be deprecated in a future version of Lasernet Core.
Expand for image
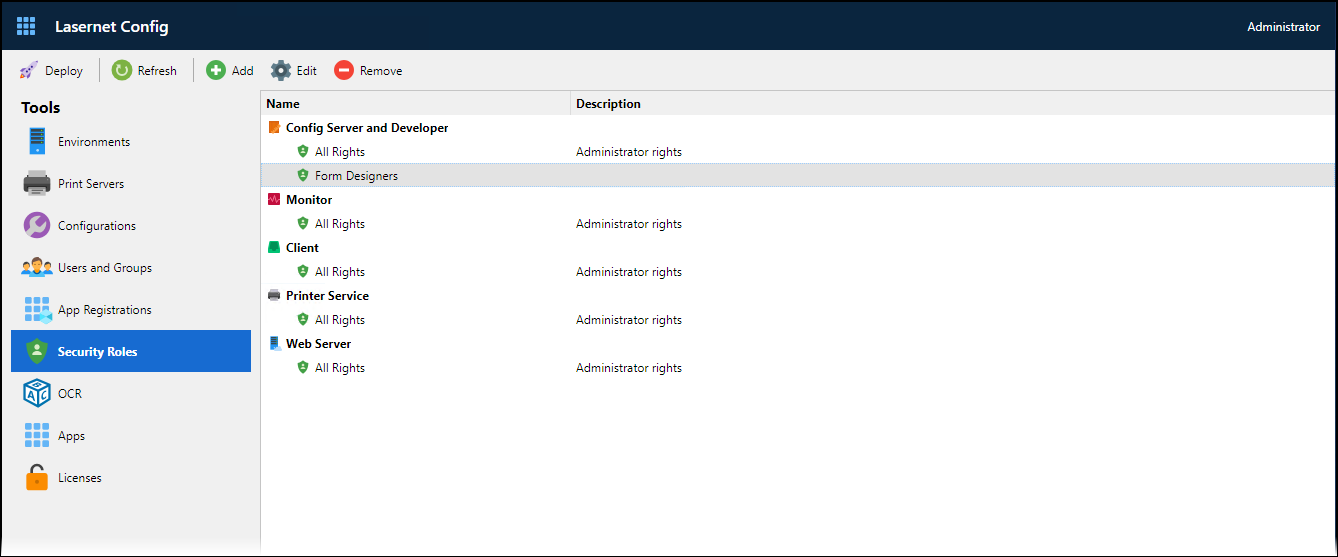
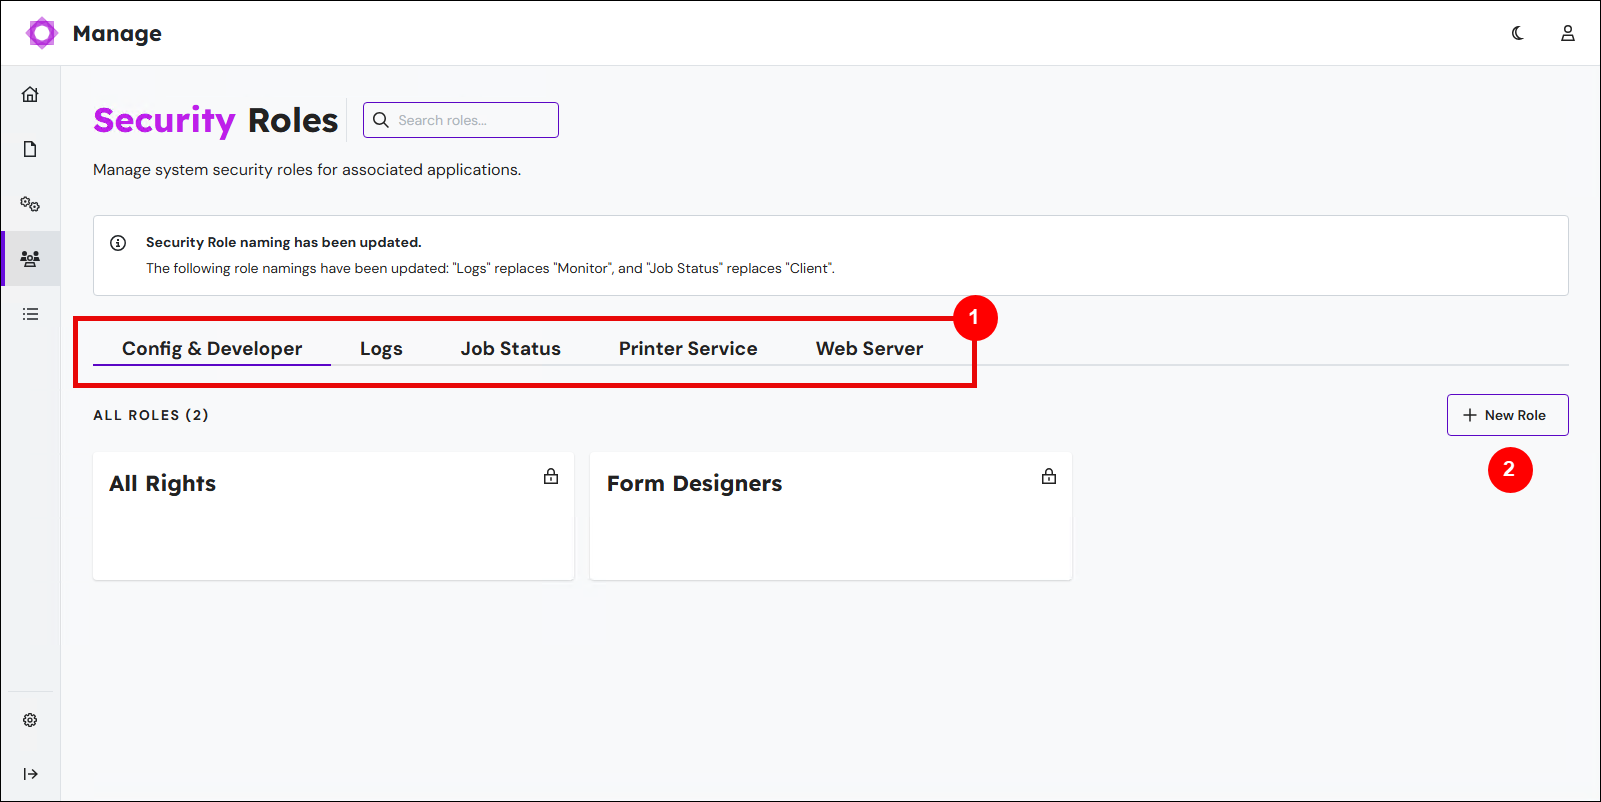
Security Role Categories
The security roles defined on the Security Roles page are organized into five categories. Each of these categories relates to a particular Lasernet Core application or service (or group of applications), and contains one or more security roles. These roles control permissions to access capabilities of that application (or access the application or service itself).
For more information about each category, see its explanatory section on this page:
Each category contains an All Rights security role, in addition to any custom security roles that have been defined.
The All Rights Security Roles
Each category contains an All Rights security role. These roles grant full access to the users who have the role. The configuration of these roles has every permission option enabled, and you cannot remove permissions from these roles.
They provide the admin user with full system access. As a result, by default, the Administrators group is a member of every All Rights security role.
Warning
Do not remove the Administrators group from the Members list of any All Rights role.
You can add other groups to the Members list for the All Rights roles.
However, to provide users with a smaller set of capabilities that more closely match their requirements, you must create custom security roles and add appropriate groups to those roles.
Custom Security Roles
You can create custom security roles that provide a specific set of permissions that are more restrictive than the All Rights security roles, and consequently are more appropriate for the requirements of particular non-administrative users.
For example, you might want a particular set of users to be able to deploy Lasernet Core configurations to Test and Development environments through Manage and create configurations in Lasernet Developer. But you might also want those users to be unable to modify the Config Server’s licensing and security role configuration through Manage or deploy Lasernet Core configurations to the Production environment.
You could grant users the permission set described in the example above by creating appropriately configured custom security roles, and then adding the group (that the users are members of) to those new security roles.
A custom security role has multiple permission options that you can configure appropriately. For a description of each permission option provided by a custom security role, refer to the role category-specific information in the Security Role Permissions Reference part of this page:
Add a Security Role
To add a security role, follow these steps.
Manage
In the side menu, click User Management and then Security Roles.
.png)
Click the tab for the category that you want to add a role to (see 1 in the image below).
Click New Role (2).
Enter a Name and Description for the security role.
Click Confirm to create the security role. Manage adds a tile for that role in the relevant tab.
By default, the new security role provides full permissions (like the All Rights groups), and it has no members. So, to appropriately modify the new security role’s permission options and add groups to the role, you must edit the security role.
Lasernet Config Web App
Note
The Lasernet Config web app was provided with earlier versions of Lasernet Core. It is a legacy web app and will be deprecated in a future version of Lasernet Core.
Expand for information
In the Tools menu, click Security Roles (see 1 in the image below).
.png)
In the main area of the window, click the category that you want to add a security role to. For example, Config Server and Developer.
In the toolbar, click Add (2).
Enter a Name and Description for the security role.
Click OK to create the security role.
By default, the new security role provides full permissions (like the All Rights groups), and it has no members. So, to appropriately modify the new security role’s permission options and add groups to the role, you must edit the security role.
Edit a Security Role
When you edit a security role, it is usually for one of the following three reasons. Follow the steps for your task:
Change the role’s Name or Description.
Change the role’s permissions configuration.
Change the role’s member list.
Change a Security Role’s Name or Description
To change a security role’s Name or Description, follow these steps.
Manage
In the side menu, click User Management and then Security Roles.
Click the role category tab that contains the role that you want to edit.
Click the role that you want to edit. The role properties pane opens.
.png)
In the General area of the pane, change the group’s Name and Description.
Click Confirm.
Lasernet Config Web App
Note
The Lasernet Config web app was provided with earlier versions of Lasernet Core. It is a legacy web app and will be deprecated in a future version of Lasernet Core.
Expand for information
In the Tools menu, click Security Roles.
In the main area of the window, click the security role that you want to modify.
In the toolbar, click Edit.
On the General tab of the properties window, change Name or Description.
Click OK.
Change a Security Role’s Permission Configuration
To change a security role’s permission configuration, follow these steps
Manage
In the side menu, click User Management and then Security Roles.
Click the role category tab that contains the role that you want to edit.
Click the role that you want to edit. The role properties pane opens.
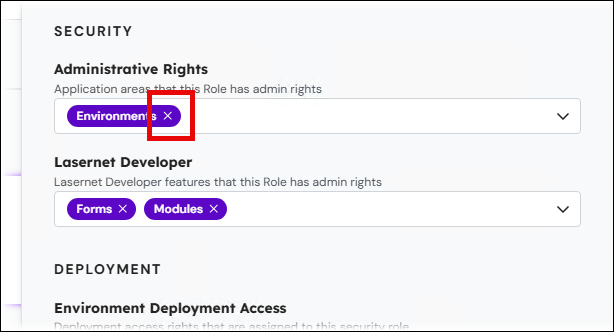
In the appropriate areas of the pane (Security, Deployment, or Environments), add or remove items to configure the role’s permissions.
Add items: Click a blank part of the list and select an item from the list. Manage adds it to the permission list.
Remove items: Click the x beside the item.
Note
For a description of the permissions, refer to the permissions reference section that corresponds to this security role’s category:
Click Confirm.
Lasernet Config Web App
Note
The Lasernet Config web app was provided with earlier versions of Lasernet Core. It is a legacy web app and will be deprecated in a future version of Lasernet Core.
Expand for information
In the Tools menu, click Security Roles.
In the main area of the window, click the security role that you want to modify.
In the toolbar, click Edit.
Depending on the security role’s category, the tabs that you use to configure permissions differ. On the appropriate tabs (Security, Deployment, or Environments), select or clear checkboxes to appropriately configure the role’s permissions. For some categories, there are no permissions tabs and a group’s membership of the role confers permissions. For a description of each category and the tabs and permissions that appear in the role properties window (if applicable), refer to the permissions reference section that corresponds to the security role’s category:
Click OK.
Add or Remove Groups from a Security Role
To add or remove groups from a security role, follow these steps.
Manage
In the side menu, click User Management and then Security Roles.
Click the role category tab that contains the role that you want to edit.
Click the role that you want to edit. The role properties pane opens.
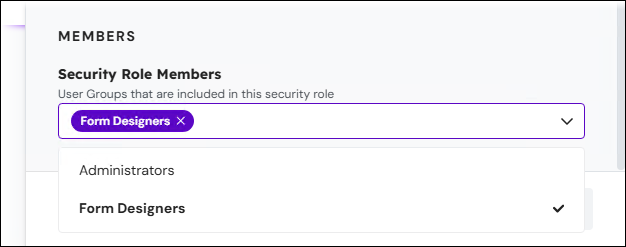
In the Members area of the pane, add or remove groups to specify which groups have this role.
Add groups: Click a blank part of the list and select a group from the Security Role Members list. Manage adds it to the members list.
Remove groups: Click the x beside the group.
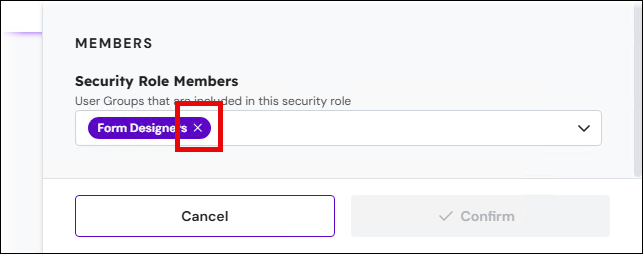
Click Confirm.
Lasernet Config Web App
Note
The Lasernet Config web app was provided with earlier versions of Lasernet Core. It is a legacy web app and will be deprecated in a future version of Lasernet Core.
Expand for information
In the Tools menu, click Security Roles (see 1 in the image below).
.png)
In the main area of the window, click the security role that you want to modify (2).
In the toolbar, click Edit (3).
On the Members tab (4), add and remove groups from the role:
Add a group to the role:
Click Add (5).
In the Add Role Member window, use the list to select the group that you want to add to the role (6).
Click OK. The group is added to the member list.
Remove a group from the role: Click the group on the Members tab and then click Remove.
Click OK.
Security Role Permissions Reference
Config & Developer
The security roles in the Config Server and Developer category:
Control access to areas of Manage (and the Lasernet Config web app). For example, access to the User Management area of Manage, and access to the Grab area in an environment’s properties pane.
Control access to areas of the Lasernet Developer application. For example, access to the Scripts and Modifiers areas of Lasernet Developer.
Control which environments the user can deploy configurations to. For example, if there are three environments (Development, Test, and Production), a security role can be configured to allow users to deploy configurations to the Development and Test environments but not the Production environment.
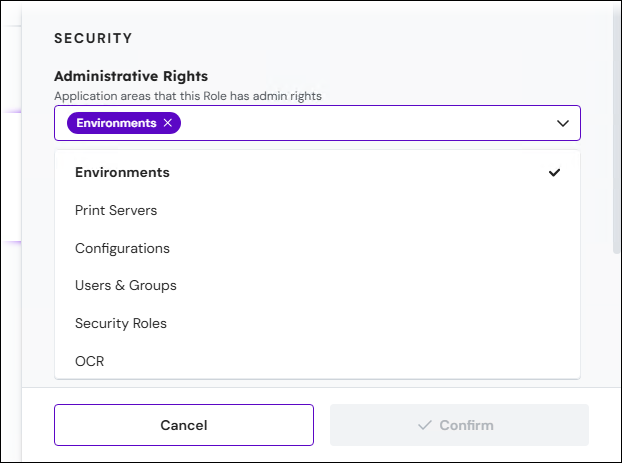
Administrative Permissions
In Manage, the Administrative Rights list in the Security area of a security role’s properties pane controls permissions to:
Access various administrative tools in Manage.
Access administrative tools in Lasernet Developer.
.png)
In the Lasernet Config web app, the checkboxes in the Administrative rights area of the Security tab (of a role’s properties window) controls permissions to:
Access various administrative tools in the Lasernet Config web app.
Access administrative tools in Lasernet Developer.
Permission | Description |
|---|---|
Environments | Scope of Permission User’s ability to:
Effect in Manage Controls whether the Environments and Licenses tabs in the System Configuration area are available. Effect in the Lasernet Config Web App Controls whether the Environments and Licenses pages of the Lasernet Config web app are available. |
Configurations | Scope of Permission User’s ability to administer the configurations that Lasernet Config Server manages and view their revision history. Effect in Manage Controls whether the Configurations tab in the System Configuration area is available. Effect in the Lasernet Config Web App Controls whether the Configurations page of the Lasernet Config web app is available. |
Security Roles | Scope of Permission User’s ability to add, remove, and manage security roles (including changing their permission configuration and adding groups to the role’s member list). Effect in Manage Controls whether the Security Roles page in the User Management area is available. Effect in the Lasernet Config Web App Controls whether the Security Roles page of the Lasernet Config web app is available. |
Grab | Scope of Permission User’s ability to:
Effect in Manage Controls whether the Grab area of the properties pane for an environment is displayed. Effect in the Lasernet Config Web App Controls whether the Edit Environment window contains a Grab tab. Effect in Lasernet Developer and Form Editor Controls whether the Grab toolbar is displayed in Lasernet Form Editor. If the user has this permission, they can start and stop grab mode through Lasernet Form Editor. Controls whether the user can import and download grab data in Lasernet Developer and Form Editor. If a user does not have this access, they will see an Access not allowed error message if they use the grab import functionality. |
Print Servers | Scope of Permission User’s ability to manage the name of Windows printer servers and connection strings for printing via cloud or on-premises. Effect in Manage Controls whether the Print Servers page in the System Configuration area is available. Effect in the Lasernet Config Web App Controls whether the Print Servers page of the Lasernet Config web app is available. |
Users and groups | Scope of Permission User’s ability to add, remove, and configure users and groups (as described on this page) and manage app registrations. Effect in Manage Controls whether the All Users page is available. Effect in the Lasernet Config Web App Controls whether the Users and groups and App Registration pages of the Lasernet Config web app are available. |
OCR | Scope of Permission User’s ability to manage OCR form lists and OCR identifiers. Effect in Manage Controls whether the OCR page in the System Configuration area is available. Effect in the Lasernet Config Web App Controls whether the OCR page of the Lasernet Config web app is available. |
Note
If a security role has none of the above permissions, users that are assigned that role:
Can log in to Manage but none of the pages are available.
Cannot log in to the Lasernet Config web app.
Lasernet Developer Permissions
In Manage, the Lasernet Developer list in the Security area of a security role’s properties pane controls permissions to access various areas of Lasernet Developer.
.png)
In the Lasernet Config web app, the checkboxes in the Lasernet Developer area of the Security tab (of a role’s properties window) controls permissions to access various areas of Lasernet Developer.
Permission | Description |
|---|---|
Environments | Scope of Permission User’s ability to add, edit, and remove environment settings from a Lasernet Core configuration. Effect in Lasernet Developer Controls whether Environments (in the Tools bar and in the View menu) and the Environments panel are displayed to the user in Lasernet Developer. |
Forms | Scope of Permission User’s ability to:
Effect in Lasernet Developer Controls whether Forms, Subforms, and Phrases (in the Tools bar and in the View menu) are displayed to the user in Lasernet Developer. Controls whether Printer Profiles, Regional Profiles, and Barcode Profiles (on the Profiles tab of the Tools bar and in the View menu) are displayed in Lasernet Developer. |
Scripts | Scope of Permission User’s ability to create and manage JavaScript scripts. Effect in Lasernet Developer Controls whether Scripts (in the Tools bar and in the View menu) are displayed to the user in Lasernet Developer. |
Modifiers | Scope of Permission User’s ability to create and manage modifiers. Effect in Lasernet Developer Controls whether Modifiers (in the Tools bar and in the View menu) are displayed to the user in Lasernet Developer. |
Modules | Scope of Permission User’s ability to access the module list and use those modules to build and maintain the workflow for the Lasernet Core configuration loaded in Lasernet Developer. Effect in Lasernet Developer Controls whether Modules (in the Tools bar and in the View menu) are displayed to the user in Lasernet Developer. |
Resources | Scope of Permission User’s ability to access the resource library in the Lasernet Core configuration loaded in Lasernet Developer. Effect in Lasernet Developer Controls whether Resources (in the Tools bar and in the View menu) are displayed to the user in Lasernet Developer. |
Commands | Scope of Permission User’s ability to create and manage connections and commands. Effect in Lasernet Developer Controls whether Commands (in the Tools bar and in the View menu) are displayed to the user in Lasernet Developer. |
Profiles | Scope of Permission User’s ability to access or manage any type of profile in Lasernet Developer. Effect in Lasernet Developer Controls whether the profile section is displayed in the Tools bar and in the View menu in Lasernet Developer. |
Note
If a user is not granted access to the Lasernet Developer areas that enable them to add, edit, and remove particular type of object, they have no ability to do those actions in Lasernet Developer. This restriction applies also to importing and exporting objects.
However, users that have restricted rights to add, edit, or delete particular types of object can still access (and add, if applicable) all object types to the configuration from the following dialogs in the editors:
Modifier events
Overlays
Grab file dialog
Connections
Destinations
Scripts
Deployment Permissions
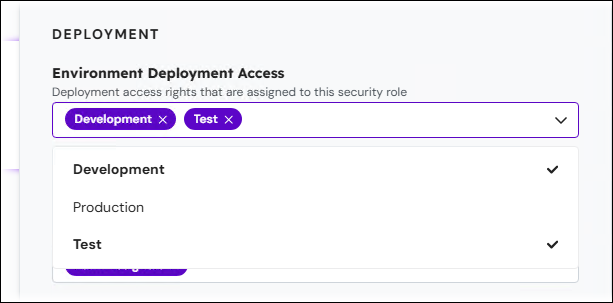
In Manage, the Environment Deployment Access list in the Deployment area of a security role’s properties pane specifies which environments the user can deploy Lasernet Core configurations to.
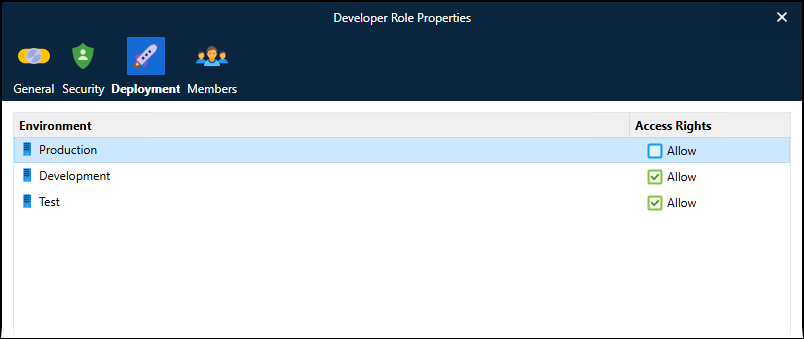
In the Lasernet Config web app, the checkboxes in the Access Rights column (on the Deployment tab) specify which environments the user can deploy Lasernet configurations to.
In the following example, users who have this role can deploy configurations to the Test and Development environments, but not the Production environment. This permission affects Manage, the Lasernet Config web app, and Lasernet Developer.
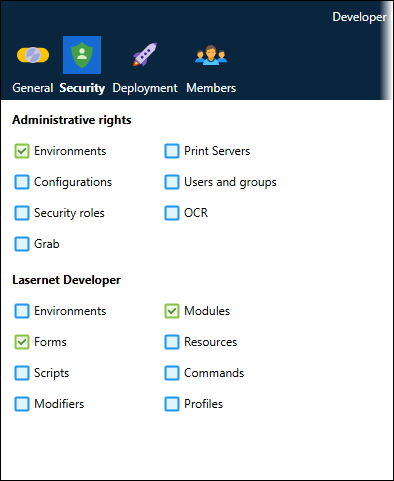
Example of a Config & Developer Security Role
In this example of a Config & Developer security role:
Environments and Print Servers are selected in the Administrative Rights list.
Environments, Forms, and Scripts are selected in the Lasernet Developer list.
Test and Development are selected in the Environment Deployment Access list.
.png)
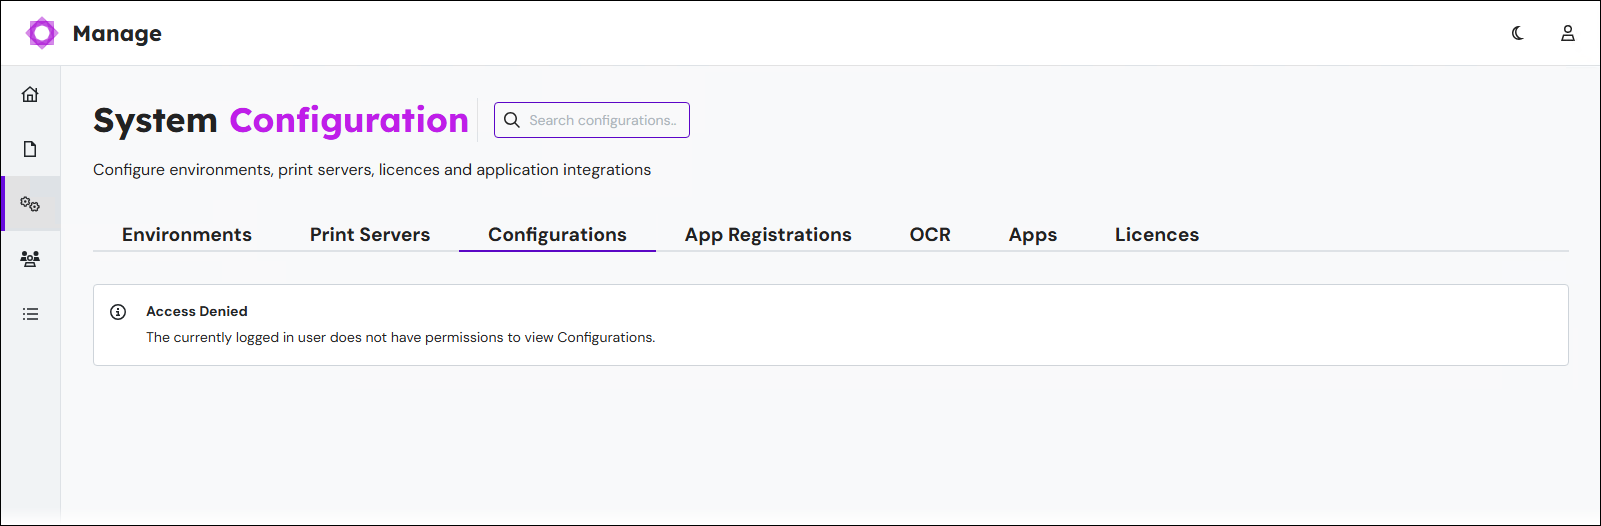
As a result, in Manage, the user can access only the Environments (and Licenses) pages and the Print Servers page. Other pages are not available.
.png)
If they click Deploy in Manage, they can deploy a Lasernet Core configuration only to the Test and Development environments.
In Lasernet Developer, they have access to only the Environments, Forms (and Subforms and Phrases), and Scripts areas in the Tools area, and the corresponding items in the View menu. Other areas such as the Resources area, and the profile administration tools, are not displayed.
.png)
Also, from Lasernet Developer, they can deploy configurations only to the Test and Development environments.
Logs (Monitor in the Lasernet Config Web App)
The effect of this role differs in Manage and the Lasernet Config Web App.
Manage
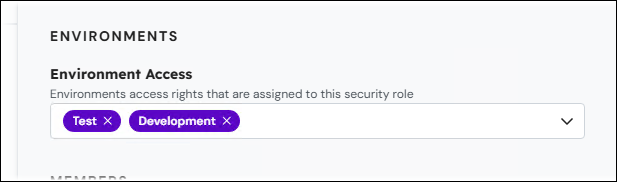
Security roles in the Logs category in Manage determine which environments a user has access to through the Logs area of Manage and the Lasernet Monitor application.
In the Environments area of the security role’s properties pane, select environments in the Environment Access list.
Lasernet Config Web App
Note
The Lasernet Config web app was provided with earlier versions of Lasernet Core. It is a legacy web app and will be deprecated in a future version of Lasernet Core.
Expand for information
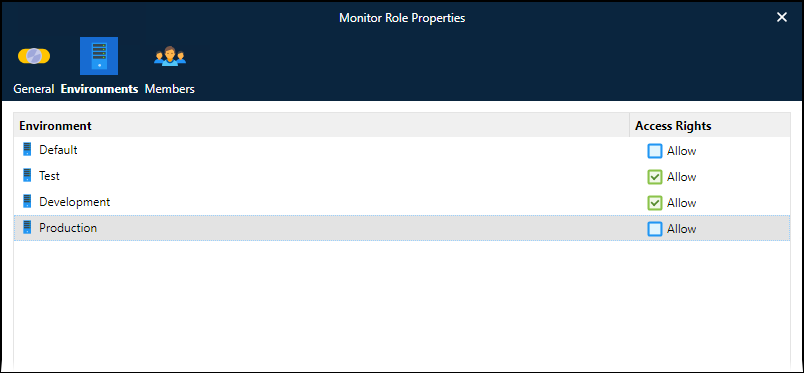
Security roles in the Monitor category in the Lasernet Config Web App determine which environments a user has access to through the Lasernet Monitor application.
On the Environments tab, the checkboxes in the Access Rights column specify which environments the user has access to.
Job Status (Client in the Lasernet Config Web App)
Security roles in the Job Status category determine a user’s capabilities in the Job Status area of Manage.
In the Environments area of the security role’s properties pane, the Environment Access list specifies which environments the user can control in the Job Status area.
In the Security area, select the Administrator checkbox to grant a user full administrative control in the Job Status area.
Administrative rights grant the user:
Visibility of all jobs in in the Job Status area. Non-administrative users see only particular jobs there.
The ability to delete jobs.
The ability the change the JobInfos for jobs, and add and remove file attachments for jobs.
Note
If the Administrator checkbox is selected for a user’s role, the user is granted the full set of permissions described above. As a result, the Write and Delete checkboxes in the Members area of the pane have no effect on that user.
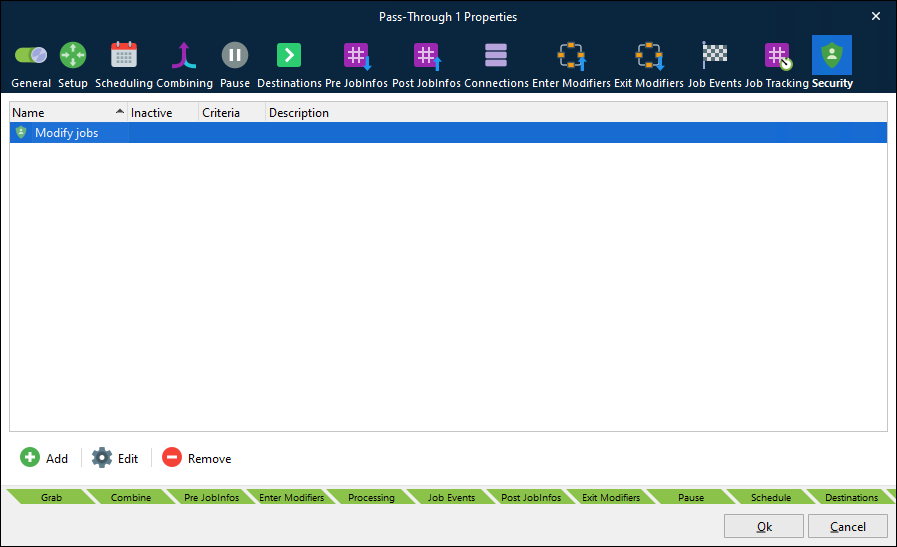
In the Members area of the pane, you select the groups to assign the role to. For each member group, Access Rights checkboxes (Write and Delete) specify the control that the users in these groups have over jobs in the Job Status area:
Write: The user can change the JobInfos for jobs.
Delete: The user can delete jobs.
The Write and Delete rights apply only if the Administrator checkbox is not selected, meaning that the members of the groups who have this role are non-administrative users. These users will not see any jobs in the Job Status area unless the Job Status security role that they are a member of is added to the Security tab of a module (in the configuration that the Lasernet Core environment is running). This configuration change is done in Lasernet Developer. After that configuration is deployed to the Lasernet Core environment, jobs appear in the Job Status area for users who have that role. For example, they will see jobs that are paused at the module that their role was added to.
Printer Service
Security roles in the Printer Service category determine which printer services the user can work with in the Lasernet Printer Service application.
In Manage, in the Deployment area of the security role’s properties pane, select print servers in the Printer Server Access list.
In the Lasernet Config web app, on the Deployment tab of the security role’s properties window, select the Allow checkbox to grant users access to the corresponding printer service instance.
Web Server
This category controls the ability for external applications to connect to the web services created by Web Server input modules in Lasernet Core workflows.
Configuring Lasernet Config Server to apply this security role to authenticated external applications is part of a larger process for setting up app-registration-based access for external applications. For instructions, see Set Up App-Registration-Based Access for External Applications.
Delete a Security Role
To delete a security role, follow these steps.
Manage
In the side menu, click User Management and then Security Roles.
Find the role that you want to delete.
Click the menu button (three vertical dots) on the role’s tile.
Click Delete.
In the Delete Security Role? window, click Confirm.
Note
You cannot delete any All Rights security roles.
Lasernet Config Web App
Note
The Lasernet Config web app was provided with earlier versions of Lasernet Core. It is a legacy web app and will be deprecated in a future version of Lasernet Core.
Expand for information
On the Users and Groups page of the Lasernet Config web app, click the security role.
In the toolbar, click Remove.
In the confirmation window, click OK.
Note
You cannot delete any All Rights security roles.
Next Steps
The next step of the Lasernet Core 11 installation and setup process is to do any necessary additional Lasernet Core environment configuration (grab mode and logging).