Configure Lasernet Web Client
- 18 Dec 2025
- 3 Minutes to read
- Contributors


- Print
- PDF
Configure Lasernet Web Client
- Updated on 18 Dec 2025
- 3 Minutes to read
- Contributors
- Print
- PDF
Article summary
Did you find this summary helpful?
Thank you for your feedback
On the server that will run the Lasernet Web Client server, you must use Lasernet Service Manager to configure the Lasernet Web Client 11 Windows service.
When you install Lasernet Web Client on a server, the installer automatically creates and starts a Lasernet Web Client 11 Windows service.
Tip
For information about how to use the Lasernet Web Client tool, see Lasernet Web Client Guide.
Steps
To configure the Lasernet Web Client server, follow the quick start process or the full installation and setup process on this page.
Note
About the quick start process: The quick start process is a simpler route to an operational Lasernet system and it requires only basic IT knowledge. However, it results in a system that is suitable only for demonstration or trial purposes. For more information about the quick start process (and its inherent compromises), see the main Lasernet 11 Installation and Setup Guide page.
About the full installation and setup process: The full installation and setup process describes all available installation and setup options and is suitable for setting up production Lasernet systems. However, parts of it require some IT and database administration knowledge.
Quick Start
The default configuration of the Lasernet Web Client service is suitable for the quick start installation process. You do not need to modify any Lasernet Web Client settings.
The next step of the process is to sign in to the Lasernet Config app, so that you can continue the Lasernet system setup process.
Full Installation and Setup Process
On the server that is running the Lasernet Web Client 11 service, open the Windows Start menu, open the Lasernet 11 folder, then click Lasernet Service Manager 11. The Lasernet Service Manager 11 window opens.
Double-click the Lasernet Web Client 11 row. The configuration window opens.
If the Lasernet Web Client 11 service is running on a different server to the Lasernet Config 11 service: On the General tab, enter the hostname of the server that is hosting the Lasernet Config 11 service (with a fully qualified domain name) in the Config server host name box.
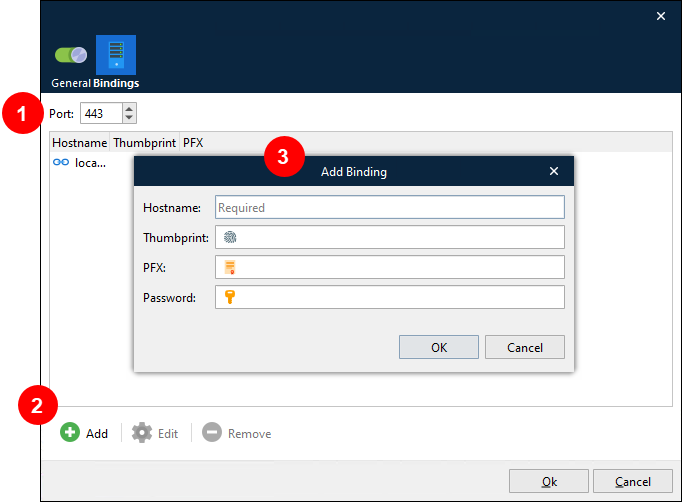
On the Bindings tab, ensure that the Port number (see 1 in the image below) matches Lasernet Config Server’s port number.
Note
In most situations, the default port number (443) is suitable. Modify the port number only if necessary to prevent port conflicts with other software running on the same server.
If the Lasernet Web Client 11 service is running on a different server to the Lasernet Config 11 service: If necessary, specify the hostnames to bind a local server certificate to. The Lasernet Web Client service will use the certificate to prove the server’s identity. The certificate also provides encryption keys to secure communication between the server and the client. The Lasernet Web Client service uses certificates installed in the Windows certificate store (in the Computer certificates area) or certificates stored on disk as PFX files. You must create a binding for every hostname that clients use to connect to the Web Client.
Note
You can skip this step if the Lasernet Web Client 11 service is running on the same server as the Lasernet Config 11 service.
Note
If no bindings are configured, Lasernet will autogenerate self-signed certificates for
localhost,<server name>and the server’s fully qualified domain name (FQDN).To specify a binding, follow these steps:
Click Add (see 2 in the image above).
In the Add Binding window (3), enter a Hostname. This is the hostname that the certificate will be bound to. Valid values for Hostname are a hostname (without a domain specified), a FQDN, or an IP address.
Provide certificate details:
If Thumbprint is supplied, the certificate (in the Windows certificate store) with the specified thumbprint will be used.
PFX is the path and filename to a certificate (including private key) that is stored in PFX format. Password is the password for the PFX file.
If you leave both Thumbprint and PFX blank, a self-signed certificate for the specified Hostname will be generated and stored in the Windows Certificate Store.
Click OK to save the binding.
Note
Repeat these steps for every hostname that clients will use to connect to Lasernet Web Client. For example, some clients might connect to
localhost, whereas other clients might connect to the server’s FQDN. If necessary, multiple bindings can point to the same certificate.Click OK to close the configuration window. Lasernet Service Manager will ask you if you want to restart the Lasernet Web Client 11 service (to apply your changes).
The next step of the Lasernet 11 installation and setup process is to sign in to the Lasernet Config app, so that you can continue the Lasernet system setup process.