Configure Lasernet Config Server
- 05 May 2026
- 9 Minutes to read
- Contributors


- Print
- PDF
Configure Lasernet Config Server
- Updated on 05 May 2026
- 9 Minutes to read
- Contributors
- Print
- PDF
Article summary
Did you find this summary helpful?
Thank you for your feedback
On the server that will run Lasernet Config Server, you must use Lasernet Service Manager to configure the Lasernet Config 11 Windows service. The main parts of this task include configuring Lasernet Config Server’s database connection and specifying which Lasernet Core environments it will manage.
When you install Lasernet Config Server on a server, the installer automatically creates and starts a Lasernet Config 11 Windows service.
Steps
To configure Lasernet Config Server, follow the quick start process or the full installation and setup process on this page.
Note
About the quick start process: The quick start process is a simpler route to an operational Lasernet Core system and it requires only basic IT knowledge. However, it results in a system that is suitable only for demonstration or trial purposes. For more information about the quick start process (and its inherent compromises), see the main Lasernet Core 11 Installation and Setup Guide page.
About the full installation and setup process: The full installation and setup process describes all available installation and setup options and is suitable for setting up production Lasernet Core systems. However, parts of it require some IT and database administration knowledge.
Quick Start Installation Process
In the Windows Start menu, click Lasernet 11 > Lasernet Service Manager 11. The Lasernet Service Manager 11 window opens.
Double-click the Lasernet Config 11 row. The Lasernet Config window opens.
On the Database tab, enter the following setting values:
Server: localhost\Lasernet
Credentials > Username: sa
Credentials > Password: Enter the password that you used when you created the new database instance.
Databases > Config: LNConfig
.png)
Click Test Connection.
Note
If the connection test fails, select Requires encryption or Trust server certificate, or both options, and then click Test Connection again.
Click Ok.
Lasernet Service Manager will ask if you want to restart the Lasernet Config 11 service. Click Yes.
After configuring Lasernet Config Service, the next step of the Lasernet Core 11 installation and setup process is to sign in to the Lasernet Core administration tool so that you can continue the Lasernet Core system setup process.
Full Installation and Setup Process
1. Start Lasernet Service Manager
On the server that is running Lasernet Config Server, in the Windows Start menu, click Lasernet 11 > Lasernet Service Manager 11. The Lasernet Service Manager 11 window opens.
Double-click the Lasernet Config 11 row. The Lasernet Config window opens.
2. Optional: Configure the Server Runtime Data Directory
On the General tab, if you leave the Server runtime data directory box blank, Lasernet Config Server will use its default location for configuration data, its job database (which tracks paused jobs, scheduled jobs, failed jobs, and combined jobs), grab data, and job data. In most situations, this is satisfactory. If you want to specify where Lasernet Config Server stores this data, enter or select a directory.
3. Configure Lasernet Config Server’s Database Connection
On the Database tab, configure Lasernet Config Server’s database connection. This database includes data about Lasernet Core configurations, revision data, and deployment log history.
On the Database tab, enter appropriate values for the following settings:
.png)
Server: The SQL Server instance that hosts the database. This can be a host name or it can identify a particular SQL Server instance:
<host name>\<instance name>Credentials > Username: The username of a database identity that grants sufficient access to the Lasernet Config Server database. Leave this box empty to use Windows authentication (see the About Windows Authentication note following the documentation for Password).
Note
The identity that the Config Server uses to connect to its database must have permission to create and alter tables, and insert, update, and delete rows.
Credentials > Password: The password that accompanies the username. Leave this box empty to use Windows authentication.
About Windows Authentication for the Config Server Database Connection
If you leave username and password blank on the Database tab:
Config Server will use the identity that the Lasernet Config service runs under to connect to the Lasernet Config database (using Windows authentication). To see which identity this is, go to the Windows Services window and refer to the Lasernet Config 11 service's Log On tab. This identity must have permission to create and alter tables, and insert, update, and delete rows in SQL Server.
Although Lasernet Core services are installed using the Windows local system account and by default run under that identity, for security reasons the best practice is for the Lasernet Config service to connect to its database using a dedicated service account identity. This requires you to change the identity that the service runs under. In summary, to use Windows authentication, follow this process as best practice:
Create a dedicated service account.
Grant the account Log on as a service rights.
Configure the Lasernet Config service to run under that identity (on the service's Log On tab).
In SQL Server Management Studio, create a corresponding login that grants that identity the necessary permissions.
Databases > Config: The name of the Lasernet Config Server database.
Databases > Dictionary: If applicable, the name of the Dictionary database.
Require encryption: Toggles database connection encryption. The appropriate setting depends on how SQL Server has been set up.
Trust server certificate: The appropriate setting depends on the database server’s configuration.
Connection > Retries: The number of database connection attempts that Lasernet Config Server will make.
Connection > Interval: The interval between each connection attempt.
Click Test Connection.
4. Configure Lasernet Config Server’s Port Number
On the Bindings tab, modify the Port number if necessary (see 1 in the image below).
Note
In most situations, the default port number (443) is suitable. Modify the port number only if necessary to prevent port conflicts with other software running on the same server.
.png)
5. Configure Certificate Bindings for Lasernet Config Server
If necessary, specify the host names to bind a local server certificate to. Lasernet Config Server will use the certificate to prove the server’s identity. The certificate also provides encryption keys to secure communication between the server and the client. Lasernet Config Server can use certificates installed in the Windows certificate store (in the Computer certificates area) or certificates stored on disk as PFX files. You must create a binding for every host name that clients use to connect to Lasernet Config Server.
Note
If no bindings are configured, Lasernet Config Server will autogenerate self-signed certificates for
localhost,<server name>and the server’s fully qualified domain name (FQDN).
To specify a binding, follow these steps:
On the Bindings tab, click Add (see 2 in the image above).
In the Add Binding window (3), enter a Hostname. This is the host name that the certificate will be bound to. Valid values for Hostname are a host name (without a domain specified), a FQDN, or an IP address.
Provide certificate details:
If Thumbprint is supplied, the certificate (in the Windows certificate store) that has the specified thumbprint will be used.
PFX is the path and filename to a certificate (including private key) that is stored in PFX format. Password is the password for the PFX file.
If you leave both Thumbprint and PFX blank, a self-signed certificate for the specified Hostname will be generated and stored in the Windows Certificate Store.
Click OK to save the binding.
Note
Repeat these steps for every host name that clients use to connect to Lasernet Config Server. For example, some clients might connect to
localhost, whereas other clients might connect to the server’s FQDN. Multiple bindings can point to the same certificate, if necessary.
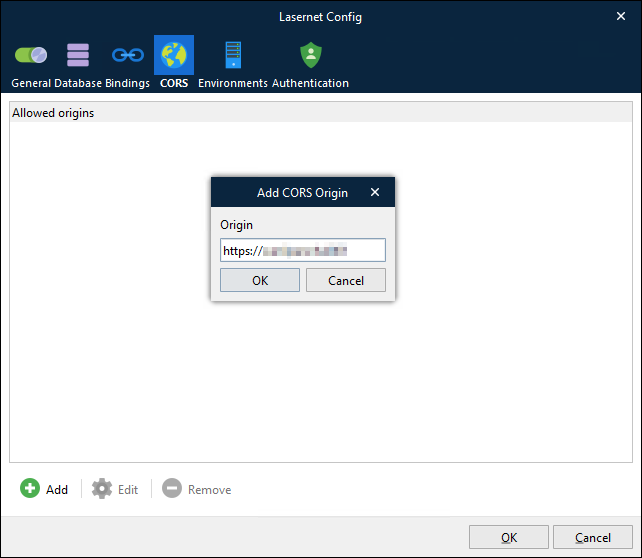
6. Specify Allowed Origins (CORS)
By default, web browsers on the server that is running the Config Server can access Manage (the Lasernet Core administration tool) at https://localhost/lasernet/manage.
However, browsers running on other computers cannot access Manage at https://<config server name>/lasernet/manage (appropriately substitute <config server name>), unless you specify “allowed origins” that match the host names that clients will use to connect to Manage. If necessary, the allowed origins can include port numbers.
For example, if the server that will run Lasernet Config Server is named config-server, you must add an entry to the Allowed origins list for https://config-server. After you do this, browsers running on other computers can access Manage at https://config-server/lasernet/manage.
To add an origin to the Allowed origins list, follow these steps:
On the CORS tab, click Add.
In the Add CORS Origin window, enter the Origin that you want to add to the list. Valid values start with
https://followed by a host name (without a domain specified), a FQDN, or an IP address. If the Config Server is not running on its default HTTPS port (443), include the port number.Click OK.
7. Specify Which Lasernet Core Environments Will Be Managed by This Lasernet Config Server
On the Environments tab, decide whether to select Automatically synchronize Environments (see 1 in the image below).
If selected, when an environment is added to the Lasernet Service Manager 11 window, it will be added to the Lasernet Config Environments tab. Consequently, the Config Server manages all the environments that run on the same server as the Config Server (and only those environments).
If not selected, you must manually Add and Remove environments from the list. If the Config Server must manage environments that are not running on the same server as the Config Server, you must add them in this way.
.png)
If Automatically synchronize Environments is not selected: Manually add environments to the list:
Click Add (below the environment list). The Add Environment window opens.
Enter the Name of the environment or select it from the list (2). The name you enter must match the name displayed in the Lasernet Service Manager 11 window on the server hosting the environment.
If the environment is running on the same server as the Config Server, the environment will be listed in the same Lasernet Service Manager 11 window as the Lasernet Config 11 service. In this scenario, you can select the environment from the list.
If the environment is running on a different server, the environment will be listed in the Lasernet Service Manager 11 window on that server. In this scenario, you must manually enter the environment’s name into the Name box.
Enter the Client secret for the environment. When you created and configured environments, you would have noted each environment’s client secret.
Note
If the environment is running on the same server as the Config Server, Lasernet Service Manager will automatically copy and enter the environment’s client secret for you.
If Automatically synchronize Environments is selected and you want to modify settings (such as Client secret) for an environment that was automatically added to the list, select the environment in the list, click Edit, then modify the settings as described above.
8. Configure External Authentication of Lasernet Core Users
If required for this Lasernet Core system, configure external authentication of users.
Note
If external authentication is enabled and multiple authentication providers are configured, the user must specify which provider to use when they log in.
Note
Enabling external authentication and specifying external providers is only part of the process for configuring external authentication. For a complete guide to the process, see the Guide to Configuring Microsoft Entra ID Authentication for Lasernet Core.
To enable user authentication through external authentication providers, select Use external provider(s) on the Authentication tab (see 1 in the image below).
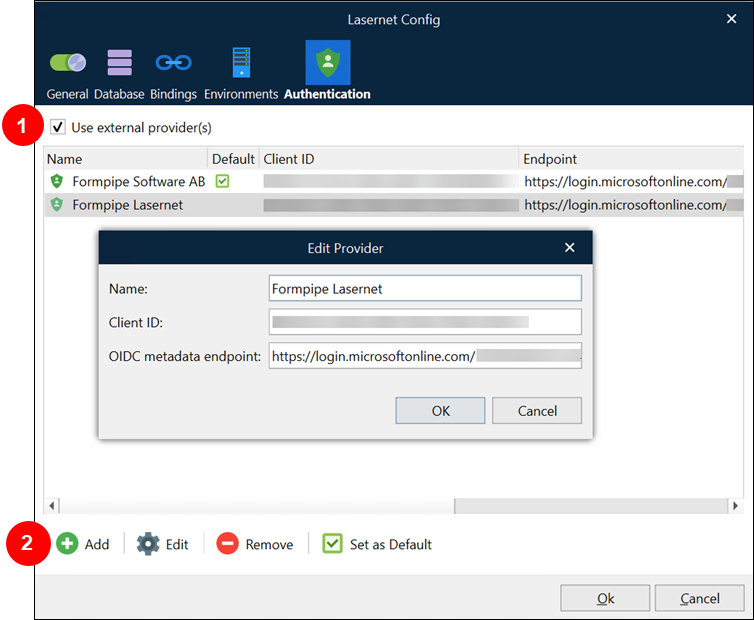
To add an authentication provider, click Add (2).
In the Add Provider window, enter the following properties, then click OK.
Name: A descriptive name that identifies the provider.
Client ID: The application (client) ID that identifies the relevant app registration (or equivalent) in the authentication provider.
OIDC metadata endpoint: The OpenID Connect Metadata document URI. The OpenID Connect Metadata document provides Lasernet Core with the information required to validate the JWT tokens issued by the authentication provider.
If more than one provider is configured: To designate the default provider, select its row on the Authentication tab and then click Set as Default.
Note
If external authentication is enabled, an External Roles page is added to the Config Server application.
9. Save Your Changes and Close the Window
Click OK to close the Config Server properties window and save your configuration changes.
The Lasernet Service Manager will ask you if you want to restart the Lasernet Config 11 service (to apply your changes).
Next Steps
After configuring the Lasernet Config Service, the next step is to sign in to the Lasernet Core administration tool so that you can continue the Lasernet Core system setup process.