Configure Keep to Use LDAP
- 16 Mar 2026
- 11 Minutes to read
- Contributors


- Print
- PDF
Configure Keep to Use LDAP
- Updated on 16 Mar 2026
- 11 Minutes to read
- Contributors
- Print
- PDF
Article summary
Did you find this summary helpful?
Thank you for your feedback
You can configure Keep to use Windows Active Directory as a source for Keep user data and credentials. Group memberships in Active Directory can drive Keep role memberships and users’ access to search and upload configurations.
After LDAP integration is configured in Keep, all user management can be done outside Keep. Users can use their Windows login to access Keep if they are in the relevant Active Directory groups.
Most of the settings that are required to configure the Keep LDAP integration are managed by the Windows Active Directory administrator.
This page describes how to configure and enable the LDAP integration (including LDAPS implementation). It also describes how to modify LDAP settings and disable the LDAP integration.
Configure and Enable LDAP
To configure and enable LDAP, follow this process:
Configure Keep’s ability to retrieve user and group data from Active Directory.
Configure the mapping of Keep roles and groups to Active Directory groups.
For step-by-step instructions, see the following sections.
1. Start the LDAP Configuration Process
To begin configuring LDAP integration, follow these steps:
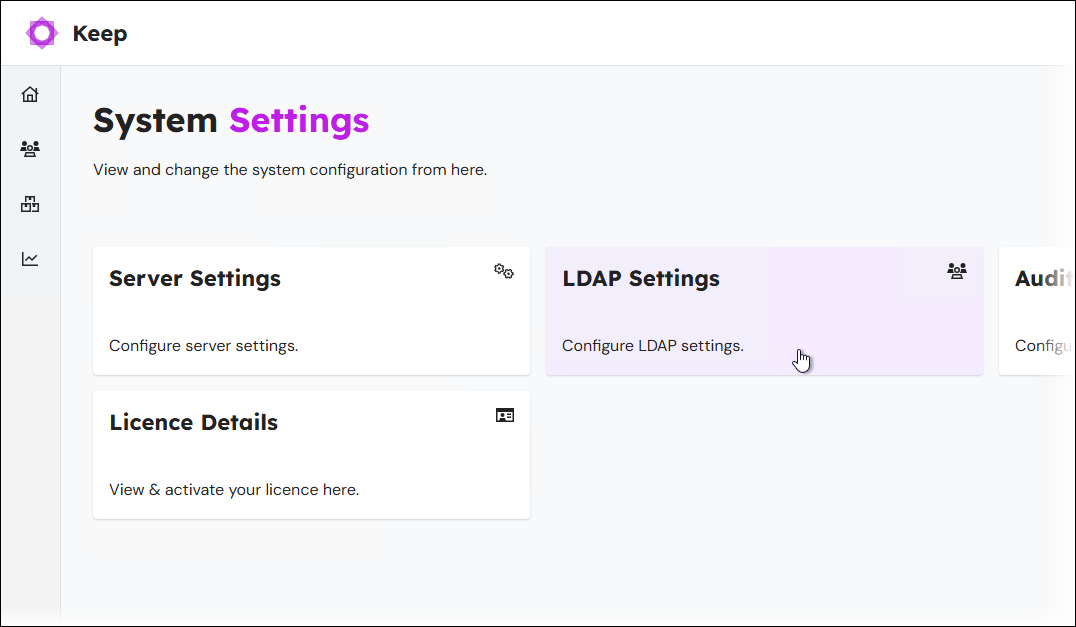
Click Settings in the admin menu, then click LDAP Settings. The LDAP Configuration page opens.
The LDAP Configuration page contains an LDAP status indicator (see 1 in the image below) and displays the current LDAP configuration settings (2). Because LDAP is not yet configured, the current configuration consists of default values.
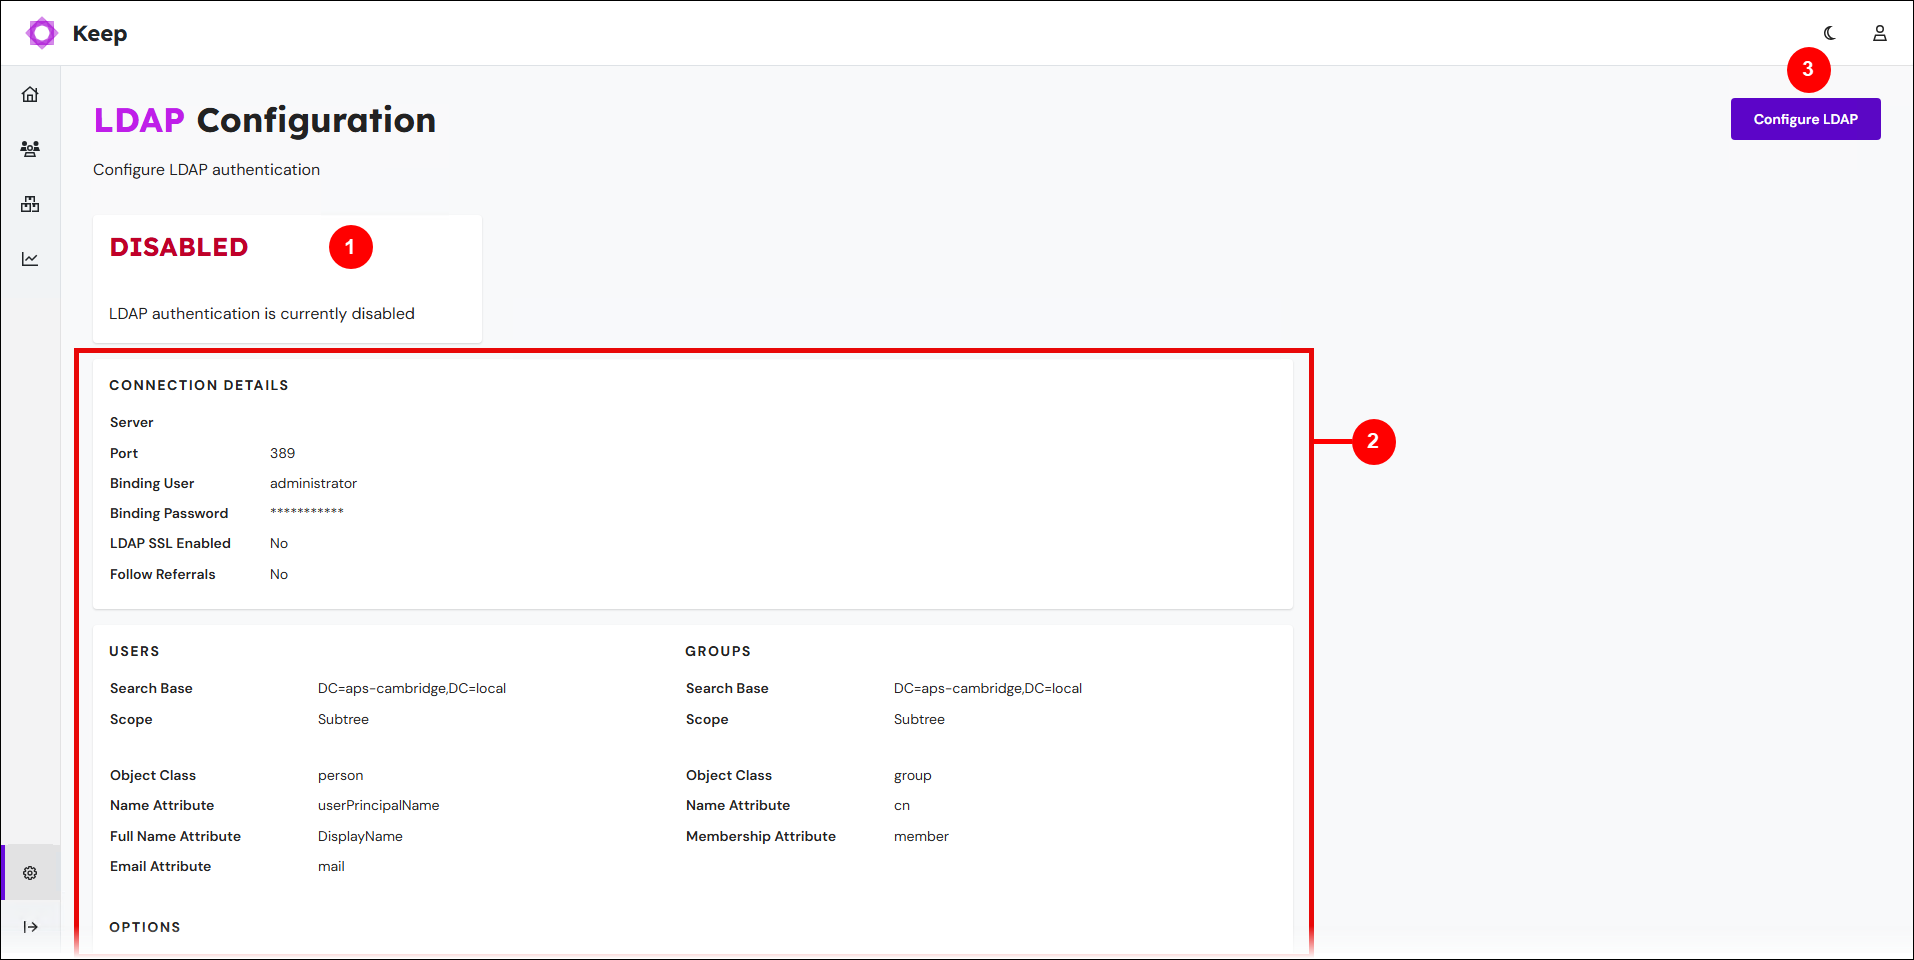
Click Configure LDAP (see 3 in the image above).
The LDAP Configuration process begins. It is a straightforward page-by-page experience. A progress indicator shows you how far through the process you currently are.
Click Next and Back (in the upper-right corner) to navigate between the pages of the process. Click Cancel to discard your changes to the LDAP configuration and return to the LDAP Configuration page.
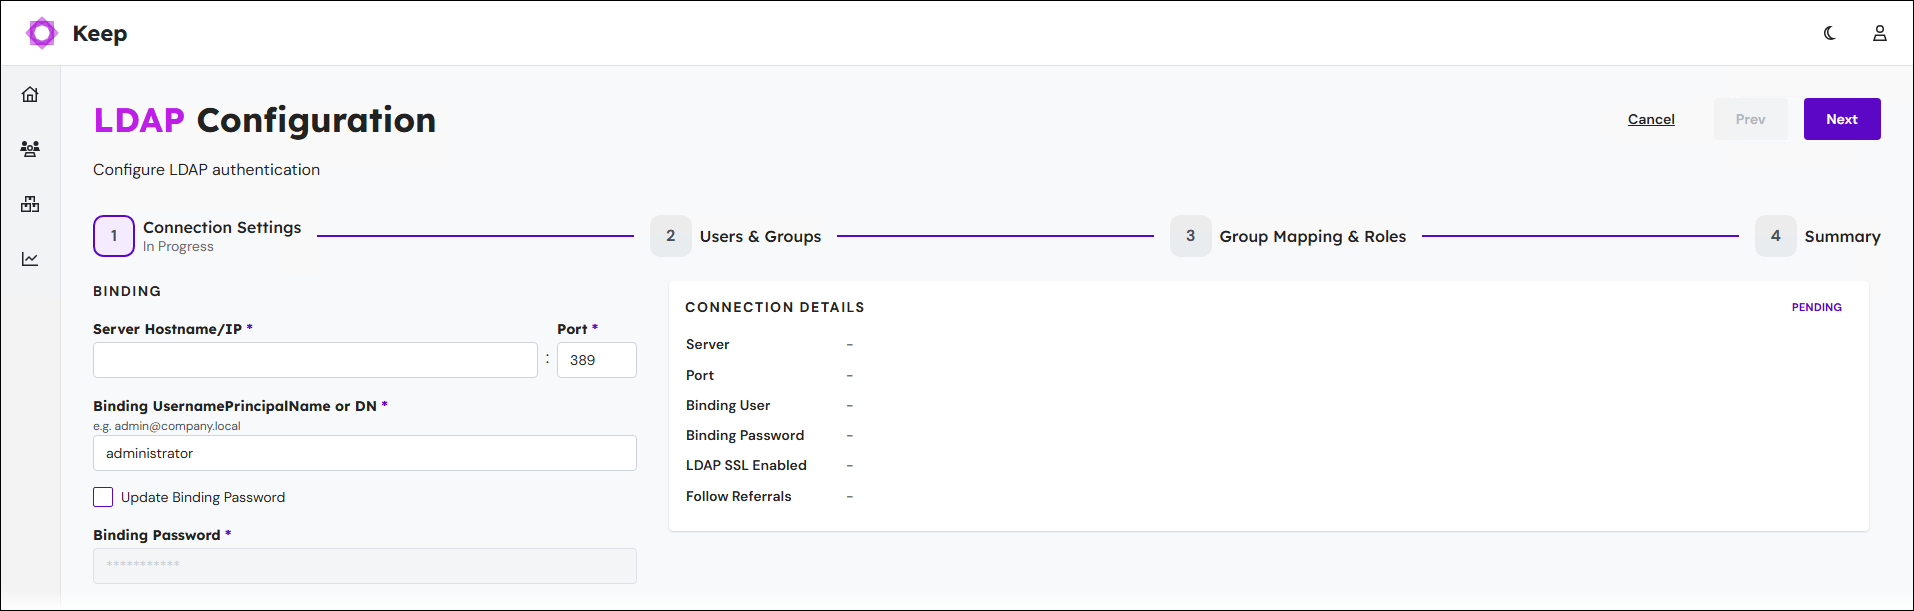
2. Add Connection Settings
On the Connection Settings page, follow these steps to configure Keep’s connection to Active Directory:
Provide appropriate values for the following settings:
Setting
Description
Server Hostname/IP
The name or IP address of the Active Directory server.
Note
We recommend defining the domain instead of a specific domain controller (DC) if multiple DCs control the same domain. If one DC goes down, another DC takes the role and Keep remains connected.
Port
The port of the Active Directory server. This is usually 389 for LDAP and 686 for LDAPS.
Binding UsernamePrincipalName or DN
The binding of the client (Keep) to the LDAP server (Active Directory) requires authentication. This connection is made under the identity of a user in Active Directory who has authenticate, read, and search permissions, and full access to the LDAP tree being searched.
In the Binding UsernamePrincipalName or DN box, enter the username of an appropriate user in Active Directory.
Update Binding Password
Select to change the password used for the binding user.
If you select this checkbox, enter the correct password in the Binding Password box.
Follow Referrals
Determines whether Active Directory referrals are followed. Active Directory referrals enable a domain controller to direct a client to another domain controller when it does not have the requested information.
Use LDAPS (SSL)
Secure LDAP communication with SSL.
Important
Enable this setting only when instructed by the LDAPS implementation process.
To proceed to the next stage of the process, Keep must test the connection settings that you entered. Click Confirm & Test in the Test area.
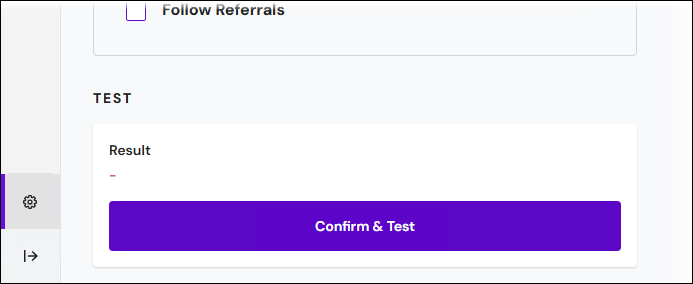
If the test passes, Keep grays out the settings boxes, adds the connection details to the Connection Details area in the summary pane, and marks the connection details as Confirmed. Click Next (in the upper-right corner) to proceed to the next stage.
.png)
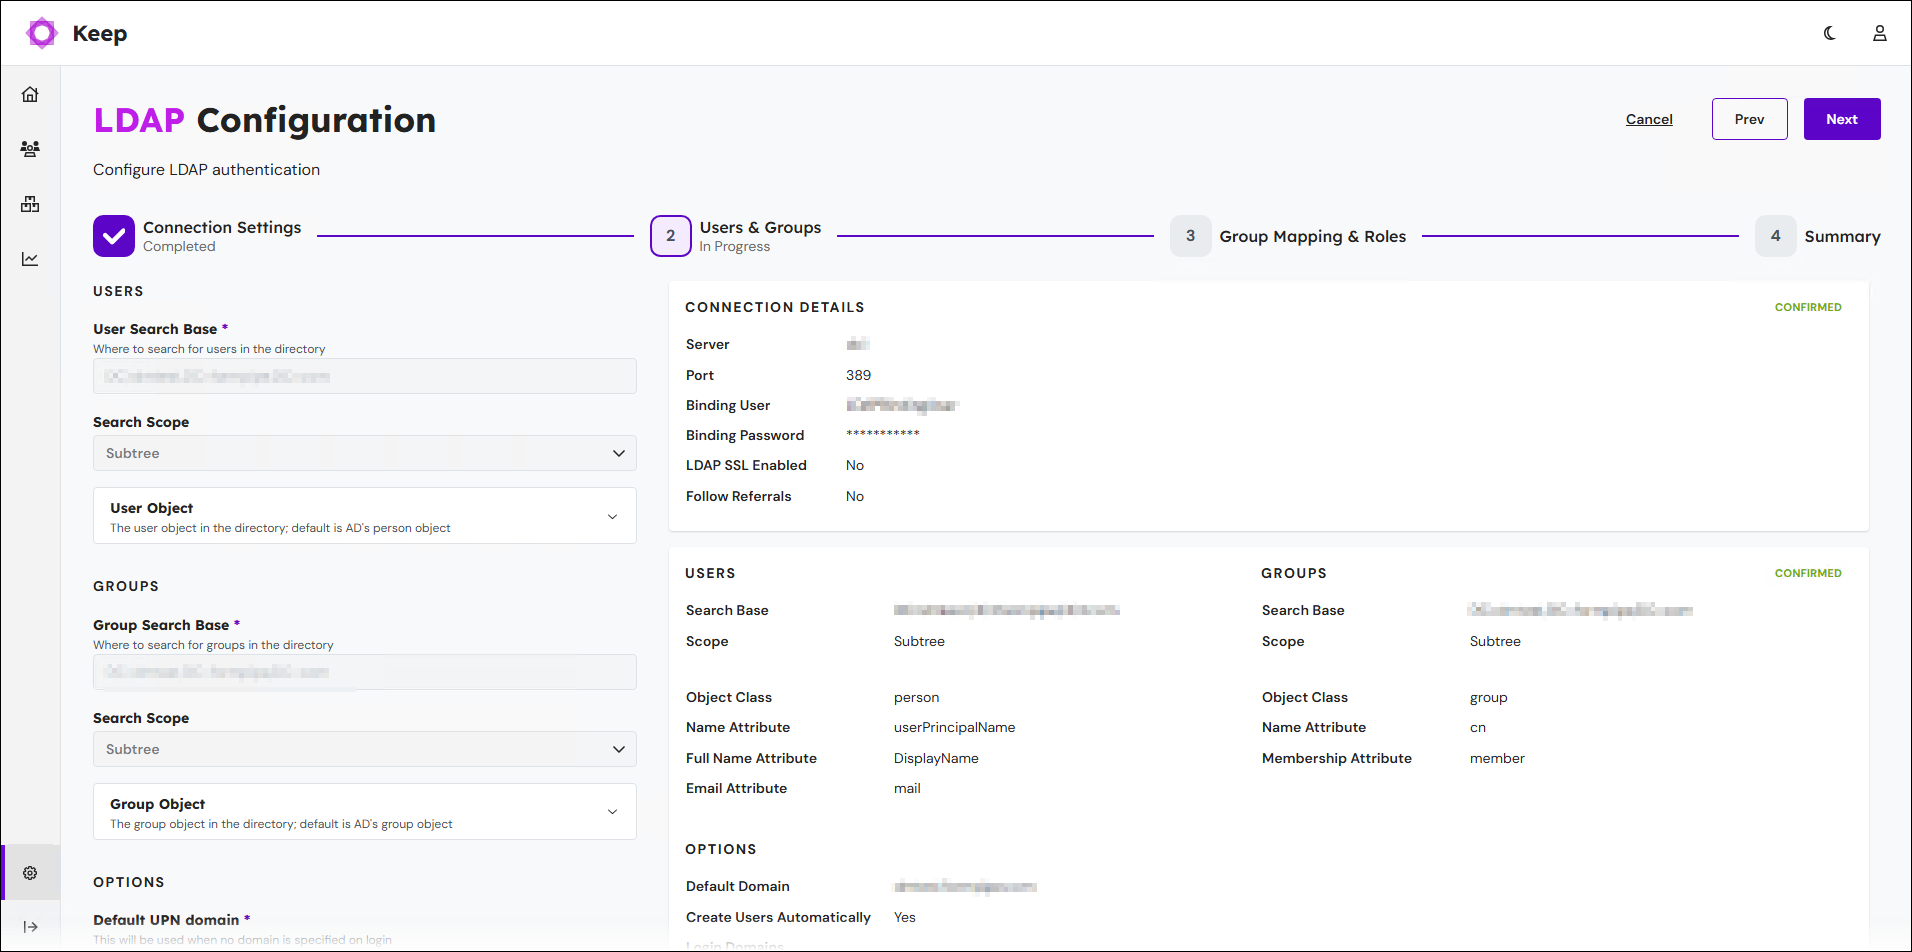
3. Users & Groups Configuration
On the Users & Groups page, follow these steps to configure Keep’s ability to retrieve user and group data from Active Directory:
Provide appropriate values for the following settings:
Users area
Setting
Description
User Search Base
Specifies the tree location of the usernames in Active Directory. For example:
CN=Users,DC=mydomain,DC=localSearch Scope
Specifies which levels to search for users beyond the User Search Base.
Users > User Object. The User Object area describes the Active Directory objects that represent users. By default, Keep uses commonly used values for these settings. If your Active Directory uses a custom class for users (or a class other than the usual
person), or uses custom user attributes, expand the User Object area and modify these settings.Setting
Description
Object class
The Active Directory class name for user objects. For example,
person.Name Attribute
The field within Active Directory that holds the login name (UID attribute) for a user.
Full Name Attribute
The field within Active Directory that contains the full name of a user.
Email Attribute
The field within Active Directory that contains the email address of a user.
Groups area
Setting
Description
Group Search Base
Specifies the tree location of the group names in Active Directory. For example:
CN=Groups,DC=mydomain,DC=localSearch Scope
Specifies which levels to search for groups beyond the Group Search Base.
Groups > Group Object. The Group Object area describes the Active Directory objects that represent groups. By default, Keep uses commonly used values for these settings. If your Active Directory uses a custom class for groups (or a class different to the usual
group), or uses custom group attributes, expand the Group Object area and modify these settings.Setting
Description
Object class
The Active Directory class name for group objects.
Name Attribute
The field within Active Directory that holds the group name.
Membership Attribute
The field within Active Directory that holds the member list of a group.
In the Options area, appropriately set the following options:
Setting
Description
Default UPN domain
Default login domain. If a user logs in without specifying a domain, this domain is appended to form a User Principal Name (UPN):
<username>@<domain>Login Domains
Login domain suffixes.
You can enter multiple suffixes. To enter a suffix, type it in the Login Domains box, and then press Enter. To enter another, continue typing. If the cursor is not currently in the Login Domains box, click in an empty area of the box and enter a suffix.
Create Users Automatically
If selected, Keep automatically creates Keep user objects when users log in to Keep via LDAP.
To proceed to the next stage of the process, Keep must test its ability to retrieve data about users.
Enter the username of a user in Active Directory into Test user search/login (single user, UPN format) in one of the following formats:
Username only
UPN format (
<username>@<domain>)
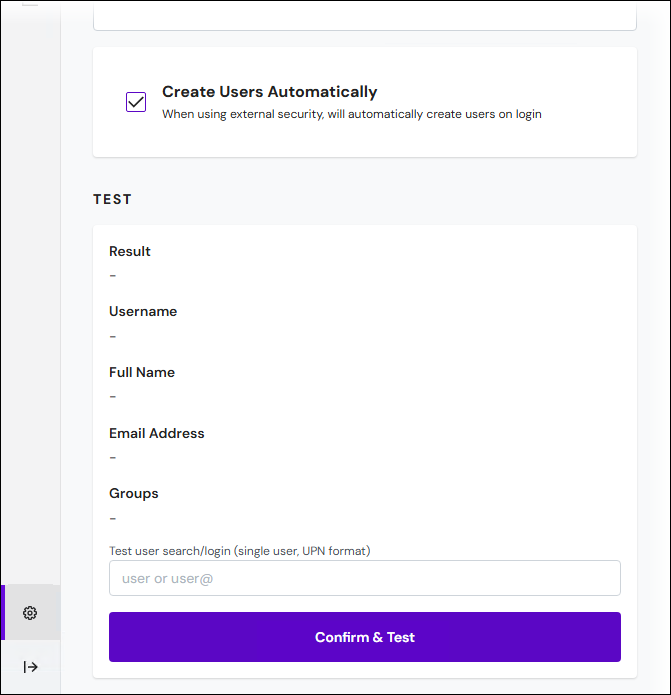
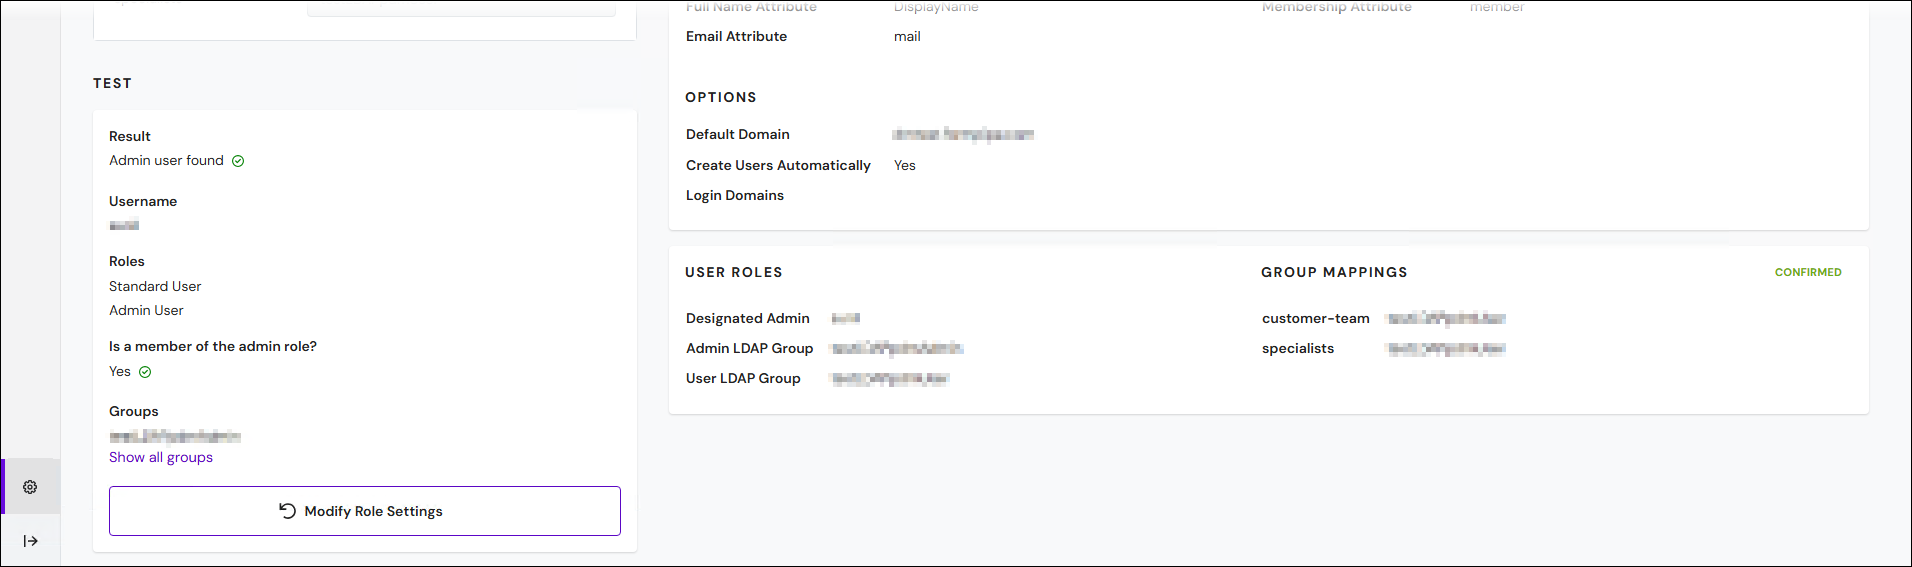
Click Confirm & Test in the Test area. If the test passes:
The Result in the Test area is User found.
Information about the user is displayed in the Test area.
Keep grays out the settings boxes on the Users & Groups page.
Keep adds the Users, Groups, and Options configuration settings to the summary pane above and marks them Confirmed.
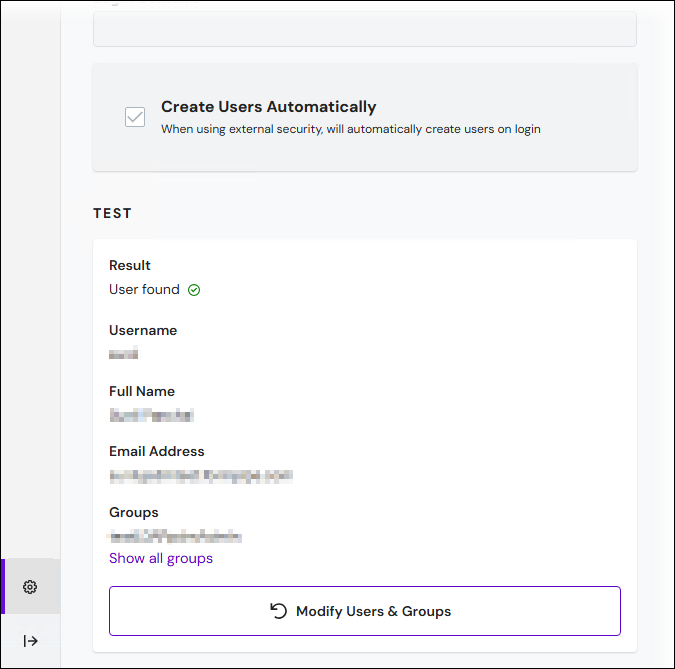
Click Next (in the upper-right corner) to proceed to the next stage.
4. Group Mapping & Roles Configuration
On the Group Mapping & Roles page, follow these steps:
To map an Active Directory group to the Keep Standard User role, enter that group’s name in User Group. The members of that group will be assigned the Standard User role in Keep. For more information about that role, see Manage Users.
Note
Membership of the Standard User role enables a user to log in to Keep. It does not grant the user access to any upload and search configurations; access to these must be granted separately. Users can be granted access to upload and search configurations directly or via their membership of Keep groups. For more information, see Manage Users.
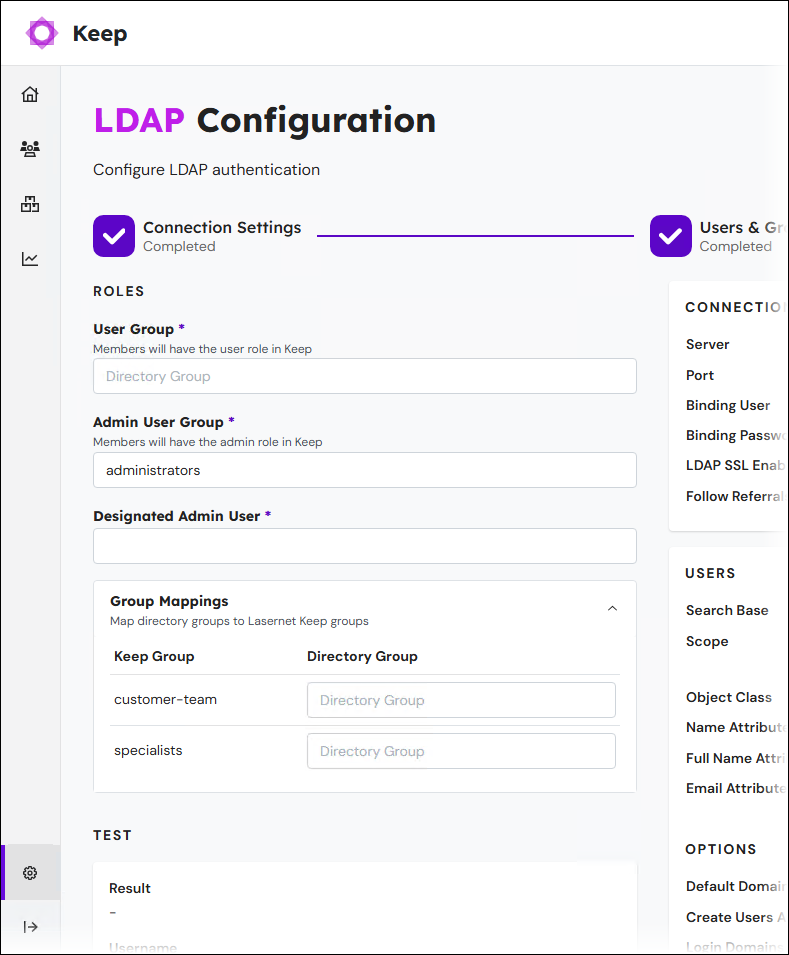
To map an Active Directory group to the Keep Admin User role, enter that group’s name in Admin User Group. The members of that group will be assigned the Admin User role in Keep, and as a result, will be able to create and modify search and upload configurations and change important system settings. For more information about that role, see Manage Users.
The Keep license includes Concurrent Web Users and Concurrent Client Connections properties, which can limit the number of simultaneous connections to Keep. To specify which admin user will be able to log in to Keep in scenarios where either of these limits has been exceeded, enter (into Designated Admin User) the username of a member of the Active Directory group that you mapped to the Keep Admin User role.
Tip
To view the currently applied license’s properties, click Settings in the admin menu and then click Licence Details.
To map Keep groups to Active Directory groups (so that Keep group membership is driven by Active Directory group membership), follow these steps:
Expand the Group Mappings area.
To map a Keep group to an Active Directory group, enter the Active Directory group’s name in the Directory Group box beside the Keep group.
Tip
Because users’ access to upload and search configurations can be driven by membership of Keep groups, you can use this group mapping to assign upload and search configuration access through Active Directory group membership.
To proceed to the next stage of the process, Keep must test the settings that you entered. Click Confirm & Test Designated Admin in the Test area.
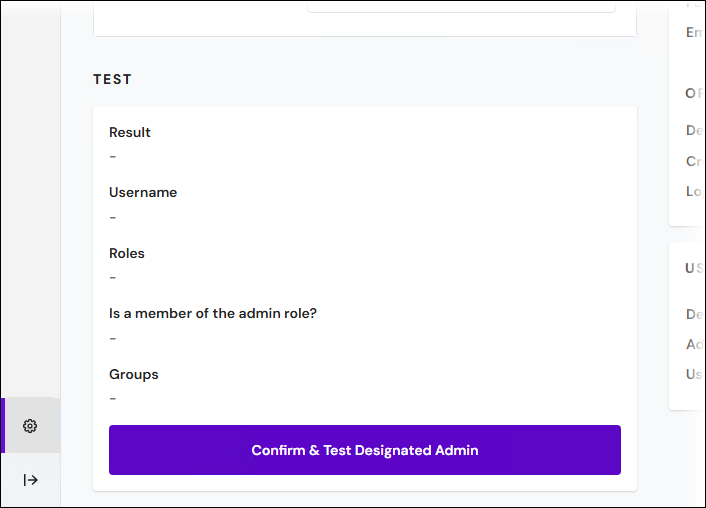
If the test passes, Keep:
Displays information about the designated admin user in the Test area.
Grays out the settings boxes.
Adds the settings to the User Roles / Group Mappings area in the summary pane.
Marks the settings in the User Roles / Group Mappings area as Confirmed.
Click Next (in the upper-right corner) to proceed to the next stage.
5. Enable LDAP
On the Summary page, follow these steps:
Review the LDAP configuration settings on the page.
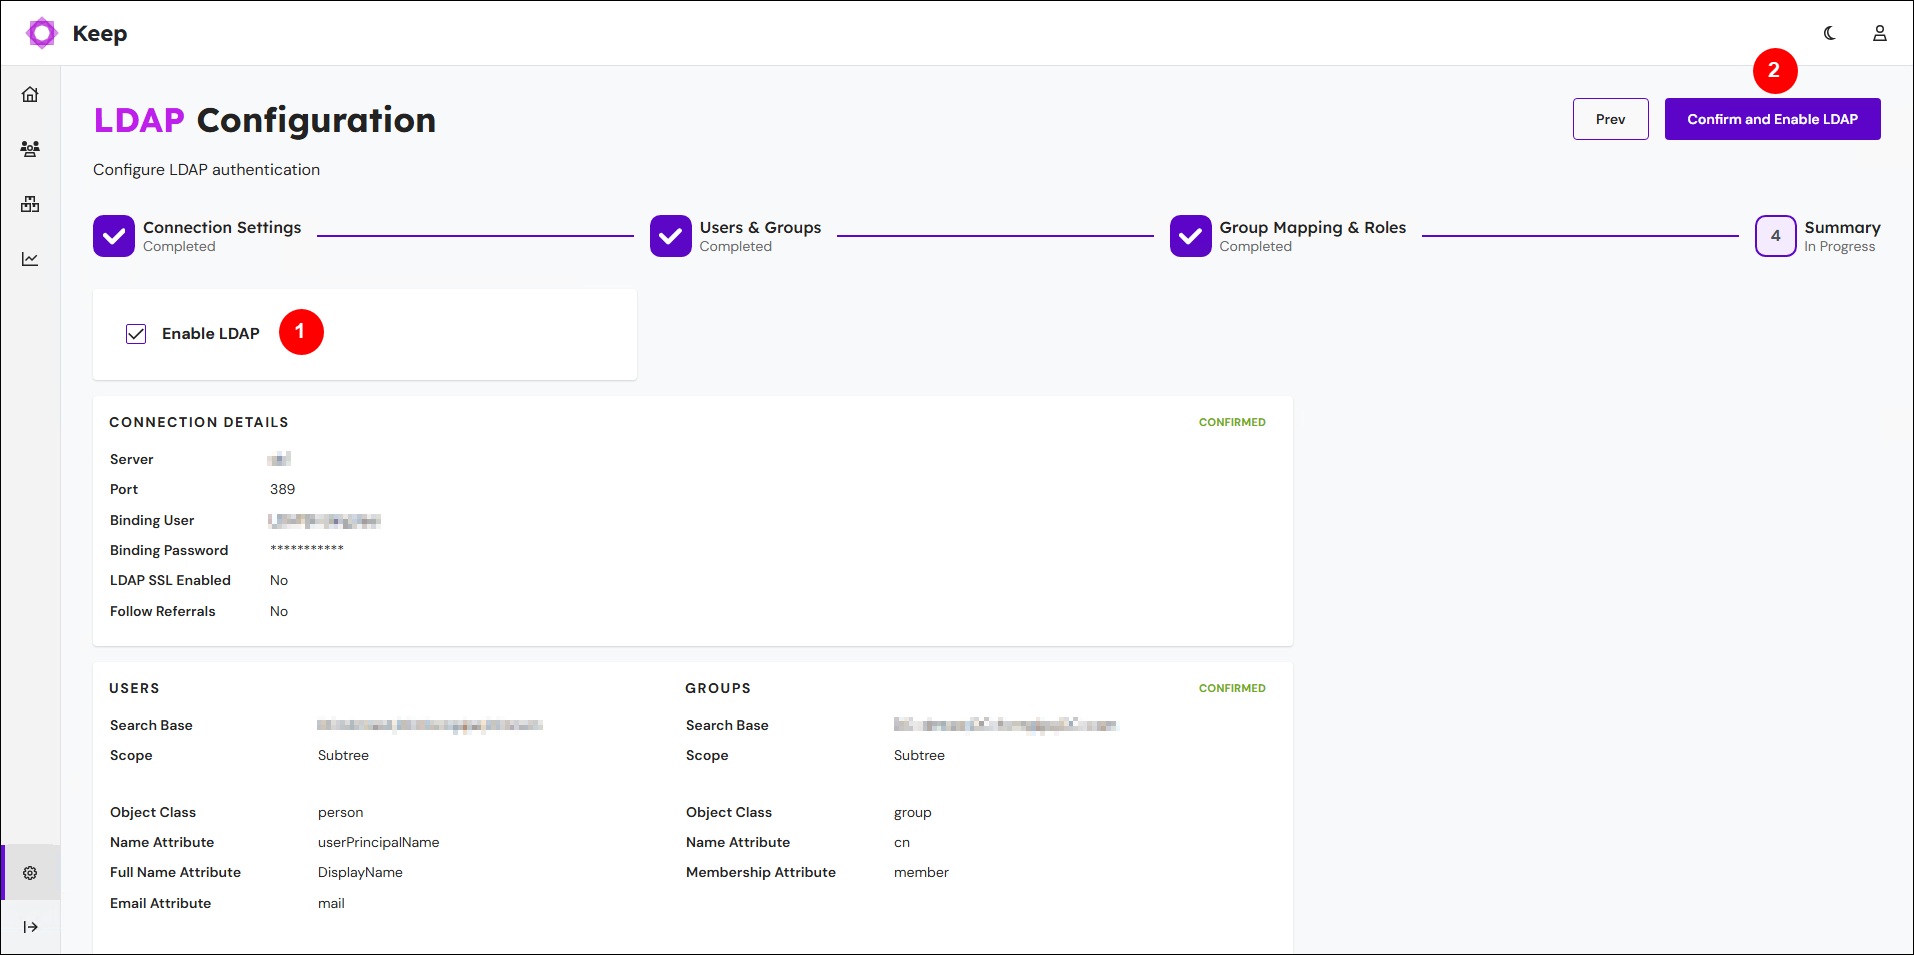
Select Enable LDAP (see 1 in the image above).
Click Confirm and Enable LDAP (2).
In the Are you sure window, read the warning, and then click Confirm. Keep will log you out. LDAP is now enabled.
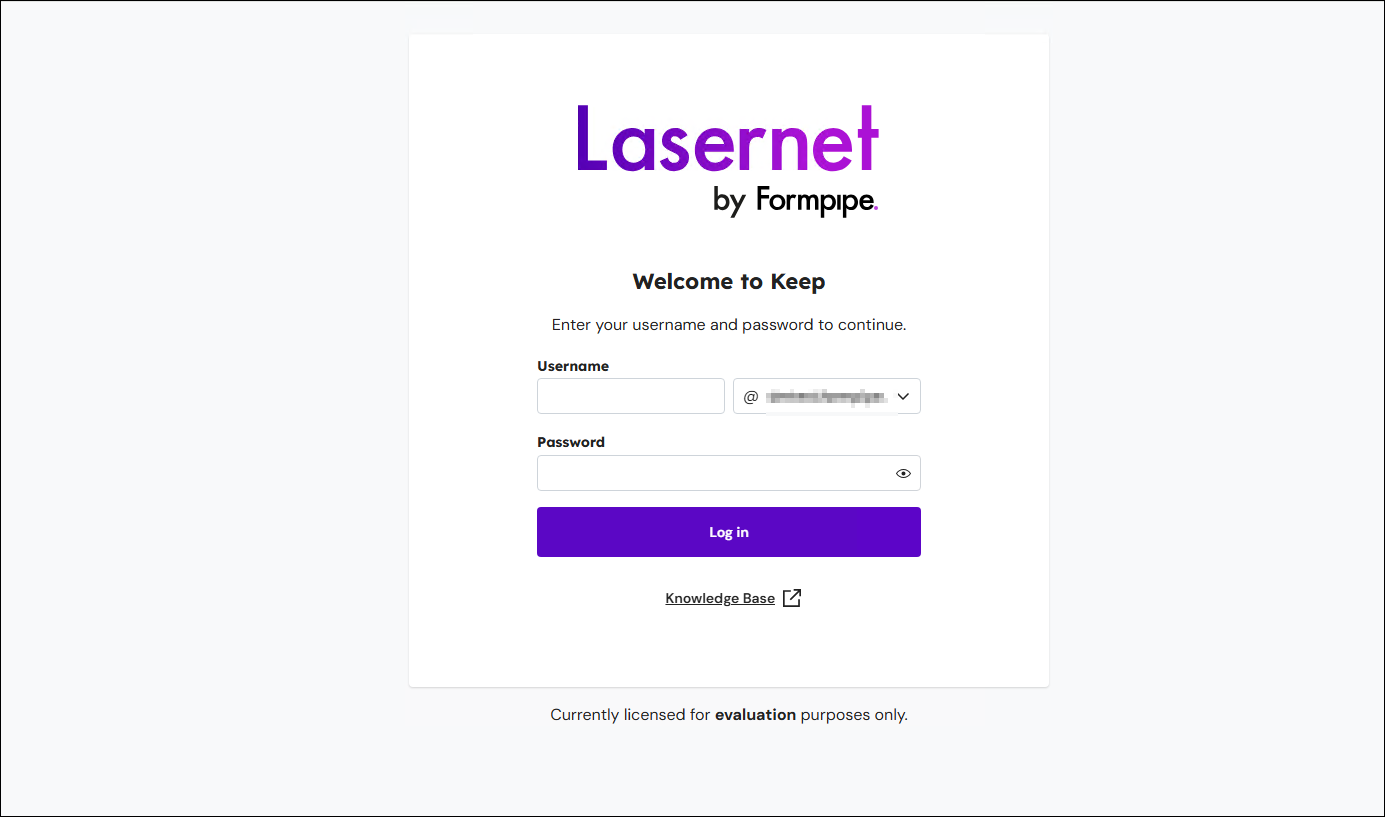
To log in as an administrative user, enter the credentials of an appropriate user in Active Directory into the Keep log in page.
Implement LDAPS
Keep supports LDAPS. To implement LDAPS, follow these steps:
Import a root certificate from the LDAP Server Certificate Store into the JDK Certificate Store:
Export the LDAP server certificate to a file (X.509) and copy it to a local folder on the Keep server.
On the Keep server, open a command prompt as an administrator.
Navigate to the
binfolder of the JDK in the Lasernet Keep installation folder:Lasernet Keep 11.1 and Later
C:\Program Files\Lasernet\Lasernet Keep\Server_11.<minor version> - <node name>\jdk-<JDK version number>\bin.Appropriately substitute
<minor version>,<node name>and<JDK version number>.Lasernet Keep 11.0
C:\Program Files\Formpipe Software\Lasernet Keep\Server_11.0 - <node name>\jdk-<JDK version number>\bin.Appropriately substitute
<node name>and<JDK version number>.Run the following command.
Substitute
<path to certificate>for the path to the LDAP server certificate that you copied to the Keep server.Substitute
<domain name>for the domain name. This part of the command provides the alias to apply to the new key in the keystore. In this procedure, the domain name is used as the alias by convention.
keytool.exe -importcert -file <path to certificate> -alias <domain name> -keystore ..\lib\security\cacerts
When you run this command, you will be prompted for the Java cacerts password. Enter the password; the default password is
changeit.
Restart the Keep Windows service:
Navigate to the Windows Services window.
Locate the Lasernet Keep <Keep version number> - Standalone [<node name>] service. Appropriately substitute <Keep version number> and <node name>.
Restart that service.
Disable LDAP:
Log in to Keep (using the credentials of a user in Active Directory who is an administrator in Keep).
Click Settings in the admin menu, then click LDAP Settings. The LDAP Configuration page opens.
Click Disable LDAP (in the upper-right corner).
In the Are you sure window, read the warning, and then click Confirm. Keep will log you out. LDAP is now disabled.
Log in to Keep as an administrator. Because LDAP is disabled, you must log in as the built-in admin user or as a separately created Keep user that has the Admin User role.
Click Settings in the admin menu, then click LDAP Settings.
Click Configure LDAP.
On the Connection Settings page:
Change Port to 636.
Enable Use LDAPS (SSL).
Continue with the LDAP configuration process as described in Configure and Enable LDAP. The previously used LDAP configuration settings will be present. At the end of the process, when you click Enable LDAP, Keep will enable LDAPS.
Modify LDAP Settings
After you configure and enable LDAP, you can modify the LDAP settings if necessary.
To do this, follow these steps:
Log in to Keep as an administrative user (using the credentials of an appropriate user in Active Directory).
Click Settings in the admin menu, then click LDAP Settings. The LDAP Configuration page opens.
In the upper-right corner, click Modify settings. The LDAP Configuration process begins.
As you follow the Configure and Enable LDAP process, change the settings that you want to modify.
Tip
Click Cancel at any time to discard your changes.
On the Summary page of the process, click Confirm and save. Keep updates the LDAP settings.
Disable LDAP
In some scenarios, you might need to log in to Keep as the built-in admin user or as a “local” Keep user that has the Admin User role. To do this, you must disable LDAP.
There are two ways to disable LDAP:
Disable LDAP Through the Keep Web Application
To turn off LDAP, follow these steps:
Log in to Keep (using the credentials of a user in Active Directory who is an administrator in Keep).
Click Settings in the admin menu, then click LDAP Settings. The LDAP Configuration page opens.
Click Disable LDAP (in the upper-right corner).
In the Are you sure window, read the warning, and then click Confirm. Keep will log you out. LDAP is now disabled.
Disable LDAP by Modifying the Keep Database
This method is necessary if the LDAP server is down or unreachable and you need to disable LDAP without logging into Keep.
In this scenario, contact Lasernet Support. This process must be performed with assistance from a Lasernet Group engineer, because it involves modifying the Keep database.