Configure Microsoft Entra ID
- 23 Mar 2026
- 5 Minutes to read
- Contributors


- Print
- PDF
Configure Microsoft Entra ID
- Updated on 23 Mar 2026
- 5 Minutes to read
- Contributors
- Print
- PDF
Article summary
Did you find this summary helpful?
Thank you for your feedback
To enable Keycloak to integrate with Microsoft Entra ID, you must create particular resources in Entra ID and appropriately configure them.
For Microsoft Entra ID, you must:
Create an app registration to represent Autoform DM (and Keycloak).
Configure the app registration and make a note of the application ID.
Generate a client secret for Keycloak to use.
Configure any access management options and then assign users and groups to the application.
The following sections describe each of these tasks.
Note
The information on this page applies only to self-hosted cloud and on-premises Autoform DM systems.
Create an App Registration and Enterprise App
To create an app registration and enterprise app, you can use the Microsoft Azure portal or run scripts supplied by the Lasernet Group.
Use the Microsoft Azure Portal
To use the Microsoft Azure portal to create the app registration and enterprise app, follow these steps:
In the Microsoft Azure portal, navigate to the Entra ID management area. Then, navigate to the App registrations page.
On that page, click New registration.
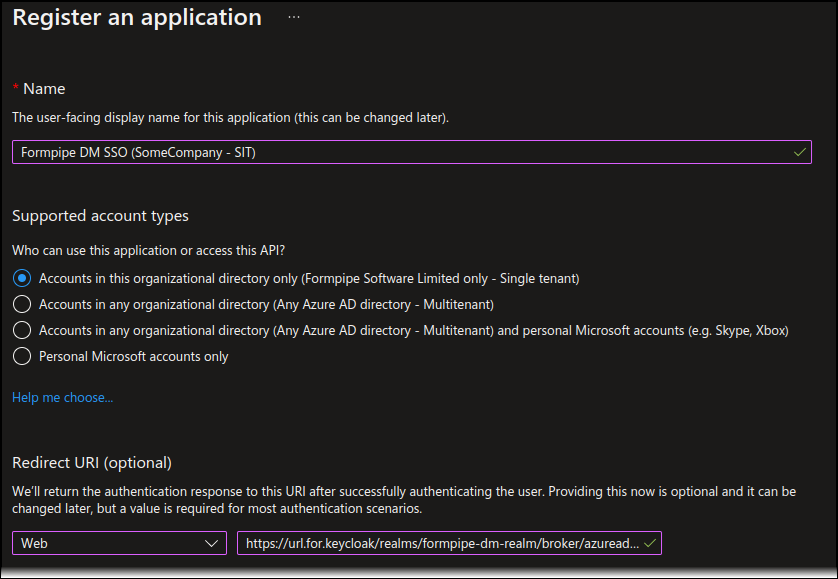
Enter a Name that:
Clearly identifies the application as Autoform DM.
Depending on whether each Autoform DM environment (Dev, Test, and Prod) will share a Keycloak instance or will each have a dedicated instance, include text in the name to indicate the environment or purpose of the Autoform DM instance.
In Supported account types, select:
Single tenancy scenario: Accounts in this organizational directory only
Multi-tenancy scenario: Accounts in any organizational directory
For Redirect URI, follow these steps:
Select Web from the Select a platform list.
Enter the SSO redirect URL.
Use the following URL syntax:
https://<keycloak host>:<keycloak port>/realms/formpipe-dm-realm/broker/azuread-idp/endpointAppropriately substitute
<keycloak host>and<keycloak port>.If the Keycloak hostname and port are not currently known, ensure that you return later to appropriately update Redirect URI.
Click Register.
A companion enterprise app is automatically created.
The image below is an example Autoform DM app registration.
Run Scripts Supplied by the Lasernet Group
Instead of manually creating the app registration and enterprise app through the Microsoft Azure portal, you can run scripts that create these items. If you want to use this method, request the scripts from the Lasernet Group.
Configure the App Registration and Note the Application ID
Navigate to the newly created app registration and follow these instructions:
On the Token configuration page, add a groups claim. When you add the groups claim, select Groups assigned to the application.
If using role-mapped access, create appropriate app roles.
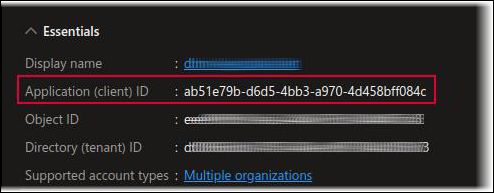
Note the Application (client) ID. You will need this ID value when you configure Keycloak.
Generate a Client Secret
To generate a client secret for the app registration (so that it can be connected to Keycloak), follow these steps:
On the Certificates & secrets page, click the Client secrets tab.
Click New client secret.
Enter a suitable Description. For example: KeyCloak Client Secret.
Select an appropriate lifetime from the Expires list. The Lasernet Group recommends 365 days (12 months).
Important
Because a client secret has an expiry date, you must “rotate” the client secret before it expires. This is a critical task to prevent SSO downtime.
Ensure that you set a reminder to complete the rotation process before this new client secret’s expiry date arrives.
Click Add to create the client secret.
Important
After Microsoft Entra ID creates the client secret, ensure that you copy its Value and record it in a secure location, because after you navigate away from the current page the Value will become hidden.

Rotate the Client Secret
Because a client secret has an expiry date, you must “rotate” it (or in other words, replace it) in the future, before it expires:
Before the current client secret expires: Generate a new client secret (as described in Generate a Client Secret above).
Apply the new client secret to the Keycloak configuration.
Test that the SSO implementation works with the new client secret.
After you have proven that the new client secret works: Delete the old client secret.
Configure Access Management
Microsoft Entra ID provides several facilities that enable you to control who has access to the Autoform DM service, and how.
To complete the following tasks, you must modify the relevant enterprise app. You can access it through:
The Enterprise applications area of Microsoft Entra ID.
The Managed Application in local directory link in the app registration’s Overview page.
Use the Assignment Required Option
The Lasernet Group strongly recommends that (on the Properties page for the enterprise app) you set Assignment required? to Yes.
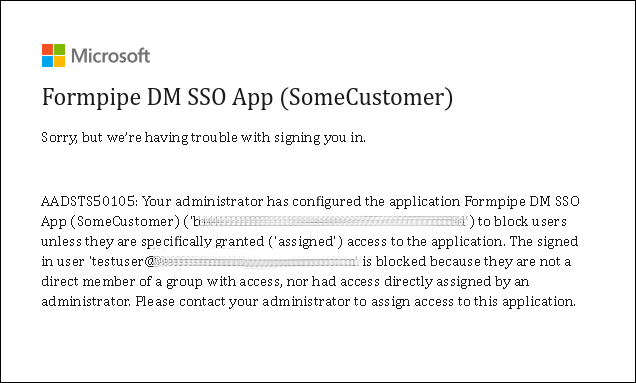
If set to Yes, a user must be explicitly assigned access, either directly or as a member of a group, to the application before they can use it. If a user who is not assigned attempts to access the service, they will see a Microsoft Azure error message indicating why they cannot do so. Setting to Yes also helps to avoid any issues around Entra ID groups not being mapped correctly, because it ensures that only assigned groups are included in tokens. If this setting is set to No and a user has a large number of group assignments, some of their group assignments might be omitted from the token.
Assign Users and Groups
The Users and groups page for the enterprise app enables you to assign users and groups to the application.
It is strongly recommended that you do not directly assign users to the application. Instead, create administrative groups to manage access (if they do not already exist), assign users to these groups, and then assign those groups access to the application.
If you want particular groups to be included in the security token generated by Microsoft Entra ID (and consequently available for mapping in Keycloak), you must assign those groups to the application. This is required regardless of the current setting of Assignment required.
Note
If a user that is not assigned to the enterprise app attempts to access Autoform DM, they will see the following message.
User Consent
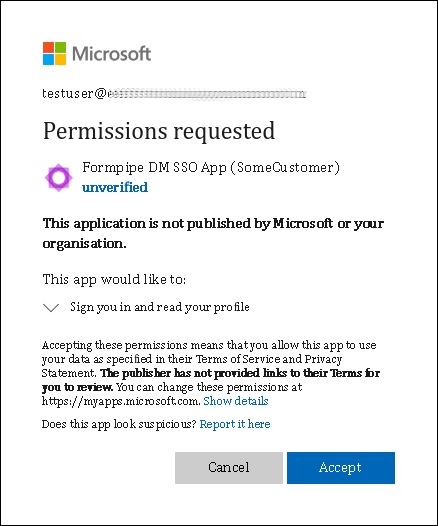
Depending on the Entra ID configuration, it is possible that when users attempt to access Autoform DM via SSO for the first time, their web browser will display a page asking them to approve Autoform DM’s access to their Entra ID profile, or asking them to request the permissions that will allow them to access Autoform DM.
.png)
If this happens, the user must approve the request. Or, they must submit an approval request for an administrator to grant these permissions, which will delay the user’s access to the application until their request is approved.
Because access to Autoform DM is determined by assignment to application groups, this permission request step can add an undesired barrier for users. To avoid this, consider granting “Admin consent” to allow any user within your tenant to use the app without an administrator having to first grant them permissions.
To do so, on the Permissions page for the enterprise app, click Grant admin consent.
Next Steps
The next stage of the process is to install and configure Keycloak.