Commit Configuration Changes to the Repository
- 16 Apr 2026
- 4 Minutes to read
- Contributors


- Print
- PDF
Commit Configuration Changes to the Repository
- Updated on 16 Apr 2026
- 4 Minutes to read
- Contributors
- Print
- PDF
Article summary
Did you find this summary helpful?
Thank you for your feedback
Applies to: Lasernet Core 11
After you have created and tested your changes to a configuration (which result in a quality-assured configuration that can be confidently deployed to production Lasernet Core environments), you can commit your changes to the Config Server’s repository.
Committing changes creates a new revision of the configuration. You select which changes from the “workspace” to commit. After you create the new revision, you can use the Deploy Commit feature to send it to a production Lasernet Core environment.
Tip
Typically, a commit is a quality-assured set of one or more completed changes that together implement a single, specific improvement to the configuration. If you have made multiple changes that do not all contribute towards the same improvement, consider doing multiple commits that logically group the changes.
For example, suppose that you have changed the folder that a File Input module reads files from and you have also added an image to a form design. First, commit the change to the File Input module; this action will create a new revision. Then, commit the change to the form and the new image in the Resources area; this action will create a further new revision. If you subsequently deploy the second new revision to a production Lasernet Core environment, it will contain both improvements.
Important
To prevent Lasernet Core performance issues, do not commit:
Any resource files that the workflow defined by the configuration does not use.
Any resource files that are not useful for maintenance purposes.
To achieve this, ensure that when you click Save Resources (to add resource files to the workspace), you select only files that are necessary or useful. For example, do not save images that are unused by the forms in the configuration or grab files that will not be essential in the future for testing the configuration. Be selective when choosing which resource files to save to the workspace, so that any later commits contain only necessary or useful resource files.
It is also important that you do not commit unfinished changes to the repository.
If you do not follow this advice, the configuration will grow very large because it will contain a large number of commits, or it will contain some commits that are very large in size. If a configuration is very large, Lasernet Core might be unable to load it.
Note
For Lasernet Core 10 documentation on this subject, see the Lasernet Config Server and Deployment Guide.
To commit your changes to the configuration, follow these steps:
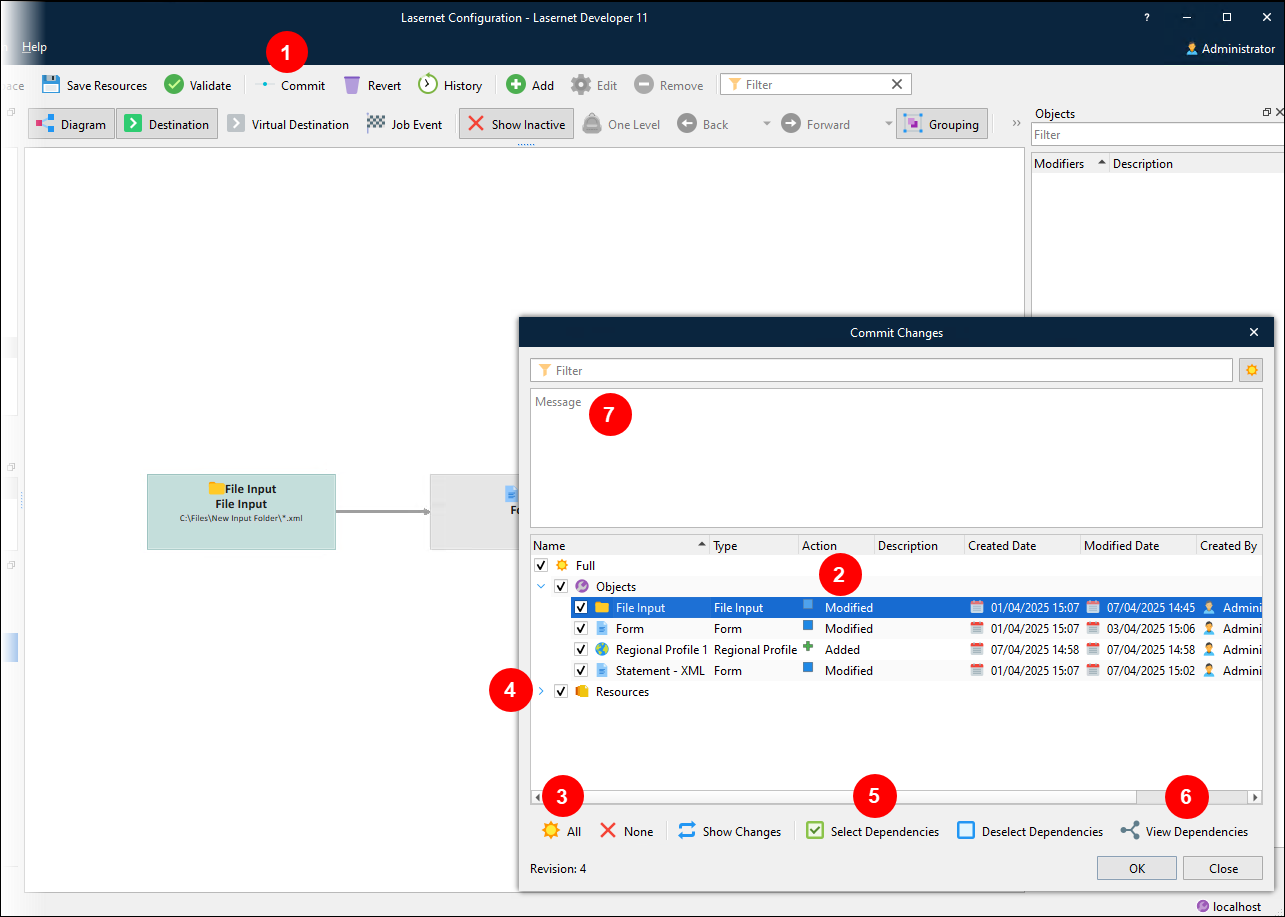
In the Lasernet Developer toolbar, click Commit (see 1 in the image below).
In the Commit Changes window, select the changes that you want to commit:
To include a change in this commit, select its checkbox.
The Action column (2) describes whether an item was added, modified, or removed.
To select all the changes, click All (3).
To deselect all the changes, click None.
Click the arrow (4) beside an item (such as the Resources folder) to reveal the items within it.
To help you select all necessary objects, use the object dependency analysis and selection tools that are provided. See the next step for more information about these.
A revision of a configuration must contain a complete set of the objects (such as modules, forms, and regional profiles) that are a part of the workflow specified in Lasernet Developer. If an object relies on another, the latest revision should contain the latest version of both objects. The Commit Changes window provides object dependency analysis and selection tools, which help you select all necessary changed objects when you commit changes. If you do not do so, the configuration might fail to run correctly on a production Lasernet Core environment.
After you select an item in the Objects part of the list, click Select Dependencies (see 5 in the image above) to automatically select all other objects in the Commit Changes window that are related to the selected object by reference. For example, a File Input module might contain a reference to a Form engine (as a destination); a form might contain a reference to a regional profile (because that regional profile is applied to a sheet of that form).
Note
Lasernet Developer does not analyze:
More than one level of dependency.
References used by script functions.
References from JobInfo substitution.
DataType profiles used from Web Server input modules.
Click Deselect Dependencies to clear the checkbox for any object that is related to the selected object. The selected object remains selected.
Click View Dependencies (6) to display all dependencies on the selected object, including objects that are not in the Commit Changes window.
.png)
Important
The scope of the dependency analysis and selection tools above does not include resources.
As a result, when you want to commit changes in the Resources folder (such as adding or removing files in the Grab, Images, or Overlay folders), you must ensure that you select the added files in the Commit Changes window.
If you do not select these files, they will not be committed. If any committed objects in the configuration use uncommitted files, the configuration might fail to run correctly on a production Lasernet Core environment because those objects use those files, but the files are not present in the new revision.
In the Message area (7), clearly describe the changes that this commit contains.
Click OK. Lasernet Developer displays a progress bar.
After the commit is complete, Lasernet Config’s repository will contain a new revision of the configuration, which includes the selected changes.