Add Grab Files to a Form
- 15 Apr 2026
- 10 Minutes to read
- Contributors


- Print
- PDF
Add Grab Files to a Form
- Updated on 15 Apr 2026
- 10 Minutes to read
- Contributors
- Print
- PDF
Article summary
Did you find this summary helpful?
Thank you for your feedback
Applies to: Lasernet Core 11 and 10 (not Lasernet Essentials / Professional / Advanced)
A grab file is a capture of a Lasernet Core job’s data at a specific point during the processing of that job by a Lasernet Core environment. For example, a grab file could be captured after an input module in a Lasernet Core workflow has read a received input file. A Lasernet Core environment can be set up to capture grab files when modules or forms are processed. Grab files can serve as representative input data files that you can design forms against.
For text grab files, the fields in the data are typically structured in rows and columns making it possible to quickly identify their position within the grab file. Other grab files can be in XML format or other data formats. If a grab file is in LNJOB format, it is a grab file that contains JobInfos and also the job’s data (as a JobInfo called JobData).
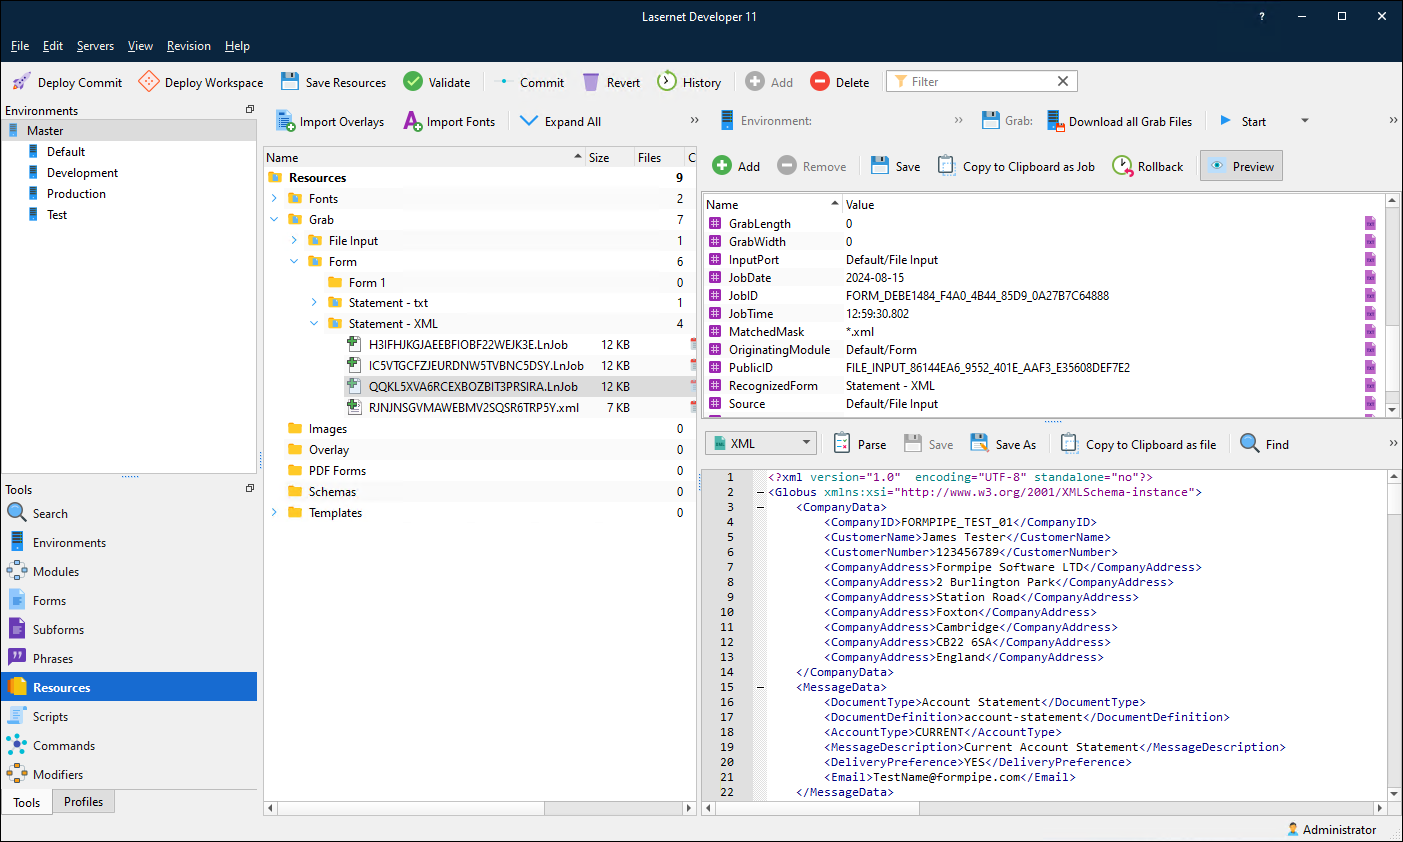
In the example above (of an LNJOB grab file displayed in Lasernet Developer 11), the grab file contains bank statement data. The upper area on the right-hand side displays the JobInfos in the grab file, and the lower area displays the job’s data (which, in this case, is XML data) which you can view or modify.
Add Grab Files to the Data Area in the Form Editor
Because a form and its sheets are designed to process data that has a specific structure, it is essential that the data files that you use to develop and test the form have that same structure. Add grab files that have this structure to the form.
You must add at least one grab file to the form. For information on how to do this, see the information (below) for your version of Lasernet Core.
However, you can add multiple grab files; each grab file could contain different data that tests your form design in different scenarios. For example, one grab file could contain a small number of line items, whereas another could contain a large number of line items.
After you add grab files, each file is presented in a dedicated tab in the data area of the Form Editor. Follow the steps for your version of Lasernet Core.
Lasernet Core 11
There are multiple ways to add grab files to a form:
Open a grab file from the currently loaded configuration’s Resources area.
Download the most recent grab file (for this form) from the relevant Lasernet Core environment.
Drag and drop a file from Windows Explorer.
Each of these methods is described below.
Generate Grab Files
If you need to generate a grab file to open, you must turn on grab mode (for form engines) on the Lasernet Core environment that is processing your form. Then, you must cause Lasernet Core to process your form (for example, by sending a data file to an input defined by the Lasernet Core configuration).
Note
Lasernet Core will generate a grab file for the form only if its form criteria is satisfied.
To turn on grab mode, ensure that the correct Environment is selected in the Server toolbar, then click Start in the Grab toolbar. All form engines that the selected environment is running will start generating grab files when they process a form.
For more information about starting and stopping grab mode, see Turn Grab Mode On and Off.
After the Lasernet Core environment generates grab files, you must download them to the Resources area of the Lasernet configuration that you are working on. Then you can add them to your form (as described in Open a Grab File below). For more information about downloading grab files, see:
Download Grab Files When Using the Open Grab File(s) Window.
The part of the Lasernet Developer guide that describes the Resources area of a configuration.
The Structure of the Lasernet Core Configuration’s Resources Area
The folder structure in the Lasernet Core configuration’s Resources area contains a Grab folder, which contains a subfolder for each module that grab files are available for. Form engine subfolders contain further subfolders that organize grab files by the form they correspond to.
The Form Editor downloads grab files from Lasernet Core environments into the appropriate part of this folder structure.
For example:
A grab file captured by a File Input module (whose name is XML Input Files) will be in Resources > Grab > XML Input Files.
A grab file that was captured when a form engine (whose name is Form Engine 1) processed a form named Statement – XML will be downloaded to Resources > Grab > Form Engine 1 > Statement – XML.
Open a Grab File
To open a grab file from the configuration’s Resources area, follow these steps:
In the Grab toolbar, click Open (see 1 in the image below).
If the appropriate grab file folder is not already open in the Open Grab File(s) window, navigate there in the Folder panel (2).
In the central panel, click the grab file that you want to open (3).
Note
If you know the server has recently captured a grab file but it is not present in the relevant folder, you can download the grab file from the Lasernet Core server. See Download Grab Files When Using the Open Grab File(s) Window.
In the right-side panel, check that the grab file data in the selected grab file is as expected. If necessary, you can modify the data in grab file.
For LNJOB grab files: The right-side panel displays the JobInfos and JobData in the grab file and provides tools to modify or copy them.
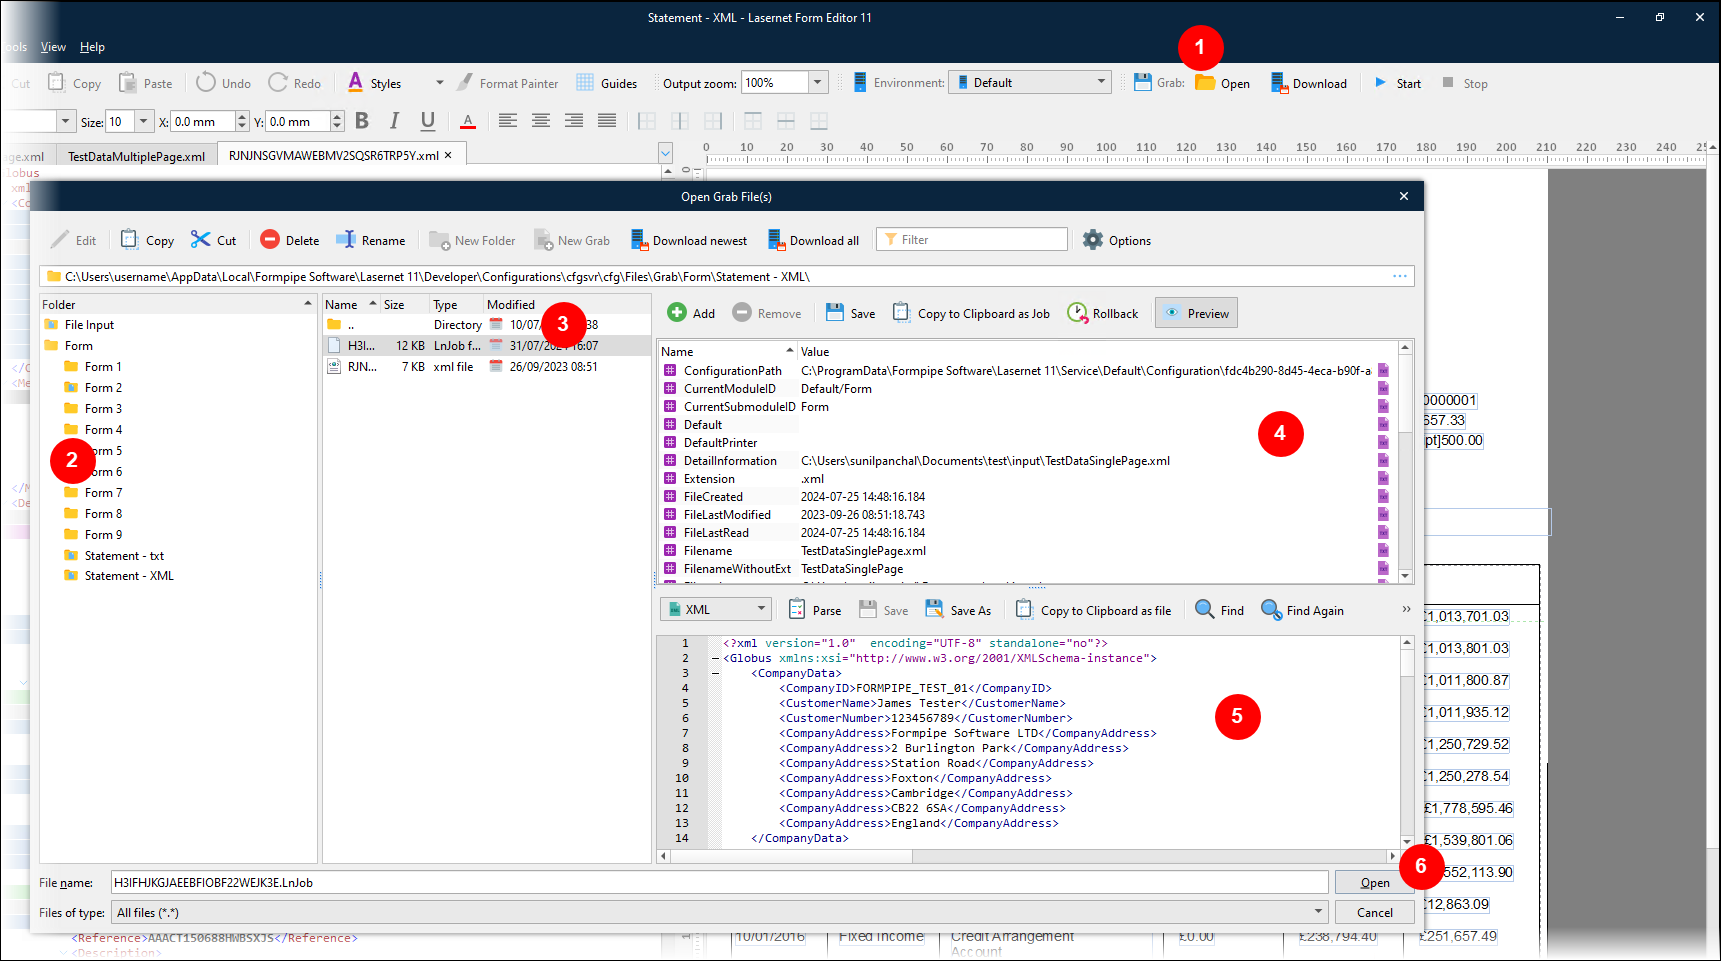
The upper area (4) displays the JobInfos in the grab file. Scroll to view all the JobInfos.
Click Add (above that area) to add a JobInfo to the grab file. To delete a JobInfo from the grab file, click the JobInfo and then click Remove. Click Save to save your changes to the grab file.
To copy the grab file to another location in the Folder panel, click Copy to Clipboard as Job, navigate to the destination folder, then click Paste in the toolbar at the top of the Open Grab File(s) window.
If Preview is clicked: The lower area (5) displays the content of JobData. JobData is a JobInfo that contains the job’s main data.
Note
In this lower area, you can modify the JobData content, so that you can test different data values. To save your changes, click Save in the toolbar above the JobData content. The XML is validated to ensure that the data is not malformed after you edit it.
The toolbar above the JobData content provides tools that are appropriate for the content’s data type. For example, Lasernet Form Editor provides a Parse tool for XML data.
To copy the JobData as a standalone file, click Copy to Clipboard as file, navigate to the destination folder, then click Paste in the toolbar at the top of the Open Grab File(s) window. Lasernet Form Editor pastes a file of the appropriate type that contains only the JobData content; for example, an
.xmlfile.
For other grab files (such as .xml files): Other grab files contain only job data. The right-side panel will be as described in If preview is clicked above.
To select multiple files, press Ctrl and click files to add them individually to your selection, or press Shift and click files to add a range of files to your selection.
Click Open (6). Lasernet Form Editor adds the selected grab files to your form.
Download Grab Files When Using the Open Grab File(s) Window
The toolbar at the top of the Open Grab File(s) window contains the Download newest and Download all buttons.
These buttons download generated grab files from the environment selected in the Form Editor. The downloaded files become available to select in the Open Grab File(s) window.
After the Form Editor downloads a grab file, it is deleted from the Lasernet Core environment that generated it.
Download the Most Recent Grab File for This Form
To download the most recently generated grab file, click Download in the Grab toolbar in the Form Editor.
If the most recently generated grab file was generated by the form that you are working on, the Form Editor will download that grab file and open it in a dedicated tab in the Form Editor data area.

Tip
In the Grab toolbar, you can Start grab mode (for the currently selected Environment), and then after you have passed data through the Lasernet Core workflow, you can download the resulting grab file and then Stop grab mode.
Drag and Drop a File from Windows Explorer
You can drag and drop a file from Windows Explorer into the left-side data area of the Form Editor. For example, you might be sent grab files directly.
The Form Editor will display the following options:
Copy to grab folder: Lasernet Form Editor copies the file from its current Windows location to the relevant Resources > Grab > [Form Engine name] > [Form name] folder in the current configuration’s Resources area. Lasernet Form Editor will also rename the file. The Form Editor opens the copy of the grab file.
Use original file location: The Form Editor opens the grab file from its current Windows location. The file is not copied into the Lasernet Core configuration.
Click an option, then click OK.
Note
The option window might be obscured by the Windows Explorer window. If this happens, click the Form Editor window.
Lasernet Core 10
Click the Form > Select Grab File menu item and browse to the directory on your computer where the relevant grab file is located. This is usually the Grab subdirectory of your configuration.

Note
Information about how to generate grab files is available in the Lasernet Developer guide.
When you have located the correct grab file, press the Open button to display it in the left-hand window of the Lasernet Form Editor. You can open several grab files simultaneously by holding down the Shift or Ctrl key and clicking them. They are displayed as tabs in the left-hand pane of the Form Editor window.

Note
XML data is represented in a tree structure with nodes identifying the variables and containing the actual data. From the View menu, you can switch the XML input view between Full XML, XML without end tags and XML as Table.
Use the F12 key to download the last saved grab file, that belongs to the open form, from the server. When using this functionality, you must be able to connect to a Lasernet Core server listed in the main configuration.

If more than one server is available, you will be prompted to choose which of the servers you want to download the grab file from. When a grab file has been downloaded, it is deleted from the directory containing the grab files on the server.

If no new grab files exist for the current form, you will receive a warning that no grab files are available for the current form on the server.

If the grab file found is older than the currently open one in the selected grab tab, it can be downloaded and replaced in the current tab or opened in a new tab.


You can also click the ![]() button to select the last grab file from the server for the open form, or select a specific grab file for one of the already loaded grab files.
button to select the last grab file from the server for the open form, or select a specific grab file for one of the already loaded grab files.
You can also load an additional grab file (.lnjob). This is an additional setting that must be activated when configuring the grab mode. The grab file contains the following information:
JobData (.grab): Contents of the JobInfo “JobData”. No JobInfos are available.
JobInfos (.lnjob): Full Job including all JobInfos.
For your convenience, you can also drag and drop a file from Windows Explorer or an equivalent file manager.
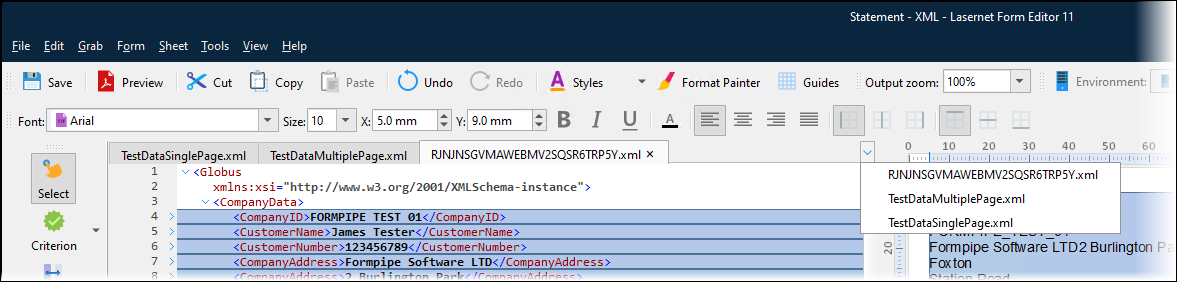
Switch Between Grab Files
To switch between the open grab files, click grab file tabs or select grab files from the list displayed by the down arrow at the upper-right corner of the data area.
View Grab JobInfos
To view the Grab JobInfos, activate View > Grab JobInfos (Ctrl+Shift+G).
If a JobInfo grab file (.lnjob) does not exist, the JobInfos view only shows the system JobInfos generated by the Form Editor.
The JobInfo view contains a Pre tab and a Post tab. The Pre tab shows the loaded JobInfos and the Post tab shows the result of JobInfos created by the system and by the user in the current sheet.

You can Add and Remove JobInfo from the list for testing purposes, Save the result into the grab file or Rollback the changes added to the list. You can only Rollback until the last Save event.
Working with a JobInfo grab file allows you to use the values of grabbed JobInfos during form design. This is a powerful feature when testing scripts, modifiers, and database commands that retrieve and change the value of JobInfos. The result of the JobInfos will often have an effect on the final design. It also shows the result of the design when processed through the Form Engine on the Lasernet Core server.