Add a Search Configuration
- 13 Apr 2026
- 16 Minutes to read
- Contributors


- Print
- PDF
Add a Search Configuration
- Updated on 13 Apr 2026
- 16 Minutes to read
- Contributors
- Print
- PDF
Article summary
Did you find this summary helpful?
Thank you for your feedback
To enable users to find documents in the Keep archive and view them along with their metadata, you can create search configurations. Users can select a search configuration when they start Keep, and then use it to search the archive for documents.
Note
Internal users can also use the Keep REST API to find, view, and download documents, regardless of permissions granted in the search configuration. When Document Sharing is enabled, they can also share those documents with external users. To prevent this, turn on Document Access Control in the Keep server settings to enforce document access verification on all API requests.
In summary, to add a search configuration to Keep, follow this process:
Set basic properties and settings for the search configuration, such as Label and Name. This stage also includes associating document definitions with the new search configuration, to specify the types of document this search configuration will look for.
Add query keys (document keys) to the search configuration. This step determines which metadata users can provide search criteria for.
Add results keys to the search configuration. This step determines which metadata will appear in the search results table.
Add editable keys to the search configuration. This step determines which document metadata the user can modify when they view the full metadata set for each search result.
Specify which user groups and users can access the search configuration.
Keep provides a user-friendly experience that guides you through this process. The following sections of this page describe how to complete each stage of this process.
Note
You must be a Keep administrator to add or modify a search configuration.
Tip
To learn how users use search configurations to find documents, see Search the Archive.
1. Start the Create New Search Process
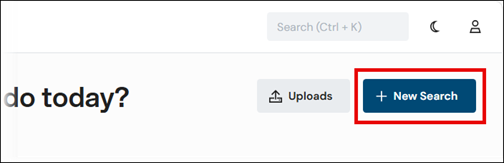
To begin the process of adding a search configuration to Keep, click New Search on the Keep home page. The Create New Search process begins.
The Create New Search process is a straightforward page-by-page experience. A progress indicator shows you how far through the process you currently are.
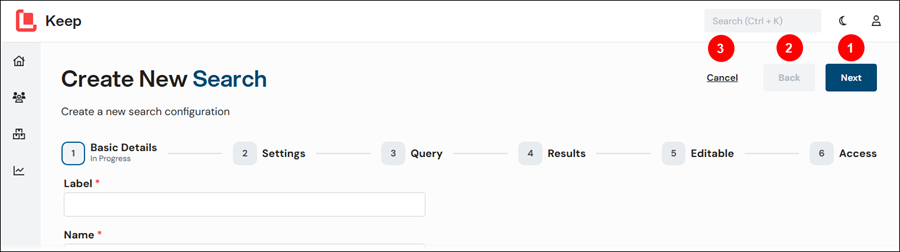
Click Next (see 1 in the image below) and Back (2) to navigate between pages of the process. Click Cancel (3) to discard the new search configuration and return to the home page.
2. Set Basic Properties for the Search Configuration
To complete the Basic Details page of the process, follow these steps:
Enter a unique Label (see 1 in the image below). This is the search configuration’s “display name”. Keep uses this label to identify the search configuration in various parts of the application, such as on the search configuration’s tile on the home page.
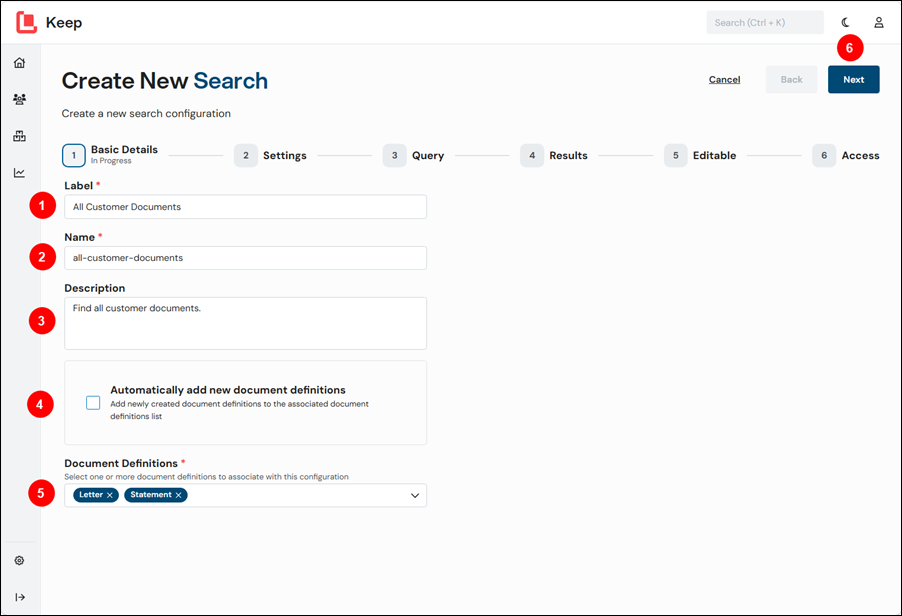
Enter a unique Name (2). Primarily, Keep uses Name internally when processing actions. It is displayed in only some areas in the Keep user interface (such as in the audit log). When you enter a Label, Keep automatically generates a Name. However, you can modify the generated name.
Note
Name must contain only lowercase letters or numbers or hyphens. It cannot contain consecutive hyphens, or start or end with a hyphen.
Optional: Enter a Description (3).
Part of this process is to add existing document definitions to this search configuration (see next step). However, it is possible for administrators to add document definitions to Keep after you create this search configuration. To automatically add any new document definitions to this search configuration, select Automatically add new document definitions (4).
The search configuration will only search for documents that have particular document definitions applied to them. To specify which types of document this search configuration will look for, select them from the Document Definitions list (5). For example, suppose that you have created Letter and Statement document definitions in Keep, but you want your new search configuration to retrieve only statements; in this scenario, select only the Statement document definition from this list.
To move to the next stage of the process, click Next (6).
3. Set Basic Settings for the Search Configuration
To complete the Settings page of the process, follow these steps:
Optional: Enter a Search Message. This message is displayed above the search criteria boxes when a user starts the search process.
.png)
Specify Maximum Search Results. This setting limits the number of search results that the search returns.
Specify Maximum Results Per Page. Keep paginates search results. This setting controls the size of each page.
The Visibility area controls whether the search retrieves documents that are marked as hidden in the archive or retrieves visible (unhidden) documents. It also specifies which related actions users can take on the documents in the search results.
Click Visible Documents or Hidden Documents to specify which documents the search retrieves.
If you clicked Visible Documents: Select Enable Document Hide to allow users to hide documents that the search retrieves.
If you clicked Hidden Documents:
Select Enable Document Restore to allow users to unhide hidden documents.
Select Enable Document Deletion to allow users to delete documents from the Keep archive.
Note
Enable Document Hide, Enable Document Restore, and Enable Document Deletion support the Keep document deletion process.
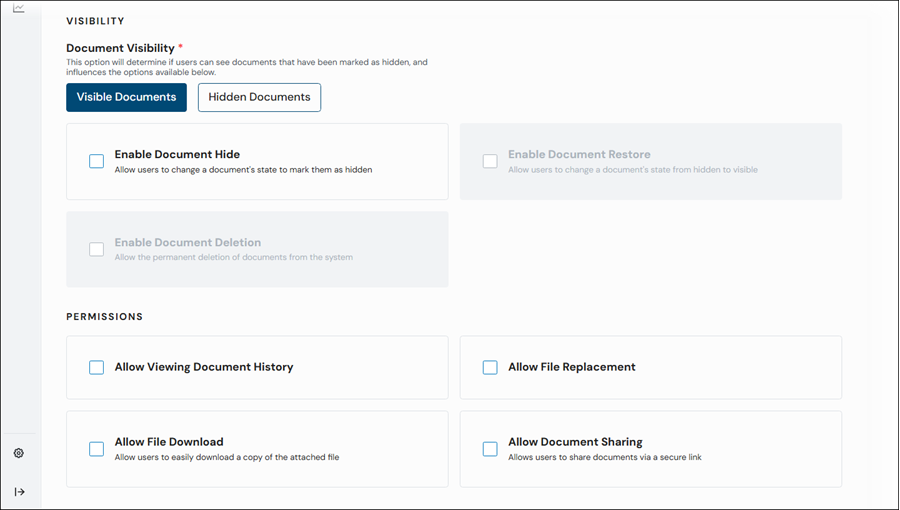
In the Permissions area:
Select Allow Viewing Document History to allow users to view and compare past revisions of archived documents.
Select Allow File Replacement to allow users to replace archived documents’ files.
Select Allow File Download to allow users to download files found through the search.
Select Allow Document Sharing to allow users to create secure links to documents found through search that they want to share with external users.
Note
Document sharing using secure links is available in Lasernet Keep 11.1 and later.
To move to the next stage of the process, click Next.
4. Specify Query Keys for the Search Configuration
The Query page enables you to specify which metadata fields users can use as search criteria.
Add a Query Key
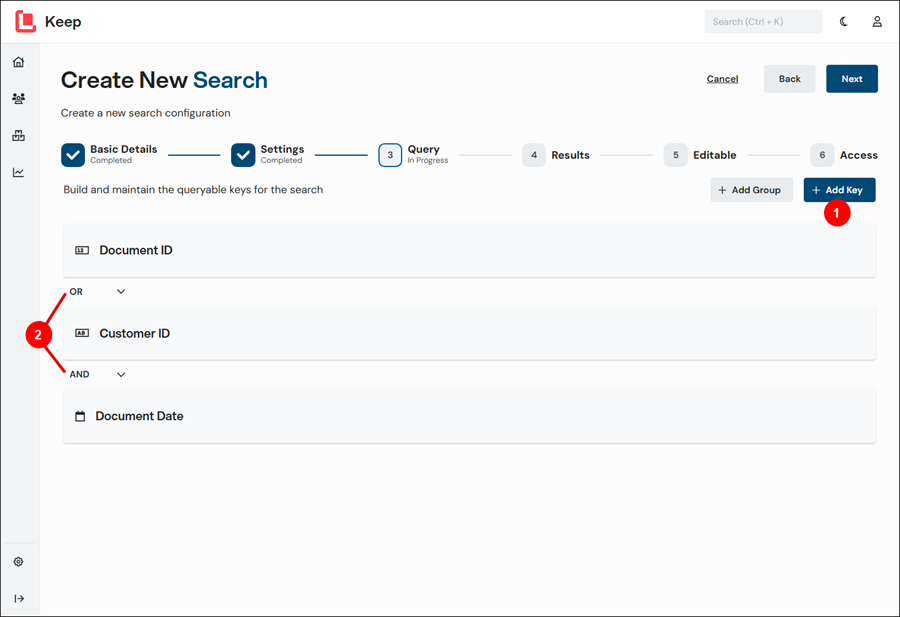
To add a query key to the search, click Add Key (see 1 in the image below).
Note
If you do not add any query keys, users cannot provide any search criteria. As a result, the search will always return all documents.
Specify Operators
If the Query page contains more than one query key or contains one or more groups, select the operator (AND or OR) that Keep will apply between criteria (see 2 in the image above) or between criteria and groups.
These operators apply standard Boolean logic to search criteria; most significantly, AND operators are evaluated before OR operators.
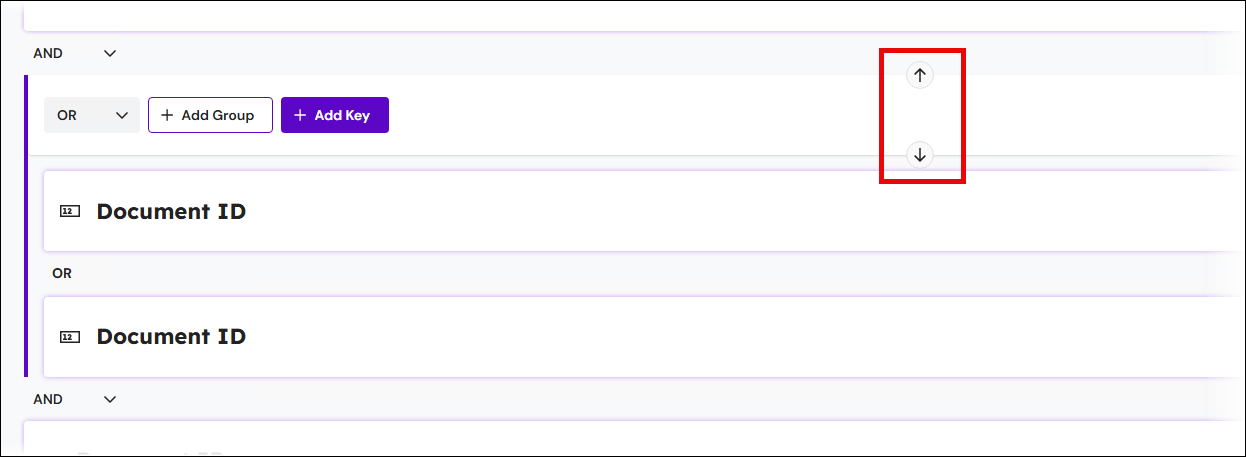
Reorder Query Keys
The order of query keys (and groups) on the Query page affects the order in which Keep displays them in the Search Criteria pane of the search.
To reorder query keys, click the arrow buttons on query key tiles.

Remove a Query Key
To remove a query key, click the menu button (three vertical dots) on its tile, and then select Delete.
Edit Query Key Properties
To modify a query key’s properties, click its tile. A Configure Query Key pane opens.
Click Confirm in the Configure Query Key pane when you have finished modifying properties.
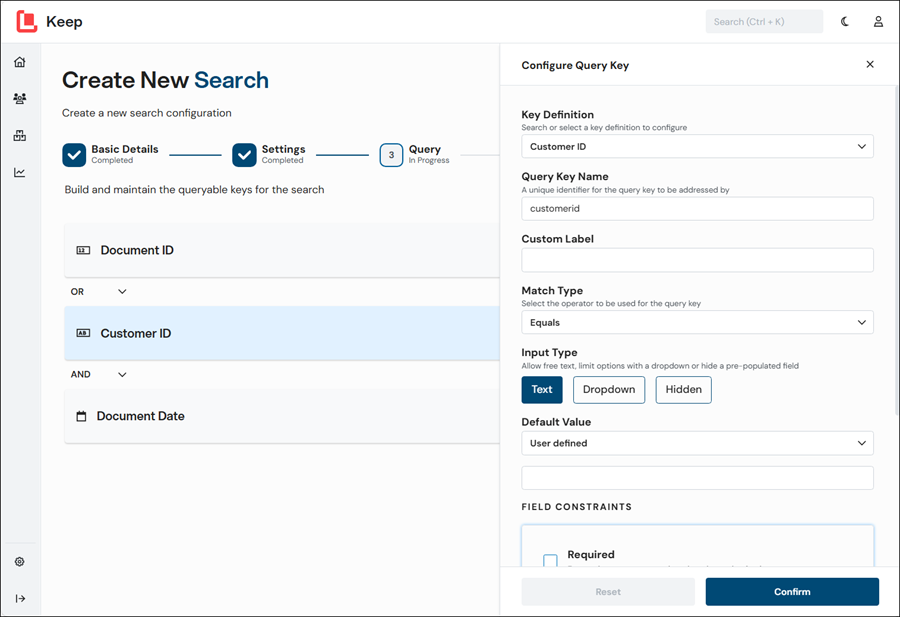
Key Definition
Select the key definition for this query key. To find the relevant key, you can type its name or scroll the list. You can select from the key definitions that are bound to the document definitions that this search configuration uses.
Query Key Name
A name that applications that integrate with Keep via its API will use to refer to this query key.
This field is automatically filled, but you can edit the name if necessary. Each query key in this search configuration must have a different Query Key Name to the other query keys; these names must be unique across the current search.
Custom Label
When a user starts the search configuration, Keep displays this label in the Search Criteria pane.
If Custom Label is blank, the Search Critieria pane displays the key definition’s name.
Match Type
The search operator for this query key. The match type determines how Keep will apply the entered search criteria value to the search.
Input Type
In the Input Type area, select how the user will provide their search criteria value for this query key (Text Input or Dropdown):
Text Input: A data entry field that the user enters a value into.
Dropdown: A menu that provides a predefined set of options.
Hidden: The query key is configured but not displayed to the user.
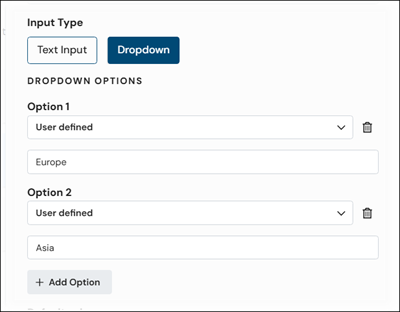
Dropdown Input Options
If you select Dropdown from the Input Type list, you must define the options that will be shown to the user of the Keep search.
Note
You must define at least two options.
In the Dropdown Options area, define the options that you want the user to select from. Click Add Option to add an option.
For each option, select a value type (for example, User defined or User’s Username), and then enter any additional text that is required. For a description of each value type, see the descriptions in the Default Value section below. For some types of query key, only User defined is available.
All the options that you define become available to choose from in the Default value list for this key binding.
Click the trashcan button beside an option to delete it.
In the following example of a String key, the dropdown list that the user will see in the search configuration will contain two options that the user can choose from: Europe and Asia.
Default Value
Specifying a good default value can accelerate the search process for the user.
Dropdown input keys: For a "dropdown input" query key, select the default value for the query key from the list. You can select from the values that you specified when setting up the dropdown list options (above).
Text input keys: For a "text input" query key, select one of the following options and then (where necessary) select or specify the default value in the adjacent list or box:
User defined: Enter the value that you want the key to have.
User property: A particular user property that has already been defined. Select a user property from the list.
User's Username
User's Email
Note
For numeric and date keys, only User defined is available.
Note
Extended properties for users must already be defined in Keep for them to be available as an option when you select User property.
Required
If you select Required, the user must enter search criteria for this query key.
If a key is required, Keep displays an asterisk icon on its tile.
.png)
Read-only
If you select Read-only, the user cannot change the search criteria in this query key. An appropriate default value must be set because the user cannot change the search criteria.
If a key is read-only, Keep displays a lock icon on its tile.
.png)
Forced Uppercase
For String query keys, select Forced Uppercase to ensure that the user’s search criteria value contains only uppercase characters.
Add Groups
You can use groups to create more complex searches.
When performing a search, Keep considers grouped search criteria in isolation first, and then applies their outcome to the search alongside other search criteria. Depending on how it is set up, a group might apply the search critieria within it on an AND basis or an OR basis.
In the following example, the search will find documents whose archive date is earlier than 8th January 2025, and that relate to either customer 12345 or customer 67890.
.png)
Add a Group to the Query Page
To add a group, follow these steps:
Click Add Group (see 1 in the image below). Keep adds a group to the bottom of the Query page with an AND operator between it and the query key or group above it.
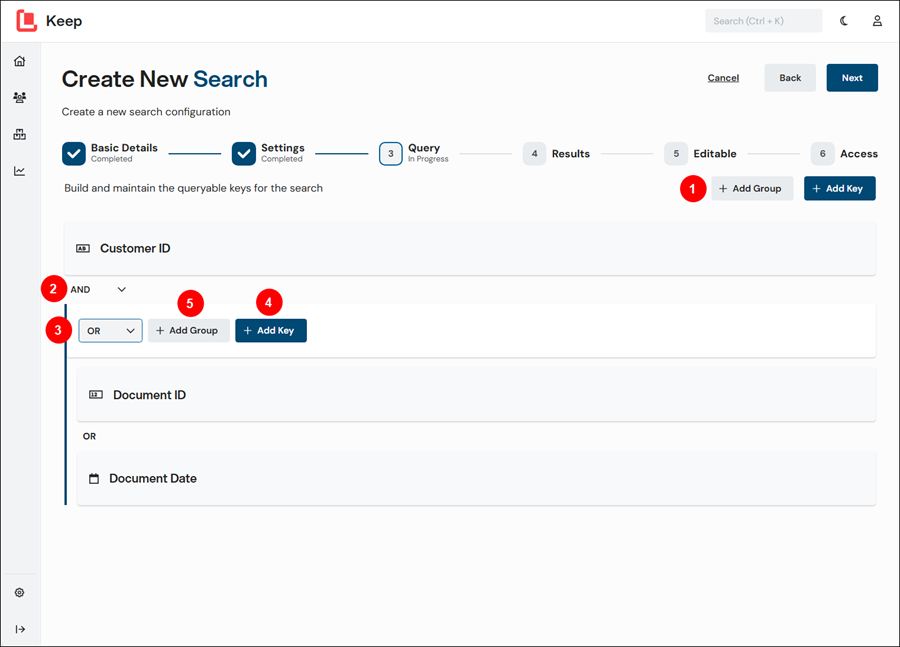
If necessary, change the operator between the new group and the query key or group above it (2).
In the banner of the group, select an operator (3). This operator is applied between every query key within the group.
To add a query key to the group, click Add Key (4).
To add a subgroup to the group, click Add Group (5).
The order of groups (and query keys) on the Query page affects the order in which Keep displays them in the Search Criteria pane of the search. To change the position of a group in the order, click the arrow buttons on the group’s banner.
Move to the Next Stage
To move to the next stage of the process, click Next.
5. Specify Results Keys for the Search Configuration
The Results page enables you to specify which metadata fields will appear as columns in the search results table. These keys are known as results keys. You can also specify the default sort order for the search results.
Add a Results Key
When you click Add Key on the Results page, Keep adds a results key to the page as a tile. For each tile, you can change which key is used and also change other properties (see the following instructions).
To add another key, click Add Key again.

Edit Results Key Properties
To edit the properties of a results key, click its tile. The Configure Result Key pane opens.
Click Confirm in the Configure Result Key pane when you have finished modifying properties.
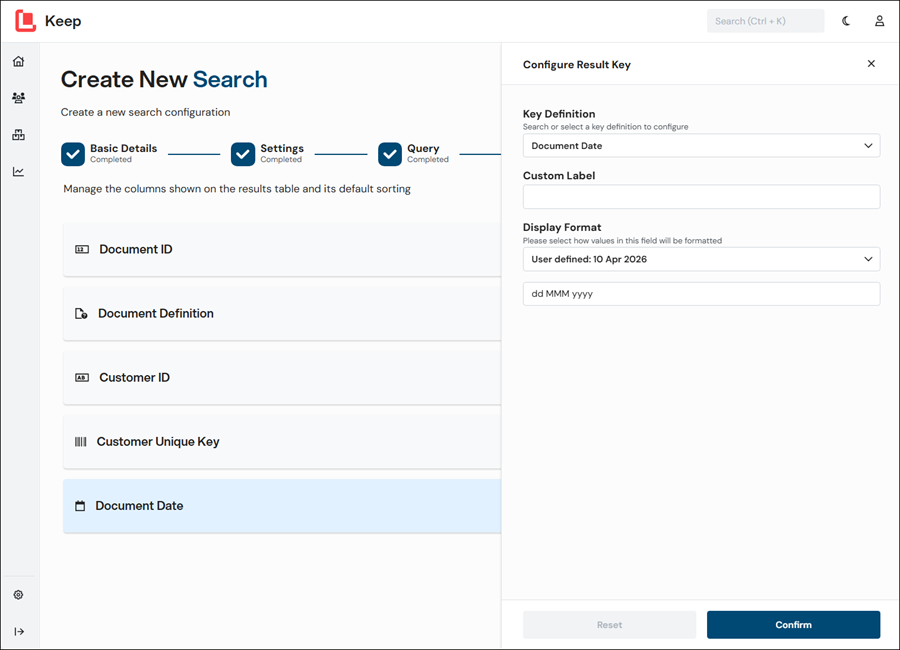
Key Definition
Select the key that you want to use from the Key Definition list. To find the relevant key, you can type its name or scroll the list.
Custom Label
Specify the text that Keep will use as the heading for this document key’s column in the search results table.
By default, Keep uses the document key’s name.
Display Format
For date keys, you can specify how Keep will format the date information in this key’s column.
Use a Predefined Format
Select a predefined format from the Display Format list.
Use a Custom Format
Select User defined and enter a custom format in the box below the Display Format list.
The following examples are all valid formats:
MM-dd-yyyyyyyy-MM-dddd MMM yyyyDDDDyyyyMMdddd/MM/yyyy HH:mm
Reorder Results Keys
The order of results keys on the Results page affects the column order in the search results table.
To reorder query keys, click the arrow buttons on query key tiles.
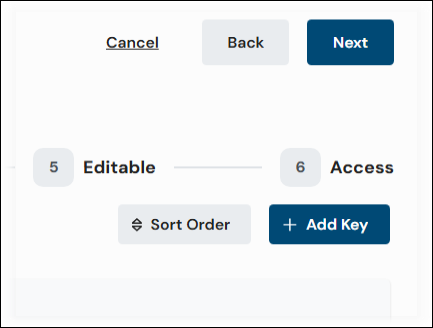
Modify the Default Sort Order for the Search Results Table
To modify the default sort order for the documents in the search results table, follow these steps:
Click Sort Order. The Sort Criteria pane opens.
To add a key as sort criteria:
Click Add Column.
.png)
Select a column from the list.
Click the arrow beside the list to toggle the sort order between ascending and descending.
Tip
To remove a column as sort criteria, click the x in its row.
To add another key, click Add Column again. Keep sorts the data in the specified order.
To finish specifying sort order, click the x in the upper-right corner of the Sort Criteria pane.
Move to the Next Stage
To move to the next stage of the process, click Next.
6. Specify Editable Keys for the Search Configuration
The Editable page enables you to specify which document metadata the user can modify when they view the full metadata set for each search result.
Document keys that are not specified as editable are presented as read-only when the user views key data for a document in their search results. Document keys that are specified on the Editable page as editable can have their metadata values edited by the user, who can then save the changes they have made to the document’s metadata.
To add an editable key, click Add Key. When you click Add Key, Keep adds an editable key to the page as a tile. For each tile, you can change which key is used and also change other properties (see the following information about properties).
To add another key, click Add Key again.

To edit the properties of an editable key, click its tile. The Configure Editable Key pane opens.
Click Confirm in the Configure Editable Key pane when you have finished modifying properties.
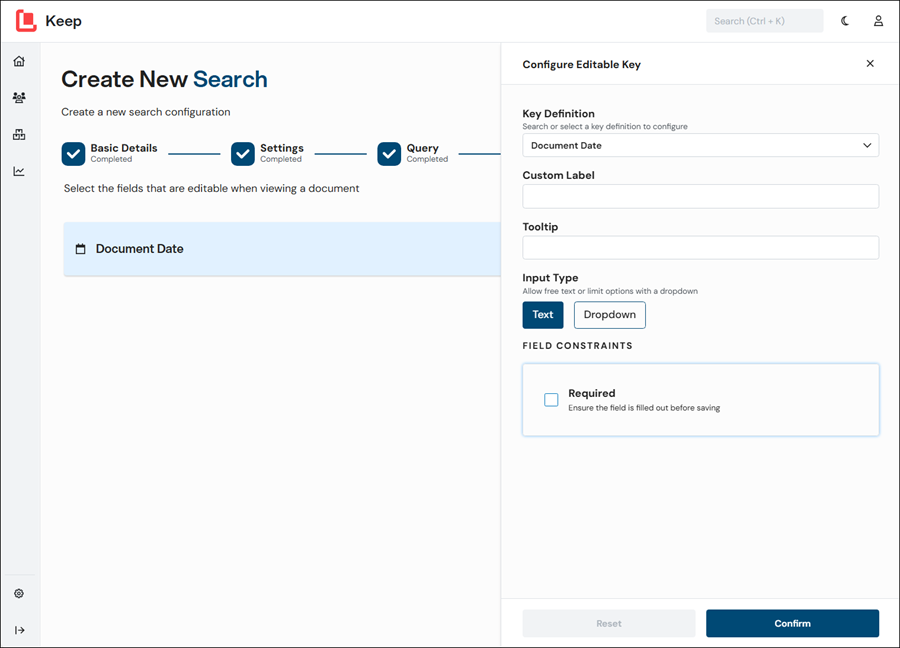
Key Definition
Select the key that you want to use from the Key Definition list. To find the relevant key, you can type its name or scroll the list.
Custom Label
Specify the text that Keep will use as the key’s label in the Key Data page for the search result.
By default, Keep uses the document key’s name.
Tooltip
Optionally, you can enter assistive text to help the user complete the metadata field. Keep displays the text when the user hovers the mouse pointer over the metadata field in the Key Data page for the search result.
Input Type
In the Input Type area, select how the user will provide a value for this document key (Text Input or Dropdown):
Text Input: A data entry field that the user enters a value into.
Dropdown: A menu that provides a predefined set of options.
Note
Input Type applies to only some types of editable key (such as date keys and String keys).
Dropdown Input Options
If you select Dropdown from the Input Type list, you must define the options that will be shown to the application user.
Note
You must define at least two options.
In the Dropdown Options area, define the options that you want the user to select from. Click Add Option to add an option.
For each option, select a value type (for example, User defined or User property), and then enter any additional text that is required. The following list describes some of the value types:
User property: A particular user property that has already been defined. Select a user property from the list.
User's Username
User's Email
User defined: Enter the value that you want the key to have.
Note
For numeric keys, User defined and User property are available.
For date keys, User defined and Today are available.
Note
Extended properties for users must already be defined in Keep for them to be available as an option when you select User property.
Click the trash can button beside an option to delete it.
In the following example of a String key, the dropdown list that the user will see in the search configuration will contain two options that the user can choose from: Europe and Asia.
Regex
To constrain acceptable entered values, you can enter a regular expression into the Regex Validation box. This is an optional property.
Note
The regular expression will apply to the entire string.
Required
If selected, the user must enter a metadata value for this key.
If a key is required, Keep displays an asterisk icon on its tile.
.png)
Move to the Next Stage
To move to the next stage of the process, click Next.
7. Grant Search Configuration Access to User Groups and Individual Users
To provide the correct users with access to the new search configuration (from the Keep home page), you must use the Access page of this process to grant those users access.
Access can be granted on a group basis (where all members of the selected groups are granted access) or on an individual user basis.
Note
Doing this grants users access to use the search configuration to find documents in the Keep archive. It does not grant administrative access (to modify the setup of the search configuration).
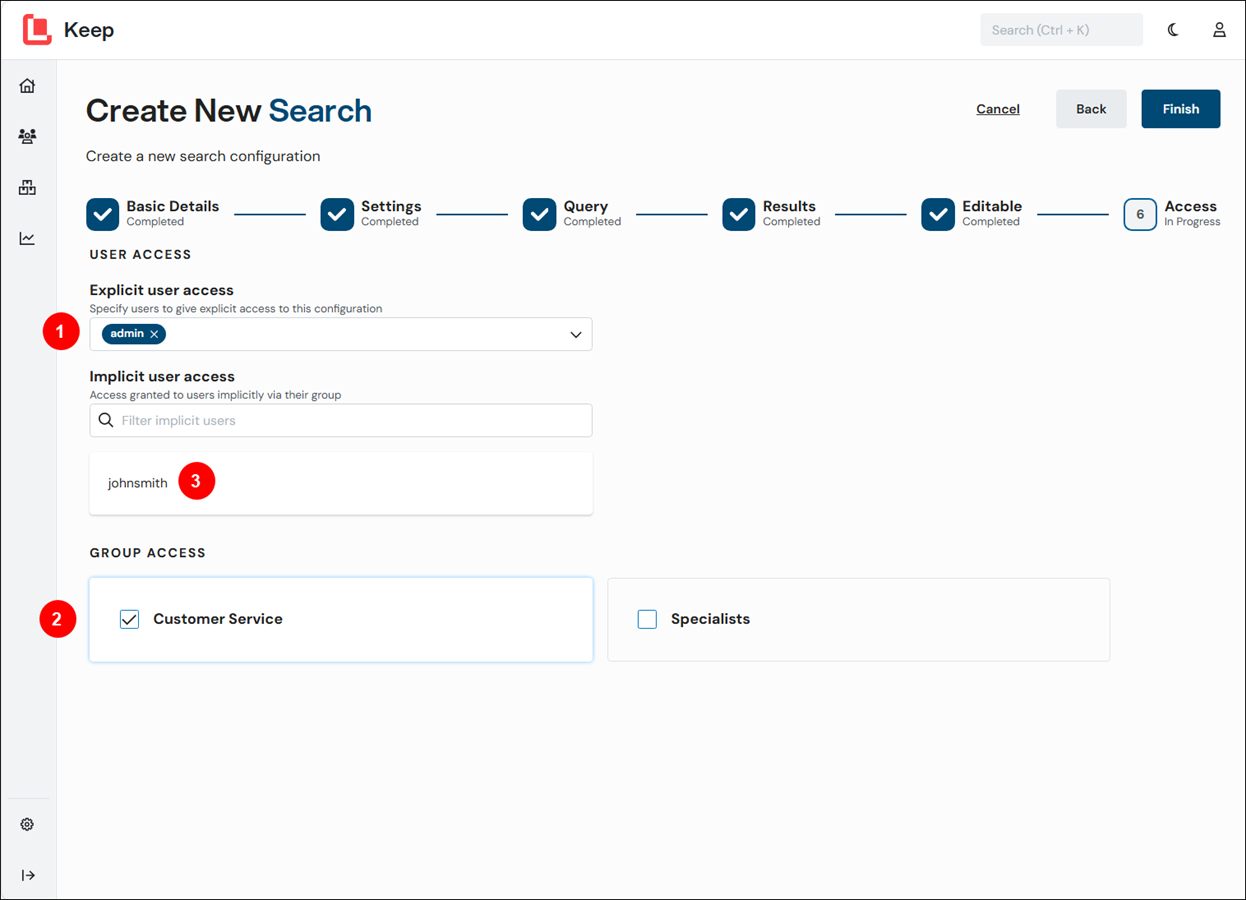
Grant Access to Individual Users
The User Access part of the page enables you to grant access to explicitly identified Keep users.
Select users from the Explicit user access list (see 1 in the image above).
To remove users, click the x icon on their user name.
Grant Access to Groups
The Group Access part of the page enables you to select user groups to grant access to. Users who are members of those groups will be able to access the search configuration.
In the Group Access area (2), select the checkboxes for the user groups that you want to grant access to. The names of those groups’ members are added to the Implicit user access list (3). You can use the Filter implicit users search box (above the Implicit user access list) to check whether particular users are in the list.
Members of subgroups are included if their parent group is selected.
8. Complete the Process and Save the New Search Configuration
To complete the Create New Search process, save your new search configuration, and make it available to users, click Finish.
The search configuration is now available to users on the Keep home page.
Important
The work you have done to create the new search configuration is not saved until you click Finish.