Add a Document Import Application
- 13 Dec 2024
- 16 Minutes to read
- Contributors


- Print
- PDF
Add a Document Import Application
- Updated on 13 Dec 2024
- 16 Minutes to read
- Contributors
- Print
- PDF
Article summary
Did you find this summary helpful?
Thank you for your feedback
To enable users to add documents to the Autoform DM archive, you must add import applications to Autoform DM.
In summary, to add an import application, you follow this process:
Add a new import application to Autoform DM and provide basic details and settings.
Configure the new import application:
The following sections describe how to complete each stage of this process.
Note
You must be an Autoform DM administrator to add or modify an import application.
Tip
To learn how users use import applications to archive documents, see Use a Document Import Application.
Add a Document Import Application
To add an import application to Autoform DM:
In the left menu, click Administration.
In the Managers column of the Administration page, click Application Manager.
In the menu bar, click New Application. The New Application - Basic Details page opens.
In the Application Type area, select Document Import (V2).
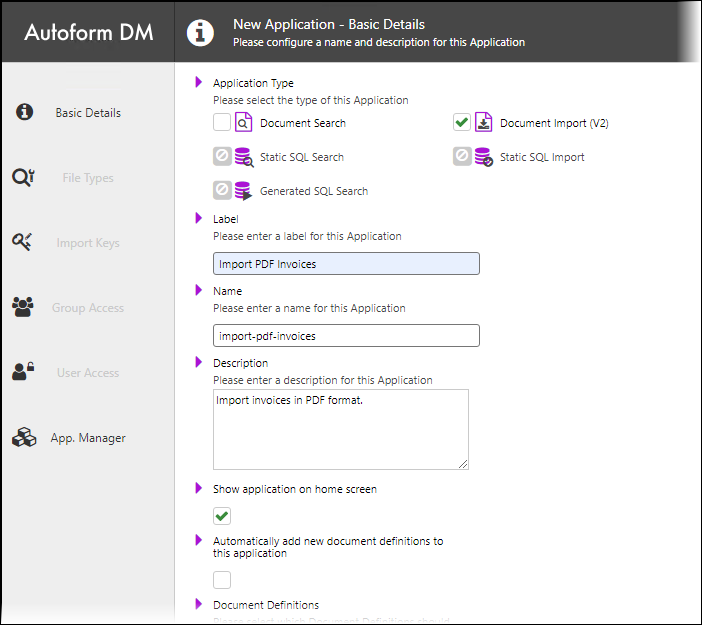
Provide basic details and settings for the application:
Label: The “display name” for the application. This name is displayed in the application lists in the Application Manager (for administrators) and the main Application page (available to all users). Label must be unique.
Name: The name that Autoform DM uses to identify the application. For example, in URLs. Autoform DM automatically creates Name from the Label that you enter. Name must be unique.
Note
Name must contain only lowercase letters or numbers or hyphens. It cannot contain consecutive hyphens, or start or end with a hyphen.
Description
Show application on home screen
Note
For a user to see an application on the main Applications page, they must be granted permission to access it. Additionally, the application’s Show application on home screen checkbox must be selected.
Autoform DM 10.1 and later only:
Automatically add new document definitions to this application
Next, you must configure the application. The first configuration stage is linking the import application to document definitions.
Configure the New Document Import Application
After you add the import application, you must configure it.
1. Link the Import Application to Document Definitions
As part of the archiving process, a user must classify each import document by selecting the document definition that describes it. To specify which document definitions the user can choose from when they use this import application, you must link the import application to document definitions.
Follow the steps for your version of Autoform DM:
Autoform DM 10.1 and Later
In the Document Definitions part of the Basic Details page, the Associated Definitions list contains the document definitions that are linked to the import application.
To link particular document definitions to the import application, move them to the Associated Definitions list:
To move a document definition to the Associated Definitions list, select it in the Disassociated Definitions list then click Associate Selected below.
To move a document definition to the Disassociated Definitions list, select it in the Associated Definitions list then click Disassociate Selected below.

Autoform DM 10.0
In the Document Definition list on the Basic Details page, select a document definition.
To move to the next configuration stage, click Next.
2. Specify the Allowed File Types
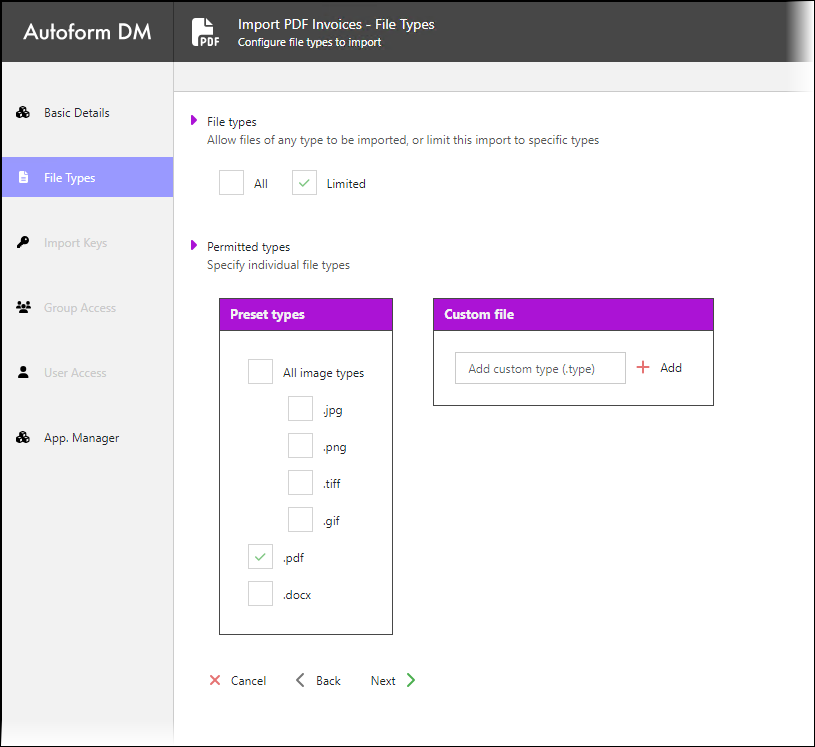
The File Types page enables you to limit the type of file (for example, .pdf, .png, .docx, and so on) that users can archive through this import application. Or, you can allow users to archive any type of file.
Follow the steps for your version of Autoform DM:
Autoform DM 10.1 and Later
Allow Any Type of File
In the File types area, select All.
Allow Only Specific Types of File
To specify which types of file are allowed, follow these steps:
In the File types area, select Limited.
You can select from a list of preset file types. If the file type you need is not in that list, you can specify it yourself.
In the Preset types box, you can select one or more file types.
To select all of the displayed image types, select All image types.
In the Custom file box, you can specify file extensions and MIME types.
File extension: Enter the file extension (for example,
.abc) into the box, then click Add.If you do not add a period (.) before the file extension, Autoform DM will automatically add one.
The file extension must:
Contain only alphanumeric characters.
Contain no more than four characters (not including the period).
If the file extension duplicates a preset type or an existing custom file extension, Autoform DM will highlight the existing file type.
MIME type: Enter the MIME type into the box, then click Add. The MIME type must:
Contain a type, followed by a slash (/), followed by a subtype. For example,
application/zip.Contain only alphanumeric characters (with the exception of the slash).
Note
Because browser support for MIME types is limited, some MIME types might not work as expected when limiting the types of file that are allowed.
You can use the Preset types and Custom file boxes at the same time.
Autoform DM 10.0
Allow Any Type of File
Leave the Allowed File Types box empty.
Allow Only Specific Types of File
In the Allowed File Types box, enter a comma-separated list of file extensions. Include all the file types that you want to allow. For example: .pdf,.docx,.png
After you have completed this stage of the process, click Next.
3. Add Import Keys to the Import Application
The Import Keys page enables you to bind key definitions (and Customer Unique Key, from Autoform DM 10.3 onwards) to your import application. The keys bound here will appear as metadata fields for the user to fill in when importing documents.
Allow enough time to carefully consider this stage of the process, because any misconfiguration here will cause problems for application users and could prevent them from uploading documents with the correct information.
Follow the steps for your version of Autoform DM:
Autoform DM 10.3 to 10.5
Bind key definitions to the import application, and (if required) bind Customer Unique Key (CUK) to the import application.
Follow the relevant steps below, depending on whether you want to bind a key definition or CUK:
Bind Key Definitions to the Import Application
Click Add Key Binding to add a key definition binding to your application. The next available key definition is added.
Note
You can bind one or more key definitions to the import application. Each key can be bound only once.
View Key Configurations
Each key binding’s configuration is contained in a collapsible panel. Click the panel header to expand it. Click the header again or click outside of the panel to collapse the panel.
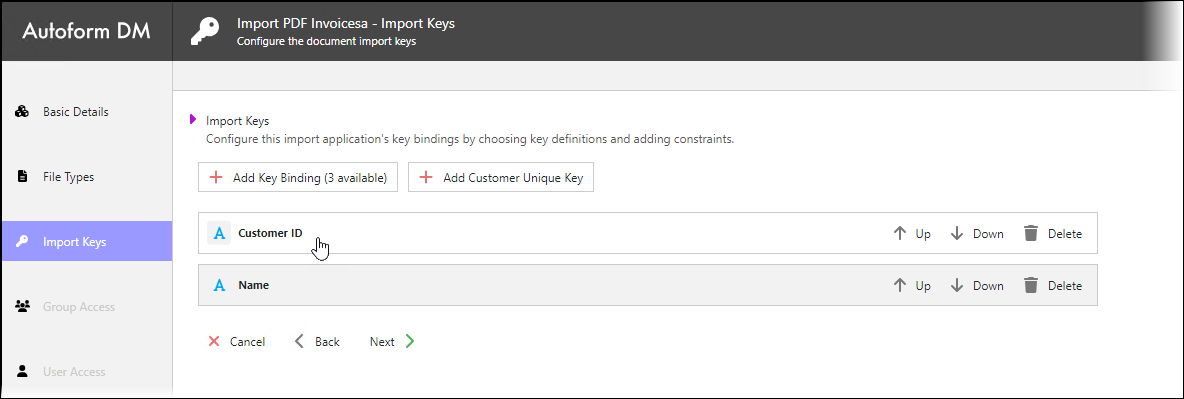
Arrange Key Order
The order in which keys appear on this page is the order in which they will appear to the application user when entering data.
Click ↑ Up to move the key configuration up one level.
Click ↓ Down to move the key configuration down one level.
Unbind Key Configurations
Click the Delete (trashcan) button to unbind the key configuration from your application.
Note
You can re-add the unbound key later by clicking + Add Key Binding, if necessary.
Configure a Key Definition Binding
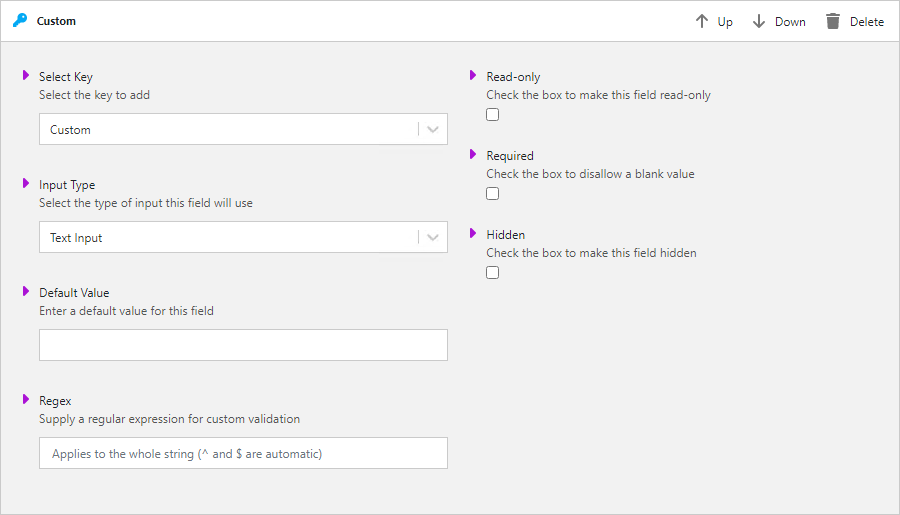
When you bind a key definition to an import application, you must configure the binding. Click the binding’s panel header to display its configuration.
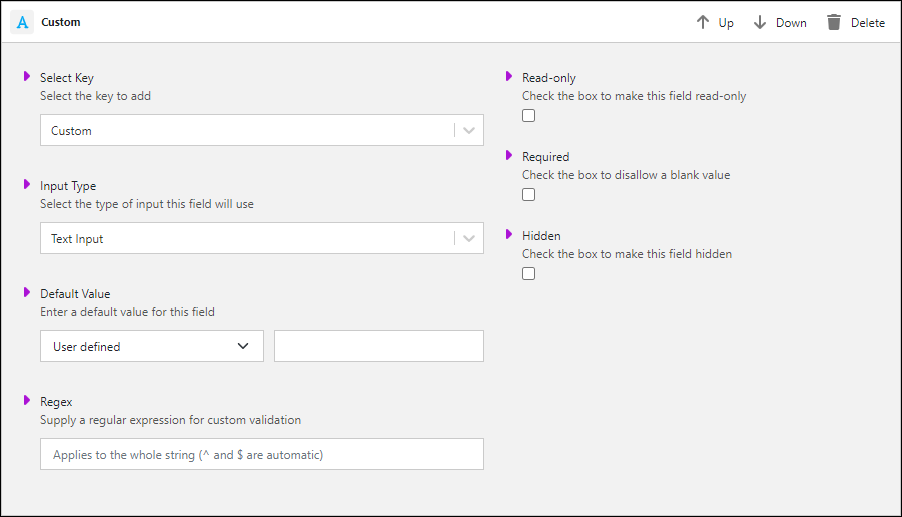
Select Key
When the key is added, it will automatically be assigned the next key definition available.
Select a different key from the Select Key dropdown menu, if required.
.png)
Key Type | Icon |
|---|---|
String key |
|
Numeric key |
|
Date key |
|
System key |
|
Input Type
Select Text Input or Dropdown Input from the Input Type list.
The input field can be displayed as either:
Text Input: A data entry field.
Dropdown Input: A menu with a predefined set of options.
Dropdown Input
If you select Dropdown Input from the Input Type list, you must define the options that will be shown to the application user.
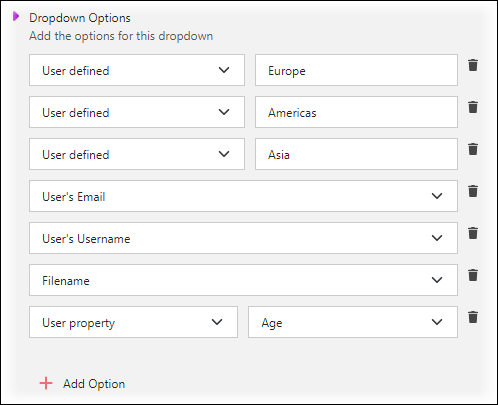
In the Dropdown Options area, define the options that you want the application user to select from. Click Add Option to add an option.
For each option, select a value type (for example, User defined or Filename), and then enter any additional text that is required.
For a description of each value type, see the descriptions in the Default Value section below.
Note
You must define at least two options.
All the options that you define become available to choose from in the Default value list for this key binding.
Click the trashcan button beside an option to delete it.
Text Input
If you select Text Input from the Input Type list, the user will enter a value for the key when using the import application, instead of selecting a predefined value.
Default Value
Specifying a good default value can facilitate the work of the import application user.
Dropdown input keys: For a "dropdown input" key binding, select the default value for the import key from the list. You can select from the values that you specified when setting up the dropdown list options (above).
Text input keys: For a "text input" key binding, select one of the following options and then (where necessary) select or specify the default value in the adjacent list or box:
User property: A particular user property that has already been defined. Select a user property from the list.
User's Username
User's Email
Filename: The filename of the import document including its extension. For example:
Document 12345.pdfFilename (no extension): The filename of the import document without its extension. For example:
Document 12345User defined: Enter the value that you want the key to have.

Note
Filename (no extension) is available in Autoform DM 10.5 and later.
Note
For numeric keys, User defined and User property are available.
For date keys, User defined and Today are available.
Note
Extended properties must have been defined elsewhere for them to be an option in the drop-down menu.
Regex
Enter a regular expression to constrain acceptable default values. This is an optional field.
Note
The regular expression will apply to the entire string.
Read-only
If selected, the field will be non-editable. An appropriate default value must be set because the user cannot change this key’s value when uploading a document.
Required
If selected, the application user must enter a value into the field.
Hidden
If selected, the field will be hidden from the application user when entering data but can still be populated via default value, key seeds, or a matched document.
Note
This is not a security feature; it is intended to reduce on-screen clutter and save space, minimizing confusion during the document import process.
Bind Customer Unique Key (CUK) to the Import Application
The Customer Unique Key (CUK) metadata field enables an organization to apply a document identifier (that is meaningful to that organization) to each document.
For example, an upstream system might generate a document identifier that Autoform DM, that upstream system, and several other business systems will all use to identify the document. This shared identifier could include text, numbers, and other characters, and could include meaningful content (such as a customer number, order number, or transaction number). Autoform DM can store this identifier in that document's Customer Unique Key field.
Although each document that Autoform DM manages has its own unique Document ID, that identifier is generated by Autoform DM (according to its own ID generation process) and contains only numbers. Also, a document's Document ID number cannot be supplied by another business system, so if an organization wants to apply their own identifier to a document it must be stored in the Customer Unique Key field.
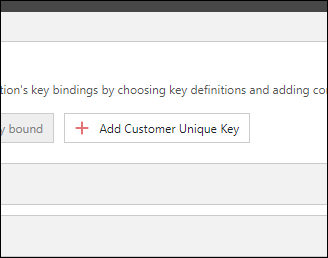
Add Customer Unique Key to the Import
To add Customer Unique Key (CUK) to the import, click Add Customer Unique Key.
Autoform DM adds a Customer Unique Key area to the page. Click the area to expand it.
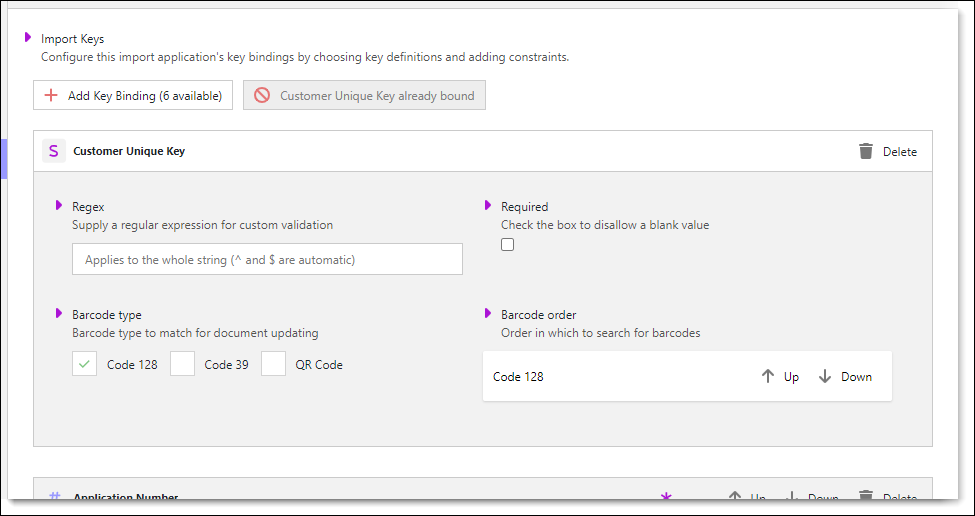
Configure the Customer Unique Key Import Field
Customer Unique Key has some dedicated settings, and some settings that other import keys also have.
Regex and Required
The Customer Unique Key field has Regex and Required settings, which other import keys also have. For more information, see the description of these settings in the Bind Key Definitions to the Import Application part of this page.
Barcode Type and Barcode Order
Note
The barcode scan and match feature (and so, the Barcode Type and Barcode Order settings) are available in Autoform DM 10.4 and later only.
Autoform DM can automatically extract an identification code from a barcode in an import document, then use that code in the import workflow as the import document's CUK.
Barcode scanning enhances the existing CUK matching feature. If the CUK read from the barcode is a match for a document in the archive, the import document becomes a new revision of that existing document, and Autoform DM applies the existing document's metadata to the import document. Else, Autoform DM creates a new document record in its archive.
.png)
Use Barcode Type and Barcode Order to configure this capability.
For more information on the topic, consider watching our FormBytes video.
Barcode Type
Select the types of barcode (Code 128, Code 39, or QR Code) that you want Autoform DM to look for in import documents. After you add a document to an import, Autoform DM will look for barcodes in that document, and will stop looking when it successfully detects one.
Barcode Order
If you select more than one type, Barcode Order determines the order in which Autoform DM looks for barcodes of those types. For example, if you select Code 128 and Code 39, but Code 39 is at the top of the Barcode Order list, Autoform DM will first search the document for a Code 39 barcode. If it doesn't find one, it will then search the document for a Code 128 barcode.
If you add more than one barcode type to the import configuration, use the Up and Down arrows to specify which type of barcode Autoform DM must look for first.
Considerations for Barcode Scanning
QR Codes
Autoform DM can read a QR code from an import document only if the document contains no more than one QR code.
Multiple Code 128 or Code 39 Barcodes in a Document
If a document contains multiple Code 128 barcodes, Autoform DM will read one of them (but cannot guarantee which one).
The same consideration applies for Code 39 barcodes.
Supported Document Formats for Barcode Scanning
PDF
Single or multipage documents
A3, A4, and A5 page size
Image
PNG, JPG, GIF, BMP
Any image size
Factors that Affect Barcode Detection
The ratio of barcode size to document page size or image size affects detection success. For example, Autoform DM might not detect a very small or very large barcode on an A4 page.
The proximity of a barcode to the edge of a page or image affects detection success. For example, Autoform DM might not detect a barcode that is close to the edge of a page in a PDF document.
Remove Customer Unique Key
To unbind Customer Unique Key from the import application, click the Delete (trashcan) button in the Customer Unique Key area.
Autoform DM 10.0 to 10.2
Click + Add Key Binding to add a key to the application.
Note
There is no limit to the number of keys you can bind. However, each key can be bound only once.
View Key Configurations
Key configurations are displayed in a collapsible panel. Click the panel header to open it. Click the header again or click outside of the panel to close it.
Arrange Key Order
The order in which keys appear on this page is the order in which they will appear to the application user when entering data.
Click ↑ Up to move the key configuration up one level.
Click ↓ Down to move the key configuration down one level.
Unbind Key Configurations
Click the Delete (trashcan) button to unbind the key configuration from your application.
Note
You can re-add the unbound key later by clicking + Add Key Binding, if necessary.
Key Configuration Options
Select Key
When you add a key to an import application, the next key definition available is added. Use Select Key to bind a different key, if necessary.
Autoform DM 10.0: Select the key type from the first list, and the key definition from the second list.
.png)
Autoform DM 10.1 and 10.2: Select a key from the list. There are three types of key: String, Numeric and Date. The key icon color indicates the key type.
.png)
Input Type
The input field can be displayed as either:
A regular input field
A dropdown menu with a preconfigured set of options
Select an option from the dropdown menu.
Dropdown Input
If you select Dropdown Input, you must define the options that will be shown to the application user.
.png)
Type the options you want to appear to the application user.
Note
You must define at least two options.
Click Add Option to add an option.
Click the trashcan button beside an option to delete it.
Default Value
Choose the option you want to appear in the field by default. This can facilitate the application user's work if there is a common but not constant answer.
Text Input
For input fields, type the default value in the field.
Note
For date keys, select the default date from the calendar.
Dropdown Input
For dropdown menu inputs, select the default option.
Note
You must choose from the options defined in the previous step.
Regex (Autoform DM 10.2 and Later Only)
Enter a regular expression to constrain acceptable default values. This is an optional field.
Note
The regular expression will apply to the entire string.
Read-only
If selected, the field will be non-editable. A default value must be set that cannot be changed.
Required
If selected, the application user must enter a value into the field.
Hidden
If selected, the field will be non-editable in the same way as Read-only; however, the field will also be hidden from the application user when entering data.
Note
This is not a security feature. It is intended to reduce on-screen clutter and save space, minimizing confusion during the document import process.
Resolving Validation Errors
Validation is performed when you configure a key binding. Errors will be highlighted in red with a message informing you of the problem. The most common issues are:
If entered, the default value must be valid for the particular key type. String keys will allow almost any content, but numeric and date keys must be valid numbers and dates respectively.
Dropdown keys, in addition to requiring a minimum of two options to be present, also require that each option matches the data type of the selected key.
Read-only fields require a default value because they cannot be changed. The default value will apply to all instances of the keys, in all documents imported by this application.
If any of these conditions are not met, the panel header will show the number of currently unresolved errors.

Note
When a binding has errors like this, the panel will not close until they are resolved.
When all errors are resolved, you can save your import application and move on to the next screen.
Note
You can return to this screen and modify the key bindings, if necessary when required. A recommended process is to initially configure key bindings, then check the look and feel of the import application by running and using it, and then return to this part of the Administration area to refine the key bindings if necessary.
After you have completed this stage of the process, click Next.
4. Grant Application Access to User Groups and Individual Users
To provide the appropriate users with access to the new import application (on the Autoform DM Applications page), you must grant application access accordingly. Access can be granted on a group basis or an individual user basis.
Grant Access to Groups
The Group Access page enables you to select user groups to grant access to the import application. Users that are members of those groups will be able to access the application.
Select the checkboxes for the user groups that you want to grant access to.
However, if you want to grant access on an individual user basis rather than a group basis, do not select any group checkboxes.
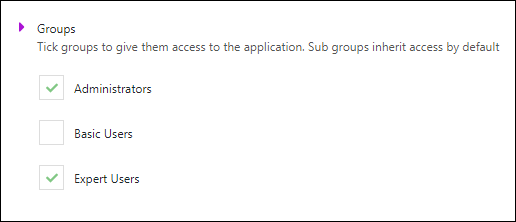
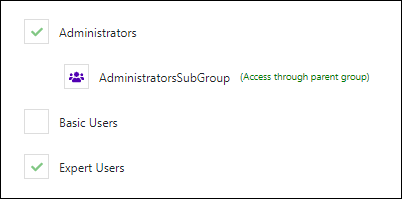
Subgroups are included if their parent group is selected.
To move to the User Access configuration stage, click Next.
Grant Access to Individual Users
The User Access page enables you to select individual users to grant access to the import application.
Move users to the column that gives them the appropriate level of access.
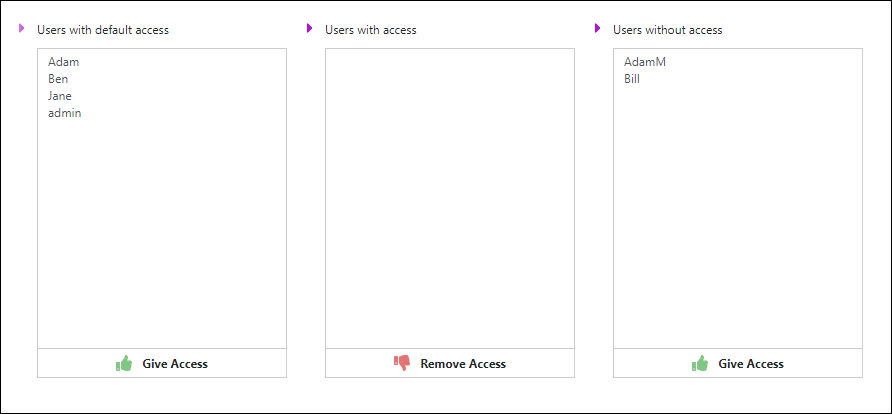
Users are categorized according to whether or not they can access the application.
Users with default access: These users inherit access based on their groups.
Users with access: These users have been given access specifically.
Users without access: These users do not have access.
Click Confirm to save your changes. User Access is the final configuration page for import applications. Autoform DM will take you to the Application Manager area.
Return to the Application Manager
After each of the preceding stages, you saved the configuration of the new import application.
At any time, you can return to the Application Manager page. To do this, click App. Manager in the left panel.