Web Server Input
- 13 Apr 2026
- 17 Minutes to read
- Contributors


- Print
- PDF
Web Server Input
- Updated on 13 Apr 2026
- 17 Minutes to read
- Contributors
- Print
- PDF
Article summary
Did you find this summary helpful?
Thank you for your feedback
Applies to: Lasernet Core 11
The Web Server input module acts as a web server that accepts, via a SOAP or REST web service, data for processing in Lasernet Core. It can also provide previews of the outcome of processing that data.
Web Server Tab
SOAP.png)
REST.png)
The Web Server input module creates an embedded web server, which can optionally provide specified methods for clients to call. When the configuration that includes the Web Server input module is deployed to a Lasernet Core environment, an embedded web server is provided by that environment. The web server listens on the same port as the Lasernet Core environment.
The Web Server input module can pass the data it receives on to other modules for processing. Whether this happens depends on how the web services provided by this input are implemented, and is also determined by the destinations configured for this input module.
Each Web Server input module defines a web API. To create multiple distinct web APIs, add multiple Web Server inputs to the configuration.
A Web Server input module either provides no methods or provides one or more methods. See the relevant parts of this page:
Authentication
The Web Server input module supports HTTP basic authentication and the client credentials flow.
If basic authentication is configured for this input, a client can use either authentication type when making web service requests. If basic authentication is not configured, only the client credentials flow is supported.
Note
Connections to this module must use HTTPS. As a result, API requests are inherently secured.
Use the client credentials flow for authentication where possible. However, if it is not possible to use the client credentials flow, or if you want to create a simple configuration for testing purposes, you can use basic authentication.
Basic Authentication
To configure basic authentication, provide a Username and Password in the Basic Authentication area of the Web Server tab. If a client uses basic authentication, it must supply these credentials as part of its API request.
Tip
Username and Password support JobInfo substitution. As a result, you can create environment JobInfos to store the username and password, and then use those JobInfo names as the value for the Username and Password settings.
This method enables you to change the username and password just by updating the relevant environment JobInfos, with no need to redeploy the Lasernet Core configuration.
If you do not do this and you instead enter credentials directly into Username and Password, but you later need to change them, you must modify the credentials in the Web Server input module’s properties and then redeploy the Lasernet Core configuration to the relevant Lasernet Core environments.
To use basic authentication, a client must add an authorization header to its requests in the following format:
Authorization: Basic <Base64 encoded username and password>
Replace <Base64 encoded username and password> with a Base64 encoding of the username and password separated by a colon. For example, if Username is username and Password is password, the client must Base64 encode username:password and then provide the result (dXNlcm5hbWU6cGFzc3dvcmQ=) in the Authorization header (Authorization: Basic dXNlcm5hbWU6cGFzc3dvcmQ=).
Client Credentials Flow
Clients can authenticate with the web server through a “client credentials” authentication flow. To make a web service request, the client must submit a valid token. For more information on how to make this authentication method possible for a client, see Set Up App-Registration-Based Access for External Applications which describes:
How to create an app registration for a web service client.
How to configure Lasernet Core permissions to allow the client to connect to Lasernet Core web services.
How the client requests an access token from Lasernet Config.
How the client supplies its token in the authorization header of requests to the web service.
Create and Use Web Services That Have No Methods
This section of the guide describes how to:
Make requests to a Lasernet Core web service that has no methods.
Create a web service that has no methods.
Make a Web Service Request
If the web service provides no methods, a client must make an HTTP POST request to a URL that has the following structure (to deliver data to the Web Server module for processing by Lasernet Core):
https://<host name>:<Lasernet Core environment port number>/webinputport/<Web Server module name>
Appropriately substitute <host name>, <Lasernet Core environment port number>, and <Web Server module name>. Ensure that the request is made over HTTPS.
For example, if the Lasernet Core environment is hosted by a computer named server1, the environment is listening on port 3279, and the Web Server input module’s Name is WebServer1, the appropriate URL is https://server1:3279/webinputport/WebServer1
Tip
To find out which port an environment is listening on, refer to that environment’s configuration in Lasernet Server Manager or see the
Listening onmessage in that environment’s activity log in Lasernet Monitor.
Provide the data for processing as the body of the HTTP POST request. The content-type of the post data is ignored, but we recommend that it is set to application/x-Lasernet.
The web service’s response will use a standard HTTP response status code. For example:
200 OK: Delivered successfully.
401 Missing
404 Object Not Found: The named Web Server input module does not exist.
408 Request Timeout: Lasernet Core did not complete the request within the Web Server input module’s configured Timeout period.
503 Service Unavailable: Lasernet Core is currently starting up or shutting down.
500 Internal Server Error: There is a problem with Lasernet Core.
When the status is 200 OK, the response message is a text/plain document that contains the JobID for the job inside Lasernet Core. The data provided in the body is copied to the JobData JobInfo and is processed by the next module in the Lasernet Core workflow.
Preview Mode
Lasernet Core can return a document to the client, for the client can display as a preview in the browser. For example, a print result.
In summary, after receiving a request that uses preview mode, the Web Server input module will wait to receive data generated by a module that is downstream in the Lasernet Core workflow. When it receives that data, it sends it to the client as the request response.
When a request uses preview mode, the Web Server input module sets the PreviewMode JobInfo to 1.
To use preview mode:
Add the built-in Preview system destination to the module (in the workflow) that generates the output document or data. For example, a workflow that generates PDFs from XML data might include a Form Engine module, which you add the Preview destination to.
Optional: Use the PreviewMode JobInfo as part of the criteria for that destination. For example, you could attach criteria to the Preview destination so that the output document is routed to the Preview destination only if the value of PreviewMode is 1.
Make an appropriate web service request:
The final step above makes a web service request that uses preview mode. After the Web Server input module processes the request (and has sent the data it received in the request body to its destinations), it will wait to receive data from the module that has the Preview destination added to it. When the Web Server input module receives the generated document (from that module), it uses the existing open connection to the client to send the document to the client. The client’s request completes with status code 200 OK.
To overrule the status code and status text that is set by the system, set the JobInfos named HTTPStatusCode and HTTPStatusText. By default, the content type of the preview result is application/pdf, but that can be overridden by setting the JobInfo named MimeType.
JobInfos
To specify additional JobInfo values as part of the request, add them to the URL as parameters.
For example, to set a JobInfo named City to Cambridge and set a JobInfo named Country to England, use the following URL: https://server1:3279/webinputport/WebServer1?City=Cambridge&Country=England
The Web Server module adds two JobInfo lists (RequestHeaderNames and RequestHeaderValues) in which it stores the headers received in the request. It also adds a JobInfo for each request parameter (as described above).
For example, if the request has headers Content-Length: 11 and Content-Type: application/text and a parameter called City whose value is Cambridge, Lasernet Core creates the following JobInfos:
JobInfo | Value |
|---|---|
RequestHeaderNames[0] | Content-Length |
RequestHeaderValues[0] | 11 |
RequestHeaderNames[1] | Content-Type |
RequestHeaderValues[1] | application/text |
City | Cambridge |
JobData
The request body is copied to the JobData JobInfo.
Create a Web Service
In summary, to set up the Web Server input module to provide a web service that has no methods:
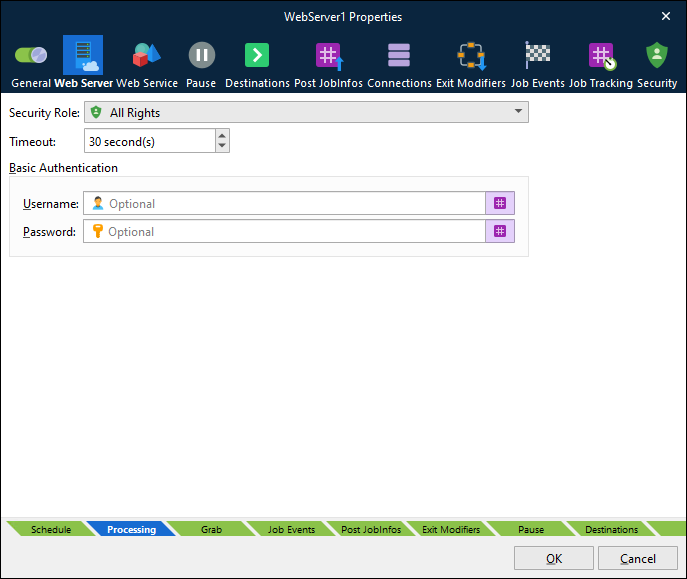
Configure the module (module Name, web service Type, Security Role, and Timeout).
Add destinations to modules.
The following sections describe how to configure REST and SOAP web services that provide no methods.
1. Complete Basic Configuration
Complete the following basic configuration steps:
On the General tab of the module’s Properties window, enter an appropriate Name for the module.
Note
This names the web API and is used as part of the request URL.
On the Web Server tab:
Set the web service’s Timeout. If the web service does not respond within the specified period of time, the request will return a
408 Request timeoutresponse status code.Configure the web service’s authentication:
To use the client credentials flow: Select the appropriate Security Role. This role identifies the clients that can use the web service. For more information, see Set Up App-Registration-Based Access for External Applications.
To use basic authentication: Provide a Username and Password. For more information, see Basic Authentication.
On the Web Service tab:
Select the web service Type: SOAP (XML) or REST (JSON).
SOAP (XML) only: Enter the appropriate Namespace for the web service.
2. Add Destinations to Modules
Add an appropriate destination (such as a Form Engine) to the Web Server input module. The data received by the Web Server input module is passed to the destination module.
If preview mode will be used, you must also add the Preview system destination to the module that generates the output document. For example, add the Preview destination to the Form Engine module in the workflow.
Create and Use Web Services That Have Methods
This section of the guide describes how to:
Make requests to a method provided by a Lasernet Core web service.
Create a web service that provides one or more methods.
Make a Web Service Request
To deliver data to the Web Server module for a specific API method to process, a client must make an HTTP POST request to the correct URL. The structure of the URL depends on the web service type (REST or SOAP).
Tip
To find out which port an environment is listening on, refer to that environment’s configuration in Lasernet Server Manager or see the
Listening onmessage in that environment’s activity log in Lasernet Monitor.
REST
https://<host name>:<Lasernet Core environment port number>/webinputport/<Web Server module name>/webservice/<method name>
Appropriately substitute <host name>, <Lasernet Core environment port number>, <Web Server module name>, and <method name>. Ensure that the request is made over HTTPS.
For example, if the Lasernet Core environment is hosted by a computer named server1, the environment is listening on port 3279, the Web Server input module’s Name is WebServer1, and the method’s name is AddItem, the appropriate URL is https://server1:3279/webinputport/WebServer1/webservice/AddItem
Provide method parameter values in the body of the request as JSON. For information about the required JSON format, click View WSDL in the lower-left corner of the Web Service tab of the Web Server input Properties window. The Request part of the information displayed in the JSON window provides example parameter JSON.
The Response part of the JSON window provides an example response for the web service request.
SOAP
https://<host name>:<Lasernet Core environment port number>/webinputport/<Web Server module name>/webservice
Appropriately substitute <host name>, <Lasernet Core environment port number>, and <Web Server module name>. Ensure that the request is made over HTTPS.
The method to call is identified within the XML that forms the body of the request. Method parameter values are also provided in the XML. Click View WSDL to view the WSDL for the web service. Use the information in this WSDL to appropriately structure the XML in the request body.
JobInfos
For each method parameter supplied in the request body, Lasernet Core creates an accordingly named JobInfo and sets its value to the parameter’s data.
To create additional JobInfos as part of the request, add them to the URL as parameters. For example, if you are sending a request to a method of a SOAP web service and you want to set a JobInfo named City to Cambridge, use the following URL: https://server1:3279/webinputport/WebServer1/webservice?City=Cambridge
Lasernet Core writes the name of the called method to the WebserviceMethod JobInfo.
JobData
The request body is copied to the JobData JobInfo.
Create a Web Service
In summary, to set up a Web Server input module:
Configure the module (module Name, web service Type, Security Role, and Timeout).
Specify the methods that the web service provides.
Add a destination to the Web Server input module.
The following sections describe how to configure REST and SOAP web services that provide one or more methods.
For additional instructions that focus on how to configure a SOAP web service, see Develop SOAP Web Services (Server).
1. Complete Basic Configuration
Complete the following basic configuration steps:
On the General tab of the module’s Properties window, enter an appropriate Name for the module.
Note
This names the web API and is used as part of the request URL.
On the Web Server tab:
Set the web service’s Timeout. If the web service does not respond within the specified period of time, the request will return a
408 Request timeoutresponse status code.Configure the web service’s authentication:
To use the client credentials flow: Select the appropriate Security Role. This role identifies the clients that can use the web service. For more information, see Set Up App-Registration-Based Access for External Applications.
To use basic authentication: Provide a Username and Password. For more information, see Basic Authentication.
On the Web Service tab:
Select the web service Type: SOAP (XML) or REST (JSON).
SOAP (XML) only: Enter the appropriate Namespace for the web service.
2. Specify the Web Service’s Methods
To specify each of the methods that the web service provides, follow these steps:
On the Web Service tab of the module’s Properties window, click Add (below the Methods area).
In the Method Properties window, complete the basic method configuration steps:

Enter a Name for the method.
Optional: Enter a Description of the method.
From the Result list, specify the data type of the data that the method returns, or select None if the method does not return any data. You can select a simple data type (such as String or Integer), or select JobInfo (to return data in JobInfo key-value pair format), or select a custom data type (see Custom Data Types) from the list. Click Add beside the list to create a custom data type.
The method returns the data stored by the JobInfo that you select from the JobInfo list (to the right of the Result list). Select a JobInfo or enter a name to create a JobInfo.
Note
The response returned by REST web services’ methods contains only this value. The response returned by SOAP web services’ methods contains this JobInfo’s value in addition to the value of “reference parameters” (which are described below).
If the method returns an array, select Array at the right of the window.
In the Method Properties window, the Input Parameters list specifies the method’s parameters. If the method has input parameters, follow these steps to add them to the method:
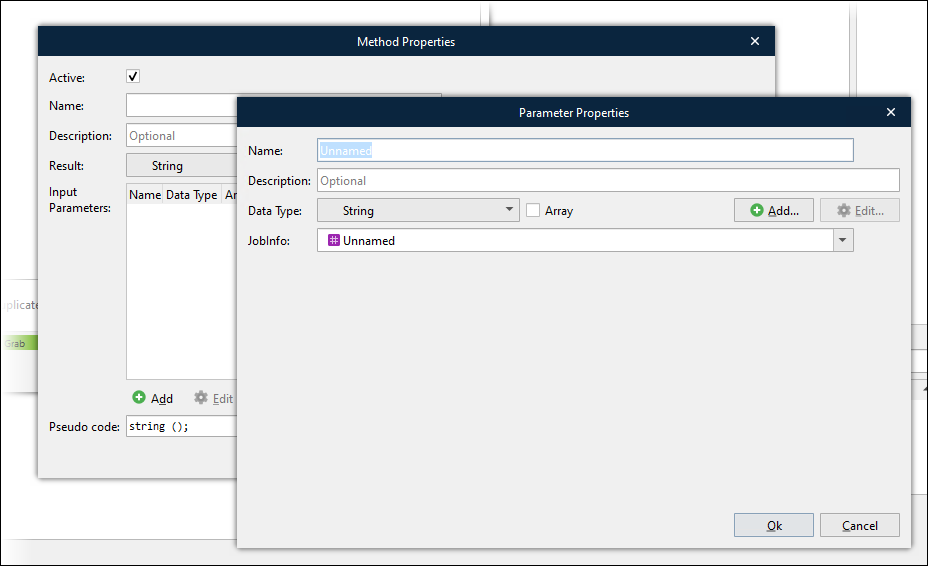
Click Add below the Input Parameters area.
In the Parameter Properties window:
Enter a Name for the parameter.
Optional: Enter a Description for the parameter.
Select the Data Type of the parameter. Similarly to the method’s result, you can select a simple data type, JobInfo, or a custom data type.
To create a custom data type, click Add beside the list.
If you select JobInfo from the list, the web service will expect a JobInfo key-value pair for this parameter; Lasernet Core will create a JobInfo that is named according to the key within the JobInfo data passed to the method and will assign it this parameter’s value. Consider using a prefix as part of the JobInfo key name. Ensure that you do not overwrite or append existing JobInfos or use Lasernet Core system keys such as JobID.
If the parameter is an array, select Array.
The method stores the input parameter’s value in the JobInfo specified in the JobInfo list. Select a JobInfo or enter a name to create a JobInfo.
Note
This step does not apply if you select JobInfo from the Data Type list.
SOAP web services only: To include this parameter’s value in the response XML generated by this method, select Reference.
Click OK. Lasernet Developer adds the parameter to the method.
Repeat the preceding step to add more input parameters.
Click OK. Lasernet adds the method to the web service.
Lasernet Developer adds the method to the module’s Methods list.
4. Returning Custom Data Types from Lasernet Core
When returning a custom data type from Lasernet Core, it is considered a complex data type in some cases. The result can be an array or multiple arrays, and these can also be custom data types.
Complex data types can be handled in two ways: either save the data structure as an XML fragment or, if possible, map JobInfos into the structure.
An XML fragment can be used as a template in Form Editor, allowing the user to build a complex result. This result must be placed in the JobInfo returned from the method when the Fragment flag is checked.
5. Specify the Implementation of Each Method
You can use exit modifiers on the Web Server input module to specify what each method does. For each method, add a modifier that will run the appropriate behavior for the method (through a particular script, a database command, or another relevant modifier). To ensure that the correct modifier runs when each method is called, add criteria (that compares the WebserviceMethod JobInfo to the method’s name) to the modifier.
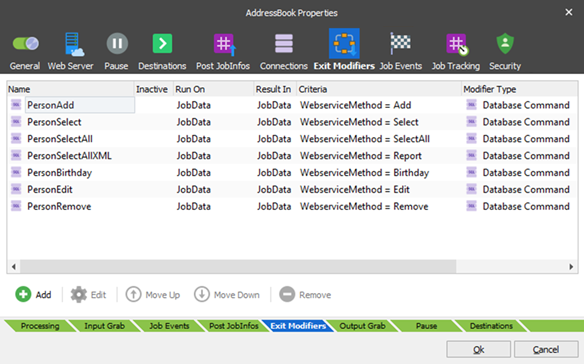
Some methods might need to do advanced logic and processing. For this, the scripting functionality of Lasernet Core can provide the necessary processing capability. Exit modifiers can run scripts.
6. Add the WebService Destination to Modules
Web service method calls are blocking. For this reason, it is important that Lasernet Core responds to method calls as soon as possible.
Lasernet Core generates the response to the client when the Job is passed to a special destination called Webservice. This is a necessary step and must be done as soon as possible, so that the client is blocked for as short a period as possible and to avoid the client “timing out” their request.
The Webservice destination can be added to the Web Server input module’s Destinations list.
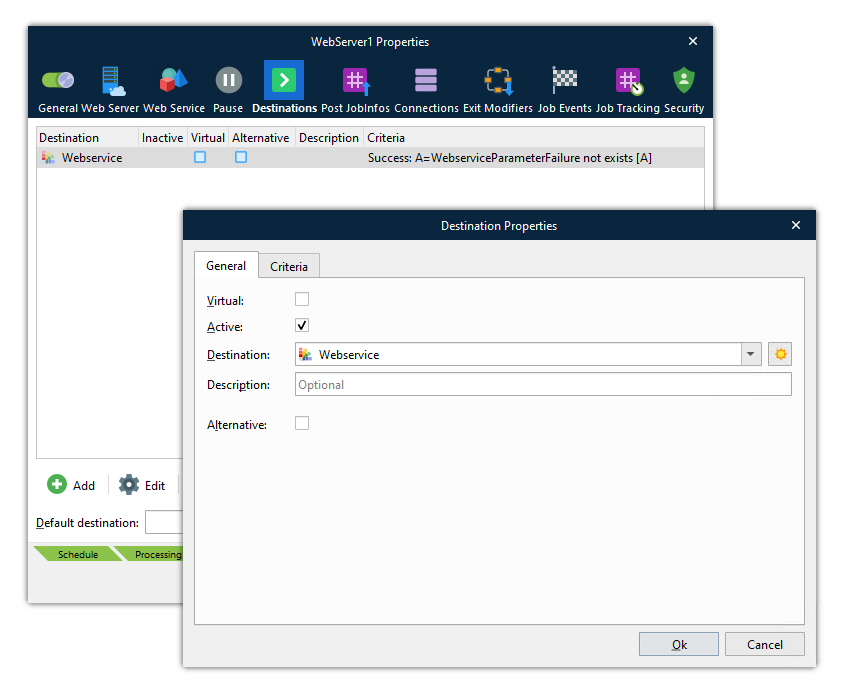
It can also be called from a script: job.addDestination("Webservice");
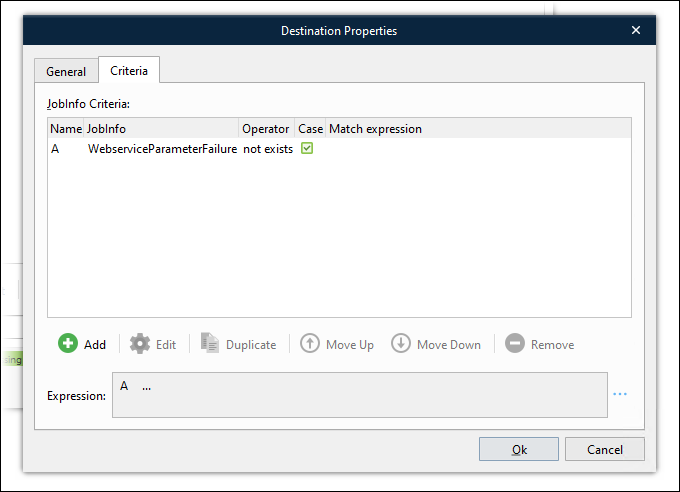
You can use the criteria on the destination to ensure that the method returns only in the right circumstances.
In the example above, the scripts that implement the web service’s methods create a custom JobInfo named WebserviceParameterFailure if the supplied method parameters are invalid. The job proceeds to the Webservice destination (which prompts Lasernet Core to send a response to the client) only if this is not the case.
Also, the Webservice destination can be added to the Destinations list of other modules.
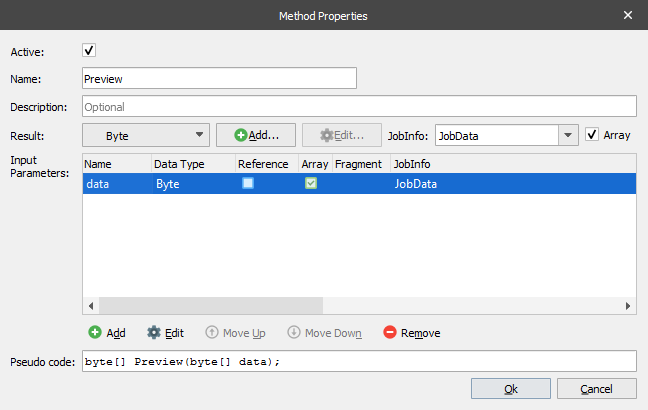
In the example below, the job proceeds only after the Preview method (which generates a PDF) completes.

If other modules must process the data received by the web service (to process it before the response is returned to the client), add relevant modules to the Web Server input’s Destinations list. Then, add the Webservice destination to the appropriate module in the workflow (see the example above).
What Happens in Lasernet Core When a Method is Called
When Lasernet Core receives a request, it creates a job and identifies the method that the request is calling.
The method name is written to the job’s WebserviceMethod JobInfo.
The value of the passed parameters are copied into the relevant JobInfos.
Custom Data Types
You can create custom data types. These enable you to create data structures that represent data in a way that simple, standard data types (such as String and integer) cannot do alone.
When you configure a method or a parameter, you select a data type. You can click Add (beside the list) to add a custom data type, or (if any have already been created) you can select them from the list where they appear alongside simple data types such as String and integer.
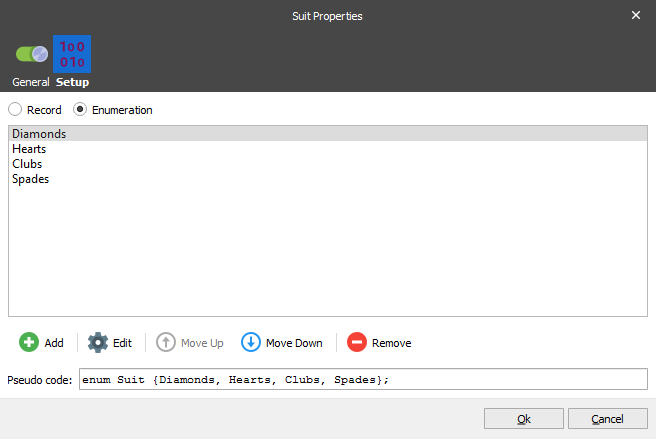
A custom data type can be a record (a collection of variables) or an enumeration (which consists of a set of named integral constants that are known as enumerators).
Record
When you create a record, each variables that you add to it can be of one of the following standard data types:
String. A sequence of characters.
Byte. An integer value between 0 and 255.
Integer. An integer value between -2147483648 and 2147483647.
Boolean. True/False value. ‘True’ and ‘1’ is considered true and everything else is false.
Double. ±5.0 × 10−324 to ±1.7 × 10308. Precision of 15-16 digits.
DateTime. From 12:00:00 midnight, January 1, 0001 Anno Domini (Common Era) through 11:59:59 P.M., December 31, 9999 A.D. (C.E.).
Lasernet Core also has a special data type called JobInfo which contains a key/value pair.
It is also possible to define custom data types, like Person in the following example:
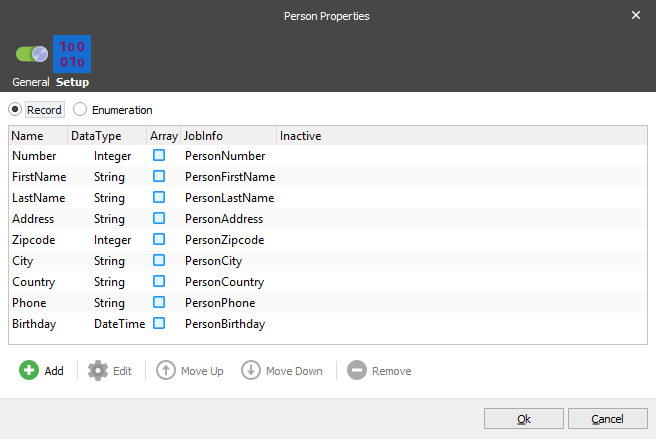
The example Person data type (in the image above) contains several variables, which have different data types: Number, FirstName, LastName, Address, Zipcode, City, Country, Phone and Birthday.
To store binary data, like a file, use an array of bytes. The JobData of a Job in Lasernet Core is a byte array.
Enumeration
An enumeration is a list of strings. An enumeration can be used for both the parameters of a method and for the result.
Other Information
The selected certificate will always be added if it does not exist prior to the start-up of the Web Server.
Ownership means that the certificate will be removed again when the Web Server stops, otherwise it will remain registered.
Default Destination is referred to as Default when editing destinations in other modules.