View Audits
- 05 Feb 2026
- 6 Minutes to read
- Contributors


- Print
- PDF
View Audits
- Updated on 05 Feb 2026
- 6 Minutes to read
- Contributors
- Print
- PDF
Article summary
Did you find this summary helpful?
Thank you for your feedback
The Audit Log page enables you to search and view activity auditing data for many different types of Keep event. For example, the audit log records when users log in, run searches, and access documents, and when administrators create document definitions, update user settings, and so on.
You can create filters to ensure that the audit log page displays only the events that you are interested in.
Navigate to the Audit Log Page
To access the Audit Log page, click Reports & Info in the admin menu, then select Audit Log.
Find Your Way Around the Audit Log Page
The page’s content differs depending on whether you have searched the audit log yet.
When the Page First Loads
.png)
Number | Item | More information |
|---|---|---|
1 | Configure Audit Log Filters pane | Use the controls in this area to specify filter criteria for your search of the Keep audit log. |
2 | Search Audit Log button | Click this button to search the audit log according to the filter criteria that you specified. |
3 | Main area | After you click Search Audit Log, Keep displays the audit log events table here. |
4 | Link to the Audit Log Settings page | Use the Audit Log Settings page to specify which types of event Keep captures in its audit log. |
After You Search the Audit Log
.png)
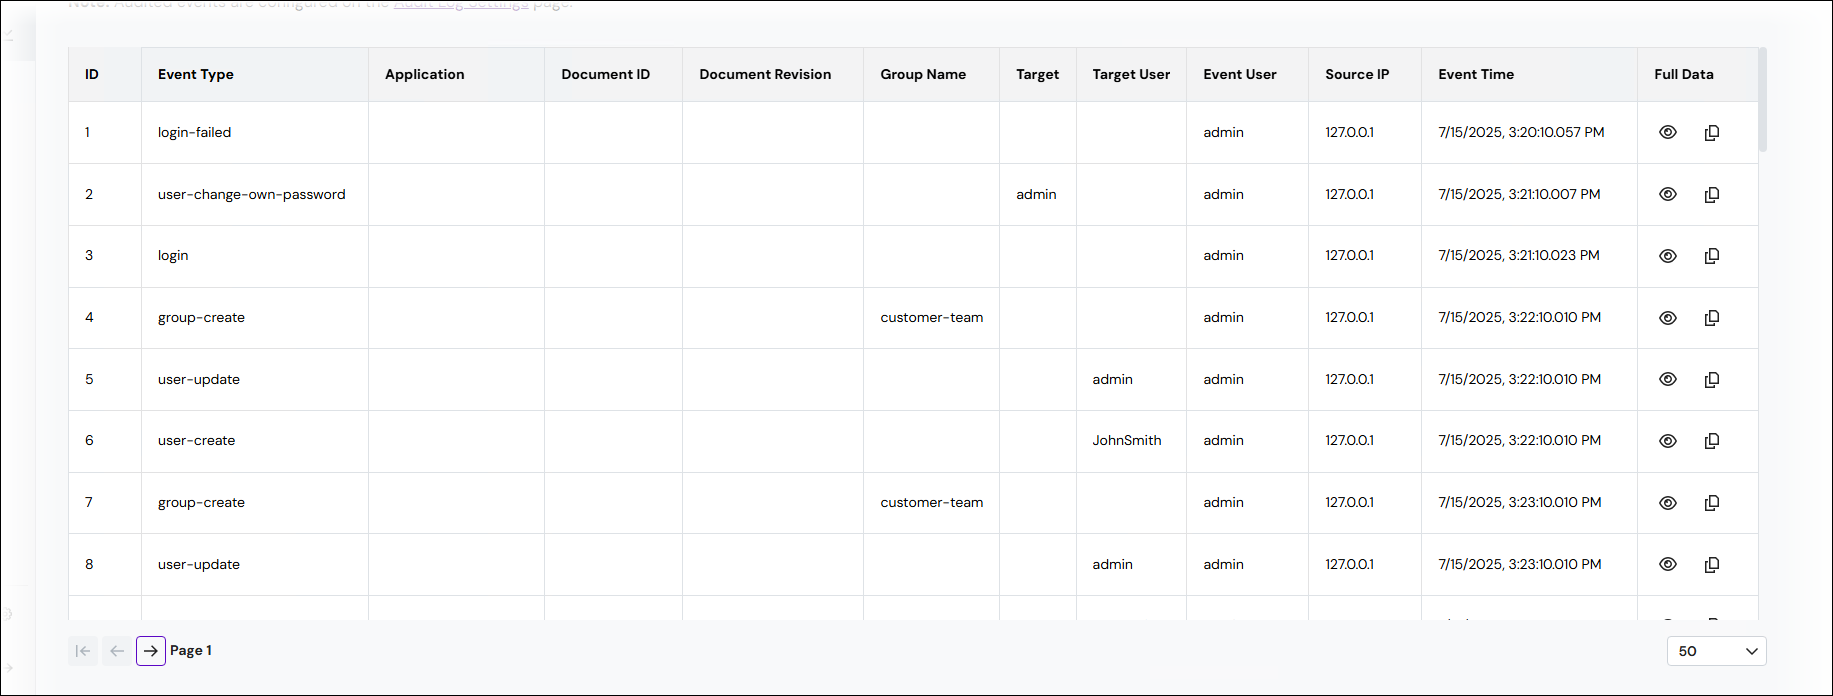
1 | Audit log events table | This table presents events from the Keep audit log. |
2 | Table row | Each table row corresponds to a single event. |
3 | Table column | Each table column contains a particular property of each event. Not all columns are relevant to all event types. |
4 | View button | Click View to view all the available data about a particular event. |
5 | Copy button | Click Copy to copy all the available data about an event to the clipboard. |
6 | Page controls | Click the Next (right arrow), Previous (left arrow), and First Page (vertical line and left arrow) buttons to navigate between pages of the table. |
7 | Results per page | Use this list to choose how many audit records each page contains. |
8 | Modify Filters | Click Modify Filters to open the Configure Audit Log Filters pane and change your filter criteria. |
9 | Export Data | Click Export Data to export the entire table contents as a CSV file. |
Find and View Audit Log Entries
To access a table of audit log entries, you specify filter criteria and then search the audit log.
You can configure the audit log filters in the Keep web application or you can set up a URL-based remote integration.
Configure the Audit Log Filters
To create an audit log search that finds the log entries that you are interested in, specify filter values in the Configure Audit Log Filters pane. For example, you could select a particular User and select two particular types of event from the Audit events list.
To apply these filter criteria and search the audit log, click Search Audit Log.
Tip
To clear all filter criteria, click Reset.
.png)
Warning
If you leave all filter criteria in the Configure Audit Log Filters pane empty, the page will display every audit log entry in the system. However, it is not recommended that you do this, because Keep will display an extremely large number of audit records.
When working with large result sets, it is recommended that you filter your search to a small time range.
Types of Filter Criteria
The following types of filter criteria are available in the Configure Audit Log Filters pane. You can use as many as you need to create a suitable search of the audit log.
Audit Events
This list contains a Preset Configurations section and an Audit Events section.
.png)
Select an entry from the Preset Configurations section to automatically add a set of relevant event types to the list of selected event types. For example, if you select User Login History, Keep automatically adds the login, login-failed, and logout event types to the list of selected event types.
The Audit Events section is below the Preset Configurations section; scroll down to find it. Select an event type (such as group-create) from the Audit Events section to add that particular event type to the Audit events list.
To remove a selected event type, click the x beside it.
To clear all selected event types, click the x at the far side of the Audit events box.
Start Date and End Date
Use Start Date and End Date to specify a time range. Keep finds events that happened during this period. To specify an open-ended period, leave Start Date or End Date blank. If they are both blank, the audit log events table contains events that occurred at any time.
Document ID
To find events that relate to a specific document, enter its Keep document ID in the Document ID box.
User
To view only audit log events relating to activities performed by a particular user, select that user from the User list. This list can contain previously deleted users.
Remote Integrations
You can prepopulate audit filter fields by parsing data supplied in the URL as parameters. After the URL is processed and the Audit Log page loads, the filter criteria in the Configure Audit Log Filters pane are editable. You must click Search Audit Log to run the search.
This capability enables you to save searches as browser bookmarks.
Valid URL Parameters
Audit event types
eventTypes=
Start date and end date
start=end=Note
The format for start and end is
YYYY-MM-DDTHH:MM. Optionally, you can add:SSto specify seconds in the time part of the format.
Document ID
documentId=
User name
user=
Example
This example contains all parameters. However, if necessary, you can include fewer parameters in the URL.
Appropriately substitute <Keep server>.
https://<Keep server>/keep/admin/audit-search?eventTypes=document-access,document-create&start=2025-03-31T16:40&end=2025-03-31T17:40:30&documentId=12345&user=adminResults Panel
The results are organized into a table with one row for each event.
Some columns (such as Event Type) are always displayed.
Other columns (such as Group Name) are displayed only when some audit log entries contain that data. If a row does not contain data that is relevant to a particular column, that cell of the row is blank.
Page Controls
The page controls are located below the table and enable you to navigate the pages of audit log data. The current page number is shown next to the buttons.
The options are:
First page (vertical line and left arrow)
Previous page (left arrow)
Next page (right arrow)
Note
Because Keep is always generating audit data, there is no “last page“ button because many audit records could have been added to the log since the search was run.
Results per Page
The Results per page control is located below the table. Select how many results you want each page to display.
Export Data
Click Export Data (beside Modify Filters) to export all the audit log data that your search returned. The export contains all the audit log data returned by the search (rather than just the data on the currently displayed page).
Note
For extremely large data sets, you might need to wait while Keep generates the export file.
View Single Entry Data
Some audit log entries contain more data than Keep can display in the table. You can view an audit log entry’s full data in JSON format.
Click the View (eye) button in a row to show that entry’s full data. Click Copy Audit Data at the bottom of the window to copy all of the data to the clipboard.
Click the Copy button beside the View button to copy all the event’s data to the clipboard (without viewing it).
.png)
Audit Log Settings
The Audit Log page enables you to view existing audit log data. However, the Audit Log Settings page enables you to specify which types of event Keep captures in the audit log when users perform actions in Keep.
To navigate to the Audit Log Settings page, use one of the following methods:
Click the Audit Log Settings link at the top of the Audit Log page.
Click Settings in the admin menu, then click Audit Log.
.png)
On the Audit Log Settings page:
Select the checkbox for each event type that you want Keep to capture in the audit log. The page is alphabetically ordered.
Clear the checkbox for each event type that you do not want Keep to capture.
Click Save.
Tip
Enter text into the Filter settings box to find a particular event type on the page.
Click Reset to discard your changes and return to the previously saved audit log settings.
.png)