Use Scripting to Expand Lasernet Functionality
- 30 Jan 2026
- 12 Minutes to read
- Contributors

- Print
- PDF
Use Scripting to Expand Lasernet Functionality
- Updated on 30 Jan 2026
- 12 Minutes to read
- Contributors
- Print
- PDF
Article summary
Did you find this summary helpful?
Thank you for your feedback
Applies to: Lasernet 11
The Lasernet Developer contains a script editor that enables you to maintain your own scripts. You can access the script editor by creating a new script or opening an existing one.
Click Scripts in the Tools menu to access the list of scripts in the currently loaded Lasernet configuration.
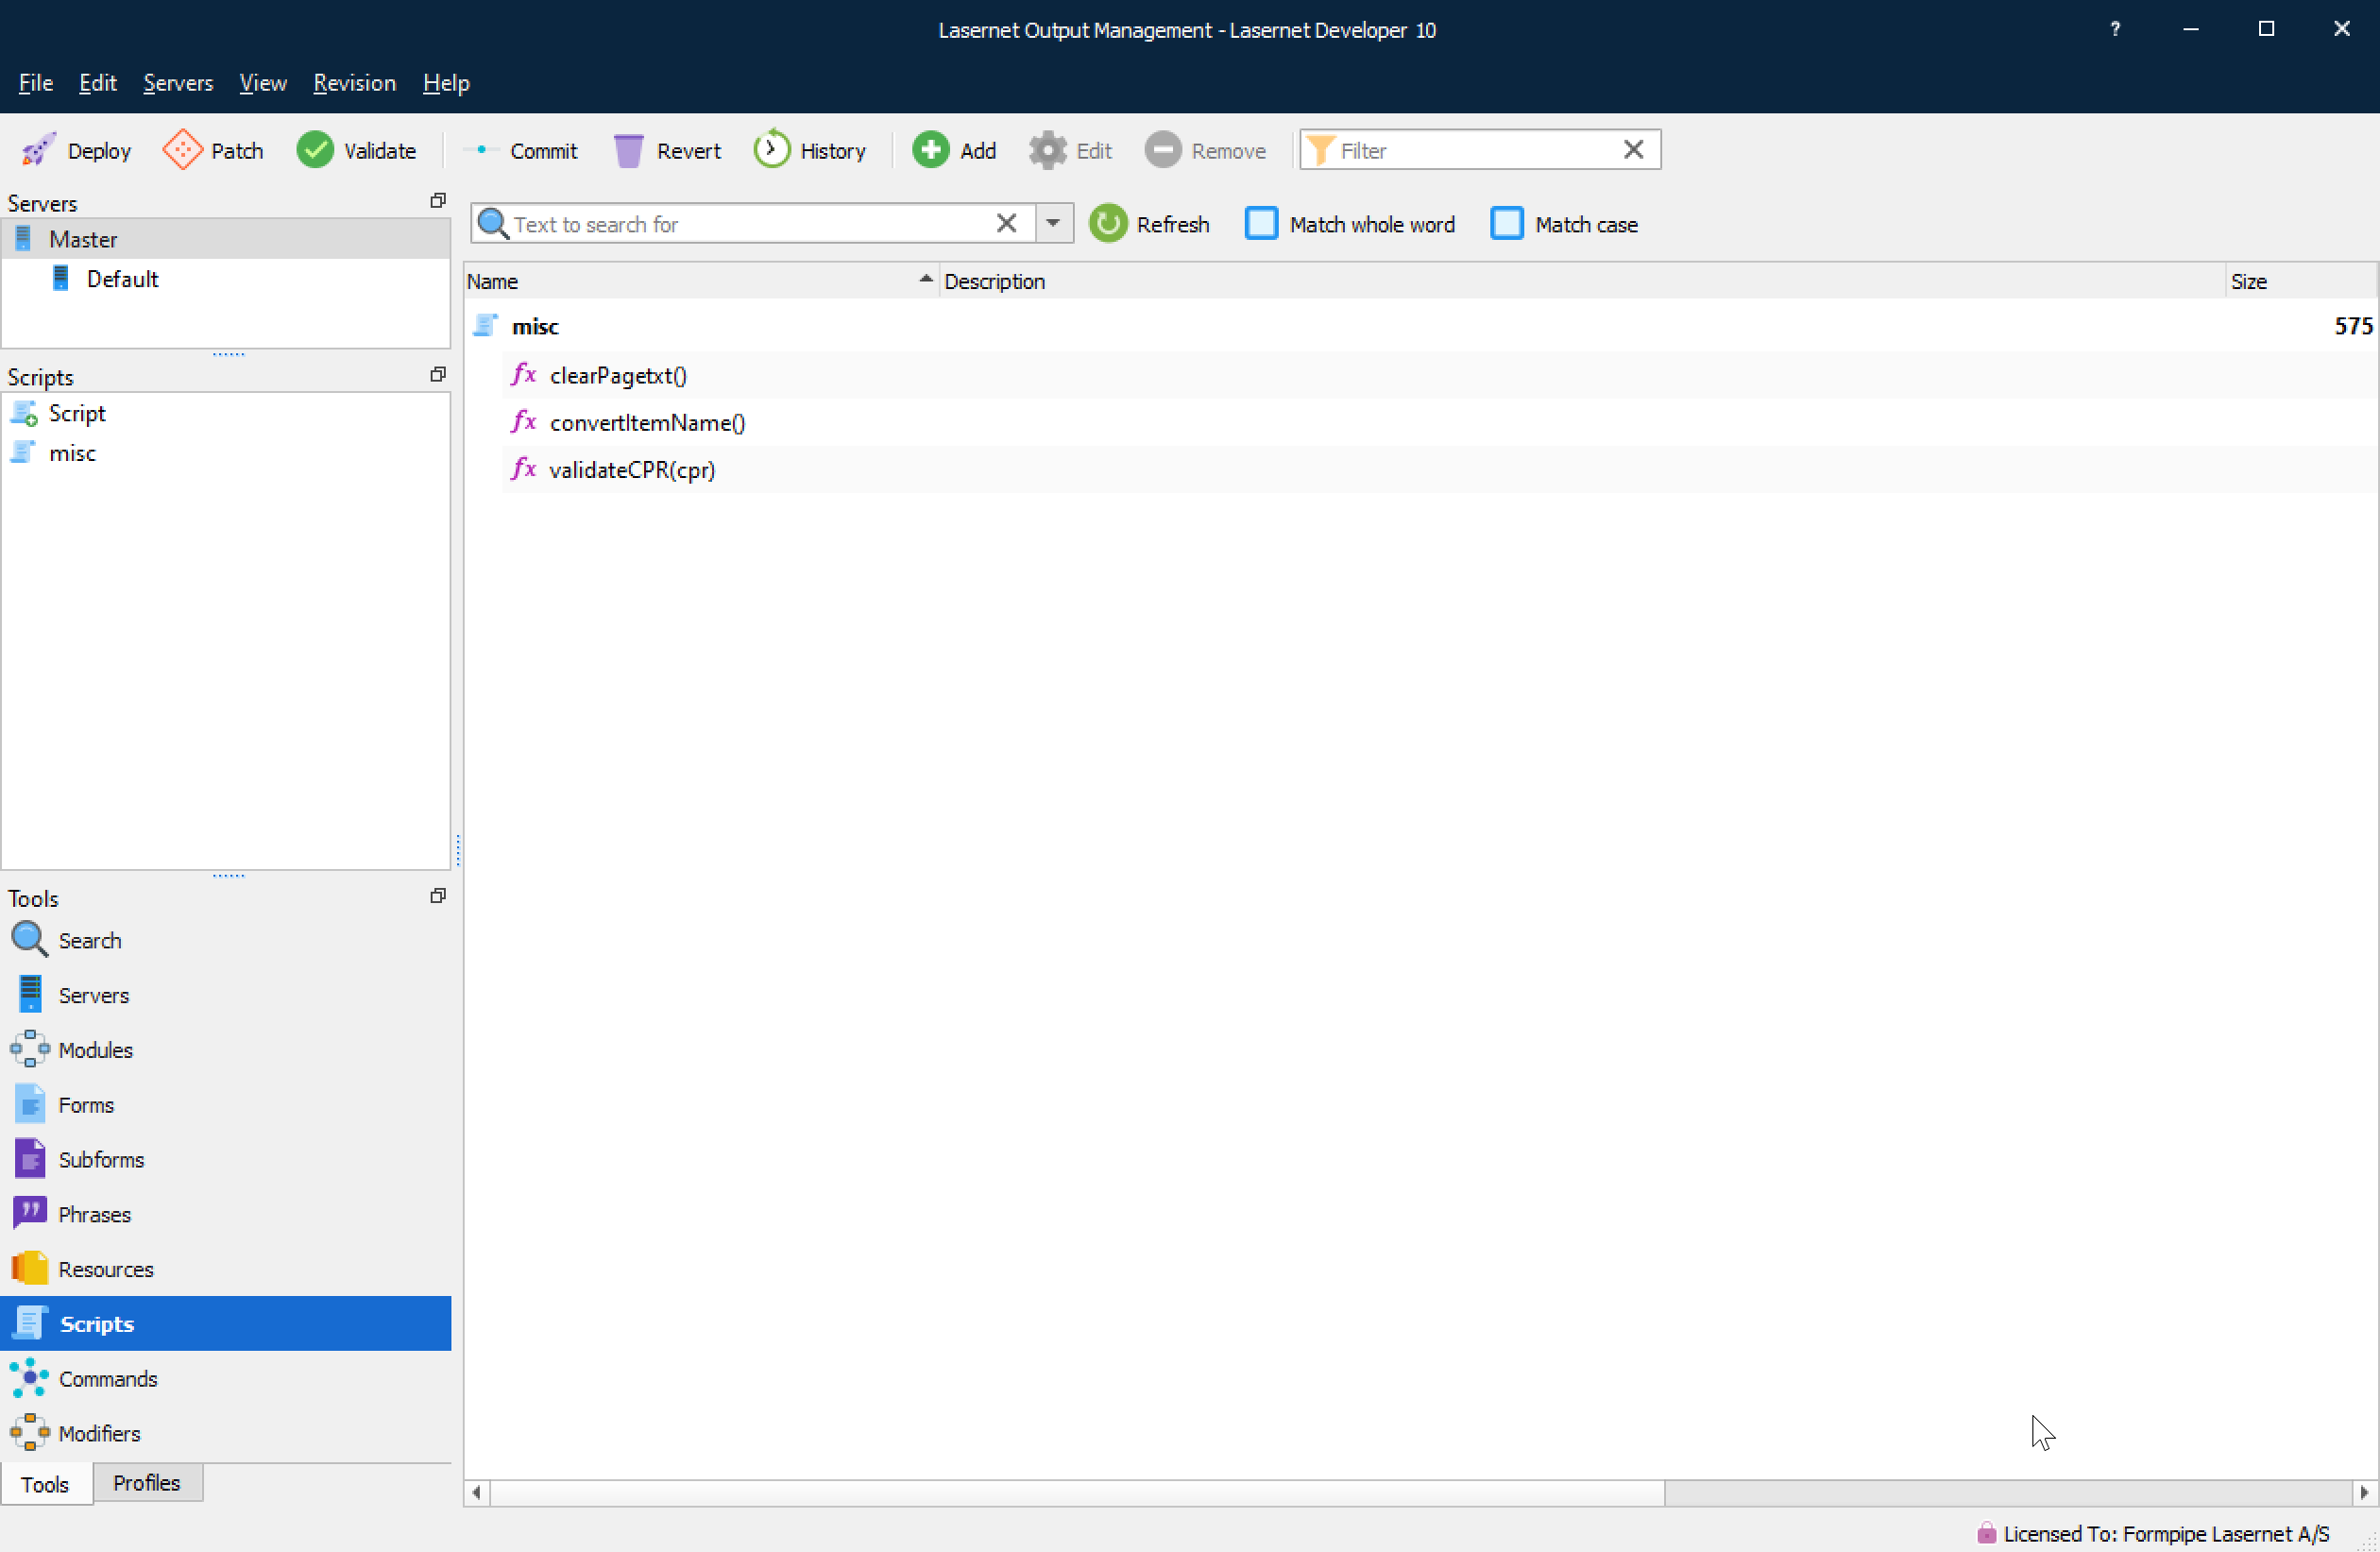
Click Add in the toolbar to add a new script object. Alternatively, select Script in the left panel and drag the icon into the list view containing script objects. When a script has been added, it will be available globally for the whole configuration, and you can add it to any module form as a modifier or rearrange object.
Click Edit in the toolbar to edit an existing script in the Script Editor. Alternatively, double-click the script. A script object can contain several functions. If you double-click on the function name, you will be guided to where the selected function starts.
Select an object (root items are marked in bold) and click Remove to delete it. This will remove all functions included in the main object. If you want to remove a function only, you must do so in the Script Editor. After a function has been removed, remember to manually remove any object references added in modules or forms, else you will get an error when validating the configuration or when processing jobs through the modules or forms.
If you have a large library of script objects and functions, you can use the Search box to find the text that you are looking for. Type in the search text then click Refresh; all the functions that match the search text will be listed, and the matching text will be marked with yellow. A few script lines before and after the match will also be listed to provide context.
In your search for strings, you can decide to Match whole word or Match case.

After a search, clear the Search box and then click Refresh to list all available script objects and functions again.

Script Editor
The editor supports the development of scripts by providing you with features for efficiently writing and editing code.
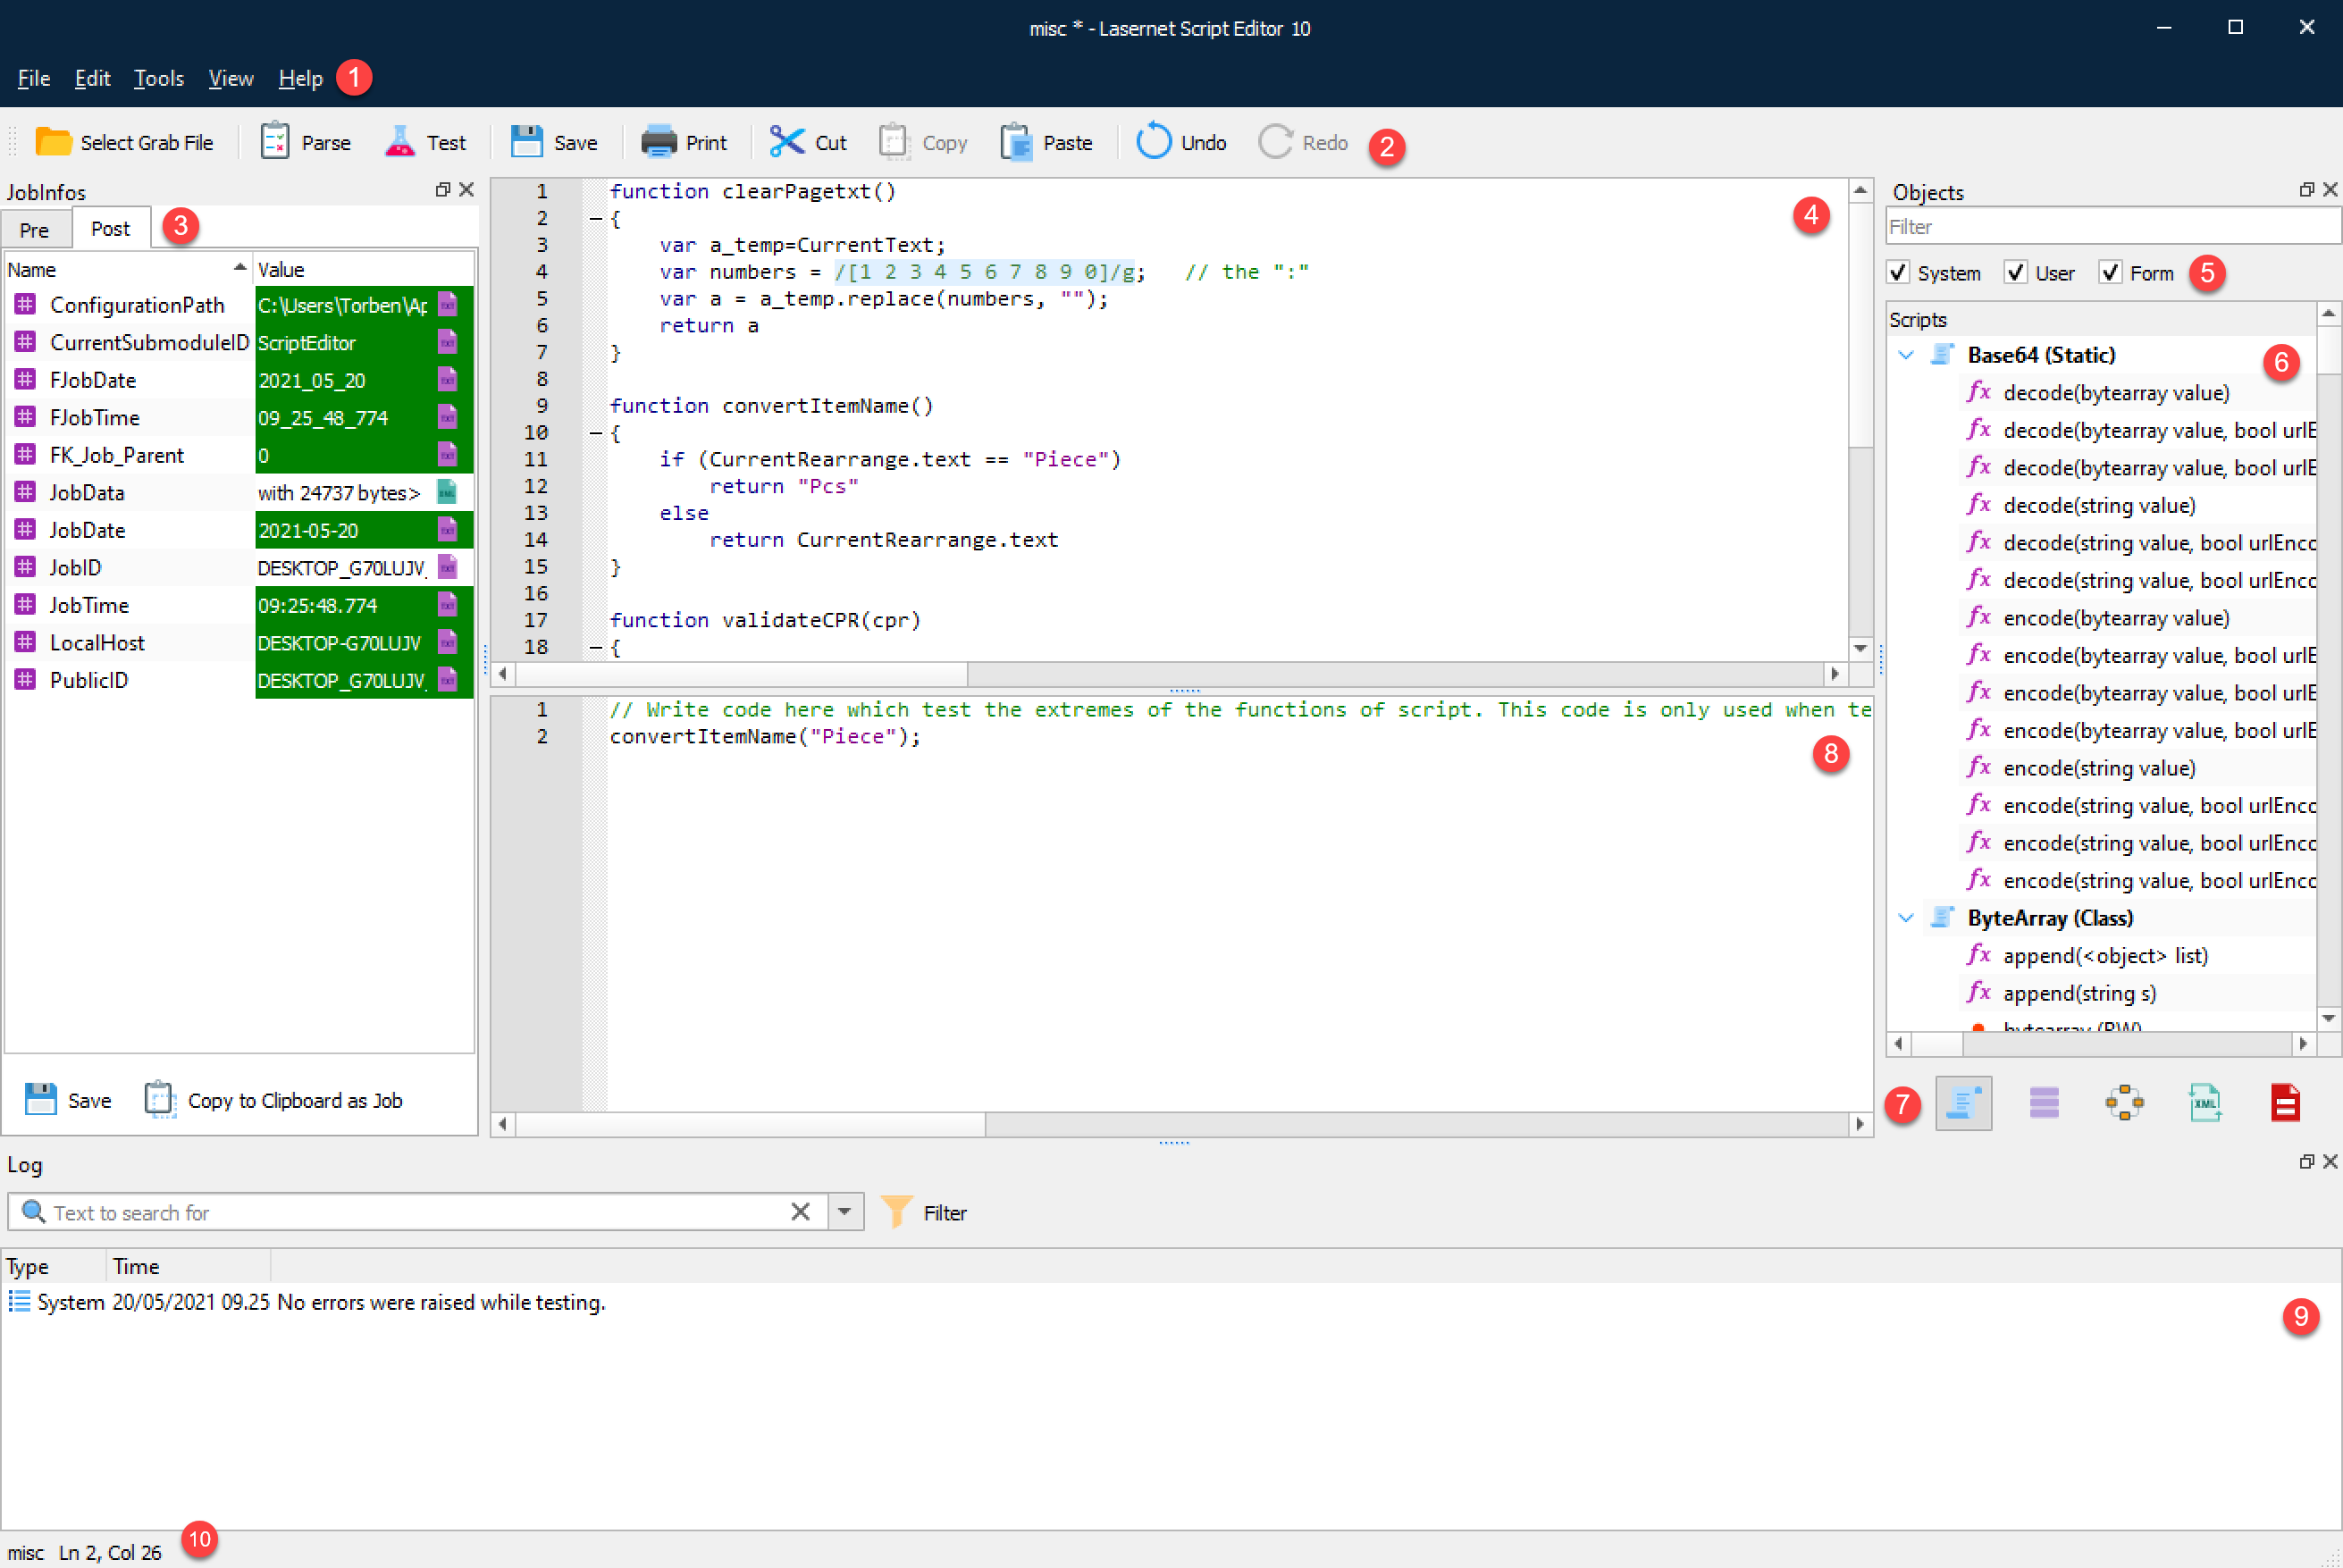
Menu bar with File, Edit, Tools and View functionality.
Toolbar with Parse, Test, Save, Print, Cut/Copy/Paste and Undo/Redo functionality.
Name and values of JobInfos in pre (before execution) and post (after execution) mode.
Script Editor with code hints and indentation guides.
Filtering support for Lasernet System, User and Form objects.
Object view with drag and drop support to Script Editor area.
Select Scripts, Database Commands, Modifiers, or XML Transformers object view.
Unit testing.
Logger view for testing and debugging of scripts.
Status for filename and cursor positioning.
Unit Testing
Unit testing can help you to validate your script functions without uploading the configuration to server and parsing jobs through Lasernet.
The idea of unit testing is to test the extremes for each function, to make sure that it works as expected and to catch errors if something is changed.
It is normal practice to implement the unit test before implementing the actual function which is being tested.
In Tools activate Unit Test and a window for the Unit Test editor will appear.
In the Unit Test mode you can type the name of the function and the conditions you would like to validate. The tool bar contains a Parse button to validate the syntax and Test button to execute the Unit Test.

In the logger window you will receive the results of your Unit Test.
Grab JobInfos
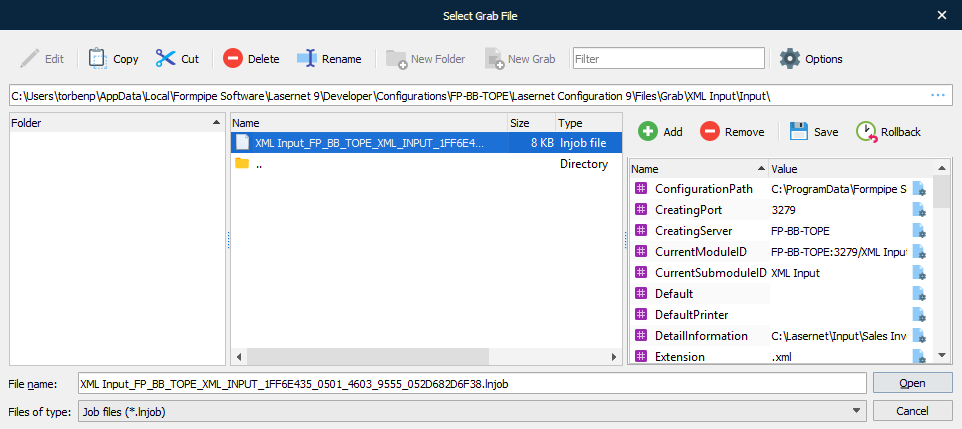
Activate View > Grab JobInfos if you want to list the results of JobInfos created in Unit Test mode. First, you must load a grab file containing JobData. Go to File > Select Grab File and browse for a valid Job file (.lnjob) that has been grabbed by a Lasernet environment.
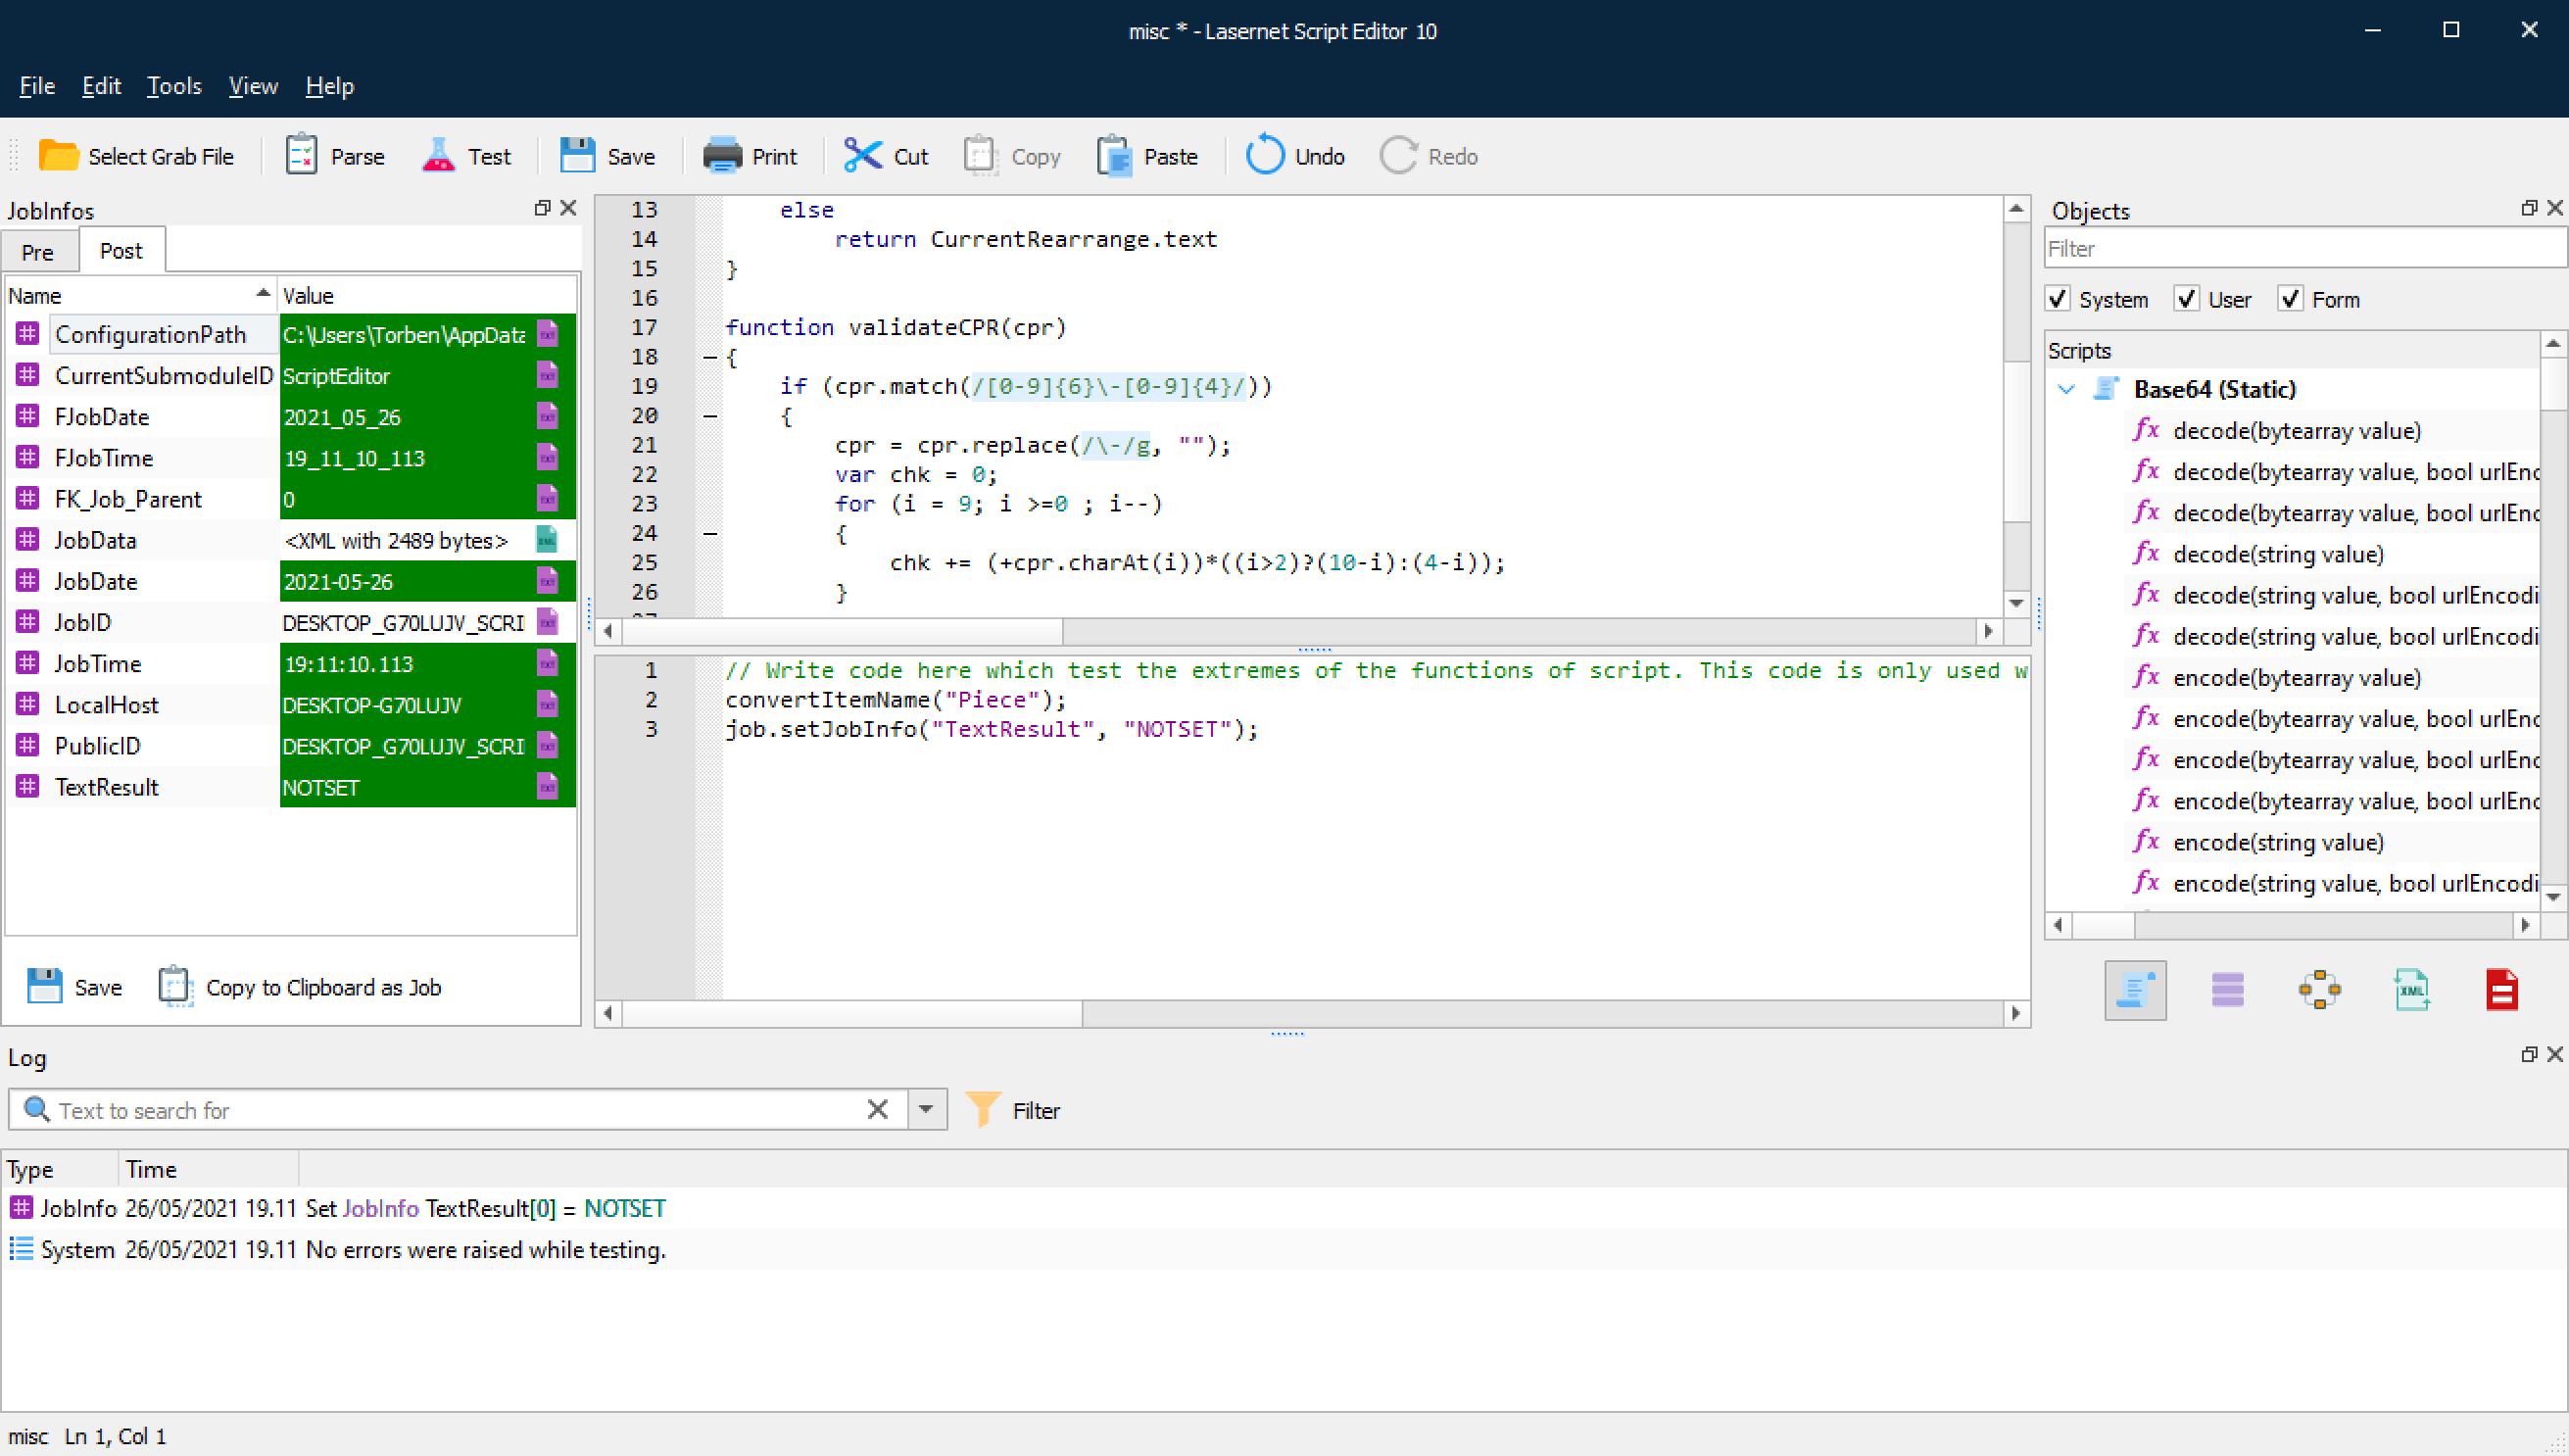
When the Job file has been loaded, the JobInfos pane will list JobInfos from the Job file (Pre) mode and new values and new JobInfos, created via Unit Testing (Post) mode.

For testing purposes, you can Add and Remove JobInfos, or edit the contents of existing JobInfos in the JobInfo pane. The Save functionality will save any changes made in the JobInfo view into the loaded job file. If you want to roll back JobInfos click the Rollback button. However, you cannot roll back changes after JobInfos have been saved into the job file. The Rollback will affect all of the changes made to the Pre job since it was loaded or last saved.
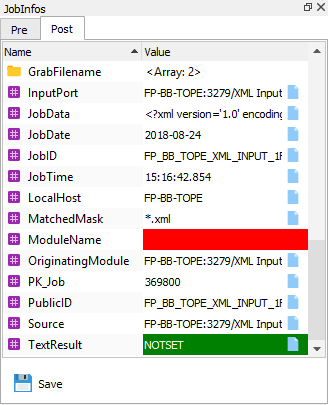

The JobInfo view will be updated with the results of JobInfo-manipulating commands like job.setJobInfo("TextResult", value) and the logger window will contain the results of your unit test.
Check Class
A major part of testing functions is to look for errors raised during execution. In order to test functions which do not raise errors, but return results or manipulate objects or variables, Lasernet provides a Check class for this purpose.
The Check class contains two static functions which can be used to check results of functions and raise errors if they are not as expected.

The Check.equal functions can be used by dragging them from the Object list to the unit test script editor.
The first implementation checks if two objects are equal. This can be used for different object types including Color.
The second implementation raises an error message if the returned Boolean is false. In this way, you can compare anything in a Boolean expression.
The following example shows both equal functions being used. The first with an unexpected result from convertItemName, second with an invalid CPR Number (Danish Personal Security number);
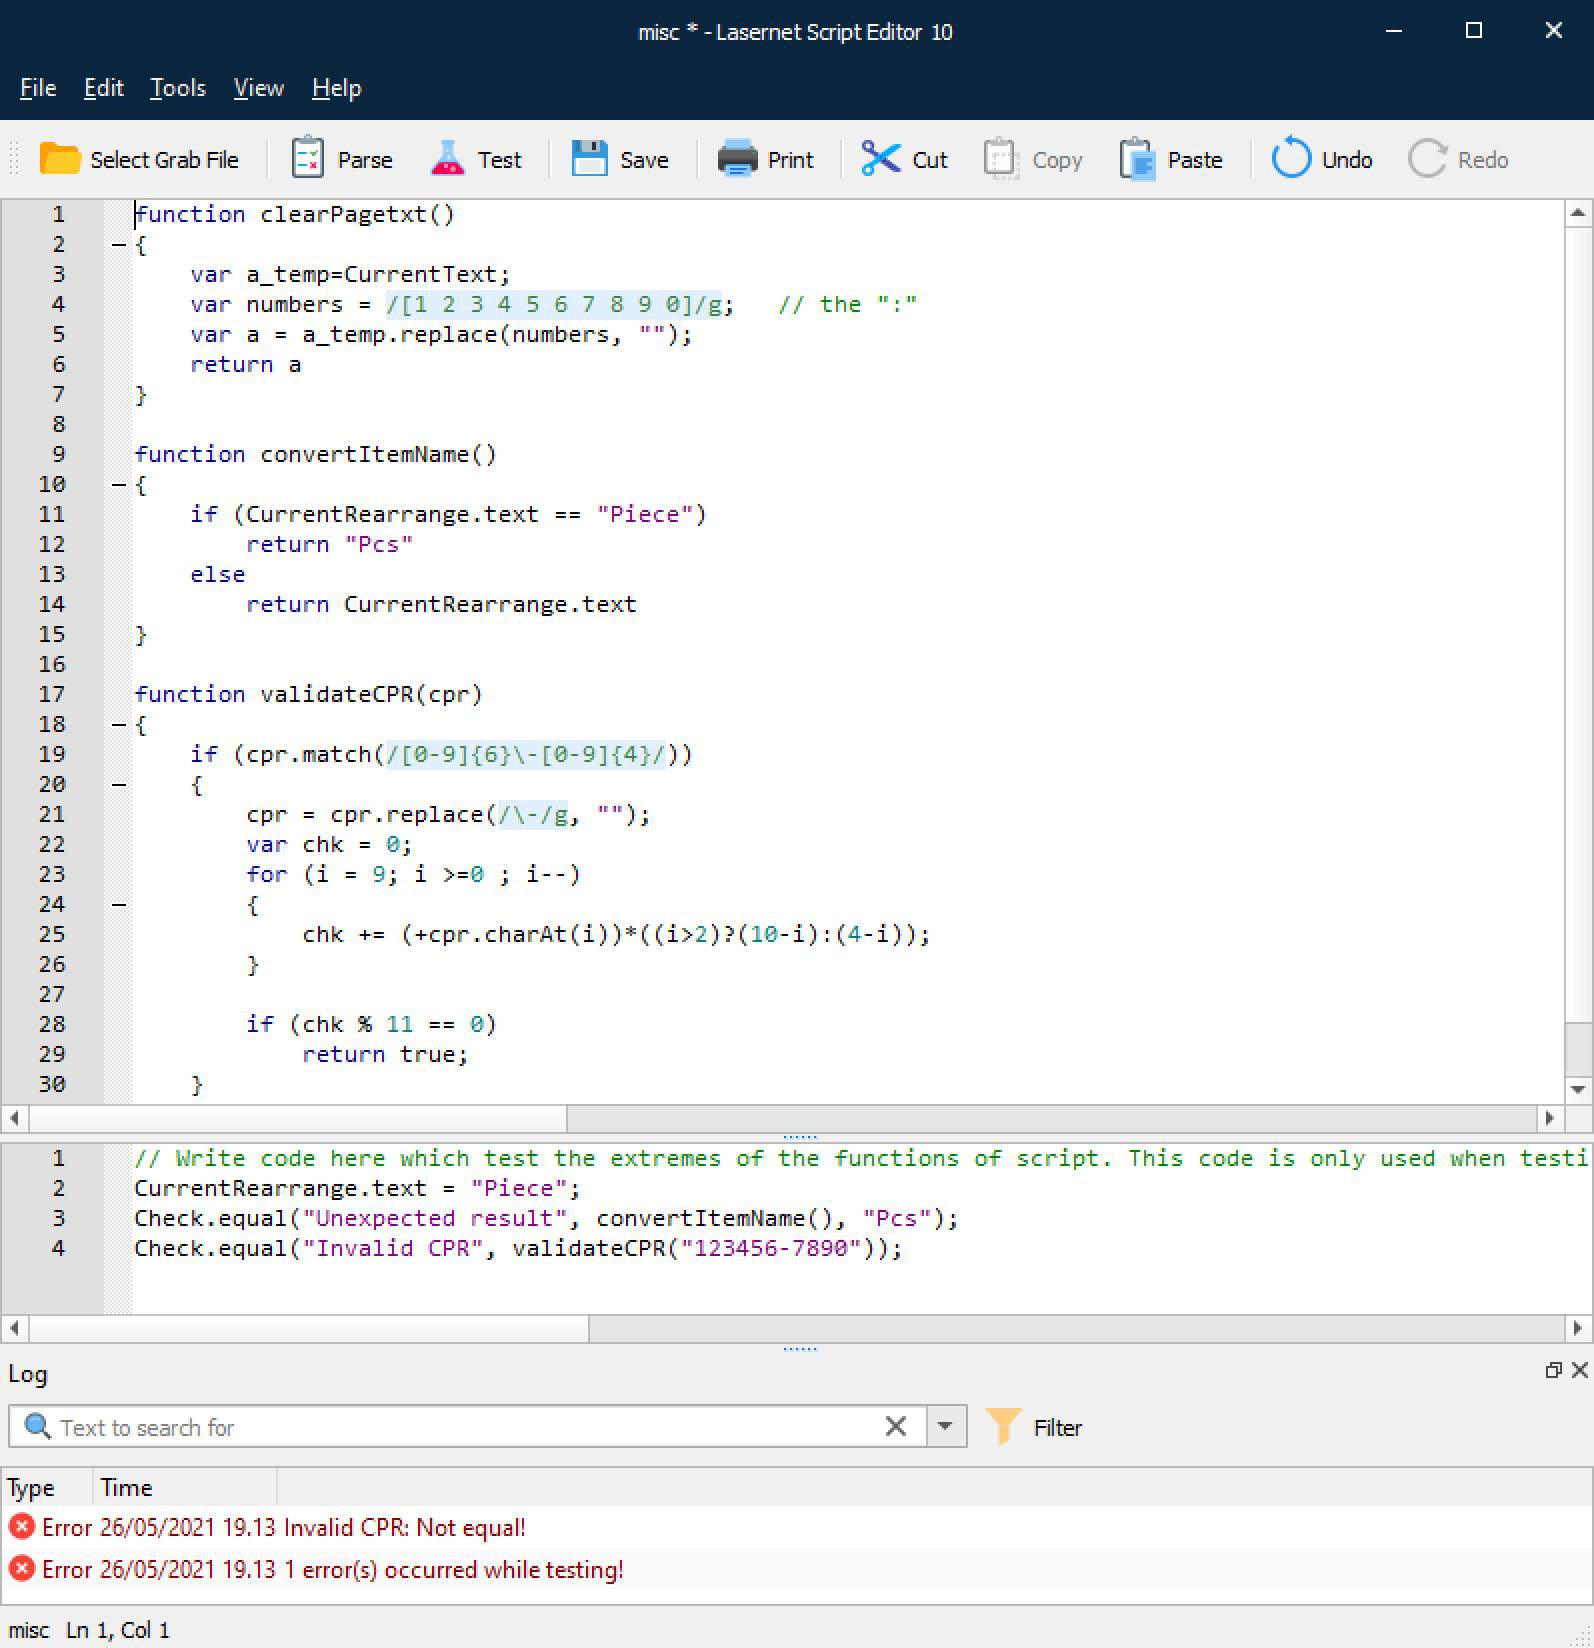
Two errors are raised showing the error message. In the first call, the reason for the failure is also included.
Loading and Saving Jobs
When a function is based on a job it can be useful to use a grabbed job (.lnjob) to test against.
A job can be loaded via the load function on the job object. The current job can also be saved to disk via the save function on the job object.
Multiple jobs can also be loaded in order to run a range of checks on them, which is not possible with the loaded grab job.
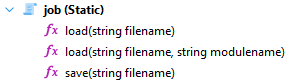
Loading and saving must be done with .lnjob files and can be either absolute or relative to the grab folder of the configuration. Both functions return true if load or save was successful.
Scripts as Form Modifiers
When working with a Lasernet configuration there are several places where a script can be added in place of a modifier.
In a form, scripts can be connected to the following types of modifier points:
Form
Sheet
Page (only for text output forms)
In addition to this, scripts can be attached to individual rearranges.
Form Modifier Resolution Order
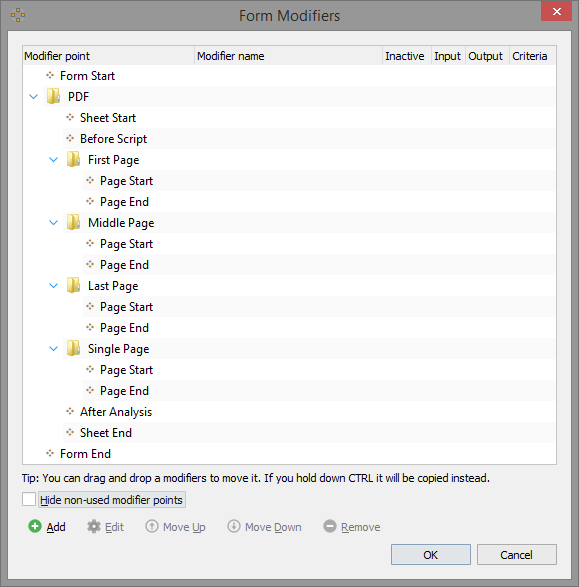
When processing a form, the modifiers or scripts are run in the following order:
Modifier point Form Start
Modifier point Sheet Start
Definition of all JobInfos contained in the Sheet
Modifier point (Sheet) Before Script
NumberOfPages JobInfo contains the number of pages in the document produced
CurrentPage JobInfo is updated
Run for each page:
Modifier point Page Start
Rearrange scripts in the conditional area
Modifier point Page End
Scripts attached to rearranges
Modifier point (Sheet) After Analysis
Modifier point Sheet End
Modifier point Form End
Manipulating Overlays
This information applies to scripting in the Form Engine.
When producing a document it is not often that the same overlay is used for every single page. As such, Lasernet provides an easy way to use separate overlays for the first, last and middle pages. Sometimes you need even more flexibility, which where scripting comes in. To aid with script writing, Lasernet provides the ability to access the Page object using the following functionality:
The page Object
When the Form Engine creates text output, it creates a number of pages. Each of these pages can be accessed from within a script and the page properties can be manipulated. It is also possible to clear and/or add overlays on each page. The pages are available in an array called pages, where the first page is named pages[1] and so on. There is one item for each page in the array.
For example, if you would like to add an overlay to the first page, you can do it in this way:
pages[1].addOverlay("SomeOverlay.emf", true, false);
pages refers to the page object and allows you to access the page array. The [1] reference provides access to the first page on which we call the method addOverlay. This method is used for instructing Lasernet to add an overlay to that particular page. Inside the parentheses three parameters can be specified. The first parameter is required and contains a string identifying the filename of the overlay that you wish to add to the page. The second parameter is optional and contains a Boolean value where true means that Lasernet will remove any existing overlays on the page before adding the new one and false means that Lasernet will keep any existing overlays.
The default value of the second parameter is false, so the function call could be written as:
pages[1].addOverlay("SomeOtherOverlay.emf");
This will instruct Lasernet to keep the existing overlays on the page.
The third parameter is also optional and contains a Boolean value where true means that the overlay will be visible in the Form Editor only and not processed by the Form Engine.
Shortcut Functions
Lasernet also provides two shortcut functions for adding overlays, either to all pages or to the current page:
addOverlay("NameOfTheOverlayFile.emf", true, false);
addPageOverlay("NameOfTheOverlayFile.emf", true, false);
The addOverlay function is best called from an After Analysis modifier point, whereas addPageOverlay should be called from an On Page End modifier point.
Manipulating Printer Profiles
This information applies to the Form Engine. To assist you in manipulating printer profiles, Lasernet provides you with the same page object as mentioned in Manipulating Overlays.
For more information about printer profiles, see Printer Profiles.
The page Object
The page object can be used to add and clear printer profiles for each page. The pages are available in an array called pages, where the first page is named pages[1] and so on. There is one item for each page in the array.
For example, if you would like to add a printer profile to the first page, you can do it in this way:
pages[1].addPrinterProfile("NameOfPrinterOutputOrPrinterService", "NameOfProfile", true);
pages refers to the page object and allows you to access the page array. The [1] reference provides access to the first page on which we call the method addPrinterProfile.
This tells Lasernet that we want to add a printer profile to that page. In the parentheses, add the first parameter: a string that contains the name of the Printer Output module, also referred as a port, or Printer Service module on which to add the profile. Note that this is just the name of the port without any computer name prefixed. The second parameter tells Lasernet the name of the printer profile that we want to add for that Printer Output module or Printer Service module. This profile must have been created on the Printer Profiles page in the Lasernet Developer when using Printer Output as printing module, or in the Printer Service application when using Printer Service as printing module. The third parameter tells Lasernet to remove any existing profiles for the given port before adding the new profile. Changing this value to false would have kept the existing profiles. Note that only the profiles for the specified port are removed. This is contrary to previous versions of Lasernet where all profiles for all ports would have been removed.
Typically you would always want to remove existing profiles, because the output port will only use the first profile added. However, to allow for both backwards compatibility and future enhancements, the parameter is still in use.
Shortcut Functions
To make it easier to add a printer profile to a page, Lasernet provides two shortcut functions: addPrinterProfile and addPagePrinterProfile. These two functions add a printer profile to all pages or to the current page.
addPrinterProfile("NameOfPrinterOutputOrPrinterService", "ProfileName");
addPagePrinterProfile("NameOfPrinterOutputOrPrinterService", "ProfileName");
The addPrinterProfile function is best called from a Sheet > After Analysis point, whereas addPagePrinterProfile should be called from a Page End modifier point.
Note that both of the above functions will replace any existing printer profiles for the given port.
Manipulating Rearranges
This information applies to scripting in the Form Editor.
When creating rearranges in Lasernet, it is possible to manipulate the content and properties of the rearrange using a script. This is especially useful when calculating checksums for barcodes, and so on.
CurrentRearrange
The CurrentRearrange variable is available for scripts being run from a rearrange where the rearrange has been given a name. The name should be unique, otherwise Lasernet might assign the wrong rearrange to CurrentRearrange. It is very important that the rearrange is named, which is why Lasernet automatically assigns a name to it if the Active checkbox is selected. If the rearrange does not have a name, CurrentRearrange is not assigned.
When the above conditions are met, Lasernet assigns an InputRearrange to CurrentRearrange. This can then be used by a script to access data which has been picked up from the left side, manipulated and returned as the output value of the rearrange.
The script must return a value if the rearrange is to display anything. If you would like the rearrange to output nothing, simply return an empty string.
The script can do the calculation directly or call a function in one of the script files.
'#' + CurrentRearrange.text + '#';
calcTheRearrange();
Besides manipulating the contents of the rearrange, it is also possible to change the appearance of the rearrange. An example could be to display negative numbers in red.
if (CurrentRearrange.number < 0)
	CurrentRearrange.color = red; // Constant defined in system.qs
You can even hide a rearrange by setting its color to white.
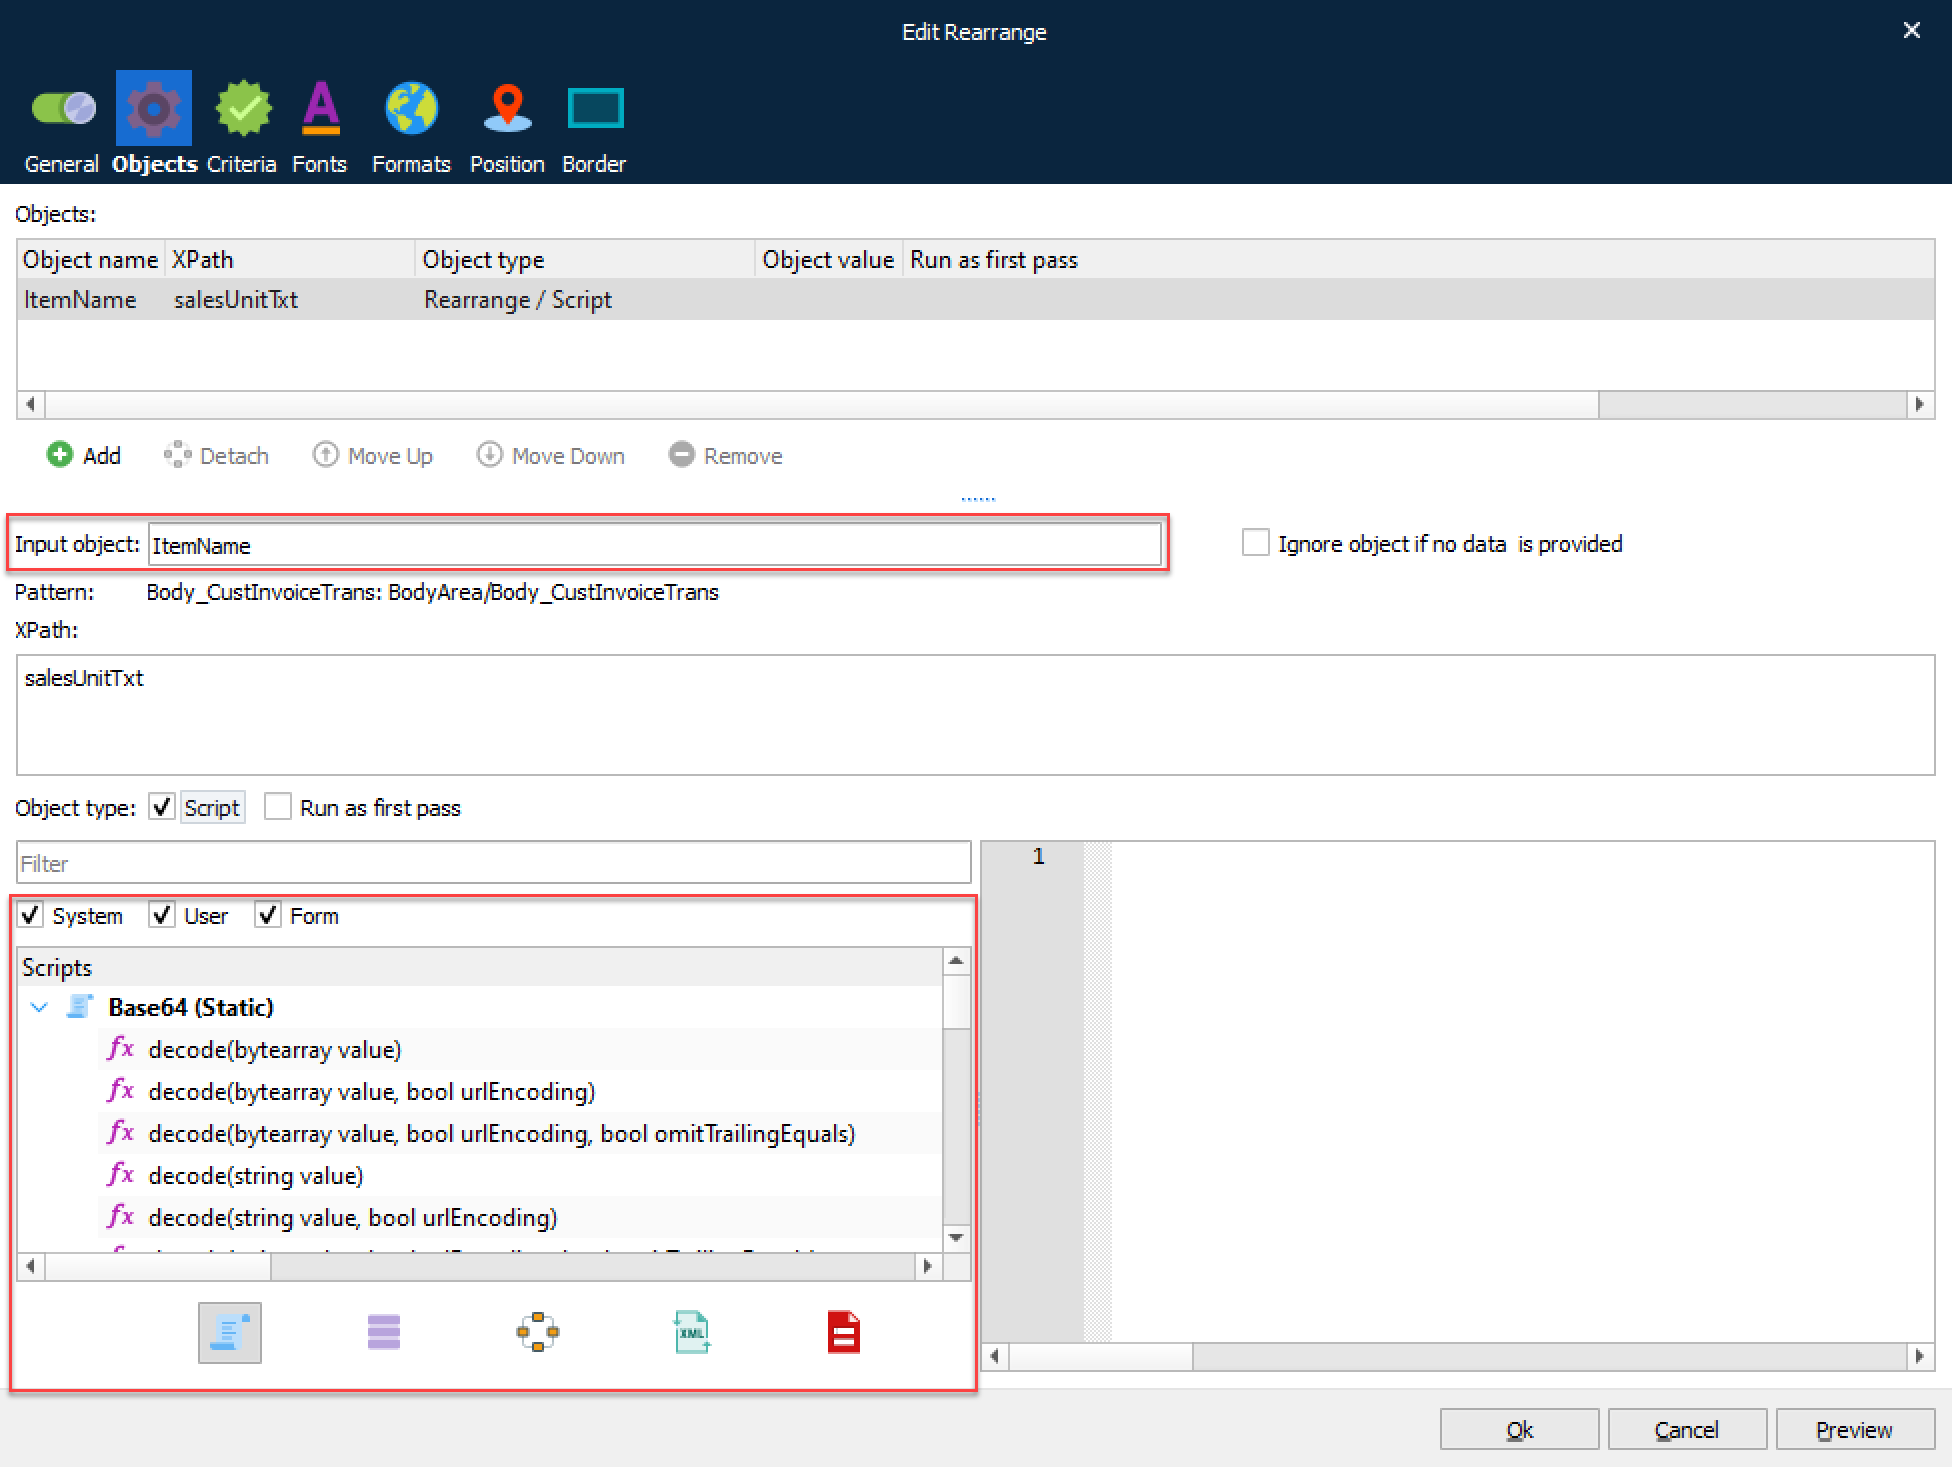
CurrentRearrange.color = white; // Constant defined in system.qsAdd or Edit Scripts from a Rearrange
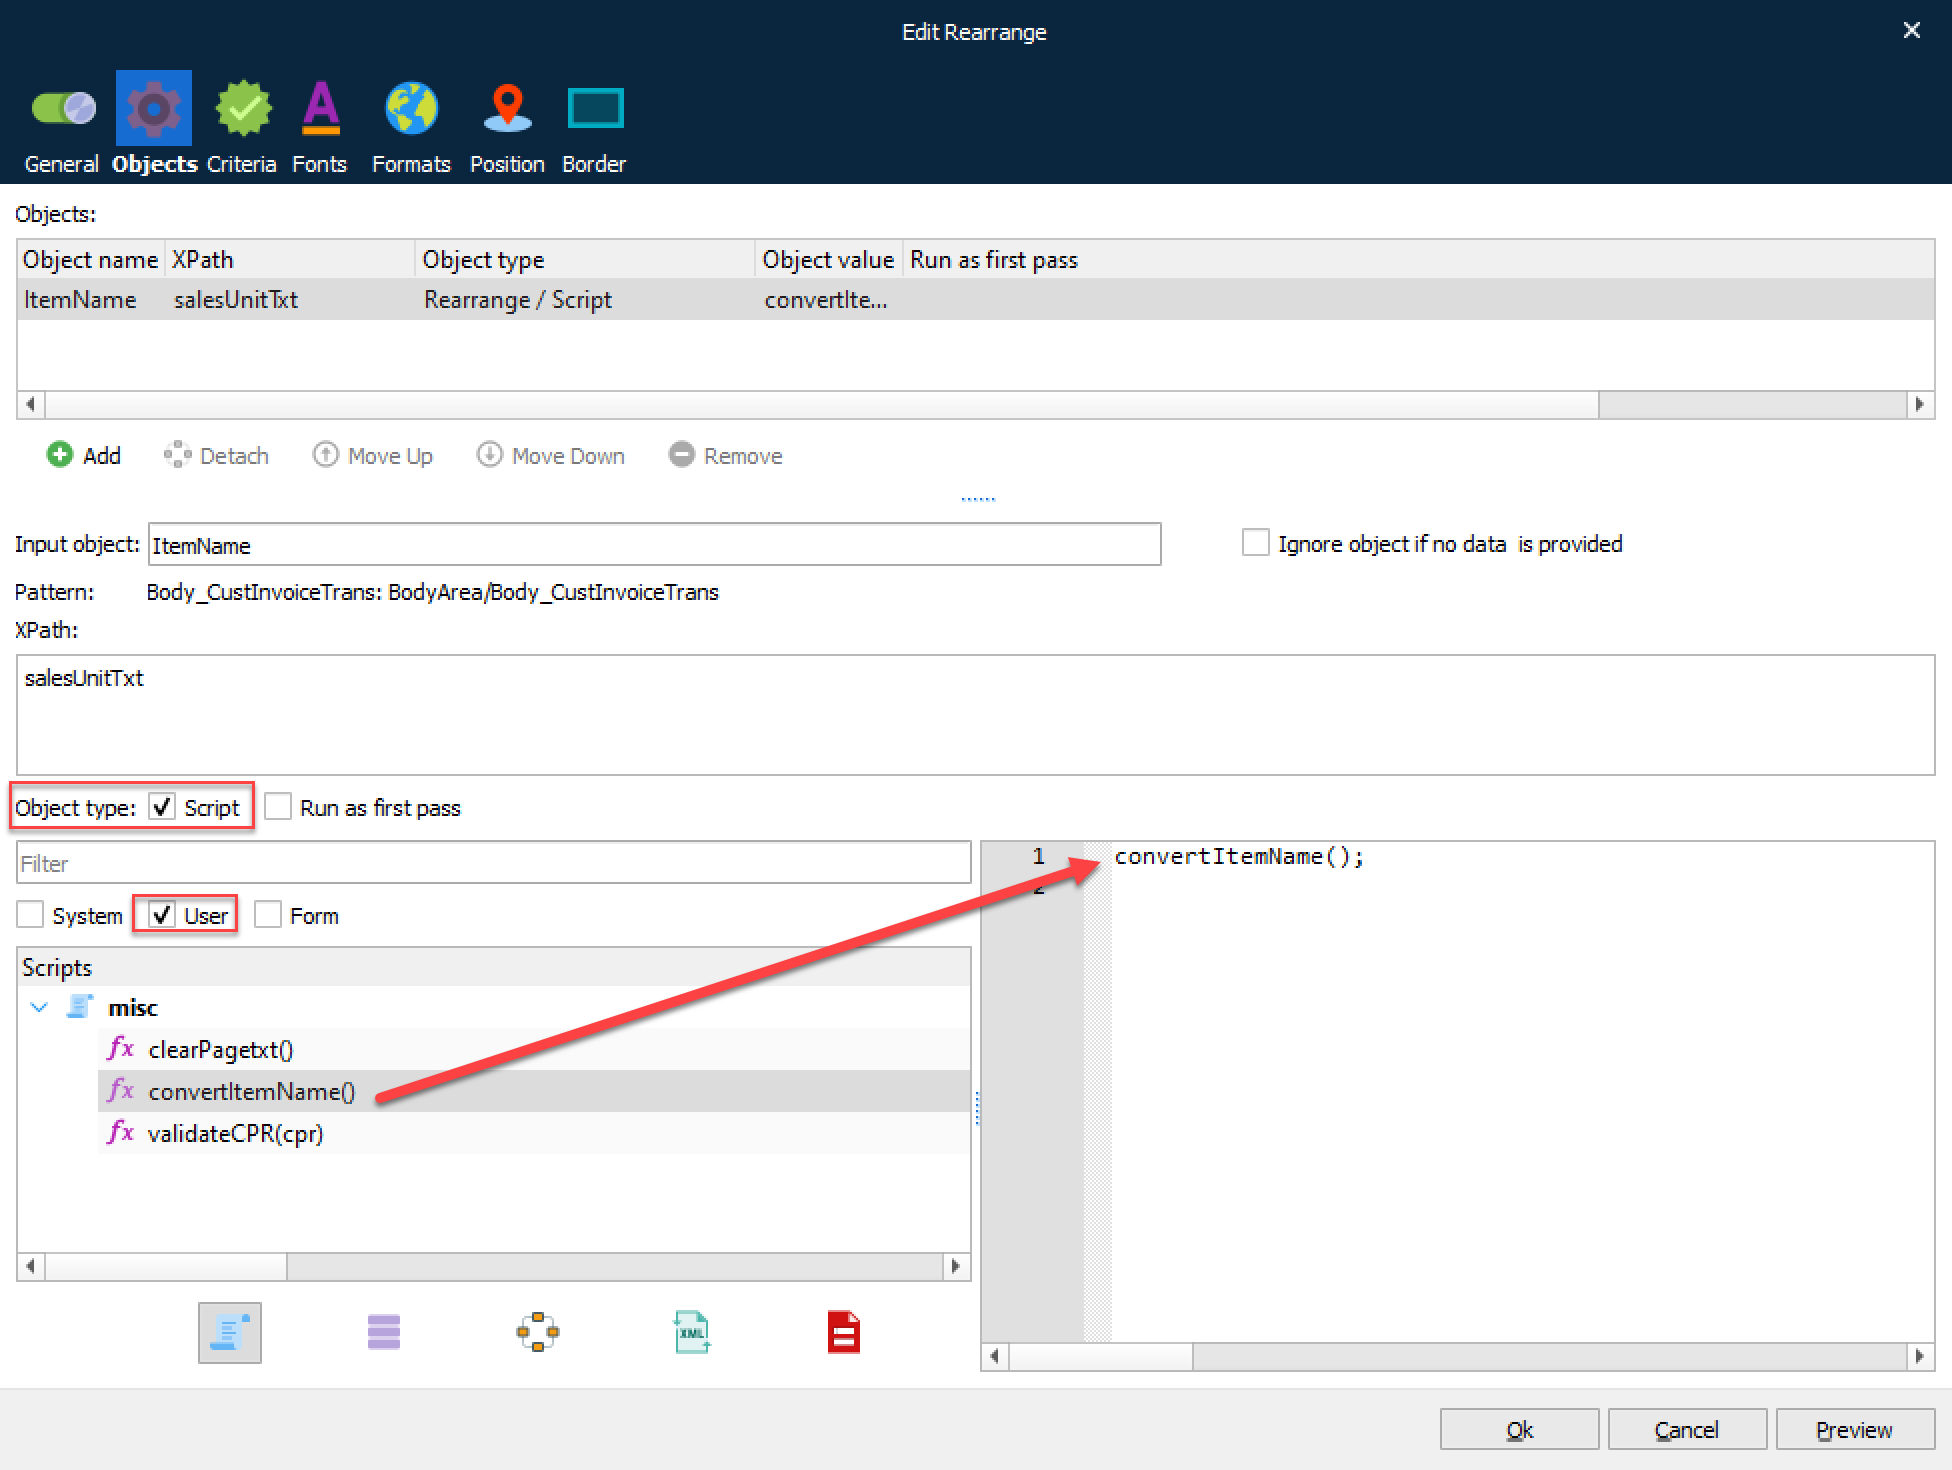
In the Edit Rearrange window, you can add a new function to either a new script or an existing script, as well as edit the chosen function.
In the list of scripts, both user-defined and system-defined scripts are available. You are only allowed to edit user-defined scripts; Lasernet Form Editor prevents you from editing the system-defined ones (by removing the Edit item from the context menu).
When running scripts from a rearrange, Lasernet will execute the script internally at an event point controlled by the system, which is important for calculating the positioning of text and number of pages.
Run as First Pass
The Run as first pass parameter comes into effect at the event point execution time. By default, the setting is turned off, which is the recommended setting in most scenarios. However, by turning the setting on, you are able to accelerate the execution time to run as the first pass in the processing of a form. The output result of the script is used in analyzing the number of pages and calculation of text positioning on pages in the final form.
CurrentText
CurrentText is required to manipulate the content and properties of the rearrange using a script at the Run as First Pass event point, because the object name of the rearrange is not available at this point for the CurrentRearrange variable. For example, in order to manipulate the value of a conditional rearrange, you can run the trim function to remove whitespaces surrounding the value of the current text:
var text = Trim(CurrentText);
The new value will figure in the output and become part of the calculation for the total number of pages in your output form.