Use Direct OData Submit and Direct Button with Workflow
- 13 Nov 2025
- 3 Minutes to read
- Contributors

- Print
- PDF
Use Direct OData Submit and Direct Button with Workflow
- Updated on 13 Nov 2025
- 3 Minutes to read
- Contributors
- Print
- PDF
Article summary
Did you find this summary helpful?
Thank you for your feedback
This article outlines the steps required to set up a workflow in Dynamics 365 Customer Engagement to invoke the plugin for submitting printing contracts to Finance and Operations. This will enable an OData dialog printing contract to be sent to FO in response to an event in CE.
Note
Two ways exist to invoke the logic in FO without user interaction, by using either a direct OData submit or a direct button which then invokes direct OData submit. The advantage of using the logic for direct buttons is that it is not needed to hardcode the process/caller to a direct OData submit record ID. Instead, it is mapped to the control ID on the Lasernet button form, which then maps to the direct OData submit or HTTP method. Performance is enhanced when using direct OData submit, however, it is easier to maintain a direct button.
Use Direct OData Submit
Create a Lasernet Direct OData Submit record. We recommend testing and confirming that it is working by attaching it to a flyout or button.
Obtain the ID of the Lasernet Direct OData Submit record. Several ways exist to obtain the Record Id, such as using the Power pane Plugin in the browser or copying it from the URL. In the following example, the URL is used:

Create a new process/workflow for the entity in question.
If this process is an action and you want to use it in a Business Process Flow, select the As a Business Process Flow action step checkbox and the As an on-demand process checkbox if required.
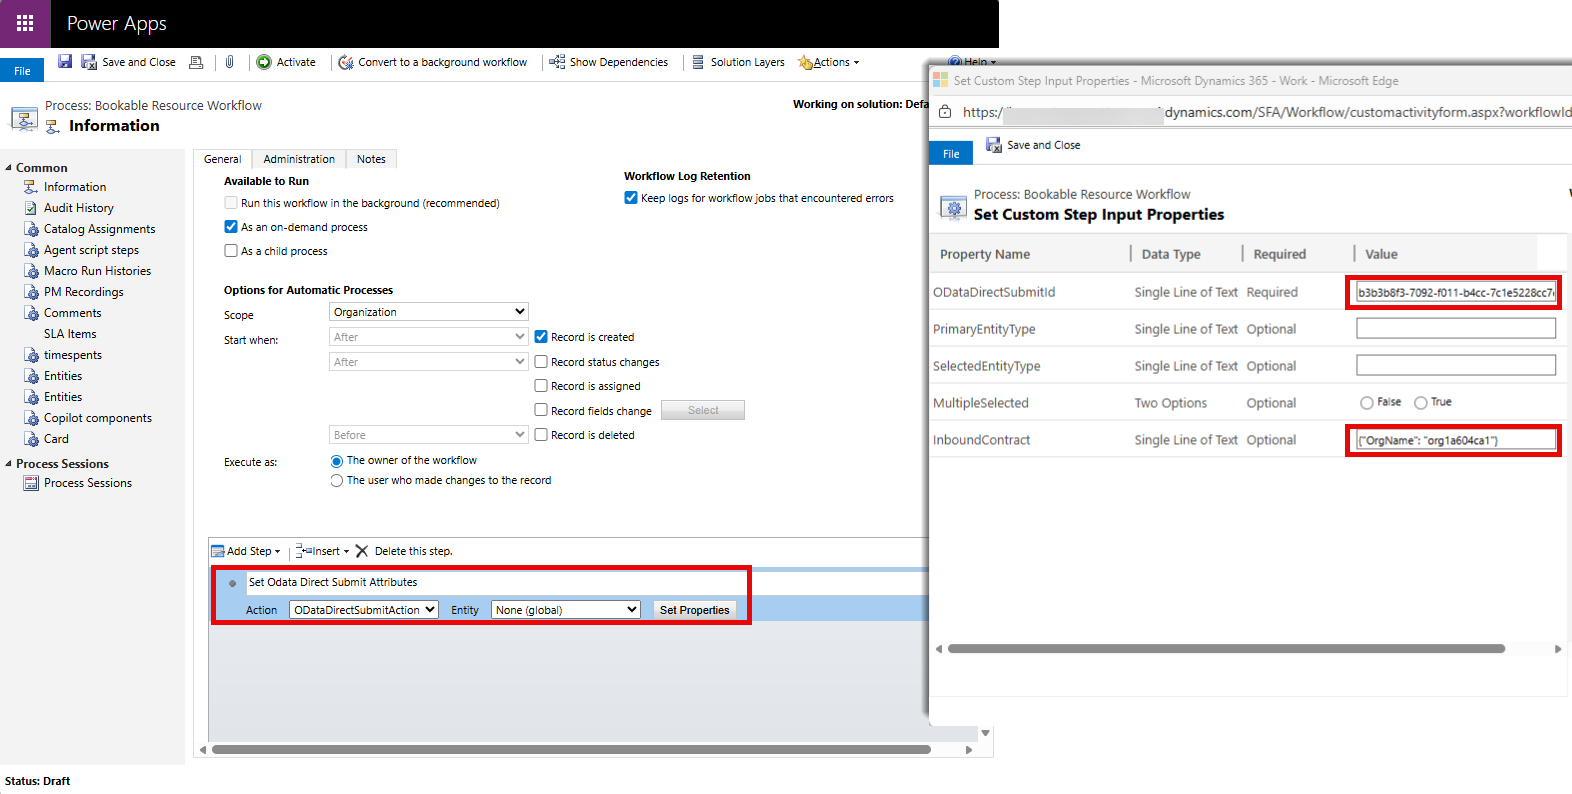
Add the Lasernet.Unified.Printing.Activities.ODataDirectSubmit step.
Fill The ID of OData Direct Submit field with the ID found in step 2.
Set Inbound serialized contract (will be returned) to a JSON object. OrgName must be added, as it is currently a requirement in FO (either hardcode or using arguments). OrgName can be found in the Developer Resources area under Settings > Customizations. The JSON object will be sent to FO, where it can be used for report mapping and filtering.
You can also set the remaining optional fields.
Add your logic to the process, set the start time, and activate it.
Optional
Option 1: Set Properties for Workflow Activity for Lasernet.Unified.Printing.Activities.ODataDirectSubmit

Option 2: Add a Workflow Action and Specify OdataDirectSubmitId and Inbound Contract
Use Direct Button with Workflow
Create a Lasernet button and assign a meaningful, unique name to controlId. This will be the ID that is matched in step 5.
Create a Lasernet Direct OData Submit record and assign it to the button. We recommend testing the button to confirm that it is working.
If you do not want the button to be displayed, hide it using a dummy criteria that matches nothing (for instance, entities that do not exist). Apply the same criteria to the properties of the process step (primary and/or selected entity) in step 5.
Create a new process for the specified entity. If this process is an action and you want to use it in a Business Process Flow, select the As a Business Process Flow action step checkbox. Select the As an on-demand process checkbox if required.
Add the step Lasernet.Unified.Printing.Activities.DirectButton.
Fill The ID passed on from the control field with the controlId that you added in step 1.
Set The data which are to be sent to a JSON object. Add OrgName, as it is currently a requirement in FO (either hardcode or using arguments).
The JSON object will be sent to FO, where it can be used for report mapping and filtering.
Example
{"AccountID": "{Account Number(Account)}", "OrgName": "orga12345" , "InvokedFrom": "MyAccountWorkflow" } The part highlighted in yellow is added from the Account entity.
You can also set the remaining optional fields.
Add your logic to the process and/or set when it should be started.
Activate it.