Upload Documents to the Archive
- 14 Jan 2026
- 13 Minutes to read
- Contributors

- Print
- PDF
Upload Documents to the Archive
- Updated on 14 Jan 2026
- 13 Minutes to read
- Contributors
- Print
- PDF
Article summary
Did you find this summary helpful?
Thank you for your feedback
You can use the upload facilities in Keep to:
Choose files to upload.
Enter metadata to describe the documents that you are uploading.
Upload the documents and their metadata to the archive.
Start an Upload
To begin the upload process, follow these steps:
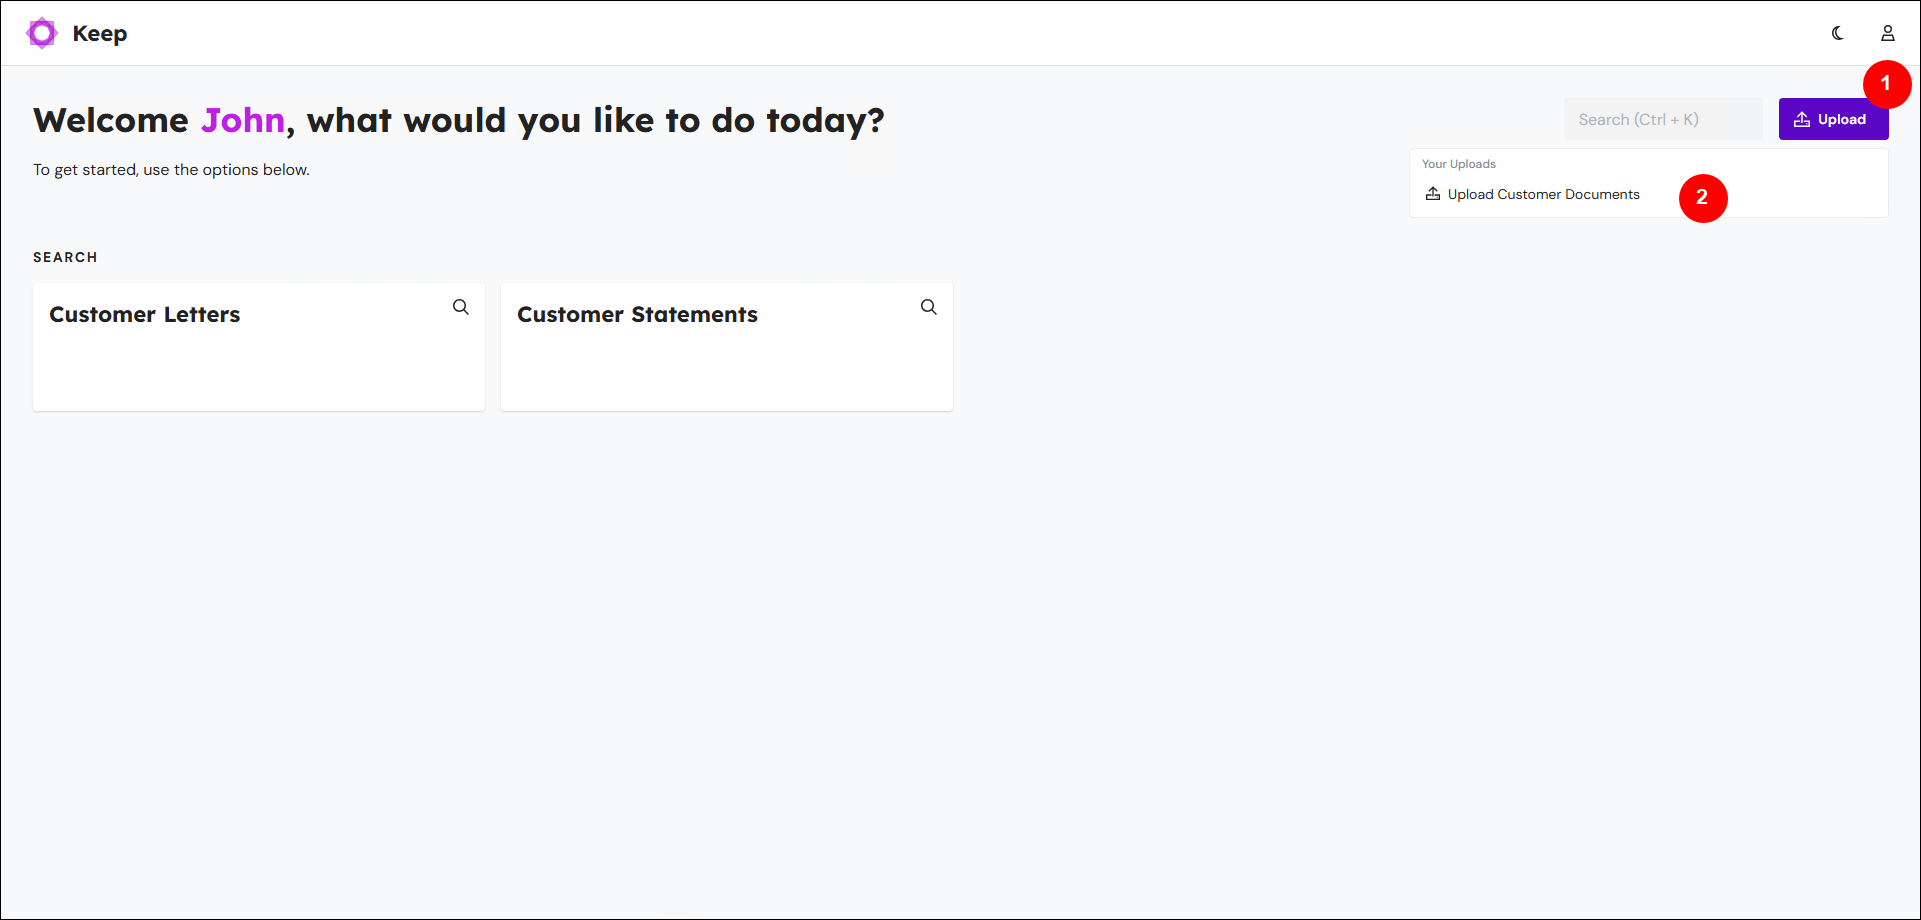
Log in to Keep and then navigate to the home page.
Click Upload (see 1 in the image below).
From the Your Uploads list, click the type of upload that you want to do (2). In the example shown in the image, Upload Customer Documents is available.
Note
The types of upload that are available to you depend on how Keep has been set up.
Find Your Way Around an Upload
An upload consists of three main elements:
Number | Element |
|---|---|
1 | |
2 | |
3 |
.png)
Tip
To return to the Keep home page, click Keep (4) or click the browser’s Back button.
File Preview Pane (1)
This area displays the content of the current file, which is the document that is currently selected in the Table Input pane (3).
Note
This content preview is available for PDF, PNG, GIF, and JPEG files.
This pane also enables you to add more files to the upload, by dragging them into this area. To skip to instructions for the upload process, see Upload Documents to the Archive.
Key Input Pane (2)
This pane contains the metadata that will be associated with the current file when it is uploaded to the archive. The current file is the document that is selected in the Table Input pane.
In the Key Input pane, you can add and update metadata for upload documents. This pane and the Table Input pane both display metadata; consequently, any changes that you make here appear there too.
Note
To use the Key Input pane, you must add one or more files to the upload.
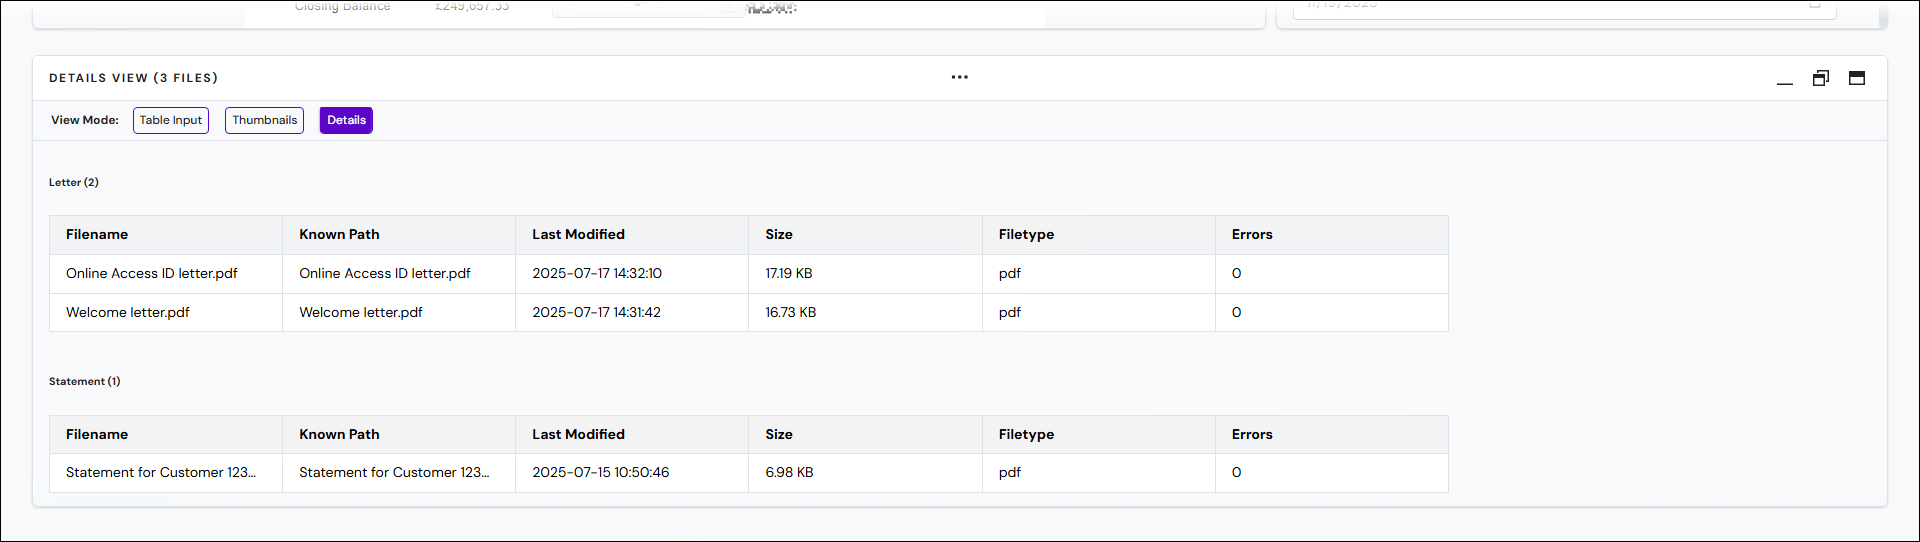
Table Input Pane (3)
This pane lists the documents you have chosen to upload. Three display modes are available. To switch between them, click the View Mode buttons:

Drag the arrow at the top of the pane (between the pane name and the Minimize button) to change the size of this pane.
.png)
View Mode: Table Input
This is the default view. It displays key data organized into a table, which makes entering and editing metadata simple. Each table row corresponds to an upload document.
If your categorization of the upload documents uses more than one document definition (for example, some documents are letters and others are statements), the Table Input pane will contain multiple tables, one for each document definition used.
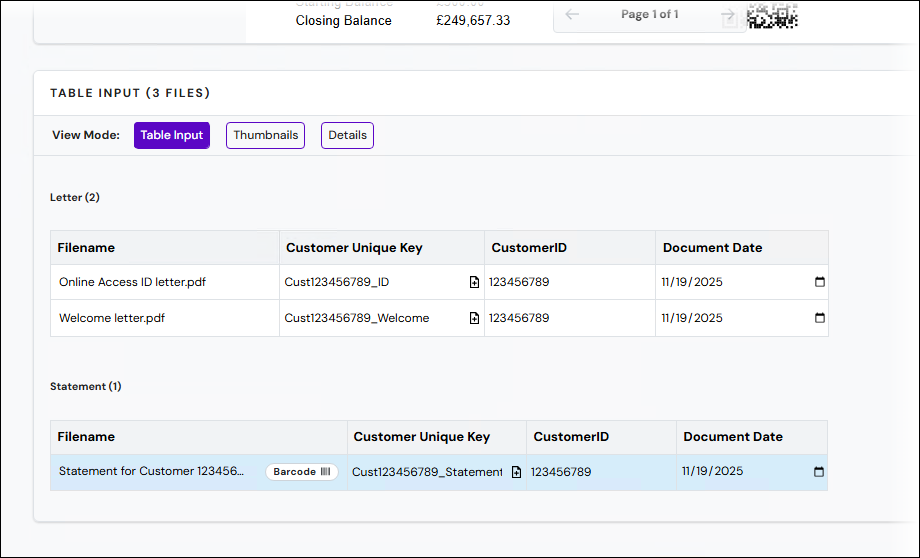
When you select a table row, that row's document is previewed in the File Preview pane, and that document's metadata is displayed in the Key Input pane (in addition to the Table Input pane).
Click a cell to enter or modify the data in it. To use the keyboard to move between table cells, press Tab. The cursor will move to the next editable cell in the current row. Or, if the currently selected cell is the last cell in a row, the cursor will move to the first editable cell in the next row.
Note
You can overwrite the data either directly in the table cells, or alternatively in the Key Input pane. If a key is set to read-only, its data cannot be changed.
View Mode: Thumbnails
This view shows resizable thumbnail previews of the upload documents.
Click a thumbnail to select that document. Its content will be displayed in the File Preview pane, and the Key Input pane will display its metadata.

View Mode: Details
This view shows additional metadata.
Upload Documents to the Archive
The steps in this section describe how to select files to upload, provide metadata to describe those documents, and upload them to the Keep archive.
Upload Documents and Accompanying Metadata
To upload documents into the archive, follow this process:
Each of these parts of the process are described below.
1. Choose Files to Upload
To choose files to upload, use one of the following methods:
Drag one or more files from a File Explorer window onto the File Preview pane (see 1, in the image below). You can do this at any time, regardless of whether the pane is empty or is displaying a document preview.
Click Add Files (2), select the files, then click Open.
If the File Preview pane is currently empty: Click in the File Preview pane, select the files, then click Open.
Note
You can upload only files of the types that this upload is configured to accept. For example, it might be configured to accept only
.png)
2. Link Each Upload Document to a Document Definition
After you select files to upload, the Adding Files window opens. In this window, you link each upload document to a document definition. This action classifies each document. For example, if you selected two files, you might classify the first document as a statement and the second document as a letter.
Note
If the type of upload that you selected on the home page is associated with only one document definition, the Adding Files window will not open because there is no need for you to manually classify each document. Keep will automatically apply the same document definition to every document. As a result, you can skip to the next stage of the upload process (where you enter metadata for each document).
Note
At any time, you can click the x (Close button) to close the Adding Files window.
If you need to manually classify each document by document definition, follow these steps:
After you choose files to upload, you must specify whether all the documents are the same type. Click Yes or No.
Yes: One document definition describes all the selected files. During Step 2 of the “adding files” process, you will choose the document definition to apply to all of those documents.
No: The collection of files that you chose consists of more than one type of document. During Step 2 of the “adding files” process, you will choose which document definition to apply to each document individually.
.png)
Complete Step 2 of the “adding files” process. The tools that Keep provides you to classify the documents differ depending on which option you selected during Step 1:
If you clicked Yes: Click the document definition that you want to apply to the documents.
.png)
If you clicked No: Keep will display tiles (or thumbnail previews, if possible) to represent each document. Colored areas beside these tiles represent document definitions. Drag and drop each document to the document definition that you want to apply to it. To remove a document from the upload during this classification process, click the x on the document’s tile.
Tip
If only some of the document definitions are relevant to you, click Filter Document Definitions and deselect any document definitions that are not relevant. Keep will hide them.
.png)
After you have dragged all documents to a document definition, a table summarizes your actions (see 1, in the image below). To accept these classifications, click Confirm and Finish (2)..png)
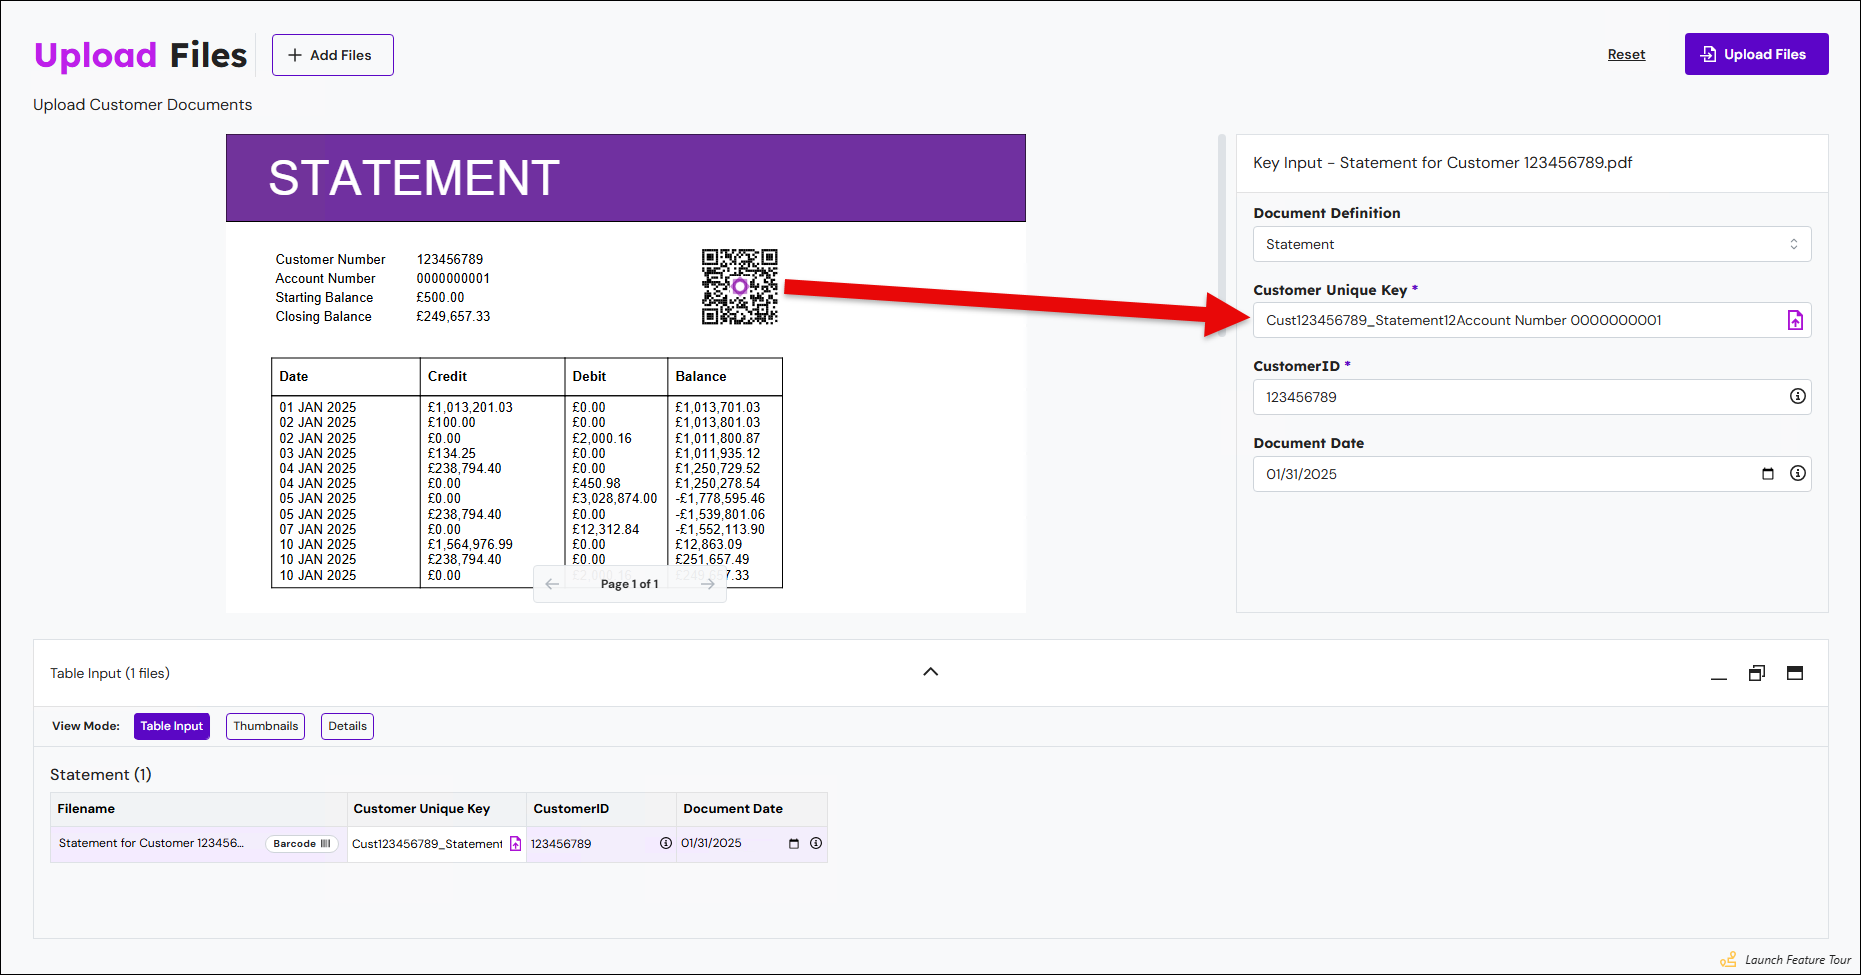
3. Enter Metadata
After you have classified the documents, the Adding Files window closes. The Table Input pane (see “a” in the image below) and the Key Input pane (b) show which document definitions you applied.
.png)
Before you upload the documents, you must ensure that their metadata is complete and correct. In the Key Input pane and Table Input pane, check existing values, and enter or select metadata values that are appropriate for the documents. You must complete all mandatory fields.
Note
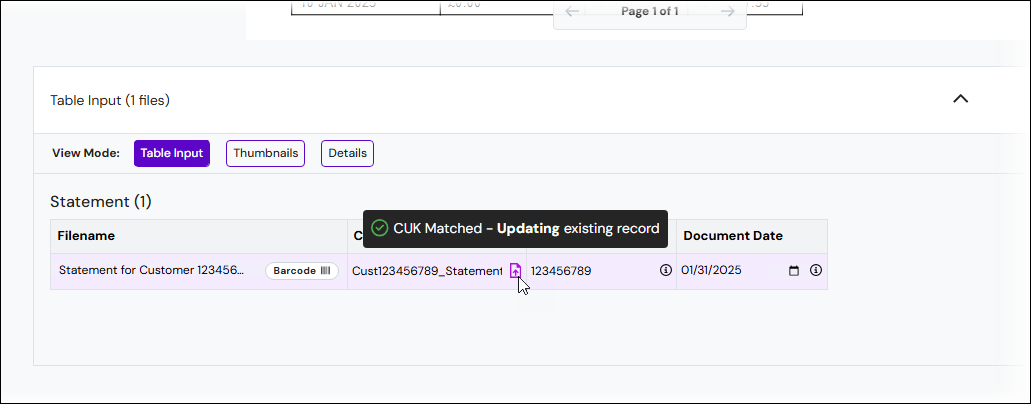
Some types of upload collect Customer Unique Key metadata for documents. For more information about Customer Unique Key (CUK) and the icons that Keep displays within a Customer Unique Key column in the Table Input pane, see Customer Unique Key (CUK).
Note
If this type of upload is configured to, it will automatically extract an identification code from a barcode (if present) in each file that you selected, then use that code in the upload workflow as the document’s CUK. For more information about this feature, see Barcode Scan and Match.
Key Input Pane (b)
In the Key Input pane, enter the metadata that will be associated with each document when it is archived. Populate the fields as required for each document. To select a document to enter metadata for, click that document’s row in the Table Input pane.
You cannot upload a document unless you complete all required fields.
Note
Keys that the system administrator has configured as read-only cannot be overwritten.
Number and date keys have validation but String keys do not.
The system administrator specifies which keys Keep displays here. As a result, they might be different from the examples shown here.
Table Input Pane (a)
In the Table Input pane, enter metadata directly into the table cells in each row.
You can right-click a cell to display a menu that provides additional capabilities:
Delete File: Deletes the row and removes the corresponding document from this upload process.
Fill value up: Fills all fields above, in the same column, with the same value.
Fill value down: Fills all fields below, in the same column, with the same value.
Fill series down: Fills all cells below, in the same column, from the top cell downwards, with values that (for each row of the table) increment by 1 (for numeric keys) or 1 day (for date keys). For example, if a table in the Table Input pane contains four documents, a numeric data cell in the first row of the table contains 4, and you right-click the 4 and then select Fill series down (+1), that column will contain (from the top row downwards): 4, 5, 6, then 7.
This command is available only when you right-click a numeric or date key cell, in the top row of a table.
For numeric keys, the menu item is Fill series down (+1).
For date keys, the menu item is Fill series down (+1 day).
Reclassify As: Displays a list of available document definitions, to enable you to change the selected file to another document type.
4. Upload the Documents to the Archive
When you are ready to upload the documents to the archive, click Upload Files. Keep archives the documents.
.png)
Restart the Upload Process
To restart the upload process without uploading the currently selected documents, click Reset (beside the Upload Files button).
Return to the Home Page
To exit this upload and return to the home page, click Keep or click the browser’s Back button.

Customer Unique Key (CUK)
Customer Unique Key (CUK) metadata enables an organization to apply an identifier (that is meaningful to that organization) to each document in the archive.
Customer Unique Key will appear in the Key Input pane and Table Input pane if it is bound to the upload configuration. After a value is entered for Customer Unique Key, Keep displays either a CUK Matched icon, Warning icon (meaning CUK matched but with possible data loss), or CUK Not Matched icon. Hover the mouse over the icon for more information.
CUK Matched
If the CUK that you enter for a document (that you have chosen to upload) matches the CUK of a document that is already in the Keep archive, the document in the archive and its metadata will be updated (when you click Upload Files). So, the Key Input pane and Table Input pane will be prepopulated with metadata from the existing document’s Keep record (taking key value precedence into account).
Proceeding with the upload will create a new revision of the existing document in the Keep archive. The new revision will represent the document currently being uploaded. The newly uploaded document will become the latest version of the document in the archive, and its metadata values will be set to the values supplied during the current upload. However, although after the upload the current latest revision will no longer be the latest, that revision (and its metadata) will remain available from the archive as a previous revision of the document.
Note
Document history remains available for auditing.
Warning – CUK Matched But With a Risk of Data Loss Due to Unbound Keys
If the CUK that you enter for a document (that you have chosen to upload) matches the CUK of a document that is already in the Keep archive, but the existing document has data in keys that are not bound to this upload configuration, there is a risk of data loss.
For example, suppose that the latest revision of an existing document in the archive has data in a Document Date key, but the Document Date key is not bound to the upload configuration (that you are using to upload a new version of the document). As a result, you cannot provide a value for Document Date when you upload a new version of the document. Because you cannot provide an Document Date for the new document revision that you are creating, the Document Date metadata stored for the current latest revision of the document cannot be applied to the new revision, and consequently that metadata will be "lost". The warning alerts you to this situation.

CUK Not Matched
If the CUK that you enter for a document (that you have chosen to upload) does not match the CUK of any document currently in the Keep archive, a new archive record will be created using that CUK.

Key Value Precedence
In some scenarios, multiple values are provided for a particular key. For example, an upload configuration might specify a default value for a key, but seed data provided to Keep might also provide a value for that key. For a brief definition of seed values, see Seed Values.
The following list is the order of precedence for key values:
Read-only keys never change. A read-only key's value always matches the default value for that key.
Seed values override all other available values for a key, unless that key is read-only (see 1 above).
Key values copied from an archived document (because it is a CUK match for the upload document) override the default values for the upload document’s keys. However, this happens only for the keys that the archived document has values for; essentially, only those keys that the archived document is able to contribute a value for.
Otherwise, a key's default value will be used (if it has one). An upload configuration specifies the default value for the keys that are bound to it.
Click the i button in a cell to see a tooltip that summarises how the upload configuration has determined the value for a field.
.png)
However, although a value can be automatically provided for a key (as described above), you can manually change that key's value before you upload the document, unless the key is read-only.
Seed Values
Seed values are document metadata values that are provided to an upload configuration by a third-party system.
When a third-party system initiates the Keep upload process and provides seed values, a Keep upload configuration automatically opens. After you select the files you want to upload into the archive, the provided seed values are automatically applied to the upload documents' keys (in the Table Input pane and Key Input pane). From this point, you can continue and complete the upload process.
For more information about seed values and how third-party systems can supply them to upload configurations, see Integrate Third-Party Software with an Upload or Search Configuration.
Barcode Scan and Match
An upload configuration can scan the content of each upload document for a barcode to extract a document identification code from. If it finds a barcode and is able to read it, the upload will use the code that it extracts from the barcode as the document’s CUK.
Barcode scanning enhances the existing CUK matching feature. If the CUK that Keep reads from a barcode matches the CUK of a document in the archive, the document you are uploading becomes a new revision of the existing document in the archive. If there is no match, Keep creates a new document record in its archive.
Note
An upload configuration will scan documents for barcodes only if it is configured to do so.