How Do I Set Up a Remote Connection to Lasernet 10 Server from a Local Machine?
- 04 Mar 2026
- 1 Minute to read
- Contributors


- Print
- PDF
How Do I Set Up a Remote Connection to Lasernet 10 Server from a Local Machine?
- Updated on 04 Mar 2026
- 1 Minute to read
- Contributors
- Print
- PDF
Article summary
Did you find this summary helpful?
Thank you for your feedback
Applies to: Lasernet Core 10
This article describes the setup required to remotely connect to a Lasernet server from a local machine. This lets you make development changes on your local machine and deploy them to your remote Lasernet server.
Warning
Ensure the Lasernet Server has a public IP address associated with it and a Fully Qualified Domain Name (FDQN). The Lasernet Server and Lasernet Web Client must be installed on your Lasernet Server.
Lasernet Server Setup
Stop the following Lasernet Services in services.msc.

Navigate to
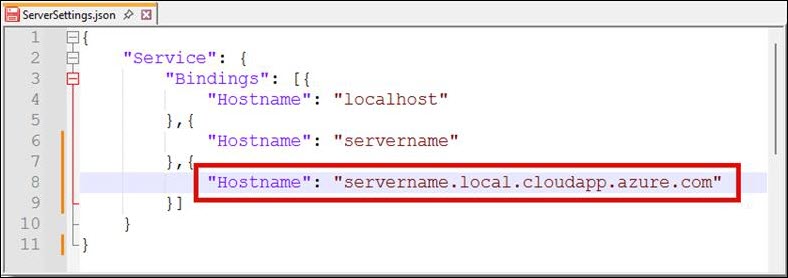
C:\ProgramData\Formpipe Software\Lasernet 10\Config\Default.Open ServerSettings.json with Notepad or Notepad++.
Under the Server Name, add the FQDN and save the changes.
Start the Lasernet Services within services.msc.
Open the config.lnlog within
C:\ProgramData\Formpipe Software\Lasernet 10\Config\Default. This is the log for the configuration server.Ensure the Listening on
https://servername.local.cloudapp.azure.com:33443/with your FQDN is visible.

Ports
To reach your Lasernet server remotely, you must enable the connection to the Lasernet port. The default Lasernet 10 port is 33443.
Note
Reach out to your IT department regarding the following steps as your security settings may need adjusting.
The following example is the newly opened inbound port in Windows Defender Firewall:

Hosted on Azure
If your server is hosted on Azure, you will need to add an NSG inbound port rule.

Ensure you open port 33443 and pick TCP.

Access Lasernet Web Portal with FQDN
You can access the Web Portal by browsing https://FQDN:33443/lasernet/. In our example, the FQDN is servername.location.cloudapp.azure.com, but yours may vary.
Info
If the "Your connection isn't private" error shows up, select advanced, and click continue to FQDN.com (unsafe).

Connect to the Lasernet Server from Lasernet Developer on a Local Machine
Install Lasernet Developer on your local machine and load a valid license into the Developer License Manager.
Launch Lasernet Developer on your local machine.
Set the server to the FQDN of the server that you created previously and click Connect.

Enter your login credentials.

The Lasernet Developer on your local machine is now connected to your Lasernet Server. You can make developments on Lasernet Developer locally. Any objects that you create will be saved and deployed on the Lasernet Server.
Verify Successful Connection
From Lasernet Developer, if you can successfully click Connect with your provided FQDN to retrieve the Sign In dialog, you have successfully verified access from your application to the Lasernet Config Server.
If you accessed the provided URL from a web browser and received the Sign In dialog or the message "Your connection isn't private”, you have successfully verified access to the Lasernet Config Server.