Search the Archive
- 16 Mar 2026
- 18 Minutes to read
- Contributors


- Print
- PDF
Search the Archive
- Updated on 16 Mar 2026
- 18 Minutes to read
- Contributors
- Print
- PDF
Article summary
Did you find this summary helpful?
Thank you for your feedback
You can use the searches in Keep to find documents in the archive. As part of your search, you can provide search criteria to find documents that have particular metadata.
For example, the searches available in Keep might enable you to search for all documents generated for a particular customer, or for all documents generated after a particular date.
After you find documents, you can view their content (depending on file type) and access their metadata.
Depending on how Keep has been set up, you might be able to access additional capabilities, such as the ability to update document metadata, replace a document’s file in the archive, or share the document with external users.
Note
The setup of Keep determines the following aspects of your search access:
Which searches are available to you.
The type of search criteria that you can provide.
The data that you can access through the search.
The additional capabilities that you have access to (such as updating metadata and replacing document files in the archive).
As a result, the searches that are present in Keep, the data that they provide access to, and access to Keep features that you can use on those search results might differ in your Keep system from the examples that this page contains.
Start a Search
Log in to Keep and then navigate to the home page.
The main part of the home page (see 1 in the image below) provides access to searches. Click the type of search that you want to perform.
.png)
Enter Search Criteria and Search the Archive
After you click a search tile, the Search Criteria pane for that search opens (see 1 in the image below).
Use the boxes in the pane to enter search criteria. Doing this specifies which documents you want to retrieve from the archive.
Then, click Search (2).
Tip
Click Reset to discard your search criteria and reinstate any default search criteria.
.png)
Search Criteria
For some search criteria, you enter a value directly into the relevant box. For others, you select a value from a list or a date picker. The icon on the left side of each box (see 3 in the image above) indicates the type of data that the search criteria accepts.
The symbol above the upper-right corner of a search criteria box (4) indicates the search operator, which determines how Keep will apply the entered value to the search. For example, if the operator is = (equals), Keep will retrieve documents whose metadata value matches the value that you entered. For a list of operators, see Search Operators.
Any search criteria that are left blank (5) are not applied to the search.
Depending on how Keep is set up, some search criteria might have helpful default values (that are usually appropriate but that you can change if needed), and some might contain read-only values that your search must use.
Example
In the example shown in the image above, the search will find documents whose CustomerID metadata value is 123456789. Because Document Date is blank, the Document Date of archive documents will not affect whether they appear in the search results.
Tip
At this stage, you can also specify the sort order for the results. For more information, see Sort the Search Results.
Search Operators
Keep supports the following search operators. The Keep administrator chooses the search operator for each search criteria when they create the search configuration.
Symbol | Operator |
|---|---|
| Equals |
| Not equals |
| Contains |
| Starts with |
| Ends with |
| Greater than |
| Greater than or equals |
| Less than |
| Less than or equals |
| Is null |
| Is not null |
.png)


AND and OR Criteria
How your criteria is applied to the search depends on how the search has been set up by a Keep administrator.
Criteria that are separated in the Search Criteria pane by -OR- are applied on an OR basis. The documents included in the search results must satisfy either the criteria before the -OR- marker or the criteria that follows it.
All other criteria are applied to the search on an AND basis. Adjacent search criteria that are applied on an AND basis form a set of criteria that must all be satisfied. Keep evaluates adjacent AND criteria together and before OR criteria.
However, depending on how the search is set up, if the search criteria pane contains one or more -OR- markers, criteria that are applied on an AND basis might not need to be satisfied for Keep to include a document in the search results.
In the example depicted in the following image, a document is included in the search results if (within its metadata) either of the following statements is true:
CustomerID is 12345 and DocumentID is 67890.
OR
Archive Date is earlier than 1st August 2025.
As a result:
A document that has CustomerID 12345, DocumentID 67890, and an Archive Date of 10th August 2025 is included.
A document that has an Archive Date earlier than 1st August 2025 is included (regardless of its CustomerID and Document ID).
.png)
As described in Search Criteria, a search criteria that is left blank is not applied to the search. Additionally, the OR operator that precedes the search criteria (if OR is displayed above the criteria in the Search Criteria panel), or the AND operator that precedes the search criteria (if nothing is displayed above the criteria) is removed from the search too. This affects the search that Keep runs in that scenario.
For example, in the search above, if CustomerID is blank, the CustomerID search criteria and the OR operator that accompanies it are removed from the search. As a result, a document is included in the search results if (within its metadata) both of the following statements are true (because an AND operator precedes the DocumentID search criteria):
Archive Date is earlier than 1st August 2025.
AND
DocumentID is 67890.
To provide another example, if Document ID is blank, the Document ID search criteria and the AND operator that accompanies it are removed from the search. As a result, a document is included in the search results if (within its metadata) either of the following statements is true:
CustomerID is 12345.
OR
Archive Date is earlier than 1st August 2025.
Groups
A search might provide some groups of search criteria, which enable Keep to perform searches that are more complex.
When performing a search, Keep considers grouped search criteria in isolation first, and then applies their outcome to the search alongside other search criteria. Depending on how it is set up, a group might apply the search critieria within it on an AND basis or an OR basis.
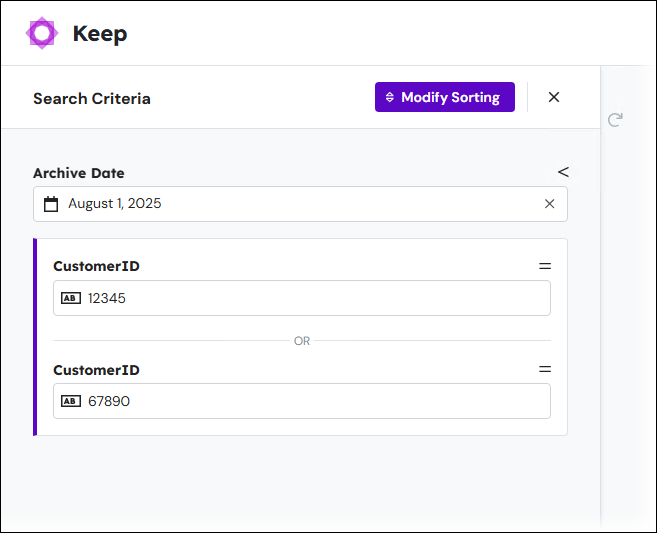
In the example below, the search will find documents whose archive date is earlier than 1st August 2025, and that relate to either customer 12345 or customer 67890.
Navigate the Search Results
After you click Search, Keep displays your search results. Each row in the search results table represents a document in the archive.
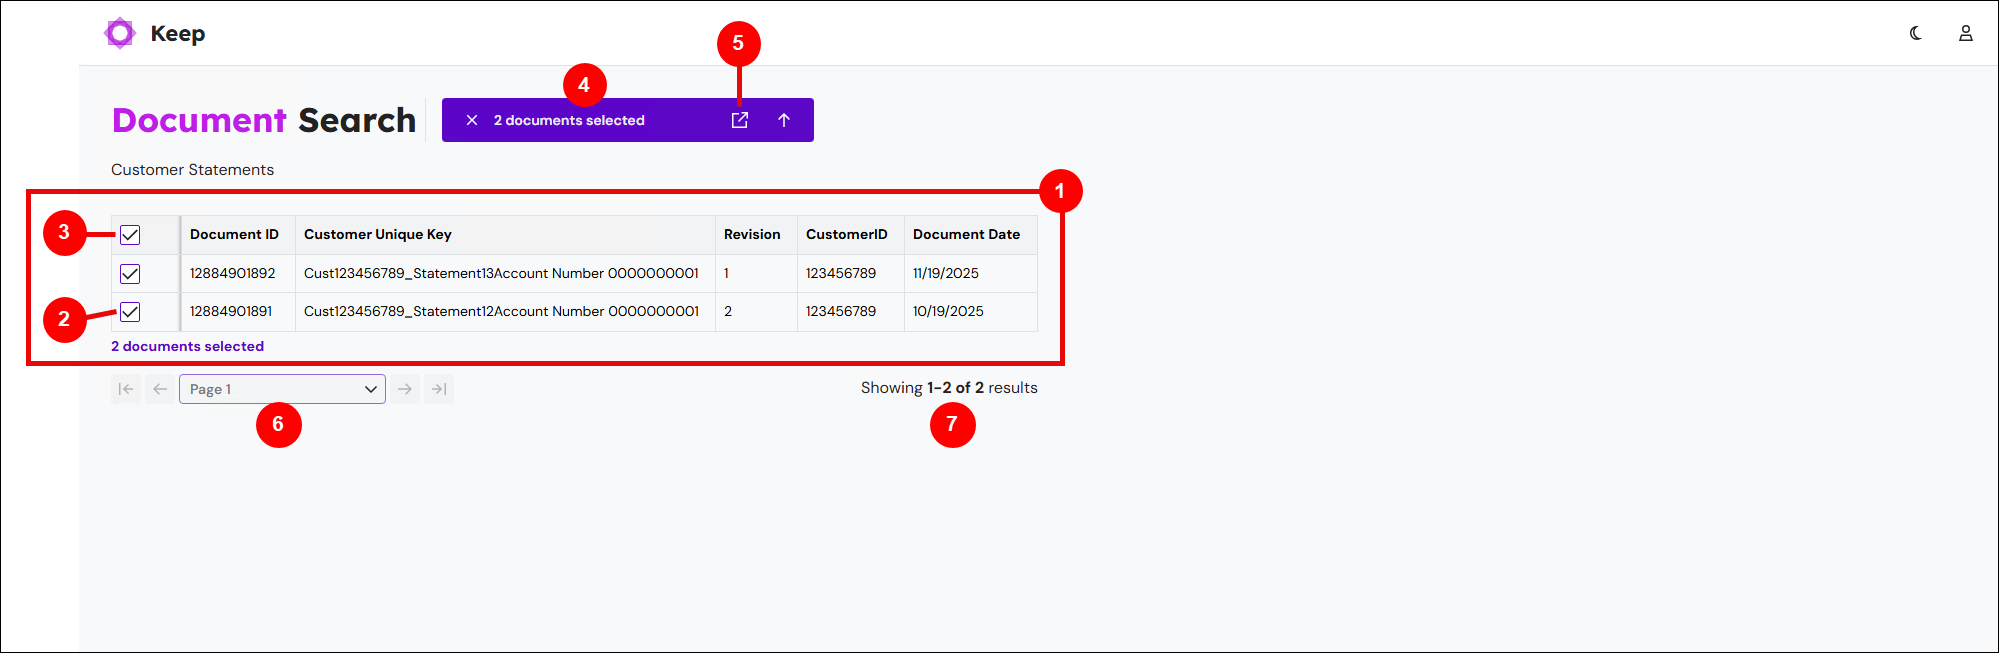
Number | Element |
|---|---|
1 | Search result table |
2 | Row selection checkbox |
3 | “Select all results” checkbox |
4 | Action bar Keep provides relevant action icons (including Open) here. |
5 | Open icon |
6 | Search result page controls |
7 | Result count |
Access the Metadata and the Content Preview for the Search Results
The search result table (see 1 in the image above) provides some metadata about each search result. However, this is usually only some of the metadata that Keep holds for each document. Follow the steps below to see all of a document’s metadata and (depending on file type) view the document’s content:
Click table rows to select the documents that you want to work with. Alternatively, use the selection checkboxes (see 2 and 3 in the image above).
Use the page controls (6) to navigate between the pages of the search results.
The result count (7) tells you how many search results (in total) there are and which of those are currently displayed by the search result table.
In the action bar, click Open (see 5 in the image above). The document metadata and preview pane opens (see image below). This pane displays the latest revision of each selected search result.
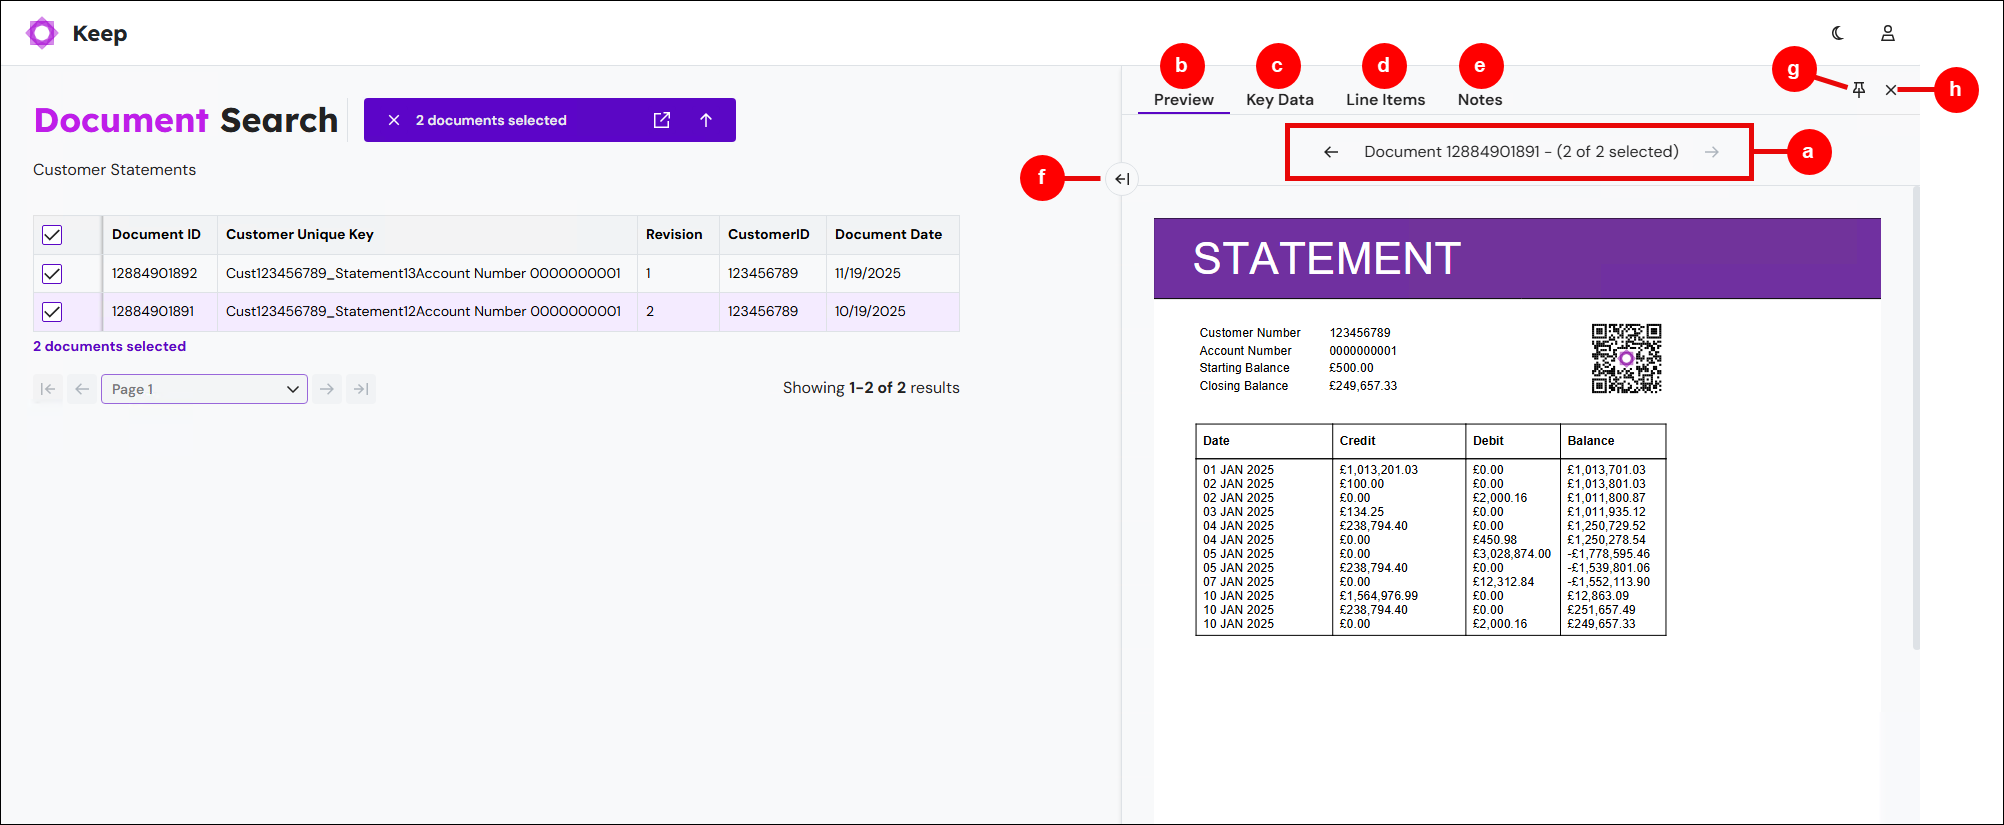
Use the navigation controls (see “a” in the image above) to move between search results.
To view a preview of the current search result, click Preview (b). This feature is available only for some file types (including PDF, JPG, JPEG, PNG, and GIF).
To view that document’s key data (metadata), click Key Data (c). If any keys are editable, you can modify that metadata.
To view the Preview and Key Data pages alongside each other, click the expand (arrow) icon (f). Click it again to hide the second pane.
If you deselect all search results in the table, the pane automatically closes. To prevent this from happening, click the Pin icon (g).
To view that document’s line item metadata, click Line Items (d).
Note
Line item metadata is relevant only to some Keep systems.
To view the notes added to the document, click Notes (e).
At any time, you can click the x icon (h) to close the pane.
To view the document in full-screen mode, scroll down the document preview, then click View in New Tab (below the document preview).
.png)
Editable Keys
If any of the keys on the Key Data page are editable (for example, see Document Date in the image below), you can modify the metadata they contain:
Enter or select a new value for the metadata key.
To save your metadata changes, click Confirm (see 1 in the image below). Keep creates a new revision of the document and the search results table displays updated metadata.
To discard your changes, click Reset (2).
The Show only editable keys / Show all keys toggle (3) controls whether the Key Data page displays any non-editable key data (other than basic metadata such as Created Date, Revision, and File Size). In the example above, this toggle hides CustomerID from the Key Data page.
.png)
Sort the Search Results
To specify the sort order in the search result m, follow these steps:
To return to the Search Criteria pane after searching the archive, close the action bar and then click Modify Query.
Tip
You can also specify a sort order in the Search Criteria pane before you run the search for the first time.
Click Modify Sorting. The Sort Criteria pane opens.
.png)
In the Sort Criteria pane, click Add Column (see 1 in the image below) to add a metadata key to sort the search results on.
Select a metadata key from the list (2) that Keep adds to the pane.
.png)
Click the arrow beside the metadata key (see 3 in the image above) to specify the sort order on that key.
Click the x in a row (4) to remove that key from the sort criteria.
If necessary, use Add Column again to add more keys to sort on. Keep sorts the data on the top key in this pane first, and then the second key, and so on.
To apply the sort criteria, click Search.
Click Reset (6) to remove all your search criteria.
Modify Search Criteria
To modify the search criteria, click x in the action bar (to close it), then click Modify Query.
.png)
Run the Search Again
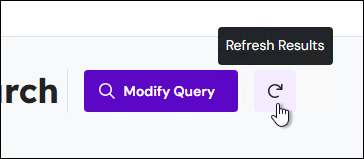
To run your search again and retrieve up-to-date results, click x in the action bar (to close it), then click Refresh Results.
Other Actions
Depending on how Keep is set up, you might have access to additional features, such as the ability to download documents, access document revision history, or replace a document’s file in the archive.
The following sections describe these features.
Download a Document
After you find a document through the search, you can download it.
Note
Whether this feature is available to you depends on how Keep is set up.
To download a document, follow these steps:
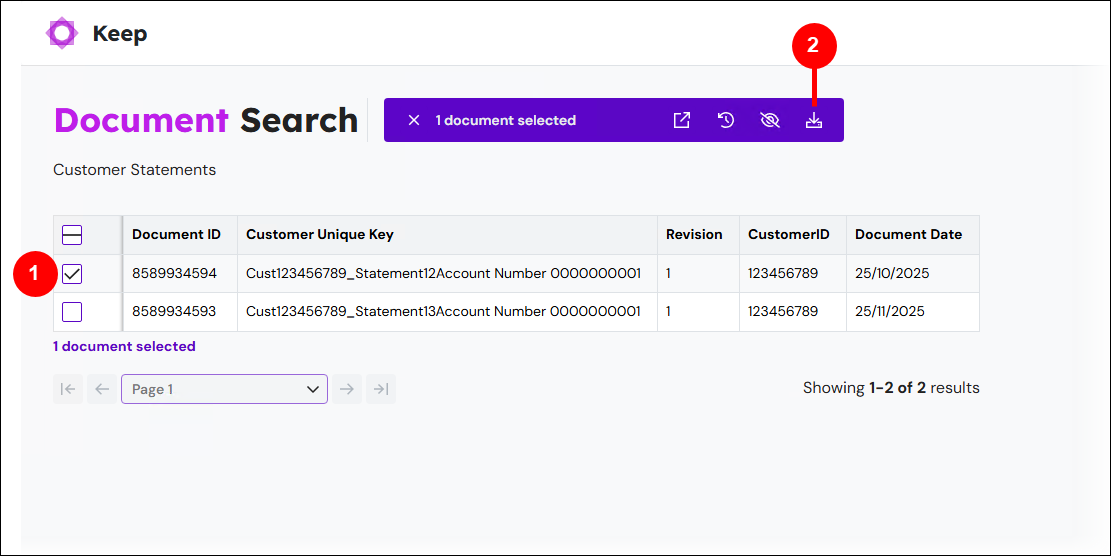
In the search result table, select the checkbox for the document that you want to download (see 1 in the image below).
In the action bar, click Download File (2).
Alternatively, when you view the preview of a document in the search results, scroll down the document preview and then click Download (below the preview).
See a Document’s History
The history of a document in the archive can show you how the content of the document itself or its metadata changed over time.
Note
Whether this feature is available to you depends on how Keep is set up.
To view a document’s history, follow these steps:
In the search result table, select the checkbox for a document that has multiple revisions.
.png)
In the action bar, click Document History (see 1 in the image above).
The revision history page opens (see the image below). The table at the top of the page (see “a” in the image below) displays metadata for each revision. The lower part of the page (b) displays previews of each selected revision (depending on the file type)..png)
Use the checkboxes (c) to select two revisions in the table.
Use the table to learn how the document’s metadata changed between the selected revisions.
Use the file previews to visually inspect the documents for differences in their content.
To return to the search results, click Back to results (d) in the action bar.
Update Editable Keys for Multiple Documents in One Action (Bulk Update)
As described in Editable Keys, some item metadata in Keep might be editable. If you want to update the same metadata for multiple documents in one action, you can use the bulk update feature.
Note
Whether this feature is available to you depends on how Keep is set up.
To update editable keys for multiple documents in one action, follow these steps:
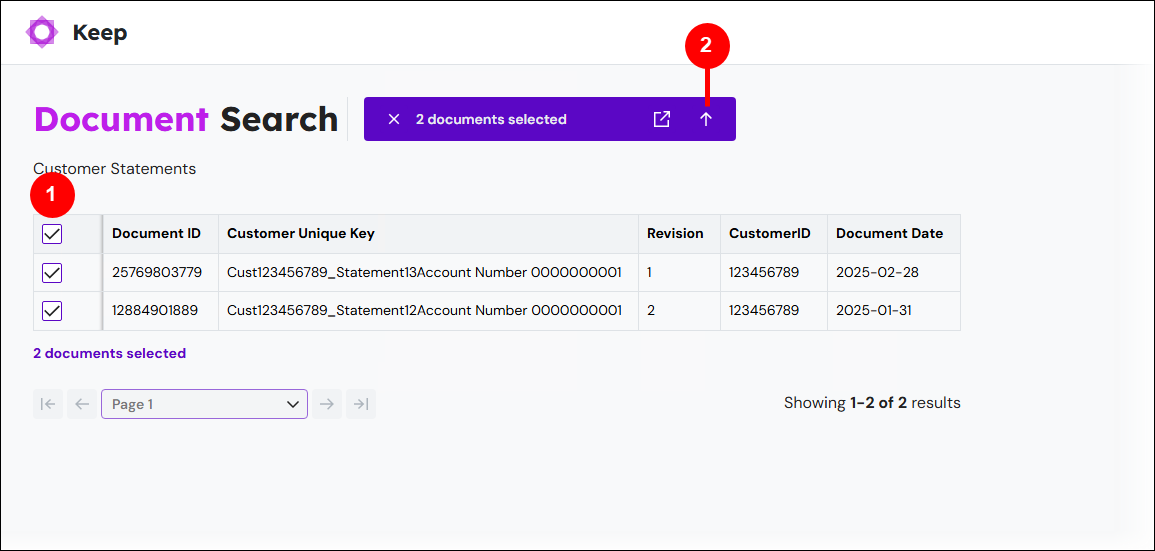
In the search result table, select checkboxes for the documents that you want to modify metadata for (see 1 in the image below).
Click the Bulk Update icon (2).
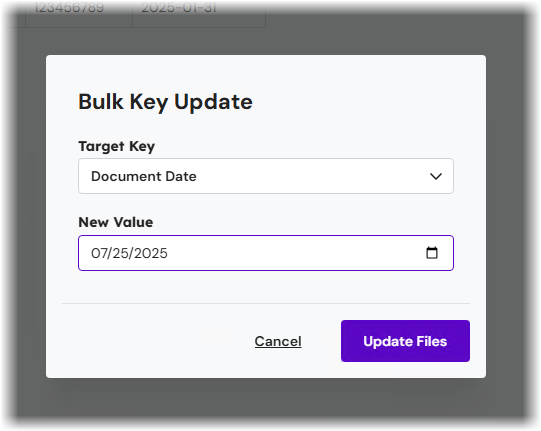
In the Bulk Key Update window, select the metadata that you want update from the Target Key list.
In the New Value box, provide a new metadata value.
Click Update Files. Keep updates the metadata for the documents that you selected and updates their Revision metadata.
Replace a File
Keep provides a simple process for replacing a document’s file in the archive without changing its metadata (other than its Revision and File Revision).
Note
Whether this feature is available to you depends on how Keep is set up.
To do this, follow these steps:
In the search result table, select the checkbox for the document that you want to update (see 1 in the image below).
Click the Replace File icon (2).
.png)
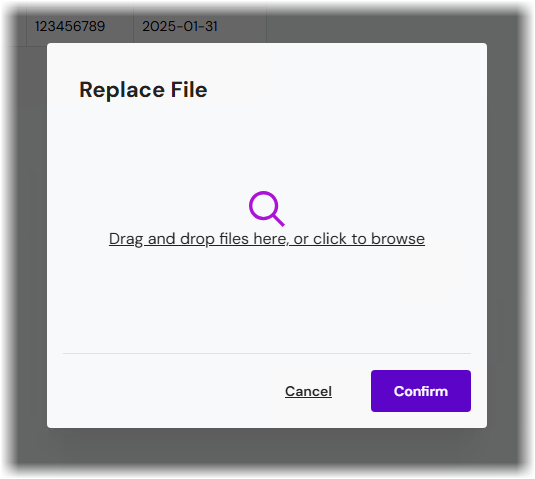
In the Replace File window, use one of the following methods to provide the replacement file:
Drag a file from a File Explorer window into the window.
Click in the window, select a file in the Open window, then click Open.
Click Confirm. Keep updates the file in the archive and its Revision and File Revision metadata.
View and Add Document Notes
To accompany the metadata held in document keys, you can add notes to documents. Notes are essentially text comments.
You can use notes to hold general information about a particular revision of a document. This can include any information that does not belong in a document key. Also, notes can facilitate teamwork through the sharing of information between team members, because any user can add a note and all notes are visible to other users.
When a user adds a note to a document, it is always added to the latest revision of the document. However, you can always access notes relating to earlier revisions of the document. Keep presents the existing comments on a document in chronological order (grouped by the document revision that they relate to), but you can only update or delete notes you have created.
View a Document's Existing Notes
To view a document’s notes, follow these steps:
Select a search result (see 1 in the image below).
.png)
Click Open (2) in the action bar.
Click the Notes tab (3).
Keep displays the document's notes with the most recent note at the bottom of the list. The number beside a group of notes (see 4 in the image above) indicates which document revision the adjacent notes relate to.
Add a Note
Enter text into the box at the bottom of the Notes tab (see 5 in the image above). To add your note, click Submit (6).
Edit a Note
You can edit your own notes up to an hour after adding them.
Note
Keep administrators can edit any user’s notes up to an hour after they have been added.
To edit a note, follow these steps:
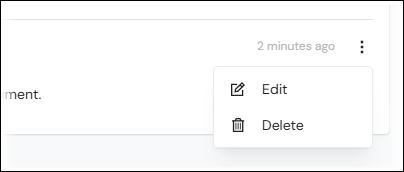
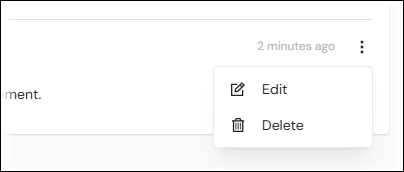
Click the three vertical dots (menu) button on a note, then click Edit.
Modify the note.
Click Save.
Delete a Note
You can delete your own notes at any time.
Note
Keep administrators can delete any user’s notes at any time.
To delete a note, follow these steps:
Click the three vertical dots (menu) button on a note, then click Delete.
In the Delete Note window, click Confirm.
Migration of Notes from Autoform DM
The notes feature in Lasernet Keep replaces a similar feature in Autoform DM. When an Autoform DM system is upgraded to Lasernet Keep, each document's notes are migrated. However, the notes feature in Lasernet Keep is simpler and, as a result, does not involve "note definitions".
Share Documents with External Users
Note
Document sharing using secure links is available in Lasernet Keep 11.1 and later. Whether this feature is available to you depends on how Keep is set up.
You can share a document that appears in search results with a user from another organization by creating a secure link and sending it to them – they do not need a user account.
When the user receives and clicks on the link, they are prompted to enter their email address. Entering the correct email address authenticates the user and allows them to view or download the document from within Keep.
As well as using an email address as proof of a user’s identity, each link includes the following security features:
Expiry time: When you generate a secure link, you specify how long it is available for use. For example, you could set a 7-day expiry time for each link. After this time, the link still opens Keep, but the associated document will no longer be available for view or download.
Lock to a document revision: You can specify whether a link opens a specific document revision, or the most recent version that is available at the time of viewing.
Revocation: You can log in to Keep at any time and revoke or delete a secure link. For example, if a user leaves their company.
Tokenization: Instead of a direct link to a document file, the secure link uses a token to prevent unauthorized access to the document archive.
You can also view details of any secure links you have created, including basic analytics that track their use.
Create and Share a Secure Link
Search for the document you want to share, then configure, create, and share a secure link to it.
Note
The search configuration you use must have the following setting selected: Settings > Allow Document Sharing.
Tip
If you need to share a document with users from multiple organizations, you could create a secure link for each organization.
Search Keep for the document you want to share.
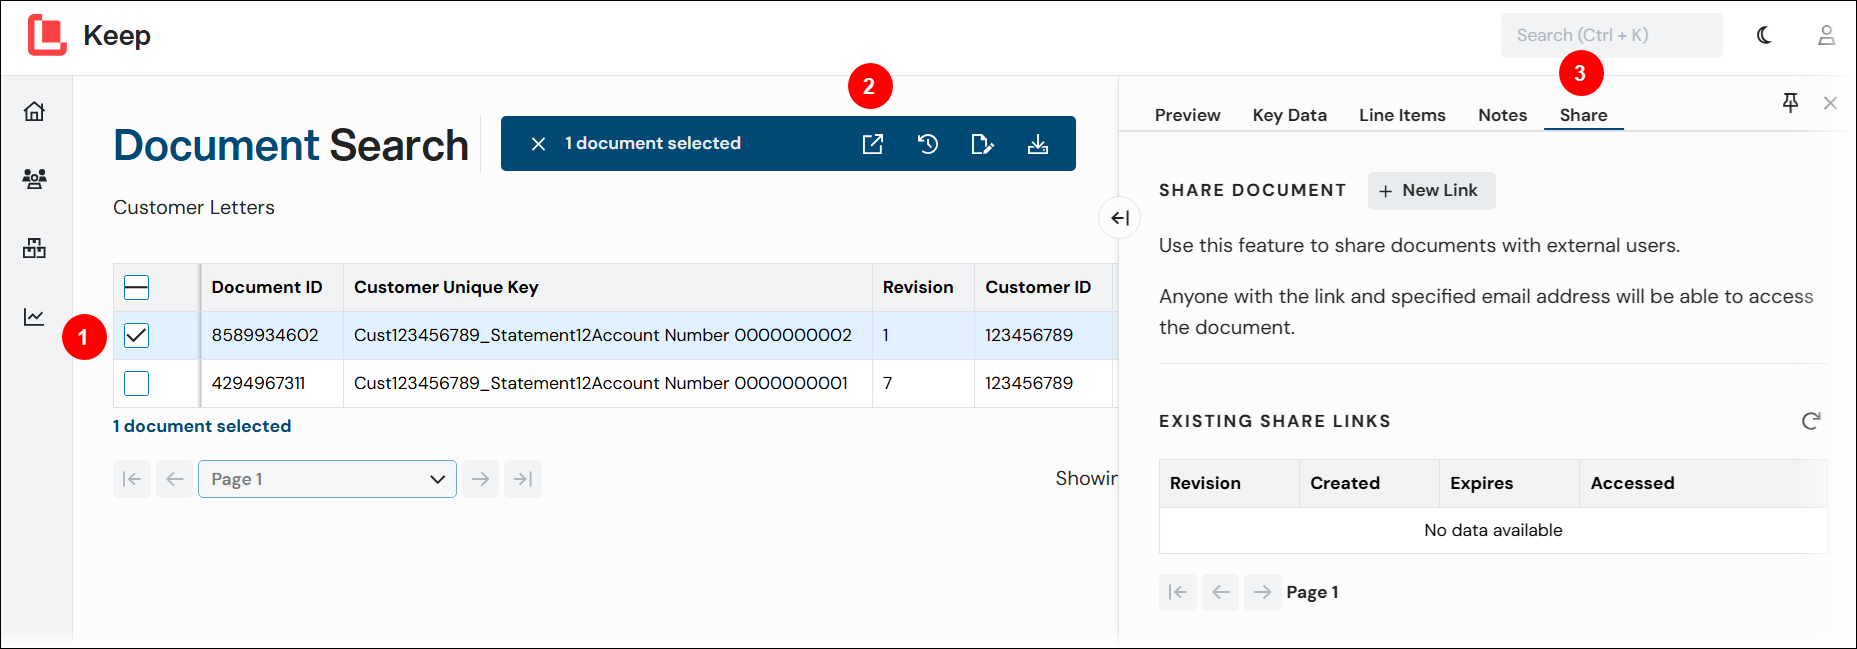
In the search results table, select the relevant document (see 1 in the image below) and click Open (2) in the action bar.

Click the Share tab (3), then click New Link (4) to configure your secure link.
From the Scope list (see “a” in the image below), select which revision of the document the link will open, either:
Leave the default value (Latest Revision) to create a link that always opens an up-to-date version of the document.
Select Revision, then a revision number from the second list, to create a link that always opens a specific version of the document.
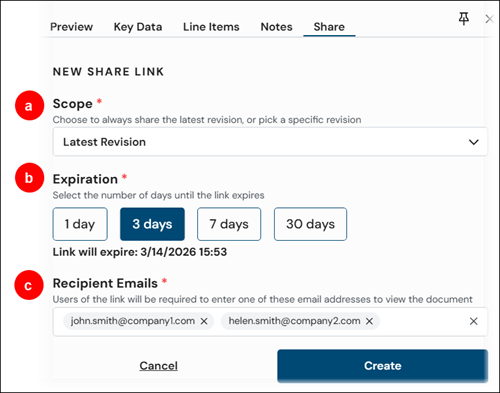
In the Expiration area (b), select the number of days after which the link will expire. After this date, link recipients will no longer be able to view or download the linked document.
In the Recipient Emails box (c), enter the email addresses of one or more users with whom you want to share the link.
Click Create. When the link appears (see 1 in the image below), either:
Copy (2) and paste it into an email or other messaging application.
Click Email (3) to open a new email message with the link already populated. This option is only available if your email application is configured to run on the Keep server.
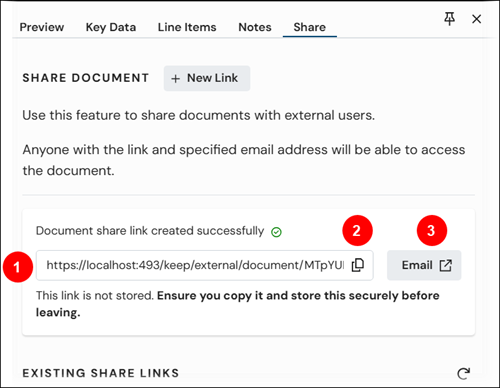
When you navigate away from the Share tab, you will no longer have access to the secure link URL.
Tip
To test the link yourself, you must log out of Keep.
View Existing Link Details
View details of the active links you have shared. When a link expires, its details are no longer displayed in Keep.
Search Keep for the document you shared.
In the search results table, select the relevant document (see 1 in the image below) and click Open (2) in the action bar.
Click the Share tab (3).
Look at the Existing Share Links table, which shows basic details for each secure link you created. For tracking purposes, the Accessed column (see “a” in the image below) shows:
The total number of times a shared document has been viewed.
The number of unique users who have viewed the document, identified by the email addresses they used to access the document.
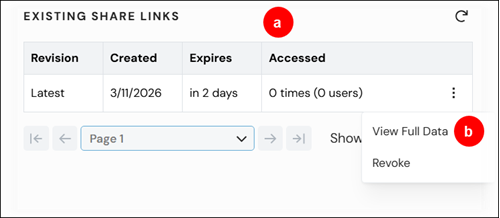
To view more details for a link, including the Document ID and email addresses of the users with whom you shared it, in the Accessed column, click the menu button (three vertical dots) (b) and select View Full Data.
Revoke a Secure Link
To cancel access to a document from a secure link, you can revoke the link.
Search Keep for the document you shared.
In the search results table, select the relevant document (see 1 in the image below) and click Open (2) in the action bar.
Click the Share tab (3).
In the Existing Share Links table, find the details of the link you want to revoke. If you need to see more information about a link, such as the email addresses the link was shared with, in the Accessed column, click the menu button (three vertical dots) and select View Full Data.
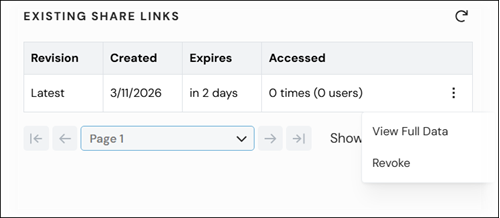
When you have identified the correct link details, in the Accessed column, click the menu button (three vertical dots) and select Revoke, then Confirm. The link is revoked, and the link details are removed from the table.
Hide a Document
Keep enables you to hide a document that appears in the results of a search. Hiding a document prevents it from appearing in the results of searches that are set up to search for visible documents (in other words, documents that are not hidden).
Hiding a document is the first part of the document deletion process. The hide action applies only to searches that are set up to search for visible documents.
Note
Whether this feature is available to you depends on how Keep is set up.
Note
The search configuration that you use must be set up as follows:
Settings > Document Visibility set to Visible Documents.
Enable Document Hiding selected.
To hide a document, follow these steps:
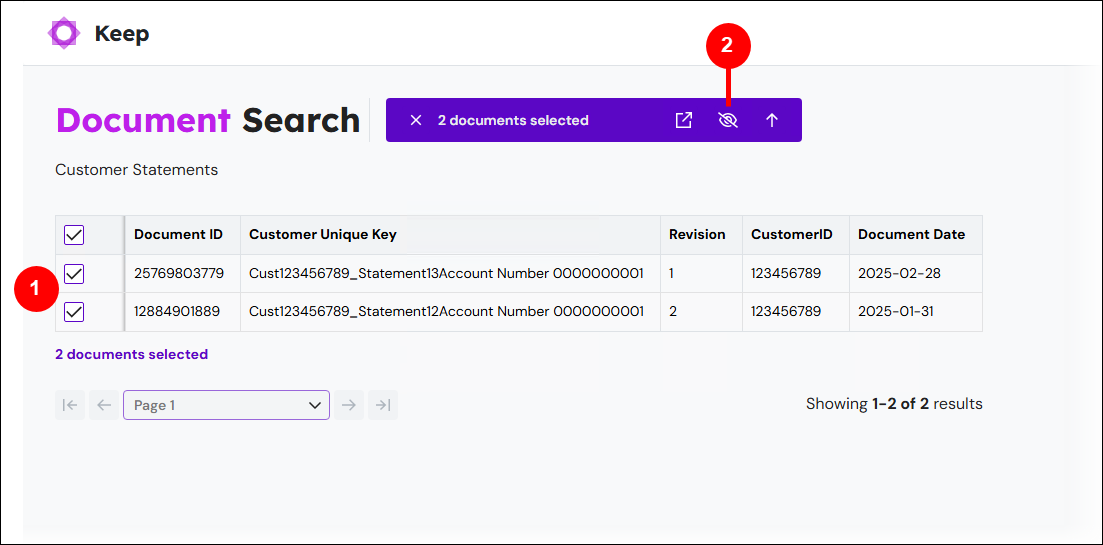
Select checkboxes in the search result table (see 1 in the image below) to select the documents that you want to hide.
Click the Hide documents icon (2).
In the Hide documents window, click Confirm.