Sample Setup - Add a Button
- 09 Mar 2026
- 1 Minute to read
- Contributors

- Print
- PDF
Sample Setup - Add a Button
- Updated on 09 Mar 2026
- 1 Minute to read
- Contributors
- Print
- PDF
Article summary
Did you find this summary helpful?
Thank you for your feedback
This scenario will cover the following setup:
Create a new Print button for emailing to a specific email address.
This Print button will only be visible to one user.
This Print button will only be applied to the Sales confirmation report and Sales invoice report using a Report Group.
This Print button has been set up to make it faster and easier to test the email functionality.
The scenario can be set up by following these steps:
Navigate to Print buttons > Common > Direct printout destinations.

Click New.
In the Direct printer configuration id field, enter a unique ID for the new Print button.
In the Description field, enter the text that will be displayed for the Print button.
In this scenario, only the Admin user should be able to see the button. Therefore, select Table in the Relation type field and Admin in the Relation field.

This Print button will be restricted to the Sales confirmation report and Sales invoice report.
Right-click Report group, then click View details to find an appropriate Report group.

There is a Report group named Sales Reports containing the SalesConfirm report and the SalesInvoice report.

Click <- to go back to the Direct printout destinations form.
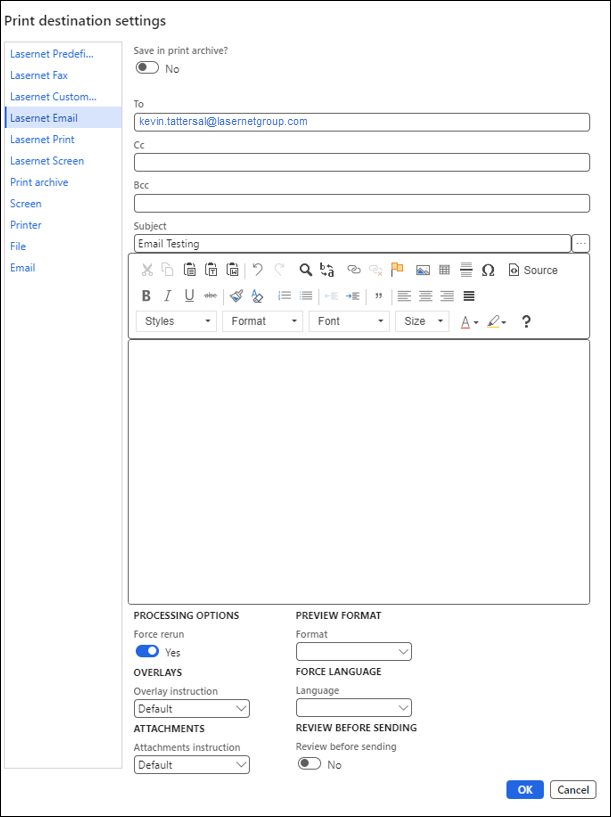
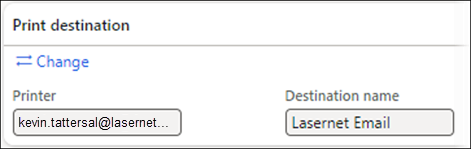
Open the Print destination FastTab and click Change.

Select Lasernet email.
Enter an email address.
A Subject has been added in this scenario. However, this field is optional.
A body of text can also be added if required.
There are various options at the bottom of this form. However, these have been left as the default options, apart from Force rerun, which has been set to Yes.
Click OK.
An overview of the options is displayed in the Direct printout destinations form.
Button setup FastTab:

Show buttons has been set to Dialog so that the Print button only appears when confirming the Sales confirmation and posting the Sales invoice. The Print button will not be displayed on the Sales confirmation journal or Invoice journal.
An Image has also been added for the button, which will appear to the left of the text.
A Preview shows what the button will look like in the Dialog form.
In the following two images, the Email to Kevin Print button is displayed on the Confirm sales order print dialog and the Post invoice print dialog.


However, the Print button is not displayed for other reports, such as the Packing slip posting dialog.
