Report Setup
- 08 May 2025
- 3 Minutes to read
- Contributors

- Print
- PDF
Report Setup
- Updated on 08 May 2025
- 3 Minutes to read
- Contributors
- Print
- PDF
Article summary
Did you find this summary helpful?
Thank you for your feedback
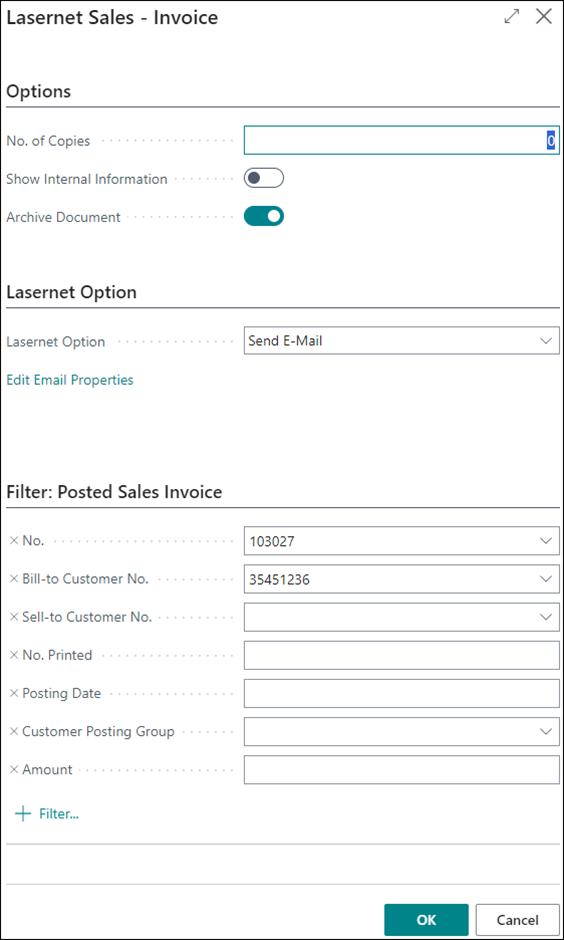
Lasernet includes predefined documents; each is identified on the Report Setup page. To access the page, follow these steps:
Sign in to Dynamics 365 Business Central and select the Lasernet Document Management dropdown from the list. The page will be displayed. Otherwise, you can search for the Lasernet Document Management page.
Select Report Setup in the Setup section.


The following page is displayed:

The upper section shows a list of Lasernet reports. If you have a customized report, it will also appear here.
The fields are defined as follows:
Document Type: Indicates the Business Central report name.
Report ID / Report Name: Indicates the number and name of the predefined report.
Active: Enable or disable the report.
Distribution Email: Choose whether you want to use SellTo or BillTo to find the email address.
Always Show Request Page: Select this checkbox if you want to use the Lasernet Request page for reports that normally do not include it, such as Issue Reminder.
Keep Empty Line in Dataset: Select this checkbox if you want to add all lines to the report layout. This includes BC-generated lines like roundings, prepayments, and empty lines. Without this enable Lasernet will remove empty lines.
Lasernet Archive Setup
Here, you can enable or disable the Archive function for a single report. You can also control what Lasernet Option will cause the report to be archived. For example, you can disable archiving when performing a Preview to screen or for a specific report.

Print Method: Choose what type of Lasernet Option you want to control. If empty, it will be all Lasernet Options.
Archive: Enable or disable the Archive function for the current Print Method.
Example of disabling preview for a report:

Example of disabling archiving for a report:

The small dots indicate that a record is available within Lasernet Archive Setup.

Lasernet Attachment Setup
Here, you can enable attachments for a single report.

Active: Enable or disable the attachments.
Attachment Type: Currently, only Base64 Text is available. This will embed the attachment into the XML file as a Base64 string.
Language Code: This is the Language Code used in the record to which the file should be attached. If empty, it applies to all languages.
Use for Document Attachment: This will add documents that are attached to BC's documents via the Attachments menu.
Used For Fixed Attachments: This will add fixed attachment(s) that are added in the Fixed Attachments column.
Fixed Attachments: Select the number of files to be added as fixed attachments..
Save to PDF: Enable or disable attachments when using BC internal Email account.
Send E-mail: Enable or disable attachments when using Lasernet Email account.
Attachments
In BC, you can add attachments to your documents, such as a Sales Order or an Invoice. Lasernet can then add this attachment to an email as an additional attachment.
Setup
Ensure that you have enabled the Attachment function for the report you wish to add attachments to. This guide will use a Sales Invoice as an example. Apply the following steps:
Locate and open Lasernet Report Setup.

In the Lasernet Attachment Setup section, add a new line and change the settings to comply with the following image:

Close the form.
We are now ready to use attachments on the Sales Invoice report. The next step is to add attachments to a Sales Invoice.
Add attachments
Open a Sales Invoice within BC. It can be either a Posted or Non-Posted Invoice, as both options have the same functionality.
On the top-right corner, click Attachments.

Select the correct number on the right side.

Click Attach File(s)…, then select the file you wish to send.

Enable Add to Attachment. If you have files within the attachments that you do not want your customer to receive, do not enable them.

Once the attachments are added, close the form.
To email the customer, click Print/Send.
Two options will now appear: Print and Email. Click Print to produce the Lasernet request page, where you can send an email through the Lasernet server. Select Send Email to generate the Lasernet report, where you can change the email body and subject.

Verify that the attachments at the bottom of the page are correct.
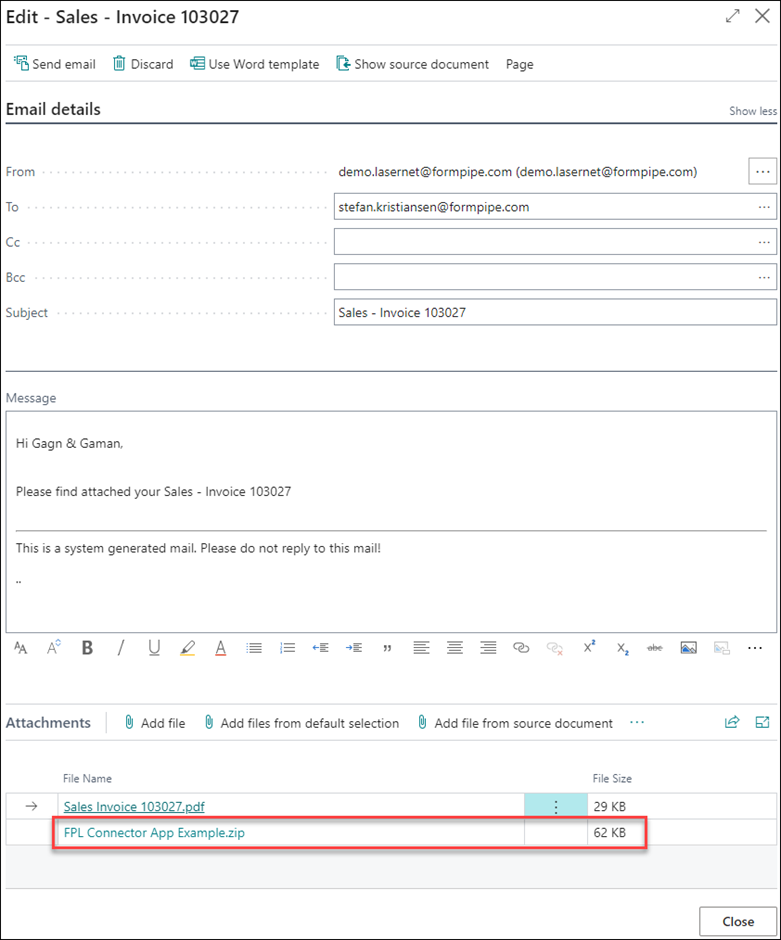
The customer will now receive the invoice and the additional attachments.
