Position Form Objects in Specific Areas of a Sheet
- 15 Apr 2026
- 8 Minutes to read
- Contributors


- Print
- PDF
Position Form Objects in Specific Areas of a Sheet
- Updated on 15 Apr 2026
- 8 Minutes to read
- Contributors
- Print
- PDF
Article summary
Did you find this summary helpful?
Thank you for your feedback
To control the position of form objects (such as rearranges), you can position them relative to conditional areas and regions. You can move and resize custom conditional areas.
Note
Unless you create new conditional areas and regions, you use the default conditional area and region.
Conditional Areas
Unlike input data, the output form design can contain more than one conditional area. This allows for more flexibility when organizing the data on each page. Form objects (such as a pattern and its rearranges) can be positioned relative to a specific conditional area.
Note
Output conditional areas apply only to PDF, TIFF, and EMF sheets whose underlying format is EMF.
There are two types of output conditional areas: default and custom.
Aside from the default conditional area, a custom conditional area can be added by following the steps below:
On the Sheet menu, click Conditional Area.
Alternatively, right-click anywhere in a working space and then select Conditional Area on the context menu.
With the Conditional Area dialog displayed, navigate to the Output tab.
Under the Areas group box, click the Add button.
With the dialog displayed, indicate the parameters required for a new custom conditional area:

Area name: Add a name for a new custom conditional area.
Position: Indicate the X and Y values to set a start point for a new conditional area, and then enter Width and Height values to set a conditional area size.
Note
Once a custom conditional area is added to the output data file, you can move it. First, select the area and when the pointer becomes a four-headed arrow, drag the area to its new position. As a result, the X and Y values change accordingly.
In addition, you can resize the area by dragging an area side when a pointer becomes a double-headed arrow until the area is the size that you want. To resize the area proportionally, drag an area corner. As a result, the Width and Height values are changed accordingly.
When you move or resize an area belonging to the area batch (multiple areas), you can move/resize only one area of the batch; the rest of the areas are changed automatically.
Absolute: Define page(s) on which the conditional area is to appear by selecting the required checkbox (or checkboxes): First, Middle, Last, and/or Single. If data (conditional rearranges) does not match the specified page(s), data is cut.
Note
Default conditional area settings do not have any check boxes as they appear on every page by default.
Area: Click the plus button to add a new area. Each custom conditional area can have more than one area allowing you to organize data in the output file to present a special layout, for example newspaper-style layout. Position, size and availability on page(s) can be defined for each area.
Note
Applies only if Multiple areas is not selected.
Master only: Select the checkbox to apply the custom conditional area to the Master sheet only and not to the child sheets (sheets inherit data from the Master sheet).
Locked: Select the checkbox to prevent the area from being moved or resized.
Table: Click the button to open the Table Properties dialog. For more details, see Table Properties. The button is disabled if the table is not applied to the current conditional area.
Multiple areas: Select the checkbox to create multiple areas at a time.
If you select the Multiple areas checkbox, you can specify the following parameters.
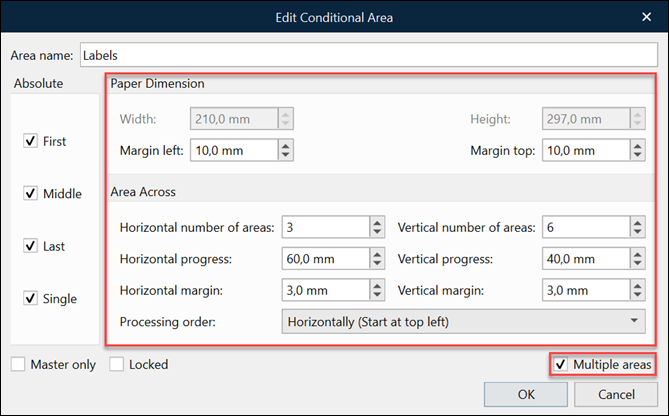
Paper Dimension Parameter | Description |
|---|---|
Width | The field is disabled. The value for the field is taken from the paper setup. |
Height | The field is disabled. The value for the field is taken from the paper setup. |
Margin left | Denotes a space between the edge of multiple areas and the left page edge. |
Margin top | Denotes a space between the edge of multiple areas and the top page edge. |
Area Across Parameter | Description |
|---|---|
Horizontal number of areas | Denotes a number of areas to be added horizontally. |
Vertical number of areas | Denotes a number of areas to be added vertically. |
Horizontal progress | Denotes the width of each single area belonging to a batch. |
Vertical progress | Denotes the height of each single area belonging to a batch. |
Horizontal margin | Denotes a distance between areas horizontally. |
Vertical margin | Denotes a distance between areas vertically. |
Processing order | Denotes the order areas are presented and enumerated in the batch. |
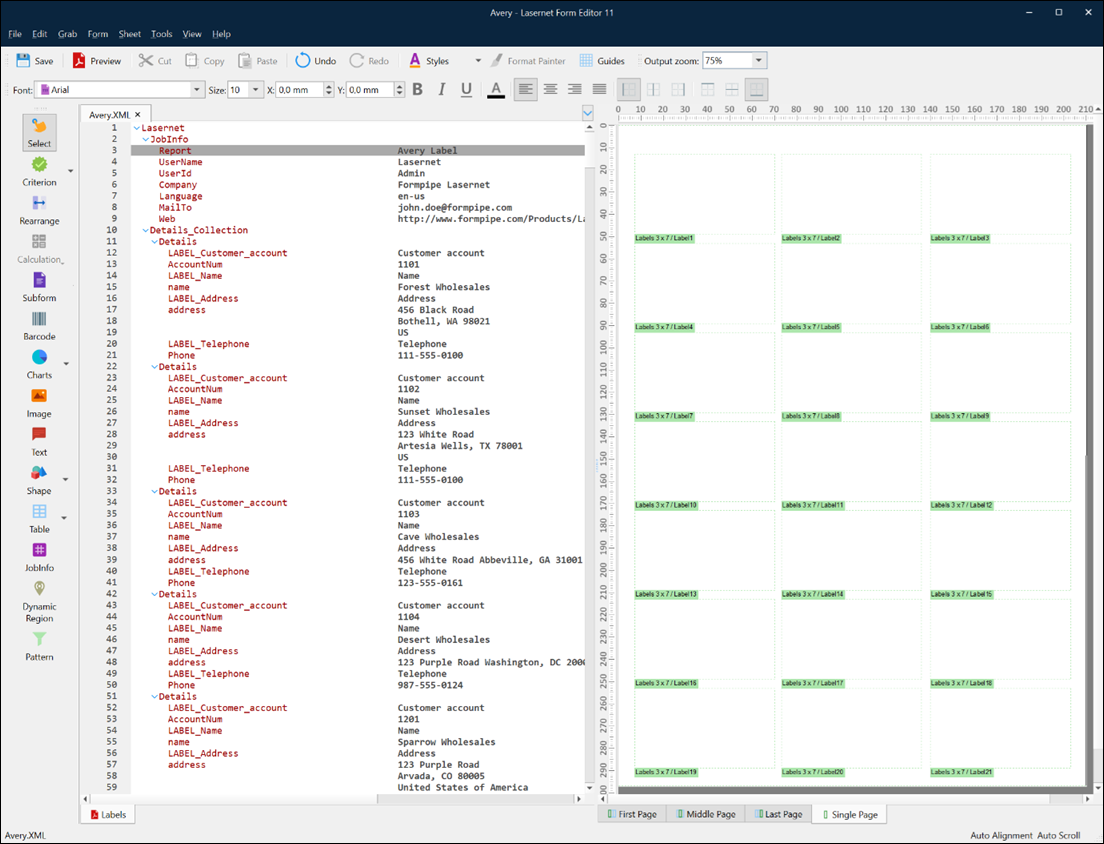
In the following image, you can see an example of adding multiple areas to the output.
The Output Tab of the Conditional Area Window
The Output tab of the Conditional Area window has the following controls and properties.
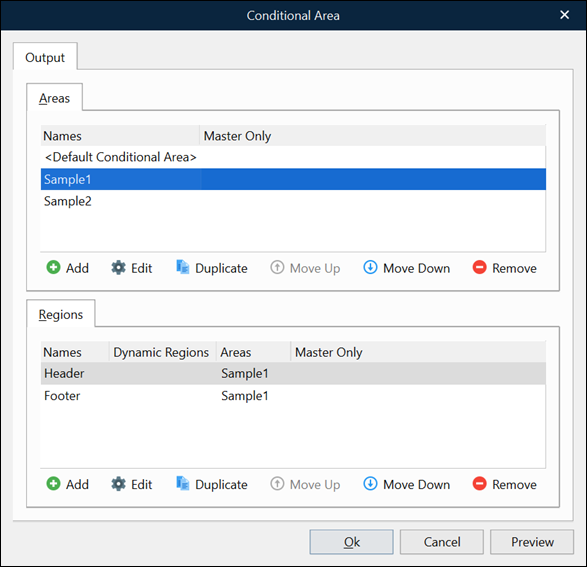
Area Controls | Description |
|---|---|
List of areas | Contains <Default Conditional Area>, which is listed by default and has fixed position parameters and custom areas (if added). |
Add | Adds a custom conditional area. |
Edit | Edits the selected conditional area in the list. In addition, you can also edit the selected conditional area by double-clicking.
|
Duplicate | Creates a copy of the selected conditional area in the list. |
Move Up | Moves the selected conditional area up one position in the list. |
Move Down | Moves the selected conditional area down one position in the list. |
Remove | Removes the selected conditional area from the list. |
The tab contains the following controls and properties of regions.
Regions Controls | Description |
|---|---|
List of regions | Contains regions (if any have been added). Each region is shown by its name and the conditional area it belongs to. |
Add | Adds a region to a specific conditional area. |
Edit | Adds the selected region to the list. |
Duplicate | Creates a copy of the selected region in the list. |
Move Up | Moves the selected region up one position in the list. Once you move the region up in the list, it is moved up in the output file layout as well. |
Move Down | Moves the selected region down one position in the list. Once you move the region down in the list, it is moved down in the output file layout as well. |
Remove | Removes the selected region from the list. |
Regions
Regions allow you to organize data (patterns) in the output file. One or more regions can be added to the default and/or a custom conditional area.
In the Output properties of the conditional area, you can also add, edit, remove, and arrange regions.
To add a region, under the Regions group box on the Output tab of the Conditional Area dialog, click the Add button. With the dialog box displayed, you can specify the following region properties.
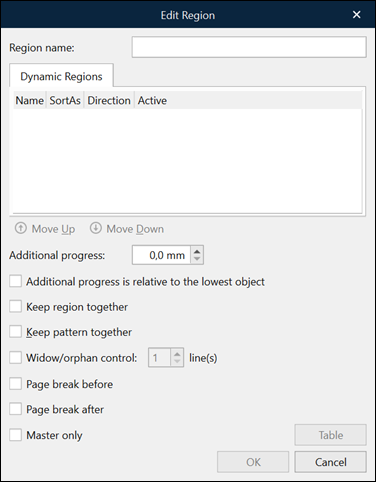
Edit Region Controls | Description |
|---|---|
Region name | The region’s name. |
Additional progress | Define the size of the vertical margin after the region output. |
Additional progress is relative to the lowest object | An additional progress will automatically be added to the bottom of the region if an object included in the region is higher than the total progress summarized for all objects. |
Keep region together | If enabled, Lasernet Core keeps all patterns related to the region together on the same page. |
Keep pattern together | If the checkbox is selected, Lasernet Core keeps all the consistently located lines of the pattern together on the same page. If the checkbox is cleared, Lasernet Core does not keep all pattern lines together on the same page. |
Widow/orphan control | If the checkbox is selected, Lasernet Core avoids putting one or more paragraph-ending lines at the top of a page (widows) and leaving one or more paragraph-starting lines at the bottom of a page (orphans). You can set a number of lines to be considered widowed/orphaned. |
Page break before | If the checkbox is selected, a page break is inserted before the region output. |
Page break after | If the checkbox is selected, a page break is inserted after the region output. |
Master Only | If the checkbox is selected, the region and related patterns only apply to the Master sheet, not to the child sheets (sheets inherit data from the Master sheet). |
Table | Click the button to open the Table Properties dialog. For more details, see Table Properties. The button is disabled if the table is not applied to the current region. |
To edit the region properties, double-click the region record in the list.
You can reassign a region from one conditional area to another if needed. To do this, drag the region from the list to the chosen conditional area in question located under the Areas group box.
Dynamic Regions
“Dynamic regions” are an extended functionality of regions that enables you to organize data (patterns) in the output file with even greater flexibility. One or more dynamic regions can be added to an existing region to organize data within it according to the specified properties.
Use the dynamic region tool to add a dynamic region. To activate the tool, click the Dynamic Region button in the toolbar.

Once a dynamic region is added, you can use the Edit Rearrange and Conditional Area dialog boxes to specify the dynamic region properties.
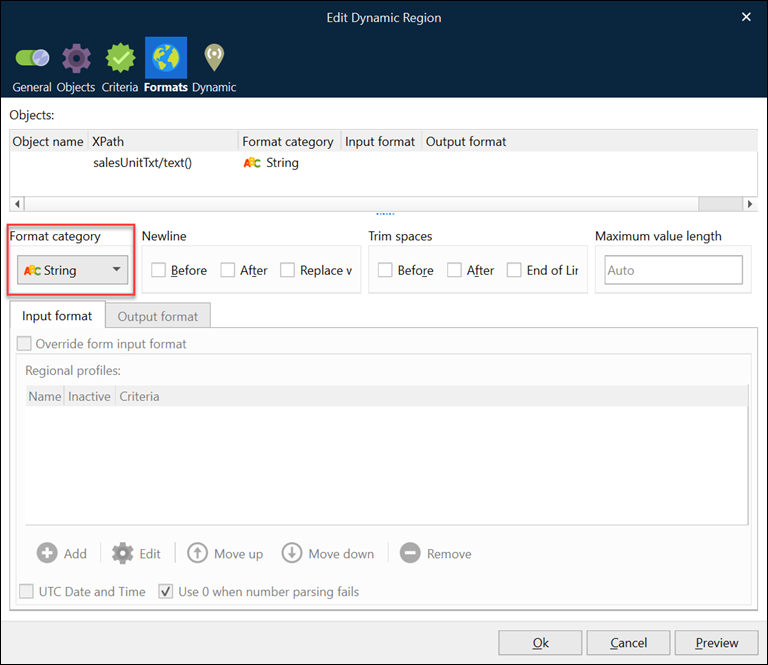
You can specify the data input type in the dynamic region properties. Data can be interpreted as follows:
Number
Currency
Time
Date
String
You can also specify the following dynamic region properties.
Dynamic Region Property | Description |
|---|---|
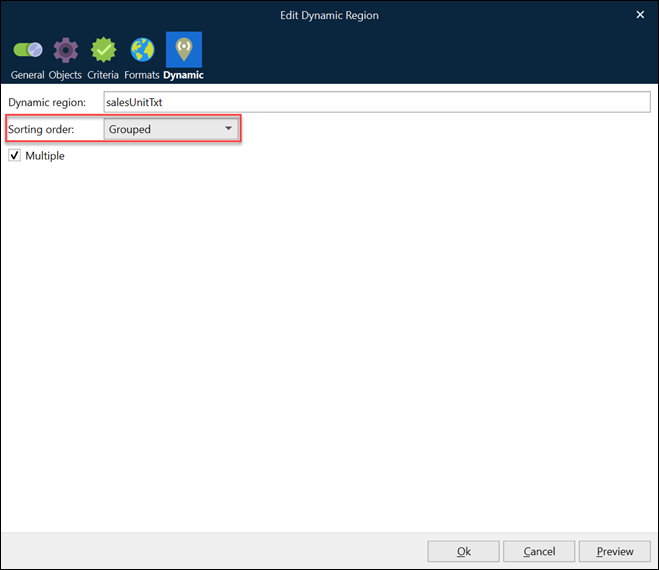
Dynamic Region | Type a new criterion (dynamic region) name. |
Sorting Order | Arranges all available pattern instances in a defined order within a region. Pattern instances are processed from top to bottom.
|
Multiple | If the checkbox is cleared, available pattern instances are considered as one region. All data is grouped in one set but still arranged according to the specified sorting order. If the checkbox is selected, each available group of pattern instances is considered as standalone, and all available pattern instances are then arranged according to the specified sorting order. |
More than one dynamic region object can be added to the region at a time. As a property of the conditional area, you can arrange dynamic region objects by moving each up or down. The top object is applied first, with each following object applied to the sorted data one by one until the end (bottom) of the list.

A dynamic region object can be added to the pattern in which the Output Region value is set to Same As Previous Pattern.

In this case, the dynamic region is applied to the selected regions in line with the current grab file, according to the pattern settings. If you choose another grab file, it still comes into effect for the regions where it has already been applied in the first pass, even if it does not correspond to the selected grab file/pattern settings anymore.