Manage Lasernet Jobs
- 26 May 2026
- 5 Minutes to read
- Contributors

- Print
- PDF
Manage Lasernet Jobs
- Updated on 26 May 2026
- 5 Minutes to read
- Contributors
- Print
- PDF
Article summary
Did you find this summary helpful?
Thank you for your feedback
Applies to: Lasernet Core 11
The Job Status page of Manage enables you to view job queues for Lasernet Core environments. You can also perform basic tasks like editing JobInfos for running jobs; searching, viewing, and deleting jobs; and releasing temporarily paused jobs.
Find Your Way Around the Job Status Page
When no jobs are selected, Manage displays the job list and provides controls that enable you to select different environments and queues.
When jobs are selected, Manage displays the action bar.
No Job Selected
.png)
Number | Item | More information |
|---|---|---|
1 | Environment list | Select which environment’s job status data to view. |
2 | Queue list | Select which job queue to view. |
3 | Refresh button | Refresh the job list data for the currently selected queue. |
4 | Search box | |
5 | Category tabs | Select a category of jobs (paused, scheduled, or failed) to view a list of. |
6 | Job list | A list of jobs with their metadata fields displayed in table columns. Jobs are listed in chronological order. |
7 | Select all jobs | To select all listed jobs, select this checkbox. When you select jobs, Manage displays the action bar. |
8 | Select individual jobs | To select a job, select its checkbox. Alternatively, click anywhere in its row. When you select a job, Manage displays the action bar. |
9 | Page navigation controls | |
10 | Jobs per page | |
11 | Delete All button | Delete all jobs in the currently selected queue. |
12 | Release All button | Release all jobs in the currently selected queue to their default destination. |
The Action Bar
When you select one or more items in the job list, Manage displays the action bar.
.png)
Action Bar Buttons
The number and type of actions in the bar depend on how many jobs you selected and their type.
Hover the mouse pointer over a button to learn what it does.
View Job Details
.png)
Displays the Job Details pane.
Download
.png)
Downloads the documents associated with the job.
Release To
.png)
Releases the selected jobs to a destination that you select.
In the Release Job to Destination(s) window, select a destination and then click Confirm.
Release
.png)
Releases the selected jobs to their default destinations.
Failed jobs are retried.
Delete
.png)
Deletes the selected jobs.
Note
You cannot recover deleted jobs.
Open in OCR

This command is shown only for users running the Lasernet Input Management solution. If a job is paused, select it and then click Open in OCR to open the job in Lasernet OCR Editor.
Note
A local installation of Lasernet OCR Editor is required.
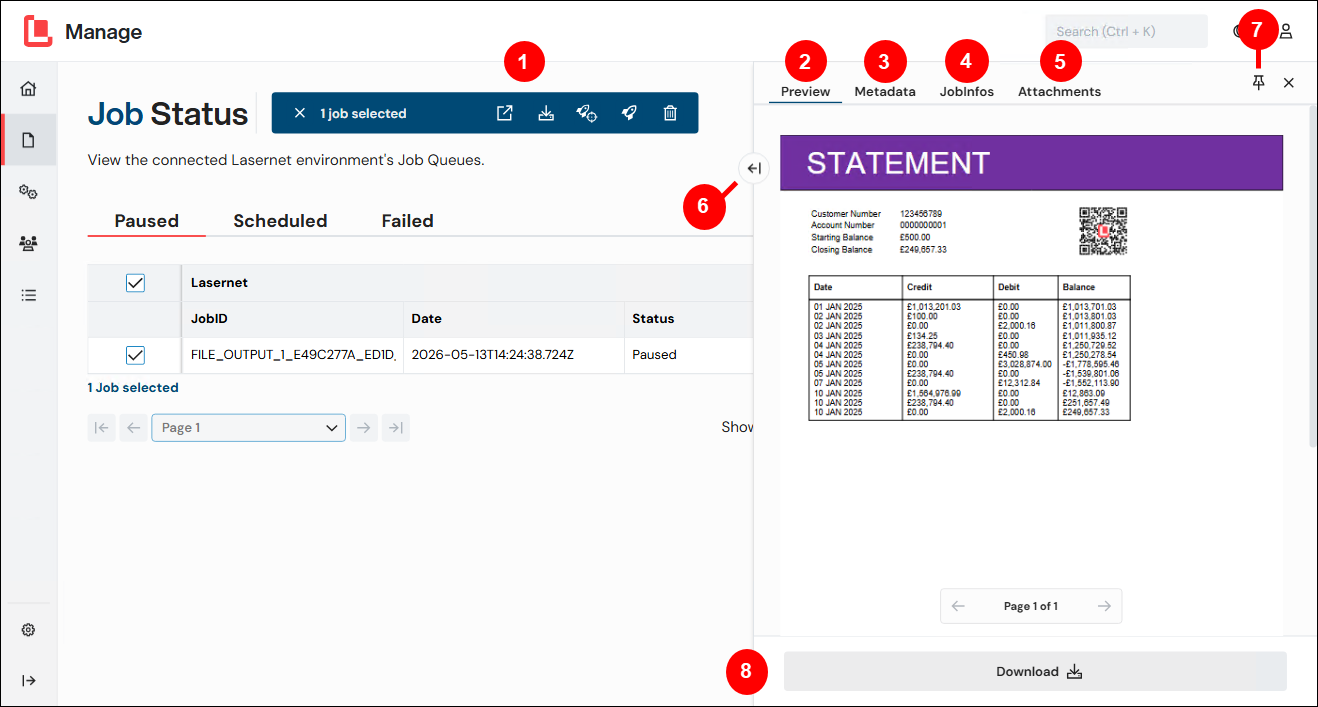
The Job Details Pane
Number | Item | More information |
|---|---|---|
1 | Action bar | If you selected one job from the job list, you can:
If you selected two or more jobs from the job list, you can:
|
2 | Preview tab | Displays a preview of the document.
|
3 | Metadata tab | Displays the job’s additional JobInfo and metadata fields. Values can be modified (except for system fields). To modify values, change them on this tab and then click Confirm. |
4 | JobInfos tab | Displays the job’s user and system JobInfos. Values can be modified if the JobInfo is not read-only. System JobInfos cannot be modified. To modify values, change them on this tab and then click Confirm. |
5 | Attachments tab | Add new documents to a job or delete existing documents from a job. To attach a document:
You can preview, download, and delete attachments. |
6 | Expand button | To view the Preview and other tabs alongside each other, click the expand (arrow) icon to permanently display the document preview. Click it again to hide the preview. |
7 | Pin this panel button | If you deselect all jobs in the table, the pane automatically closes. To prevent this from happening, click Pin this panel. |
8 | Job-specific actions buttons | Buttons that act on the currently selected job are below the document preview. |
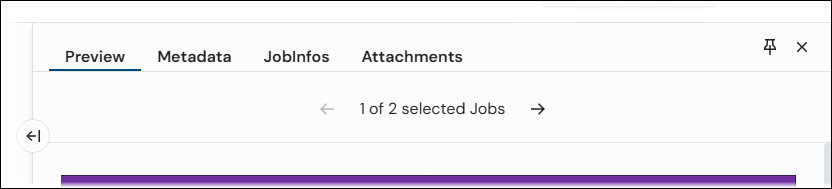
If you select two or more jobs, use the job navigation controls above the document preview to move between jobs.
Categories
The Job Status page displays lists of paused, scheduled, or failed jobs.
Paused Jobs
A module in a Lasernet Core workflow can be configured to pause jobs that pass through it. Pause a job to verify that a module's output looks correct before releasing it to its output destination (or destinations).
After checking a paused job, you must manually release it. Lasernet Core unpauses the job and continues to process it.
When a paused job is released by a user, it is passed to the job destination (or destinations) specified by the module that paused the job. In Lasernet Developer, one or more of a module’s destinations can be designated as an alternative. Alternative destinations are skipped when you release jobs unless you specifically choose to release a job to them.
Scheduled Jobs
A module in a Lasernet Core workflow can have a schedule applied to it. For example, a module’s schedule can be “18:00:00 daily”; this schedule will pause the job until the time reaches 18:00.
The system automatically releases scheduled jobs from their paused state according to their schedule. Scheduled jobs can be manually released.
Alternative destinations are not configurable for scheduled jobs.
Failed Jobs
If a job has failed in Lasernet Core, it is often because communication cannot be established between an output module and the external environment, such as an email server.
To retry a failed job, select the jobs that you want to release and then click Release in the action bar. Alternatively, to release all listed failed jobs, click Release All. Lasernet Core will process the jobs again (from the same state that they failed) by attempting to reconnect and send the job again.
Instead of retrying jobs, you can delete them. Select jobs and then Delete in the action bar, or click Delete All to delete all listed jobs.
Queues
The queue list contains a tree of queues. Each queue contains jobs of each category (paused, scheduled, and failed). If a queue does not contain jobs, it is not displayed.
The tree queue has two levels. Each entry in the tree shows how many jobs it contains.
Level 1: Logical module name.
Level 2: Jobs can have a special JobInfo called FormType. Entries at the second level of the tree group jobs by their FormType value.
For example:
XML Output 1 (18)
Invoice (18)
PDF Output 1 (76)
PDF Documents (76)
The FormType JobInfo is a special JobInfo that is defined on the environment. If no FormType is specified for a job, it is grouped under a <None> entry.
FormType is stored by default, so a JobInfo profile does not need to be created to use this feature.