Licence Plate Labels
- 03 Mar 2026
- 15 Minutes to read
- Contributors


- Print
- PDF
Licence Plate Labels
- Updated on 03 Mar 2026
- 15 Minutes to read
- Contributors
- Print
- PDF
Article summary
Did you find this summary helpful?
Thank you for your feedback
Introduction
Licence Plate labels are standard Dynamics 365 functionality. More information regarding Licence Plate labels can be found at this link.
Licence Plate labels can also be used with Lasernet. This requires Lasernet FO Connector configuration as well as Dynamics 365 configuration, which this guide will explain.
However, due to the complexities involved, this section of the Warehouse Labels User Guide will not cover the complete setup required to print Licence Plate labels. Refer to Microsoft’s documentation for more information on how Licence Plate labels can be configured in Dynamics.
Lasernet FO Connector Configuration
This section will cover the Lasernet FO Connector configuration needed to create an XML file for a Licence Plate label, which can be used with a Lasernet configuration. This guide will not cover configuration within the Lasernet Developer.
Lasernet Report
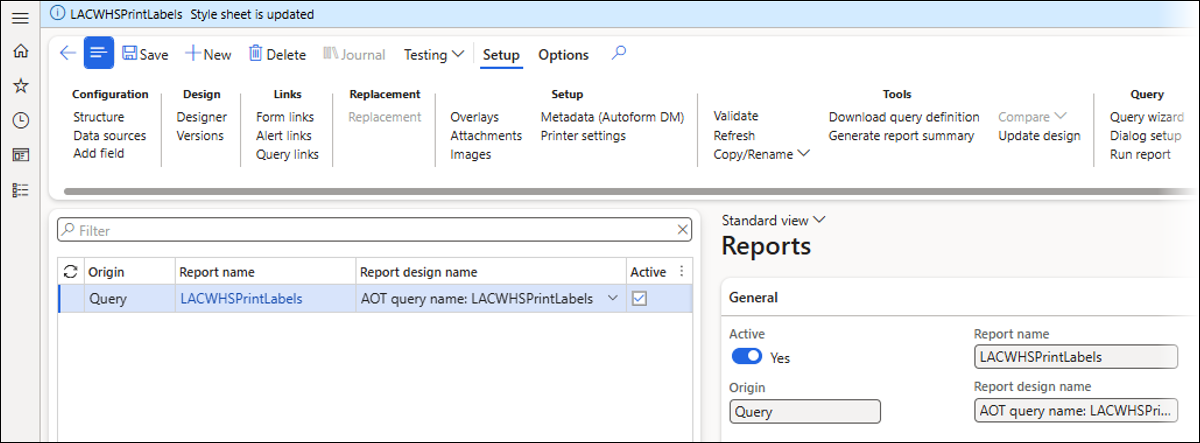
The LACWHSPrintLabels Lasernet query is used as an alternative to the standard Dynamics 365 solution for printing Licence Plate labels.
The LACWHSPrintLabels Lasernet query is included as part of the default Lasernet FO Connector configuration. However, if this Lasernet query is not included in your Lasernet FO Connector configuration, it can be manually added by following these steps:
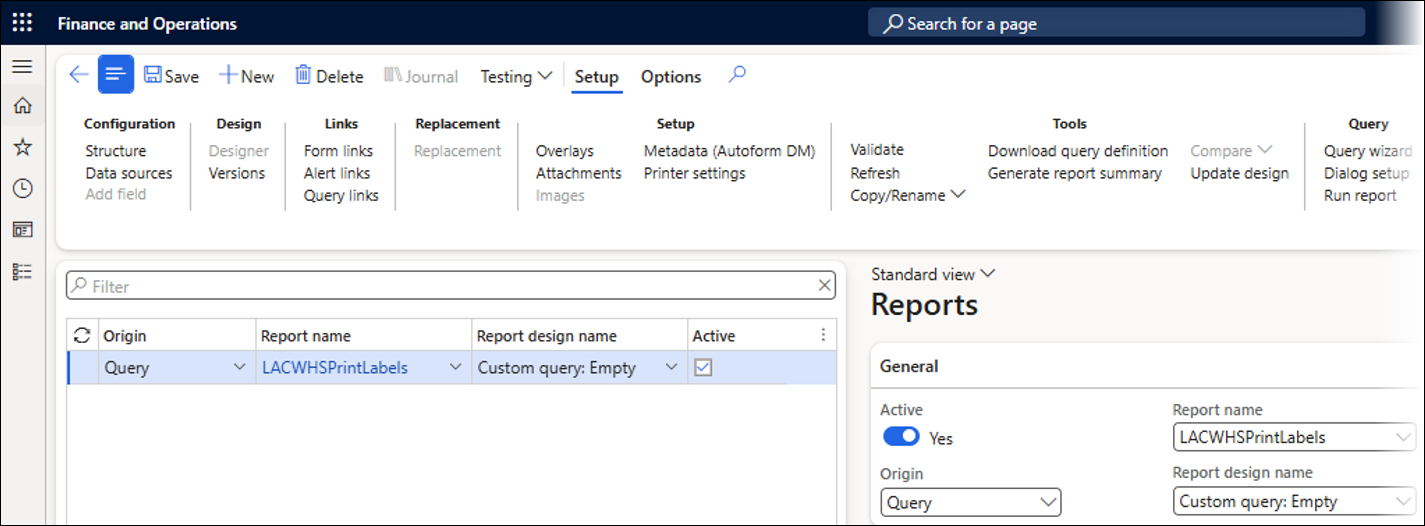
Navigate to Lasernet > Common > Reports.
Create a new report.
Origin: Query
Report name: LACWHSPrintLabels
Active: Yes
Archive: Default (this is useful for testing, but is usually turned off in a Prod environment)
Save XML: Yes (this is useful for testing, but is usually turned off in a Prod environment)
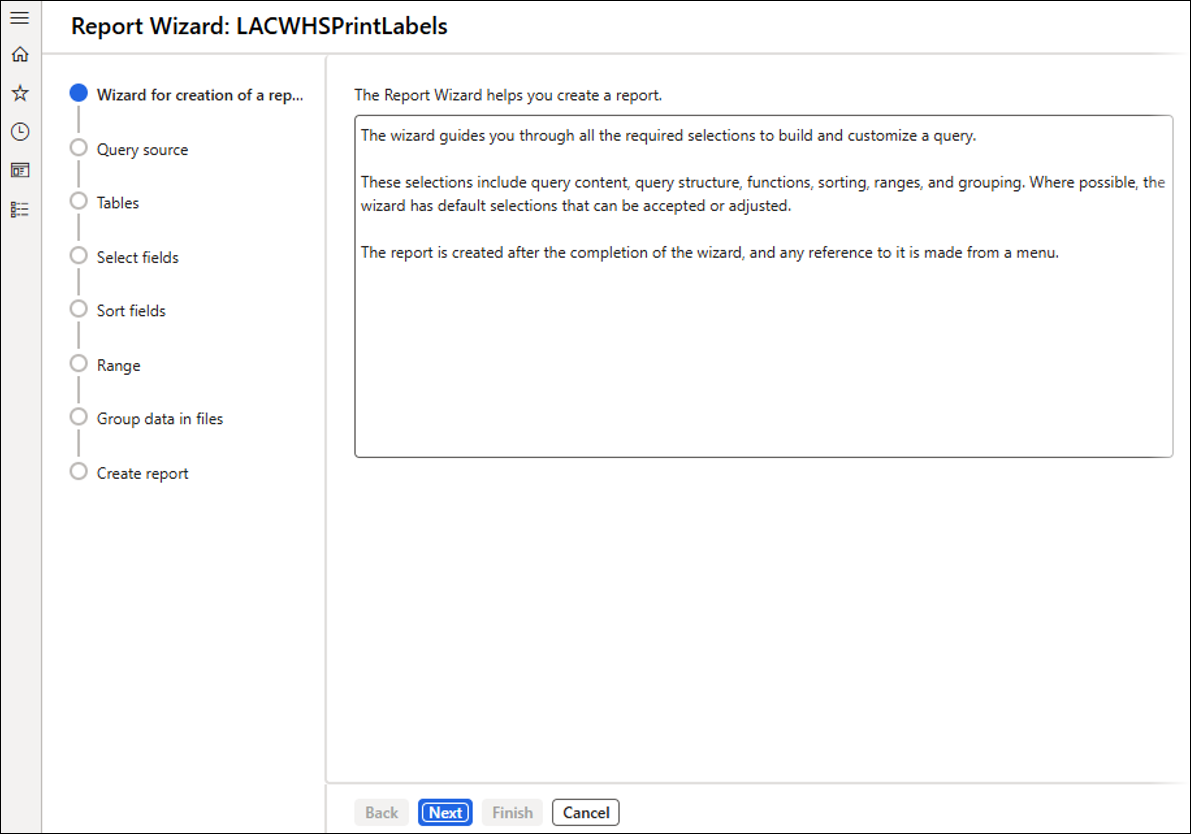
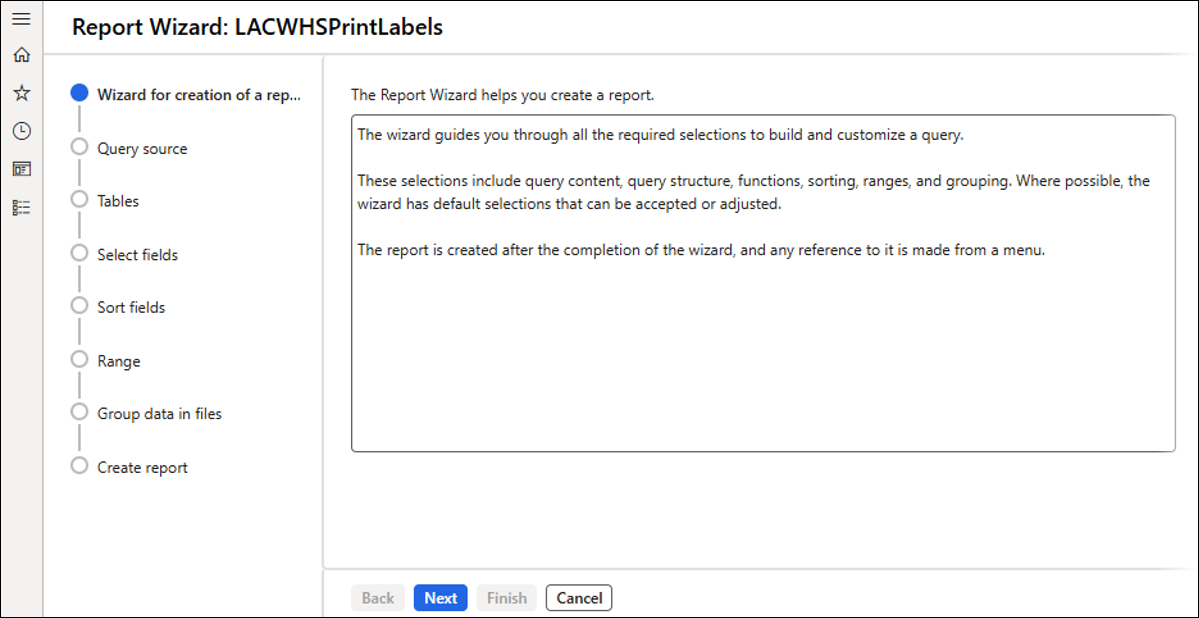
Click Query wizard.
Click Next.
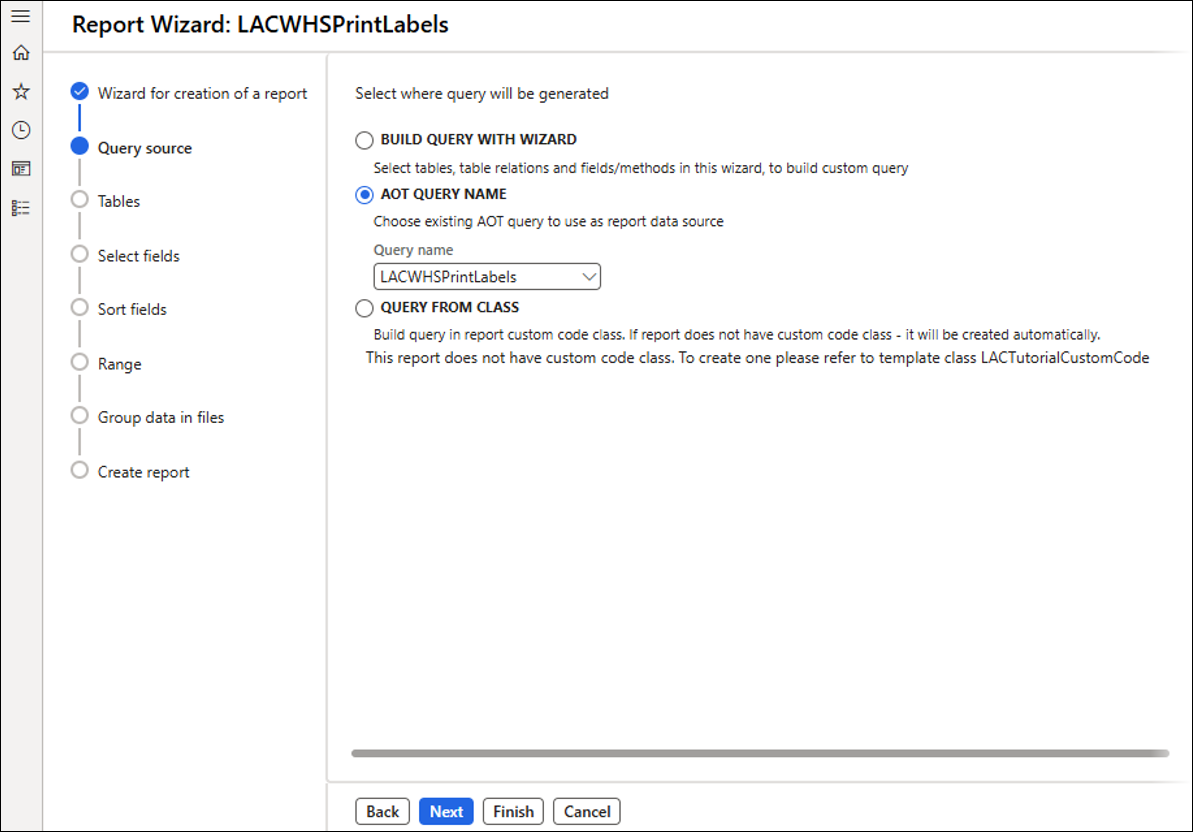
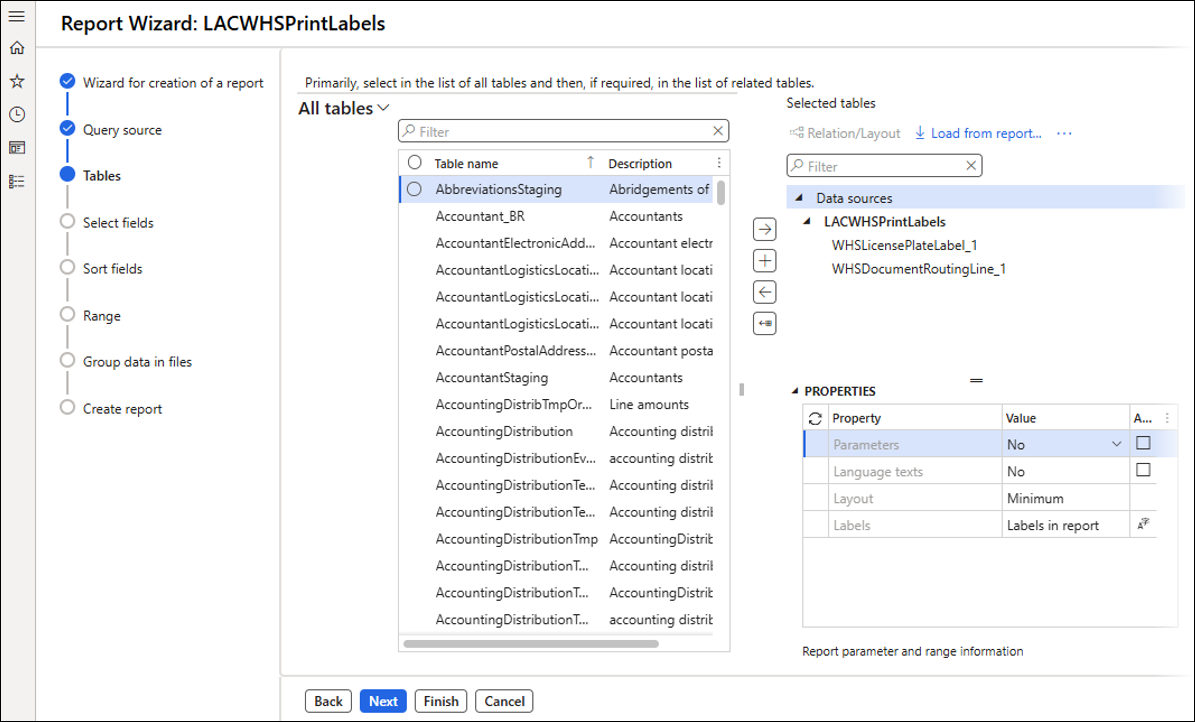
Select the AOT QUERY NAME option.
Select LACWHSPrintLabels from the Query name field.
The LACWHSPrintLabels AOT query is included as part of the Lasernet FO Connector deployable package.
Click Finish.
Ensure the LACWHSPrintLabels Lasernet query is still selected, then click Query wizard.
Note
The Query Wizard is closed and then re-opened. The default tables and fields will be visible when the Query Wizard is re-opened. The tables and fields may not be visible if you were to select BUILD QUERY WITH WIZARD before clicking Finish.
Click Next.
Change the selection from AOT QUERY NAME to BUILD QUERY WITH WIZARD.
This needs to be selected if additional tables and fields that are not part of the default tables and fields for this Lasernet query are needed.
Click Next.

The tables and fields that are typically used for a Licence Plate label are included in the following two default tables:
WHSLicensePlateLabel_1
WHSDocumentRoutingLine_1
These default tables should not be removed. However, you can join other tables to these default tables if needed.
Click Next.
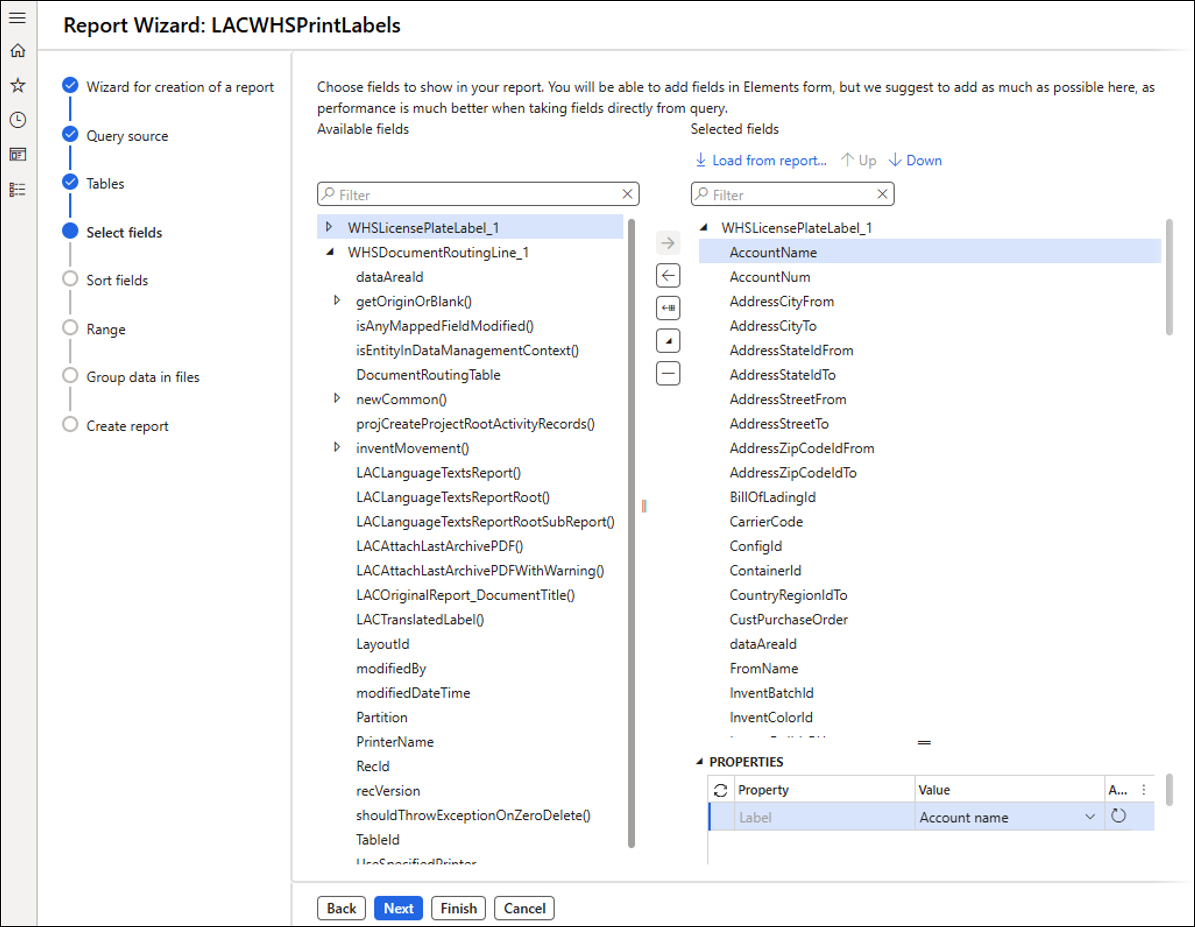
Some fields have already been included from the default tables. However, additional fields can be added if needed.
Click Finish.
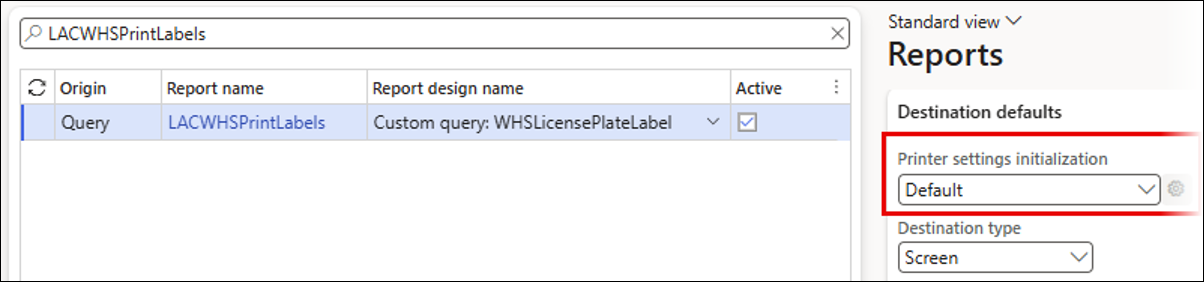
Printer Settings Initialization
The Printer settings initialization needs to be set as Default to use the Document routing print destination and the default printer destinations.
Quick Destinations
A Quick destination must be set up as a prerequisite for the Document routing, as this is needed to use a Lasernet print destination when printing from the Warehouse Mobile Device.
A Quick destination is used to define a print destination. For example, it can be created for:
Lasernet Screen - useful for testing.
Lasernet Print - for a specific printer.
Lasernet Email - for a specific email address.
Lasernet Predefined - can be used to send the label to a different print destination based on the scenario.
A Quick destination can be created by following these steps:
Navigate to Lasernet > Setup > Quick destinations.
Click New to create a new Quick destination.
Enter a Destination name.
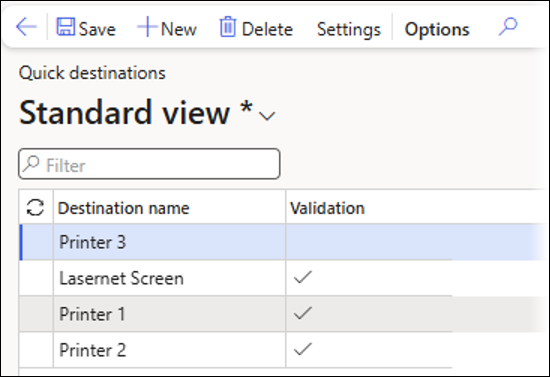
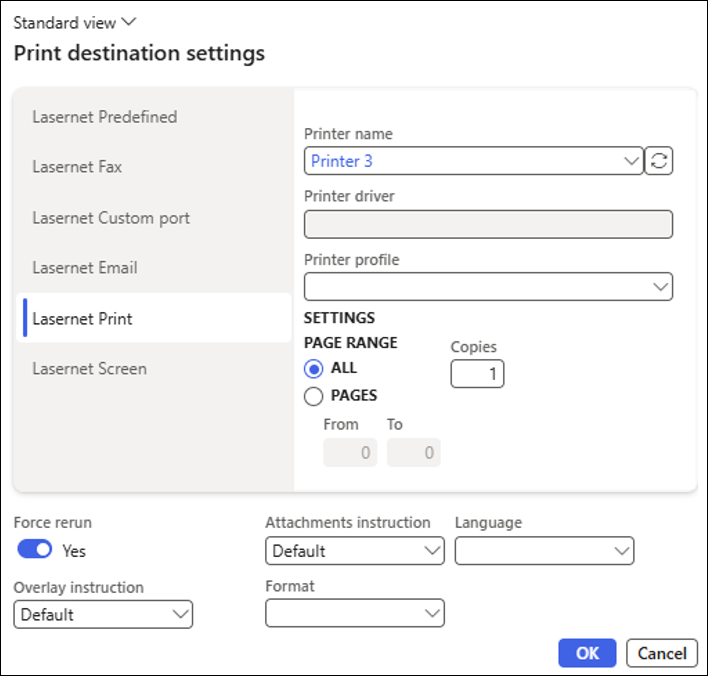
Click Settings to define the print destination. The following options are available:
Lasernet Predefined
Lasernet Fax
Lasernet Custom port
Lasernet Email
Lasernet Print
Lasernet Screen
Lasernet Screen is a good destination for testing a label design. However, Lasernet Print or Lasernet Predefined is often used when printing a Licence Plate label in a Prod environment.
Click OK.
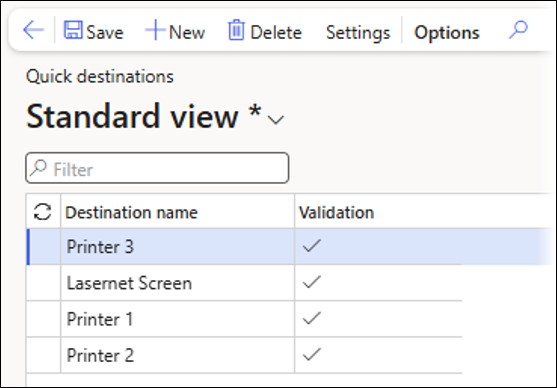
The Validation field has been updated when a valid print destination was selected.
In the Document routing section of this guide, we will explain how to link the Quick destination to a Document routing.
Dynamics Configuration
Numerous fields can be configured within the Warehouse management module of Dynamics 365 Finance and Operations to accommodate a variety of warehouse processes across various industries. Due to the complexity of these processes, this section of the Warehouse Labels User Guide will not explore the whole setup required to run warehouse processes when using the mobile app. For more information, refer to Microsoft’s documentation.
This section will guide you through a few key settings needed to print the Licence Plate label.
Document Routing Layouts
Document routing layouts define how labels are laid out with the data printed on them. When using standard Dynamics, the layouts are created using ZPL code.
A Document routing layout is also needed for the Lasernet version of the warehouse label. However, the label design is created in the Lasernet Developer. Therefore, the label layout can be left blank within the Label layout FastTab.
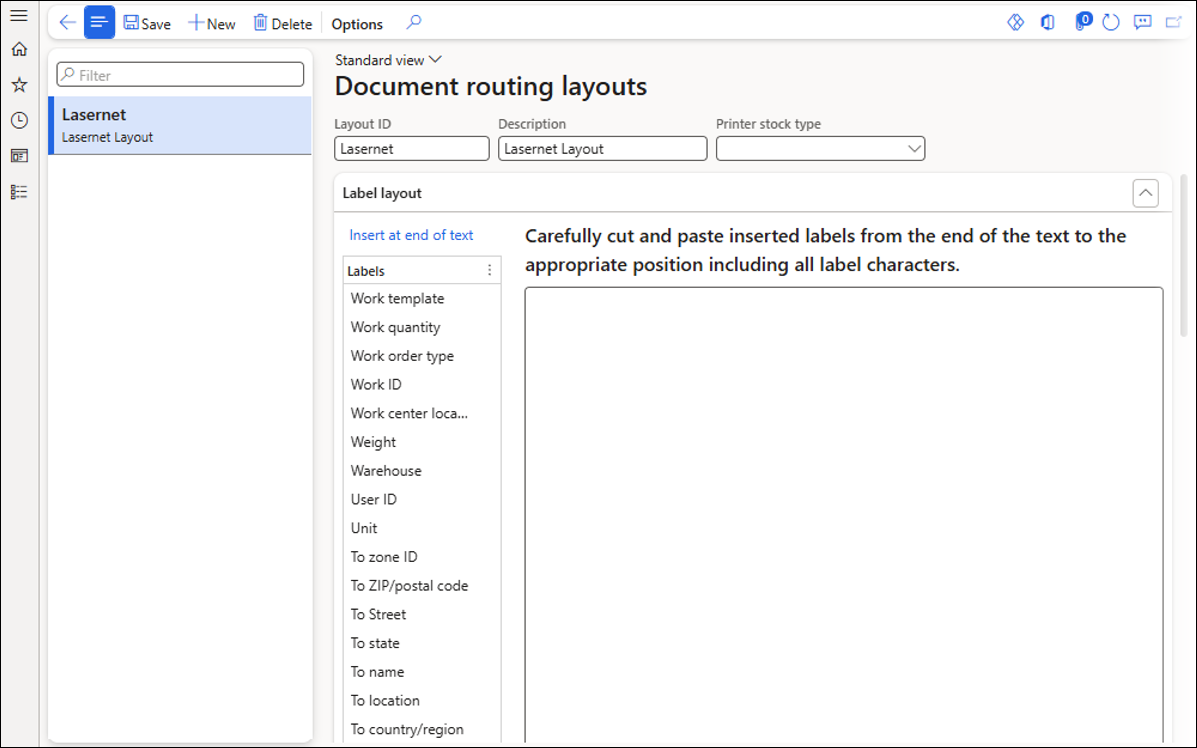
A Document routing layout can be created by following these steps:
Navigate to Warehouse management > Setup > Document routing > Document routing layouts.
Click New.
The blank fields can be completed as follows:
Layout ID: Lasernet
Description: Lasernet Layout
No changes are needed for the Label layout FastTab
Document Routing
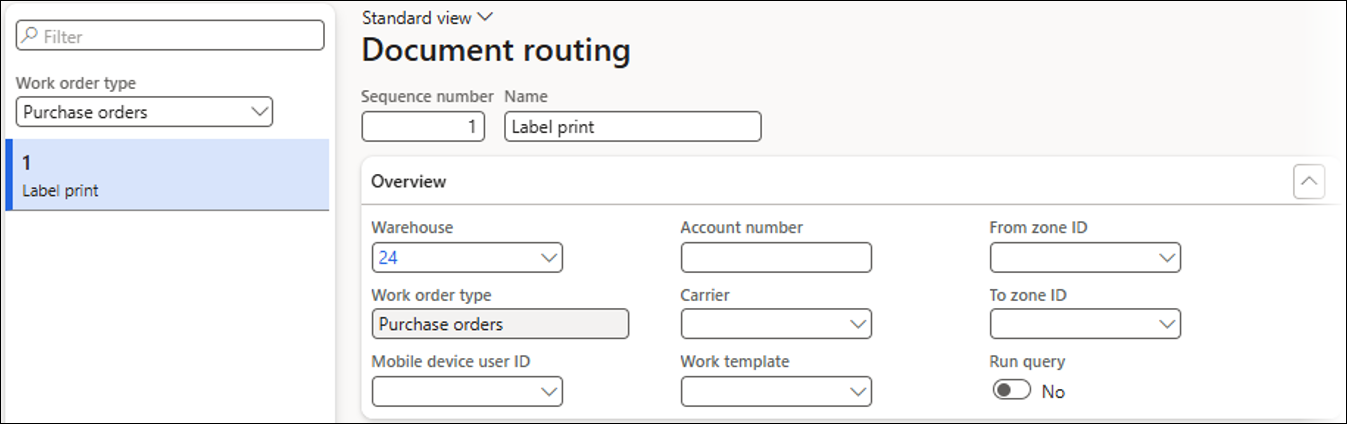
Document routing is used to define when the labels should be printed. For example, a Document routing can be set up for Purchase orders, so labels are printed for this Work order type.
A Document routing can be created by following these steps:
Navigate to Warehouse management > Setup > Document routing > Document routing.
Select a Work order type from the dropdown list. In the example below, a Document routing has been created for Purchase orders.
The Overview FastTab contains fields that can be used to link the document to a specific:
Warehouse (mandatory field)
Mobile device user
Account number
Carrier
Work template
Range of zones
Refer to Microsoft’s documentation for more information regarding Document routing in Dynamics 365.
In this scenario, a Document routing has been set up for Warehouse 24:
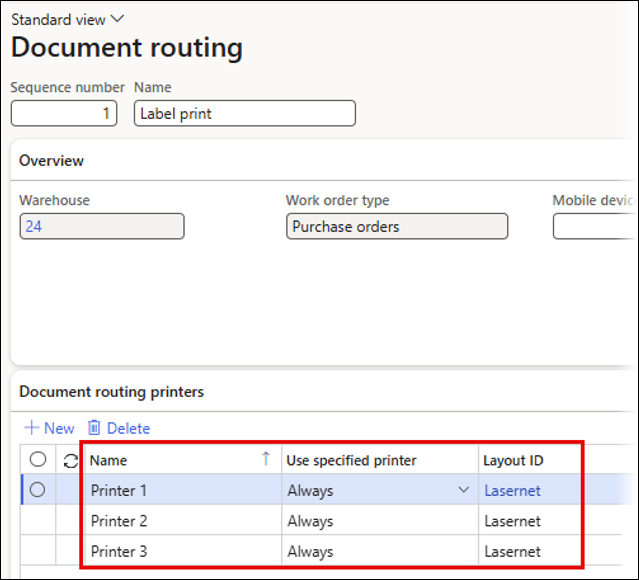
The Document routing is linked to the Lasernet print destination by using the fields within the Document routing printers FastTab:
Name: Select a Quick destination.
Use specified printer: Always.
Layout ID: Select the Lasernet Document routing layout that was created earlier.

Work Template
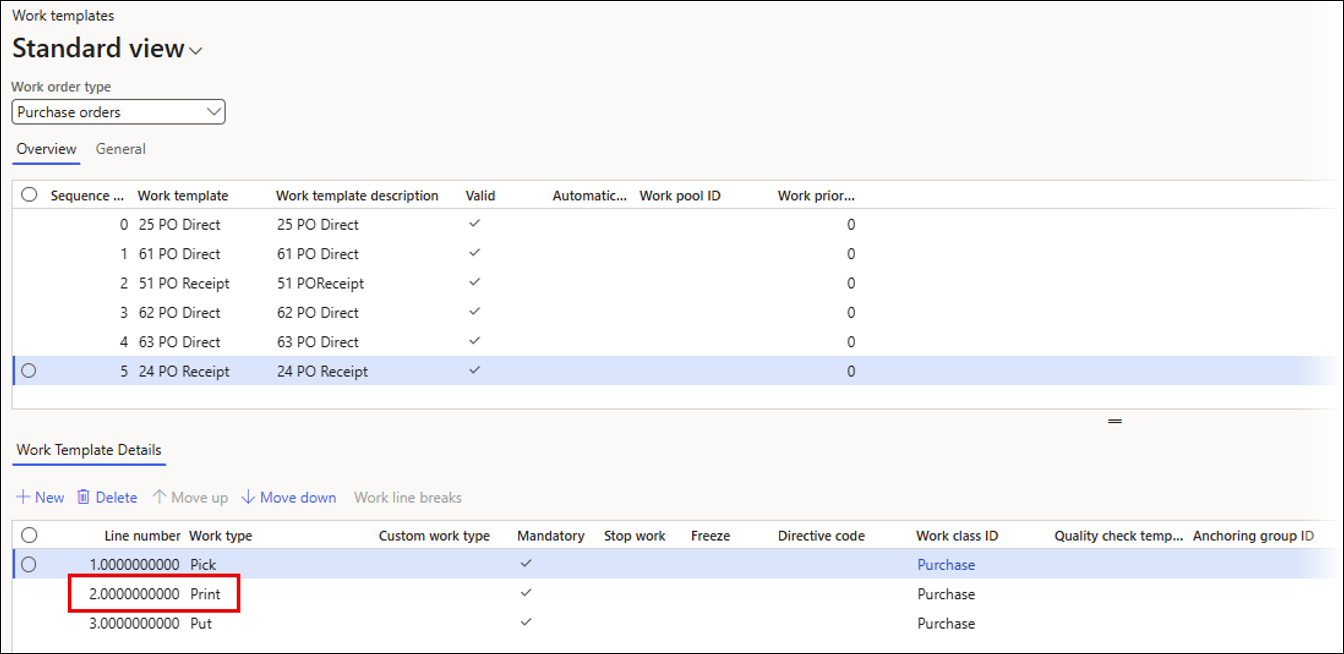
Navigate to Warehouse management > Setup > Work > Work templates.
Ensure a Print Work type has been added between the Pick and Put Work type for the Work template that will be used to print a Licence Plate label.
Mobile Device Menu Items
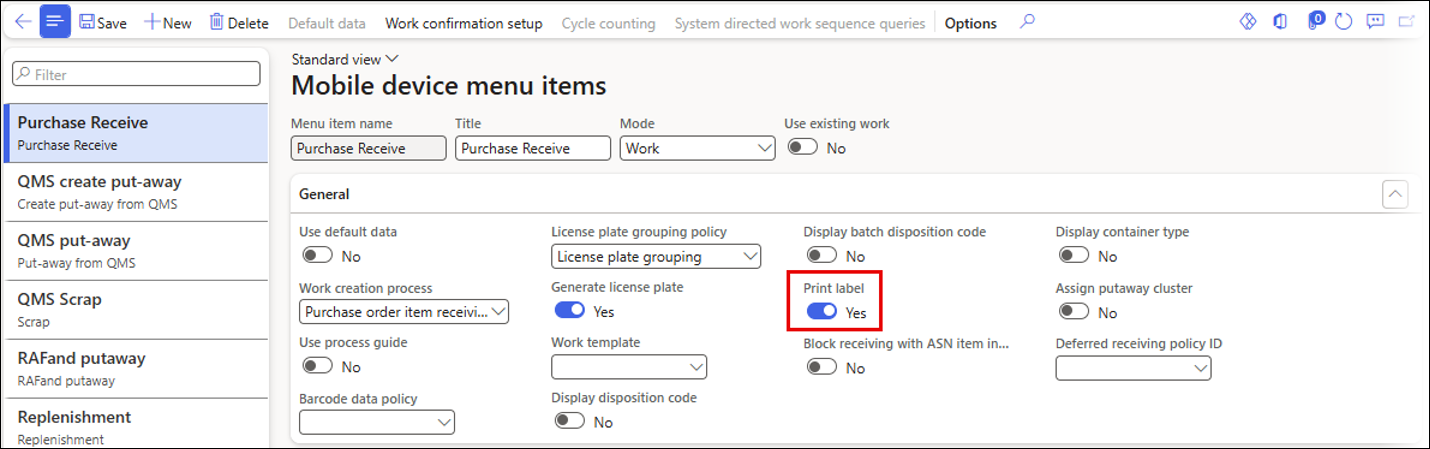
Navigate to Warehouse management > Setup > Mobile device > Mobile device menu items.
Expand the General FastTab.
Ensure the Print label toggle is set to Yes for the Menu item that is used to print the Licence Plate label:
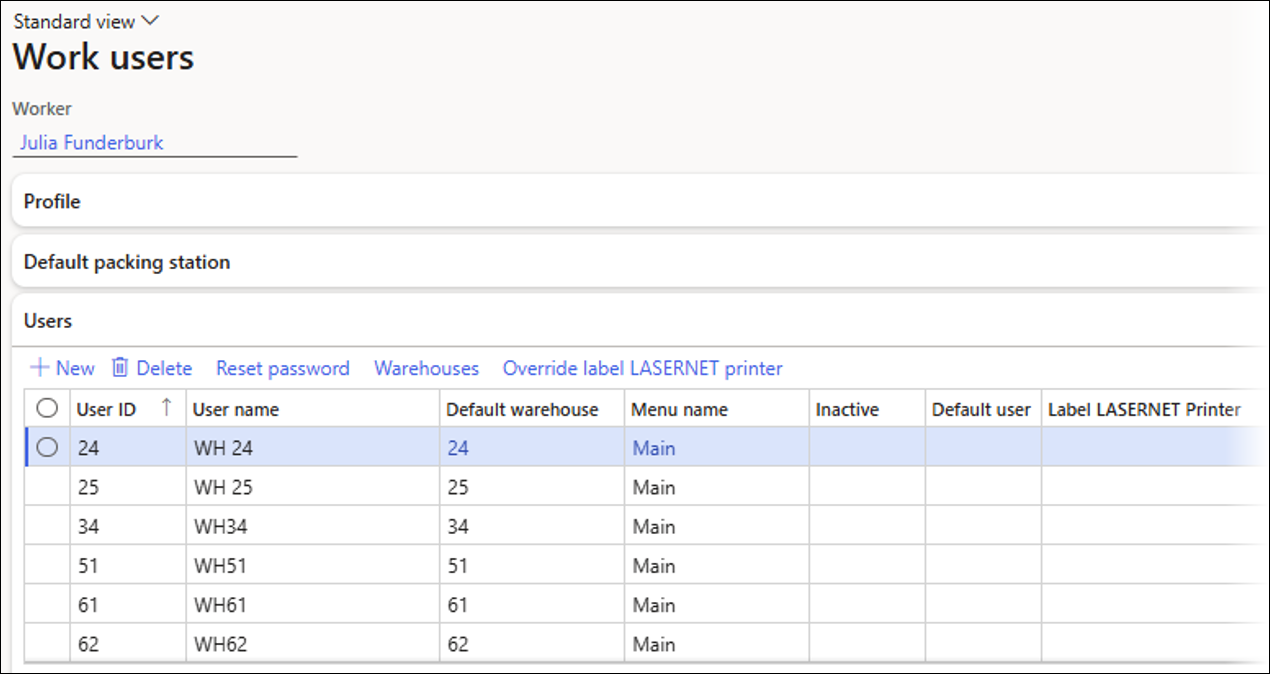
Worker
Login details must be entered when using the Warehouse Mobile Device app. Therefore, a user account must be created (which is separate from the user account created in System administration > Users > Users).
A Warehouse Mobile Device user can be created by navigating to Warehouse management > Setup > Worker. Multiple users can be created for a worker.
Click Reset password to create a new password.
Scenario: Using the Document Routing Print Destination
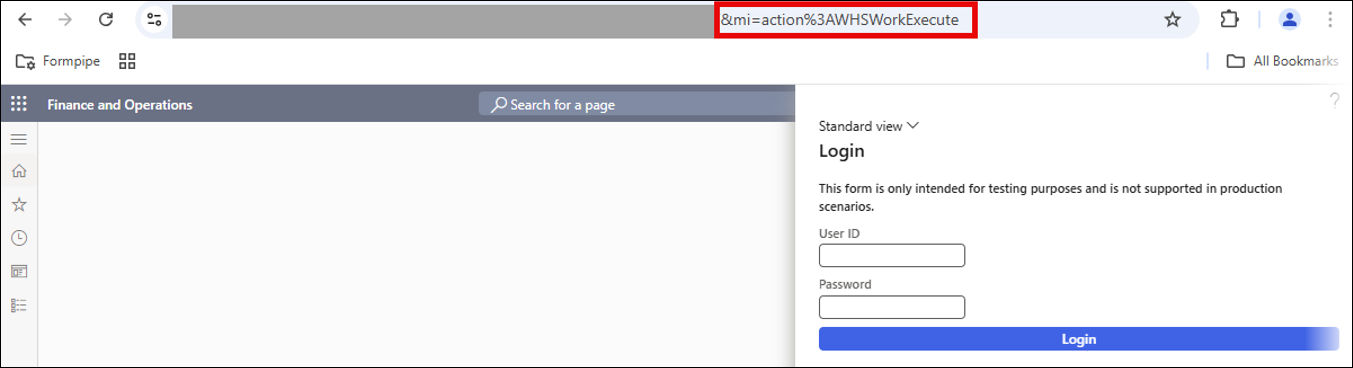
Standard Dynamics provides an emulator for the Warehouse Mobile Device app that uses the same functionality as the app but runs in a normal Dynamics browser session. This emulator can be used for testing purposes.
Start the Warehouse management mobile app emulator by entering a specific URL into your browser. For instance, enter either the Menu item “mi=action:WHSWorkExecute” or the Menu item “&mi=action%3AWUSWorkExecute” as a suffix to the Dynamics 365 FO environment URL:
https://DynamicsEnvironment/?cmp=ABCD&mi=action:WHSWorkExecute
https://DynamicsEnvironment/?cmp=ABCD&mi=action%3AWUSWorkExecute
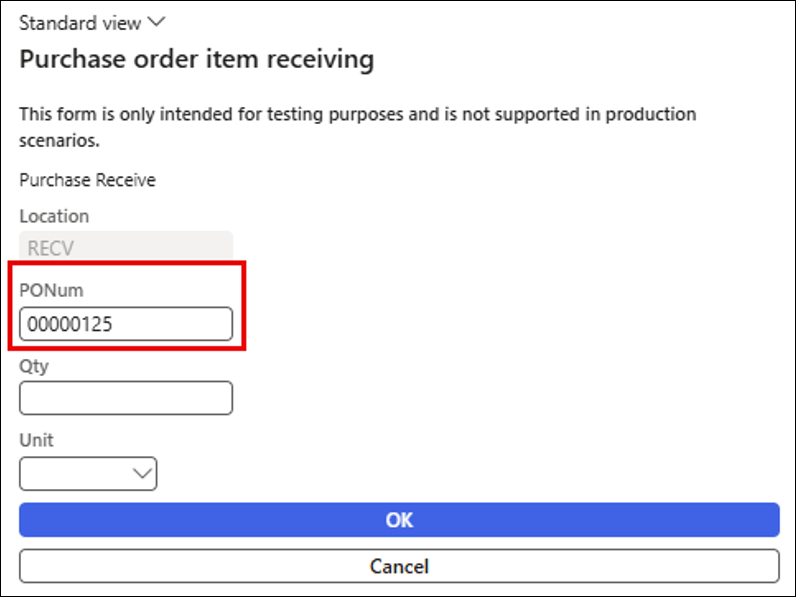
In this scenario, a Purchase Receive will be performed using the Document routing print destination as the print destination.
Follow these steps:
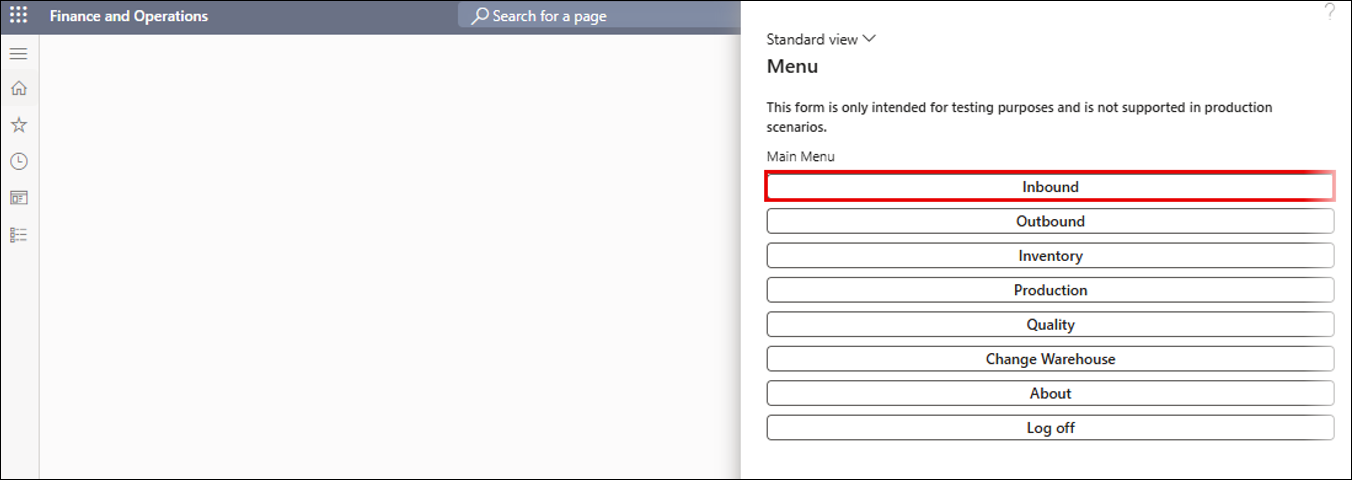
Log in using the user ID and password set up in Warehouse management > Setup > Worker.
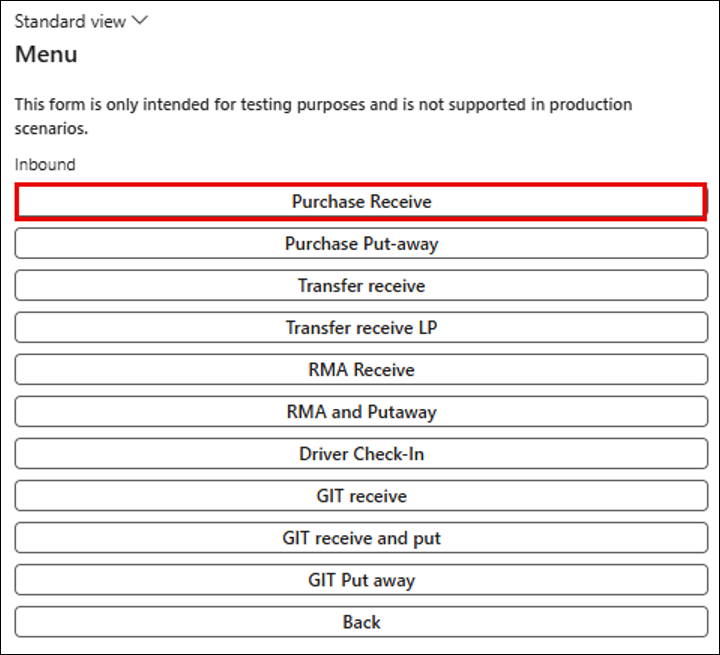
Once logged in, select Inbound.
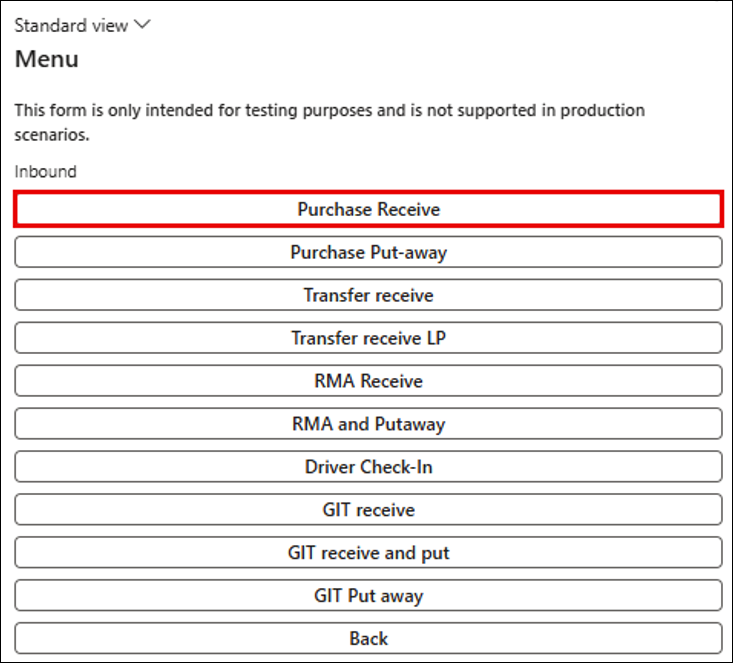
Select Purchase Receive.
Enter a PONum, then click OK.
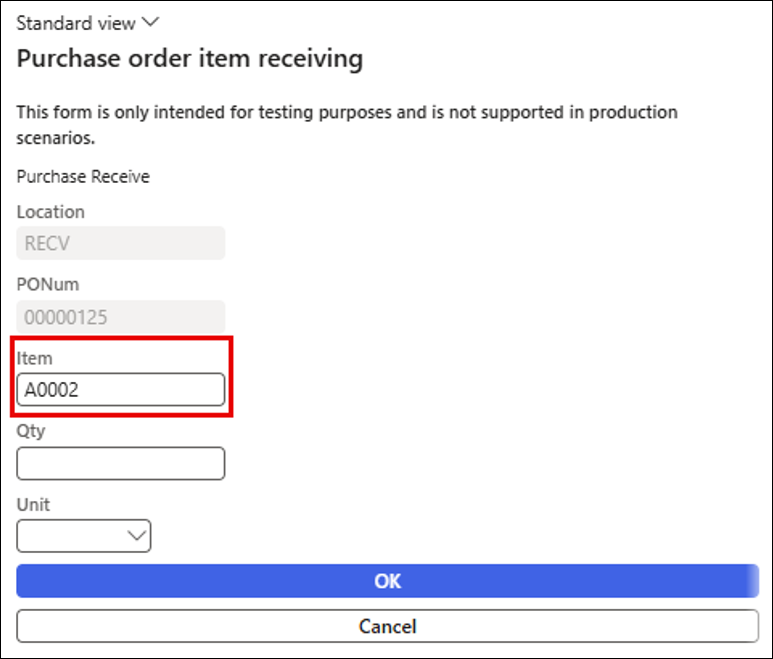
Enter an Item, then click OK.
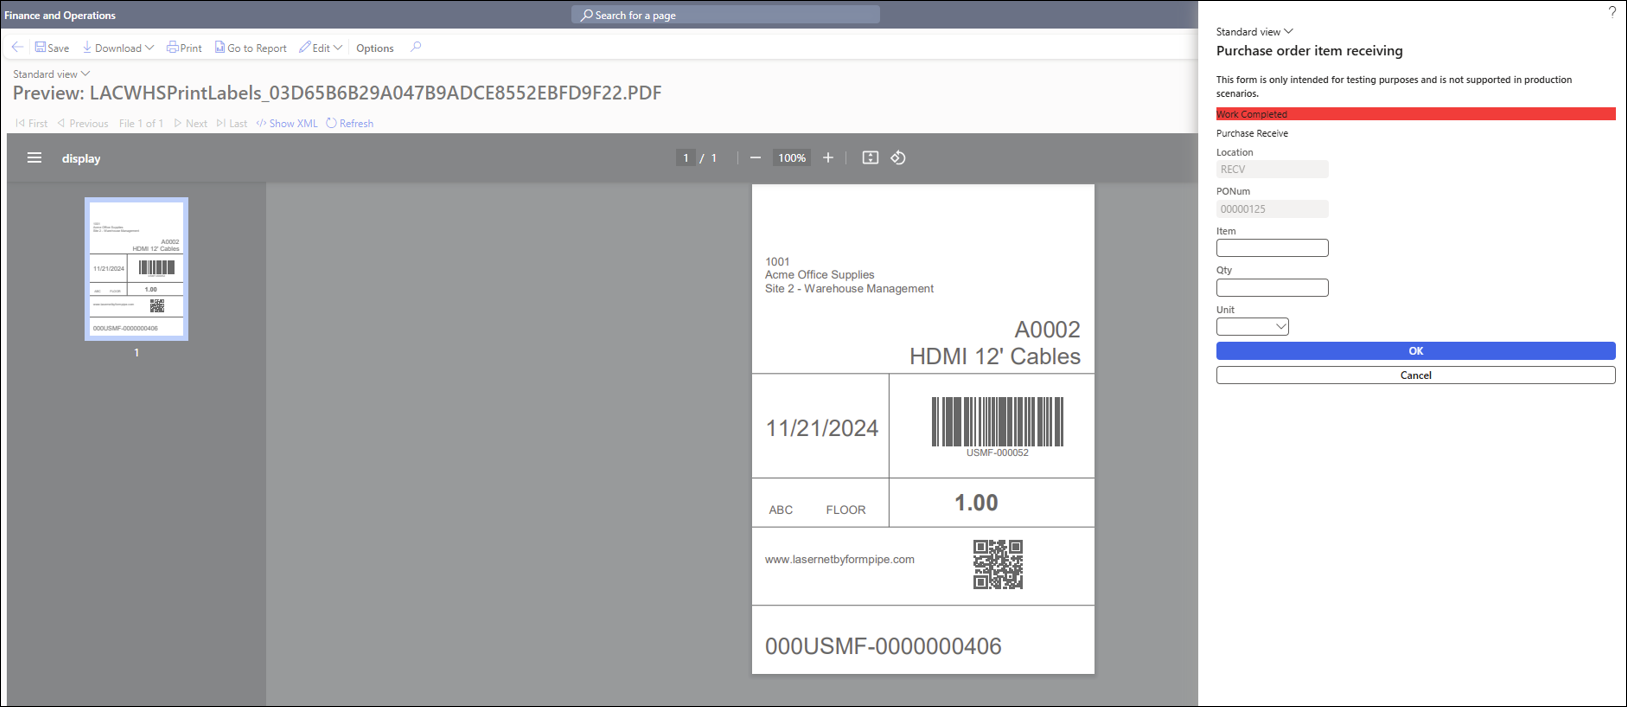
Enter a Qty, then click OK.

A message appears indicating that the work is completed. The Document routing was set up to use Lasernet Screen as the print destination. Therefore, the form design is also printed to the screen:
Re-Print Licence Plate Labels Using a Form Link
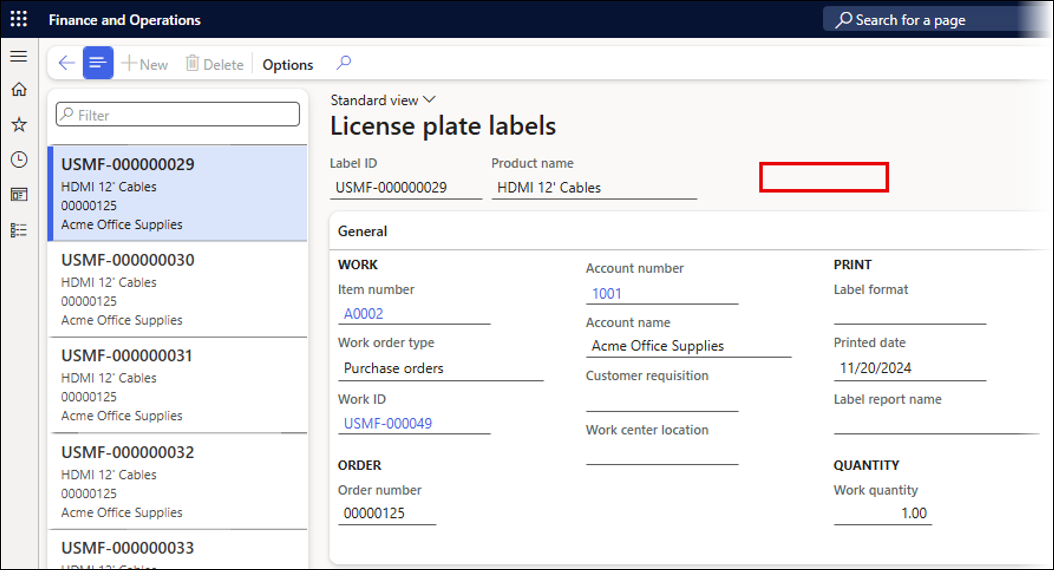
Licence Plate labels can be found by navigating to Warehouse management > Inquiries and reports > License plate labels.
By default, no Lasernet print button is available to re-print the Licence Plate label from this form. However, a Form link can be added to the LACWHSPrintLabels report to place a Lasernet print button in the area outlined in red:
Follow these steps to do so:
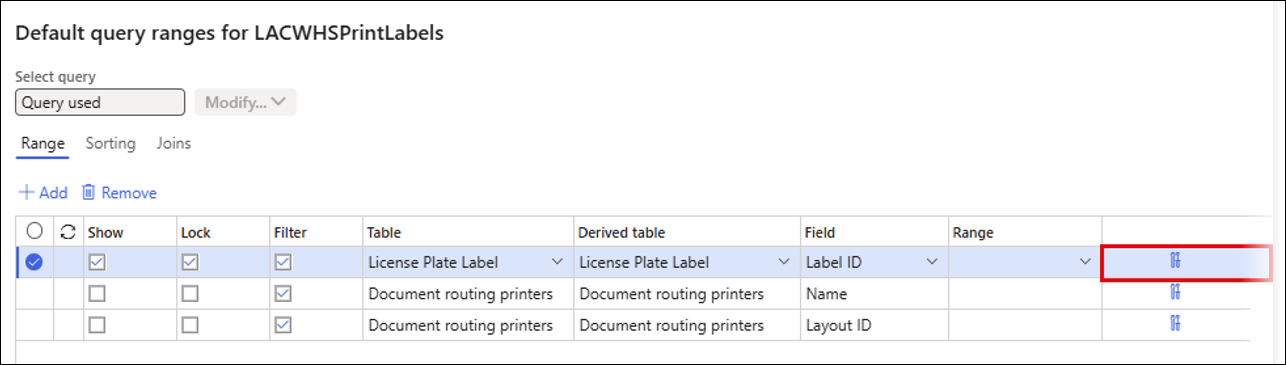
Navigate to Lasernet > Common > Reports, then select the LACWHSPrintLabels report and click Form links.
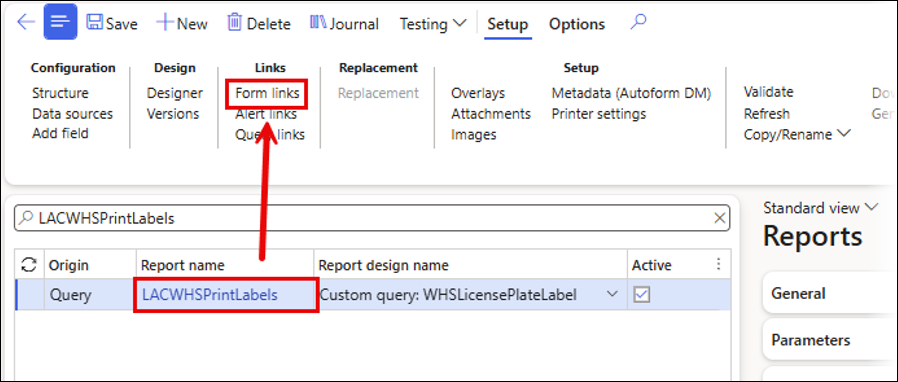
Create a Form link for the WHSLicensePlateLabel form with the following configuration:
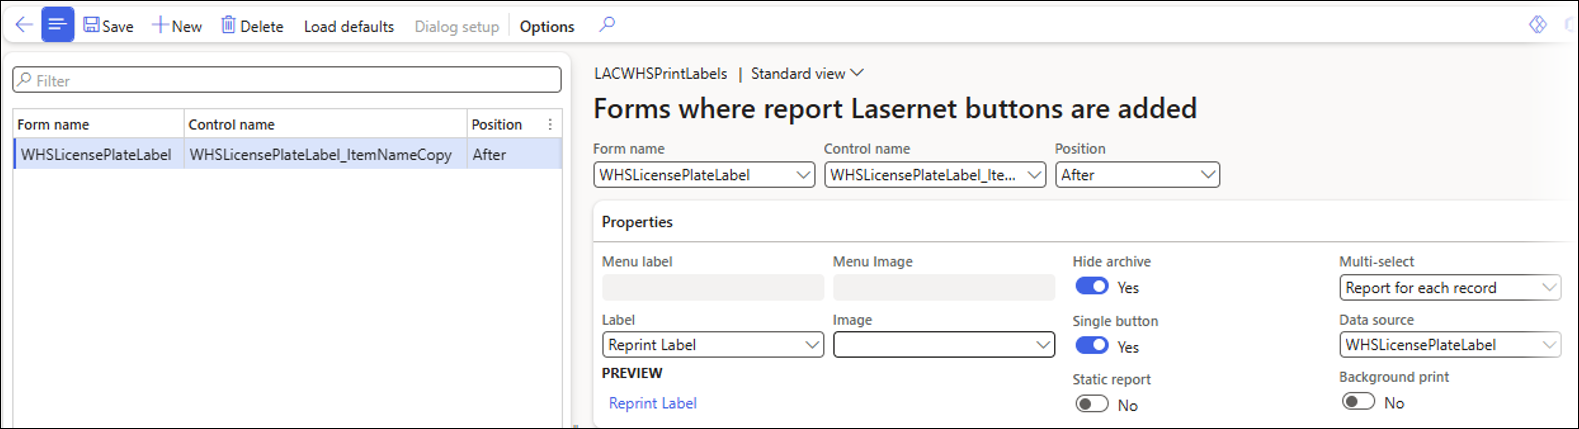
Click Save.
Click Dialog setup.
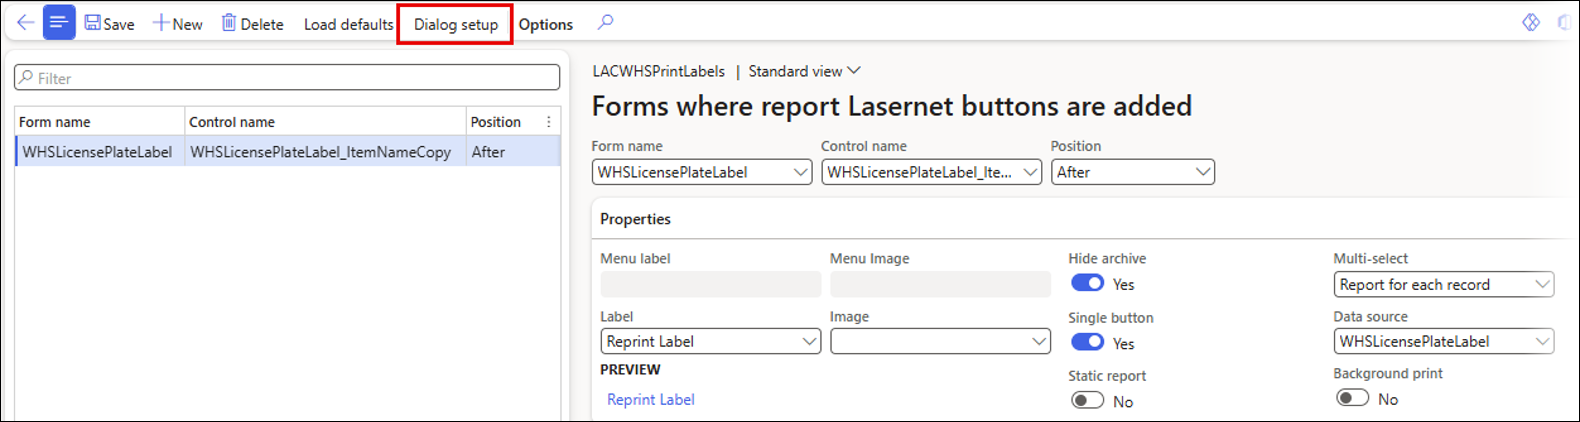
Click Default ranges.
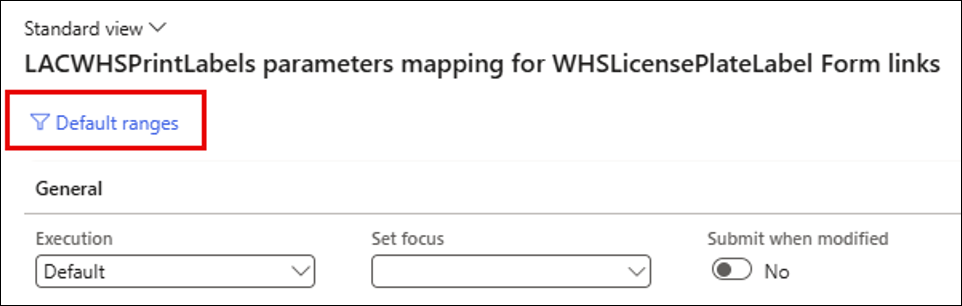
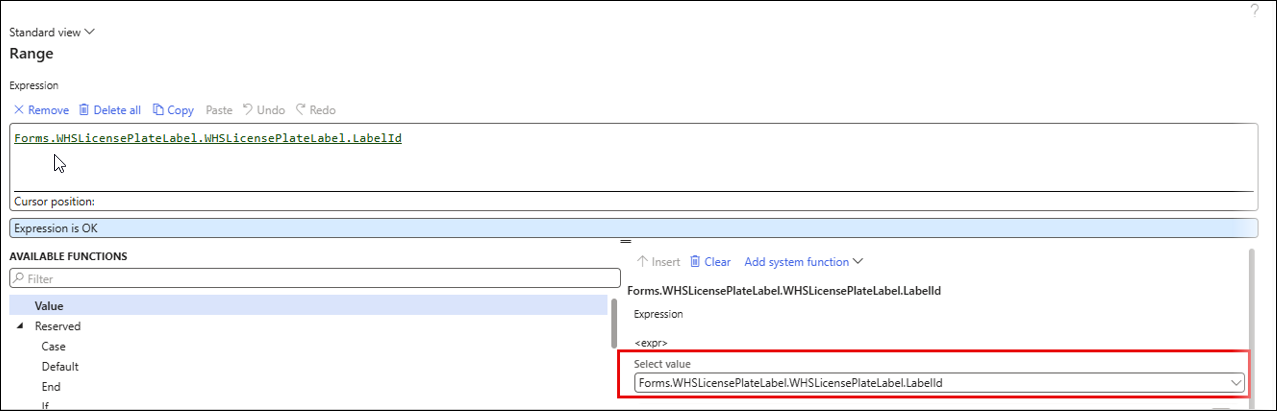
Click the Range expression button for the License ID field.
Select Forms, then the WHSLicensePlateLabel form, then the WHSLicensePlateLabel table, and finally click LabelId.
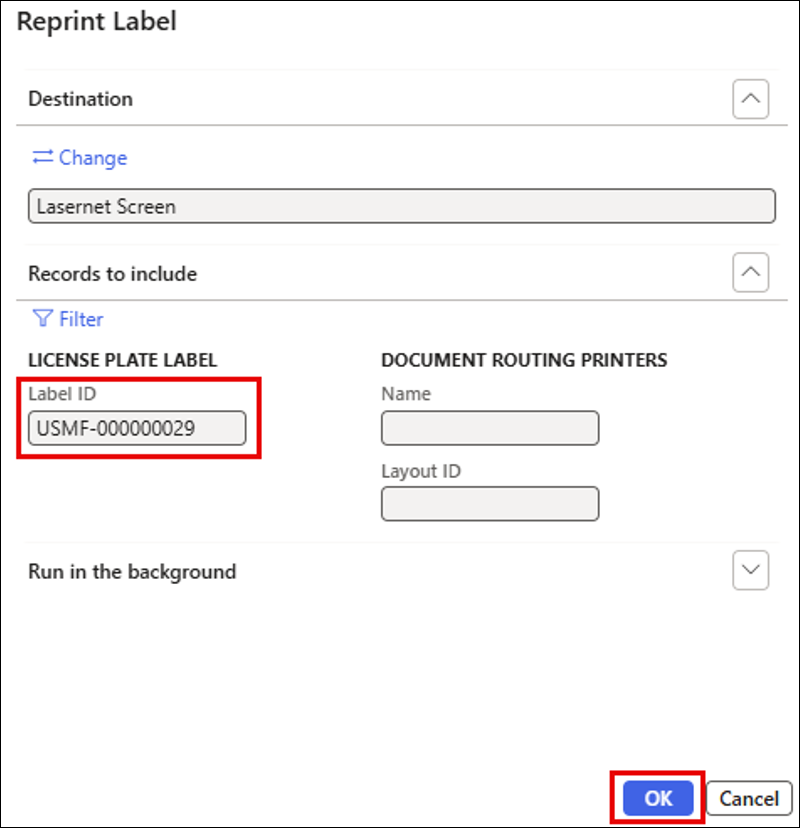
Navigate to Warehouse management > Inquiries and reports > License plate labels. Select a License Plate label and click the Reprint Label button.

Click Change to select a Lasernet print destination.
The Label ID filter has been pre-populated with the selected License Plate label from the list page. This feature was activated by the Default range in the Form link, which was set up earlier.
Click OK to print the Lasernet version of the Licence Plate label.
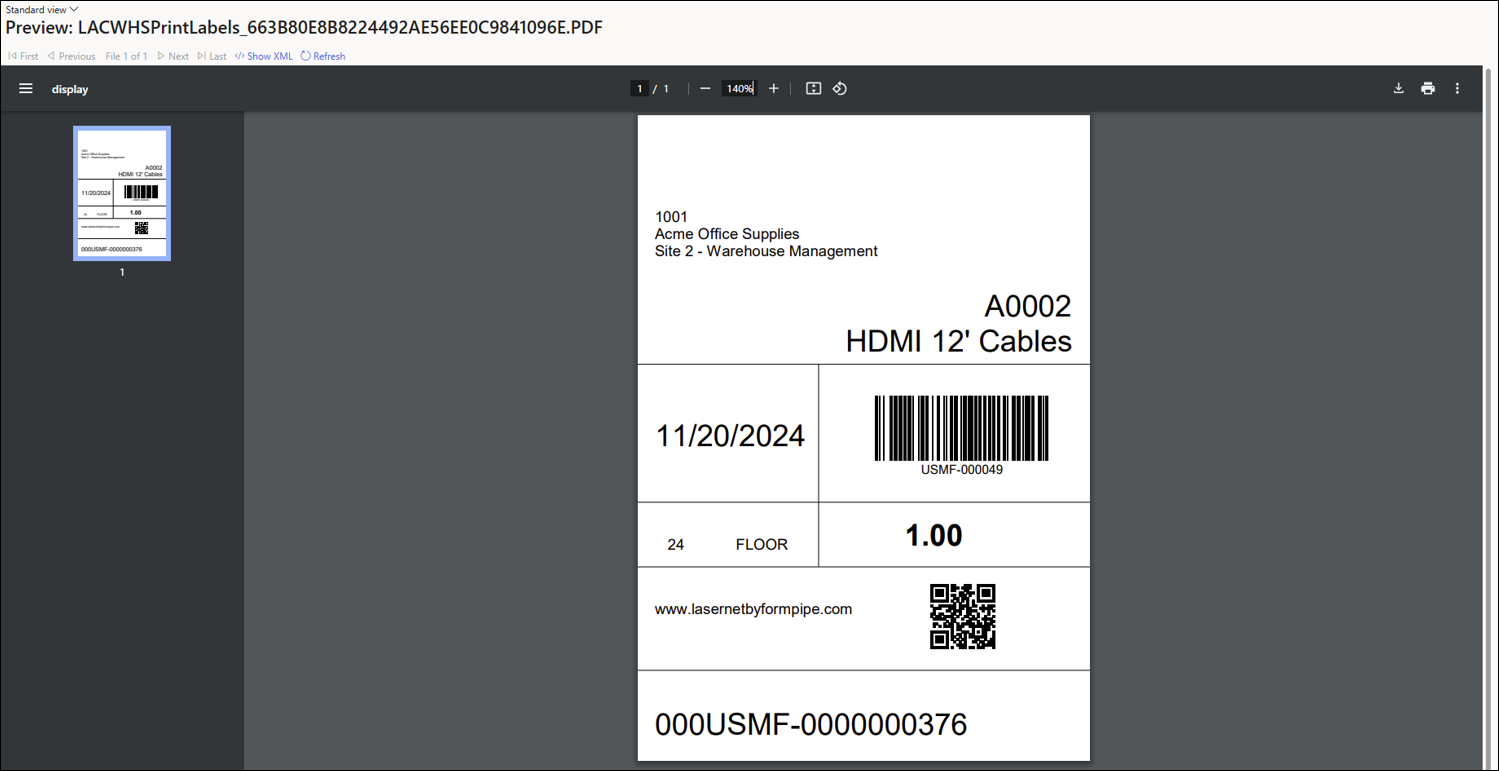
The following is the Licence Plate label when printed to Lasernet Screen:
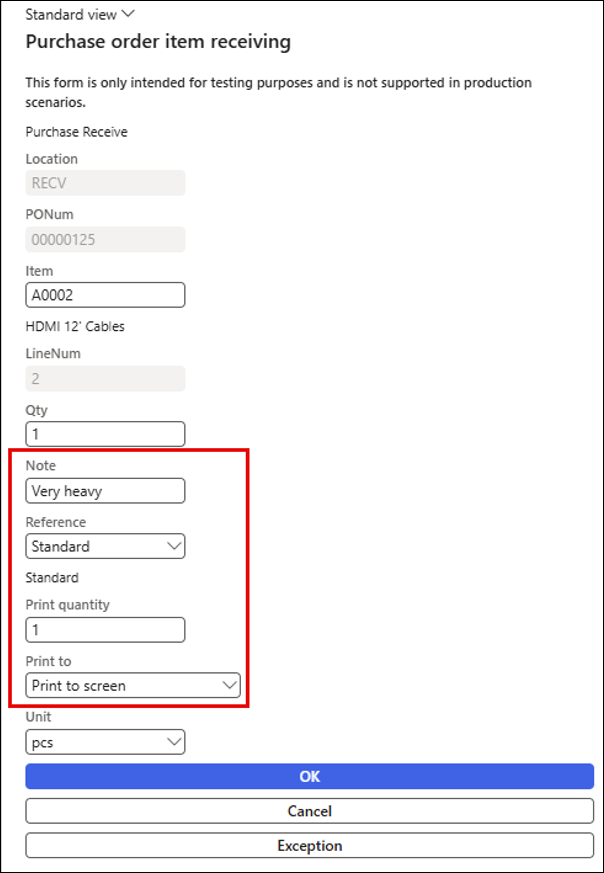
Add Fields to UI on Mobile App for End User
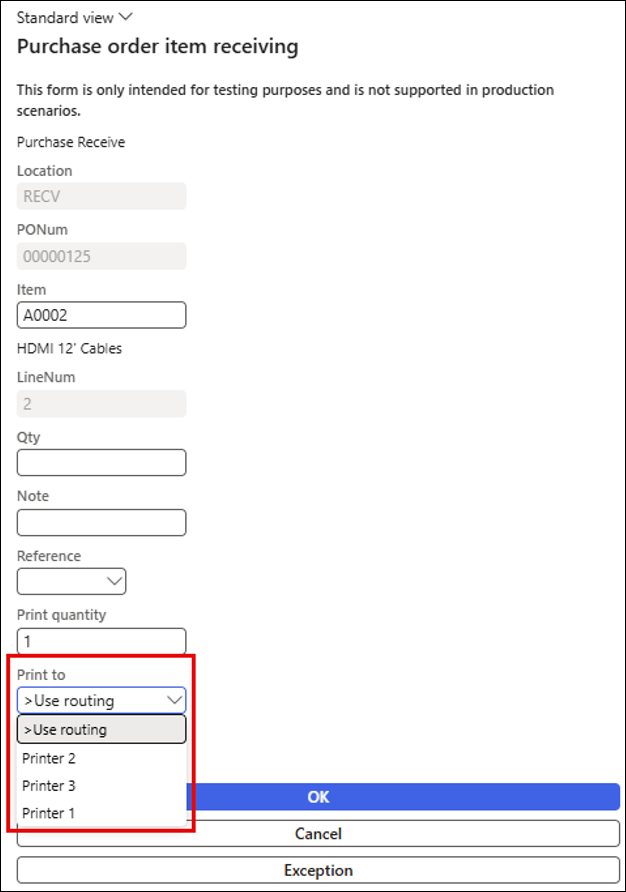
Additional fields can be added to the mobile app to enable end users to enter additional data in the XML file, which can then be used with Lasernet.
The following four fields can be added to the UI:
Reference
Note
Print quantity
Print to (destination)
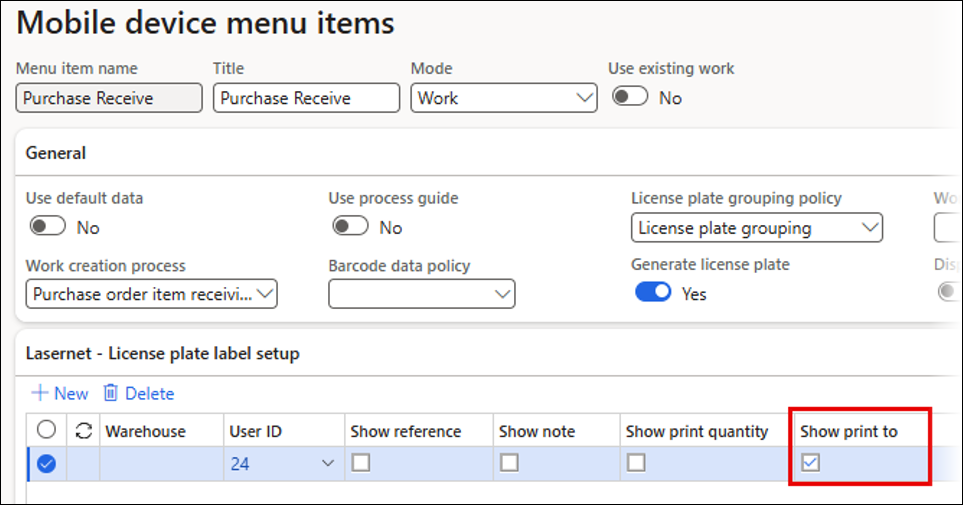
The fields can be added to the mobile app by navigating to Warehouse management > Setup > Mobile device > Mobile device menu items. Select the Menu item for the additional fields, then expand the Lasernet – License plate label setup FastTab.
The following four fields (Show reference, Show note, Show print quantity, and Show Print to) can be used to activate the corresponding fields in the mobile app:
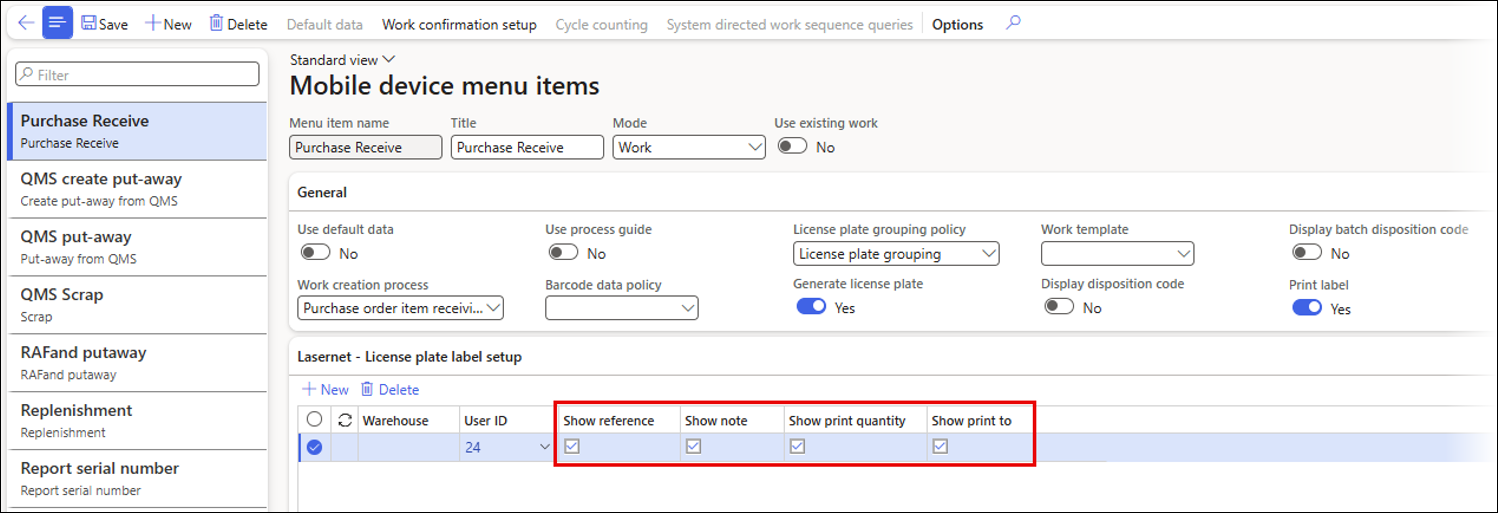
Restrictions can be placed on the Menu item to define when the fields should be displayed in the mobile app. The Warehouse and User fields can be used to define when the fields should be displayed. In this example, a restriction has been placed so that User 24 has access to the four additional fields in all warehouses.
Mobile app UI with the four additional fields:
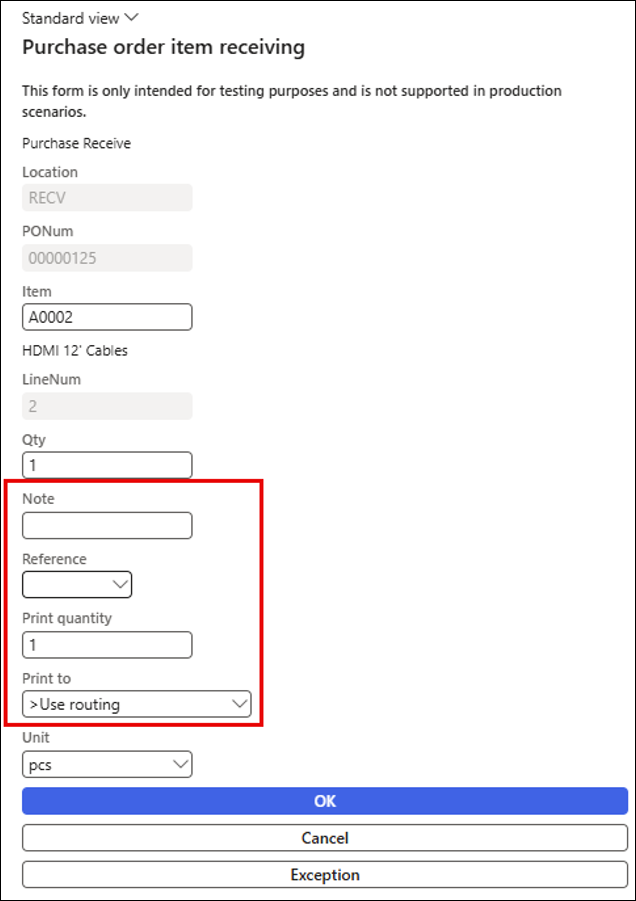
Show Reference
Reference is a dropdown list that enables an end user to select from a predefined list of options.
The predefined list of references can be set up by navigating to Lasernet > Setup > Label references.
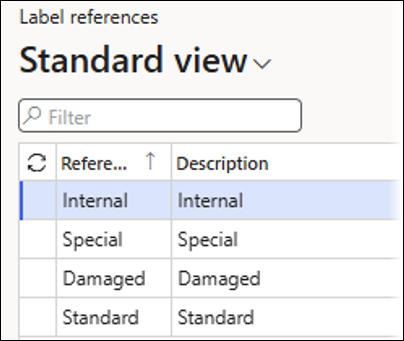
The following is the list of references as it appears in the Reference dropdown field on the mobile app:
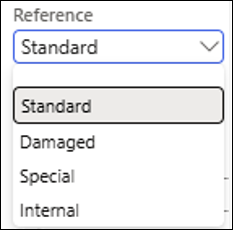
The selection will be added to the XML file for the Licence Plate label.
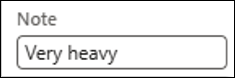
Show Note
Note is a free text field. The end user can type data into this field, which is then added to the XML file for the Licence Plate label.
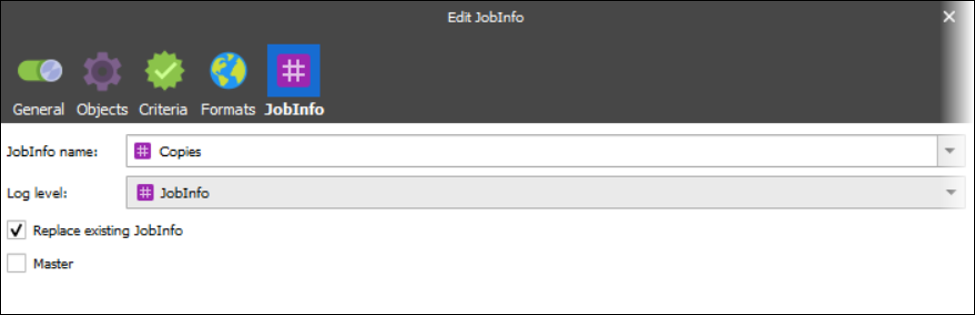
Show Print Quantity
The default value for Print quantity is 1, but it can be changed if necessary.
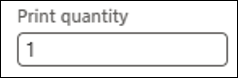
This is typically used to define the number of copies for the label by using this field as the Copies JobInfo in the Lasernet Developer:
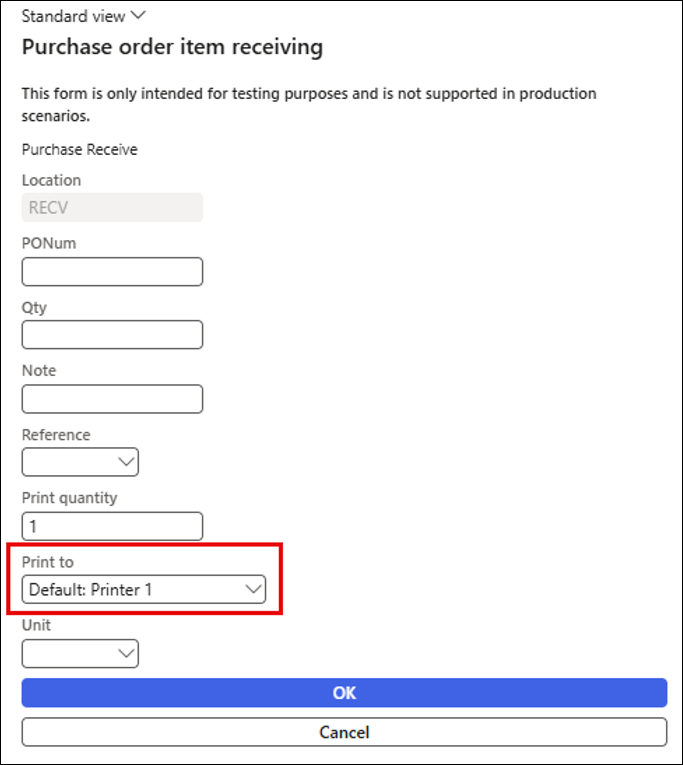
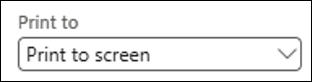
Show Print to
The Print to field is used with the Default printers functionality. For more information, refer to the Default printers section of this guide.
XML File
The following data has been added to the four additional fields:
The Note, Reference, and Print quantity fields can be seen in the XML file:

Note
The data in the Print to field is not displayed in the XML file as it serves another purpose, as outlined in the Default printers section of this guide.
Default Printers
Document routing is used as a predefined print destination for the end user. However, when printing from the Warehouse Mobile Device, it is possible to use the Default printers functionality to select a print destination as an alternative to the Document routing print destination.
Note
Default printers will not work if Document routing is not set up, even if the Document routing print destination is not used.
Note
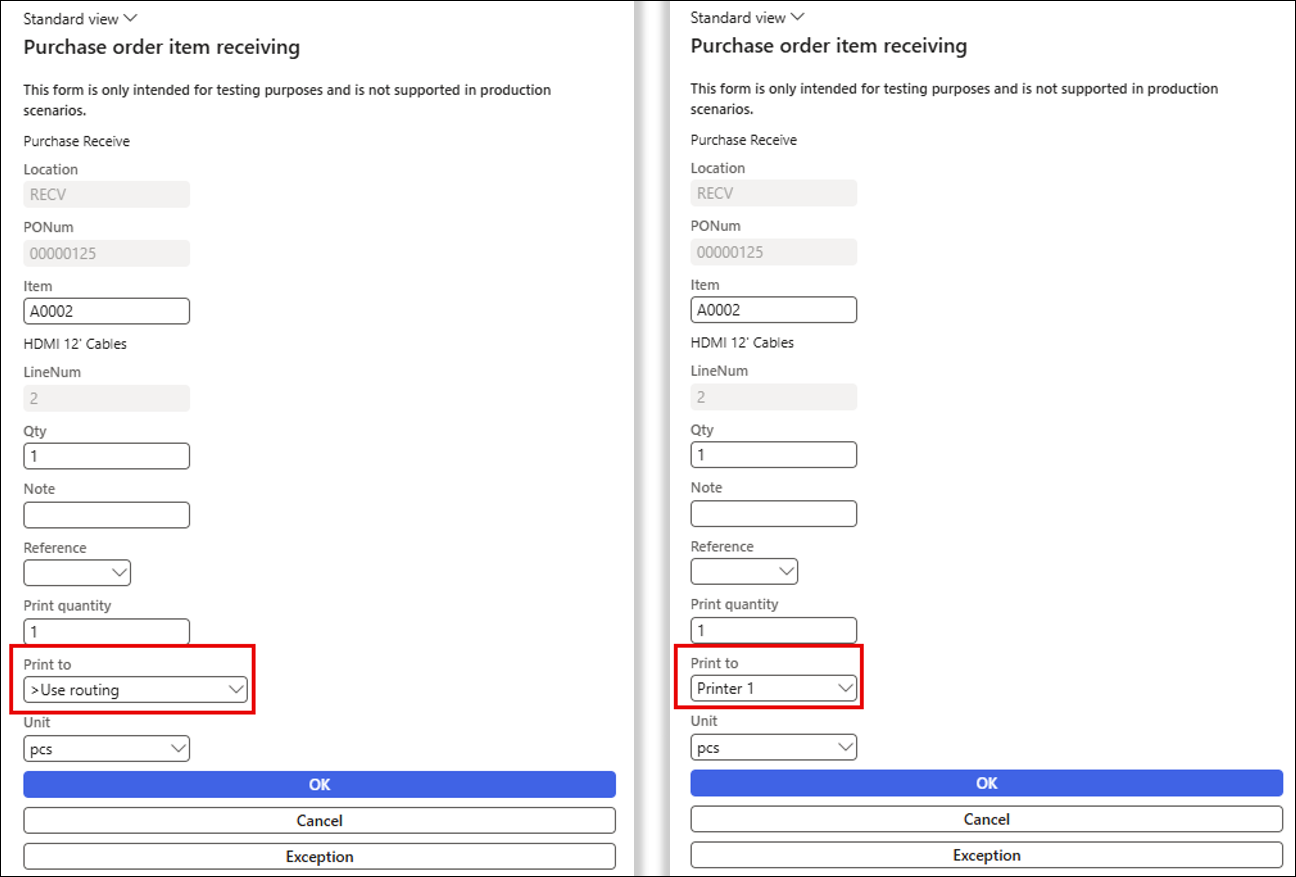
Each Document routing printer record will be replaced by the Default printer when this is selected by an end user. For example, three Document routing printers are set up here:
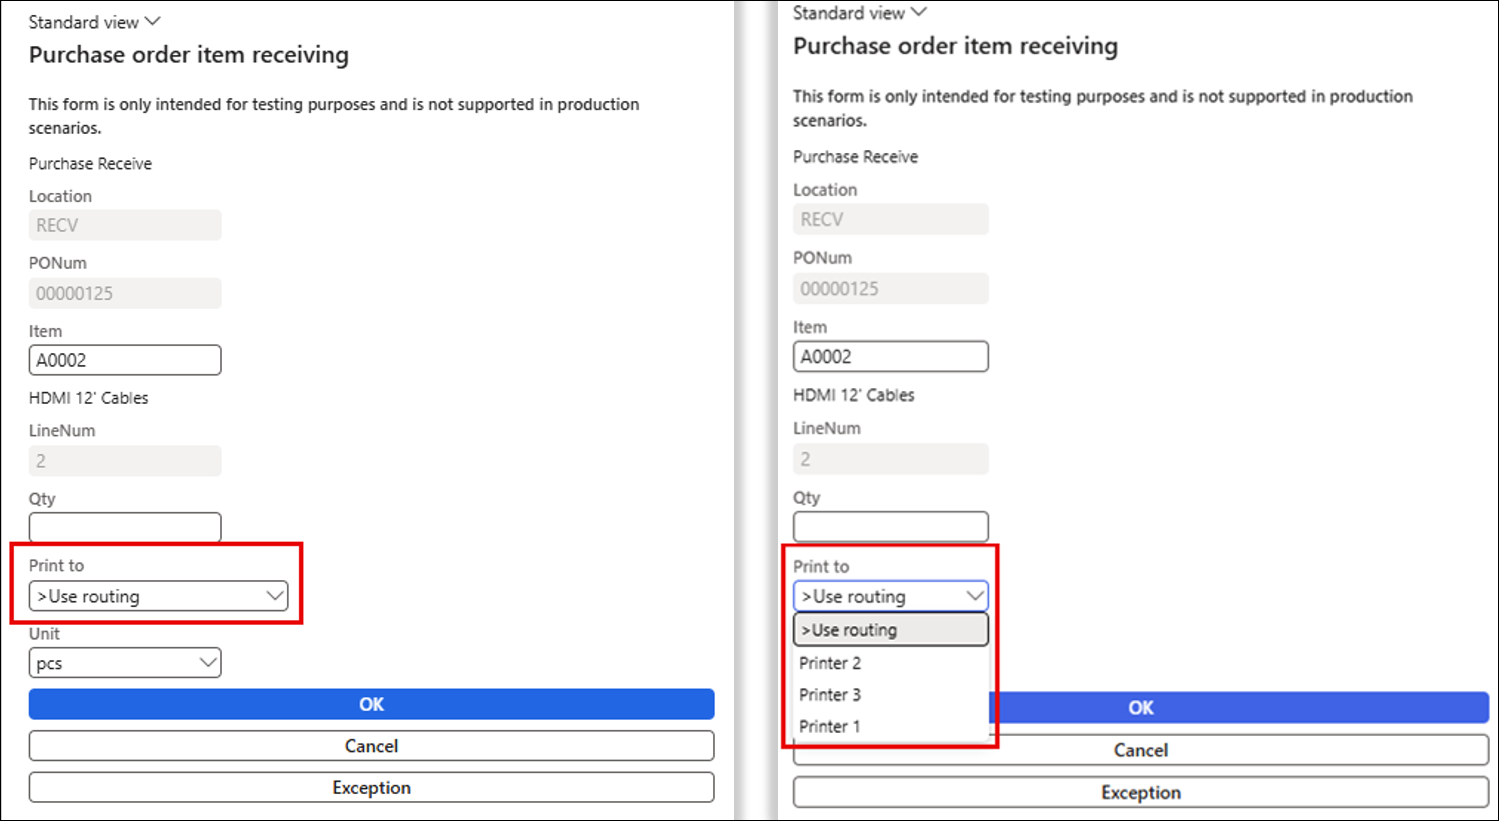
The mobile device user changes the Print to field from the default >Use routing option to Printer 1:
All three Document routing printers have been replaced with Printer 1:
Prerequisite for Selecting a Printer
The Print to field must be visible on the mobile app for a mobile app user to change the Document routing print destination.
Navigate to Warehouse management > Setup > Mobile device > Mobile device menu items.
Select a Menu item where the Print to field must be displayed.
Expand the Lasernet – License plate label setup FastTab.
Set the Show print toggle to Yes.
Use the Warehouse and User ID fields to restrict the Print to field to specific warehouses and users. In this example, the Print to field is visible in the Purchase Receive Menu item for User 24 in all warehouses.
Default Printers Form
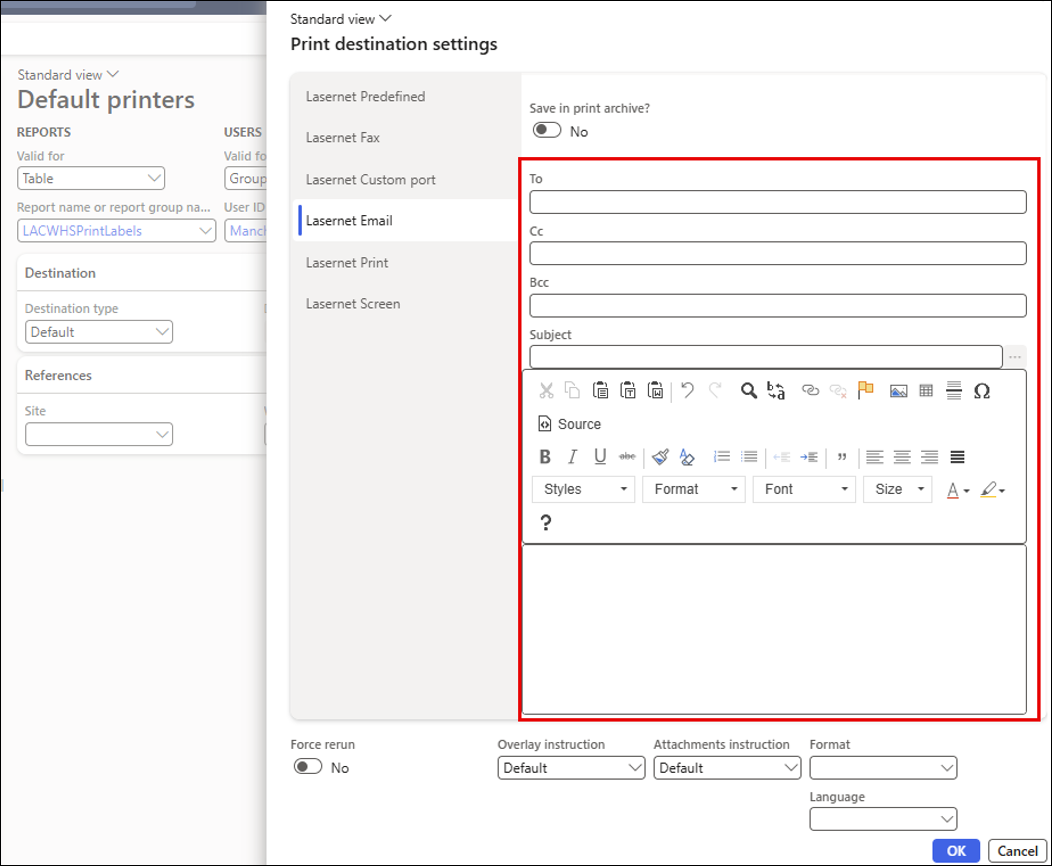
Default printers are set up by navigating to Lasernet > Setup > Defaults > Default printers.
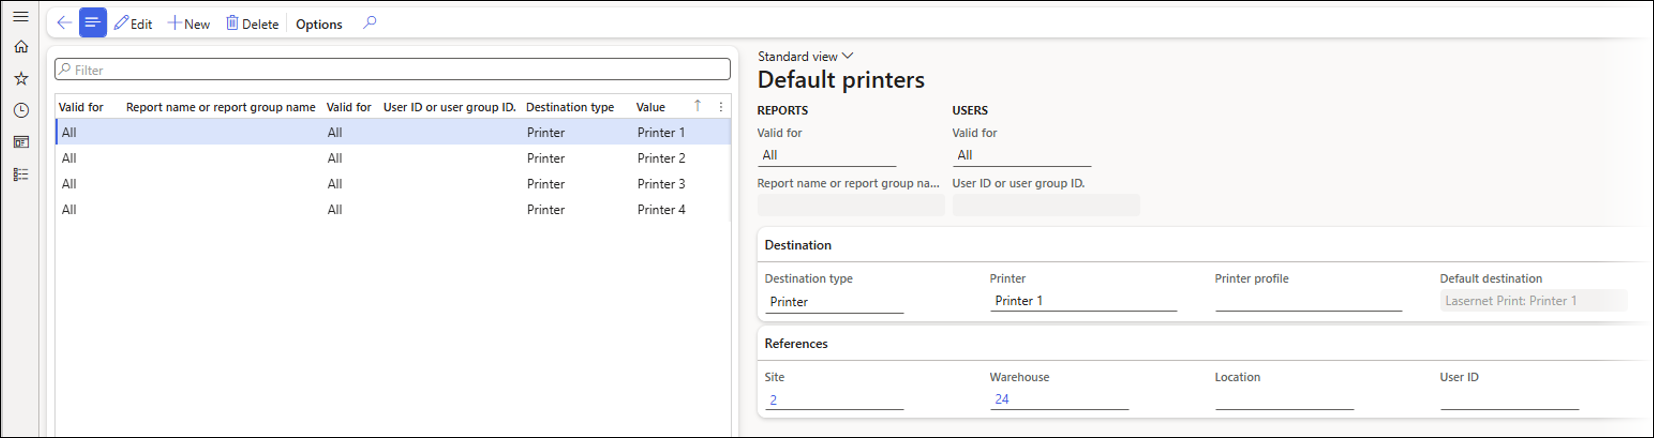
Header - Valid for
Default printers can be configured so that they can only be selected for specific reports/Report groups and for use by specific users/User groups. This is achieved by creating rules that define when each printer should be available.
Example: Four Default printers have been created:

The Admin user is in the Manchester User group but not the London User group.
The LACWHSPrintLabels report is used in this example scenario.
Therefore, the Admin user has the following Default printers to select from on the mobile device:
Printer 1
Printer 2
Printer 3
Destination FastTab
The fields in the Destination FastTab will change depending on the Destination type selected.
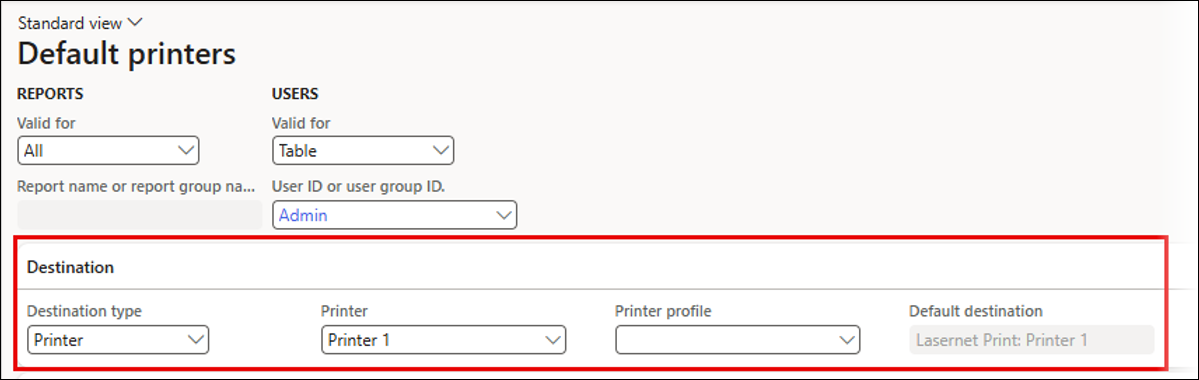
Destination type
The following print Destination types can be used as a Default printer:
Default
Lasernet predefined destinations can be used with the Default Destination type.
The Default field can be used to define the text displayed on the mobile device for the end user.
Note
The Default field is read-only when Default is selected as the Destination type. Therefore, you may need to change this field by selecting another Destination type such as Fax, entering the value, then changing the Destination type back to Default.
The Lasernet Predefined destination can be selected from the Default destination field.

Lasernet Email can also be used as a print destination. If Lasernet Email is needed, it should be set up using the Default Destination type, not the Email Destination type.
Select the Default destination dropdown to change the print destination.

Enter the details for the email destination here:
Printer
The Print Destination type is used to send a label to a printer.
Select a Printer and Printer profile, if applicable.

Email
Use the Default Destination type instead of the Email option.
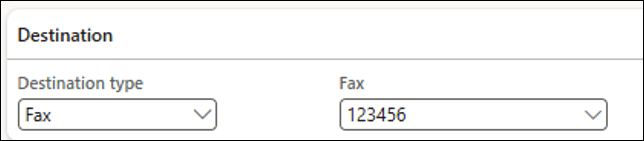
Fax
The Fax Destination type is used to send a label by fax.
Enter the Fax number in the Fax field.
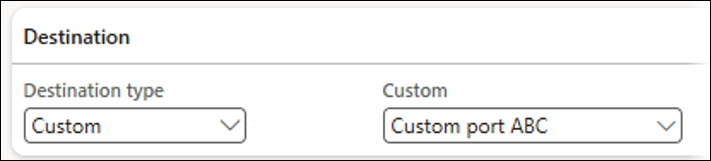
Custom
The Custom Destination type is used with the Custom ports functionality.
Select the Custom port from the dropdown list on the Custom field.
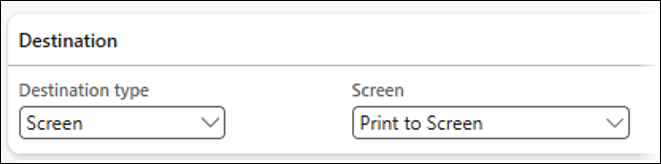
Screen
The Screen Destination type is used to print to the screen.
Use the Screen field to define the text that will be displayed for an end user on the mobile device.
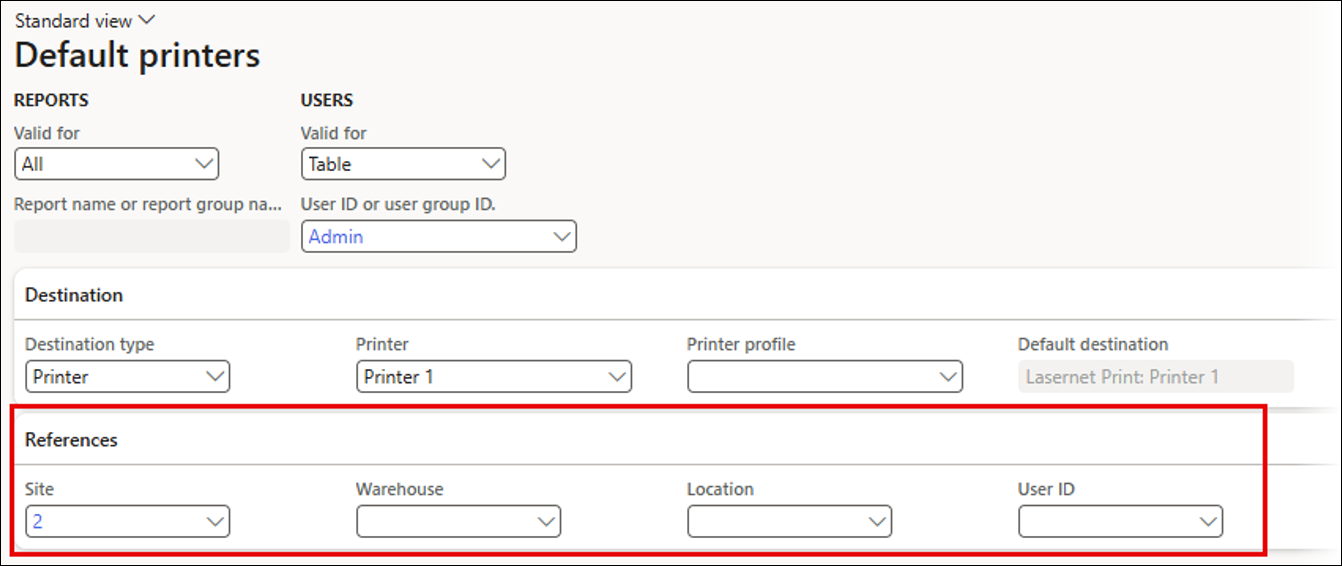
References FastTab
The fields within the References FastTab can be used to define when a printer should be available for selection.
For example, Printer 1 has been set up to only be available for selection for Site 2.
If the field is left blank, it is not restricted. In this example, the Warehouse field is blank; therefore, it will not affect whether this Default printer is available for selection.
Scenario: Using a Default Printer Instead of the Document Routing Print Destination
Follow these steps to use a Default Printer instead of the Document Routing print destination:
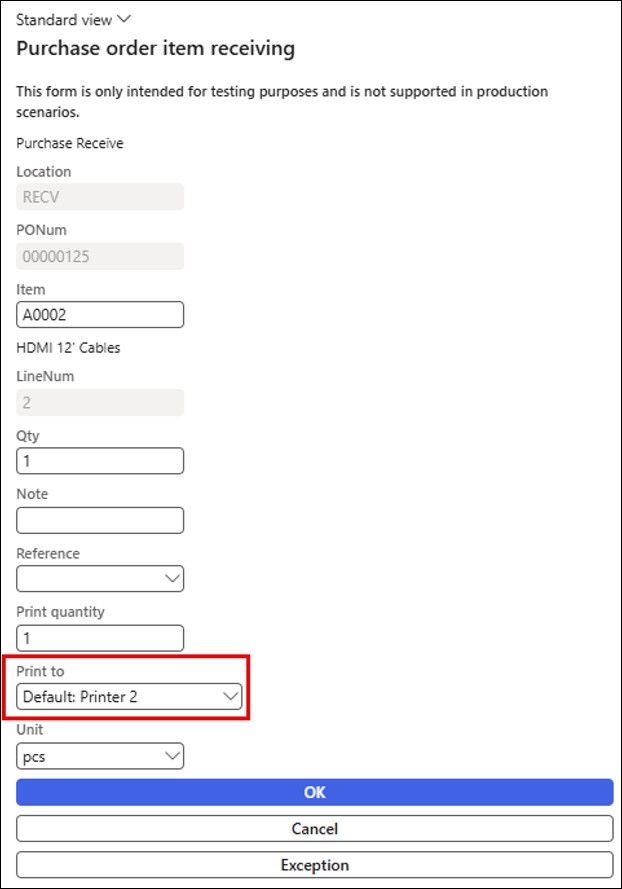
Log in to the Mobile device app emulator.
Select the Purchase Receive Menu item.
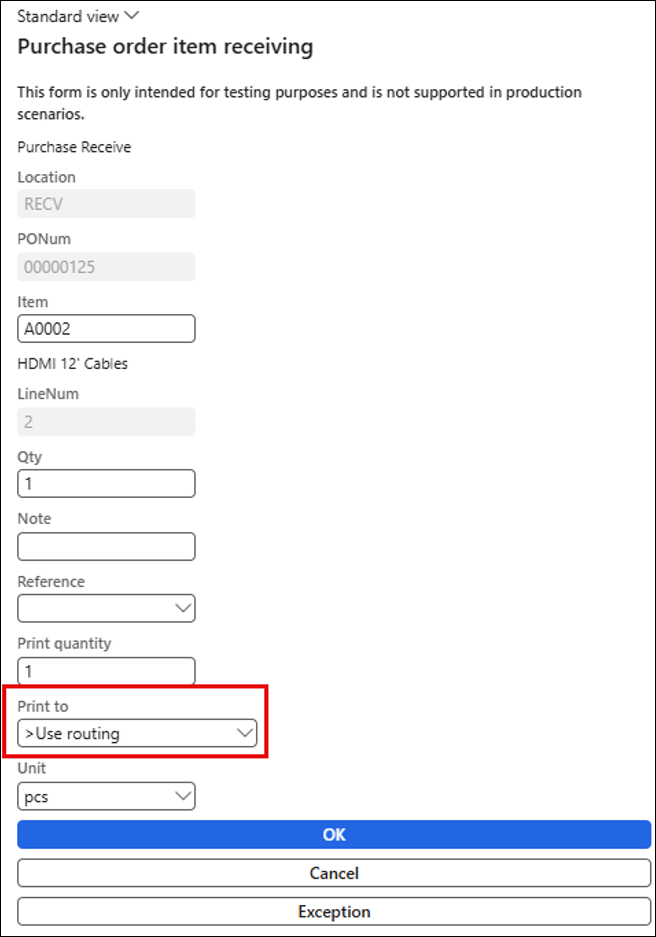
The Print to field can be used to select a Default printer as an alternative print destination to the Document routing print destination.
Override the Default Printer for a Mobile App User
Introduction
This section of the Warehouse Labels User Guide will demonstrate how to set a mobile app user's Default printer.
This requires some configuration within the Warehouse management module to change a user’s Default printer.
Default Printer - Before Changes
The >Use routing print destination is the default Print to destination in the mobile app.
Default Printer - Configuration Changes
The Default printer can be changed by following these steps:
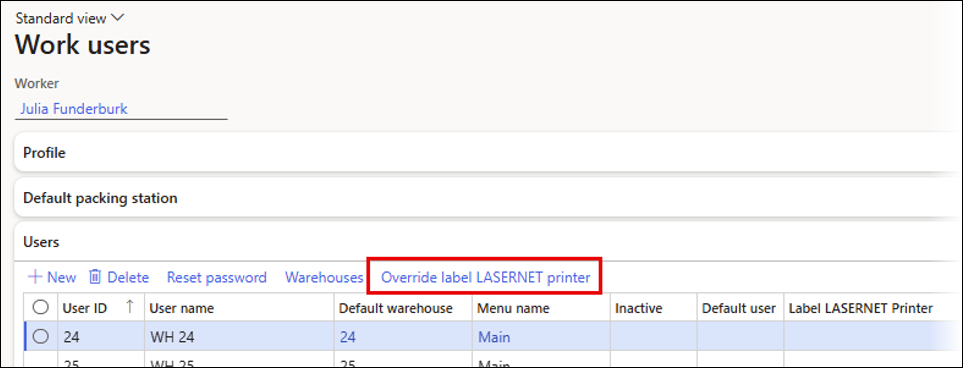
Navigate to Warehouse management > Setup > Worker.
Select a User ID.
In this example, the Label LASERNET Printer field is left blank for User ID 24, which means this user will have the >Use routing print destination as the default Print to destination. This can be changed by clicking Override label LASERNET printer.
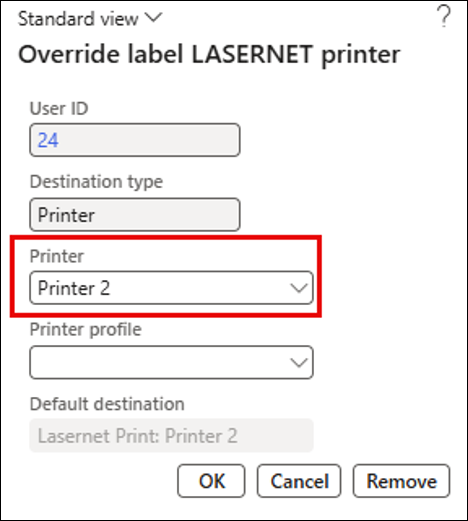
The Printer field is used to select a Default printer.
Printer 2 has been selected.
Click OK.
The Label LASERNET Printer field has now been updated with the selection:
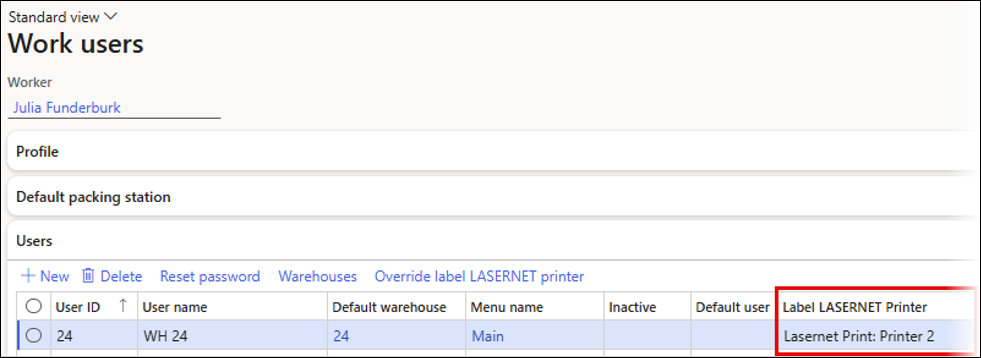
The Default printer is now Printer 2 instead of <Use routing for User ID 24.
Allow a Mobile App User to Change their Own Default Printer
Introduction
This section of the Warehouse Labels User Guide will demonstrate how a mobile app user can change their own Default printer.
This requires some configuration within the Warehouse management module.
Setup
Create a New Mobile Device Menu Item
Follow these steps:
Navigate to Warehouse management > Setup > Mobile device > Mobile device menu items.
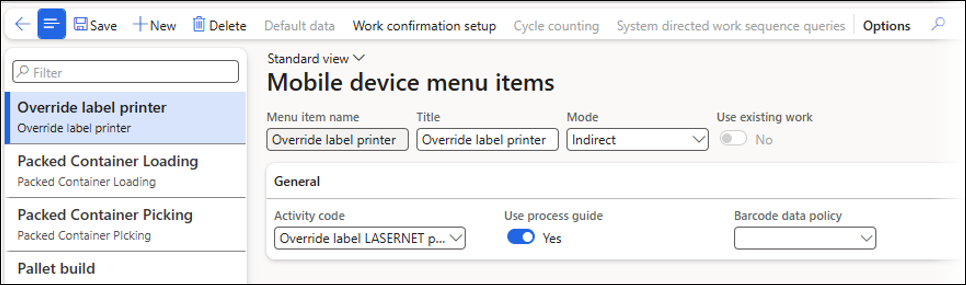
Create a new Menu item called Override label printer.
Select Override label LASERNET printer in the Activity code field.
Setup for Warehouse App Field Name
A Warehouse app field name must be configured to select the Default printer on the mobile app.
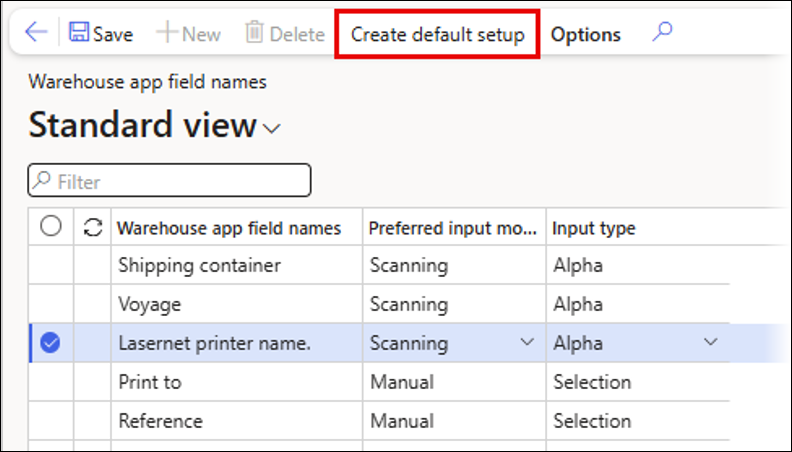
Navigate to Warehouse management > Setup > Mobile device > Warehouse app field names.
If Lasernet printer name. does not exist in the list, click Create default setup, which will automatically create the Lasernet printer name.
This Warehouse app field name can be configured for Scanning, where a mobile device user can use a barcode scanner to enter the printer name instead of manually typing it. In this guide, we will only demonstrate the scenario in which the printer name is typed in manually.
Add Mobile Device Menu Item to Mobile Device Menu
The Override label printer Mobile device Menu item must be added to a Menu before a mobile device user can select it.
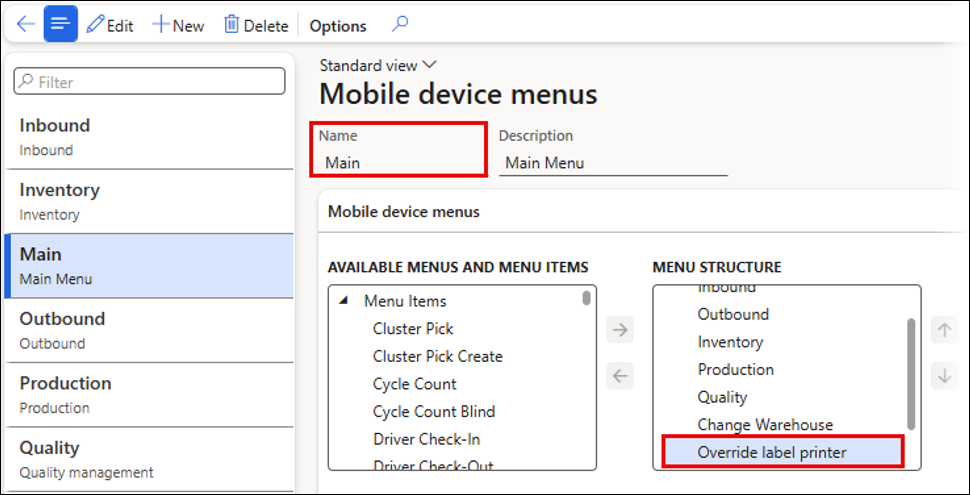
Navigate to Warehouse management > Setup > Mobile device > Mobile device menu.
Add the Override label printer Menu item to the Main menu.
Demonstration from the Mobile App User’s Perspective
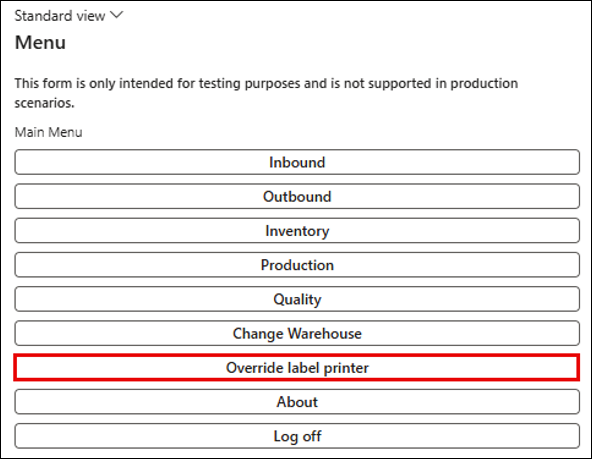
Log in to the mobile app.
Select the Override label printer from the Main Menu.
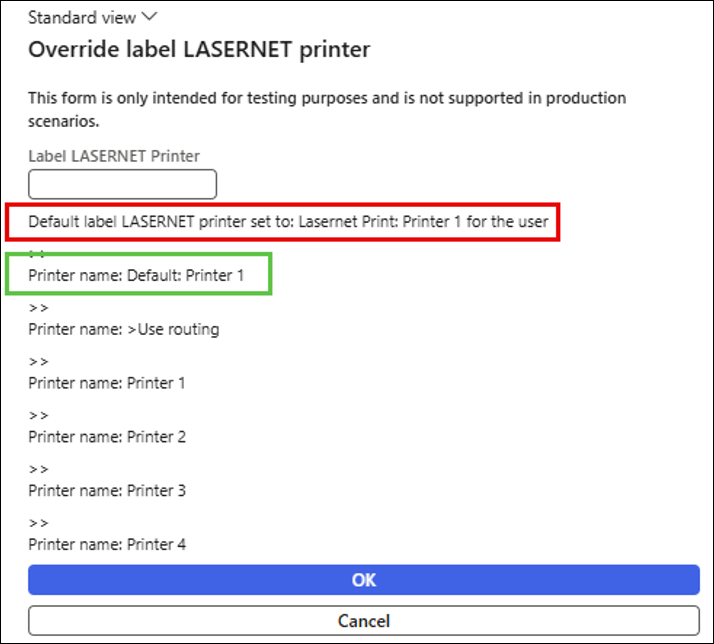
Enter the name of the printer that needs to be the new Default printer for this user.
Note
The list of Default printers can be viewed below the Label LASERNET Printer field. In this case, the mobile app user has four options: >Use routing, Printer 1, Printer 2, and Printer 3. Printer 4 is a Default printer but this is not available for User 24, as defined by the rules in the Default printers form, which is why that does not appear in the screenshot below. The text entered in the Label LASERNET Printer field is not case sensitive.
Click OK.

This form will not update if the printer does not exist in the list of Default printers. However, as Printer 1 does exist, a message is now displayed to show the new Default printer.
Outlined in red - The Default printer is now set to Printer 1 for this user. This text will no longer be displayed when exiting the Override label printer Menu item.
Outlined in green - The current Default printer for this mobile app user. This text will still be displayed when exiting the Override label printer Menu item.
The Default printer is now set to Printer 1, as shown in the Print to field: