Lasernet
- 14 May 2025
- 3 Minutes to read
- Contributors

- Print
- PDF
Lasernet
- Updated on 14 May 2025
- 3 Minutes to read
- Contributors
- Print
- PDF
Article summary
Did you find this summary helpful?
Thank you for your feedback
Lasernet Server
Follow these links to install the Lasernet application:
Hosted Customers
Install Lasernet - Hosted Customers
Self-hosted Customers
Install Lasernet - Self-hosted Customers
Lasernet Setup
The next step is to choose how the Lasernet Connector application in Business Central should communicate with the Lasernet server. You can choose between Azure technologies or File systems.
Within Business Central, open Lasernet Setup. You can use the search function.

Make the changes according to the following image. If you prefer another default language, select it from the list. Remember to enable the Archive option.
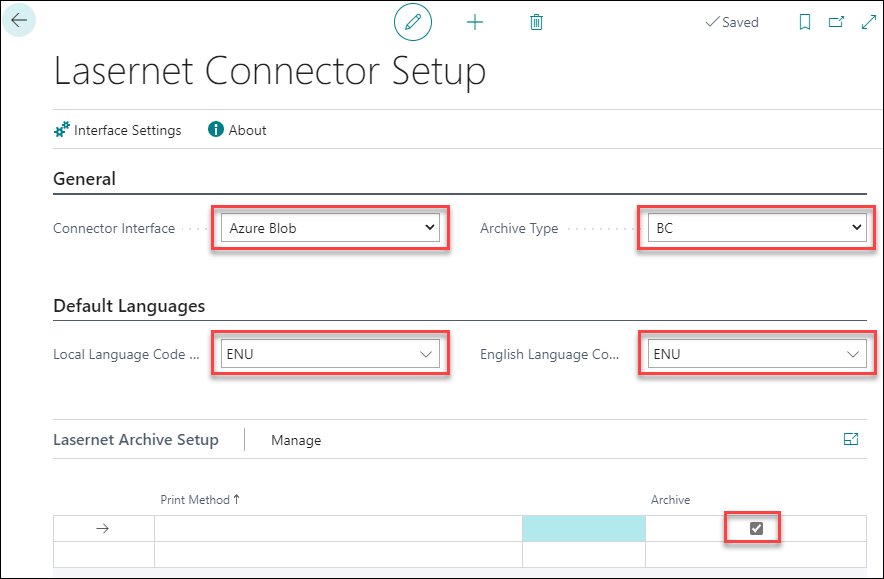
Click Interface Settings and type in the relevant information:
(45).png)
(36).png)
The fields on this FastTab are described in the following table:
FIELD | DESCRIPTION |
|---|---|
Connection String | A full string to access the current storage blob. |
Account Container | Choose a container for exported XML files. |
Connection String | A full string to access the current service bus. |
Queue Name | Choose the Queue name for the service bus. |
How to create Azure Blob Connection String
Click here to learn how to create an Azure Blob Connection String.
How to Create Azure Service Bus
Click here to learn how to create an Azure Service Bus.
If you cannot look up the Azure Service Bus Queue or Azure Storage Blob Container, read the following article:
How Do I Look Up Azure Service Bus Queue or Azure Storage Blob Container?
Connect Lasernet Server and Lasernet Connector
This section will guide you through connecting the Lasernet server with the Lasernet Connector for Dynamics 365 Business Central. By this time, you should have installed the Lasernet Connector and the Lasernet server. You should also have entered the information within Lasernet Setup in Business Central, which is needed here.
Log in to the server where Lasernet is installed and open Lasernet Developer. Log in with your user credentials.

Click Import configuration.

Choose the Lasernet configuration that you received in the software package and click Open.

Select Servers from the Tools menu.

Double-click the default server, and from the Instance drop-down list, select the instance that matches your server.

If you are using File system to communicate, skip this and go to step 12. Select the JobInfos tab and correct the two JobInfos so they match the Azure Storage settings that you entered within Business Central and in Lasernet Setup.
When done, click Ok to close the form.

Select Modules from the Tools menu, and double-click the Azure Service Bus input module.

Enter the Azure Service Bus Connection String and select the correct queue from the Entity Path drop-down list. Then, click Test Connection in the lower left corner.
When done, click Ok.

Select the Commands tab from the left-hand side menu and double-click Azureblob.

Copy the account key from the Azure Storage connection string, paste it into the Key field, and click Ok. You cannot test the connection because JobInfos are in use.

If you are using a File system, select Modules from the left menu and double-click the File Input module.

Select the Setup tab and change the Directory path. Click Ok to close the form.

Do the same on the File Output module. Both directory paths should match the input and output folder that you have entered with Business Central and Lasernet Setup.
Click Ok to close the form.

Click Commit from the top menu and give the commit a description. Then, click OK.


Click Deploy from the top menu and deploy the configuration.

For more information on the topic, watch our feature video.
Configure Lasernet Connector
Open Business Central and use the search icon to search Lasernet Document Management.

Open Report Setup.

On the top ribbon bar, click Update Report Setup. This will load all reports that are available with Lasernet.

Activate all the reports you want to use with Lasernet.
(29).png)
Open a Sales order.
In the top ribbon bar, click Print/Send and then Print Confirmation.

Ensure Preview is selected in Lasernet Option, and then click OK.

You should now have received a PDF - open it. If you have not received a PDF, double-check the connection between Lasernet BC Connector and the Lasernet server.
