How Do I Change the Color of Objects within a Lasernet Form?
- 06 Nov 2025
- 7 Minutes to read
- Contributors

- Print
- PDF
How Do I Change the Color of Objects within a Lasernet Form?
- Updated on 06 Nov 2025
- 7 Minutes to read
- Contributors
- Print
- PDF
Article summary
Did you find this summary helpful?
Thank you for your feedback
Lasernet has a number of different methods for changing the color of objects in the Forms Editor.
Default Colors in Lasernet
Lasernet uses five default colors: red, green, blue, white, and black. However, HEX color codes can be used to specify a greater range of colors. For example, a light orange using the hex code #fadda2.
Change the Font Color
The text color in rearranges and text boxes can be easily changed in the text box properties.
To change the text color, follow these steps:
Double-click the text to open the object properties window.
Click the Fonts tab.
Click the Color button. The Choose color window opens. You can use the following methods to select a color:
Click a color in the Basic colors area.
Click Pick Screen Color and then click the crosshairs anywhere (to use the color of that screen pixel).
Click a color in the color selection square and then drag the adjacent vertical bar to lighten or darken the color.
Use the Hue, Sat, and Val settings.
Use the Red, Green, and Blue settings.
Use the HTML box to specify a color hex code.
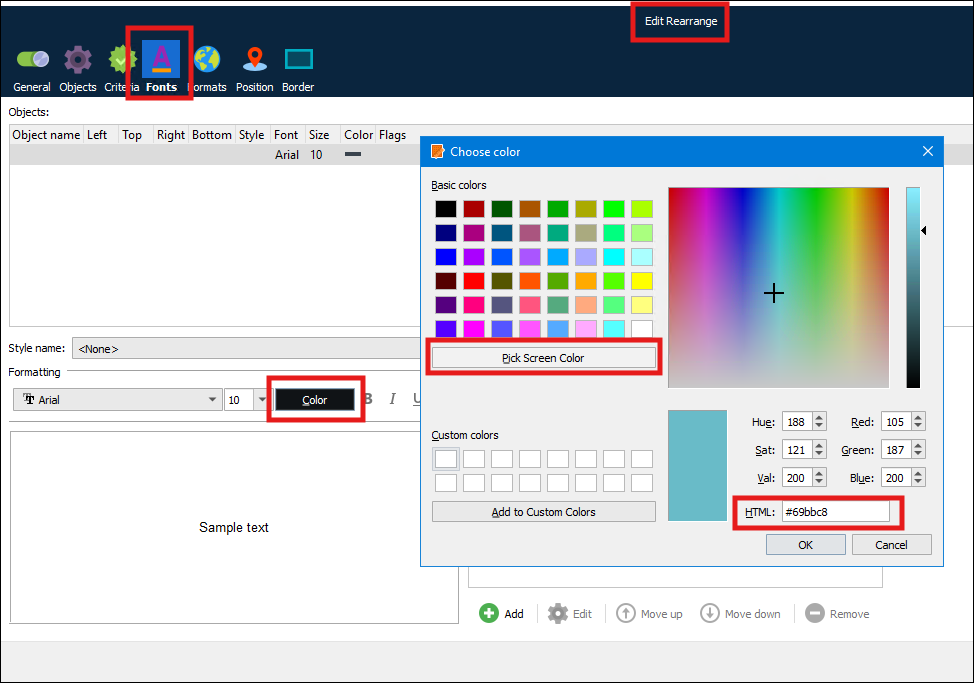
Tip
Enter a hex code for a basic color (#ff0000 for red, #00ff00 for green, or #0000ff for blue) into the HTML box, and then use the other controls in the window to alter the color to your requirements.
Tip
The Automatically Vary Text and Shape Colours on Each Sheet of a Form via Scripting method requires you to specify colors as hex codes. You can use the Choose color window to select the color you want to use, and then you can copy its hex code from the HTML box.
Add a Border, Background, or Both to Text
Within the Border tab, there are Border and Fill areas. To add a border, background, or both to text, follow these steps:
Click the Border tab.
In the Border area, you can select a Color and line Width for each side of the form object.
In the Fill area, you can select a background Color. You can also specify a Margin, which determines how far outside the form object’s box the fill color spreads.

Click Preview to check the effect of your changes. Click OK to apply them to the form object.
Change the Color of a Rearrange via Scripting
To change the color of a rearrange, follow these steps:
Double-click the rearrange, open the Objects tab, and enter an Input object name in the text box.
Select the Script checkbox to activate the text box in the bottom right-hand corner, where the script text can be written.

//To set the text colour (To use hex replace red with the hex code i.e. 0xFF0000 is red).
CurrentRearrange.color = red;
//To set the background colour.
CurrentOutputRearrange.backgroundColor = blue;
//To set the text box border colour.
CurrentOutputRearrange.borderColor = red;
Automatically Vary Text and Shape Colours on Each Sheet of a Form via Scripting
You can use scripting and Sheet Start modifier points to vary aspects of text and shape style (such as color) on every sheet of a form.
For example, your form might consist of three sheets that must have the same overall design but must each apply a specific color to their text and shape content. To achieve this, you can follow this process:
Create a master sheet, which contains the document design.
Create text styles and shape styles that apply specific styling to the text and shapes in the design.
Apply the master sheet to the three sheets that Lasernet will output, so that each sheet inherits the master sheet's design.
Create scripting functions that change the color that the text and shape styles apply. These functions take a color parameter and modify the styles to use that color.
Add scripting code (that calls the functions) to the Sheet Start modifier point for each sheet. Before it processes each sheet, Lasernet will run the functions that you created.
Follow the instructions in the following sections to complete this process.
1. Create a Master Sheet and Apply Styles to Text and Shapes
Follow these steps:
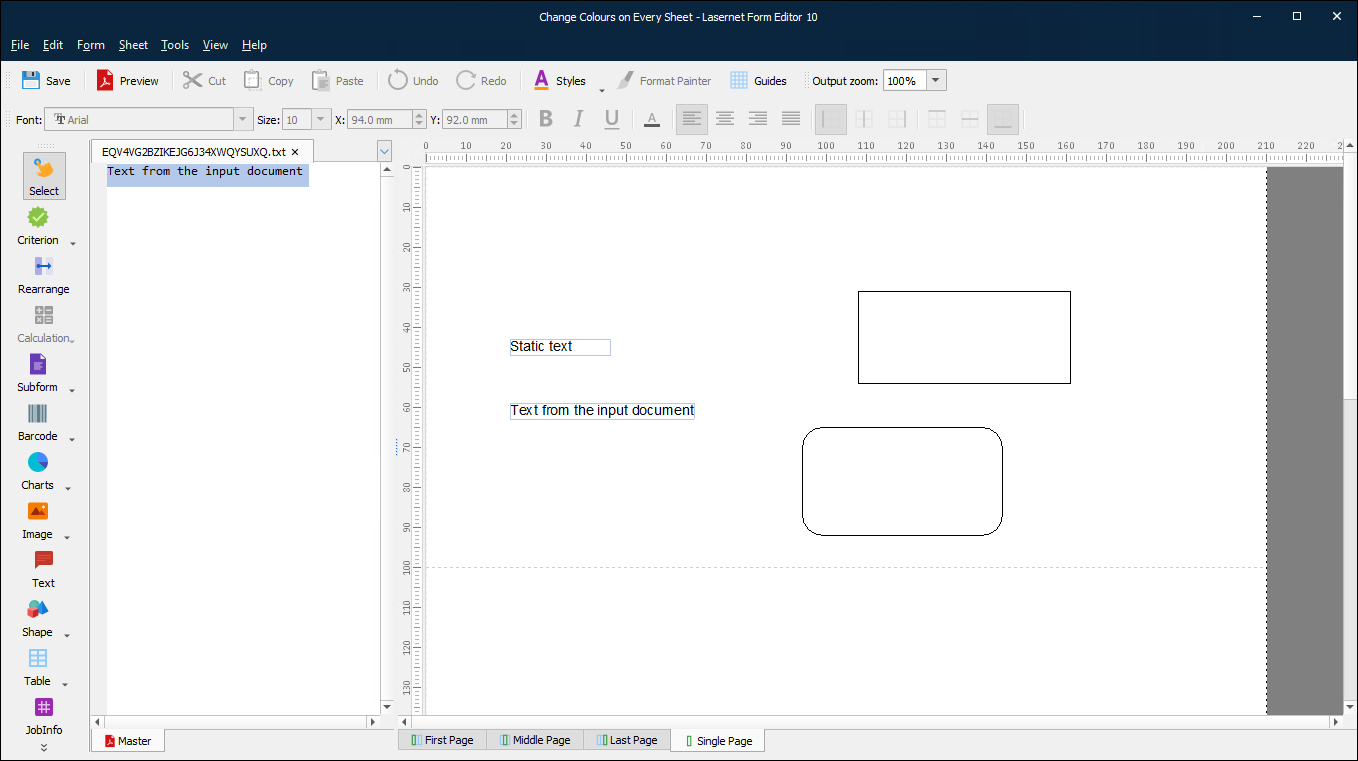
Create a form. The default sheet will be used as the master sheet. Change that sheet’s Name to Master.
On this sheet, create the form design that will be applied to the color-specific sheets. In the example below, the sheet design contains a text label, a rearrange (that uses text from the input document), a rectangle (whose border color will change), and a rounded rectangle (whose fill color will change).
2. Create and Then Apply Styles to Text and Shapes
Follow these steps:
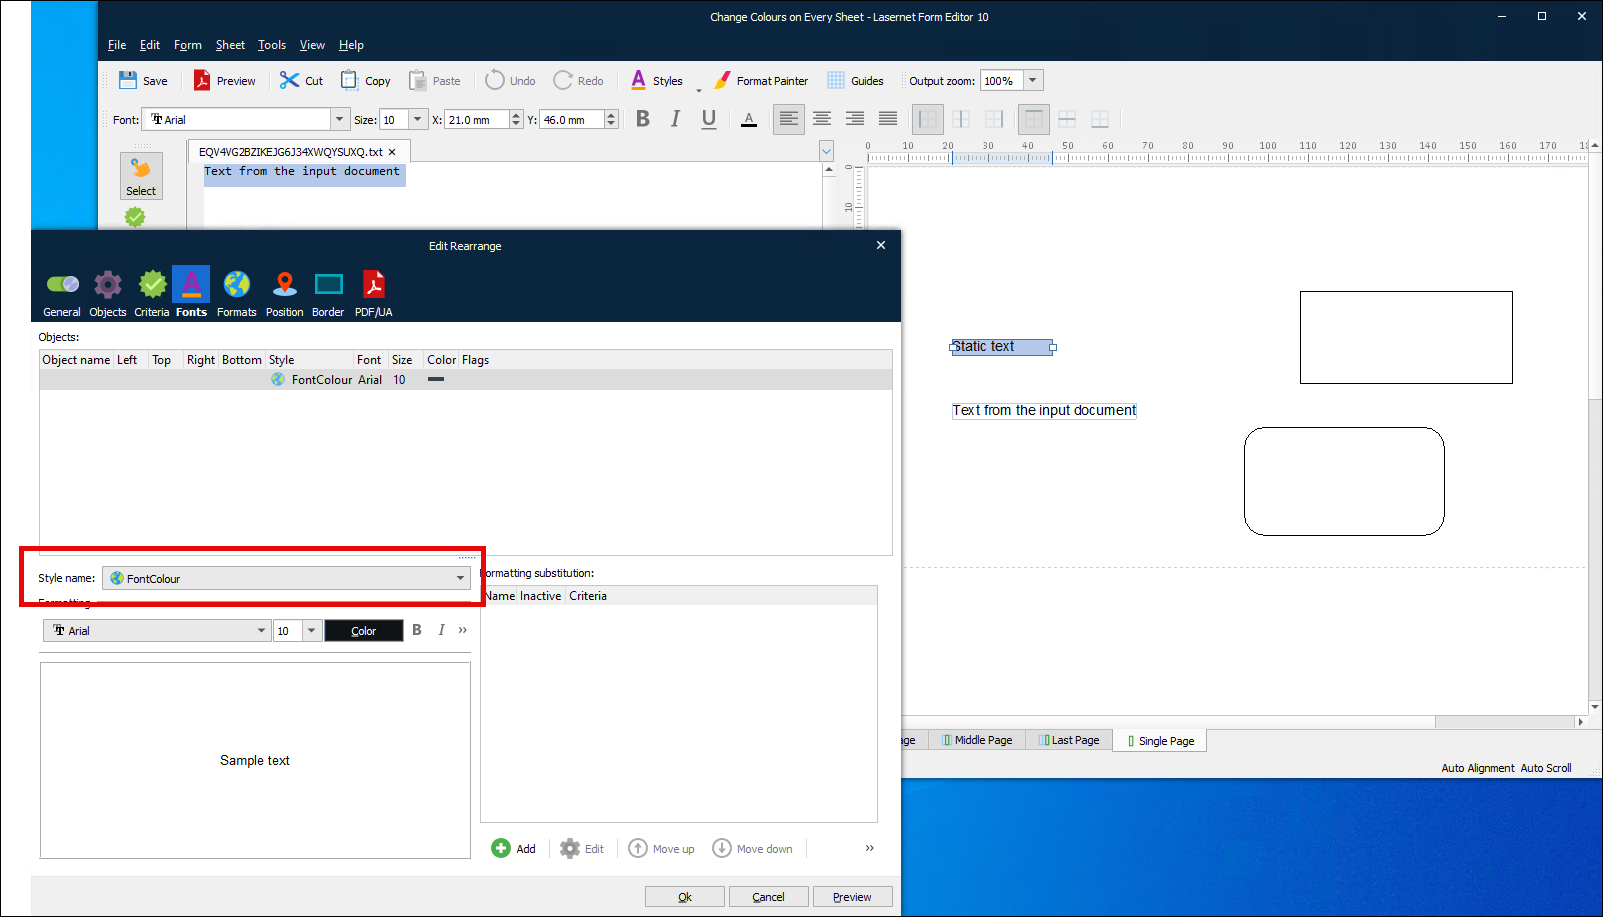
In the form design, click the text label.
In the Styles dropdown area, create a text style called FontColour to control the color of the text label and the rearrange. It is not important which color the style applies, because the script will change the text color on the other sheets.
.png)
Double-click the text label, and then in the Edit Rearrange window, select that text style from the Style name list on the Fonts tab. Click Ok.
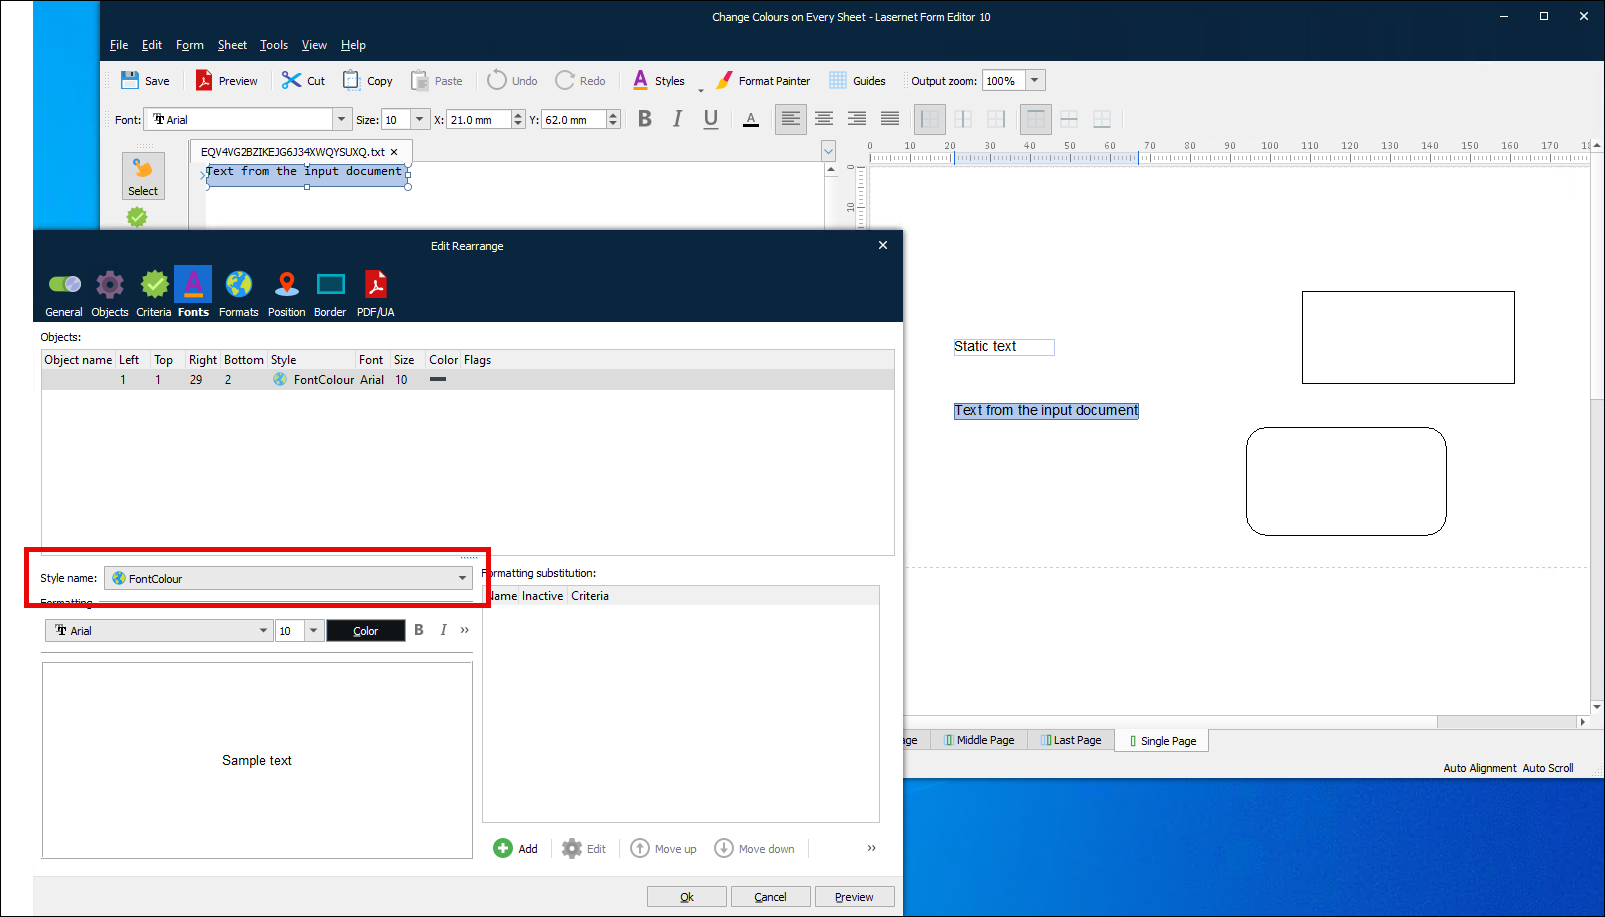
Double-click the input data rearrange and then apply the text style to it. Click Ok.
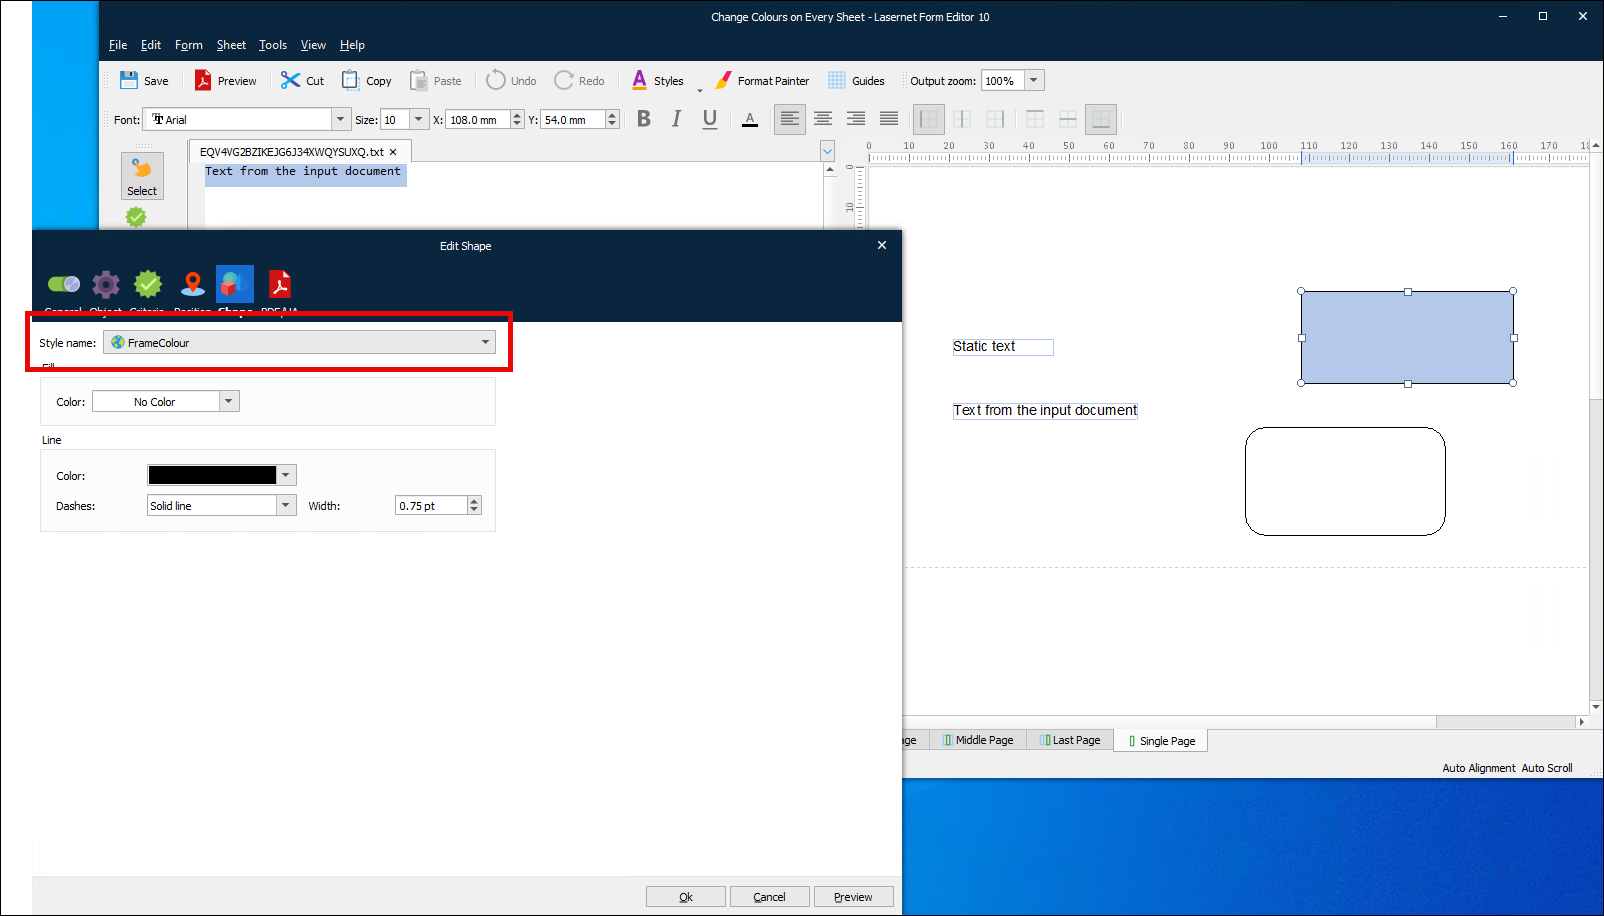
Click the rectangle. In the Styles dropdown area, create a shape style called FrameColour to control the border color of the rectangle.
.png)
Double-click the rectangle, and then in the Edit Shape window, select that shape style from the Style name list on the Shape tab. Click Ok.
Click the rounded rectangle. In the Styles dropdown area, create a shape style called ShadeColour to control the fill color of the rounded rectangle.
Double-click the rounded rectangle, and then in the Edit Shape window, select that shape style from the Style name list on the Shape tab. Click Ok.
3. Apply the Master Sheet to Other Sheets
Follow these steps:
Create the color-specific sheets that will generate output documents. In the following example, these sheets (see 1 in the image below) are named Red, Green, and Blue.
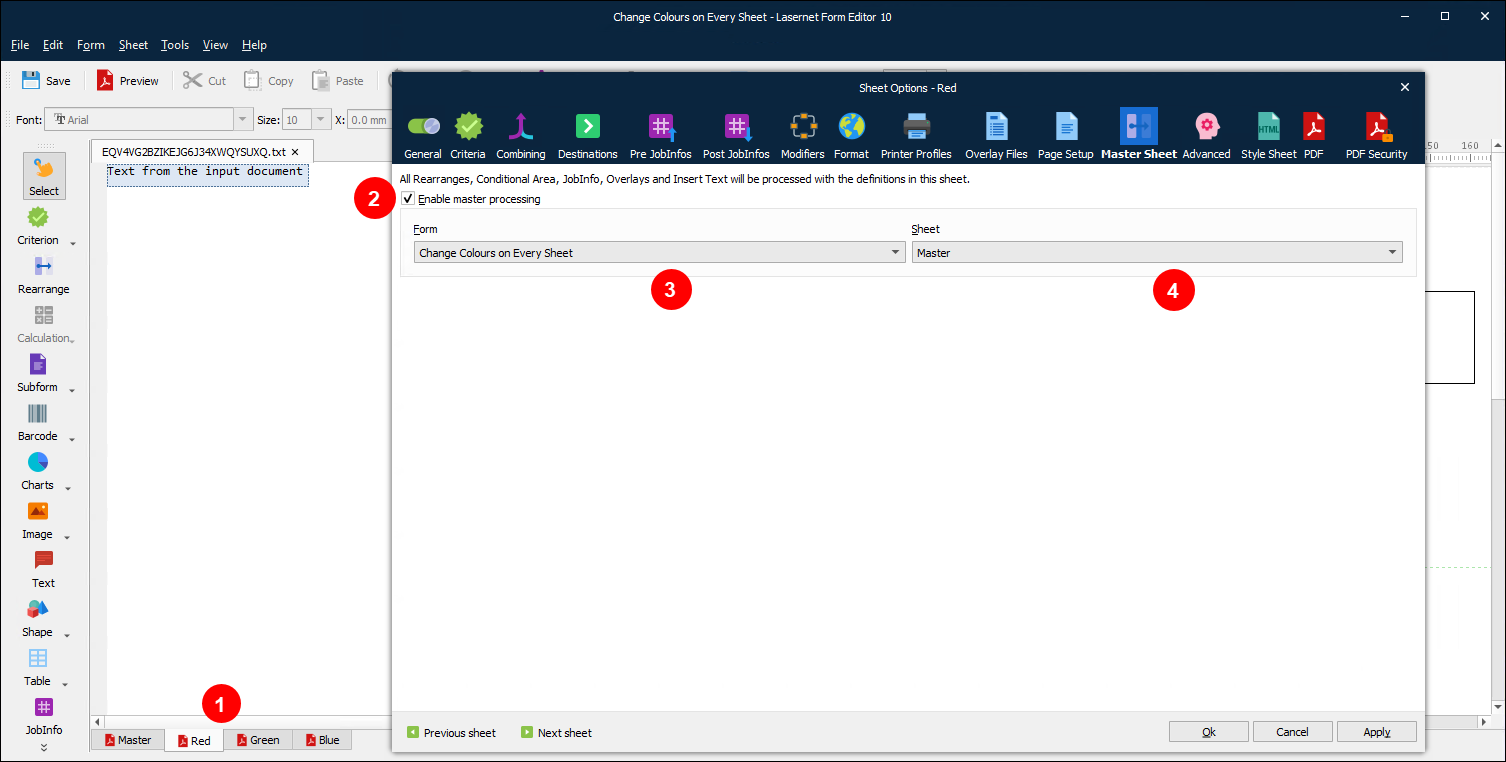
In the Sheet Options window for each sheet, click the Master Sheet tab.
Select Enable master processing (2).
Use the Form (3) and Sheet (4) lists to select the master sheet that you created.
Click Ok. The master sheet’s design is now applied to the sheet that you created.
Repeat steps 2 to 5 for the other sheets.
Save and then close the form.
4. Create a Scripting Function that Modifies Text and Shape Styles
Follow these steps:
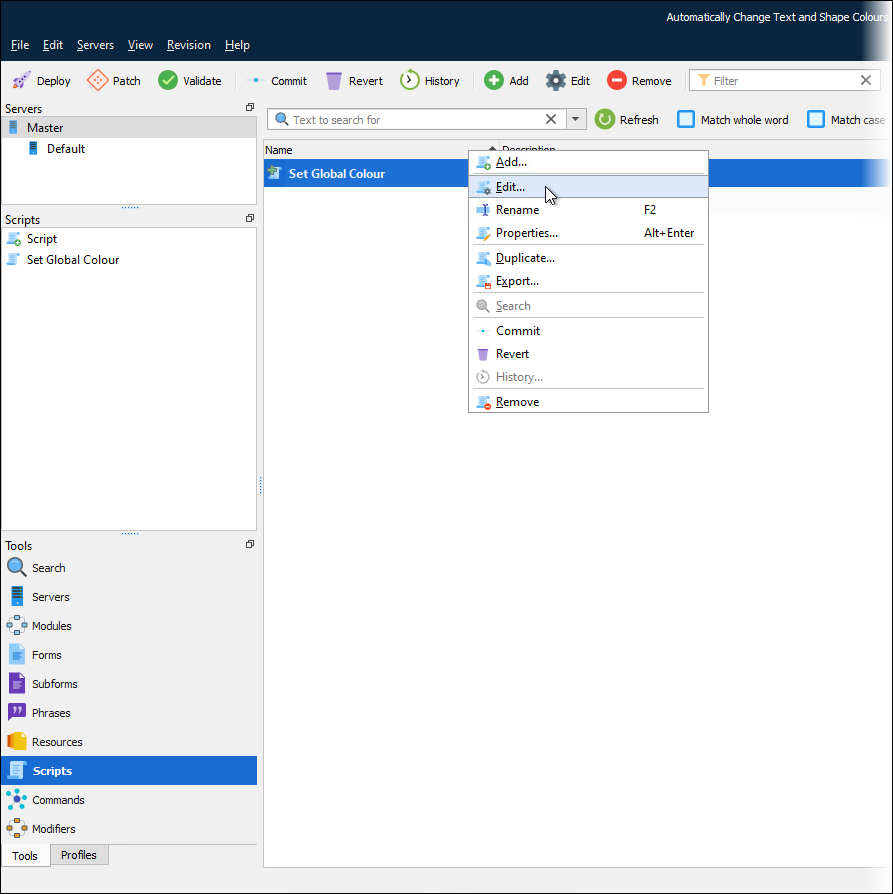
In Lasernet Developer, click Scripts in the Tools menu.
Create a new script. Set its Name to Set Global Colour.
Right-click the new script, then click Edit.
In the Lasernet Script Editor window, paste in the following code. This code creates two functions:
setSheetColour(colorString)andsetSheetShadingColour(colorString).function setSheetColour(colorString) { //the hex value for the required colour is passed into the script via variable colorString var mycolor = new Color(); mycolor.setRgb(colorString); //sets the RGB property for the variable //change the global font colour that uses the style called FontColour var globalFont = form.fontStyle("FontColour"); globalFont.color = mycolor; //Changes the global frame colour for shapes using the style FrameColour var globalShape = form.shapeStyle("FrameColour"); globalShape.lineColor = mycolor; //globalShape.fillColor = mycolor; } function setSheetShadingColour(colorString) { //the hex value for the required colour is passed into the script via variable colorString var mycolor = new Color(); mycolor.setRgb(colorString); //sets the RGB property for the variable //Changes the global frame colour for shapes using the style FrameColour var globalShape = form.shapeStyle("ShadeColour"); globalShape.lineColor = mycolor; globalShape.fillColor = mycolor; }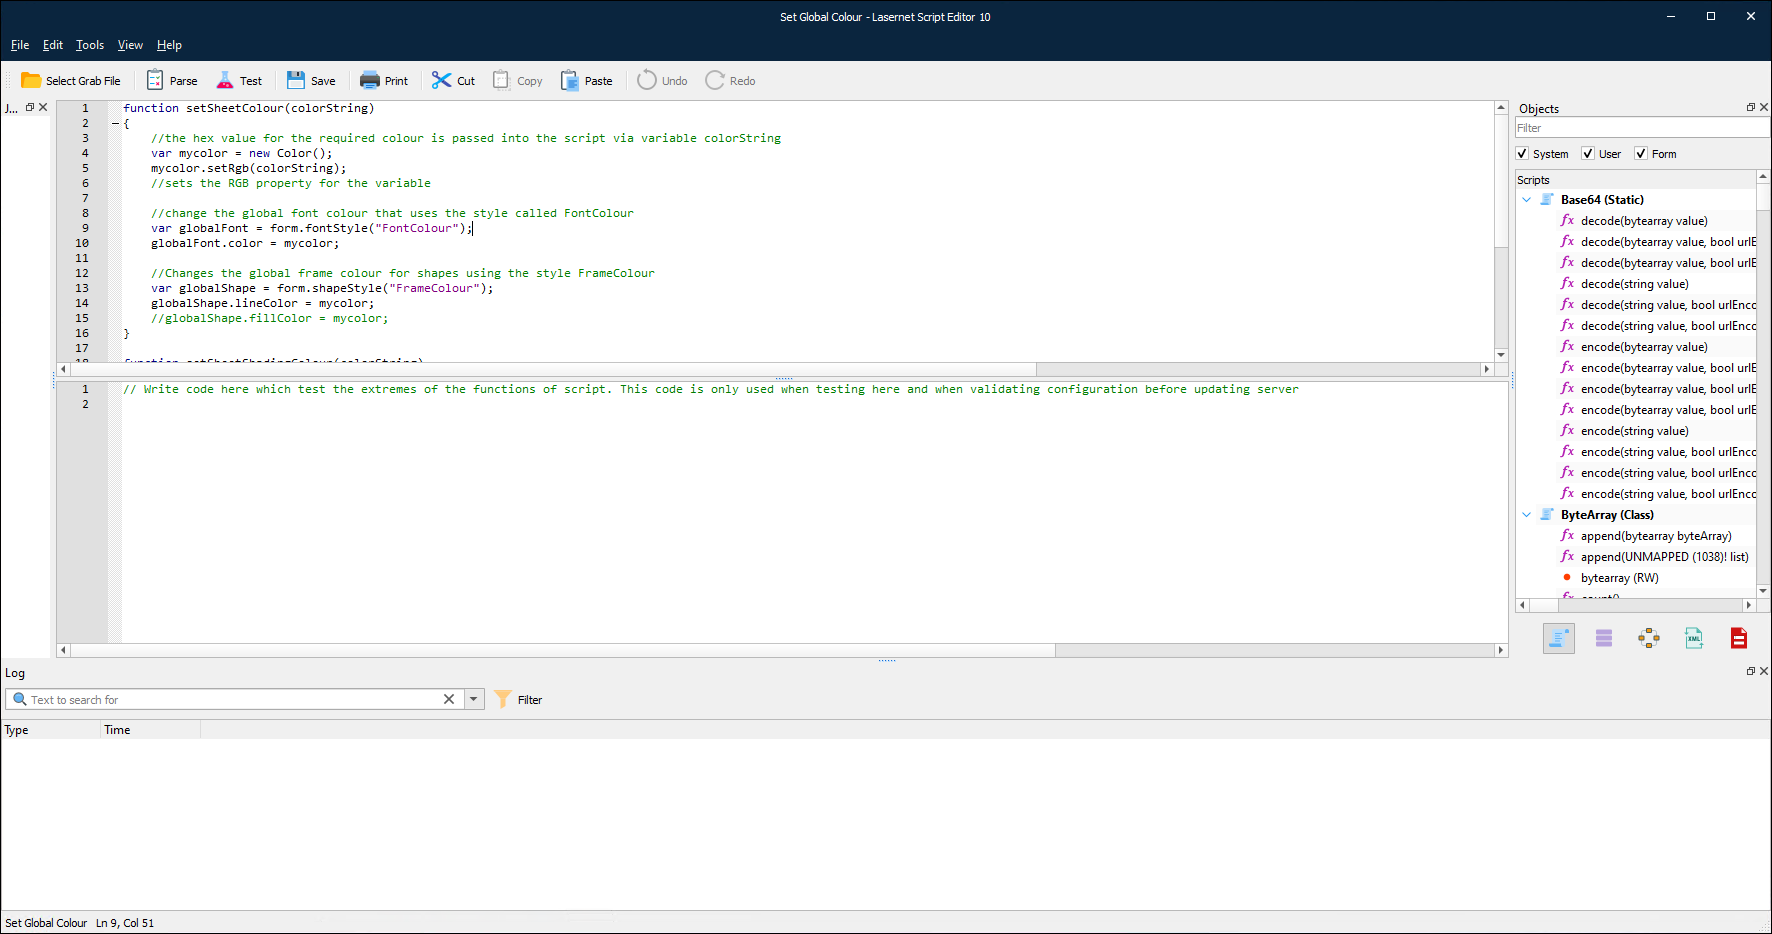
In the Lasernet Script Editor window, click Save.
Close the window. You can now use the script in your new form.
5. Run that Scripting Function at Each Sheet's Sheet Start Modifier Point
Follow these steps:
Return to the form that you created earlier.
In the Form Editor window, select Modifiers in the Form menu (see 1 in the image below).
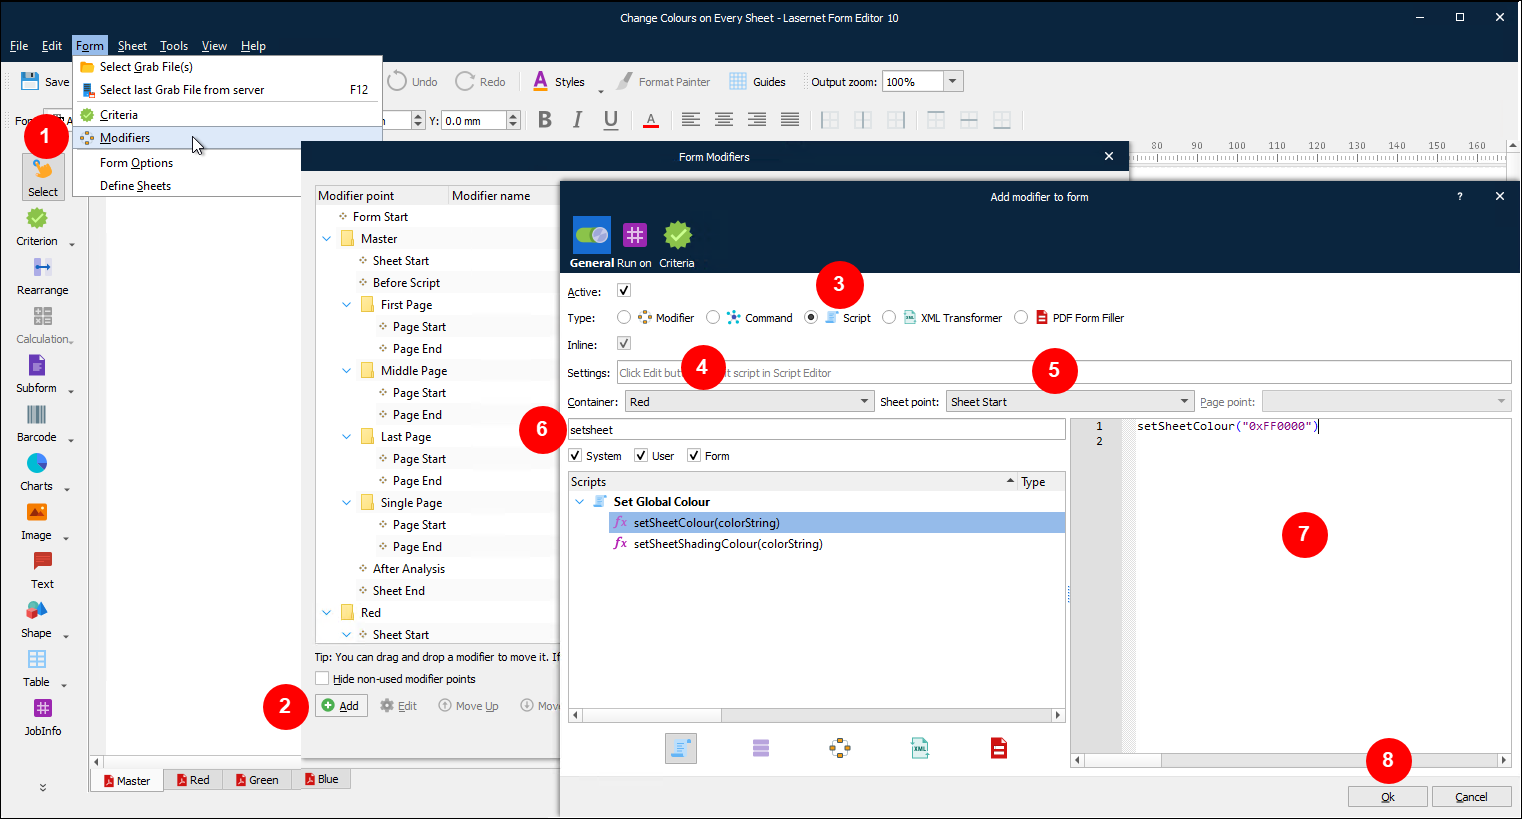
In the Form Modifiers window, click Add (2).
In the Add modifier to form window, click Script (3) in the Type row.
Select Red (4) from the Container list. This example assumes that the output sheets are named Red, Green, and Blue.
Select Sheet Start (5) from the Sheet point list.
Use the Filter box (6) to search for setsheet. Lasernet finds the
setSheetColour(colorString)andsetSheetShadingColour(colorString)functions within the Set Global Colour script.Drag
setSheetColour(colorString)to the script area (7).In the script area, change
colourstringto"<hex color code>". Use a hex color code that is correct for the sheet that the script modifier will be manipulating. For example,setSheetColour("0xFF0000")for red.Click Ok (8). Lasernet saves the script modifier in the Red > Sheet Start part of the modifier point list.
Repeat steps 3 to 10 for the
setSheetShadingColour(colorString)function for the Red sheet.Repeat steps 3 to 11 until you have created two modifiers each for the Green and Blue sheets to run the
setSheetColour(colorString)andsetSheetShadingColour(colorString)functions at the Sheet Start point for those sheets..Click OK to close the Form Modifiers window.
You can click Preview for each sheet to test the effect of the script on that sheet’s styling.
.png)