Contacts
- 29 Jan 2026
- 7 Minutes to read
- Contributors

- Print
- PDF
Contacts
- Updated on 29 Jan 2026
- 7 Minutes to read
- Contributors
- Print
- PDF
Article summary
Did you find this summary helpful?
Thank you for your feedback
Customer/Vendor Contacts
The Customer/Vendor Contacts functionality provides an overview of all reports and their destinations, and manages templates for customer and vendor reports. To find this functionality, navigate to Lasernet > Setup > Contact > Customer/Vendor contacts.

The Customer/Vendor Contacts functionality enables adding, editing, and deleting report destinations. These settings are used as templates for all customers and vendors.
To view all customer and vendor reports with defined destinations in the Customer/Vendor contacts page, click the Show all button available on the Menu bar at the top of the page.

The reports are not accessible in the Customer/Vendor contacts list until they are added to the Allowed reports list. To access this list, click the Allowed reports button available on the Menu bar.

On the Allowed reports page, the user can add a record (including a Reference type, Report name, and Destination type). The user can then proceed to add conditions (values) to any customer/vendor contacts.

If needed, the user can verify or change the security permissions for customers and vendors on the Security configuration page. To find the Security configuration page, navigate to System administration > Security > Security configuration. The security privileges for the Lasernet user are Background print, and Run reports to Lasernet.

If all security configurations are shown on the page in columns, you must use the scroll bar to view them all. To keep a fixed number of visible columns within the page, click Restrict hierarchy view to four levels.

How to Set Up Predefined Destination Emails Using Customer/Vendor Contacts in Lasernet FO Connector
Predefined destinations enable reports' destinations to be handled more flexibly and dynamically. Predefined destinations can be used to create rules for sending reports in different formats to different destinations, based on set criteria. Each Lasernet report can have its own set of predefined destinations with its criteria and priorities, as needed by the business.
Predefined destinations can be used in numerous ways. This page will focus on how to use the Customer/Vendor contacts table in Lasernet FO Connector to send emails using predefined destinations. The following steps show an example of how to add the related source to the report, create the predefined destination, and send the report to the configured email.
Set up a new contact record for a report on the Customer/Vendor contacts page.
Click Allowed reports.

In the Allowed reports page, click New. On the new record created, select the report from the Report name column dropdown, the Destination type (in this case Email), and the Reference type (in this case Customer). Click Save and leave the page.

In the Customer/Vendor contacts page, click New. On the new record, check the Active box, select the same Reference type, Report name, and Destination type as previously selected, and type an email address in the Value column.

Right-click a blank space in the grid and select Personalize: Lasernet customer/vendor contacts.

A personalization form will open: select Add a field, then click the Add a field option.

A window will open: check the Account Number box and click Update to close the personalization form.

The Account number column is now visible on the form. Select the account number for which this contact record applies from the dropdown menu and click Save.

To add the table to the desired report, navigate to Lasernet > Common > Reports and select the report for which we just created a contact record.
Open the Setup tab in the Action pane and click Query wizard.

Click Next on the wizard until you have reached the Tables form. On the right-hand side, select the section to which you want to add the contact information (CustInvoiceJour in this case).

Search for and select LACCustVendContacts from the All tables list and select the right-pointing arrow to add it to the query.

Click Relation/Layout and give your table a new name under Data sources. This step is optional.


To add the relation, select New under the Fields section, choose OrderAccount for the Related field section, and CustVendAC for the table field. The records from the Customer/Vendor contacts table must have the same account number as the report. Click OK.

To add some more criteria and select the correct records from the table, click Next on the wizard until you reach the Ranges form.
Select the field ReportName from the Available fields on the left-hand side list. Select the right-pointing arrow to add the field as a range to the query. On the Properties table for the ReportName field, click the tool icon to open the Expression Editor.

Click the dropdown menu for the Select value field and select Calculated. Click the dropdown again and select ReportName(). The records from the Customer/Vendor contacts table must have the same report name as the report. Click OK.

Select the field Active from the Available fields on the left-hand side list. Select the right-pointing arrow to add the field as a range to the query. On the Properties table for the Value field, select Yes from the dropdown. The records from the Customer/Vendor contacts table must be active.

Select the field Destination from the Available fields on the left-hand side list. Select the right-pointing arrow to add the field as a range to the query. On the Properties table for the Destination field, select Email from the dropdown. The records from the Customer/Vendor contacts table must have Email as their destination type. Click Finish.

To then create the predefined destination, select the report and navigate to Setup > Distribution > Destinations.

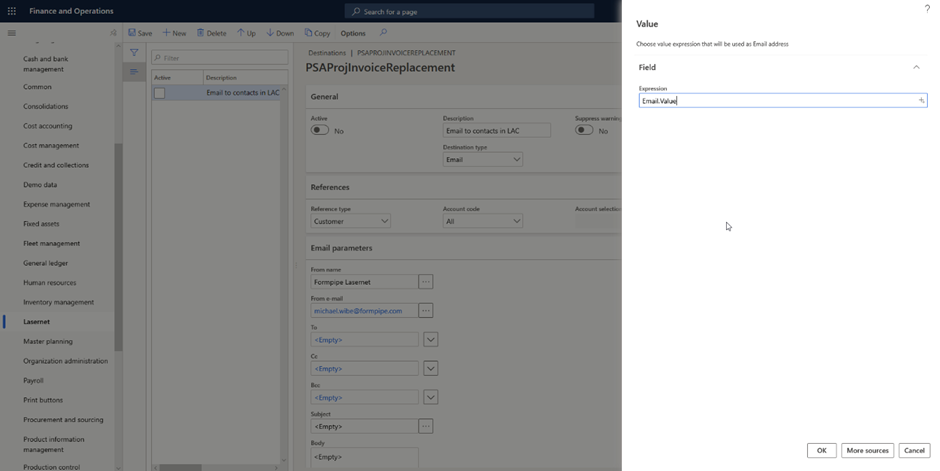
In the Destinations form, click New. Give your new record a Description and the same Reference type, Account code, and Destination type. In the To field under the Email parameters FastTab, click the down-pointing arrow and select From code, as the email must be sent dynamically to the contact set up in the Customer/Vendor contacts table.

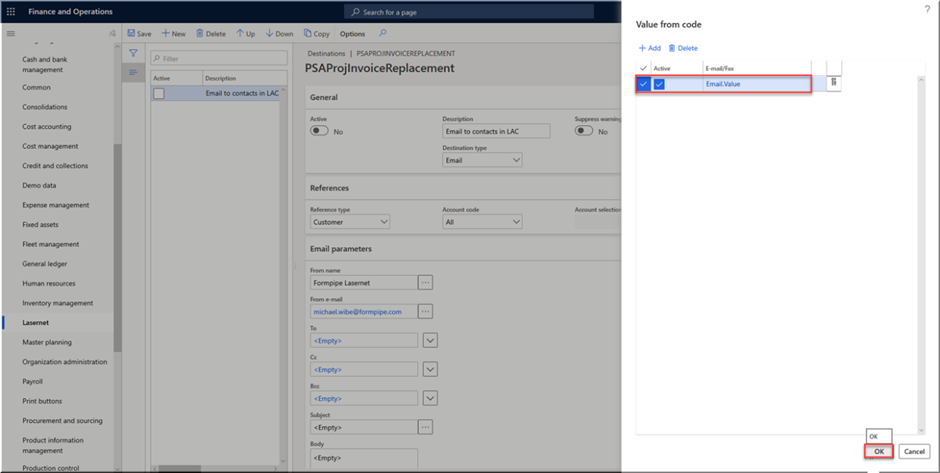
On the Value from code form, click New and select the Customer/Vendor contacts table from the dropdown. If you rename it, the new name will be available in the dropdown. Then select Value, as this is the table field with the email address. Click OK.
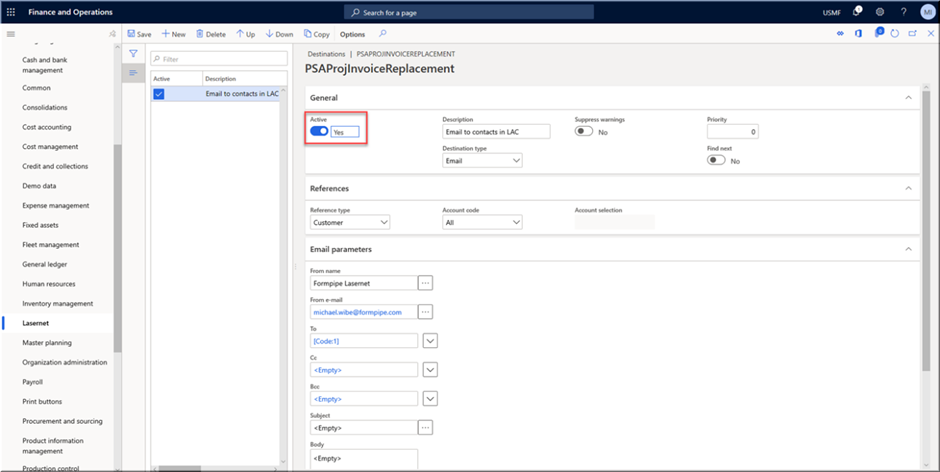
Mark the record Active and click OK.
Mark the destination record Active and close the Destinations form.
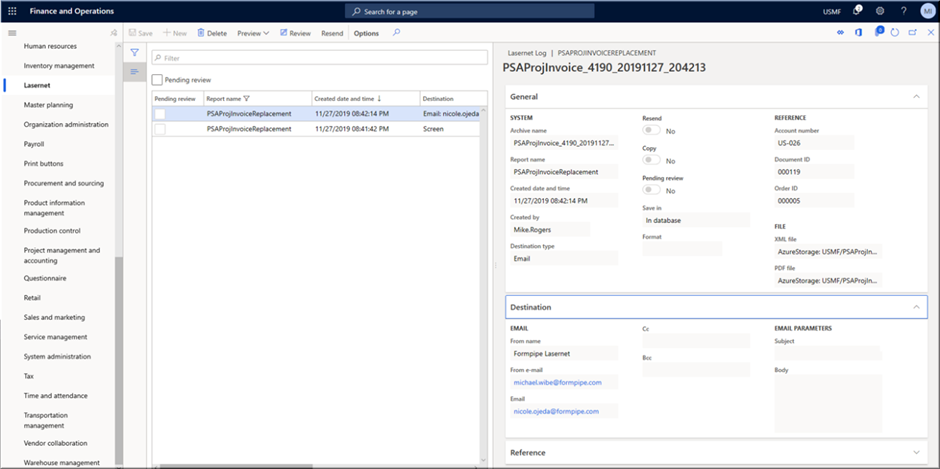
Test the new setup. Navigate to the report in Dynamics and click Resend. Select Lasernet Predefined. You can also set up a FALLBACK DESTINATION. This is optional and is used if the predefined destination does not work. Enable Force rerun. Click OK.

Navigate to Lasernet > Common > Archive and review the Destination information in the printed report. Notice that the email is the same one entered in the Customer/Vendor contacts table.
Customer Contacts
To access the Customer contacts page, navigate to Lasernet > Setup > Contacts > Customer contacts.

The functionality is designed to provide an overview of all reports and their destinations. Use the Customer Contacts functionality to manage templates for customer reports. You can add, edit, or delete report destinations. These settings are used as templates for all customers.
To view all Customer reports with defined destinations on the Customer contacts page, click the Show all button available on the Action pane at the top of the page.

The reports are not accessible in the Customer contacts list until they are added to the Allowed reports list. To access this list, click the Allowed reports button available on the Action pane.

On the Allowed reports page, the user can add a record (including a Reference type, Report name, and Destination type). The user can then proceed to add conditions (values) to any customer contacts.

If needed, the user can verify or change the security permission for customers on the Security configuration page. To find the Security configuration page, navigate to System administration > Security > Security configuration. The security privileges for the Lasernet user are Background print and Run reports to Lasernet.

If all security configurations are shown on the page in columns, you must use the scroll bar to view them all. To keep a fixed number of visible columns within the page, click Restrict hierarchy view to four levels.

Vendor Contacts
To access the Vendor contacts page, navigate to Lasernet > Setup > Contacts > Vendor contacts.

The functionality is designed to provide an overview of all reports and their destinations. Use the Vendor Contacts functionality to manage templates for vendor reports. You can add, edit, or delete report destinations. These settings are used as templates for all vendors.
To view all Vendors reports with defined destinations in the Vendors contacts page, click the Show all button available on the Action pane at the top of the page.

The reports are not accessible in the Vendors contacts list until they are added to the Allowed reports list. To access this list, click the Allowed reports button available on the Action pane.

On the Allowed reports page, the user can add a record (including a Reference type, Report name, and Destination type). The user can then proceed to add conditions (values) to any Vendor contacts.

If needed, the user can verify or change the security permission for vendors on the Security configuration page. To find the Security configuration page, navigate to System administration > Security > Security configuration. The security privileges for the Lasernet user are Background print and Run reports to Lasernet.

If all security configurations are shown on the page in columns, you must use the scroll bar to view them all. To keep a fixed number of visible columns within the page, click Restrict hierarchy view to four levels.
