Find Your Way Around Lasernet Form Editor
- 22 Apr 2026
- 15 Minutes to read
- Contributors


- Print
- PDF
Find Your Way Around Lasernet Form Editor
- Updated on 22 Apr 2026
- 15 Minutes to read
- Contributors
- Print
- PDF
Article summary
Did you find this summary helpful?
Thank you for your feedback
This page describes how to start Lasernet Form Editor and aims to familiarize you with the application window.
How Do I Start Lasernet Form Editor
To learn how to start the Form Editor, refer to the information for the version of Lasernet that you are using.
Lasernet Core 11 and 10
The Form Editor is part of Lasernet Developer. When you create or open a form in Lasernet Developer, it opens in the Form Editor.
Lasernet Essentials / Professional / Advanced
After you have installed the Form Editor (as part of following the Setup Wizard), select a report in Lasernet Essentials / Professional / Advanced and then click Open designer.
Find Your Way Around
For an overview of each area of the Form Editor window, refer to the information for the version of Lasernet that you are using.
Lasernet Core 11
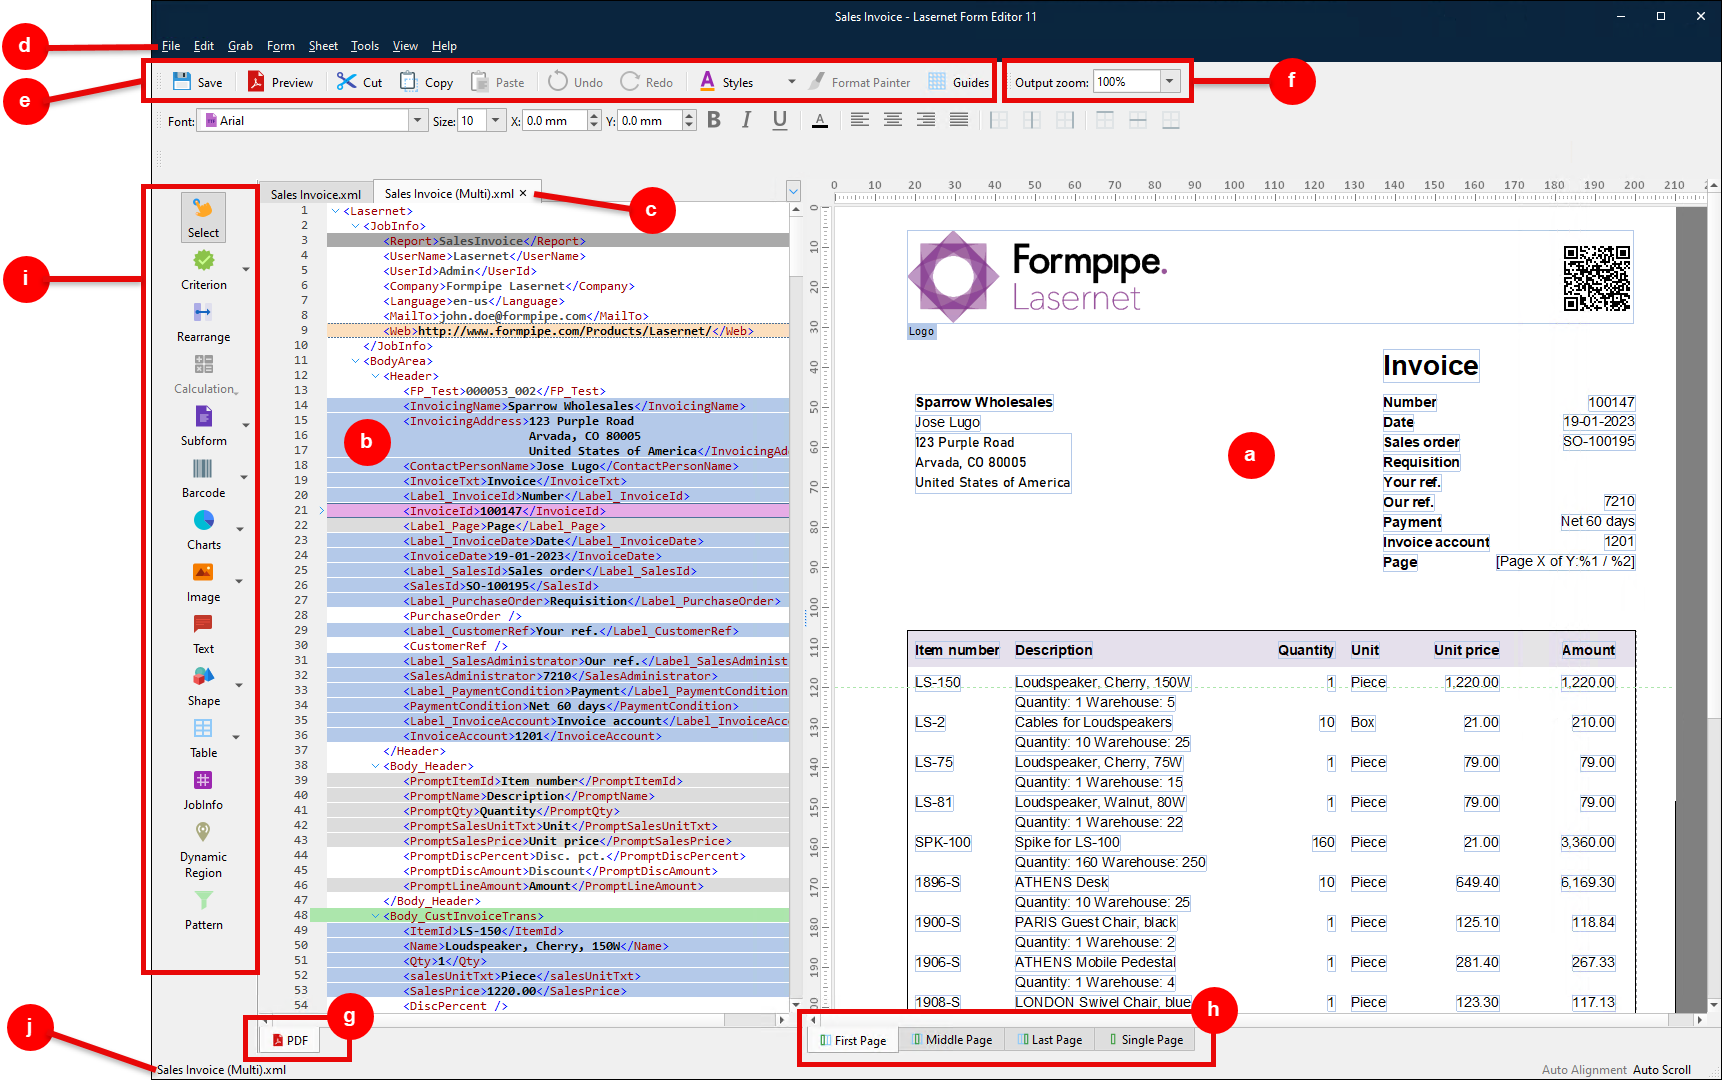
The Form Editor window has several distinct areas.
.png)
Letter | Area |
|---|---|
a | Sheet design area |
b | Data area |
c | Grab file tabs |
d | Menu bar |
e | Main toolbar |
f | Zoom control for sheet design area |
g | Environment toolbar |
h | Grab toolbar |
i | Sheet tabs |
j | Sheet design area tabs |
k | Developer toolbar |
m | Status bar |
n | Currently logged-in user |
o | Currently connected Config Server |
Each of these areas is described below.
Sheet Design Area
In general, this area enables you to specify the structure and content of the output that the selected sheet will generate. Depending on the output format of the selected sheet, you can specify how parts of that sheet's output will look.
What you can see (and do) in this area depends on the output format of the selected sheet:
Visual formats (such as EMF, PDF, HTML, and DOCX): You can select, move, and manipulate items on the page (such as text, data, images, and charts).
Data-oriented formats (such as XML, CSV, JSON, EDI, and XLSX): You can design the structure of the output data (and its format, if applicable) and see how the form's input data will be inserted into the output data structure. For data-oriented formats that can have a visual element (such as XSLX), you can add images and move them to a suitable position in the output.
You use the sheet design area tabs (j) to do these tasks.
Data Area
This area displays data from the selected grab file tab. The data in grab files (see Add Grab Files to a Form for more information) is representative of the data that Lasernet Core will encounter when it processes your form as part of a live, running workflow. As a result, grab files help you design the form, because you can consider them as test data.
The way that the Form Editor displays grab file data in the data area depends on the form's input format.
In general, you use this area to specify how the form's input data is used in the form's output. For example, you can add a rearrange that is linked to particular input data, to specify that the data will appear in the output document. Then, you could use the form design area to move the data to an appropriate position on the page.
The data area displays highlighting that indicates which input data the form's design uses, and for what purpose it uses the data. For example, colored highlights indicate that particular data is used by rearranges; a different color indicates data used by patterns. Several other colors indicate other important aspects of how input data is used.
Grab File Tabs
Click a grab file's tab to apply that file's data to the currently selected sheet's design (and see the outcome in the sheet design area).
For more information about grab files, see Add Grab Files to a Form.
Menu Bar
You can access the Form Editor’s functions and options through the various menus in the menu bar.
Main Toolbar
The main toolbar provides easy access to useful tools such as Save, Cut, Copy, Paste, Undo/Redo, and Preview. You can drag this toolbar (and all other toolbars) to different locations in the Form Editor window.
Zoom Control for Sheet Design Area
This control determines the zoom level of the sheet design area. Zoom in for greater detail or zoom out to see an overview of the page. This is a toolbar, so you can drag it to another location in the Form Editor.
Environment Toolbar
You can select any Lasernet Core environment that is present in the configuration (that is loaded in Lasernet Developer). JobInfos created for that environment become available in the Form Editor for testing purposes. Also, the Download, Start, and Stop buttons in the Grab toolbar operate on the selected environment.
Grab Toolbar
This toolbar enables you to start and stop grab mode (for form engines) on the environment selected in the Environment toolbar. You can also download (to the form you are working on) the last generated grab file from that environment.
Sheet Tabs
Each sheet in a form specifies the design of a particular document that the form can generate. To design the output of a sheet, click its tab.
A form can consist of one or more sheets, and each sheet has an output format (such as PDF). If necessary, a sheet’s output format can differ from the output format of other sheets in the form.
A Form Engine module will generate output for one, some, all, or none of a form's sheets when it processes a form. A sheet's "sheet criteria" (see Add a Sheet) determine whether the Form Engine module will generate output for that sheet (usually depending on some aspect of the input data).
Tip
You can use multiple sheets to create variants of the same document, or different documents that are based on the same data.
For example, suppose that a bank operates three distinct banking brands, and that the form's input data (which consists of a particular person's transactions for the previous month, for inclusion in their monthly statement) additionally specifies which brand that person is a customer of. The form could consist of three sheets that generate statements, but whose design differs only in the colors and brand logo used.
Then, each sheet's "sheet conditions" could specify that the form engine will generate output for that sheet only if the "brand" name included in the input data matches the name of the brand that the sheet generates statements for.
Sheet Design Area Tabs
You use these tabs to design the output for the currently selected sheet. The tabs that are present here depend on the output format of the selected sheet.
For example, if the output format of the selected sheet is PDF, you use the Single Page tab to design the output for scenarios in which the input data will fit on a single page, and you use the First Page, Middle Page, and Last Page tabs to design the PDF output in scenarios where the amount of input data will result in a multipage document.
Whereas if the output of the selected sheet is XLSX, there is a single XLSX tab where you can type static data into cells, see where input data will be inserted into cells, format cell data (visual appearance and data format), and add content such as images to the spreadsheet.
Developer Toolbar
This toolbar provides easy access to tools that enable you to do important form design tasks in the Form Editor.
Status Bar
The status bar is located in the bottom left-hand corner of the window and provides information about rows and columns in the input sheet and the X and Y coordinates in the sheet design.
Currently Logged-In User
The name of the Lasernet Core user that you are currently logged into the connected Config Server as. This identity determines which capabilities and features you can use in various Lasernet Core applications. Also, Lasernet Core records that your form changes were made by this user identity.
Currently Connected Config Server
The name of the Config Server that Lasernet Form Editor and Lasernet Developer are connected to. Form Editor actions such as selecting an environment and starting grab mode (for the selected environment) are done in the context of the selected Config Server. The Lasernet Core configuration (and consequently, forms) that you are editing are stored by this Config Server.
If your Lasernet Core system has more than one Config Server, this information can help you to ensure that you are editing the Lasernet Core configuration and forms stored by the correct Config Server.
Lasernet Core 10

The window where you design your forms is split in two, with a data input side on the left and the actual form design on the right. The user interface is laid out as follows.
Left Side
The left side contains the original data received from the administrative system. The original data is viewed as ASCII text in rows and columns or as an XML tree structure.
Right Side
The right side contains the actual form design with overlays and the ability to place text/data, change fonts and font sizes.
Menu Bar (1)

You can access all application functions and options through the various menu items.
Toolbar (2)

The toolbar provides easy access to useful tools such as Save, Print, Cut, Copy, Paste and Undo/Redo, as well as Guides, Styles and Format Painter. You can drag the toolbar to another location in the application.
You can use the Styles and Format Painter tools to work in the output with objects such as rearranges and shapes. On top of it, use the Format Painter tool to apply and further manage formatting of tables in the output.
Output Zoom Bar (3)

The output zoom bar lets you control the zoom level when you view your design. Zoom in for greater detail, or zoom out to get an overview of your page. You can drag the output zoom bar to another location in Lasernet Form Editor.
Property Bar (4)

The property bar contains tools and settings for changing font type, size, color, and typeface. It also contains tools for changing the justification and positioning of text boxes. You can drag the property bar to another location in Lasernet Developer.
Server Bar (5)

The server bar enables you to select a server instance added in the configuration. As a result, JobInfos created for that server instance become available in the Form Editor application for testing purposes.
Sheet Tab (6)

The sheet tabs are available in the bottom-left corner. The number of sheets shown depends on the number of copies made. The sheets can have different destinations. As can be seen above, there are three more sheets in addition to the original: these are Copy, Mail and Archive. Sheets are opened by clicking the relevant tab. You can add, copy or access sheet options by right-clicking the sheet bar. The first ten sheets can also be selected by using CTRL+1, CTRL+2, and so on.
Page Tab (7)

In the bottom-right corner there are four tabs: First Page, Middle Page, Last Page and Single Page. These tabs allow the user to create a form which has different designs according to the number of pages generated for a specific report.
First Page: The first page of the finished print
Middle Page: All pages between the first and the last page of the finished print
Last Page: The last page of the finished print
Single Page: The first and only page. This design is used if the finished print only consists of one page.
Pages are opened by clicking the relevant tab. Right-clicking the page tab allows access to additional page options. Pages can also be selected using ALT+1, ALT+2, ALT+3 and ALT+4.
Developer Toolbar (8)

The developer toolbar provides easy access to various tools for: defining criteria, creating JobInfos, rearranging input texts, defining conditional areas, patterns, inserting static text, lines, shapes and images into the form design.
Status Bar (9)

The status bar is located in the bottom left-hand corner of the window and provides information about rows and columns in the input sheet and the X and Y coordinates in the form design.
Lasernet Essentials / Professional / Advanced
The Form Editor window has several distinct areas.
Letter | Area |
|---|---|
a | Sheet design area |
b | Data area |
c | Grab data tabs |
d | Menu bar |
e | Main toolbar |
f | Zoom control for sheet design area |
g | Sheet tabs |
h | Sheet design area tabs |
i | Developer toolbar |
j | Status bar |
Sheet Design Area
In general, this area enables you to specify the structure, content, and appearance of the output that the selected sheet will generate. For visual output formats such as EMF, PDF, and HTML, you can select, move, and manipulate items on the page (such as text, data, images, and charts) and specify how they look.
You use the sheet design area tabs (j) to do these tasks.
Data Area
This area displays grab data. Grab data is representative of the data that Lasernet Core will encounter when it processes your form to generate output documents. As a result, grab data helps you design the form, because you can consider it as test data.
In general, you use this area to specify how the form's input data is used in the form's output. For example, you can add a rearrange that is linked to particular input data, to specify that the data will appear in the output document. Then, you could use the form design area to move the data to an appropriate position on the page.
The data area displays highlighting that indicates which input data the form's design uses, and for what purpose it uses the data. For example, colored highlights indicate that particular data is used by rearranges; a different color indicates data used by patterns. Several other colors indicate other important aspects of how input data is used.
Grab Data Tabs
Click a grab data tab to apply that data to the currently selected sheet's design (and see the outcome in the sheet design area).
Menu Bar
You can access the Form Editor’s functions and options through the various menus in the menu bar.
Main Toolbar
The main toolbar provides easy access to useful tools such as Save, Cut, Copy, Paste, Undo/Redo, and Preview. You can drag this toolbar (and all other toolbars) to different locations in the Form Editor window.
Zoom Control for Sheet Design Area
This control determines the zoom level of the sheet design area. Zoom in for greater detail or zoom out to see an overview of the page. This is a toolbar, so you can drag it to another location in the Form Editor.
Sheet Tabs
Each sheet in a form specifies the design of a particular document that the form can generate. To design the output of a sheet, click its tab.
A form can consist of one or more sheets, and each sheet has an output format (such as PDF). If necessary, a sheet’s output format can differ from the output format of other sheets in the form.
Tip
You can use multiple sheets to create variants of the same document, or different documents that are based on the same data.
For example, suppose that a bank operates three distinct banking brands, and that the form's input data (which consists of a particular person's transactions for the previous month, for inclusion in their monthly statement) additionally specifies which brand that person is a customer of. The form could consist of three sheets that generate statements, but whose design differs only in the colors and brand logo used.
Then, each sheet's "sheet conditions" could specify that the form engine will generate output for that sheet only if the "brand" name included in the input data matches the name of the brand that the sheet generates statements for.
Sheet Design Area Tabs
You use these tabs to design the output for the currently selected sheet.
You use the Single Page tab to design the output for scenarios in which the input data will fit on a single page, and you use the First Page, Middle Page, and Last Page tabs to design the output in scenarios where the amount of input data will result in a multipage document.
Developer Toolbar
This toolbar provides easy access to tools that enable you to do important form design tasks in Form Editor.
Status Bar
The status bar is located in the bottom left-hand corner of the window and provides information about rows and columns in the input sheet and the X and Y coordinates in the sheet design.
The following information describes the options in the Form Editor View menu.
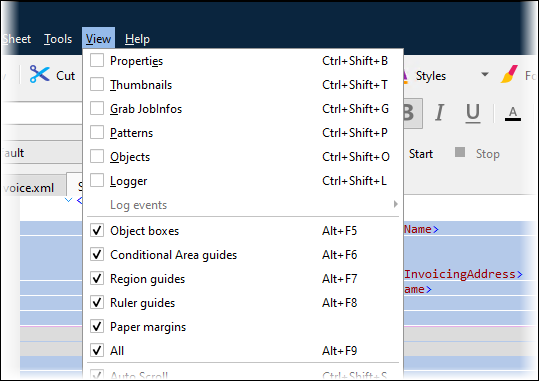
The View Menu
The View menu provides access to features that can assist you in the form design process.
Properties (Show Property Editor)
Click Properties to open a third pane that you can use to edit the properties of the selected form item.
 1.png)
Thumbnails (Show Thumbnails)
Click Thumbnails to open a third pane that displays thumbnails of the selected sheet’s pages. You can scroll through the thumbnails and click the page whose design you want to edit.
If the sheet is combined or mixed (see Combine Sheet Output), all pages of the combined or mixed document are shown in the pane.
.png)
Grab JobInfos (Show Grab JobInfos)
Click Grab JobInfos to open a third pane that displays the available grab JobInfos.
Note for Lasernet Core 11 and 10 users (not Lasernet Essentials / Professional / Advanced)
For more details, see View Grab JobInfos on the Add Grab Files to a Form page.
Patterns (Show Patterns)
Click Patterns to open the Patterns pane, where you can view and manage the form’s patterns. You can also view and manage the objects that belong to each pattern, in addition to managing any objects that do not belong to a pattern.
 1.png)
If you select a pattern on the Patterns pane, all the objects belonging to that pattern are highlighted in yellow.
Objects (Show Objects)
Click Objects to open a third pane that lists all named objects.
.png)
Logger (Show Logger)
Click Logger to open the Log pane. The Log pane provides low-level information messages and error messages generated whilst you are using the Form Editor.
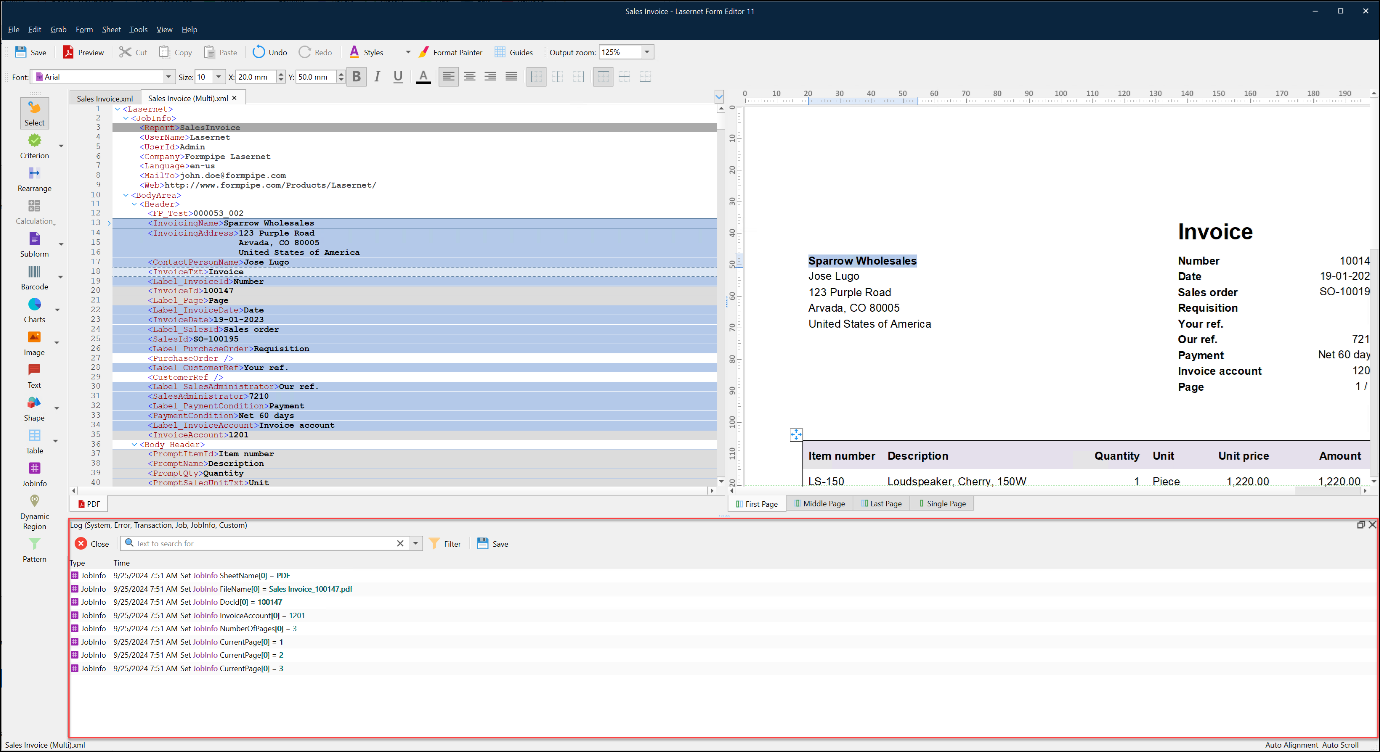
Show Log Events
If Logger is selected in the View menu, you can access the Log Events menu. Use this menu to choose which type of log event the Log pane displays. The list includes options such as System, Error, Job, and JobInfo, in addition to other log event types.
Object Boxes, Guides, and Margins
The following menu items display visual elements in the page design area to assist you in the design process.
Object boxes
Conditional Area guides
Region guides
Ruler guides
Paper margins
To toggle all of these options on or off, click All.
The fewer options you select, the closer your page designs will look to the generated documents.
Note
These options do not affect the generated output documents.
Line Numbers
Applies to: Lasernet Core 11 and Lasernet Essentials / Professional / Advanced
When the form’s input format is XML, JSON, or an input format that Lasernet Core converts to XML (such as CSV), the Form Editor can display line numbers in the data area.
Click View > Show line numbers to toggle whether line numbers are displayed.