Destinations
- 04 Mar 2026
- 9 Minutes to read
- Contributors

- Print
- PDF
Destinations
- Updated on 04 Mar 2026
- 9 Minutes to read
- Contributors
- Print
- PDF
Article summary
Did you find this summary helpful?
Thank you for your feedback
The distribution of each Lasernet report can be automated by using the Destinations functionality. Destinations enable you to configure multiple destinations (printer, email, screen, fax, custom ports, etc.) with different criteria for each report.
Selecting Predefined destinations when printing the report triggers the Lasernet Connector to identify the proper destination for the report based on the criteria and settings found in Destinations. This functionality is useful when the report destination is not known, such as during batch jobs or when the end user does not need to manually select where the Lasernet report should be printed.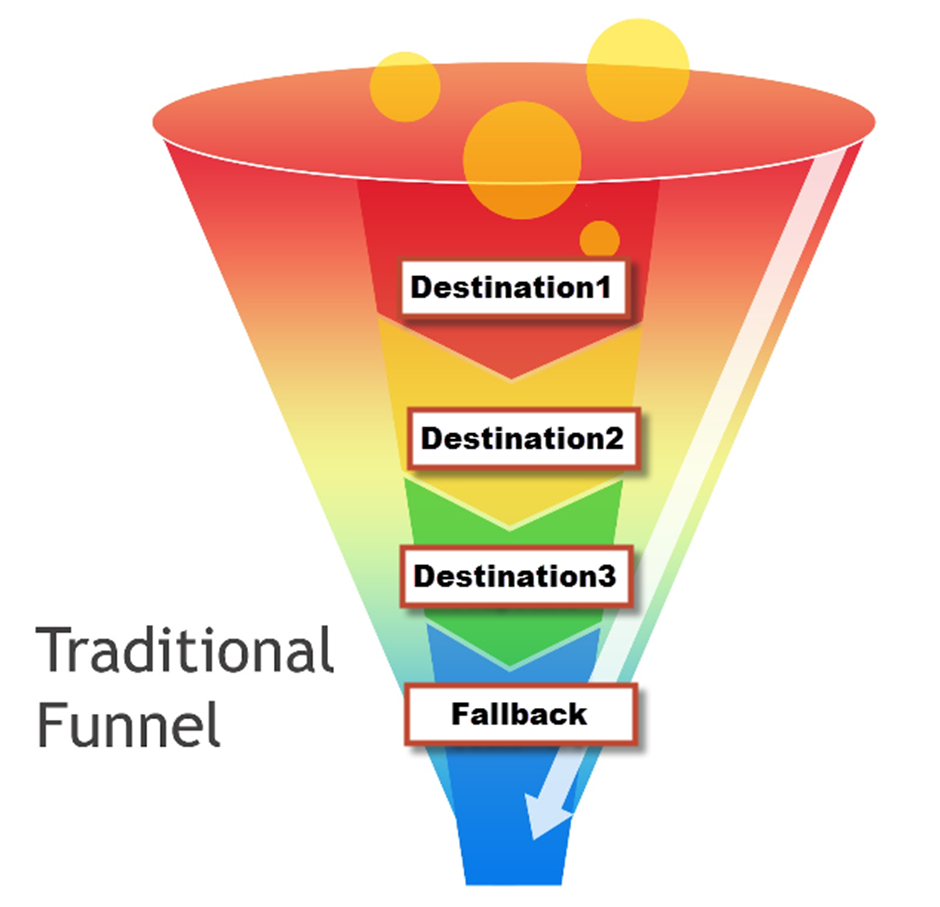
Think of destinations as a funnel - the trajectory of the yellow circles starts from the top and goes towards the bottom.
If the circles match the criteria for Destination1, they stay in Destination1.
If the circles do not match the Destination1 criteria, they proceed to Destination2.
If the circles do not match that criteria, they proceed to Destination3 and so on, until they reach the Fallback destination.
The Fallback destination is commonly an internal mailbox that a department has to check occasionally to determine why emails never reach their intended destination.
Recommendation for Funnel Fallback
To ensure that people actually check this mailbox, sometimes it is better to set the Fallback destination to a printer. This is because printed-out emails make a more noticeable visual impact than a number of emails in an email inbox.
Where Do I See or Set Up Destinations?
In Dynamics 365 Finance and Operations, navigate to Lasernet > Common > Reports, select the wanted report, and click Setup > Destinations:

Destinations
General

Active
Yes: The destination is active and ready to ship the document.
No: The destination is deactivated, and the document will not be shipped.
When working with Destinations, start by building the destination funnel in No status. Then, test in the evening and validate the destinations with the customer. When they are approved, set them to No status in the test environments to prevent sending documents to real customer email addresses.
Description
Freetext: Provide a concise overview of the destination.
Destination type
Default: Uses the report destination defaults if you have created them.
Printer: Uses cloud printing to print the document.
Email: Uses the Email module in Lasernet to send the report.
Fax: Uses the specified fax number to send the report.
Custom: Uses the custom ports you have configured in Custom Ports and Lasernet Developer to ship the document.
Screen: Prints the report to the screen. This option cannot be used with batch.
Suppress warnings: Hides all warnings that may appear at run time while validating or skipping this destination.
An example of a warning:
Warning
Destination could not be reach - no email in "to email"
This means that the customer has not set an email address in the To email field. Therefore, the PDF travels down the funnel to the Fallback destination.
If your business has a Fallback destination and a clear process for handling and regularly checking it, you can suppress the warnings by setting this field to Yes.
Priority: Each destination must have a priority. The priorities start from 0 and determine the order in which the destinations will be validated.
Find next
Yes: If the current destination matches, the Lasernet report will be sent to that destination, and the next destination will also be validated. Use this option to send a Lasernet report to multiple destinations.
No: If the current destination matches, the Lasernet report will be sent to that destination, and no other destinations will be validated afterward.
References
Reference type: The type of FO account for this report. This setting corresponds with the values set in the Mapping FastTab of the report.
Accounts receivable (Customer)
Accounts payable (Vendors)
Global address book (Party)

Account code: Defines to which accounts this destination applies.
Table: A single account. Specify the account in Account selection.
Group: An account group. Specify the group in Account selection.
All: All accounts. Leave Account selection blank.

Account selection

Condition
A condition can be used to control whether a destination is a match.
None - No condition.
Query - Can use query filters and ranges. It will match this destination if the query filters or ranges are met, and will skip this destination if the Query filters or ranges are not met.
Code - Can use an expression. Will match this destination if the code condition expression is True or 1, and skip this destination if the code condition expression is False or 0.
Query example – The following images show a query condition that checks the customer group field. CustGroup must be 10 for this destination.


Code example - The following images illustrate a code condition that utilizes an expression to verify the customer group field. CustGroup must be 10 for this destination.


Custom Properties
Custom Properties can be used to pass additional job information for a report if defined in Lasernet > Setup > Defaults > Custom properties.
File Format
File format can be defined at the destination level for destination types, email, and custom port.
How Do I Set Up an Email Destination?
When configuring a Lasernet email destination, it is essential to understand the business process and the configuration of emails within the ERP system. A business can:
Use a single email address to correspond with all its customers (for Quotations, Invoices, Collection letters, Account statements, etc.).
Use several email addresses for different purposes when corresponding with its customers and branches (Invoice to the Finance approve workflow, Quotation to the purchase approve workflow, Collection letters to the finance department email).
Send e-invoices to customers who do not wish to receive a PDF of the document.
Use a Fallback destination if the customer provides no email address.
Ensure you are aware of this before setting up the funnel: the business must have a transparent overview of the processes and what it needs to provide. When it creates an account for a new customer, it must be aware of the process and the email configuration in the ERP system so that the new account aligns with the Lasernet email setup.
The following describes the process of setting up an Email destination using standard Dynamics 365 FO Contact information purposes.
Set Up Contact Information Purpose
Standard Dynamics 365 Finance and Operations provides the option to add a purpose for each record in an account’s Contact information section. For example, a customer account may have an email address with the purpose Invoice to receive only invoices and a separate email address with the purpose Business for all other communications.

The contact information purpose setting can be used to configure the Lasernet email and ensure the Lasernet email setup meets business needs.
Ensure the Contact information option is enabled for the purpose options you wish to use. To this end, navigate to Organization administration > Global address book > Address and contact information purpose.
Many options will be marked as Contact information by default.

Once you have ensured your purpose is enabled for Contact information, set up your accounts’ contact records to use the purpose. To this end, navigate to an account (Organization administration > Global address book > Global address book), expand the Contact information FastTab, Add a new record of type Email address, and provide the Contact number/address.

Select Advanced.
On the dialog that appears, click the drop-down menu and the radio buttons corresponding to the purposes of this email address.

Create the Email Destination
Navigate to Lasernet > Common > Reports, select your report, and click Destinations from the Action pane’s Distribution group.

Create a new destination, provide the description, mark it Active, and set the Destination type to Email. This will display the Email parameters FastTab.

Note
The From e-mail value comes from Lasernet > Setup > Parameters > General > Email defaults.

Populate the Reference type, Account code, and Account Selection if applicable.

Note
For email-type destinations, the reference details determine where the contact information for the To email address originates. The reference and mapping details must be populated for email destinations to work.
Select a Dropdown Option for the To Email Address Field
The dropdown menu of the To email address field presents several options. Each option will return all the email addresses recognized for the customer or vendor accounts.
From contact information: Returns the email addresses from the account’s contact information.

From contact and contact information: Returns the email addresses from the account's contact's contact information.


From contact: Returns the email addresses from all the contacts' contact information. For this option, you will need to add a query to select the emails from contacts.

From report: Provides an overview of all fields in the report. A field can be activated to use as the email address.

From code: Provides the option to use a value expression that will be used as an email address.

Filter on Purpose
You can further specify which email addresses should be used by using filters. Filters are available for multiple dropdown options for the To email address field. For this example, select From contact information.
The recognized email addresses are shown. Contact information is pulled from Customer accounts because the Reference type was set to Customer for this report.
As shown in the following image, all roles are recognized:

Select the Use query to get recipients checkbox.

Click Filter.

If not already present, add a line for the Table Roles and Field Role.

Specify the roles in the Criteria column and select OK.

The recognized email addresses are now filtered by the specified role. In this example, only email addresses with the Business Role will be used as destinations to send this report.

Run the report.

Review the email addresses used in the Journal. In this example, only the email addresses of the type Business on the Customer account contact information were picked up.

Email Body
Placeholders
Placeholders can be used in the email body to customize messages based on information in the record.
Select the Setup email bodies button to open the E-mail body setup form.

Expand the Values used in e-mail FastTab and select Add.

A dialog opens with an Expression field. For this example, we will retrieve fields from the report to use as placeholder values. Select a table and then select a field.

Add all the desired values for the placeholders.

Use the placeholder values to write your subject and email body. This email subject and body will be used whenever this report is emailed in the specified language en-us.

Languages
Every E-mail body record has a linked language. When the report runs in a specific language, the corresponding E-mail body record is used. If no translation exists for that language, the default translation is utilized.
To ensure the current E-mail body is used when the report runs in a different language without translations, enable the Default for this record.

If your emails may need to be in different languages, multiple E-mail body records can be created. Click Duplicate to create a new E-mail body record.

Select the Language.

Modify the subject and body as needed. This email body translation will be used if the report is run in the specified language, da.

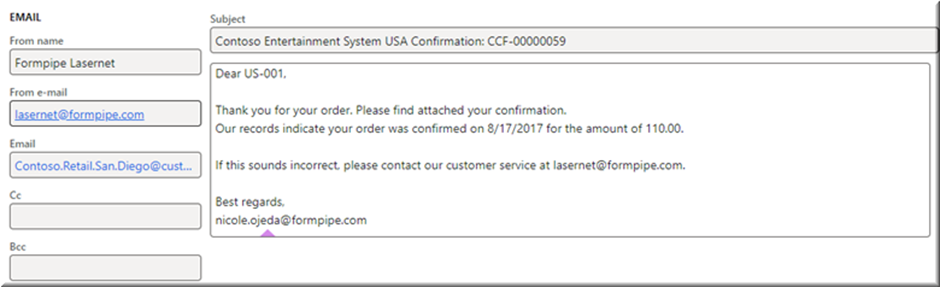
The results of running the report in en-us are:
The email address for the customer account US-001 is of type Business.
The email subject and body are in en-us, and placeholders are replaced with record-specific data.
HTML
Lasernet FO Connector includes the option to prepare an HTML (XHTML) email body instead of plain text.

To enable HTML, navigate to Lasernet > Setup > Parameters > Email, and set Email body editor type to HTML editor.

The following image illustrates how to add an image to the email body:
(9).png)