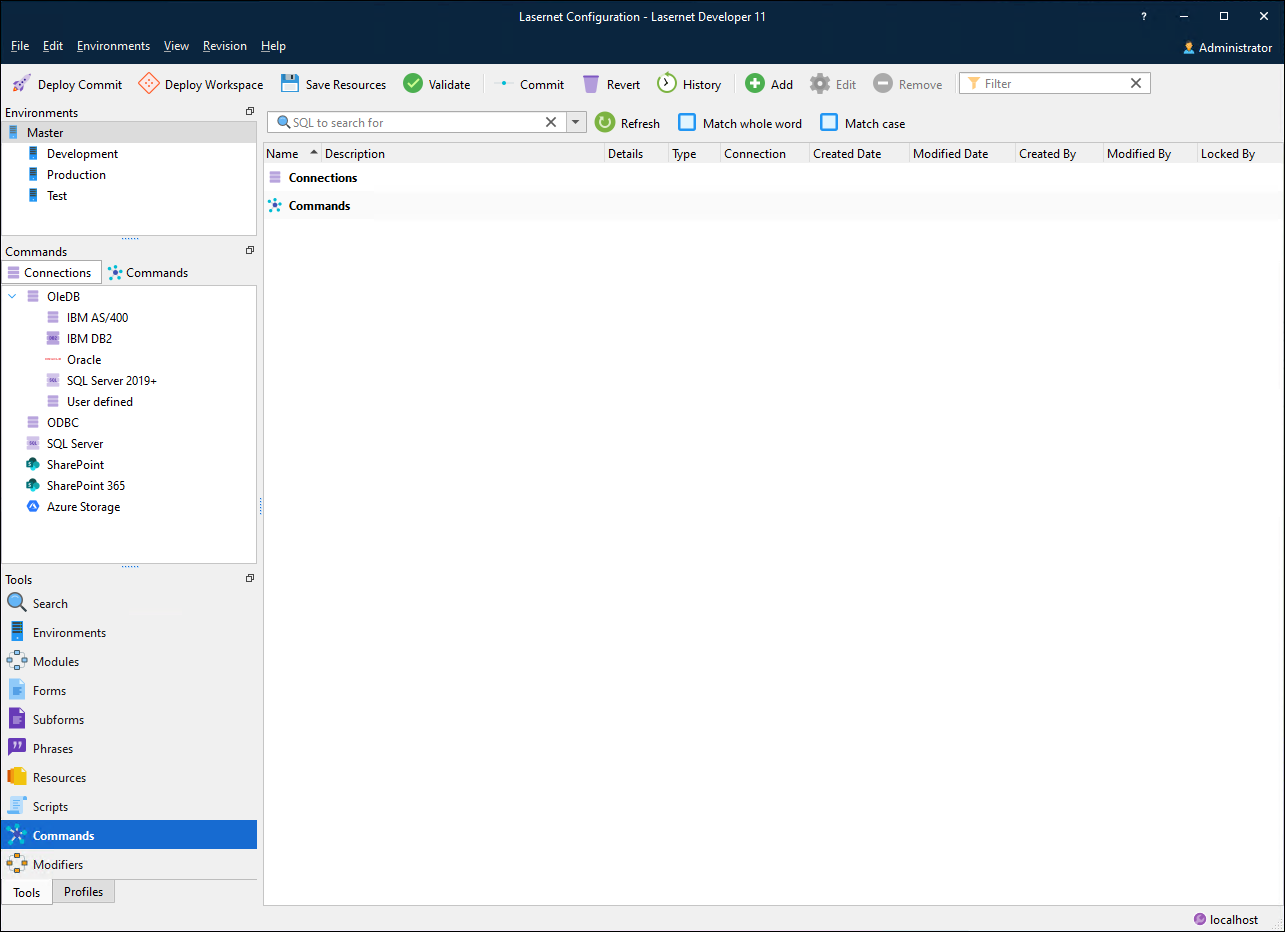
Connect Lasernet to Databases
- 02 Feb 2026
- 12 Minutes to read
- Contributors

- Print
- PDF
Connect Lasernet to Databases
- Updated on 02 Feb 2026
- 12 Minutes to read
- Contributors
- Print
- PDF
Article summary
Did you find this summary helpful?
Thank you for your feedback
Applies to: Lasernet 11
You can connect Lasernet to databases and run SQL queries and stored procedures. To do this, you must create a database connection and then use a database command.
Database Connections
To work with a database, a connection is required. The parameters required for each type of database vary, so a general overview is provided here, together with specific instructions for commonly used databases.
Note
In addition to database connections, the Connections area of Lasernet Developer contains connections that are used to access Microsoft Azure services such as SharePoint 365 and Azure Storage.
Connection Name
A unique name used for referencing the connection in the commands.
Server Type
.png)
OLEDB
All major databases use OLEDB drivers. These are supported via the OLEDB framework which provides access to almost every function of the database.
The necessary drivers for your database must be installed on the computer running Lasernet. They also need to be installed on the computer that runs the Lasernet Developer otherwise connections and commands cannot be tested.
If Lasernet can’t communicate via the OLEDB provider, it will result in an error. This can typically happen if the connection string has not been defined as intended or Lasernet is not sharing the same 32-bit or 64-bit architecture as the OLEDB provider. In such scenarios, the error message COM error when communicating with OleDb: Provider can’t be found. It may not be properly installed will occur.
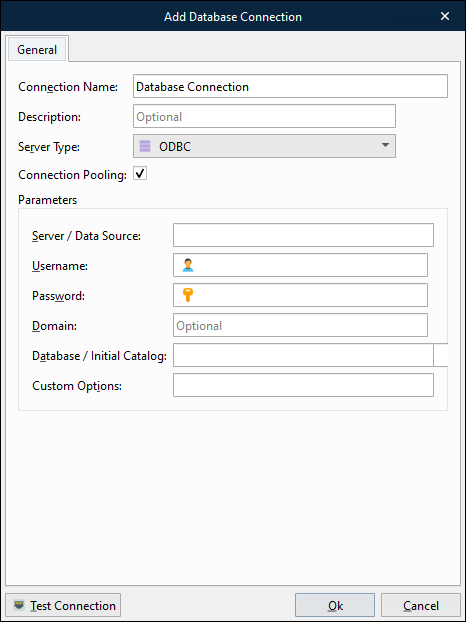
ODBC
To use ODBC, an external client and driver components must be installed on the computer running Lasernet. Any ODBC client can access a DBMS (Database Management System) for which there is an ODBC driver. DBMS server is a back-end system, for example SQL Server, Oracle and AS/400, or any DBMS for which an ODBC driver exists.
ODBC drivers must be installed and maintained via the Windows ODBC Data Source Administration tool and support the same 32-bit or 64-bit architecture as Lasernet.

Note
When adding a database connection using ODBC in Lasernet Developer, you must copy the Data Source Name (in the Windows ODBC Administration tool) and paste it as the Database / Initial Catalog value in the Add Database Connection window.
SharePoint 365
This connection is used for connecting to a SharePoint server.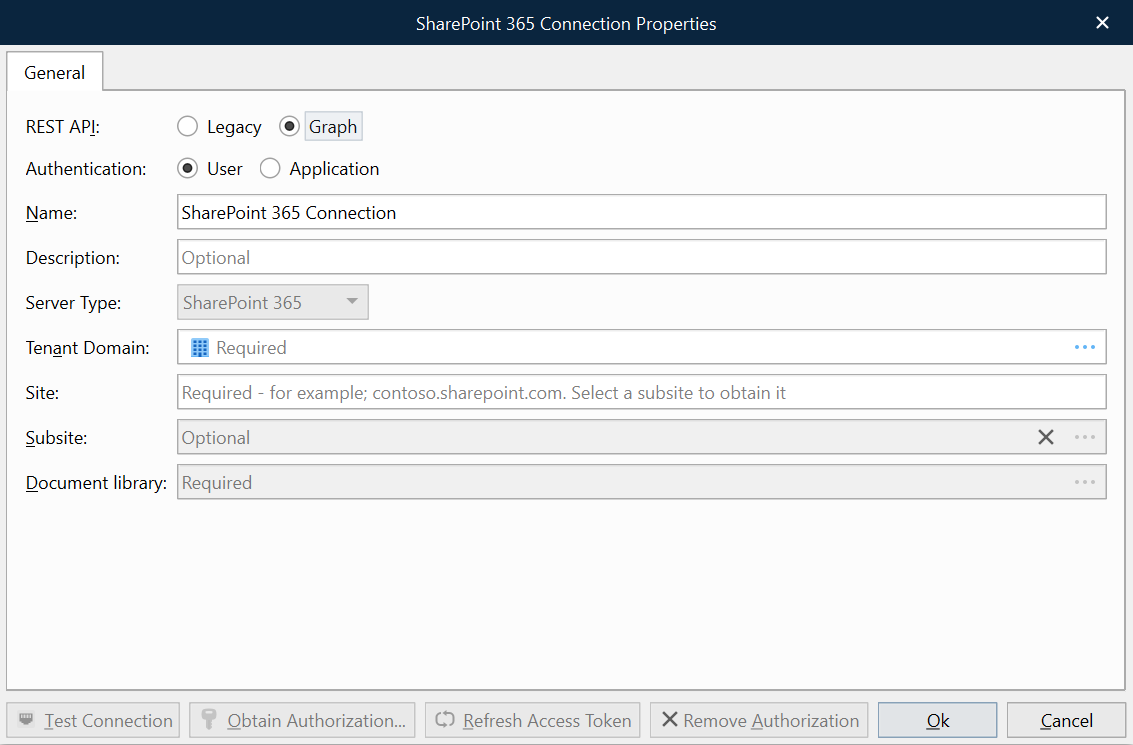
For more information, see the Lasernet 11 SharePoint Guide.
Azure Storage
This connection is used for connecting to Azure Storage..png)
For more information, see the Lasernet 11 Azure Guide.
General Settings
The following settings apply to only some server types.
Connection Pooling
The Connection Pooling option is activated by default when adding a new database connection. It works as a cache of database connections which can be reused when future requests to the database are required. Connection pools are used to enhance performance when executing commands on a database. Opening and maintaining a database connection for each user is costly and wastes resources.
When using connection pooling, the connection is placed in the pool after it has been created and used repeatedly, so that a new connection does not have to be established each time. If all the connections are being used, a new connection is made and is added to the pool. Connection pooling also reduces the time a user must wait to establish a connection to the database.
When exporting or migrating a database connection from an earlier version that does not support pooling, the setting will not be activated automatically. Instead, Lasernet will connect to the database and behave as in older versions.
OLEDB Provider
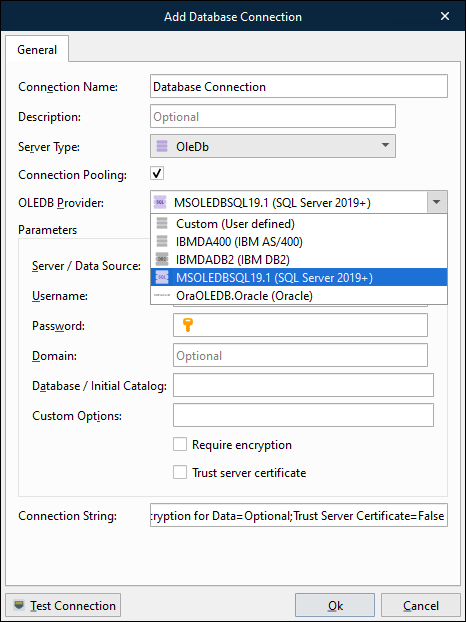
The OLEDB Provider list is enabled when the server type is set to OleDb. There are many providers listed here however the list is not exhaustive. You can enter any provider you want to. For help with specific details for your provider, see http://www.connectionstrings.com.
Server/Data Source
This is usually the name of the server on which the database server runs. It corresponds to the OleDb Data Source setting. For Microsoft Access databases, this is the full path to the .mdb file.
Username and Password
This is the username and the password for the connection. If using integrated security for OleDb and SQL Server they can be left empty and Integrated Security=SSPI can be set in Custom Options.
Database/Initial Catalog
This is the name of the database on the server. It corresponds to the OleDb Initial Catalog setting. For ODBC it is the name of the DSN (Data Source Name).
Custom Options
Custom Options are only used for OLEDB and give the opportunity to set any specific options needed. One setting could be Integrated Security=SSPI for SQL Server.
Connection String
The Connection String field is visible and read-only when a specific OLEDB provider is selected. In the case of an unsuccessful connection to a database server, you can set the connection string to Custom (User defined) and manually edit Connection String.
Database Commands
Database commands are used for executing SQL queries against databases.
Command Name
The command Name is a unique name which is used for referencing the database command when calling it from either a modifier point or script.
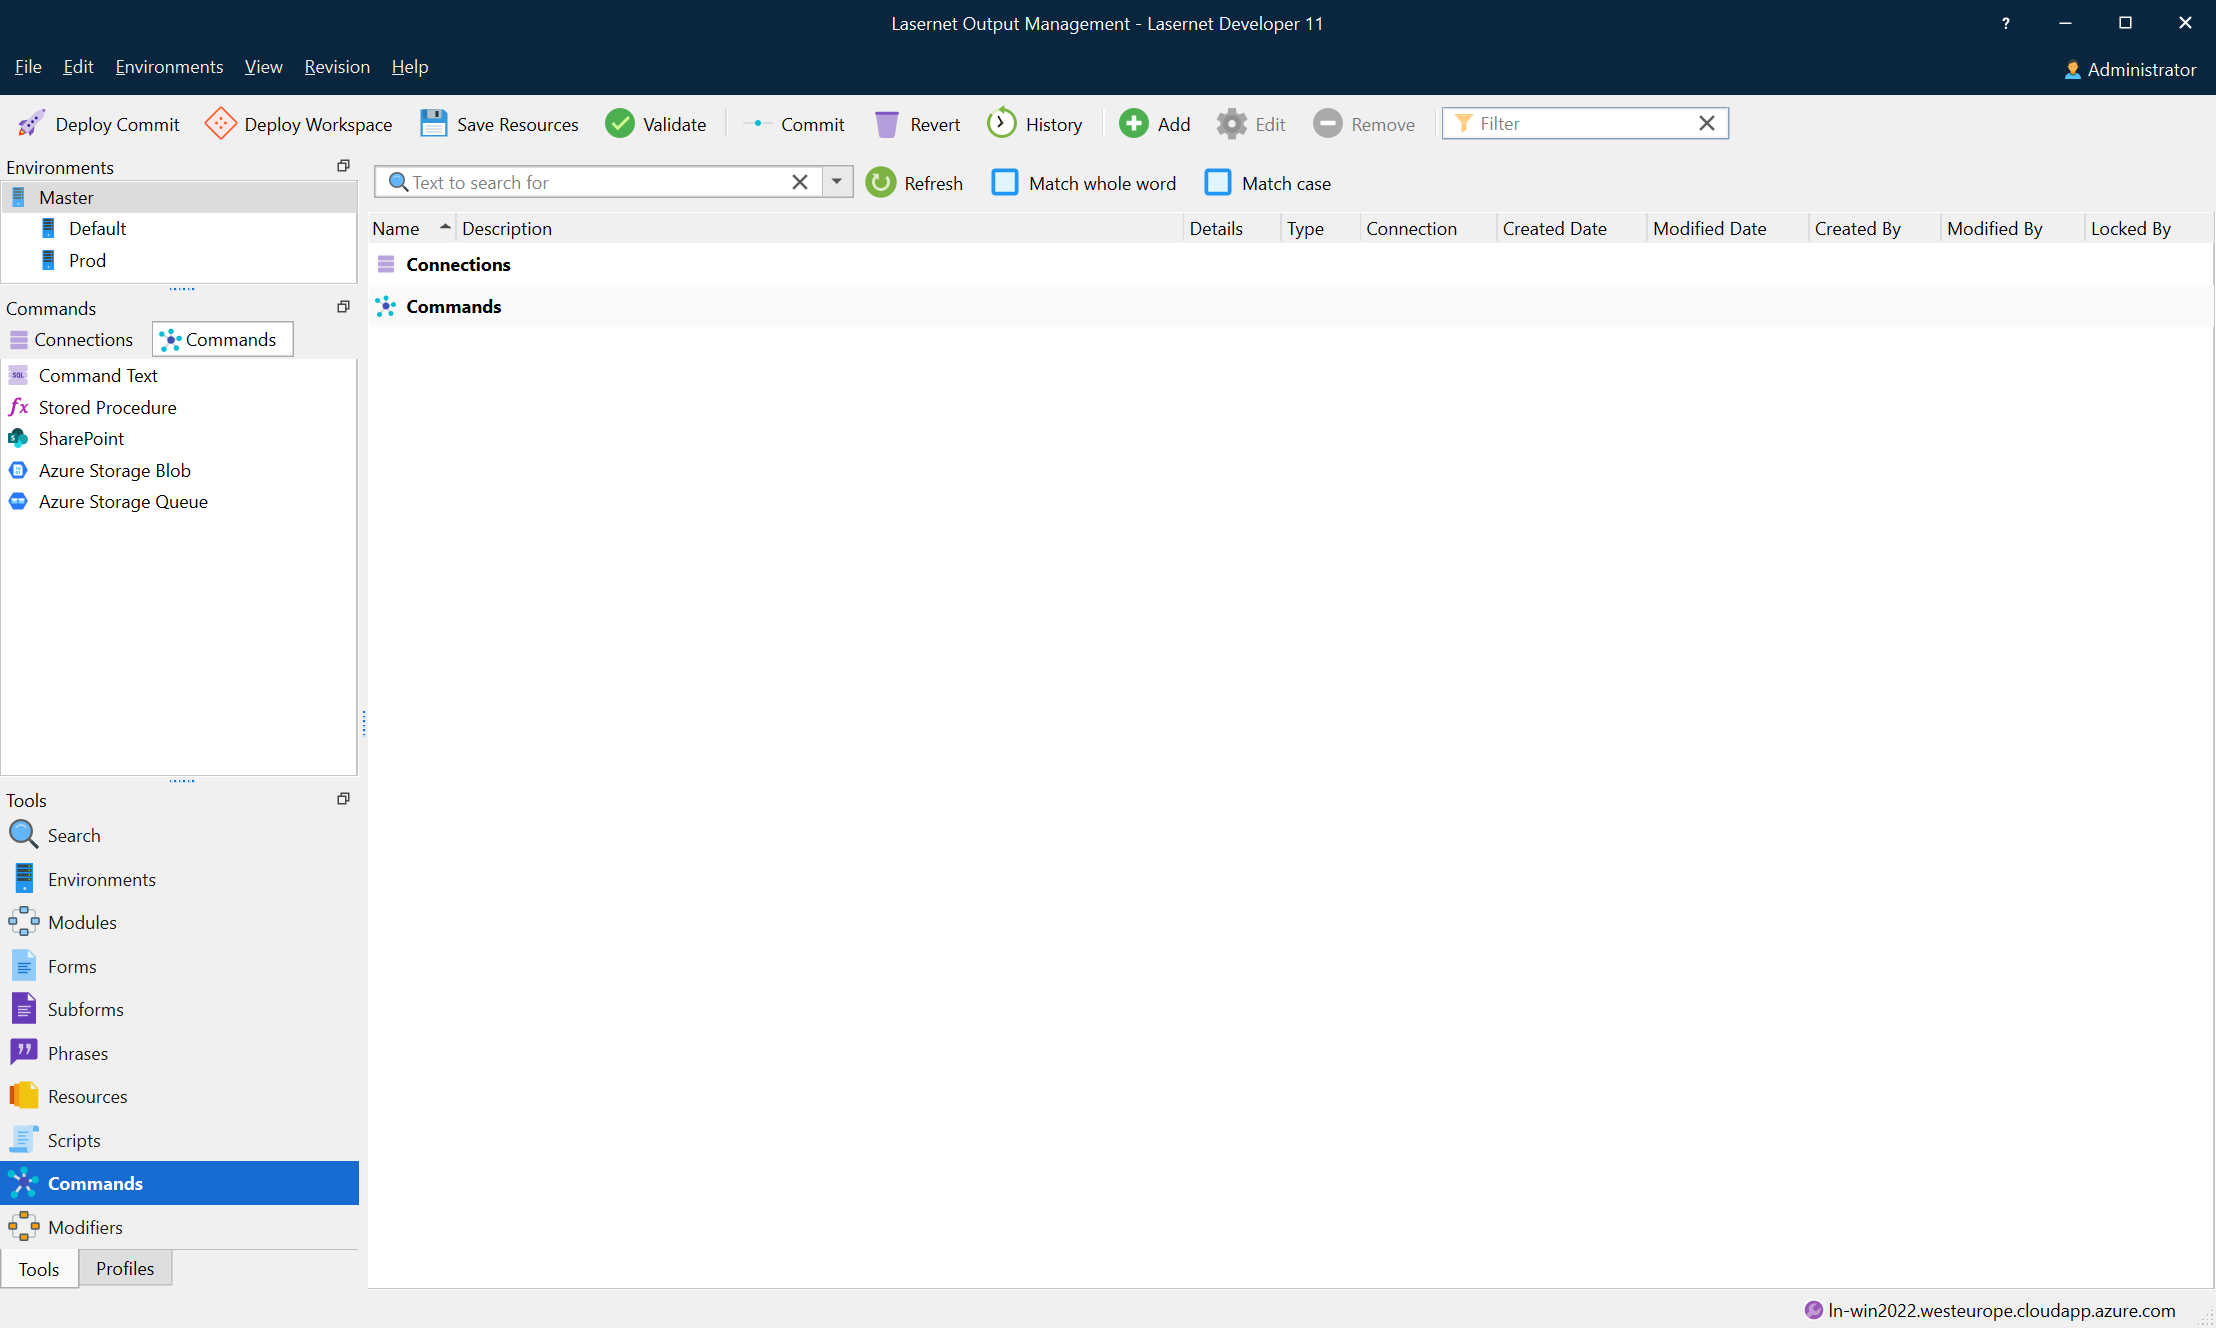
Connection
Choose the connection to execute the command through. There is a special connection in the connection list called #DatabaseConnection#, which instructs Lasernet to use the connection name in the DatabaseConnection JobInfo. This can be used for choosing the connection dynamically at runtime.
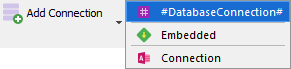
Command Type
Once the server type for the connection is defined, you can choose the command type. The available commands are:
Command Text
Stored Procedure
SharePoint
Azure Storage Blob
Azure Storage Queue.
Command Text and Stored Procedure are used for OLEDB, ODBC, and native database connections.
A SharePoint command is always used with a SharePoint connection.
Command Text
This is a SQL query that is sent to the database server. The SQL query usually retrieves data from the database, or updates, inserts, or deletes data in the database. The syntax supported in the command text depends on the specific database backend used, but there are some common features which Lasernet makes available.
One is substituting #JobInfo# markers for the content of the specified JobInfo. For example:
select * from customers where id = #CustomerID#
In this command, #CustomerID# is substituted with the value of the JobInfo CustomerID when the command is run. When simple numeric values are needed, this is the preferred way to customize a SELECT statement.
However, when using string values, this method can cause trouble. Consider this query:
select * from mytable where text = '#SomeText#'
As before, Lasernet will substitute #SomeText# with the value of that JobInfo. However, if a JobInfo stores text that contains an apostrophe, the text will not be correctly substituted in the SELECT statement. A a result, you must use binding, which is the recommended method. The example below shows the correct syntax:
select * from mytable where text = :sometext
Formatting the SELECT statement in this way makes :sometext a “bindable parameter”. In the Parameters list, the default values, data types, and so on for the parameter can now be set:
When editing each parameter there are some options:
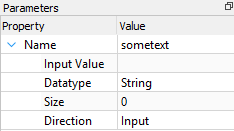
The Input Value field is used for setting the value of the parameter. This can be any #JobInfo# references, which are automatically substituted.
The Datatype field is used to set the type of the parameter. Usually, the database is quite strict about this setting, however some databases are capable of converting types by themselves. Generally, types like String, Double, Long (an integer) and Long binary are used. Lasernet also uses the type to determine how to convert input and output values.
Direction tells Lasernet and the database in which direction the data from the parameter flows. Input means that the data flows from Lasernet to the database. Output, which is Stored Procedure specific, means that the database backend fills the parameter with some data. Input/Output specifies that data flows in both directions.
Command Result
In the Tools > Command Result window (of the Lasernet SQL Editor), you can specify the behavior of return values for JobInfos and specify that the command result should be generated as XML.
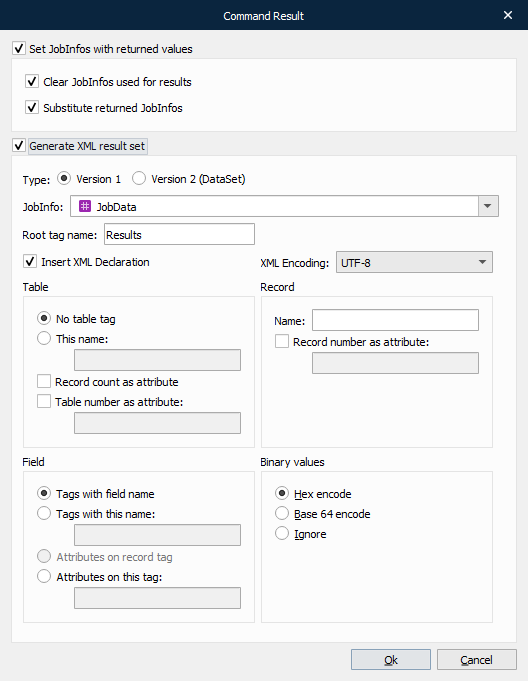
Set JobInfos with Returned Values
If Set JobInfos with returned values is selected, Lasernet returns data from the database into JobInfos, which are named after the column names in the table of the database. This means that if you retrieve more than one row of data from the database, you will get arrays of JobInfos containing data.
It is possible to find out if anything was returned. This is done by checking the RecordCount JobInfo. If its value is 0 (zero), no records were returned. Output parameters always return a value.
Clear JobInfos Used for Results
If Clear JobInfos used for results is selected, Lasernet automatically clears the JobInfos before starting to enter data into them.
Substitute Returned JobInfos
If Substitute Returned JobInfos is selected, Lasernet will run JobInfo substitution on the returned values before storing them in JobInfos. For more information, see JobInfo Substitution.
Generate XML Result Set
Default data is retrieved as JobInfos from the database. It is also possible to return the data into an XML document. This is useful if data needs to be placed into a job to be rearranged in the Form Engine or the result stored into a file.
Select Generate XML result set if you want to retrieve your database command result as an XML document. JobInfos containing field names and values from the database tables will also be created.
JobInfo
The name of the JobInfo that will contain the XML document.
By setting the value to JobData, the primary job parsing through Lasernet will now consist of the XML result set.
Root Tag Name
The root tag name of the XML document.
XML Encoding
The XML encoding to be used in the XML document.
Table Tag Name
Specifies which tag name (if any) is used for the table.
If No table tag is selected, the attribute is placed on the root tag.
Record count as attribute sets the value of the RecordCount attribute to the number of records returned from the database.
Record Tag Name
For each record returned from the database, this tag is used to enclose the records.
Record number as attribute sets the number of the record (starting from zero) in the attribute specified.
Field Tag Name
Specifies how to store the value in the XML document for each field in each record.
Tags with field name adds a tag for each field with the tag name set to the field name.
Tags with this name adds a tag with the given name for each field.
Attributes on record tag adds the field values as attributes on the record tag. Each attribute has the name from the field.
Attributes on this tag adds one tag with the given name and sets the values as attributes on that tag.
Binary Values
Choose how to handle binary values:
Hex encode encodes the value in this format in hex format.
Base 64 encode encodes the value in this Base 64 format.
Ignore ignores binary values.
Example
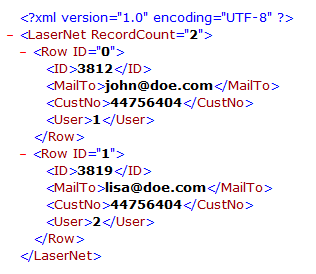
In this example all rows from the table MAIL_DB are selected where the field CustNo is equal to 44756404.
select * from MAIL_DB where CustNo = '44756404'

In the Database Command modifier, Generate XML result set is selected and the parameters are defined as follows:
XML encoding is set to UTF-8.
Root tag named
<LaserNet>with record count defined as an attribute (two records are selected).Each record includes
<Row>with ID defined as an attribute containing the record number.Tags selected from the table are named with field names and the value of the field is added.
The result is an XML document stored into the DBData JobInfo with the following structure.
Other variants of the XML document can be defined by setting the appropriate properties.
DataTable Relations Between Queries in Database Command
You can specify how DataTables are related, making it possible to have master/detail relationship. This enables you to mail merge or create reports, for example, with customers and their orders, based on your query.
Stored Procedures
Calling a stored procedure is as easy as picking a database connection, selecting which procedure to call and filling in the parameters accordingly.
Lasernet supports input and output parameters as well as a return value from the procedure (OLEDB connections only). Features may vary depending on the backend used. For example, Lasernet reads the possible parameters from some backends (SQL Server, Oracle, MySQL), while for others it is up to the user to add parameters manually via the Add and Remove buttons in the toolbar.
Parameter values support JobInfo substitution.
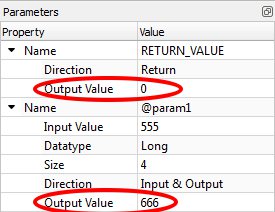
Parameters can have different directions; Input, Output, Input & Output and Return.
Input: Is sent to the backend.
Output: Parameter is filled with value set in backend.
Input & Output: Is sent to the backend and filled with value set in the backend.
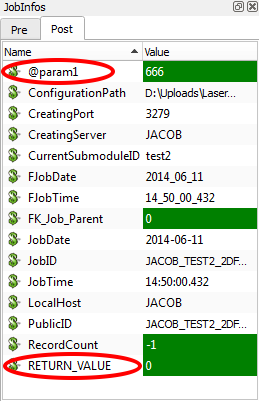
Return: A procedure can return an integer value called a return code to indicate the execution status of a procedure.
The returned values are inserted into JobInfos with the name of the parameter. The return value is sent in the JobInfo RETURN_VALUE. For example:
Datasets returned from a stored procedure are either inserted as JobInfos or as XML in JobData exactly like running a ‘Command Text’.
Executing a Query in Transaction or Without Transaction
The Execute or Execute in transaction button in the toolbar is used for testing queries directly from the SQL Editor. 
Execute In Transaction
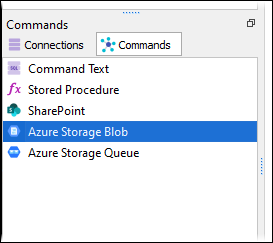
It can be advantageous to execute queries without actually changing the data in the database, especially when testing. For this reason, this is the default behavior of the software, in order to prevent making accidental changes to the database. The feature issues a BEGIN TRANSACTION before executing the query and afterwards does a ROLLBACK TRANSACTION. Log and result sets show changes as they were at the time. Multiple changes and selects can be done simultaneously in the same transaction, if each query is terminated with a semi colon.
INSERT INTO Customer (FirstName, LastName) VALUES ("John", "Doe");
SELECT * FROM Customer WHERE LastName = "Doe";
Execute (Without Transaction)
Execute works identically to Execute in transaction except the BEGIN TRANSACTION and ROLLBACK TRANSACTION are not issued. This means the changes made to the database are permanent.
Executing Partial Queries
When having a several queries separated by semicolon, it can be useful to only execute a few of them. This can be done by selecting just the text covering the queries and then executing the query.
Table Editor
The table editor is built into the SQL Editor. You need a working connection to a database before you can manipulate tables in it. The table editor is only supported on a small subset of the supported backends in Lasernet.
The table editor is accessed via the Object Explorer using the Add Table or Edit Table option.
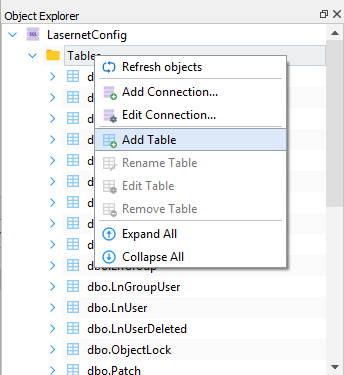
The features available in the table editor depend on the backend used. For example, some backends do not support the renaming of columns.
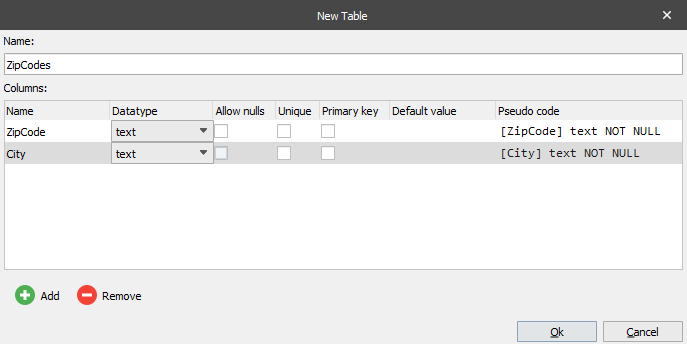
A table name must be specified and at least one column added to the table.
The specified datatype of the columns will reveal or lock out additional features; for example, precision of doubles.
The default value is used when inserting rows in the table where the column is not specified and given a value.
The Pseudo code example is for advanced users who want to know exactly how the column is created (SQL query sent to backend).
Relations between tables cannot be manipulated with the SQL/Table Editor, but must be done either with other software or via manually created SQL queries.