Configure Lasernet Print Servers and User Access
- 02 Mar 2026
- 14 Minutes to read
- Contributors


- Print
- PDF
Configure Lasernet Print Servers and User Access
- Updated on 02 Mar 2026
- 14 Minutes to read
- Contributors
- Print
- PDF
Article summary
Did you find this summary helpful?
Thank you for your feedback
Applies to: Lasernet 11
At this stage of the process, you configure access to printers in different locations, via cloud or on-premises print servers.
For optimal performance, depending on print load and available cores, we recommend that multiple printer services are added to the same print server. This enables you to separate print server queues into batches for larger printer jobs and on-demand for production labels.
The steps that you follow depend on whether you are using Manage or the Lasernet Config web app.
Note
The Lasernet Config web app was provided with earlier versions of Lasernet. It is a legacy web app and will be deprecated in a future version of Lasernet Core.
View a List of Print Servers
Manage
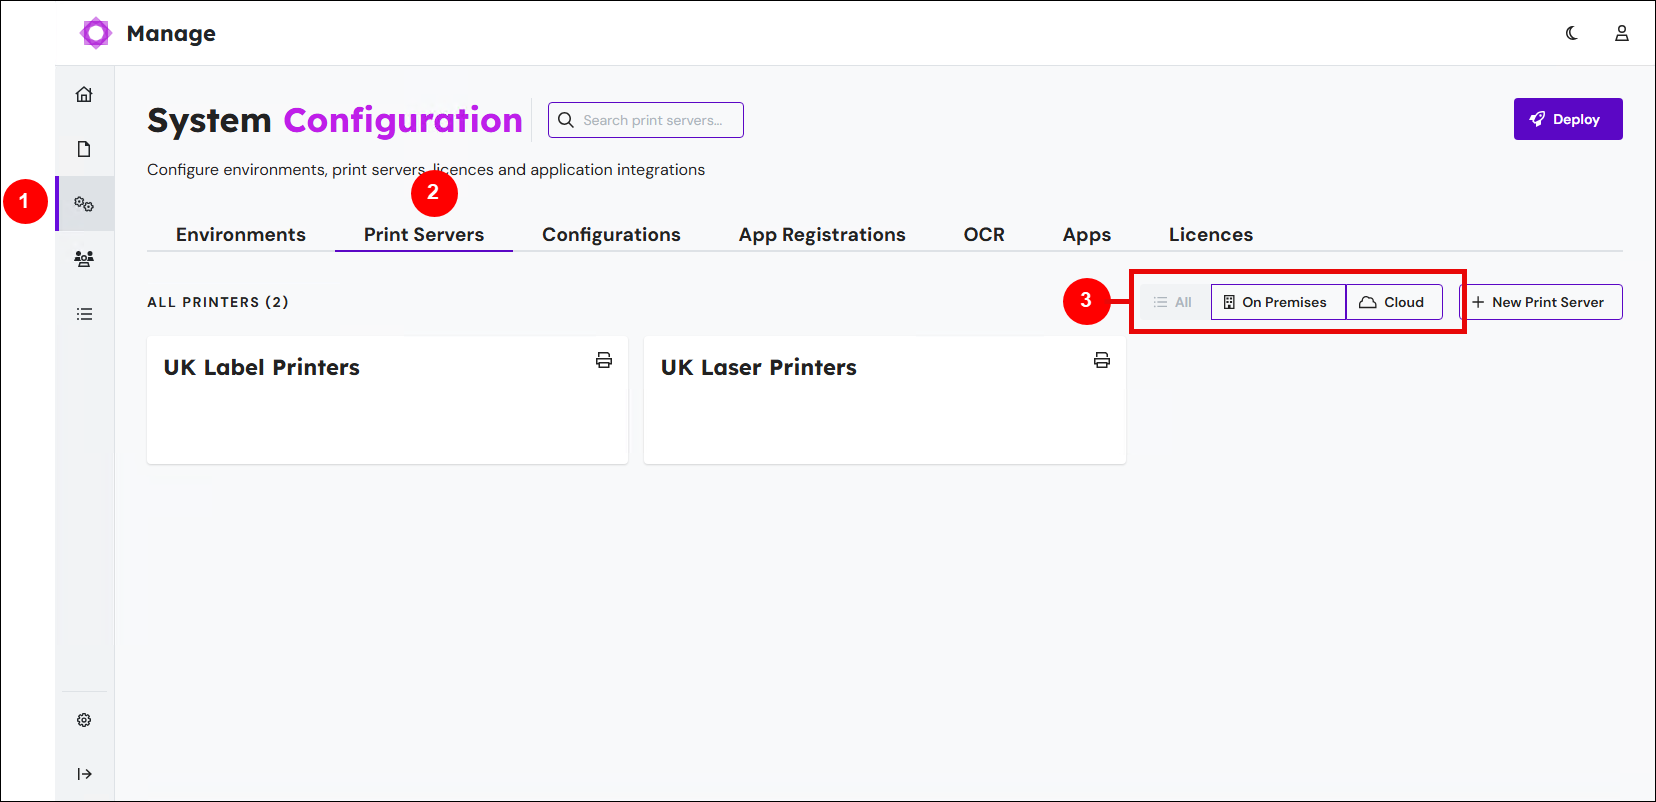
In the side menu, click System Configuration (1).
Click the Print Servers tab (2).
Each tile represents a print server. Click On Premises and Cloud (3) to filter the list. Click All to display all print servers.
Lasernet Config Web App
Set Print Server Properties
When you add or edit a print server, you must appropriately set its properties.
The steps for this task depend on the tool that you are using.
Manage
You can set up on-premises or cloud print servers.
To create a new print server, click New Print Server.
.png)
To edit an existing print server, click its tile.
On-Premises
At the top of the New Print Server window, click On-Premises.
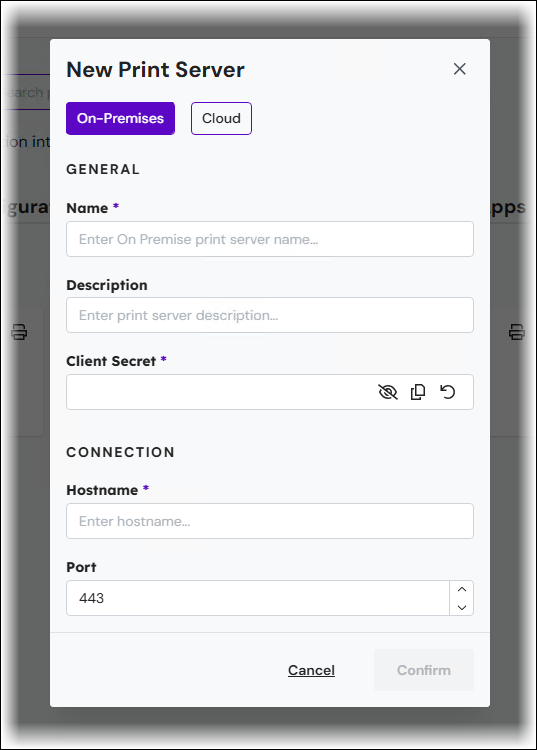
General
Name: The name that will be displayed to identify the print server.
Description: Custom description of the print server.
Client Secret: A unique character string used by Lasernet environments to authenticate a session with the Printer Service. Click the Regenerate Client Secret (anticlockwise arrow) icon in the field to generate a random client secret.
Note
Client Secret is used for both cloud and on-premises printing.
Note
If the printer service is running and the client secret is regenerated, you must log out of the Printer Service application, log in again, and then redeploy your printers and printer profiles to update the client secret.
Connection
Host name: Enter the host name or IP address of the server that is running the Printer Service app.
Port: The default port number is 443. The port number can be changed.
To save the print server, click Confirm.
Cloud
At the top of the New Print Server window, click Cloud.
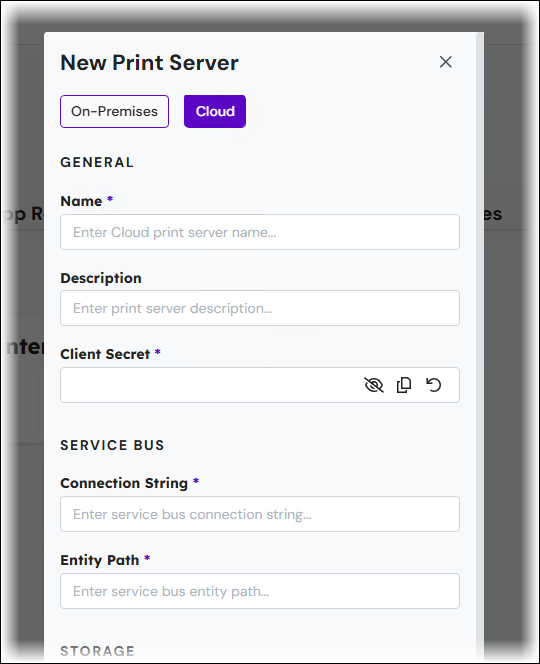
General
Name: The name that will be displayed to identify the print server.
Description: Custom description of the print server.
Client Secret: A unique character string used by Lasernet environments to authenticate a session with the Printer Service. Click the Regenerate Client Secret (anticlockwise arrow) icon in the field to generate a random client secret.
Note
Client Secret is used for both cloud and on-premises printing.
Note
If the printer service is running and the client secret is regenerated, you must log out of the Printer Service application, log in again, and then redeploy your printers and printer profiles to update the client secret.
Service Bus
Insert the endpoint and entity path for the service bus as defined in Microsoft Azure.
Connection String: The Service Bus endpoint connection string. Use the connection string that you noted when following the instructions in the Azure Service Bus section of Configure Microsoft Azure.
Entity Path: The name of the Service Bus queue that will be used. Use the name that you noted when following the instructions in the Azure Service Bus section of Configure Microsoft Azure.
Note
Separate printer servers should have individual Service Bus queues and entity paths; they should not share.
Storage
The instructions for configuring authentication with the Azure Storage account depend on the authentication type (access key, app-registration-based, or Shared Access Signature (SAS) token) that Lasernet will use to access the storage. Refer to the relevant following section.
Connection String (Access Key)
If Lasernet will use access key authentication, click Connection String, then use the storage account container name and connection string (as defined in Microsoft Azure) that you collected when following the instructions in the Container Name, Storage Account Name, and Tenant ID and Access Keys sections of Configure Microsoft Azure.
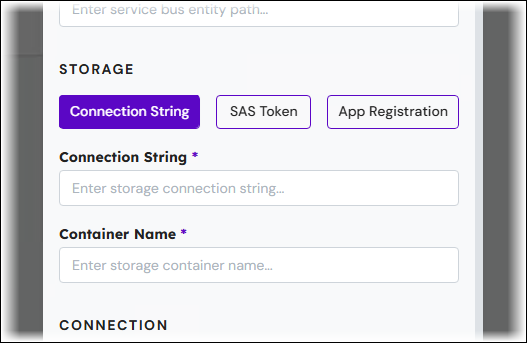
Connection String: The storage account connection string. Use the connection string that you noted in Access Keys.
Container Name: A unique name to identify the container. Use the name that you noted in Container Name, Storage Account Name, and Tenant ID.
If Lasernet will use app-registration-based authentication, click App Registration, then use the app registration details and container name (as defined in Microsoft Azure) that you collected when following the instructions in the Container Name, Storage Account Name, and Tenant ID and Application Registration sections of Configure Microsoft Azure.
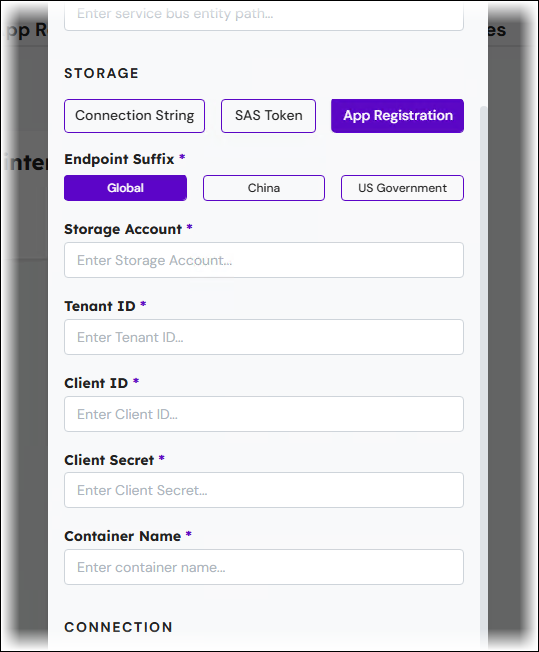
Endpoint Suffix: Select the Microsoft cloud that hosts the storage account. Microsoft maintains separate clouds for data residency and regulatory compliance reasons.
Storage Account: Use the storage account name that you noted in Container Name, Storage Account Name, and Tenant ID.
Tenant ID: Use the tenant domain that you noted in Container Name, Storage Account Name, and Tenant ID.
Client ID: Use the Application (client) ID (from the Azure Portal) of the app registration that Lasernet will authenticate as. See Application Registration.
Client Secret: Use a client secret (from the Azure Portal) for the app registration that Lasernet will authenticate as. See Application Registration. Note: This is not the same client secret that you entered on the General tab.
Container Name: Use the name that you noted in Container Name, Storage Account Name, and Tenant ID.
Shared Access Signature (SAS) Token
If Lasernet will use a Shared Access Signature (SAS) to access Azure Storage, click SAS Token.
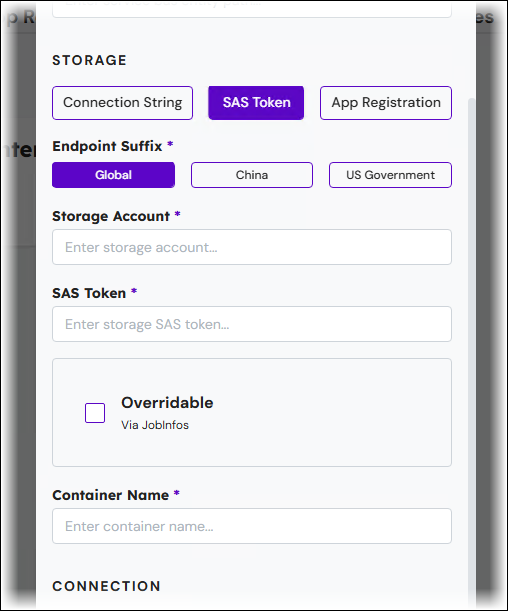
The Overridable checkbox determines whether the Printer Service Output module can read Endpoint Suffix, Storage Account, Container Name, or SAS Token from JobInfos when Lasernet sends jobs to the Printer Service app.
The relevant JobInfos are:
PrinterServiceAzureStorageAccountName
PrinterServiceAzureStorageContainerName
PrinterServiceAzureStorageSASToken
PrinterServiceAzureStorageEndpointSuffix
If the PrinterServiceAzureStorageEndpointSuffix JobInfo exists, it must contain one of the following values:
core.windows.net
core.chinacloudapi.cn
core.usgovcloudapi.net
If Overridable is selected, and one or more of the JobInfos listed above exist when Lasernet processes a job, the values provided by the JobInfos that are present will override the values present in this New Print Server window.
If Overridable is selected, Endpoint Suffix, Storage Account, Container Name, and SAS Token can each either be left as their default value or given values, depending on the behavior that you want to implement. This is because these settings are individually overridable. For example, you can enter values in the New Print Server window for Storage Account and Container Name, leave SAS Token blank, and then ensure that Lasernet jobs contain the PrinterServiceAzureStorageSASToken and PrinterServiceAzureStorageEndpointSuffix JobInfos.
If Overridable is cleared, you must provide values in this New Print Server window for Storage account, Container name, and SAS Token.
Overridable: See the information above.
Endpoint Suffix: Select the Microsoft cloud that hosts the storage account. Microsoft maintains separate clouds for data residency and regulatory compliance reasons.
Storage Account: Use the storage account name that you noted in the Additionally For Shared Access Signature (SAS) Authentication Only section of Configure Microsoft Azure.
SAS Token: This is the SAS token supplied to you by the Microsoft Azure administrator. See the Shared Access Signature (SAS) section of Configure Microsoft Azure.
Container Name: Use the name that you noted in the Container Name, Storage Account Name, and Tenant ID section of Configure Microsoft Azure.
Connection
You must specify the host name or IP address of the printer server that is running the Printer Service app.
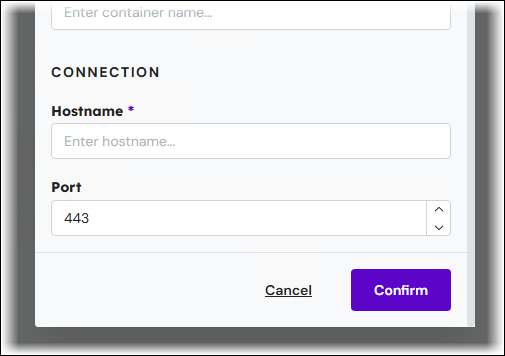
Hostname: Enter the host name or IP address of the server that is running the Printer Service app.
Port: The default port number is 443. The port number can be changed.
To save the print server, click Confirm.
Lasernet Config Web App
Expand for information
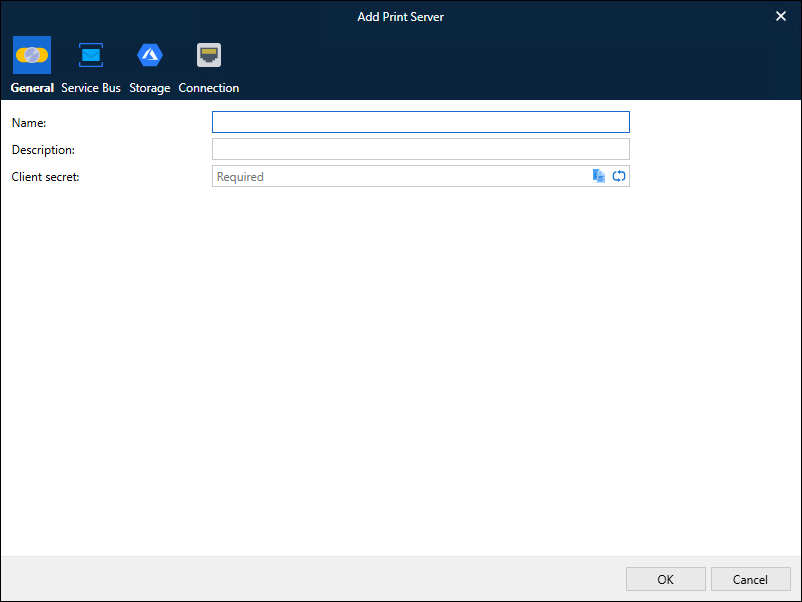
The Add Print Server or Print Server Properties window is displayed when you add or edit a print server.
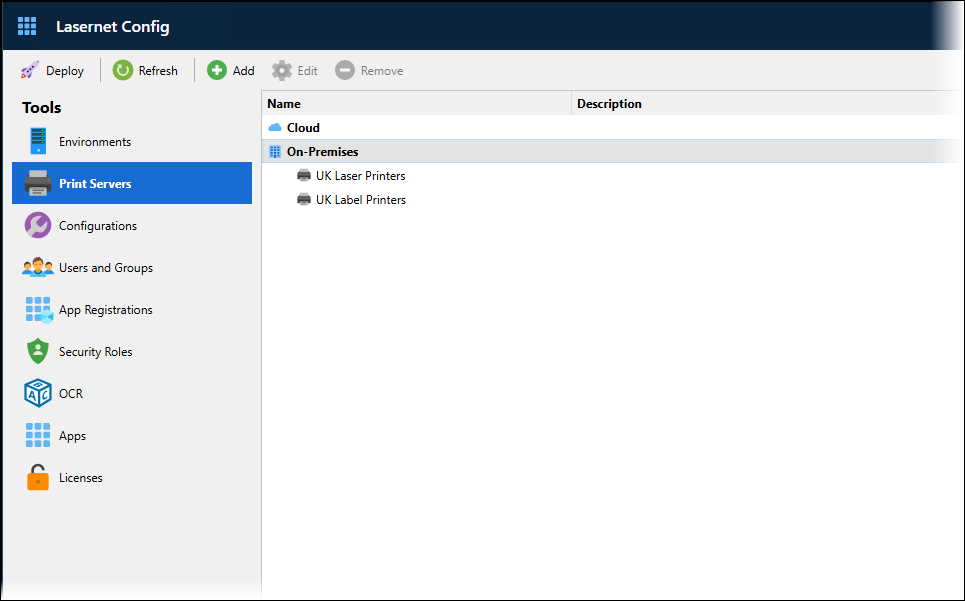
In the Lasernet Config web app, click Print Servers in the Tools menu, then:
To add a print server, click Cloud or On-Premises, then click Add in the toolbar.
To modify the settings for an existing print server, double-click it, or click it and then click Edit in the toolbar.
To delete a print server, click it and then click Remove.
General Properties
Cloud
On-Premises
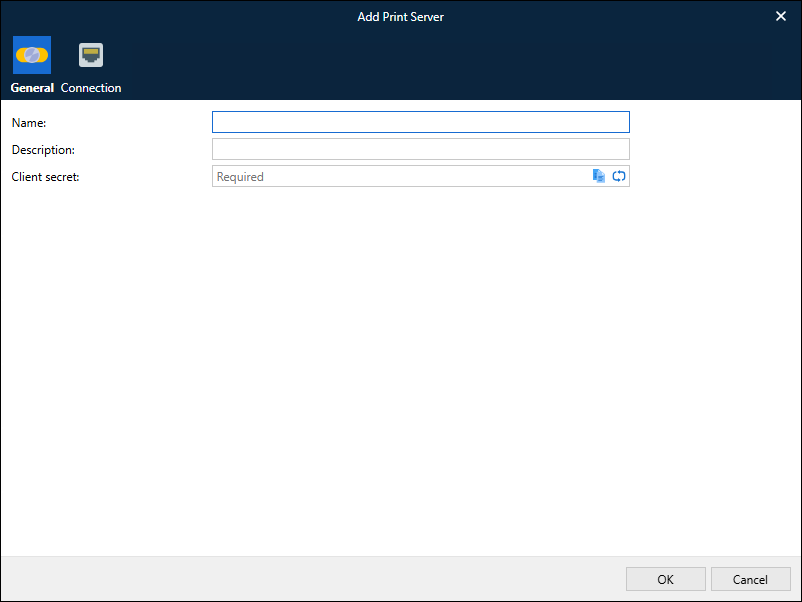
Name: The name that will be displayed to identify the print server.
Description: Custom description of the print server.
Client Secret: A unique character string used by Lasernet environments to authenticate a session with the Printer Service. Click the  (two arrows) icon in the field to generate a random client secret.
Note
Client Secret is used for both cloud and on-premises printing.
Note
If the printer service is running and the client secret is regenerated, you must log out of the Printer Service application, log in again, and then redeploy your printers and printer profiles to update the client secret.
Cloud Print Server Properties
The following sections are relevant only for Cloud print servers.
Cloud — Service Bus
Insert the endpoint and entity path for the service bus as defined in Microsoft Azure.
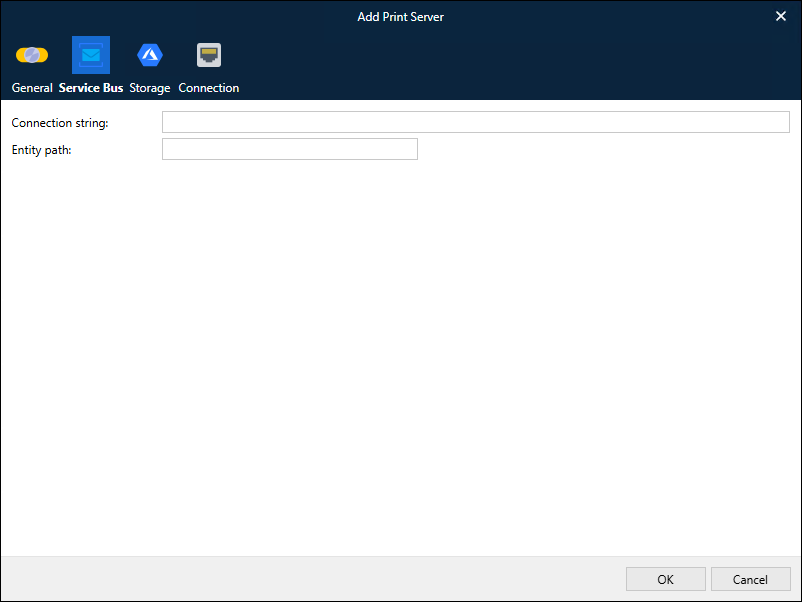
Connection String: The Service Bus endpoint connection string. Use the connection string that you noted when following the instructions in the Azure Service Bus section of Configure Microsoft Azure.
Entity Path: The name of the Service Bus queue that will be used. Use the name that you noted when following the instructions in the Azure Service Bus section of Configure Microsoft Azure.
Note
Separate printer servers should have individual Service Bus queues and entity paths; they should not share.
Cloud — Storage
The instructions for configuring authentication with the Azure Storage account depend on the authentication type (access key, app-registration-based, or Shared Access Signature (SAS) token) that Lasernet will use to access the storage. Refer to the relevant following section.
Connection String (Access Key)
If Lasernet will use access key authentication, click Connection String, then use the storage account container name and connection string (as defined in Microsoft Azure) that you collected when following the instructions in the Container Name, Storage Account Name, and Tenant ID and Access Keys sections of Configure Microsoft Azure.
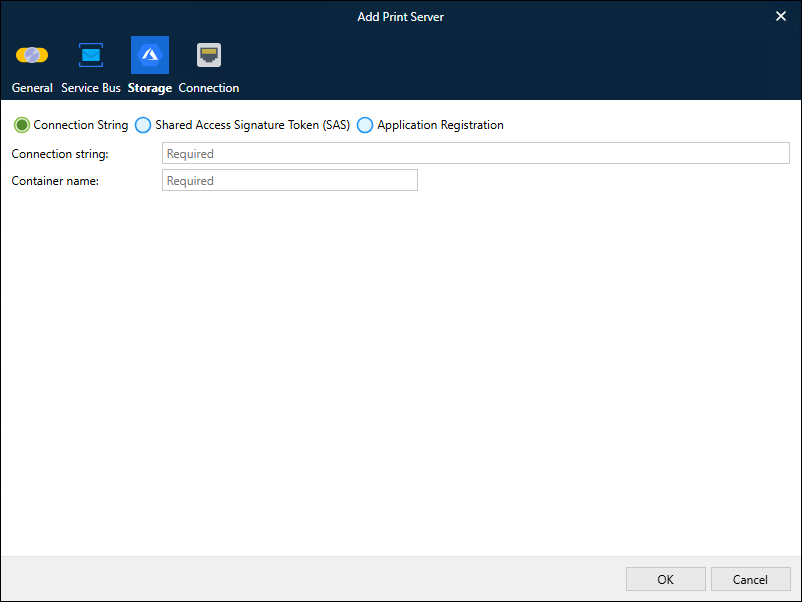
Connection string: The storage account connection string. Use the connection string that you noted in Access Keys.
Container name: A unique name to identify the container. Use the name that you noted in Container Name, Storage Account Name, and Tenant ID.
If Lasernet will use app-registration-based authentication, click Application Registration, then use the app registration details and container name (as defined in Microsoft Azure) that you collected when following the instructions in the Container Name, Storage Account Name, and Tenant ID and Application Registration sections of Configure Microsoft Azure.
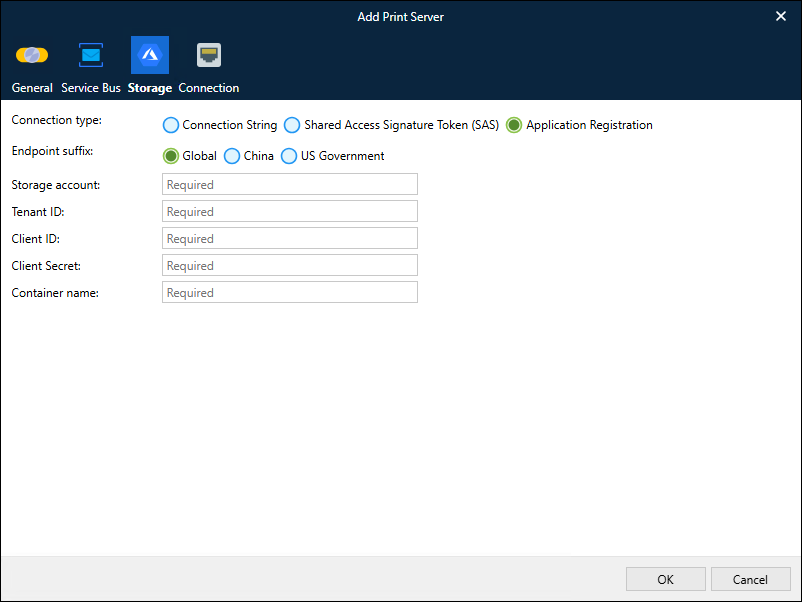
Endpoint suffix: Select the Microsoft cloud that hosts the storage account. Microsoft maintains separate clouds for data residency and regulatory compliance reasons.
Storage account: Use the storage account name that you noted in Container Name, Storage Account Name, and Tenant ID.
Tenant ID: Use the tenant domain that you noted in Container Name, Storage Account Name, and Tenant ID.
Client ID: Use the Application (client) ID (from the Azure Portal) of the app registration that Lasernet will authenticate as. See Application Registration.
Client Secret: Use a client secret (from the Azure Portal) for the app registration that Lasernet will authenticate as. See Application Registration. Note: This is not the same client secret that you entered on the General tab.
Container name: Use the name that you noted in Container Name, Storage Account Name, and Tenant ID.
Shared Access Signature (SAS) Token
If Lasernet will use a Shared Access Signature (SAS) to access Azure Storage, click Shared Access Signature Token (SAS).
The Overridable checkbox determines whether the Printer Service Output module can read Endpoint suffix, Storage account, Container name, or SAS Token from JobInfos when Lasernet sends jobs to the Printer Service app.
The relevant JobInfos are:
PrinterServiceAzureStorageAccountName
PrinterServiceAzureStorageContainerName
PrinterServiceAzureStorageSASToken
PrinterServiceAzureStorageEndpointSuffix
If the PrinterServiceAzureStorageEndpointSuffix JobInfo exists, it must contain one of the following values:
core.windows.net
core.chinacloudapi.cn
core.usgovcloudapi.net
If Overridable is selected, and one or more of the JobInfos listed above exist when Lasernet processes a job, the values provided by the JobInfos that are present will override the values present in this Add Print Server window.
If Overridable is selected, Endpoint suffix, Storage account, Container name, and SAS Token can each either be left as their default value or given values, depending on the behavior that you want to implement. This is because these settings are individually overridable. For example, you can enter values in the Add Print Server window for Storage account and Container name, leave SAS Token blank, and then ensure that Lasernet jobs contain the PrinterServiceAzureStorageSASToken and PrinterServiceAzureStorageEndpointSuffix JobInfos.
If Overridable is cleared, you must provide values in this Add Print Server window for Storage account, Container name, and SAS Token.
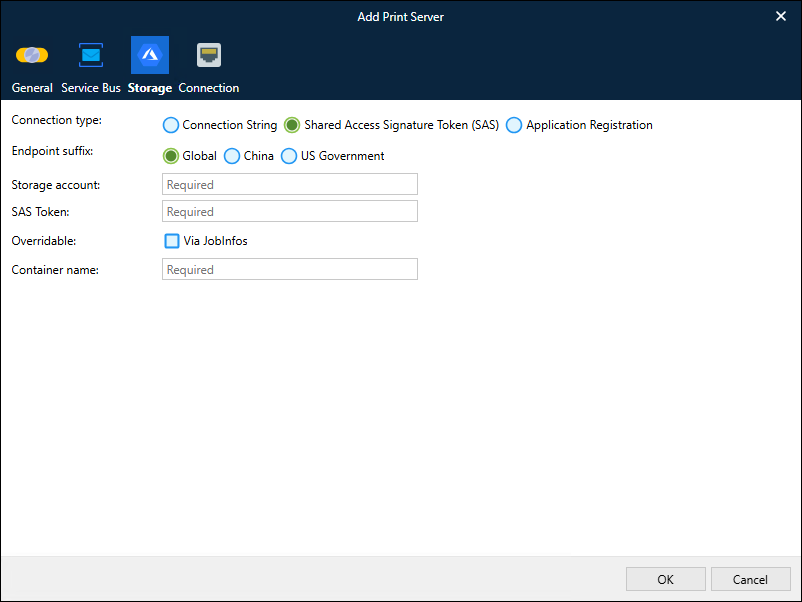
Overridable: See the information above.
Endpoint suffix: Select the Microsoft cloud that hosts the storage account. Microsoft maintains separate clouds for data residency and regulatory compliance reasons.
Storage account: Use the storage account name that you noted in the Additionally For Shared Access Signature (SAS) Authentication Only section of Configure Microsoft Azure.
SAS Token: This is the SAS token supplied to you by the Microsoft Azure administrator. See the Shared Access Signature (SAS) section of Configure Microsoft Azure.
Container name: Use the name that you noted in the Container Name, Storage Account Name, and Tenant ID section of Configure Microsoft Azure.
Cloud — Connection
You must specify the host name or IP address of the printer server that is running the Printer Service app.
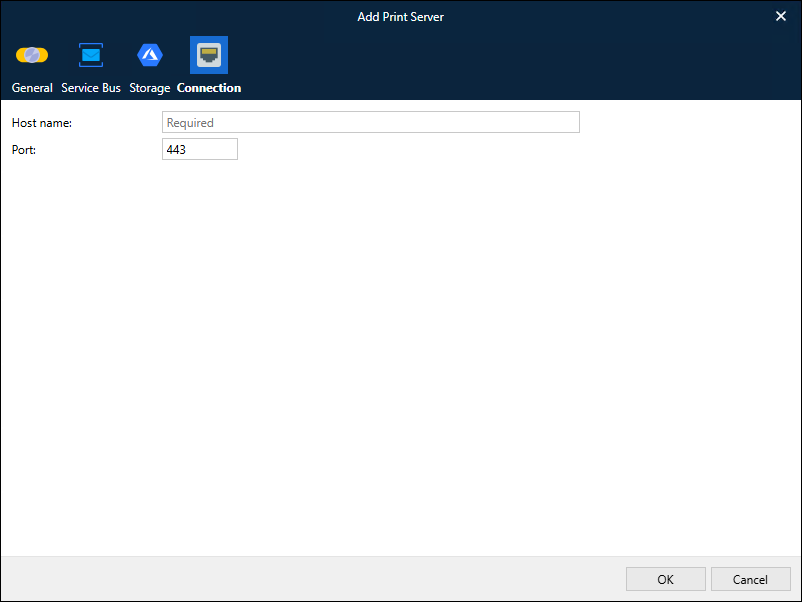
Host name: Enter the host name or IP address of the server that is running the Printer Service app.
Port: The default port number is 443. The port number can be changed.
On-Premises Print Server Properties
The following section is relevant only for on-premises print servers.
On-Premises — Connection
For on-premises print servers, you must specify the host name of the printer server on the network that is running the Printer Service app.
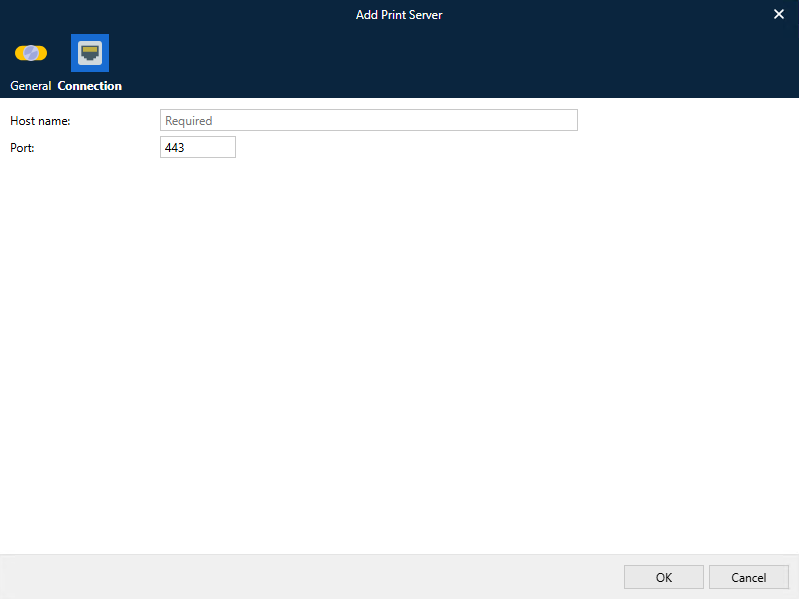
Host name: Enter the host name of the server that is running the Printer Service app. The Lasernet environment that is running the Printer Service module must be able to access this print server via a TCP/IP connection.
Port: The default port number is 443. The port number can be changed.
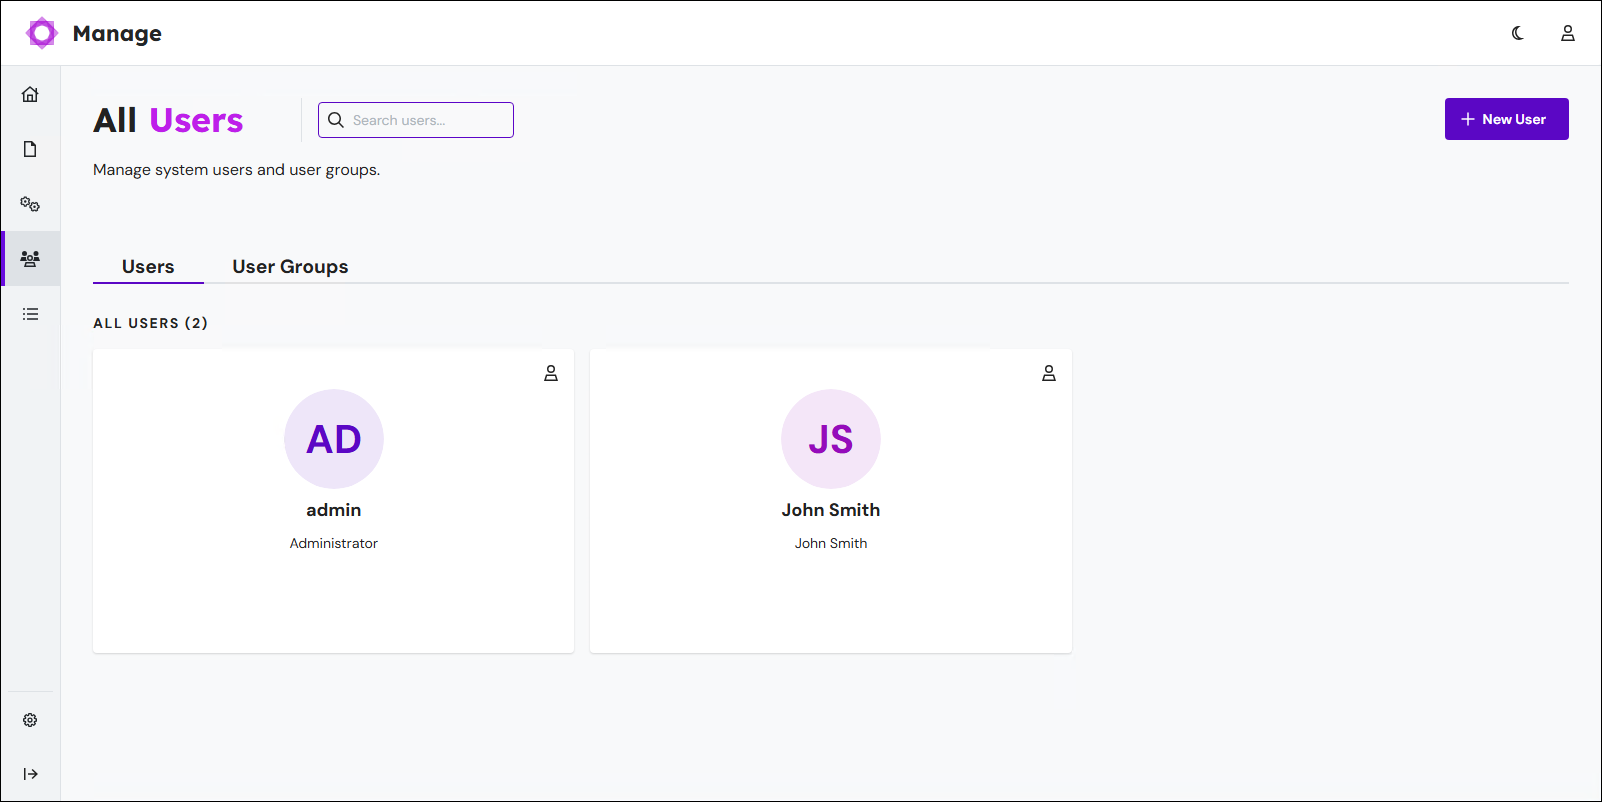
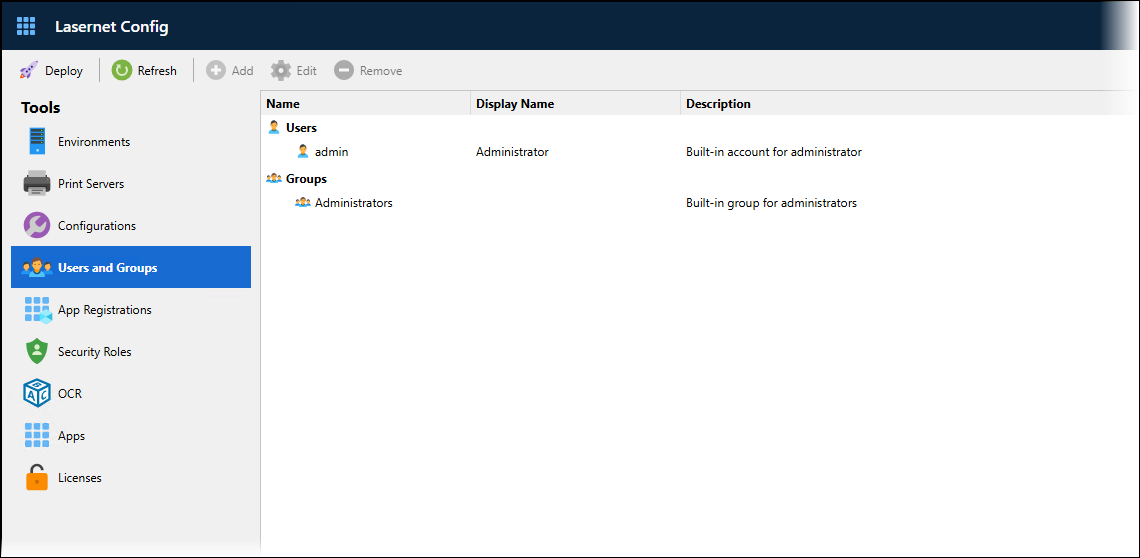
Users and Groups
Optionally, create users and groups to represent the users who will log into Lasernet. Groups are added to printer service security roles (see next section) to grant the members of those groups access to specific print servers. If you do not create users and groups, you must use the built-in admin user.
For more information about users and groups, see Configure Users, Groups, and Security Roles.
Manage
Lasernet Config Web App
Security Roles
Security roles enable you to define the Lasernet capabilities that are available to the members of the groups that are assigned that role. For the Lasernet Printer Service, the security roles in the Printer Service category specify which print servers the members of the group can access. Doing this gives members of those groups access to specific printers and print profiles. The built-in All Rights security group provides access to all print servers.
For instructions on how to assign users to an appropriate printer service role, follow the steps for the tool you are using.
Manage
In the side menu, click User Management and then Security Roles.
.png)
Click the Printer Service tab.
Click the tile for the security role that you want to add deployment permissions and groups to (see 1 in the image below). The properties pane for the security role opens. Or, to create and configure a new role, click New Role to create a role, then click the tile for the new security role.
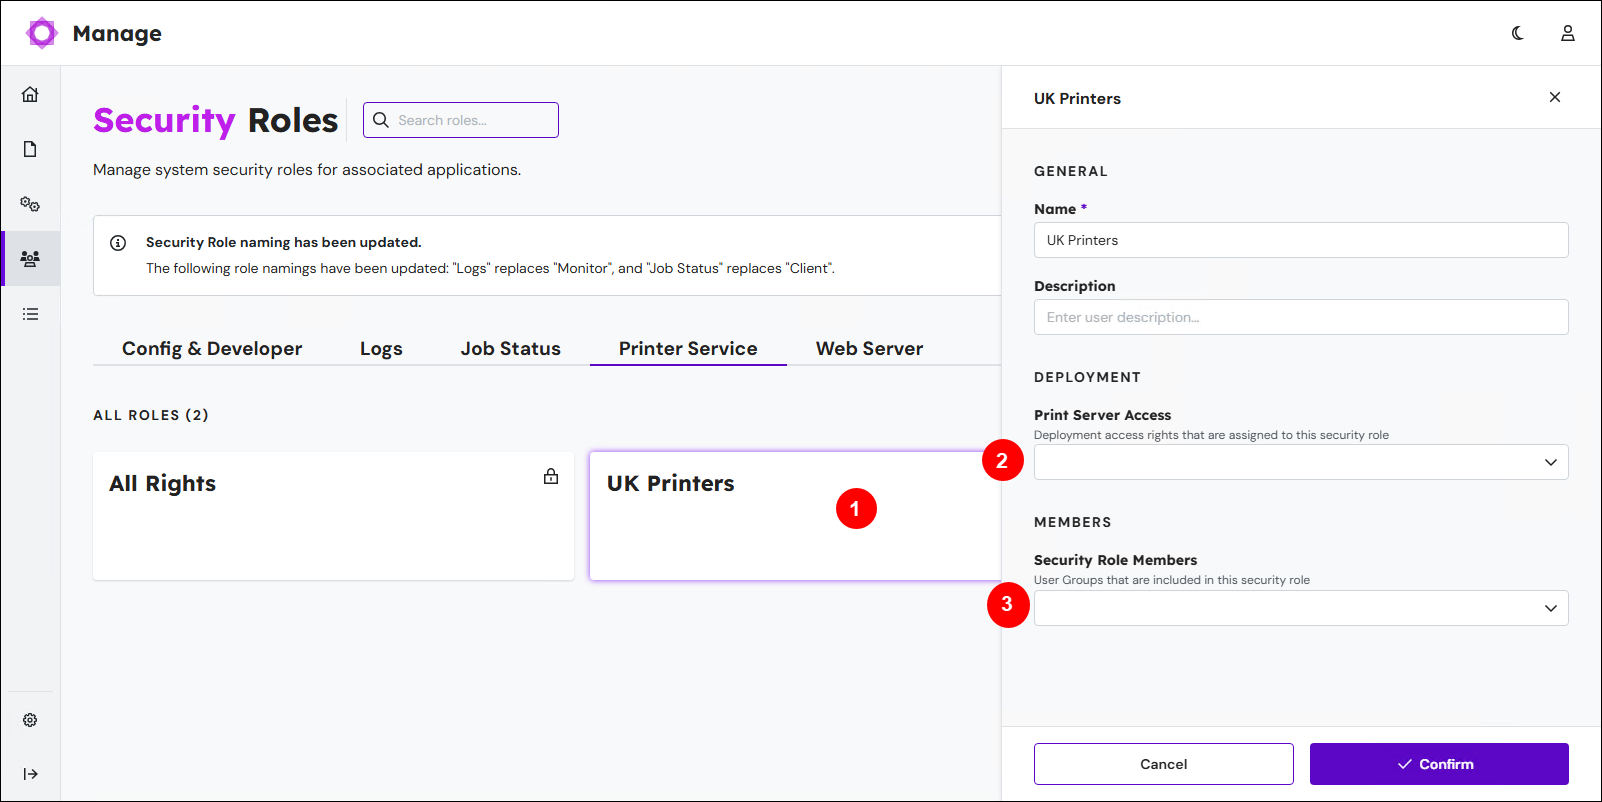
In the Deployment area, select print servers from the Print Server Access list (2) to specify which print servers the members of this group have access to.
Note
You cannot modify this setting for the All Rights security role
In the Members area, select users groups from the Security Role Members list (3) to specify which groups (and consequently, which users) have access to the selected print servers.
Note
If a user is a member of several groups, their access rights are a summary of all groups.
Click Confirm.
Lasernet Config Web App
Expand for information
In the Lasernet Config web app, click Security Roles in the Tools menu.
The main area of the window lists Lasernet applications and their associated security roles. This list includes a Printer Service category.
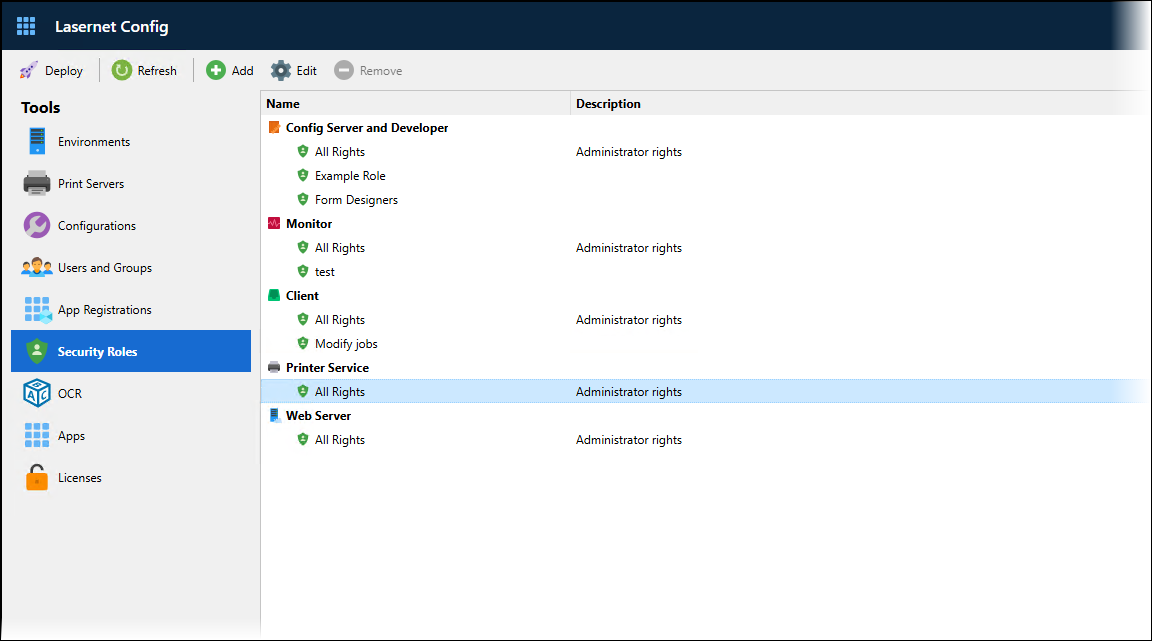
In the toolbar:
Click Add to configure and add a new security role to the selected category.
Click Edit to modify the selected security role. Alternatively, double-click it.
Click Remove to delete the selected security role.
For more information about security roles, see Configure Users, Groups, and Security Roles.
The following section (Configure Printer Service Security Roles) describes how to configure Printer Service security roles.
Configure Printer Service Security Roles
In summary, you add groups to the Members tab of a security role in the Printer Service category, and use the Deployment tab to select which print servers the members of those groups have access to. The built-in All Rights security group provides access to all print servers.
On the Security Roles page of the Lasernet Config web app:
To create a printer service security role, click Printer Service in the main area of the page, and then click Add in the toolbar.
To modify an existing security role, click it and then click Edit in the toolbar.
The PrinterService Role Properties window opens. You can assign groups access to specific print servers. Doing this gives members of those groups access to specific printers and print profiles.
Deployment Tab

For each print server, select Allow to enable that print server’s printers to be accessed through the Printer Service.
You cannot modify these settings for the All Rights security role
Members Tab
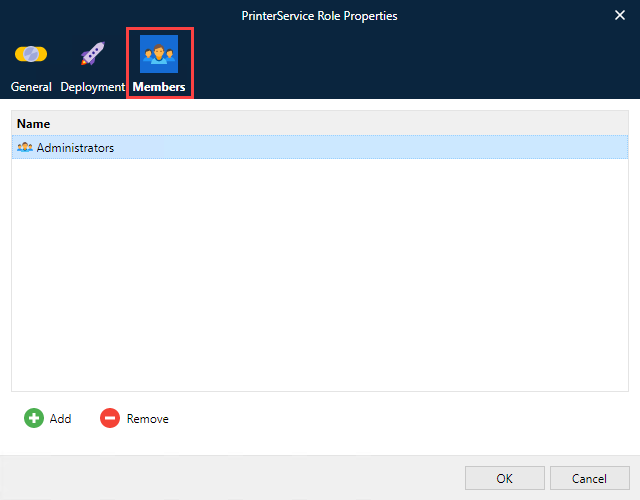
Click Add to select user groups and add them to the security role.
To revoke a user group’s access rights, select it and then click Remove.
Note
If a user is a member of several groups, their access rights are a summary of all groups.
Next Steps
The next part of the process is to install the Printer Service application.