- Print
- PDF
For the Lasernet Connector to work, two connections must be configured: one for storage and one for the service bus.
Configure Azure Service Bus
The service bus is the mechanism that the Lasernet Connector uses to communicate with Lasernet to send files back and forth.
Once the connection string is obtained, follow these steps:
Navigate to Lasernet > Setup > Admin > Connections.
.png)
Because the default configuration is installed in this entity, there are several connections already created:
.png)
Select the Azure Service Bus Queue, leave all the options as standard, but paste the connection string into the AZURE SERVICE BUS QUEUE CONNECTION STRING field.
Click Save, type a sensible queue name into the Queue name field, then click Save again.
.png)
The following dialog box appears:
(8).png)
Click Yes in the dialog box.
Click Validate, and a message in the blue bar appears, indicating that the connection is successfully validated.
(9).png)
Configure Azure Storage
In this instance, we are using the storage that comes with Dynamics, so there is nothing else to configure outside of the system. Follow these steps:
Navigate to Lasernet > Setup > Admin > Connections and click New.
(8).png)
Enter the following details into the appropriate fields:
Connection ID: Enter a sensible name
Connection type: Storage
Type: Select Azure storage from the dropdown
(8).png)
Click Save, and in the Instance name field, select lasernet from the dropdown menu.
(9).png)
Click Save again and then click Validate. A message in a blue bar is displayed indicating that the validation was successful.
(9).png)
Configure Server
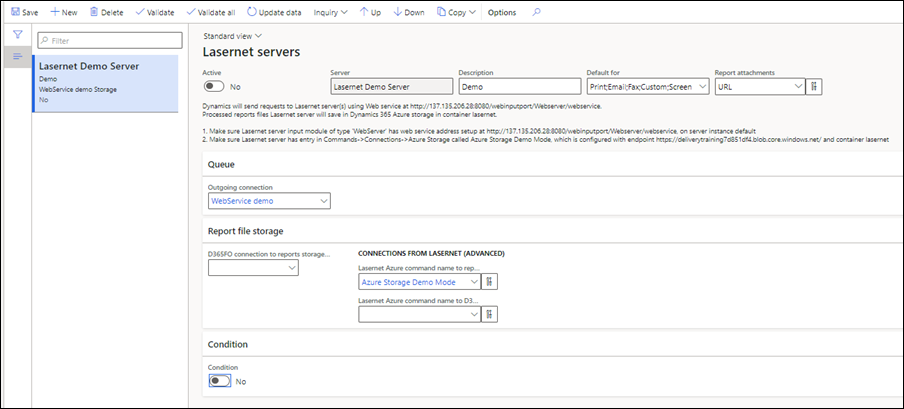
To let the Lasernet Connector know that the connections must be used to connect to the Lasernet server, navigate to Lasernet > Setup > Administration > Lasernet servers.
.png)
A test server has already been created as part of the default configuration.

From the Outgoing connection dropdown, select the Azure Service Bus Queue, which was configured on the previous page.
(2)(1).png)
From the D365FO connection to the reports storage dropdown, select Azure Storage, which was configured in the previous step.
(2)(1).png)
The other storage options should be left blank.
Toggle the Active button to Yes.
(8).png)

