Configure Document Encryption for Keep
- 14 Jan 2026
- 13 Minutes to read
- Contributors

- Print
- PDF
Configure Document Encryption for Keep
- Updated on 14 Jan 2026
- 13 Minutes to read
- Contributors
- Print
- PDF
Article summary
Did you find this summary helpful?
Thank you for your feedback
This page contains information and guidance on enabling, configuring, and managing document encryption in Keep. It applies to both standalone and clustered setups.
Keep has application-level encryption for documents; specifically, the ability to encrypt files that are stored in the archive. This feature adds an additional layer of security to help protect against unauthorised access or processing of sensitive data.
For new installations, Keep can be set up to encrypt documents as they are added to the archive.
For existing installations that are updated to use encryption, encryption is enabled in the same way (to turn on encryption for new documents), but existing archive documents must be encrypted too. The migration of existing documents into an encrypted state occurs over time and must be scheduled. This provides a flexible solution that enables you to migrate Keep installations of any size to an encrypted state, during suitable times of the day, over a period of time.
Keep uses a hybrid encryption method (symmetric asymmetric) to balance security and speed, so that overall system performance is not impacted after encryption is enabled. Documents and files are encrypted using AES (256 bit), with the encryption key stored in the header of the document. This key is then encrypted using RSA (2048 bit); the key is held in the Keep keystore.
Note
Document encryption is compatible with on-premises Keep systems only. The feature is not available for cloud environments.
Set Up Document Encryption
Warning
After encryption has been enabled on your Keep system, it cannot be disabled. We recommend that you perform a full backup of your database and chunks folder prior to enabling encryption, so you can revert the system changes, if necessary.
To fully enable document encryption, complete the following process:
Choose whether to use Keep-generated keys or supply your own keystore.
Choose or obtain a master password for the keystore, and then use the Master Password window on the Document Encryption page in Keep to encrypt the password.
Stop the Keep service.
Enable document encryption in the
node.propertiesKeep configuration file.Provide the encrypted password in
node.properties.Modify settings in
node.propertiesto configure Keep to use system-generated keys or a supplied keystore.Start the Keep service.
Standalone Keep Systems
The following sections of this page provide step-by-step instructions for every stage of this process. These instructions are for standalone Keep systems only. Before you begin to configure document encryption, read all of the following information so that you understand the options available and what you must do at each stage of the process.
Clustered Keep Systems
The steps are similar to the process for standalone systems, but there are a few differences in the process for clustered systems, including the location of the configuration and how the keystore is imported. For more information, see Clustered Setups.
1. Decide Whether to Use Keep-Generated Keys or Supply Your Own Keystore
You must decide whether Keep will generate keys to encrypt your documents or whether you will import your own keys.
You must make this decision now because it affects later stages of the process.
2. Encrypt the Master Password
The master password is used for the internal keystore. If using Keep-generated keys, choose a password to use. If importing your own keys, the master password must match the password for the keystore that you import.
You must encrypt this password before you later use it in the node.properties configuration file. Follow these steps:
Log in to Keep as an administrator
Navigate to the Document Encryption page. To do this, click Settings (cog icon) in the admin menu, then select Document Encryption.
Click the menu (three dots) button, then select Encrypt Master Password.
.png)
In the Master Password window, enter the master password into the Password and Re-enter Password boxes (see 1 in the image below).
.png)
Click Encrypt (2).
Click the Copy icon (3) to copy the Encrypted Password.
Click Close.
You will use the encrypted password at a later stage of this process. We recommend that you keep a copy of the master password safe at all times.
3. Stop the Keep Windows Service
In the Windows Services window, locate and then stop the relevant service.
For example, for a standalone Keep system, the service name is Lasernet Keep 11.0 - Standalone [<node name>]. Appropriately substitute <node name>.
4. Enable Encryption
By default, encryption is not enabled. To enable encryption, you must update the node.properties Keep configuration file.
This file is in the \standalone\configuration\ area of the Keep installation directory.
For example: C:\Program Files\Formpipe Software\Lasernet Keep\Server_<Keep version number> - [<node name>]\wildfly-<Wildfly version number>.Final\standalone\configuration\.
Appropriately substitute <Keep version number>, <node name>, and <Wildfly version number>.
Important
Take a backup of the
node.propertiesfile before you make any changes to it.
To enable encryption, follow these steps:
In the
node.propertiesfile, locate theefs.document.encryption.enabledproperty.Remove the
#before it (to uncomment that line of the file).Change the value of
efs.document.encryption.enabledfromfalsetotrue. For example, change#efs.document.encryption.enabled=falsetoefs.document.encryption.enabled=true.
5. Provide the Encrypted Master Password in the node.properties File
In the node.properties file:
Locate the
efs.encryption.master.passwordproperty.Remove the
#before it (to uncomment that line of the file).Set the property’s value to the encrypted password. For example:
efs.encryption.master.password=DBA46157BA63367AF8D6B38F9AE0C110
6. Configure Keep to Use System-Generated Keys or a Supplied Keystore
Earlier in this process, you decided whether Keep will use system-generated keys to encrypt your documents or whether you will supply your own keystore.
However, Keep will be unable to start until you make changes in node.properties that tell Keep whether to use system-generated or manually imported keys. Follow the steps in either Use an Automatically Generated Keystore or Use a Supplied Keystore below.
Use an Automatically Generated Keystore
To use automatically-generated encryption keys, follow these steps:
In the
node.propertiesfile, locate theefs.encryption.keystore.modeproperty.Remove the
#before it (to uncomment that line of the file).Change the value of the property to
auto. For example, change#efs.encryption.keystore.mode=[auto/manual]toefs.encryption.keystore.mode=autoSave and close the
node.propertiesfile.
This change will cause Keep to generate the keys for document encryption and decryption and store these in the system keystore.
Encryption is now enabled and configured. However, encryption will not begin until you start the Keep service.
Example Completed Keystore Configuration for System Generated Keys
# Enable Document Encryption

efs.document.encryption.enabled=true

# Specify the encrypted password for the internal keystore

efs.encryption.master.password=DBA46157BA63367AF8D6B38F9AE0C110

# Automatically Generate Encryption Keys

efs.encryption.keystore.mode=auto
Use a Supplied Keystore
You can provide your own keys to use for document encryption. The keystore being imported can be in either JKS (Java Key Store) or PFX (industry standard) format.
To use your provided keys, follow these steps:
In the
node.propertiesfile, locate theefs.encryption.keystore.modeproperty.Remove the
#before it (to “uncomment” that line of the file).Change the value of the property to
manual. For example, change#efs.encryption.keystore.mode=[auto/manual]toefs.encryption.keystore.mode=manualUncomment
efs.encryption.keystore.initialand set its value to the location of the keystore that holds the keys that you want to import.Uncomment
efs.encryption.keystore.aliasand set its value to the alias for the keystore.Note
The alias length must be exactly 8 characters.
Confirm that the value of
efs.encryption.master.passwordis the encrypted keystore password. You provided this encrypted password at an earlier stage of this process. Keep also uses this password for the internal keystore.Save and close the
node.propertiesfile.
Encryption is now enabled and configured. However, encryption will not begin until you start the Keep service.
Example Completed Keystore Configuration for Imported Keys
# Enable Document Encryption

efs.document.encryption.enabled=true

# Specify the encrypted password to use for both the keystore to import and the internal keystore

efs.encryption.master.password=AABBCCDDEEFFGG112233

# Import the encryption keys

efs.encryption.keystore.mode=manual

# Import the encryption keys from the keystore located at ''c:\keystores\dm_encryption.keystore''

efs.encryption.keystore.initial=c:/keystores/dm_encryption.keystore

# Import and use the keys identified by the alias 'myalias1' (8 characters)

efs.encryption.keystore.alias=myalias1
6. Start the Keep Windows Service
In the Windows Services window, locate and then start the relevant service.
For example, for a standalone Keep system, the service name is Lasernet Keep 11.0 - Standalone [<node name>]. Appropriately substitute <node name>.
Keep will start with document encryption enabled.
To confirm that document encryption is enabled, log in to Keep as an administrator, then check the document encryption status on the Document Encryption page. New documents will be encrypted as they are added to the archive.
.png)
Set Up Encryption Migration for Existing Documents
In existing Keep installations that already store documents and have been updated to use encryption, new documents are encrypted when they are added to the archive, but existing archive documents remain unencrypted until they are migrated to an encrypted state.
The migration of existing documents into an encrypted state occurs over time and must be scheduled. This provides a flexible solution that enables you to migrate Keep installations of any size to an encrypted state with migration taking place only at suitable times of day (according to the encryption schedule).
Note
The migration covers only your current archive directory. Existing documents in historical archive directories are not encrypted.
Schedule Encryption Migration Through the Keep User Interface
Depending on various aspects of the Keep installation, the size of the archive, network load, and the encryption schedule that you set up, encryption migration of archived files could take from a few hours to multiple days.
Although the processing load of document encryption is low, to maintain good system performance and network health, it is recommended that you set up the encryption schedule to perform archive encryption outside of peak business operating hours.
To configure encryption migration, follow these steps:
On the Document Encryption page, click Edit migration active hours (see 1 in the image below).
.png)
In the Edit Active Hours window, specify the time window during which Keep can perform archive encryption.
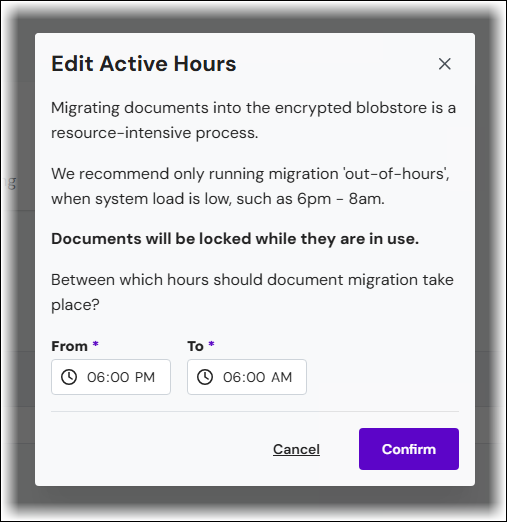
Click Start Migrating (see the button indicated by the number 2 in the image below step 1 above).
Keep will begin archive encryption according to the encryption schedule.
The migration status indicator (see 3 in the image below step 1) indicates whether encryption migration is currently running. For a description of each status, see Document Migration Status.
To monitor the progress of archive encryption, refer to the migration report.
Status Indicators and Controls on the Document Encryption Page
Document Encryption Status
Value | Notes |
|---|---|
ON OFF | Document encryption status should be ON. If it is OFF, check the |
Document Migration Status
Value | Notes |
|---|---|
STOPPED | Encryption has not been scheduled to start or has been manually stopped. |
RUNNING | The encryption process is actively processing files. |
SCHEDULED | The encryption process is ready to start during the active hours defined. |
COMPLETE | The encryption process is complete. No further input is required. |
COMPLETE WITH ERRORS | All files have been processed, but errors occurred. Check the migration report to identify errors, fix and then retry. |
FAILED | The encryption process encountered too many errors and has stopped. Check the migration report to identify errors, fix and then retry. |
Active Hours
Value | Notes |
|---|---|
(START TIME in Hours:Minutes) - (END TIME Hours:Minutes) | By default, the active hours are 18:00 to 06:00. Adjust them to suit your workflow. |
Migration Controls
Control | Notes |
|---|---|
Start Migrating | Schedules the migration process to run during the “active hours” that you specified. |
Stop Migrating | During active hours, stops the migration if it is running. Outside active hours, cancels the scheduled migration (if it is due to run). |
Migration Report
.png)
To check on the encryption migration progress, refer to the migration report. The migration report is below the status indicators.
The report is automatically updated every 10 seconds. The report shows you how many files have been processed (see 1 in the image above) and how many Keep failed to encrypt (2). The table (3) contains a row for every document that Keep processed.
To see only report lines for documents that failed encryption, click Show failed entries only (4).
Keep provides page navigation controls (5) and you can choose how many rows each page contains (6).
Click the down arrow (7) to choose which columns the report table contains.
Clustered Setups
Like with the instructions for standalone system configuration, we recommend that you read through this section in full before enabling encryption for clustered Keep setups, so that you know what to expect and what your options are. The decisions that you need to make and the information you will require will be the same as the standalone setup, so they will not be covered here again in detail.
The process for enabling encryption on a clustered installation is a little different to that of the standalone setup, because much of the configuration information is added into the Wildfly management console, so that it can be easily propagated to all of the nodes in the cluster. If you are using your own keys rather than automatically generated ones, you will also need to configure a particular Keep node to perform the import of the keys into the Keep database for the whole of the cluster to use.
Initial Steps
Ensure that your cluster is fully deployed and is ready to use.
Log in to a running Keep node and navigate to the Document Encryption page.
Enter and encrypt your master password. If using your own keys, your master password should be the same as the password for the keystore you are importing. Use the same facility that the process for standalone systems uses; see Encrypt the Master Password.
Log in to the Wildfly management console via your PDC’s IP address or host name, and its management port (for example:
http://192.0.0.168..:9990). Unless changed during install, the default management port is 9990 (HTTP) or 9993 (HTTPS). Using the management account you created for Wildfly during the PDC installation process, use your credentials to log in.Note
To check the default port number for the Wildfly management console, refer to the setting in
node.propertiesthat corresponds to the method of access (HTTP or HTTPS):jboss.management.http.portjboss.management.https.port
From the management console, navigate to: Runtime > Server Groups > dm-server-group, then click View.
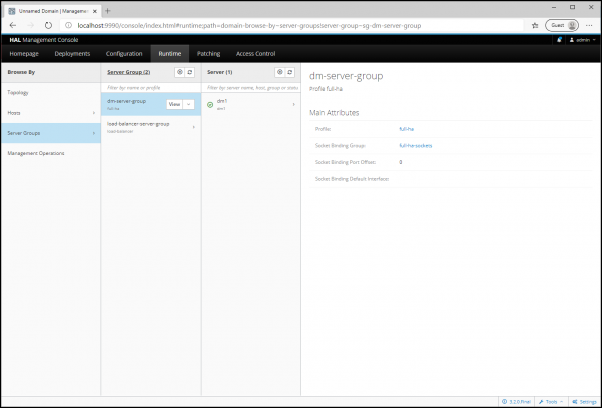
Click System Properties.
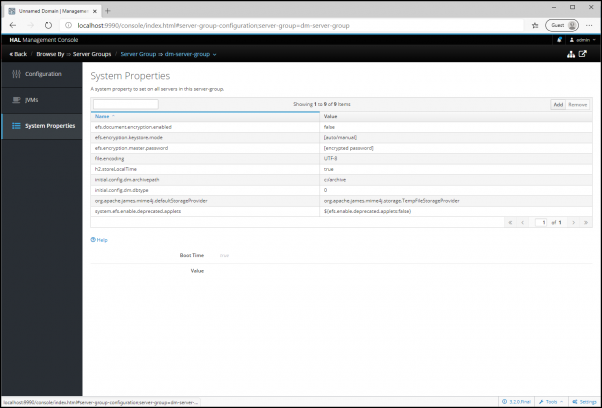
Add your encryption configuration into the following fields, overwriting the default values with your own:
efs.document.encryption.enabled : [false]
efs.encryption.keystore.mode : [auto / manual]
efs.encryption.master.password : [encrypted password]
Example: Cluster Using Automatic Keystore
efs.document.encryption.enabled: true

efs.encryption.keystore.mode: auto

efs.encryption.master.password: your-encrypted-password
Example: Cluster Using Manual Keystore
efs.document.encryption.enabled: true

efs.encryption.keystore.mode: manual

efs.encryption.master.password: your-encrypted-password
For an Automatically Generated Encryption Keystore
The configuration must be initialised. Use the Wildfly Management Console to start a single Keep application node. Once it has started, we recommend logging in and navigating to the Document Encryption page in Keep to confirm that encryption is enabled. After this is done, any other Keep application nodes in the cluster can also then be started.
If everything is configured correctly, encryption is now enabled for your cluster.
We recommend that you keep a copy of your master password safe at all times.
For a Manually Configured Encryption Keystore
If you have chosen to use your own keystore, the next step is to import your keystore into the database so it is accessible by all nodes in the cluster. To do this, you must choose one node in the cluster to perform the import. For simplicity, we recommend that you stop the cluster while you are in the Wildfly management console, because all nodes will need to be rebooted in order to pick up the configuration changes and new keystore.
Choose the node on which you will perform the import and browse to the node.properties file on that node’s server. This file is in the \domain\configuration\ area of the Keep node’s directory.
For example: C:\Program Files\Formpipe Software\Lasernet Keep\Server_<Keep version number> -<your-cluster-role-server>\wildfly-<Wildfly version number>.Final\domain\configuration\
Unlike the node.properties file for a standalone server, the clustered version covers only the configuration for a manually specified keystore.
You must specify the path to the keystore. The path must be reachable by the Keep node you are currently on, else the import will fail. You will also need to set the alias for the key in the keystore you wish to use.
Note
The alias must be exactly 8 characters long.
#
# Document Encryption (Keep Node)

[...]
#efs.encryption.keystore.initial=

[...]
#efs.encryption.keystore.alias=
Example Completed node.properties File For a Manually Configured Encryption Keystore
[...]
efs.encryption.keystore.initial=c:/secure/data/keystore

[...]
efs.encryption.keystore.alias=myalias1
When this is done, save the node.properties file, then return to the Wildfly Management Console and start the Keep node that you have updated. Once it has started, we recommend logging in and navigating to the Document Encryption page in Keep to confirm that encryption is enabled. After this is done, you can start the other Keep application nodes in the cluster.
If everything is configured correctly, encryption is now enabled for the cluster.