Add Images to a Sheet
- 15 Apr 2026
- 9 Minutes to read
- Contributors


- Print
- PDF
Add Images to a Sheet
- Updated on 15 Apr 2026
- 9 Minutes to read
- Contributors
- Print
- PDF
Article summary
Did you find this summary helpful?
Thank you for your feedback
Use the insert image tool to add an image. To activate the tool, click the Image button in the toolbar.

Note
Lasernet Core will not load images that are larger than 128 MB. If an image’s size exceeds 128 MB, Lasernet Core will downscale the image to a maximum resolution of 2048x2048 pixels and then load it.
Steps
Refer to the information for the Lasernet that you are using:
Lasernet Core 11 and 10
The method for adding an image to a form design depends on the form’s output data format.
Follow the relevant steps below:
EMF-Based Output
By default, images you want to insert into the output should be stored in the Images folder (see Lasernet Developer > Resources > Images). However, you can manually set the path to the required image file as a fixed text on the Input tab of the Edit Image dialog, when adding an image rearrange. You can specify any alternative in the corresponding field of the Fixed text tab:
A full path to the image file;
A URL to the image file;
A filename (only for the files located in the Images folder of the current configuration).
These are the following options for inserting an image:
To the output directly, not based on the input data:

To the output based on the input data:

For your convenience, you can also drag in an image file from a file manager. For example, Windows Explorer.
Image from External File
Use this option to insert an image into the output from an external file.
To insert an image from an external file, follow the steps listed below:
On the toolbar, click the Image button, and then click the down arrow next to it.
From the menu that appears, click Local and Remote, and then click File.
When the pointer becomes a cross, mark the area on the input pattern where you want to add the image or where you want to insert it directly in the output.
Once marked, the Choose an image file dialog opens and you can select the image file to use. The selected file is copied to the Images folder and an image rearrange with its filename as input is created.
If there is already a file with the same filename in the Images folder, Lasernet Form Editor asks you whether you want to replace the file. Click Yes to replace the file and create the image rearrange or click No to cancel the image insertion.
Once you are done, click Open. The image is then inserted into the output.
Image from URL
Inserting an image from a URL is similar to inserting an image from an external file (see Image from External File), the only difference is that you need to specify an URL to the image file.
Image from File Name in Input
Use this option to insert an image into the output by defining a file name in the input. The function recognizes the filename of a graphic file in any of the following formats: WMF, PNG, JPG, TIFF, and LnEMF.
To insert an image from a filename in the input, follow the steps listed below:
On the toolbar, click the Image button, and then click the down arrow next to it.
From the menu that appears, click Job, and then click File.
When the pointer becomes a cross, select the string containing the name of the image file in the input that you want to insert into the output.
Note
The image file you select should be stored in the Images folder of the current configuration.
Once selected, the image file is inserted into the output.
Image from URL in Input
Inserting an image from a URL in the input is the same as inserting an image by defining a file name in the input (see Image from File Name in Input); the only difference is that you select the string containing the URL to the image file.
Image from Image Embedded in JobInfo
Use this option to insert an image embedded in a JobInfo. This option is recommended if you want to use the same image in the output for multiple targets or to use JobInfos based on definite criteria to select different images.
Note
To use the JobInfo option, the File Retriever modifier must be configured (for more details, see the File Retriever chapter of the Lasernet Developer guide).
Note
You have to specify the image file when creating a JobInfo using the File Retriever modifier, prior to setting the embedded image in the JobInfo.
To insert an image from the one embedded in JobInfo, proceed through the steps listed below:
On the toolbar, click the Image button, and then click the down arrow next to the button.
From the menu that appears, click Job, and then click JobInfo.
When the pointer becomes a cross, mark the area on the input pattern where you want to add the image or where you want to insert it directly in the output
Once selected, the Edit Rearrange dialog opens (for more information see Image Properties). Specify a JobInfo name in the corresponding field of the Fixed text tab.
Once you are done, click the Ok button in the Edit Rearrange dialog. The image is then inserted into the output.
Interpret as Base64
If an image is presented as a Base64 string, you can add an image rearrange using the Base64 option.
This option is only available for XML input.
Retrieve Images from Microsoft Azure Storage
If configured, you can retrieve images from Microsoft Azure Storage (for more details, see Configure Azure and SharePoint 365 Connections).
This option is only available for XML input.
Retrieve Images from SharePoint 365
If configured, you can retrieve images from SharePoint 365 (for more details, see Configure Azure and SharePoint 365 Connections).
This option is only available for XML input.
Image Properties
You can access the image properties via the Edit Image dialog. To open the Edit Image dialog, right-click the image you have inserted into the output and then click a required property command on the context menu, or just double-click the image.
.png "image 4(1).png")
Image Tab Properties
Property | Description |
|---|---|
Graphics format | This group box contains radio buttons for each of the graphics formats supported by Lasernet Core:
If the Autodetect radio button is selected, the image is inserted into the output, preserving the format in which it is stored in the Images folder. We recommend that you select this option if the image file name indicates the file extension. If the file extension is not indicated, you can manually select a graphics format using the radio buttons. |
Interpret as | This group box contains radio buttons for each of the different methods used to interpret the value indicated on the Input tab of the Edit Rearrange window:
|
Position Tab Properties
Property | Description |
|---|---|
Upscale | Selecting the checkbox allows you to proportionally scale the image you have inserted to the output according to the values specified in the Width and Height text boxes. The check box is enabled if Auto Width+Height is selected in the Size type list. If the checkbox is cleared, the image can be scaled to full size regardless of the values indicated in the Width and Height text boxes. |
Formats Tab Properties
Property | Description |
|---|---|
Hyperlink | If the Active checkbox is selected, the URL in the Address field will be opened when the image is clicked. Click the Formats tab to create a hyperlink. Once the Active checkbox is selected, the Hyperlink tab becomes enabled, and you can enter any URL into the Address field. This functionality is useful only if you are going to generate a PDF document as a result of processing the current sheet. You can insert an embedded JobInfo as a part of the hyperlink to include a dynamic value as a part of the URL. |
HTML/XHTML (XML-Based) Output
Insert Image Tool
Use the Insert Image tool to add an image rearrange. To activate the tool, click the Image button in the toolbar.

There are two ways to insert an image into the output:

In addition, you can copy an image from any resource and then paste it into the output. The image is inserted as a Base64 encoded string.
HTML/XHTML Image Translation
An image can be inserted to the HTML/XHTML output from various sources. Depending on where the HTML/XHTML is going to be used, these sources might not be available. In these cases, Lasernet Core supports translating these sources into something which is available at the time of use.
Translation is optional for some image types and required for others.
To this end, you can use the HTML / XHTML tab of the Sheet Options dialog to translate image sources from one location to another.

Image sources can be one of the following types:
Local: a local image on a local drive or network.
Remote: a remote image on the internet or intranet.
Embedded: Base64 encoded image data.
Local
A local image can have either an absolute or relative URL.
<img src="smiley.gif" alt="Smiley face">
<img src="/subfolder/smiley.gif" alt="Smiley face">
<img src="c:\images\smiley.gif" alt="Smiley face">
<img src="\\server\images\smiley.gif" alt="Smiley face">
Remote
A remote image is identified by the http prefix.
<img src="http://server/images/smiley.gif" alt="Smiley face">
<img src="http://server.com/images/smiley.gif" alt="Smiley face">
Embedded
An embedded image is presented in the HTML/XHTML data. Not all browsers are able to show embedded images.
<img src="data:image/png;base64,iVBORw0KGgoAAAANSUhEUgAAAM0AAAD

 NCAMAAAAsYgRbAAAAGXRFWHRTb2Z0d2FyZQBBZG9iZSBJbWFnZVJlYWR5c

 cllPAAAABJQTFRF3NSmzMewPxIG//ncJEJsldTou1jHgAAAARBJREFUeNrs2EEK

 gCAQBVDLuv+V20dENbMY831wKz4Y/VHb/5RGQ0NDQ0NDQ0NDQ0NDQ0NDQ

 0NDQ0NDQ0NDQ0NDQ0NDQ0NDQ0PzMWtyaGhoaGhoaGhoaGhoaGhoxtb0QGho

 aGhoaGhoaGhoaGhoaMbRLEvv50VTQ9OTQ5OpyZ01GpM2g0bfmDQaL7S+ofFC6x

 v3ZpxJiywakzbvd9r3RWPS9I2+MWk0+kbf0Hih9Y17U0nTHibrDDQ0NDQ0NDQ0

 NDQ0NDQ0NTXbRSL/AK72o6GhoaGhoRlL8951vwsNDQ0NDQ1NDc0WyHtDTEhD

 Q0NDQ0NTS5MdGhoaGhoaGhoaGhoaGhoaGhoaGhoaGposzSHAAErMwwQ2HwRQ

 AAAAAElFTkSuQmCC" alt="Beastie">
Below is a description of possible ways of translation:
As is: Allows leaving the source untouched, which means that translation is not performed.
Embed: Allows embedding the image directly in the HTML/XHTML data as Base64 binary data. Note that this can make the HTML/XHTML output very large. Moreover, embedded images are not supported by all browsers.
Attach: Allows attaching the image in a JobInfo and referring to the filename of the attachment instead. Only certain bundled Lasernet Core modules support such attachments, namely Exchange and Mail Output, which is why the default JobInfo is MailAttachment. Filenames are inserted in MailAttachmentFileName when MailAttachment is used.
Uri Replace: Allows translating the local path to a global path when a local image, which also resides on a server, is used.
<img src="c:\images\smiley.gif" alt="Smiley face">→<img src="http://server.com/images/smiley.gif" alt="Smiley face">
Rich-Text-Based DOCX, PDF, and HTML/XHTML Output
Use the Insert Image tool to add an image to the page. To activate the tool, click the Image button in the toolbar.
There are two available options for inserting an image into the output:
Lasernet Form Editor adds the image to the page. You can drag its handles to resize it or drag the image to move it.
Lasernet Essentials / Professional / Advanced
Interpret as Base64
If an image is presented as a Base64 string, you can add an image rearrange using the Base64 option.
This option is only available for XML input.
Image Properties
You can access the image properties via the Edit Image dialog. To open the Edit Image dialog, right-click the image you have inserted into the output and then click a required property command on the context menu, or just double-click the image.
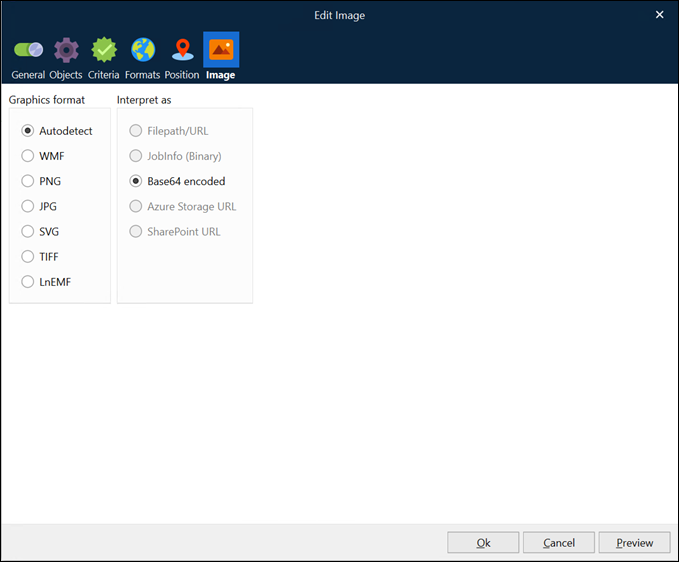
Image Tab Properties
Property | Description |
|---|---|
Graphics format | This group box contains radio buttons for each of the graphics formats supported by Lasernet:
If the Autodetect radio button is selected, the image is inserted into the output preserving the format in which the image is stored in the Images folder. We recommend that you select this option if the image file name indicates the file extension. If the file extension is not indicated, you can manually select a graphics format using the radio buttons. |
Interpret as | This group box contains radio buttons for each of the different methods used to interpret the value indicated on the Input tab of the Edit Rearrange window:
|
Position Tab Properties
Property | Description |
|---|---|
Upscale | Selecting the check box allows you to proportionally scale the image you have inserted to the output according to the values specified in the Width and Height text boxes. The check box is enabled if Auto Width+Height is selected in the Size type list. If the check box is cleared, the image can be scaled to full size regardless of the values indicated in the Width and Height text boxes. |
Formats Tab Properties
Property | Description |
|---|---|
Hyperlink | If the Active checkbox is selected, the URL in the Address field will be opened when the image is clicked. Click the Formats tab to create a hyperlink. Once the Active checkbox is selected, the Hyperlink tab becomes enabled, and you can enter any URL into the Address field. This functionality is useful only if you are going to generate a PDF document as a result of processing of the current sheet. You can insert an embedded JobInfo as a part of the hyperlink to include a dynamic value as a part of the URL. |