Set Up App-Registration-Based Access for External Applications
- 08 May 2026
- 7 Minutes to read
- Contributors


- Print
- PDF
Set Up App-Registration-Based Access for External Applications
- Updated on 08 May 2026
- 7 Minutes to read
- Contributors
- Print
- PDF
Article summary
Did you find this summary helpful?
Thank you for your feedback
If the Lasernet Core configuration that is deployed to an environment contains a configured Web Server input, that environment will host web services that external applications can connect to. One of the authentication types supported by that input module is based on a “client credentials” authentication flow.
To enable an external application or service (such as another Lasernet Group application or a third-party application) to connect to a Lasernet Core web service through this client credentials flow, you must create an app registration for it (in Manage or the Lasernet Config web app) and then configure the app registration’s permissions to allow the app to connect. The Set Up an App Registration section below describes how to do this.
This page also describes how to reset the external application’s client secret.
Note
You will require an understanding of web services and how to make requests to them.
Set Up an App Registration
This process involves creating an app registration (to represent the external application) and then adding it to appropriate groups and security roles.
Manage
In the side menu, click System Configuration (see 1 in the image below).
Click the App Registrations tab (2).
Click New App Registration (3).
.png)
In the Add App Registration window, enter an appropriate Name that identifies the external application, and (optionally) enter a Description.
By default, the Disabled checkbox is cleared. To create the app registration in an inactive state (so that you can make it active later), select the Disabled checkbox.
Click Confirm. The Lasernet Config app displays a Client Info window that contains a Client Id and Client secret.
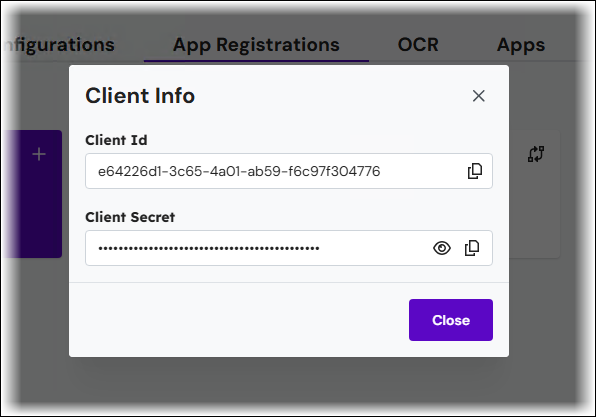
In the Client Secret window, click the copy buttons (at the end of each box) to copy the client ID and client secret. Store these in a secure place. You will need these when you configure the external application to authenticate with the web service. To unobscure the client secret, click the eye icon.
Note
After the Client Secret window closes, it is not possible to display the app registration’s client secret in Manage. So, it is important to copy the client secret and store it securely now.
Click Close. You have successfully created an app registration.
Tip
To display the app registration’s client ID, click its tile on the App Registrations page.
Add the app registration to an appropriate group:
In the side menu, click User Management.
Click the User Groups tab.
Click the group that you want to add the app registration to. The group properties pane opens.
In the App Registrations area of the pane, select the app registration from the Group App Registrations list.
Click Confirm.
Add that group to the All Rights security role in the Web Server category:
In the side menu, click User Management and then Security Roles.
Click the Web Server tab.
Click the All Rights tile. The role properties pane opens.
In the Members area of the pane, click a blank part of the Security Role Members list and select the group that you added the app registration to.
Click Confirm.
The application is now authorized to connect to Lasernet Core web services.
Important
If you created the app registration in a disabled state, enable it before it is used.
Note
The final part of the solution is to appropriately configure the Web Server input in the Lasernet Core configuration. For more information about this input module, see Web Server Input in the Lasernet Developer guide.
Lasernet Config Web App
Note
The Lasernet Config web app was provided with earlier versions of Lasernet Core. It is a legacy web app and will be deprecated in a future version of Lasernet Core.
Expand for information
Sign in to the Lasernet Config web app.
In the Tools menu, click App Registrations.
In the toolbar, click Add.
In the Add App Registration window, enter an appropriate Name that identifies the external application, and (optionally) enter a Description.
By default, the Disabled checkbox is cleared. To create the app registration in an inactive state (so that you can make it active later), select the Disabled checkbox.
Click OK. The Lasernet Config app displays a Client Secret window that contains a Client Id and Client secret.
In the Client Secret window, click the copy buttons (at the end of each box) to copy the client ID and client secret. Store these in a secure place. You will need these when you configure the external application to authenticate with the web service. To unobscure the client secret, click the eye icon.
Note
After the Client Secret window closes, it is not possible to display the app registration’s client secret in the Lasernet Config app. So, it is important to copy the client secret and store it securely now.
Click OK. You have successfully created an app registration.
Add the app registration to an appropriate group:
In the Tools menu, click Users and Groups.
Click the group that you want to add the app registration to, and then click Edit in the toolbar. The Group Properties window opens.
On the App Registrations tab, click Add, select the app registration from the Select application to add list, then click OK.
Click OK to close the Group Properties window.
Add that group to the All Rights security role in the Web Server category:
In the Tools menu, click Security Roles.
In the main area of the window, click the All Rights security role in the Web Server category, and then click Edit in the toolbar.
On the Members tab of the WebServer Role Properties window, click Add.
In the Add Role Member window, select the group that you want to add to the role.
Click OK. The group is added to the member list.
Click OK to close the WebServer Role Properties window.
The application is now authorized to connect to Lasernet Core web services.
Note
The final part of the solution is to appropriately configure the Web Server input in the Lasernet Core configuration. For more information about this input module, see Web Server Input in the Lasernet Developer guide.
External Application Authentication Process
To use the web services hosted by a Lasernet Core environment, the application must use its client ID and client secret to request a token from the Config Server, and then include that token in the authorization header of its requests to the Lasernet Core web services. This process is the “client credentials” flow.
Request a Token from the Config Server
Config Server provides a token endpoint at https://<config server hostname>/lasernet/connect/token (appropriately substitute <config server hostname> ; if necessary, include a port number).
Make a POST request to the token endpoint. Ensure that the request:
Has a
content-typeofapplication/x-www-form-urlencodedIncludes the following URL parameters:
grant_typeSet to
client_credentials.
client_idSet to the application’s client ID.
client_secretSet to the application’s client secret.
Example cURL command:
curl --request POST \
  --url 'https://localhost/lasernet/connect/token' \
  --header 'content-type: application/x-www-form-urlencoded' \
  --data grant_type=client_credentials \
  --data client_id=6ea896d9-73f4-4a2f-adc4-3c813c0fdecf \
  --data client_secret=eWZyZDBBOE4yRWZ6dXZkWlpxajNkMnRDU09VRjd2QVVu
If the request succeeds, the response will include a token. Extract the token so that you can use it in web service requests.
Use the Token in the Authorization Header of Web Service Requests
Use the token in requests to the Lasernet Core web service by adding an authorization header to your requests in the following format:
Authorization: Bearer <token>
Replace <token> with the application’s token.
Reset the Client Secret
If you lose an app registration’s client secret, you must reset its client secret (to generate a new one). It is not possible to display an app registration’s current client secret. Follow these steps.
Manage
In the side menu, click System Configuration.
Click the App Registrations tab.
On the app registration’s tile, click the menu button (three vertical dots), then click Reset Client Secret.
In the confirmation window, click Confirm.
In the Client Secret Reset window, click the copy buttons (at the end of each box) to copy the client ID and client secret. Store these in a secure place. To unobscure the client secret, click the eye icon.
Click Close.
Lasernet Config Web App
Note
The Lasernet Config web app was provided with earlier versions of Lasernet Core. It is a legacy web app and will be deprecated in a future version of Lasernet Core.
Expand for information
In the Tools menu, click App Registrations.
Click the app registration, then click Edit.
Click Reset client secret. The Lasernet Config app will display a Client Secret window that contains the application’s Client Id and a new Client secret.
Click OK to close the Edit App Registration window.
Edit an App Registration
To edit an app registration (so that you can select or clear its Disabled checkbox or change its Name or Description), follow these steps.
Manage
In the side menu, click System Configuration.
Click the App Registrations tab.
Click the app registration that you want to edit. The app registration’s properties pane opens.
Edit the properties, then click Confirm.
Lasernet Config Web App
Note
The Lasernet Config web app was provided with earlier versions of Lasernet Core. It is a legacy web app and will be deprecated in a future version of Lasernet Core.
Expand for information
In the Tools menu, click App Registrations.
Click the app registration, then click Edit.
Change the app registration’s properties.
Click OK to close the Edit App Registration window.
Delete an App Registration
To delete an app registration, follow these steps.
Manage
In the side menu, click System Configuration.
Click the App Registrations tab.
On the app registration’s tile, click the menu button (three vertical dots), then click Delete.
In the confirmation window, click Confirm.